
Background
I'm writing this guide to help players learn effective strategies in Company of Heroes 3 in a 2v2 multiplayer setting, where most of my experience is derived from.
I'm a pretty big fan of real time strategy games, and enjoy helping people learn and succeed. I believe that by helping people succeed at the game we can foster a healthy, competent competitive multiplayer environment.
I find 2v2s are unique in that resource income is somewhat quicker, and both individual skill and team play is required to be successful. Situations where command point timings would be relevant in 1v1, are less potent in a team game situation.
This guide was written for game version 1.4 in December 2023
Build Summary

Core Build
2 Grens
2 MG 42
Scout Car
Base Heal
4 Jaegers (convert & build 2), 1 shrek, 3 rifles upgrades
2 Marders
MortarLate Game
Second Pioneer
AT - Panther
AI - Stoßtruppen Squad
Indirect - Nebel or WespeReplace dead rifle jaegers with Stoßtruppen
Build is indifferent towards whether 8-rad or Stug Assault is chosen. I find that in 2v2s, due to higher fuel income, the period in which these are typically useful, the command points just aren't available. Therefore we choose other abilities that are useful throughout the full lifetime. Scopes provide intelligence, mechanized assault greatly amplifies jaegers when used near. Wespe + Nebel for artillery slugfests.
Early Game
Build Order
Infantry Companie
Ketten -> Coms Cable (optional)
Grenadier
MG42
Grenadier
Flamer Pio (optional)
MG 42
Mortar (optional)
What to do with these units
EARLY GAME IS ABOUT SECURING RESOURCE FLOW
For Wehrmacht, the whole point of Early game is to not-lose, by taking and hold a critical part of the map. In 2v2, this will mean the Large Fuel (+10), at least one Victory Point and adjacent green cover. Keep your four to five units relatively close to one another so they can support and overwhelm in every engagement.
Remember: Your at-minimum job is sit near the fuel & VP (not on top of) and reasonably hold them until you can build into the next phase.
Failing to obtain ~ 30-40% map control during this phase will result in serious resource deficiencies you may never be to recover from. in 2v2 it is unlikely you'll be able to disconnect the other teams territories to compensate for superior opposing team resource flow.
Early Game Threats
Allies, in my opinion, have a huge mobility & damage advantage during the early game phase. They will do their best to flank your positions, overwhelm individual squads and capture your flanks. Mitigate this by keeping your units close enough to support one another and in cover, and understand that all you just need to hold the points nearest to the large fuel to not-lose. Do not spread out too much, as an allied player will be able to find your two units over yonder, and commit all of their units to clear them out, thus dislodging you from the map.
A less mobile allied player may op to build a mortar, these units will force you to reposition MGs. This in itself isn't a huge issue, as the allied player will have less combat units to push with, when they inevitably push and get suppressed, you'll have a huge combat unit count to exploit & push with. Mitigation: move your MGs around small amounts to avoid damage, pull lines back slightly to bait forward infantry into MGs. Every minute you delay them, brings you closer to your T2 build.
When to take Initiative
In any situation where you have suppressed 1-2 squads, you have an immediate (and extremely large) advantage. Push your grens + pio forward to take advantage, focus firing down squads as best possible, and overrun/dislodge any mortars. A smart allied player will immediately retreat, so they can get back on the field quicker.
If your opponent builds MGs, just smile. Because what are we doing? holding our ground. MGs on their own cannot push. In this situation consider getting a mortar.
Example Engagement
The USF player has 3 rifles, 1 jeep and 1 mortar - a higher threat situation. I have been holding the 10 fuel, and bottom + middle VP . USF player decides to pressure the center MG with a mortar, which is then immediately repositioned. USF follows up with 3 rifles, expecting the MG to be compromised and are instead immediately suppressed. With 3 units suppressed, we exploit the situation by pushing forward and causing a rout. Holding this fuel allowed transition into a scout car quickly without a response from the USF player.
Mid & Late Game
Mid Game ~7 - 20 mins
T2 Building
Scout Car
Jaeger Replacement (next gren retreat)
Jaeger Squad
Base Heal
Shreck upgrade or Scout Car AT
Jaeger Squad
Jaeger Replacement (optional)
Support Upgrade
Marder x2
Scout Car Usage
Immediately after the scout car (high anti infantry damage) comes out, it will be the first (real) time your build has the ability to take the initiative. Rush it immediately to any ongoing infantry fight, isolated infantry squad/team weapon location and overrun it.
This scout car will allow you to add AI damage to any fight on the map, without giving up your entrenched position. If used well, it will continue to serve you throughout the entire game, continually keeping squads off your flanks.
Allied players may respond by upgrading units with bazookas, or saving to get their light vehicle out ASAP.
Jaegers
By late game, It should go without saying that grenadiers are near useless for damage output, but useful in their utility. Jaegers will serve as our mid game AT for light vehicles, and frontline AI damage. Don't forget about using mechanized assault for large pushes, as this ability will turn them into terminator squads.
You should make it a priority to build 2 new jaegers, replace gren squads. once operational you'll have the ability to conduct more aggressive attacks. Aim to have 3 to 4 Jaeger squads operation for mid game. If your opponent is going light tank vehicle heavy, simply get shreks on your first jaeger squads.
Marders
These glass cannon AT guns are built around the time you should expect allied mediums to appear, giving you the ability to knock them out as soon as they over extend.
Realized Mid Game Build
Late Game
Late Game > 20 mins
Second Pioneer
AT - Panther
AI - Stoßtruppen Squad
Indirect - Nebel or Wespe
Bunkers
If the game makes it to this point, you should focus entirely on holding VPs, and building late game units that counteract the mid game composition of your opponents.
Build a panther if you're opponent is tank heavy, Stoßtruppen if they are infantry heavy, more indirect if they stationary or grouping together.
Excess manpower should be spent on bunkers for forward reinforce, or camping VPs / flanks. A second pio is useful for spending munis on mines, bunker construction & repair duty.
Theory Of General Build Potency
It is my belief that in Company of Heroes, build potency can be relatively gauged within the following terms:
Anti Tank Damage (AT)
Anti Infantry Damage (AI)
Utility (Suppression, Snares, Mark Target etc)
Indirect
When adapting to the ever-changing battle landscape, one should ask if they need more of these categories and buy the corresponding unit their faction possesses.
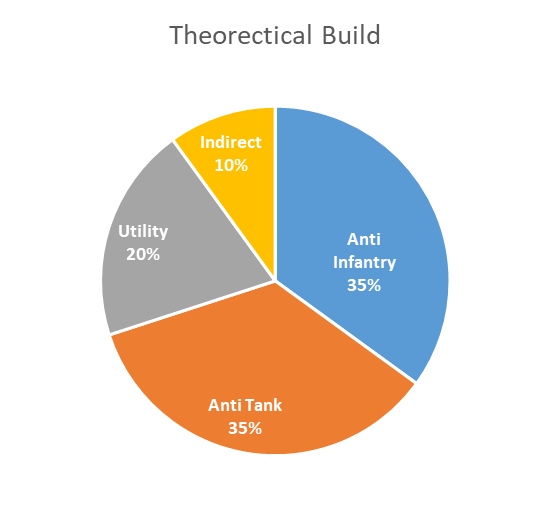
Balanced Build - Quantified
AT: 35
AI: 35
Utility: 20
Indirect: 10
in this hypothetical build, there is equal AT & AI damage, amplified by some utility and able to passively deal damage indirectly.
Utility should be viewed as a force multiplier. If your AI damage is "10", and having some utility around (say 2.0x) this will increase the build's potency (10 x 2 = 20). If your build has a bunch of utility (say 3.0x) but you have base units doing damage (5), then the overall potency of your build is lower (5 x 3 = 15). EG: 3 rifles supported by one mortar, versus 3 mortars with one rifle.
Example Theory Statements
Builds lacking anti vehicle damage, but possessing large amounts of Anti Infantry damage, are susceptible to massed light vehicles.
Builds with large amounts of indirect are generally immobile and low on AT, therefore are susceptible to compositions which are highly mobile and possess utility.
Powerful units, such as the tiger, dramatically increase available AT & AI of your build. Therefore losing a tiger can be game ending. Conversely, if you spread AT and AI value across multiple units, a build's potency will be more resilient in the face of an individual loss.
Support Troyd
Enjoyed this guide? Please comment and rate this guide.
Follow my Youtube and Twitch[www.twitch.tv] channels.
Source: https://steamcommunity.com/sharedfiles/filedetails/?id=3118950055
More Company of Heroes 3 guilds
- All Guilds
- How to win matches more frequently? [COH3]
- Company of Heroes 3 Multiplayer Guide Part 1: Overview
- Erfolg - Die Vertuschung
- Gua y Datos de DAK
- Gua y Datos de la Wehrmacht
- Company of Heroes 3 Guide 327
- British Standard build order and general strategy
- Gua y Datos de la UKF
- Guide for new players on how to play team games
- COH3 (20/05/2024)