Puzzle 1: GOLDEN COINS.


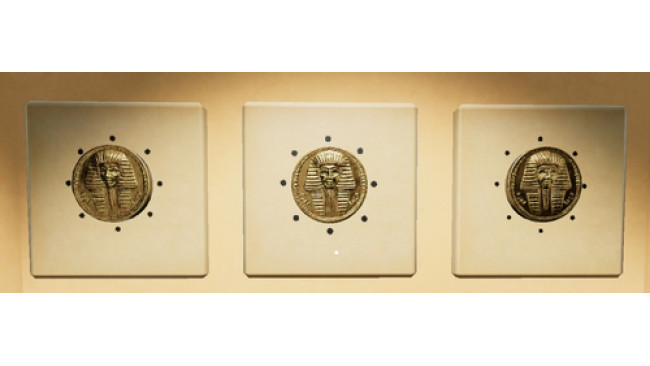
a) In Room A, there are 3, turnable golden coins on the wall with black dots around them (if you can't see the coins, you probably pushed the third button on the right side of the Stone Table, push it again to bring back the coins). You have to rotate each coin to open the shelf with red strip under the Stone Table.
b) Push the first button on the right side of the Table to open the Sarkofagus in Room B.
c) Player 2 needs to search the Sarkofagus to find 3 digits - it tells you how many times Player 1 have to rotate each coin counterclockwise. To make it easier - count the dots while rotating the coins.
d) The shelf should be opened now. Take 2 Stone Cubes and Pyramid Statue out of it.
Puzzle 2: STONE WALL BLOCKS.


a) In Room 2, there is a wall with pushable stone blocks. You have to push only specified blocks, otherwise nothing will happen.
b) There is a hint in Room 1 telling which blocks Player 2 have to push. It is written on the wood framed picture.
c) On a vertical part of the frame, you can see number of squares representing the number of vertical row of the stone blocks from the Room 2. The horizontal number of squares on the frame tells you it is horizontal row of the stone blocks.
d) Push the stone blocks just like it is written in the hint to remove part of the wall. The sequence of pushing stone blocks does not matter.
e) When the stone block fell out of the wall, you can see another hint through the hole - important for PUZZLE 4.
f) There is a picture of 2 Pyramid Statues on the wall, and right next to it, there is a stone block with Pyramid Statue on it. Forget the Statue standing on the block and ask Player 1 to push the fourth button on the right side of Stone Table.
g) Stone block on the right side should move, causing the Statue to fall down but also showing the whole picture from which you can learn the number of triangles drawn on the missing Pyramid Statue.
Puzzle 3: GOLDEN GOBLET.


a) Ask Player 2 for a Golden Goblet. It's on the shelf over the Sarkofagus in Room B.
b) Put it on the gold, round plate on the left side of the Stone Table. A stone block will fall out of the wall on your left side.
Puzzle 4: PYRAMID STATUES.


a) Now when the stone block fell out, you can see 2 shelves through the hole. Focus on the upper one.
b) There are 4 group of Pyramid Statues on the shelf. Each group corresponds to one out of 4 digits opening the Red Chest in Room B.
a) Ask Player 2 for two Pyramid Statues. They are on the shelves over the Sarkofagus.
d) Every Statue has some number of triangles drawn on the bottom. Depending on how many triangles are on the Statue, that Statue represents a single digit. For example: if there are 5 triangles on the bottom, that means the Statue corresponds to number 5. If there is no triangle drawn, that means the number is 0.
e) There are 4 Pyramid Statues with different heights. Now when you know which digits represents each Statue you can solve the puzzle.
f )The easiest way to solve it is to place each Pyramid Statue on the Stone Table, beginning from the smallest to highest one. Now when you know what numbers correspond to the each Statue you have to check which Statues are on the first group on the shelf. Adding their numbers will give you first digit of the code needed to open the Red Chest in Room B.
g) The chest contains Golden Ball, which will be needed in Room B later.
Puzzle 5: STONE CUBES.


a) There are 12 Stone Cubes with different signs painted on them. Those are the same signs Player 2 can see on the wall in Room B.
b) There are 8 Cubes in Room A (6 Cubes in the Room + 2 in the shelf from Puzzle 1) and 4 Cubes in Room B (3 Cubes in the Room + 1 in the Sarkofagus). Cubes are pretty easy to spot but in case you have trouble finding them, here's a list for you:
Room A:
-right corner of the Stone Table, on the floor,
-right side of the table top,
-top of the stone frame, over the stone table,
-broken, wooden beam, under the coins on the wall,
-floor, under the hint for Puzzle 2,
-left side of the upper shelf,
-closed in the stone shelf under the stone table (Puzzle 1).
Room B:
-under the bench,
-left side of the table top,
-right side of the second shelf, behind pots,
-closed in the Sarkofagus.
c) Player 1 has to collect all the Stone Cubes and put them in the wooden box on the wall, over the Stone Table, in correct places in case to remove the wall with the painted signs in Room B.
d) Signs on the wall in Room B are painted vertical but the box for the Stone Cubes in Room A is rotated horizontal, counter clockwise. That means, the Cube with sign from the left, upper corner on the wall in Room B, must be placed on the left, bottom corner of the wooden box. See the solution below.
e) When you manage to put all the Cubes in right places, the wall with the signs should be automatically removed.
Puzzle 6: GOLDEN BALLS.


a) In Room B, there is a stone plate on the wall with 4 holes in it. That's the place for Golden Balls.
b) In case you didn't find 3 of them, they are hidden:
-inside the Sarkofagus in Room B,
-inside the Red Chest in Room B.
-in the Chalice on the second shelf in Room A.
c) The fourth Golden Ball is hidden in the wall in Room A.
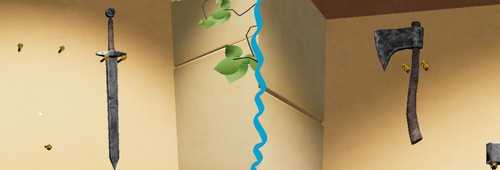
d) Ask Player 2 for a Sword (or an Axe if you have problems with exchanging the item) from display (Puzzle 5).
e) While standing face to the window that you can trade items with your partner, turn left, look at the 2 bottom blocks and use the Sword/ Axe in the middle to break off a piece of the wall.
f) Take the Dagger and drag the hat to find the fourth Golden Ball.
g) Give the Golden Ball to Player 2 and place it in the hole of a stone plate. The order of placing Golden Balls does not matter.
h) Placing all four Balls in the holes, will open the hidden stash, located under the second shelf, in Room A.
i) Take the Dagger from the hidden stash.
Puzzle 7: WEAPONRY.


a) When the wall with painted signs in Room B is removed, Player 2 can see a display with weapon elements.
b) While standing face to the display, Player 2 should turn right and look at the stone tablet behind the vines.
c) It is a hint, that tells you which items should be hanged on the display wall.
d) Player 2 must hang these items: Axe, Hammer, Sword, Dagger, Rope (Room B), Pincers (Room A). Order does not matter but the items are only placeable in specific parts of the display.
e) If items were placed correctly, the stone block from the wall in Room B will fall out.
Puzzle 8: THE EYES.


a) Remove Wooden Beams, that supports the stone blocks (in front of the hint for Puzzle 2) in Room A to find a picture. It is a hint telling you what to do with the Daggers.
b) Push the second button on the right side of the Stone Table in Room A to remove stone located under the Sarkofagus in Room B.
c) Now Player 2 should see a Tutankhamun's Mask placed under the Sarkofagus.
d) Take the Dagger off the wall display and put it in the eye of the mask. Do the same with the second Dagger.
Puzzle 9: THE HAMMER.


a) In Room A, push the second button on the left side of the Stone Table to move the block on the ceiling in Room B. You can see a drawing of a Hammer on it which is a hint for a code needed to escape.
b) There is a 3 digits code on the Hammer. Use it on the lock seen through the hole in wall in Room B. To bring it closer, Player 1 has to push the fourth button on the left side of the Stone Table.
c) Push the red button and escape!
Source: https://steamcommunity.com/sharedfiles/filedetails/?id=2642667068
More Escape Simulator guilds
- All Guilds
- Escape simulator : solution manoir Edgewood
- Escape Simulator (RUS)
- Assets and Resources for Community Rooms
- The Evil House
- Getting rid of all but one unique paint texture in a room
- Escape the clock walkthrough
- Adfundum - The third adventure
- Escape Simulator - Blackwinter Tales: Orbital (Walkthough & Hints)
- Adfundum - The second adventure
- Adfundum - The first adventure