
Overview

Welcome to the guide and walkthrough for Blackwinter Tales: Orbital.
This guide is split into two sections: a hint guide, where you can get a tip to help you progress, and a full walkthrough detailing the solutions.
To complete this Escape Room, you need to make your way through the H.M.S. Alacrity, trying to understand what happened, before taking your final action on the bridge to complete the scenario.
This room is mix of mystery and puzzles, so make sure you read all the logs and material you find carefully in order to unwravel what has happened in your role as investigator!
Good luck, and enjoy!
Hint Guide: Shuttlebay
This section will give you nudges towards how to handle each step along the way without spoiling things too much. If you are truly stuck, check out the walkthrough section at the end for the answers.
ShuttlebayTime to get your investigation started! Pick up the tablet on the floor, give it a read, and find your way off this deck...
Hint Guide: Command Deck
What did the tablet explaining your mission tell you about who you need to contact first?
You should have a look around to see if there is a way to get to the deck you need....maybe a map of your current deck would be helpful in showing what's online and what isn't?
Hint Guide: Medi-Bay
Have a look around the medi-bay and see if you can start to pick up any details about what has been going on onboard in the last few days...
The medicine cabinet looks interesting - might be useful later.
Check out the Chief Medical Officer's office and see if you can crack her computer password. What nearby might give you the hint as to what the password is?
Once you're in, read up on what the CMO thought and head back to the Command Deck...
Hint Guide: Command Deck (second Visit)
You now have two codes to some quarters...check the map again if you're not sure where to look.
Callaghan's QuartersThe clue to Callaghan's computer should be around here somewhere (check the screen hint if you're not sure where to look).
Looks like Callaghan was wanting to speak to another crew member about some concerns she had...take a note from the tablet to help you to the next quarters.
Simms' QuartersLooks like CMO Simms had locked out the lift shafts to the Science Labs. You should be able to reactivate them here...
Check the rest of the room to see if there's anything Simms stowed away which might help you.
Bateman's QuartersAs ever, have a good look around. Check high and low, as well as the computer terminal, for some hints. You should be getting used to how the crew left hints of their passwords by now so this shouldn't be too challenging for you...
Looks like there's something interesting in the briefing room which you might want to check out. But you can't get in there yet. For now, head on to the deck you just unlocked in Simms' quarters.
Hint Guide: Science II
Welcome to the Science Labs. It looks like only Science II is accessible but have a look around.
The Compound ActuatorThe Compound Actuator looks confusing, although if you break it down you just need to identify two canisters to insert - one red, one blue - which can be used to activate the unit.
There are some canisters nearby and you can see their name and codes when you hover over them. Now, where did you see some similar codes before?
If you've worked out what canisters you need, you now just need to find them. If they're not all here, where else might they be stored?
Once you've got them, insert the canisters and see what they produce. If you're not a scientist from the 23rd century, you might need a reference manual to help you. Sounds like something a doctor might have...
If you've got this far, you've now identified what those compounds make. I wonder who would want to make such a compound....and why....
Environmental Test LabThis is where the scientists onboard test a range of dispensable chemicals and their effects of various forms of flora. Checking out the screen makes it look like they've stumbled onto something which is of interest. Could you replicate their experiment and see what happens?
To do that, you'll need to find the precise mix of chemicals first, though. Fortunately Lt. Lux has left you a clue where to look for that...best head back to that deck.
Command Deck (third time) You should remember where the crew quarters are by now and you have a code to get into the one you need. Have a look around, see if you can find anything to suggest what the mix of chemicals is. You won't be able to get into the computer yet though, looks like you need some more information before you can see what Lt. Liu has been writing about...
Environmental Test Lab (second time)Select the mix of the three chemicals and dispense them into the test environment. Miraculous! What information does the display now tell you which might help you back on the Command deck?
Command Deck (fourth time)Back to the crew quarters and see what Liu has to say for himself.
If you haven't already done it, don't forget to reactivate the lift shaft that will take you down to the cargo bays. Seeing as that's the only new place you can go at the moment, best head down there...
Hint Guide: Cargo Bays & Engineering
Check out the new deck made available to you.
Once you're in the cargo bay, be sure you check for anything useful. Liu told you about some equipment stored down here that might help you get into the Captain's quarters; don't leave without it!
It seems that the engineering crew were working on the anti-grav storage units; rather unhelpfully as it goes. They've been nice enough to leave some hints as to what storage crates will unlock them though!
Check out the screen on the wall and see if you can work out what might be 'lighter than air' and 'totally unreal'. The database is corrupted, so you'll have to deduce which box goes where.
Once you activate the unit, you should be able to retrieve what was lost behind them.
The tablet on the floor gave one other piece of information - the code to a door on Deck 2. Sounds like it's worth checking out...
Engineering Gangway (via Medi-Bay, Deck 2)Have a rummage through the storage crates whilst you're here, see if there is anything you can use elsewhere.
When you're in the main engineering section, check the status screen to your right as you come in; looks like the extensive damage in this section has taken the engineering database offline.
To get it back, duck into the little cubbyhole and see if you can get it back up and running.
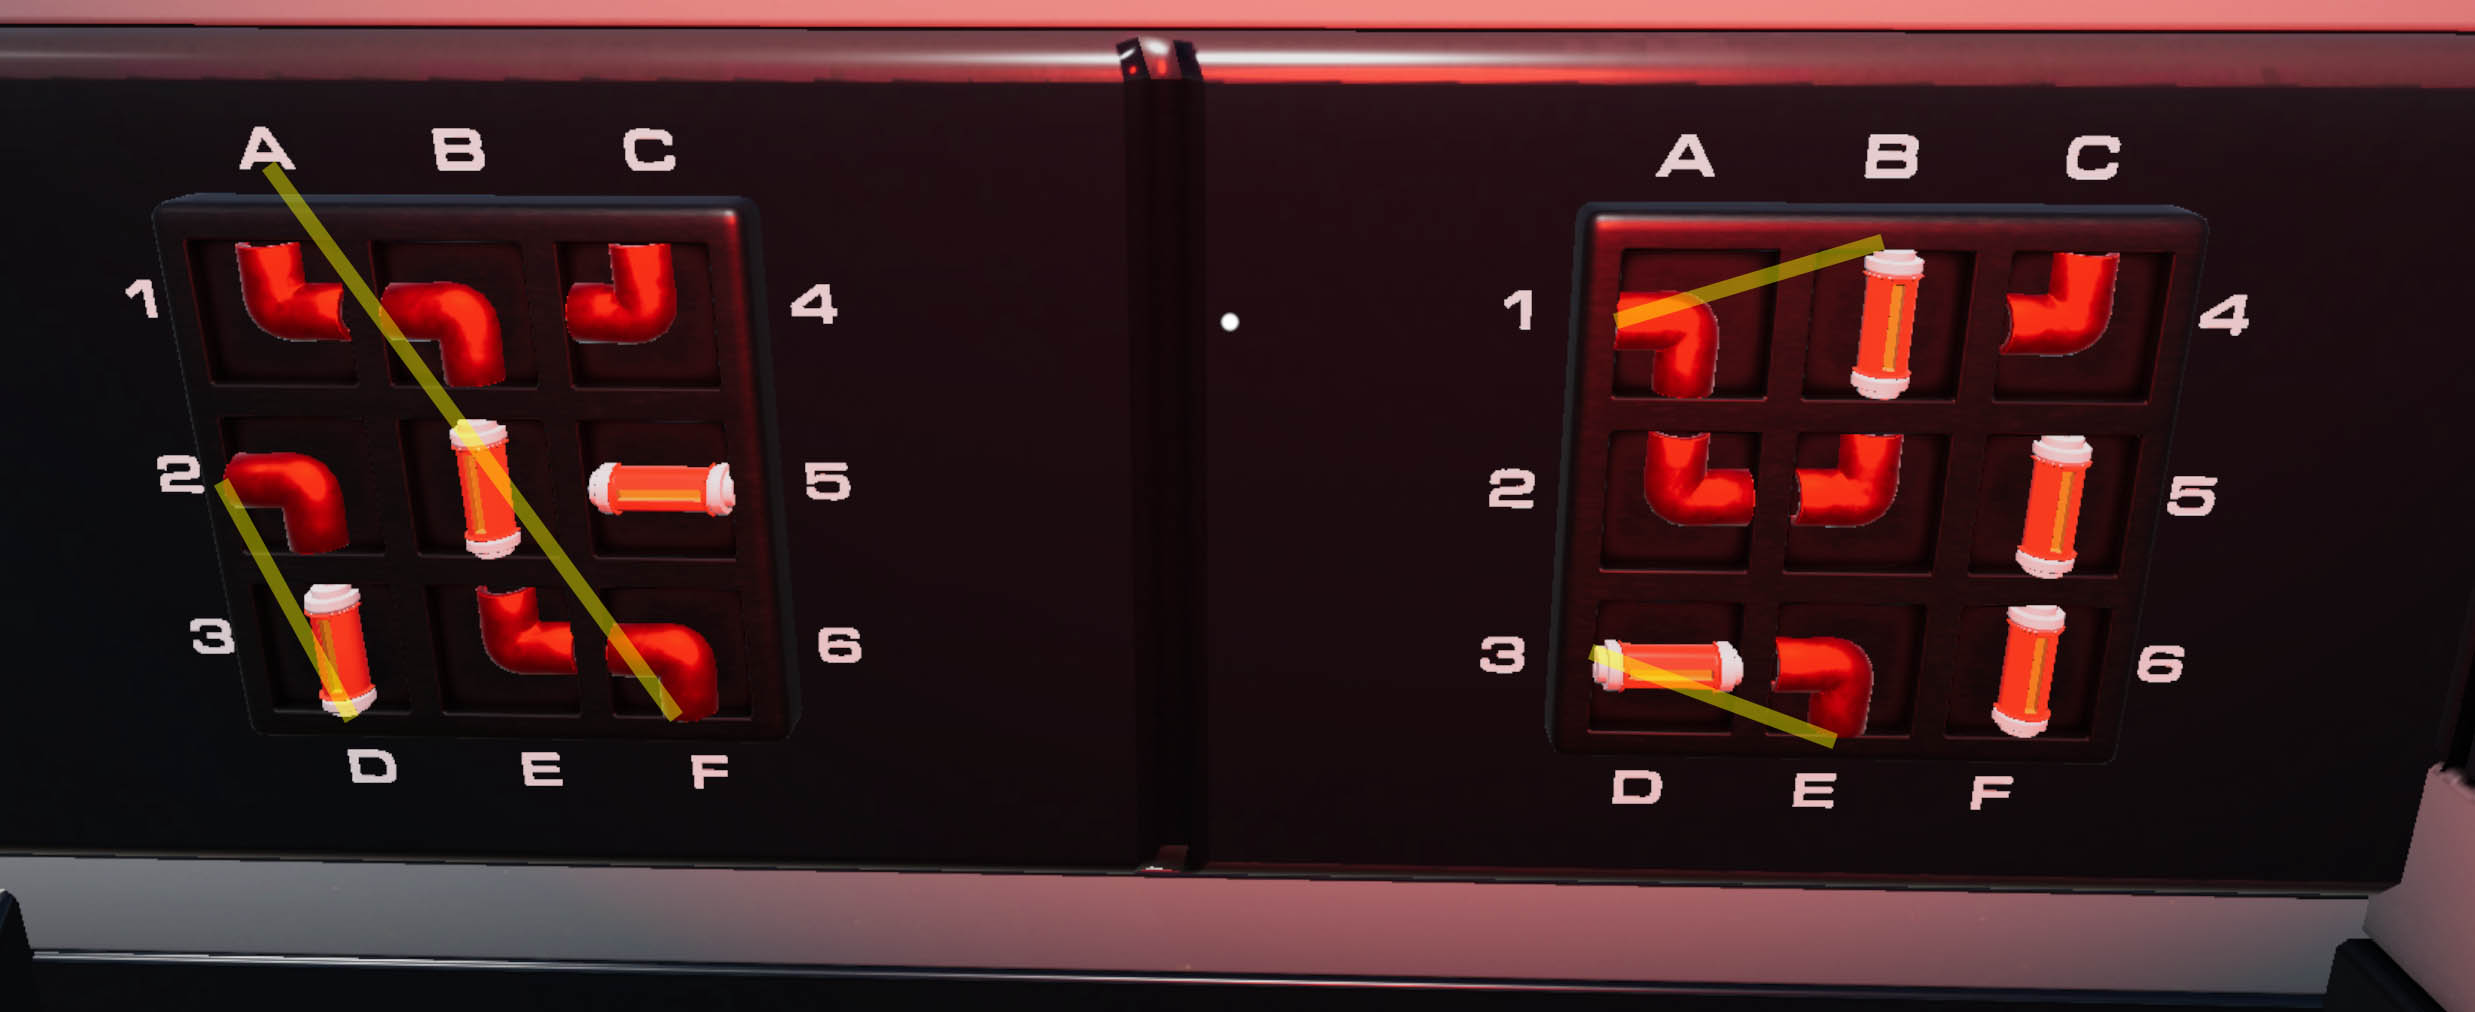
You'll need to reroute conduits so that the four 'couples' for the engineering database are all active at the same time. It's impossible for them all to be active on the one board, so you'll have to ensure all four are active across both boards - two routes on each.
Once that's back online, have a look and see what the status log has the crew members up to in the last few days. Oh and looks like you can finally get into the Mess Hall....
Hint Guide: Command Deck (fifth Time)
Mess HallNow that you've got access to the Mess Hall, there are a couple of things for you to do here. Rummage around the kitchen and see if there's anything to help you on your way. Those malfunctioning waste disposal units might've meant someone nefarious wasn't able to dispose of some evidence properly...
Cast your mind back to earlier logs you've read; didn't someone suggest 'shutting up shop'? What could that mean? Have a look in the kitchen and see if that gives you another clue...
Once you've got the hint, use the isolator that you picked up in Engineering. Don't worry, the crowbar will disappear from your inventory once you've used it! Now that you've made everything dark, can you find something to illuminate your path as to where you need to go next?
Briefing RoomIf you're keeping up with Elena's trail, you'll be looking to see where she stashed the personnel files. There's a sealed conduit at the back of the room that looks promising, but no code as yet...the tablet on the table will give you a clue for that.
That hastily-drawn diagram doesn't look like anything we've seen yet, so it must be in one of the rooms you haven't yet visited. Captain Ascott's quarters are untouched; did you find the tool Liu told you about from the Cargo Bays?
Captain's QuartersAh, that executive toy on the chest of drawers looks vaguely familiar. See what happens when you put the balls into the ballrun in the order that the diagram showed. Does this give you a lead for a code?
To get into the computer and check out those personnel files, you're going to need some more information and do a bit of maths. We'll come back to that shortly...
Oh and don't forget to look for anything suspicious....particularly if it's incongruous for someone who doesn't need a haircut!
Briefing Room (second time)So you can get into that service conduit now...but Elena has changed her mind! She's deleted the personnel files so you'll need to get back into the Captain's computer if you want a look at them. Anything in here help you with that?
The personnel logs are optional, but have a good look through them and see if they confirm your suspicions about who is responsible for the foul play aboard the Alacrity...
What you do need to do, though, is get onto the Bridge. Have a closer look at the holodisplay in the centre of the table - spin it through a few cycles and see if you can work out what Elena meant in her note.
Hint Guide: Bridge
This is it - now you can get into the Bridge, you need to decide on a course of action!
Have a look around. The AI Command software has already decided on a couple of recommended courses of action for you to take. Have a think back over all you've learnt on board and make your choice...
There are three alternative endings here, depending on what option you choose. Good luck, Commander!
Walkthrough: Shuttlebay
Pick up the tablet from the floor and examine it. You can click on the various categories on the tablet to switch screens. If you click 'power off', just click the centre of the tablet to wake it up again.
Walk to the end of the corridor and click the service hatch to leave this deck.
Walkthrough: Command Deck
The tablet said you should check in on CMO Simms in the Medi-Bay on Deck 2. All the doors around here have locks which you'll need to find the codes for, except for the one Express Lift that is working. Take it down to Deck 2 and enter the Medi-Bay.
Walkthrough: Medi-Bay
Note the screens above the beds - Marquis died from critical hypertension recently and Callaghan is missing. Suspicious...
The medical cabinet has multiple canisters of various chemicals, along with their reference codes. You'll come back for these later.
In the CMO's office, click the screen and select 'Override Reminder' to get a hint as to her password. Click out and head over to the photoframe on the desk. Zoom in and click through the pictures to find the last picture of the dog called 'Petra'. This is your password for the terminal. Enter PETRA on the keyboard to unlock it.
This gives you two codes: Callaghan's quarters (2257) and Simms' quarters (9724). Head to Callaghan's first...
Walkthrough: Command Deck (second Time)
Head back up to Deck 1 and the Executive Quarters.
Callaghan's QuartersUse 2257 to enter Ensign Callaghan's quarters.
Check the tablet on the bed to see a handwritten code for Bateman's quarters (5161).
Examining the override reminder for the terminal says 'best in class' - the trophy on the shelf has the password needed: 2236. Enter this into the keyboard to unlock the terminal.
Leah Callaghan's letter to her parents suggests she loves the colour purple and had recently had a locket sent to her as a gift. She also tells of a suspicious code she found in the navigational files and wants to ask Commander Bateman more about it. Head to Simms' quarters next.
Simms' QuartersDown the corridor, use 9724 to access CMO Simms' quarters. Check the monitor on the wall and reactivate the lift shaft to the Science lab.
Check the bottom draw of the bed to pick up the Pharmacopoeia. The database talks of a chemical - Tetramitrogen Hydroxycylin - that can cause critical hypertension when injected or ingested.
Head back down the corridor to Bateman's quarters.
Bateman's QuartersCheck the floor by the bed to find two chemical codes: A32 and D49.
The terminal can be accessed by using the password 'Mars' (Mars Raceway from the poster). The incoming email is from Marquis, explaining that she had a strange order from the Captain to send him a copy of the personnel files from HM Command (which detail the crew members' specialist skills) and that she hid a copy of them in the Briefing Room, just in case.
Now that you have unlocked the Science lab, head there via the Express Lift near the Bridge.
Check the trophy above the bed; you'll notice it has a bloodstain.
Walkthrough: Science II
The Compound ActuatorPickup chemical D49 from the side. You'll need to head back to the Medi-Bay to get A32 from the storage cabinet. Placing both compounds in the Actuator reveals they would make Tetramitrogen Hydroxycylin - IF you had the requisite command clearance. Security Level 3 or above required...
Environmental Test LabCheck the monitor to get Liu's quarters code (1532).
Note that you'll need to know the ratio mix of Sodium Hydroxide, Zirconium and Hassium in order to see what Lux and Liu had discovered. Head to Liu's quarters on Deck 1 to find this mix...
Command Deck (third time)Head to Liu's quarters and use the code 1532 on the door. Check the note stuck to the monitor to see which chemical is in which direction, then check the game near the door to see which values to assign for each.
The mix is 4 Sodium Hydroxide, 2 Zirconium and 5 Hassium (4:2:5).
In order to get into the computer, you'll need the Profile ID from the Environmental Test Lab.
Environmental Test Lab (second time)Select the fourth button on the top row (Sodium Hydroxide), the second on the middle row (Zirconium) and the fifth on the bottom row (Hassium). Press the 'Dispense' button and watch the plants grow. This is the terraforming secret they've discovered - a way to make plants grow rapidly in size instantly!
Check the Profile ID on the display - this is the password to Liu's computer.
Command Deck (fourth time)Head to Liu's computer and enter 1394 into the keyboard to unlock the terminal.
Liu reports that Elena Marquis was trying to explain something to him recently about someone on board not being who they say they are, plus a hint that the code to the Briefing Room is hidden in the Mess Hall. They also talk about Captain Ascott being more interested in the hydroponics project more than usual, confirming that only Ascott and Simms supposedly knew about it. Finally, he mentions that the Captain asked for a strange order of shampoo bottles (which is odd because he's bald) and that the Captain's Quarters door is playing up; the manual release device being in the Cargo Bays.
On the monitor on the wall, reactivate the lift to the Cargo Bays and head down there.
Walkthrough: Cargo Bays & Engineering
Cargo Bay A is inaccessible, so head to Cargo Bay B.
To the left of the room is red crate - inside is the manual door release for the Captain's quarters that Liu mentioned in his log.
On the floor by the anti-grav units is a tablet explaining what happened. Callaghan was doing some maintenance and dropped the electrical panel crowbar for the Mess Hall behind the anti-grav unit. The anti-grav units can only be activated by putting two specific crates in them; the tablet says the alpha one is 'lighter than air' and the beta one is 'totally unreal'. She also explains the Engineering Gangway code - accessed via the Medi-Bay - has been changed to 5525.
On the monitor on the wall is a cargo inventory with corrupted data. 'Lighter than air' refers to the Helium Isotopes (box with serial number 09PN8-7) and 'totally unreal' refers to the Holographic Environment Kit (box weighing 49kg). Find the right boxes and put them in the respective slots.
When both are slotted into the correct slot, push the button to the right of the anti-grav units and, if you have slotted the correct boxes in, they should slide up and reveal the crowbar on the floor. Take it and head up to the Engineering section via the Medi-Bay on Deck 2.
Engineering Gangway (via Medi-Bay, Deck 2)In the first room, open the red crate to pick up the Mess Hall Emergency Lighting Isolator.
In the main engineering room, check the monitor on the wall to find out the Engineering Database is offline.
In the Emergency Power cubbyhole, you'll see two conduit panels with letter and number references surrounding them, with a clue on the wall.
To get the Engineering Database back online, you need to ensure that routes between the four letter/number combinations are in place simultanously - this will involve having two routes on each board in the following configuration:
(A to F and 2 to D on the left hand board, then 1 to B and 3 to E on the right hand board).
If you have done this correctly, you'll hear a 'beep' and the monitor back on the gangway will now be active.
You'll note from the screen that the Mess Hall code has been changed to 7531. You'll also note that Bateman realigned the communications recently and Ascott changed the code to the Armoury, restricted to a Level 4 combination. Now head to the Mess Hall on the Command Deck.
Walkthrough: Command Deck (fifth Time)
Mess HallGo into the kitchen and have a look in the waste disposal unit. A purple locket and a skull with a bloodmark and impact wound have failed to dematerialise properly. This appears to be the fate that befell missing Ensign Leah Callaghan...
Pull the shutters down with the button on the pillar behind the counter. You'll see 'lights out' scrawled on them.
Go round to the electrical panel and use the crowbar on it - the crowbar will disappear from your inventory when you use it, don't worry!
Put the isolator chip in the panel and the lights will go off. Head back round to the kitchen and check the backs of the shutters again - a code, 2093, has now appeared.
Remove the isolator from the panel to restore the lighting and go to the Briefing Room.
Briefing RoomElena Marquis said she stashed a copy of the personnel files in the Briefing Room. Check the sealed conduit at the back of the room to see where this is.
The tablet on the desk gives a hint to where the code for the conduit is. Head to the Captain's Quarters.
Captain's QuartersUse the manual release you got from the cargo bays on the door - it will disappear from your inventory when it has been used.
Enter the Captain's quarters and look at the executive toy on the chest of drawers. You need to put the right marble with the right symbol in the correct slots at the top of the toy. If you put the right ones in, they will roll down and reveal a number in the code for the conduit door:
Put the diamond marble in the left most slot - it will roll down, dropping into the fourth slot and revealing the number 3 (of diamonds).
Put the omega marble in the second slot along - it will roll down into the third slot, revealing the number 5
Put the pound sterling marble in the third slot along, revealing the number 7 in the first position.
Finally put the sigma marble in the fourth slot along, revealing the number 1 in the second position.
The numbers in the order of the slots they landed in are the code - 7153.
Head to the bathroom and press the shampoo bottle - the mirror will swing aside and reveal a handwritten Captain's note saying they have a spy on board who has escaped with secret information and it is either Callaghan or Bateman, both of whom are missing. It also says that the rest of the crew have been evacuated on to the remaining two escape pods and that there is a virus in the navigational system that will destroy the ship if the engines are engaged. The final instruction from Captain Ascott is to target and destroy escape pod 198A if it is still in range.
Briefing Room (second time)Enter the code 7153 into the digilock by the service conduit.
Elena has destroyed the copy of the personnel files; the remaining copy is now the one stored on the Captain's computer. She also reveals that she has changed the Bridge access code on the Captain's orders, but has stored it where 'all the world can see'.
Check the button next to the holodisplay on the table in the middle of the room - the globe image will change to show <42. Pressing the button again will change it to reveal 08>. Putting the two numbers together <4208> reveals the code for the Bridge.
Check the wall monitors to get the values for core temperature and pressure, which you'll need to get into the Captain's computer.
Captain's QuartersThe maths you need here are as follows:
Pressure = 3.6
Core Temperature = 5125
Pressure x 10 = 36
Core Temp + (Pressure x 10) = 5125 + 36 = 5161.
Enter 5161 into the keyboard to unlock the personnel files. You'll note that Bateman has specialist skills in toxicology. This, together with the chemical references found in his quarters and the need for the Compound Actuator in Science II to be authorised by someone Level 3 clearance or above suggests Commander Bateman produced Tetramitrogen Hydroxycylin and somehow gave it to Elena Marquis, killing her some time later through critical hypertension.
Now you know who the enemy agent and murderer is, you should head to the Bridge to take your final action....
Walkthrough: Bridge
NOTE: The three endings are explained at the bottom of this walkthrough.
**SPOILER WARNING IS IN EFFECT**Use the code 4208 to get onto the Bridge.
There's not much to do here apart from have a look out of the window and decide on your next - and final - move.
Move to the AI Command console to the right of the room, where you will find a number of selectable actions the computer has suggested for you to take.
Choose your option and watch your respective ending....
Selecting any of the course selections - either pursuit course for escape pods or returning to EarthThe engines engage and you warp forwards...the navigational virus that Bateman planted in the system kicks in and you hurtle into the Sun. The story shows you at the home of your parents, where a 'Death in Service' notification lies on the side table in memorial to your actions. If only you had listened to the Captain's advice not to engage the engines...
The news bulletin on the wall monitor reveals that the Onyx Syndicate have used the terraforming technology to establish a colony on Mars. Bateman, successful in his mission to infiltrate the Alacrity and steal the secrets from HM Space Command, would be honoured as a hero to his masters.
Walk through the door to finish the game.
Targeting Escape Pods 157B or 187GThe computer fires up the cannons and blasts the two escape pods into smithereens.
You end up back on Earth at the memorial service for the crewman you killed in cold blood. Eight members of the Alacrity crew died needlessly at your hands and now you must face the consequences.
The tablet on the chair to your left reveals your fate - you are to face Court Martial for your actions and will undoubtedly leave HM Space Command with your reputation in tatters.
The news bulletin on the wall shows that Bateman got away with the secrets unharmed and delivered the terraforming technology to his masters in the Onyx Syndicate.
Your mission is a total failure. All that's left to do is leave the room through the door at the back to finish the game.
Targeting Escape Pod 198AThe computer fires up the cannons and fires upon Bateman's escape pod, killing him and stopping the terraforming secrets from ending up in the Onyx Syndicate's hands.
After eventually being rescued, you returned home to a hero's welcome. HM Space Command honoured you with the Venetian Star of Valour and your commendation ceremony is where the story now takes you. Check the tablet on the chair to your left, then approach the front of the room for the celebration you deserve!
Exit the room through the door at the back to end the game.
Source: https://steamcommunity.com/sharedfiles/filedetails/?id=2856336789
More Escape Simulator guilds
- All Guilds
- Jaguar's Gate
- Guide - Test for puzzle
- Build-A-Room/ Collab room tokens
- Video Tutorials for Escape Simulator
- FULL walk-through for 'LOCKED IN' (SPOILERS)
- Escape Simulator (06.08.2024)
- Step by Step Guide: Tomb of Magellan
- Escape simulator : solution manoir Edgewood
- Escape Simulator (RUS)
- Assets and Resources for Community Rooms