
What's Included
SpoilersThis guide has and doesn't tell you how to solve any of the puzzles, only the answers.
I've included locations for
Pages - 28
Fairies - 20
Secret Treasures - 12
Ability Cards - 16
Wishing Well Coins - 17
Potions and Potion Shards - 5 and 12
Effigies (money pouch) - 12
Upgrade Items
Fang: Attack Increase (Max Stat 5)
Tan Fox Figurine: Defense Increase (Max Stat 5)
Pressed Flower (with vines): Using a potion refills bar more (Max Stat 4)
Two Flowers: Health Bar (HP) Increase (Max Stat 7)
Leaves: Stamina Bar (SP) Increase (Max Stat 3)
Blue Mushrooms: Magic Bar (MP) Increase (Max Stat 4)
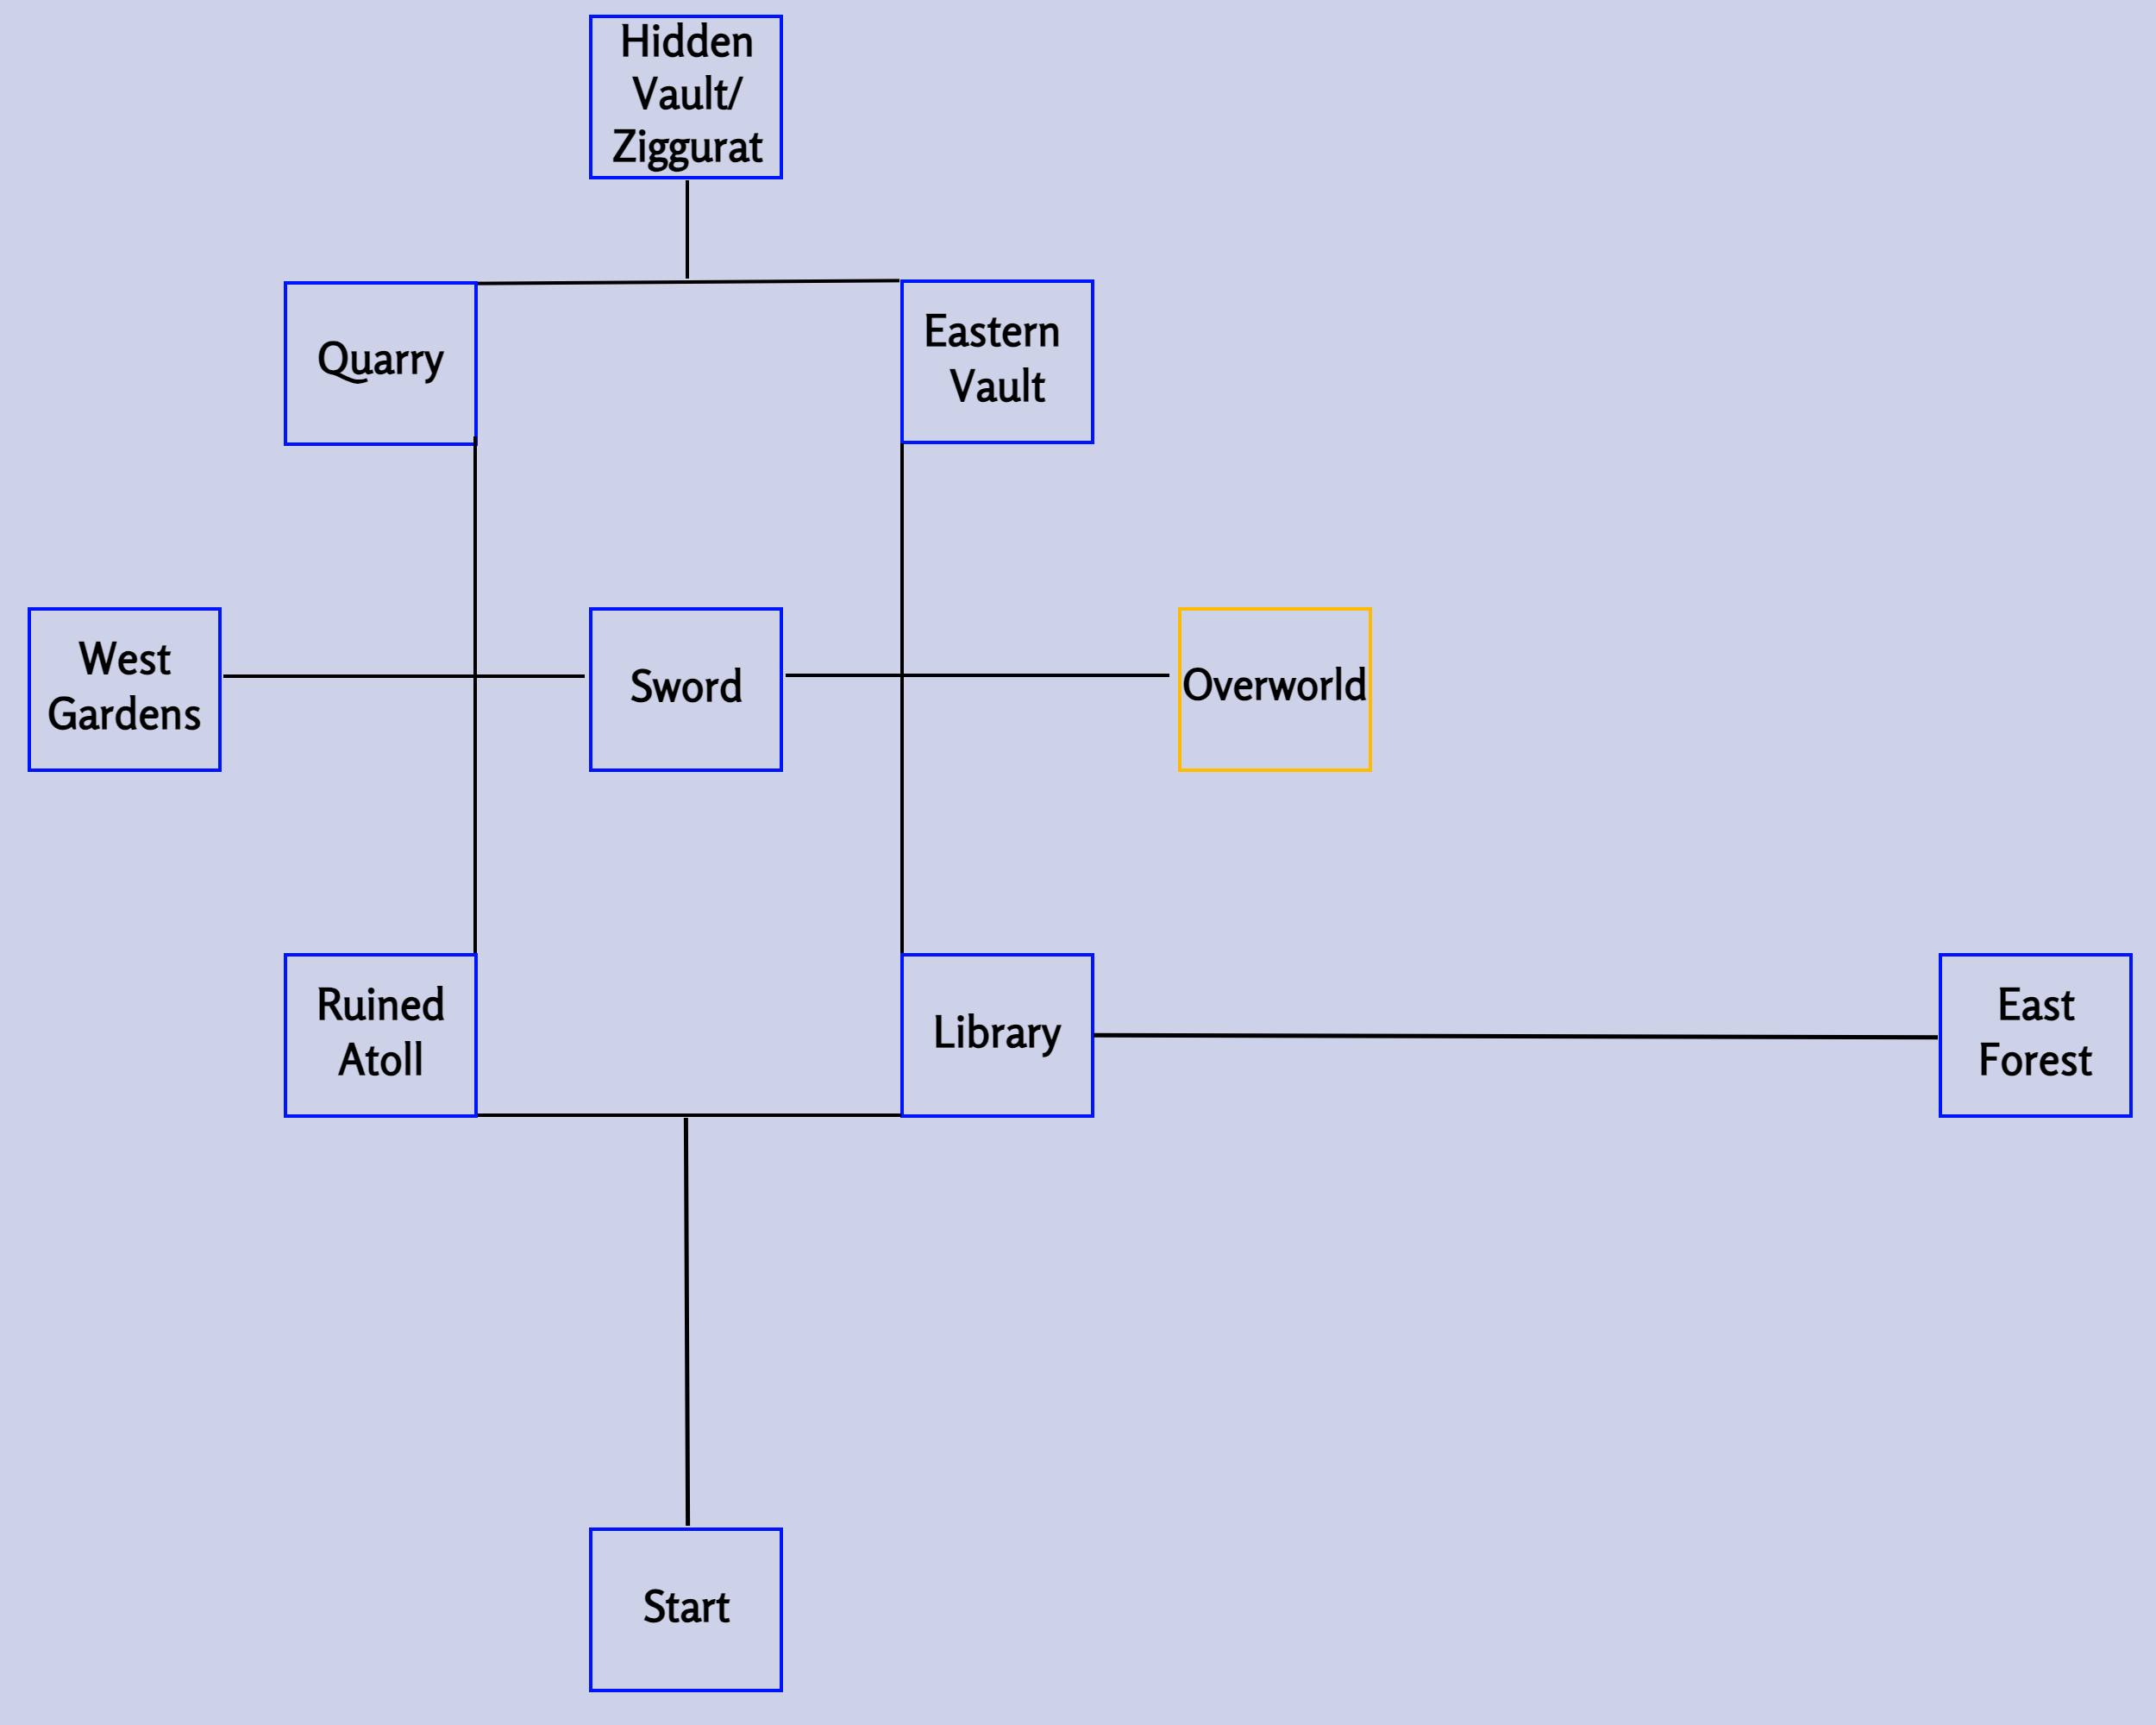
Also there is a map image for navigating the teleportation squares in the Far Shore.
Overworld Part 1
From start, Hold A 3 seconds on yellow square to get pages 2/3
Also on this yellow square Secret treasure #9
<Right, Down, Left, Up, Left, Left, Down, Right, Right, Down, Down>
Head north to Save shrine. Go down stairs to left then go north to pass under waterfall. Enter stone doorway to enter back room of old house. Open D-pad door Pages 52/53
<Up, Right, Down, Left, Down, Right>
Exit back outside and continue to follow the path up. Chest before a wood bridge. Fang (attack)
Waterfall E of Dark Tomb “The Gathering Place” Fairy
<Down, Right, Up, Right, Up, Right, Up, Left, Up, Left, Up, Right, Up, Right, Up, Left, Down, Left, Down, Left, Down, Right, Down, Left, Down, Right, Down, Right, Up, Right> (IGN #5)
Left of Dark Tomb, climb two ladders to reach a chest with Flowers (HP bar)
Backtrack to collect key across bridge from save shrine. Go back towards start and unlock door on right above first set of stairs pages 10/11
In same room notice the pattern on the wall Secret treasure #1
<Left, Up, Right, Up, Left, Down, Left, Up, Right, Down, Right, Up, Left, Up, Right, Down>
Exit room to the right then go down ladder and go right. D pad door above bridge to swamp. Ability Card - Fire Sword (sword ignites enemies, but Health becomes permanently 1 while equipped)
<Down, Right, Up, Left, Up, Right>
Go up two ladders. Move left through trees for a chest with an Effigy
Go up next ladder. By the weathervane statue Fairy
<Left, Right, Down, Up, Up, Down, Right, Left, Up, Right, Down, Left, Up, Down, Right, Left> (IGN #11)
Need Sword: Raised platform in front of entrance to East Forest (East of save shrine under pink flower island) pages 28/29
Pink flower above entrance to Eastern Forest and in front of entrance to forest Fortress Fairy
<Up , Left, Down, Left, Down, Left, Down, Left, Up, Right, Down, Right, Right, Down, Right> (IGN #1)
NE cave behind waterfall, go north down hallway by 3 flowers Fairy
<Down, Down, Right, Up, Right, Down, Left, Down, Right, Up, Right, Down, Down> (IGN #13)
Top of Mountain in front of door pages 20/21
NW gold obelisk where you get fire wand pages 48/49
<Up, Left, Down, Right, Down, Left, Up, Right>
In front of windmill Secret treasure #3
<Down, Left, Left, Up, Up, Right, Right, Left, Down, Right, Up, Down>
Main Overworld Teleportation square pages 16/17
Outside old house in front of wind chime Secret treasure #8
<Up, Down, Right, Up, Down, Left, Up, Down, Left, Right, Down, Left, Right, Up>
SE of teleportation square, past wishing well and Rudeling, across planks is a chest containing a potion shard.
Cut bush then go down curly stairs. Bomb secret door by 3 flowers at bottom of curly stairs Fairy
<Right, Right, Right, Right, Up, Up, Up, Up, Right, Right, Right, Up, Up, Up, Right, Right, Up, Up, Right, Up> (IGN #14)
Head back down two middle staircases then east through grass. Go down ladder to right of broken bridge, enter a cave under bridge (blue room) Fairy
<Right, Up, Left, Up, Right, Down, Right, Up, Right, Down, Left, Down, Right> (IGN #4)
Backtrack to teleportation square.
In red doorway down ramp west of teleportation square, chest with Flowers (HP bar)
Stairs under western bell Fairy
<Up, Right, Up, Left, Down, Left, Up, Left, Up, Right, Down, Right, Down, Right, Up, Left, Up, Right, Down, Right, Down> (IGN #3)
In front of fountain with inaccessible page in the middle Fairy
<Down, Left, Left, Down, Up, Right, Down> (IGN #16)
D pad door above fountain pages 44/45
<Down, Right, Up, Left, Up, Right>
To the right of the fountain behind trees, go down the secret stairs and open the chest for a coin.
Down stairs in front of fountain, left past Autobolt, chest up a slope. Ability Card - Lucky Cup (15% enemies drop hearts)
(Go to inventory, click on the dashed square on the right to select this card/ability)
Head south down bridge towards Ruined Atoll and there is a chest by a blue Rudeling with an Effigy.
Go down wooden ladder to the right of Envoy. Go right behind waterfall. On beach under bridge by start pages 32/33
Slightly to the right on beach, chest with coin.
Enter cave under bridge, walk invisible path to chest. Fairy
<Up, Left, Down, Left, Up, Right, Down, Right, Up, Right, Down, Left, Up, Left, Up> (IGN #15)
Head back behind waterfall to other side of beach. Island with gold tail stand on island Fairy
<Up, Right, Down, Left, Down, Left, Down, Left, Down, Left, Up> (IGN #2)
Island with gold tail stand in water Secret treasure #4
[repeated below if you want to do this after getting page 1 and do the audio exercise]
<Down, Right x 11, Left x 12>
Enter cave under bridge to Ruined Atoll Fairy
follow code on door to open. At top of tower <Left, Up, Right, Up, Right, Down, Right, Up, Right, Up, Left, Left, Left, Up, Right, Up> (IGN #10) Under bridge to Ruined Atoll, behind and to the right of the Autobolt, is a chest with Pressed Flower (potion refill amt)
Run south along beach past Autobolt to next screen. When the wall juts out a bit by a dead end, there’s a secret door to get to the other side where the chest is. Ability Card -Bracer (reduces stamina lost from blocking)
Old house Fairy
<Up, Up, Right, Down, Down, Right, Up, Up, Right, Down, Down, Down> (IGN #12)
After 10 fairies, return to waterfall cave by Dark Tomb pages 54/back
Behind windmill, next to entrance for Under the Well pages 18/19
Two coins available in the shop
Two potion slots available in the shop (second available after Dark Tomb)
After ringing Eastern and Western Bells:In the sealed temple Fairy
<Up, Right, Up, Left, Up, Right, Up, Left, Up, Right, Down, Right, Up, Up, Left> (IGN #6)
In the Sealed Temple and run up the ledge in the NE. Pages 24/25
Need Orb:On beach under western bell, lasso across for a coin.
Just left of western bell, chest guarded by Envoy. (Tip after getting the orb sneak behind him from above to get chest) Ability Card - Inverted Ash (HP potions become exclusively MP potions)
Overworld Part 2
Need Crown:SE corner, top of bridge to swamp dash to reach pages 8/9
Behind windmill, below Dark Tomb entrance on a rock pages 4/5
Fountain pages 42/43
Island above entrance to East Forest. Dash over to crumbled looking cave. Pages 22/23
Dash on pedestals east of sealed temple for a potion shard.
After 20 fairies, return to waterfall next to dark Tomb for Secret treasure #7
Need all other pages (specifically page 48):Mountain top > door puzzle Cover page/1
<Up, Left, Down, Left, Up, Left, Down, Left, Up, Right, Up, Right, Up, Left, Up, Right, Down, Right, Up, Left, Up, Left, Up, Right, Up, Left, Down, Left, Up, Right, Up, Up, Left, Up, Right, Down, Right, Down, Right, Up, Right, Down, Left, Down, Right, Up, Right, Right, Down, Right, Up, Right, Down, Right, Up, Right, Right, Down, Left, Down, Left, Down, Right, Down, Right, Down, Left, Left, Down, Right, Down, Left, Down, Right, Up, Right, Down, Right, Up, Right, Right, Down, Down, Left, Up, Right, Up, Left, Down, Left, Up, Left, Up, Left, Up, Right, Right, Up, Left, Up>
Need page 1: Island with gold tail Secret treasure #4
<Down, Right x 11, Left x 12>
(full instructions for adjusting audio)
East Forest
In front of shrine/eastern bell immediately in entrance of Forest pages 12/13
Guardhouse 1 Go up wood ladder and out to the left. Outside is a chest with a full potion slot.
On teleportation square pages 14/15
Need Sword:In front of Hero’s Grave, top of stairs, cut bushes to go behind wall. Chest contains an Effigy.
Enter Guardhouse 2 (above teleportation square) to access Lower Forest, go SE to some trees near the water, go around trees to go under the stone bridge and access chest with a coin.
Lower Forest, far east, Broken golden shrine Fairy
<Down, Right, Down, Left, Up, Left, Down, Left, Up, Right, Up, Left, Up, Right, Up, Right, Up, Left, Up, Right, Down, Right, Down, Right, Down, Left, Down, Right, Down, Left, Up> (IGN #20)
Upper level of Guardhouse 1 chest has potion shard.
Defeat Guard Captain boss (NE door in Guardhouse 1), open gate, and next room has a chest with a full potion slot.
Entrance to Eastern Forest/In front of Eastern bell. Cut bushes and go through the space in the wall that’s glowing green for a chest with a Pressed Flower (potion refill amt)
Need Orb:Go to right cliff from transport square. Use ice and fire wands together to freeze pink ooze. Then use orb to lasso orb and travel to ledge. Kill ooze and open chest for Secret treasure #6.
(If you accidentally kill ooze just pray at shrine to reset.)
Need Crown:When you’re a ghost/at night climb the ruins to the left/NW. Don’t enter Guardhouse, dash left. Find ghost. Fairy
<Up, Down, Up, Down, Left, Right, Left, Right, Down, Left, Up, Right> (IGN #8)
Lower Forest, hook down broken bridge closest to broken obelisk, then dash to chest with Flowers (HP bar)
Under The Well/Dark Tomb
Chest at in first room behind Rudeling Pressed Flower (potion refill amt)
Room to the left of first save point pages 34/35
Hallway with pink energy line. Far right go through north wall (path turns east) to access chest with an Effigy.
Far left of hallway with pink energy line, there’s an opening in the top side of the wall. Ability Card - Louder Echo (Recovering Tunic Ghost explosion causes greater damage and a larger radius)
Chest at top of ladder by 3 pots Figurine (defense)
At top of ladder interact with wall to open secret passage. First chest on right has a potion shard.
On opposite ledge above save shrine, is a chest with a coin.
After activating obelisk, follow pink path back until you pass a chest with six skulls/Phrends in front of it. Notice the wall here is now open. Secret room has a chest with a coin.
Save shrine at the very end of the Beneath the Well area. Pages 30/31
[OR go into the entrance of the Dark Tomb. Before you enter the hallway, go to the right corner and climb down a wooden ladder to the save Shrine room.]
Dark Tomb first room, after activating left and right skills to move platform, climb stairs on right to reach chest. Ability Card - Orange Peril Ring (Raises attack when low on health)
In room full of floor spikes, to the left after climbing down long stone ladder, NE corner has a chest with a potion shard.
In room with three lasers and a chest, NE passage leads to hidden chest with a coin.
Chest in center of room completely full of lasers contains an Effigy.
In lower level of giant pink glowing obelisk room, chest on left side Figurine (defense)
West Garden
Walk left past steps to Hero’s Grave, up green fallen piller and around secret path to walk inder stairs to Hero’s Grave to reach chest. Ability Card - Cyan Peril Ring (raises defense when low health)
West of save shrine, after running into first Chompignon, go north up a narrow path. Pages 26/27
Under a bridge some planks connect towards a short ladder and a bridge you can unlatch (also the spot where you drop the rope down. In front of the short ladder go under the tunnel to reach a chest to the right with an Effigy
Under Obelisk, press A on wall by 3 flowers for a chest with a coin.
Big area with Chompignon and blue Rudeling with lots of blue pattern lines on ground Fairy
<Up, Right, Up, Left, Up, Right, Up, Left, Up, Right, Down, Right, Up, Left, Down, Left, Up, Right, Up, Left, Up, Right, Up, Left, Up> (IGN #18)
Path to the right of this blue flooring, cut down many bushes to access chest with Leaves (stamina bar)
At top of ladder from blue flooring, chest with Fang (attack)
Need Crown:NE (directly west from north save shrine) is an island with a stone Garden Guardian. Chest behind stone to the right contains Effigy
Dash back to narrow path then turn right onto wider path. Follow past Chompignon until column goes into water. Walk along shallow path then dash across gap to reach small island with chest Flowers (HP bar)
Dash to the left SW corner to island with single tree Fairy
<Left, Down, Right, Left, Up, Down> (IGN #17)
Need to have activated fast travel to West garden & have crown:Teleport to Garden and then dash east and north. You may need to tilt camera to see behind island. Pages 46/47
[As a ghost go to this location to activate obelisk.]
Forest Fortress/Eastern Vault
In Forest Fortress, take the left path, pray to an obelisk, and the page is behind it pages 6/7
Second level, large open room filled with spiders, chest behind waterfall. Ability Card - Muffling Bell [Equip Immediately] (decreases enemy detention range)
Activate switch so golden bridge appears to chest Blue Mushrooms (Magic bar)
Second corridor with jail cells, top right cell has a chest with Flowers (HP bar)
First room with obelisk. Destroy barrels at far north of upper ledge to enter a room with a chest for a coin.
Up the stairs from first obelisk, upper level overlooking room with second obelisk, far left walkway pages 36/37
Directly above pages, far left door of upper level has two chests Leaves (stamina bar)
Lower level of second Obelisk room (left of Eastern Vault entrance), stand on activated obelisk surrounded by candles Fairy
<Right, Left, Down, Right, Up, Left> (IGN #19)
Two rooms to the right of Eastern Vault entrance, (before going outside to grassy area), bomb through the middle of upper walkway for a secret room with a chest with a potion shard.
Hidden chest on left side of Hero’s grave. Ability Card - Anklet (move slightly faster)
Need Crown:Far top/right of Forest Fortress (grassy map) to Hero’s Grave. Dash North/left to a cave. Bomb all four piles of leaves and a chest appears. Secret treasure #11
Ruined Atoll
Middle bridge near beginning, chest with a bird on it. Blue Mushrooms (Magic bar)
Climb NE hill and activate pillar, then walk around and behind hill to get to brick walkway with a chest Figurine (defense)
Get key behind NE hill to unlock brick house directly south. Chest up wooden ladder has a potion shard.
Frog’s Domain, chest to the right of golden doors Fang (attack)
Frog’s Domain, after getting orb. Grapple up to door with green rug, then back down stairs and ladders to save shrine. Go through left door, turn right down hallway then in room with three frogs standing around a table, grapple to NW hook and enter a hidden room. Secret chest contains potion shard.
Frog’s Domain, same room with three frogs standing around table, chest by table contains Flowers (HP bar)
(Orb not needed but for efficiency best to get both together)
Far south center of map,open gate behind birds, go right, climb wooden ladder to reach chest. Ability Card - Magic Echo (Recovering Tunic Ghost restores some MP)
Behind SW Obelisk on beach level, along pink/gray energy path is a chest with an Effigy
By brick building, defeat Envoy to go behind house to find chest. Ability Card - Tincture (Attack is increased but defense is decreased)
Throw a bomb at the wall behind the rock with a flower on it to reach chest. Ability Card - Bone (doubles invincibility time during dodge rolls)
Need Crown:Travel to the left side by the hook and down to a bit of a brick wall barely poking out of the sand. Dash left to a chest. Secret treasure #10
Library
First room you enter from Ruined Atoll, Big rug below Hero Grave shrine Fairy
<Up, Left, Down, Left, Up, Right, Up, Left, Up, Right, Up, Left, Down, Right, Down, Left, Up, Left, Down, Left, Up, Right, Up, Left, Up, Right, Up, Right, Down, Left, Down, Right, Down, Left, Down, Right> (IGN #9)
In laboratory room above book stack, smash glass cases pages 38/39, pages 40/41, pages 50/51
Chest to the left of obelisk has an Effigy
Quarry/Monastery/Inside The Ziggurat
Drop bridge to travel right, immediate chest Fang (attack)
Keep going along the path until you come to a ladder up some scaffolding (before spiral stairs down), climb the second ladder to reach a chest with Ability Card - Aura’s Gem (parry timing window is slightly increased)
Climb ladder to the right of save shrine in front of Monastery door to access a chest with a coin.
Chest next to hero’s grave in Monastery Ability Card - Scavenger’s Mask [Equip Immediately] (protects from miasma)
Stone tree by stairs to top of Mountain (accessible from Overworld via mountain) Fairy
<Up, Right, Down, Left, Up, Right, Up, Left, Down, Left, Up, Right, Right, Down> (IGN #7)
Go down spiral stairs to Lower Quarry, and go behind ledge by waterfall for a chest with a potion shard.
In the shooting range, break boxes to top right and go around cliff for a chest with a potion shard.
Before dropping bridge to train tracks, travel right from drop bridge across scaffolding to find a chest behind pillar with an Effigy.
Drop bridge to train tracks and immediate chest contains Figurine (defense)
(Last room in Ziggurat but closer to Hidden Vault Teleport square) Room with glowing walkways above miasma, you’ll see a platform with two Autobolts and a chest. Defeat them to get a full potion slot.
Need Crown:Come down mountain to Quarry, climb ladder by save shrine, dash across path to chest with Blue Mushrooms (Magic bar)
Swamp/Cathedral
From gate, go all the way to the right along fence to a chest. Ability Card - Dagger Strap (cast time for magic dagger is reduced)
Through gate, go left to stone wall. There will be a small opening to the right of a statue and the left of a tree. Go left behind wall for a chest with an Effigy.
Continue all the way north along stone wall, go up a slope behind last pillar to access chest with a potion shard.
Through the gate, climb ladder to right, chest is at top. Ability Card - Perfume (recover stamina faster)
Down ramp on right, defeat Giant Fleemer to access chest with coin.
Slightly west from Giant Fleemer, push 4 red skulls into small circle of water in front of gravestone (tilt camera for 4th skull behind cross) Secret treasure #5
Go NE past gate, along cliff to find hidden passage (at the N end of the water) to a chest with a coin.
Go up ramps on far back cliff then turn right to access a chest with a coin.
Back right corner of birdcage room, press A to open wall. Chest has a coin.
An inch to the right of secret door, behind birdcages is a chest with a potion shard.
Need Crown:Part 1 (Can be done anytime) - In ghost form or at night, go back to the room with the ladder (on the right) and press A on back wall. In next room press A on back wall again. In next room use D-pad to open door. Exit via ladder on right.
<Left, Up, Left, Up, Right, Up, Left Up, Right, Down, Right, Right, Up, Right, Down, Left, Right, Down, Left, Down, Left>
Part 2 - After getting your body back, make it day. Use the lower path of the swamp bridge. Return via the ladder (on right) to the back door you opened. The treasure chest is no longer blocked. Secret treasure #2.
Chest in first secret room behind ladder contains an Effigy.
Climb ladder after gate then dash back towards ladder to stone pillars. Dash right then dash to cliff with chest for a coin.
Far Shore
Need Crown:Dash once south towards the start platform. In the middle of this broken path dash left several times to a chest. Secret treasure #12.
Far Shore Map
Glyph Tower
After collecting all 12 secret treasures:Return to back room of old house and go through portal.
<Down, Left, Down, Right, Right, Down, Left, Down, Left, Down, Left, Up, Left, Down, Right, Down, Left, Up, Up, Right, Right, Down, Right, Up, Right, Down, Right, Up, Left, Up, Right, Up, Left, Left, Up, Right, Up, Right, Up, Left, Up, Left, Up, Right, Right, Down, Right, Up, Right, Down, Right, Up, Right, Right, Down, Right, Up, Left, Up, Right, Down, Right, Up, Right, Up, Right, Down, Left, Down, Down, Right, Down, Left, Up, Left, Down, Right, Down, Left, Down, Left, Down, Right, Up, Right, Down, Left, Down, Right, Down, Right, Down, Left, Up, Left, Down, Left, Up, Left, Down>
https://www.ign.com/wikis/tunic/Glyph_Tower_Puzzle
References
Pages
Fairy Locations
Secret Treasure Locations
Ability Card Reference[imgur.com]
Coin Locations[www.neoseeker.com]
Potion Locations[www.gamepur.com]
Interactive Map[mapgenie.io]
Glyph Tower Puzzle
How to Change Your Color and Outfit
Source: https://steamcommunity.com/sharedfiles/filedetails/?id=3146047195
More TUNIC guilds
- All Guilds
- TUNIC 100% PT-BR
- Tunic
- Tunic: Localizacin de las Tumbas del Hroe
- TUNIC | GUA para principiantes
- Unused Items and Unseen Demo Content in Tunic
- [Semi-Spoiler] Trunic Rune System - Reference for reading the ingame text
- Gua de Tunic: Tips, Trucos, Secretos y ms.
- Gun early + coin farm guide
- Additional Translated Stuff for TUNIC