Smithing, Tempering, & Altering Guide Video
The Video Is Better... Seriously
Reverse engineering my guides for Steam is a nightmare! As a result, there's some info missing and those who don't watch the video, or are unfamiliar with smithing might have a hard time following.
If you want more to read instead, here's the resources that helped me:
Mana Forge via Epithumia - https://forge.grendel.fr/
Tempering For Dummies via MMajarra - https://gamefaqs.gamespot.com/ps/256525-legend-of-mana/faqs/10806
Translated Ultimania Guide Site - http://www.oocities.org/xo_pitseleh/index.html
Fan Site - https://legendofmana.info/encyclopedias/recipes/
Legend of Mana Subreddit - https://www.reddit.com/r/LegendOfMana/
LoM Kitchen Subreddit - https://www.reddit.com/r/legendofmanakitchen/
The Blacksmith

The very first thing you'll need when you're getting into blacksmithing is the smithy itself. This is added to your workshops after you complete 'Watts Drops The Hammer' the second event that you get from watts from the Ulkan Mines location. Perform 'Watts Drops The Hammer', go back home and into your workshops, take part in Watts' lackluster tutorial and then you'll have the smithy ready and available to use!
Primary & Secondary Materials

Next we go over the differences of primary and secondary materials when it comes to smithing. The encyclopedias do tell you about these a little bit but we might as well mention them here too because you will see them in your inventory labeled as primary or secondary!
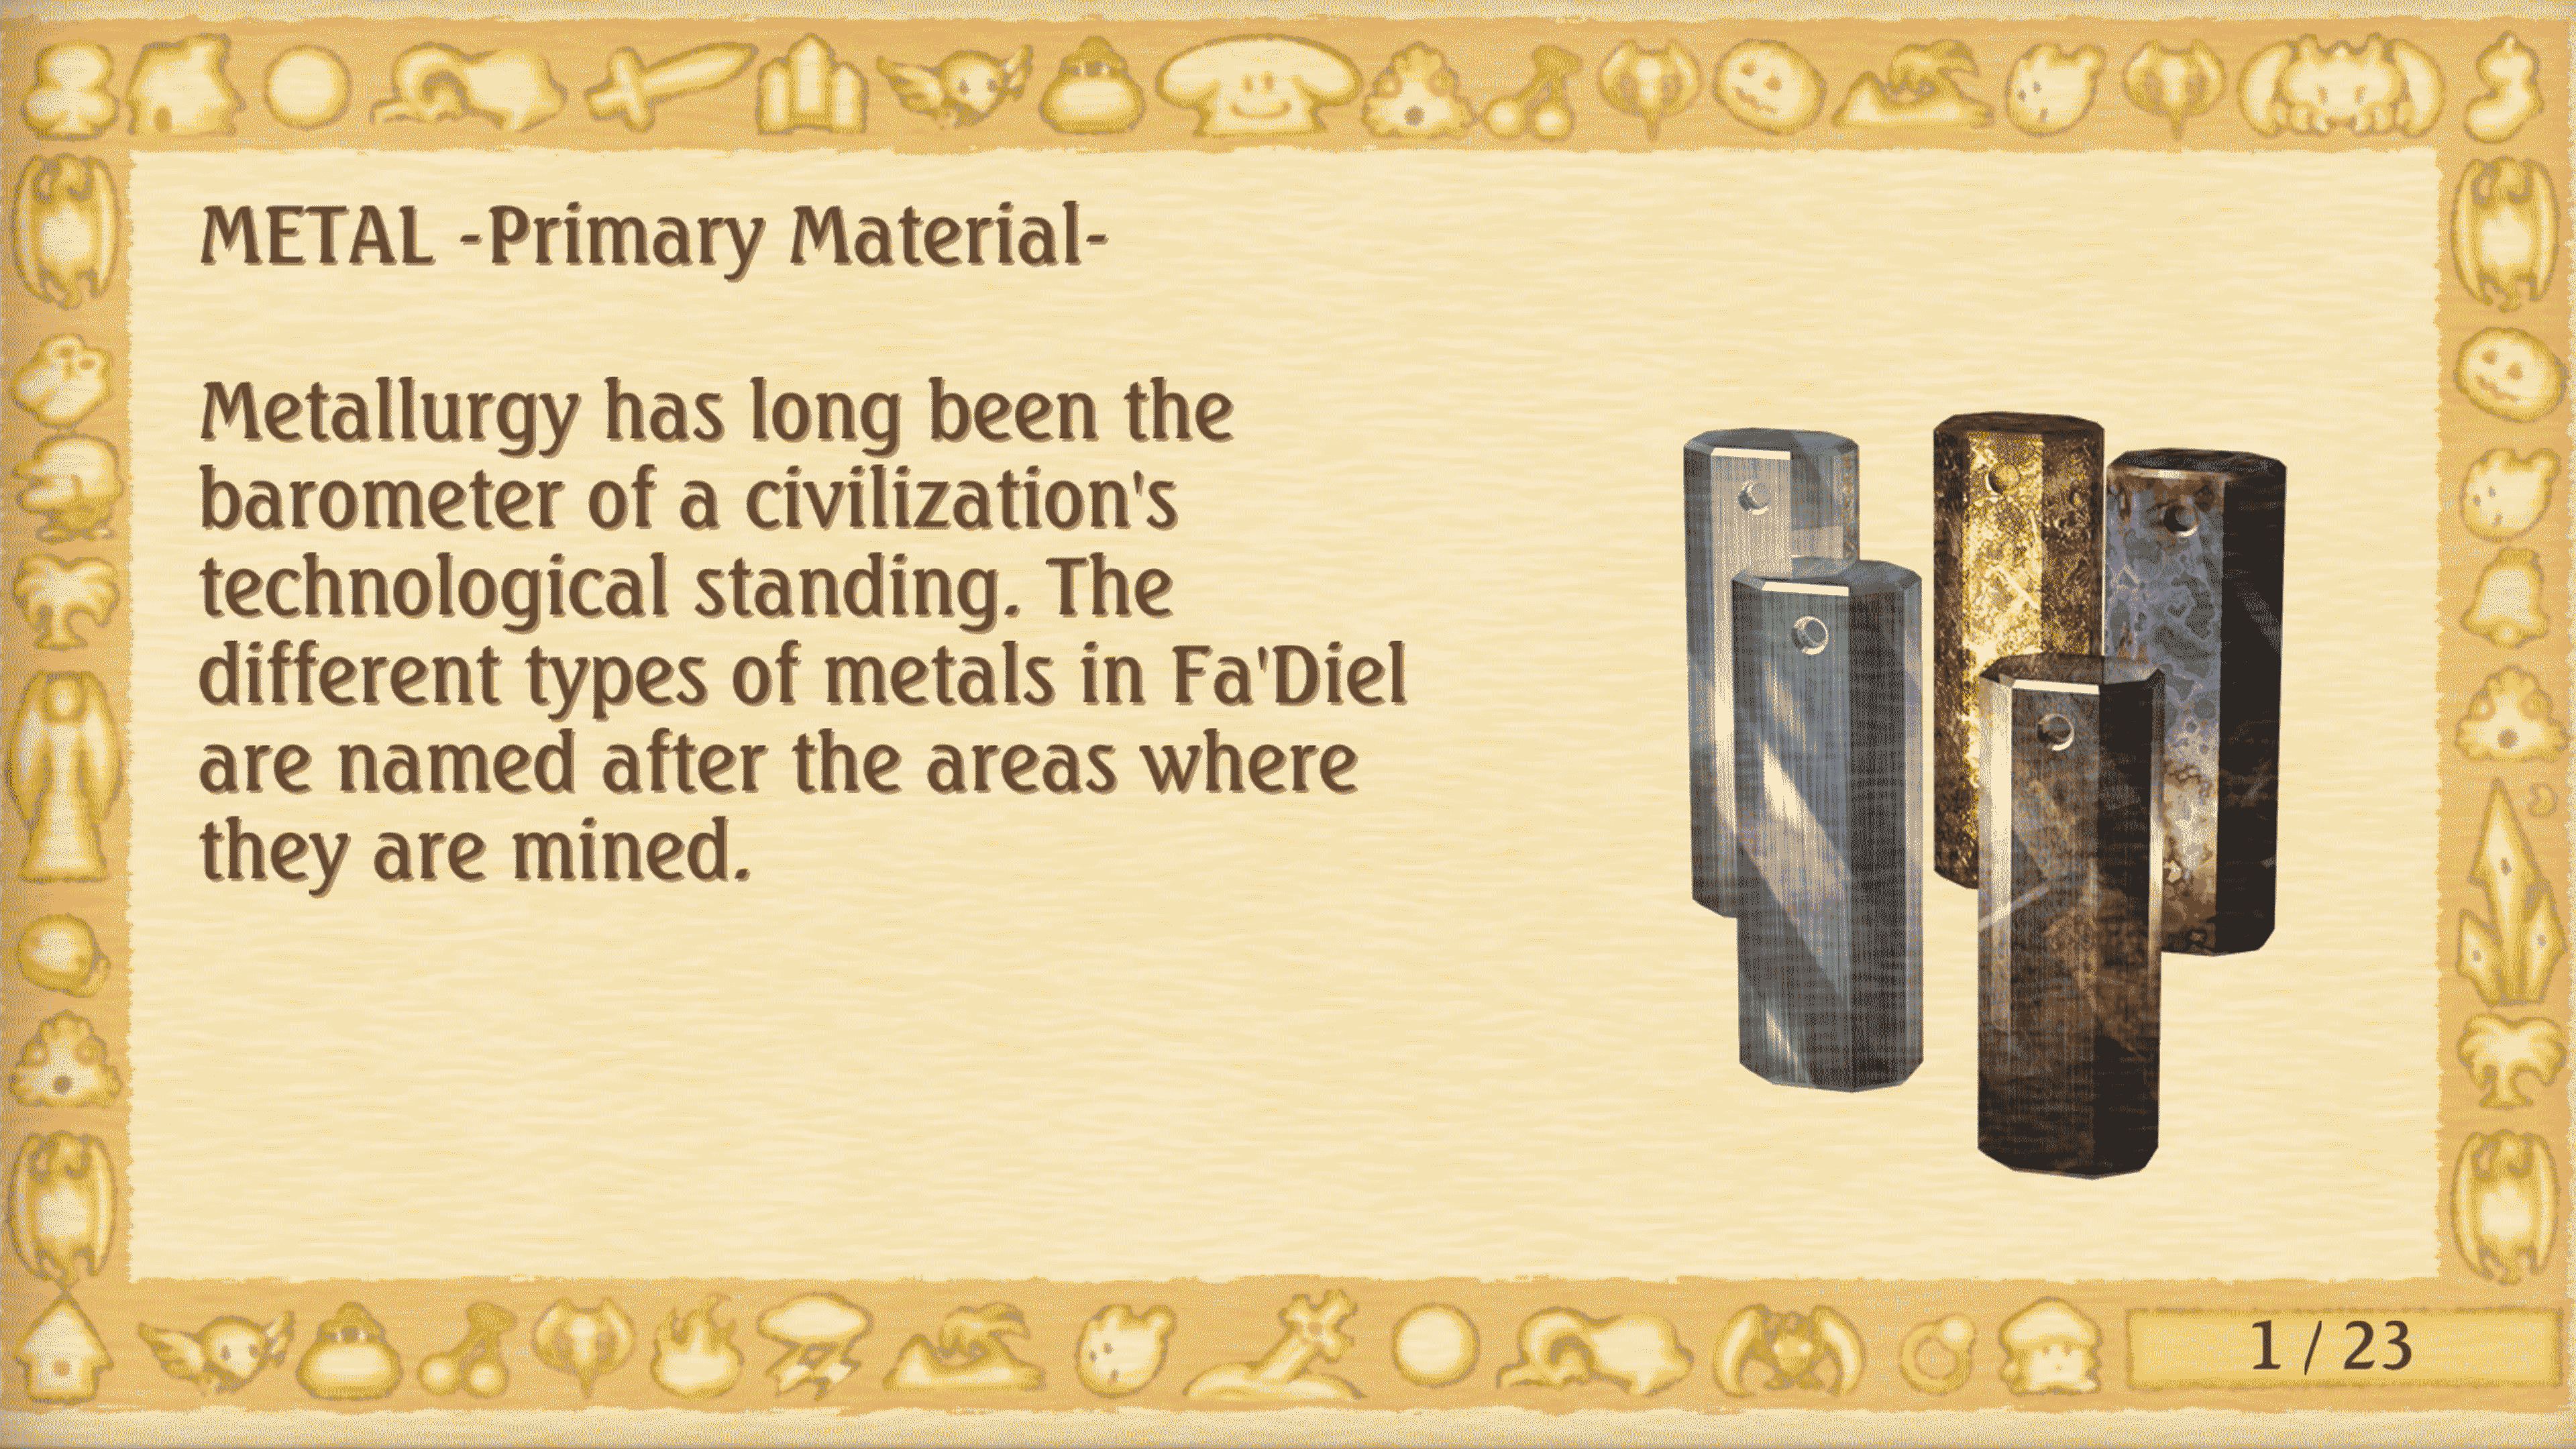
Primary materials such as wood, stone, metal, aerolites, etc... these are the things that the base item is made from and determine base stats. They also have their own resistances to certain elements, some higher than others.
All of the secondary materials like claws, feathers, crystals, and even produce and produce seeds can be used to alter or temper this equipment and can adjust that piece of gear's statistics in some way.
So, Primary for creating, secondary for modifying.
Polter Boxes

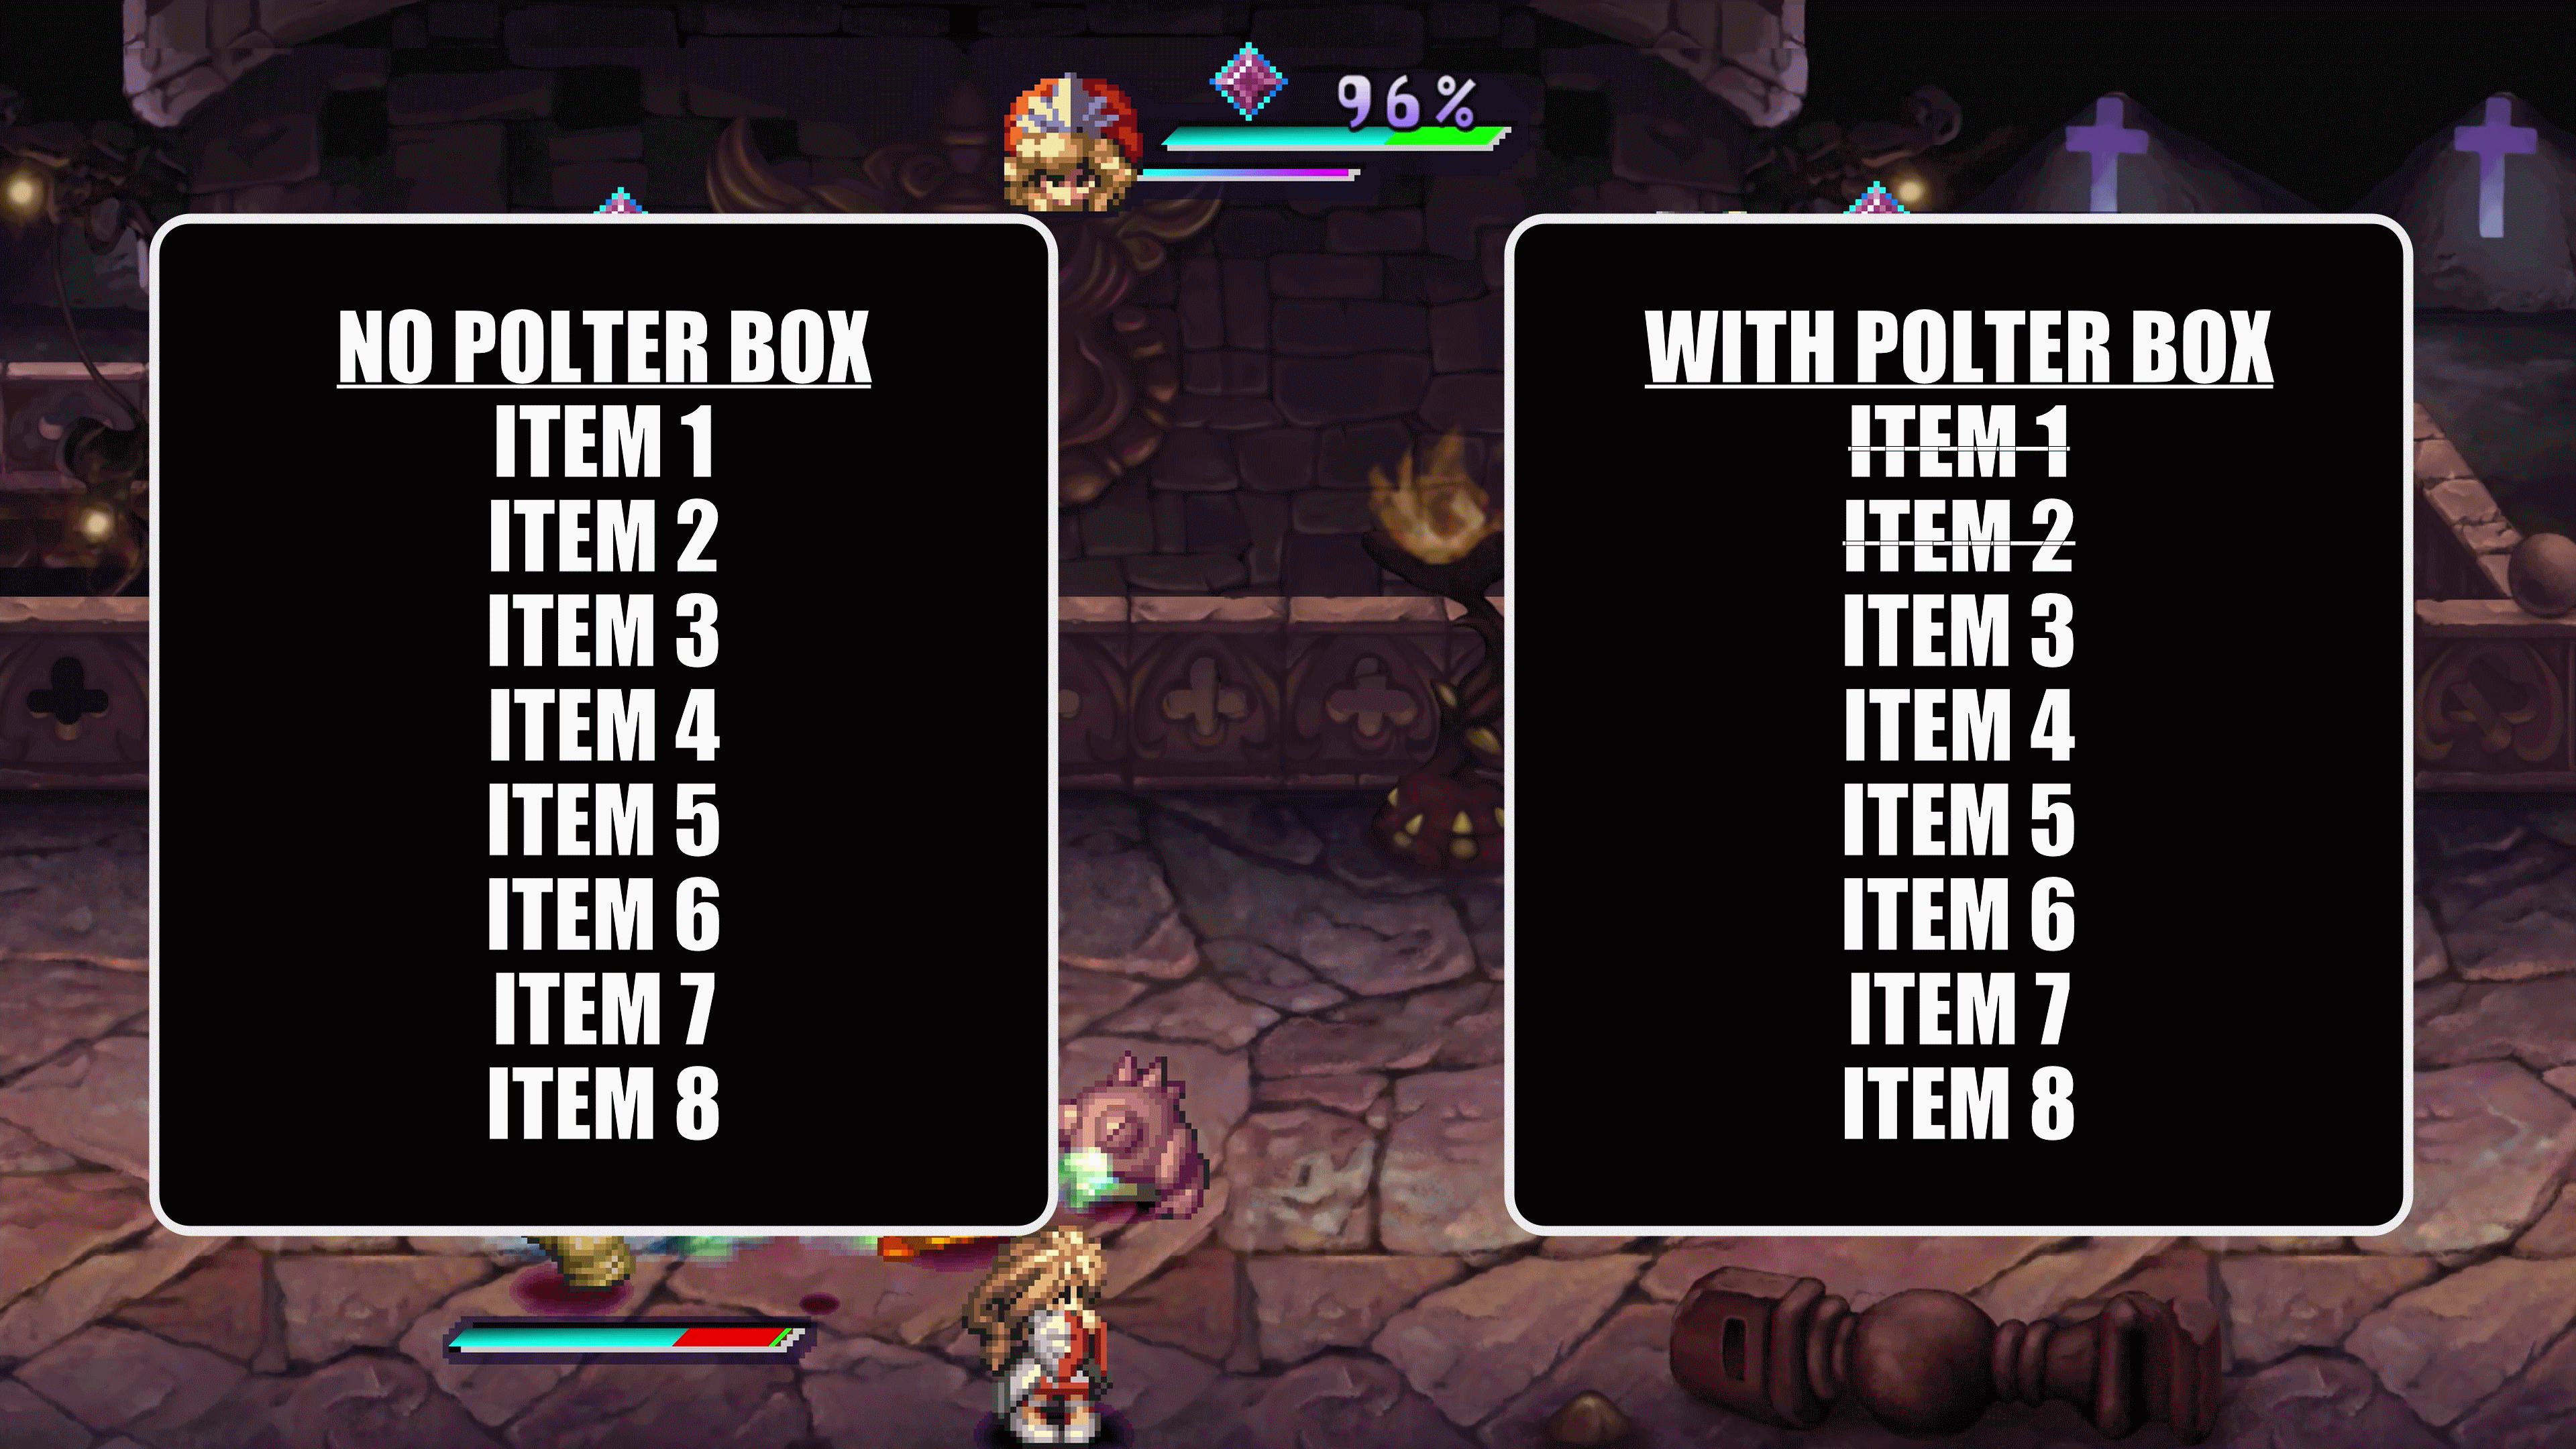
Polter Boxes are the best pet for farming items, and come from Magicali Eggs (Formerly Poltergeist Eggs) found in either the Junkyard, or Tower of Leires.
Unfortunately this pet overshadows the useful synchro effect of every other pet because of what it does in relation to the game’s loot. The Polter Box pet has the rare item synchro effect. When synched up with the player, the Polter Box skips the first two items in enemy loot pools, usually being experience and lucre.
Polter boxes also reduce the level requirements for loot tables in the process, accessing all of the enemy’s loot if they’re level 32 or higher. Without a polter box, you’d need enemies to be level 63 and up for a chance at their rarest items. Pet raising is a whole different thing, and feeding that occurs after every level can help guarantee that your polter box will survive high level encounters. Suggesting your polter-box’s diet isn’t what this guide is about, so all I’ll recommend on that front is squalphins to give it the friendly and lonely personalities. A pet who has these personalities will be more likely to stay next to the player instead of wandering off. Remember too that if you’re feeding a pet for personalities, it takes hold immediately after you place items in the feedbox, so you can check while it’s grazing, and reload if no personalities appear.
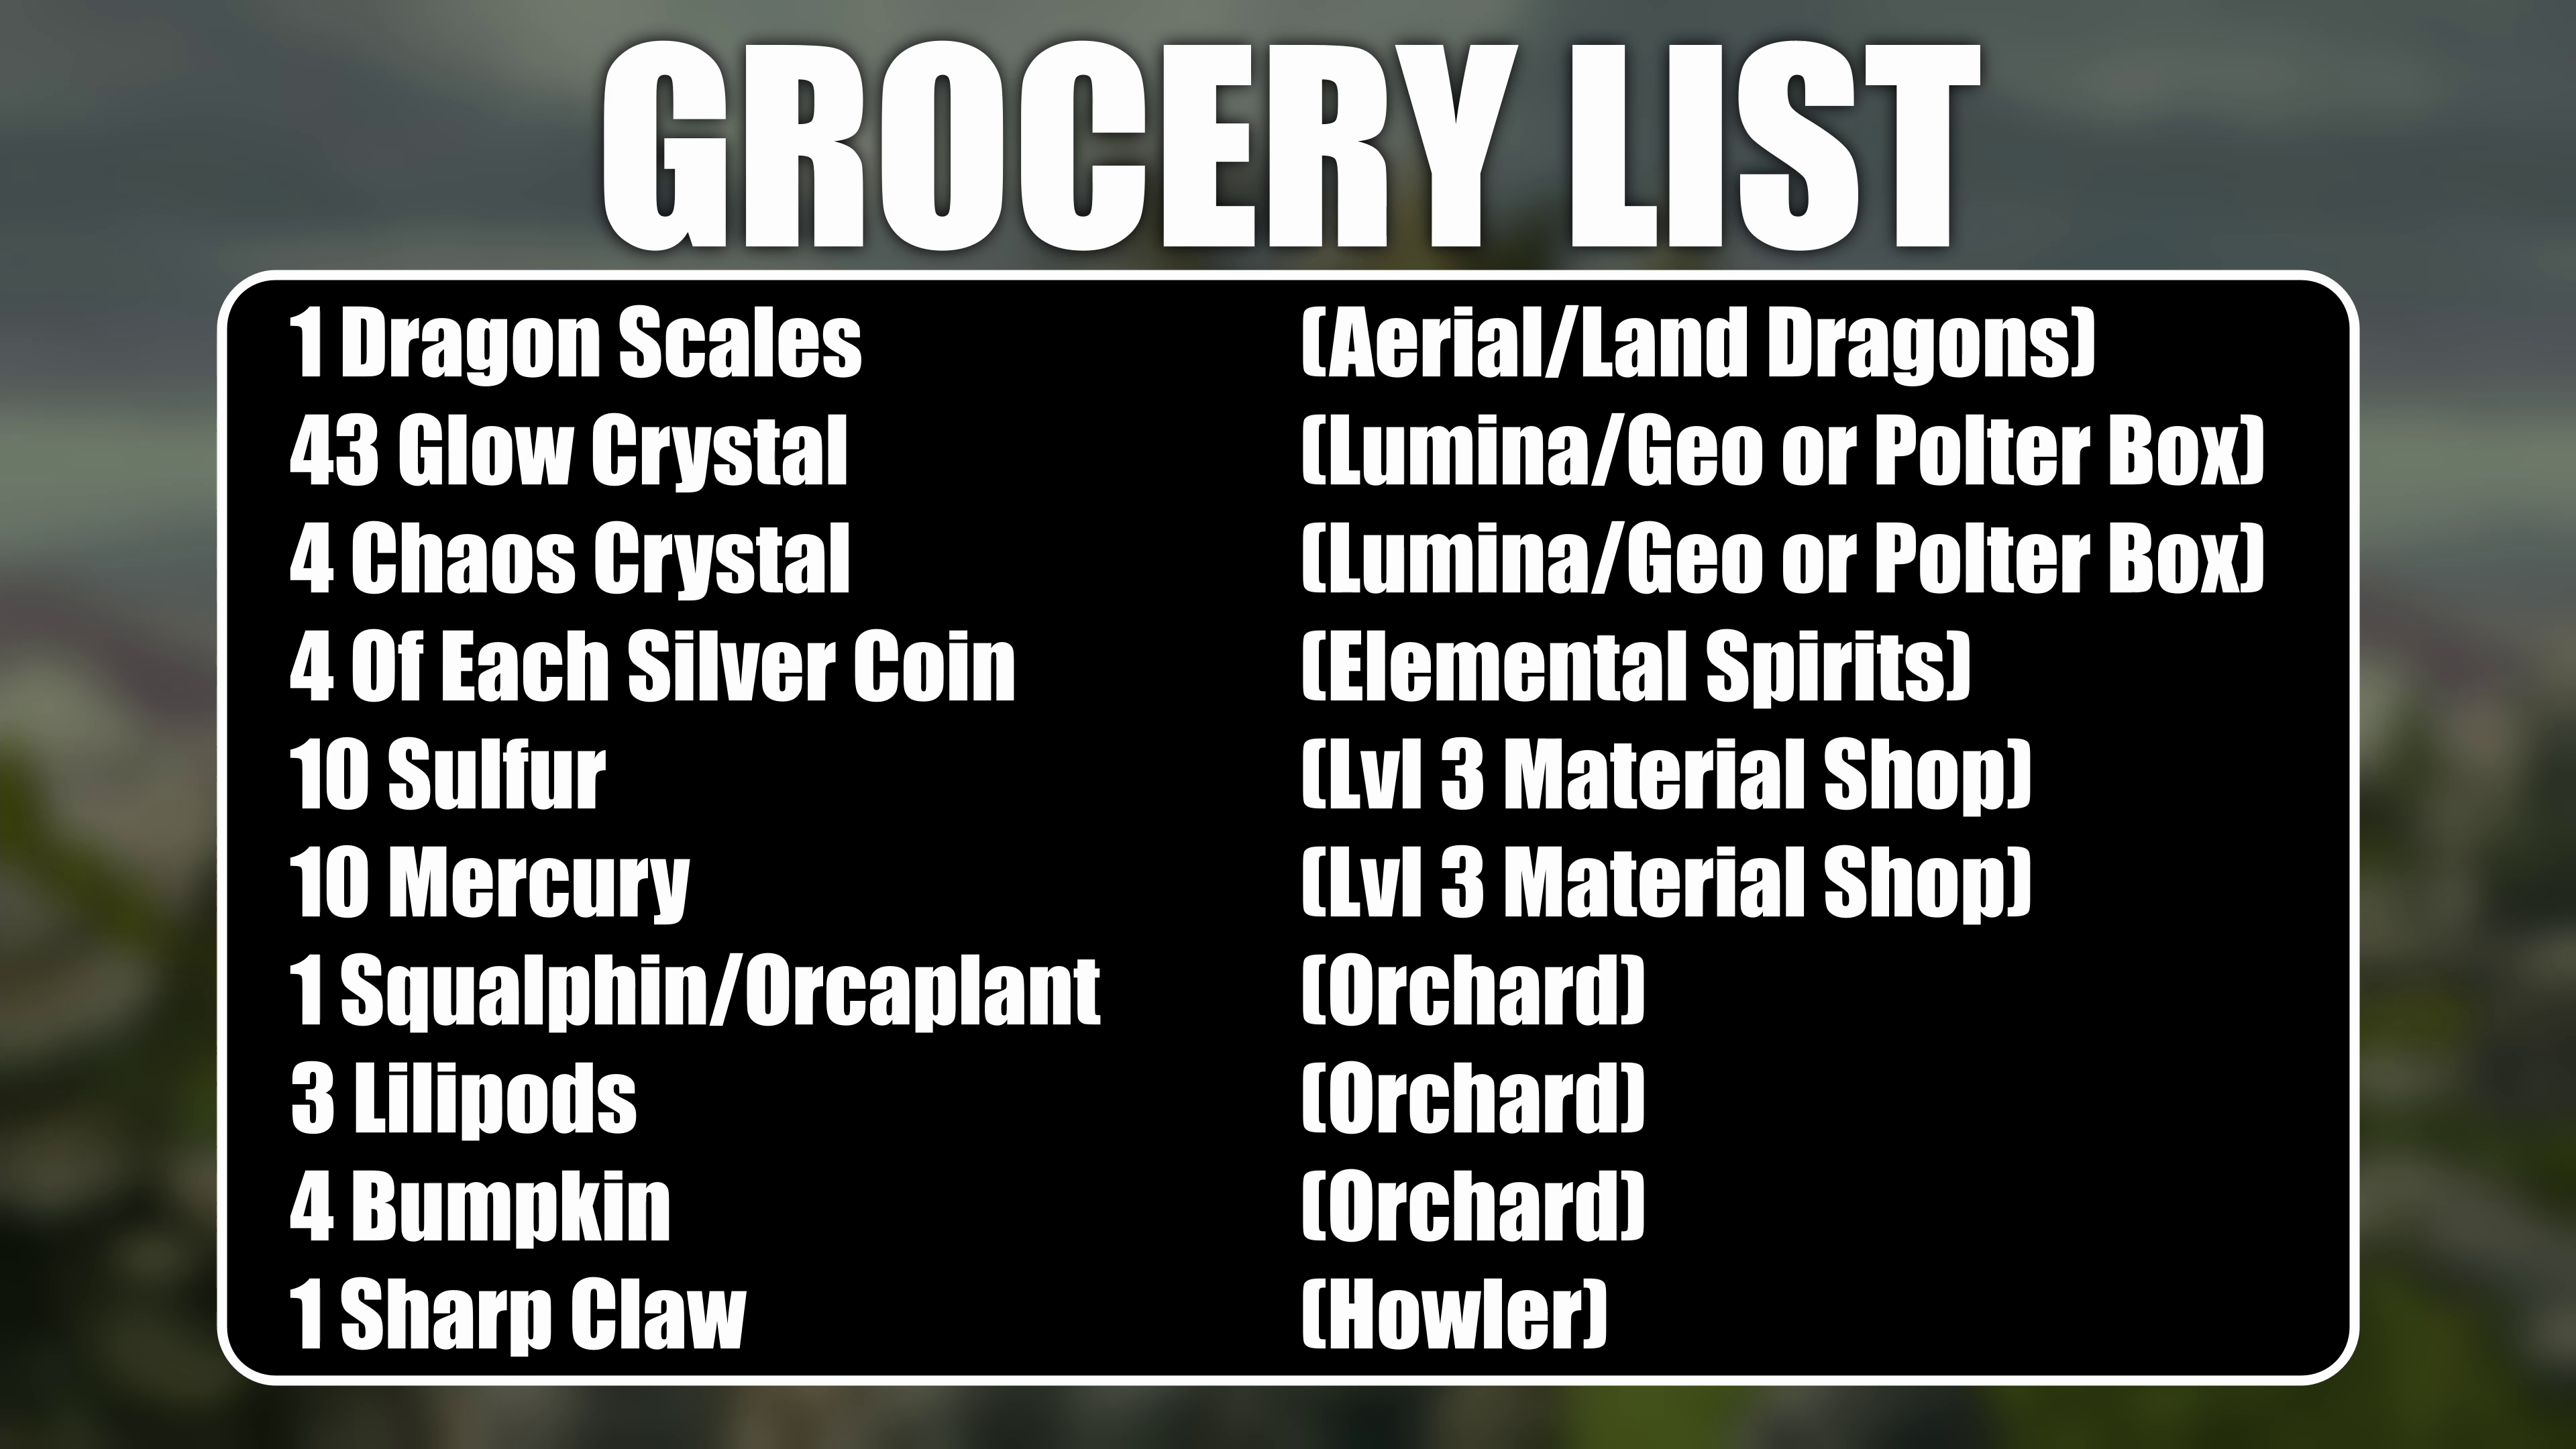
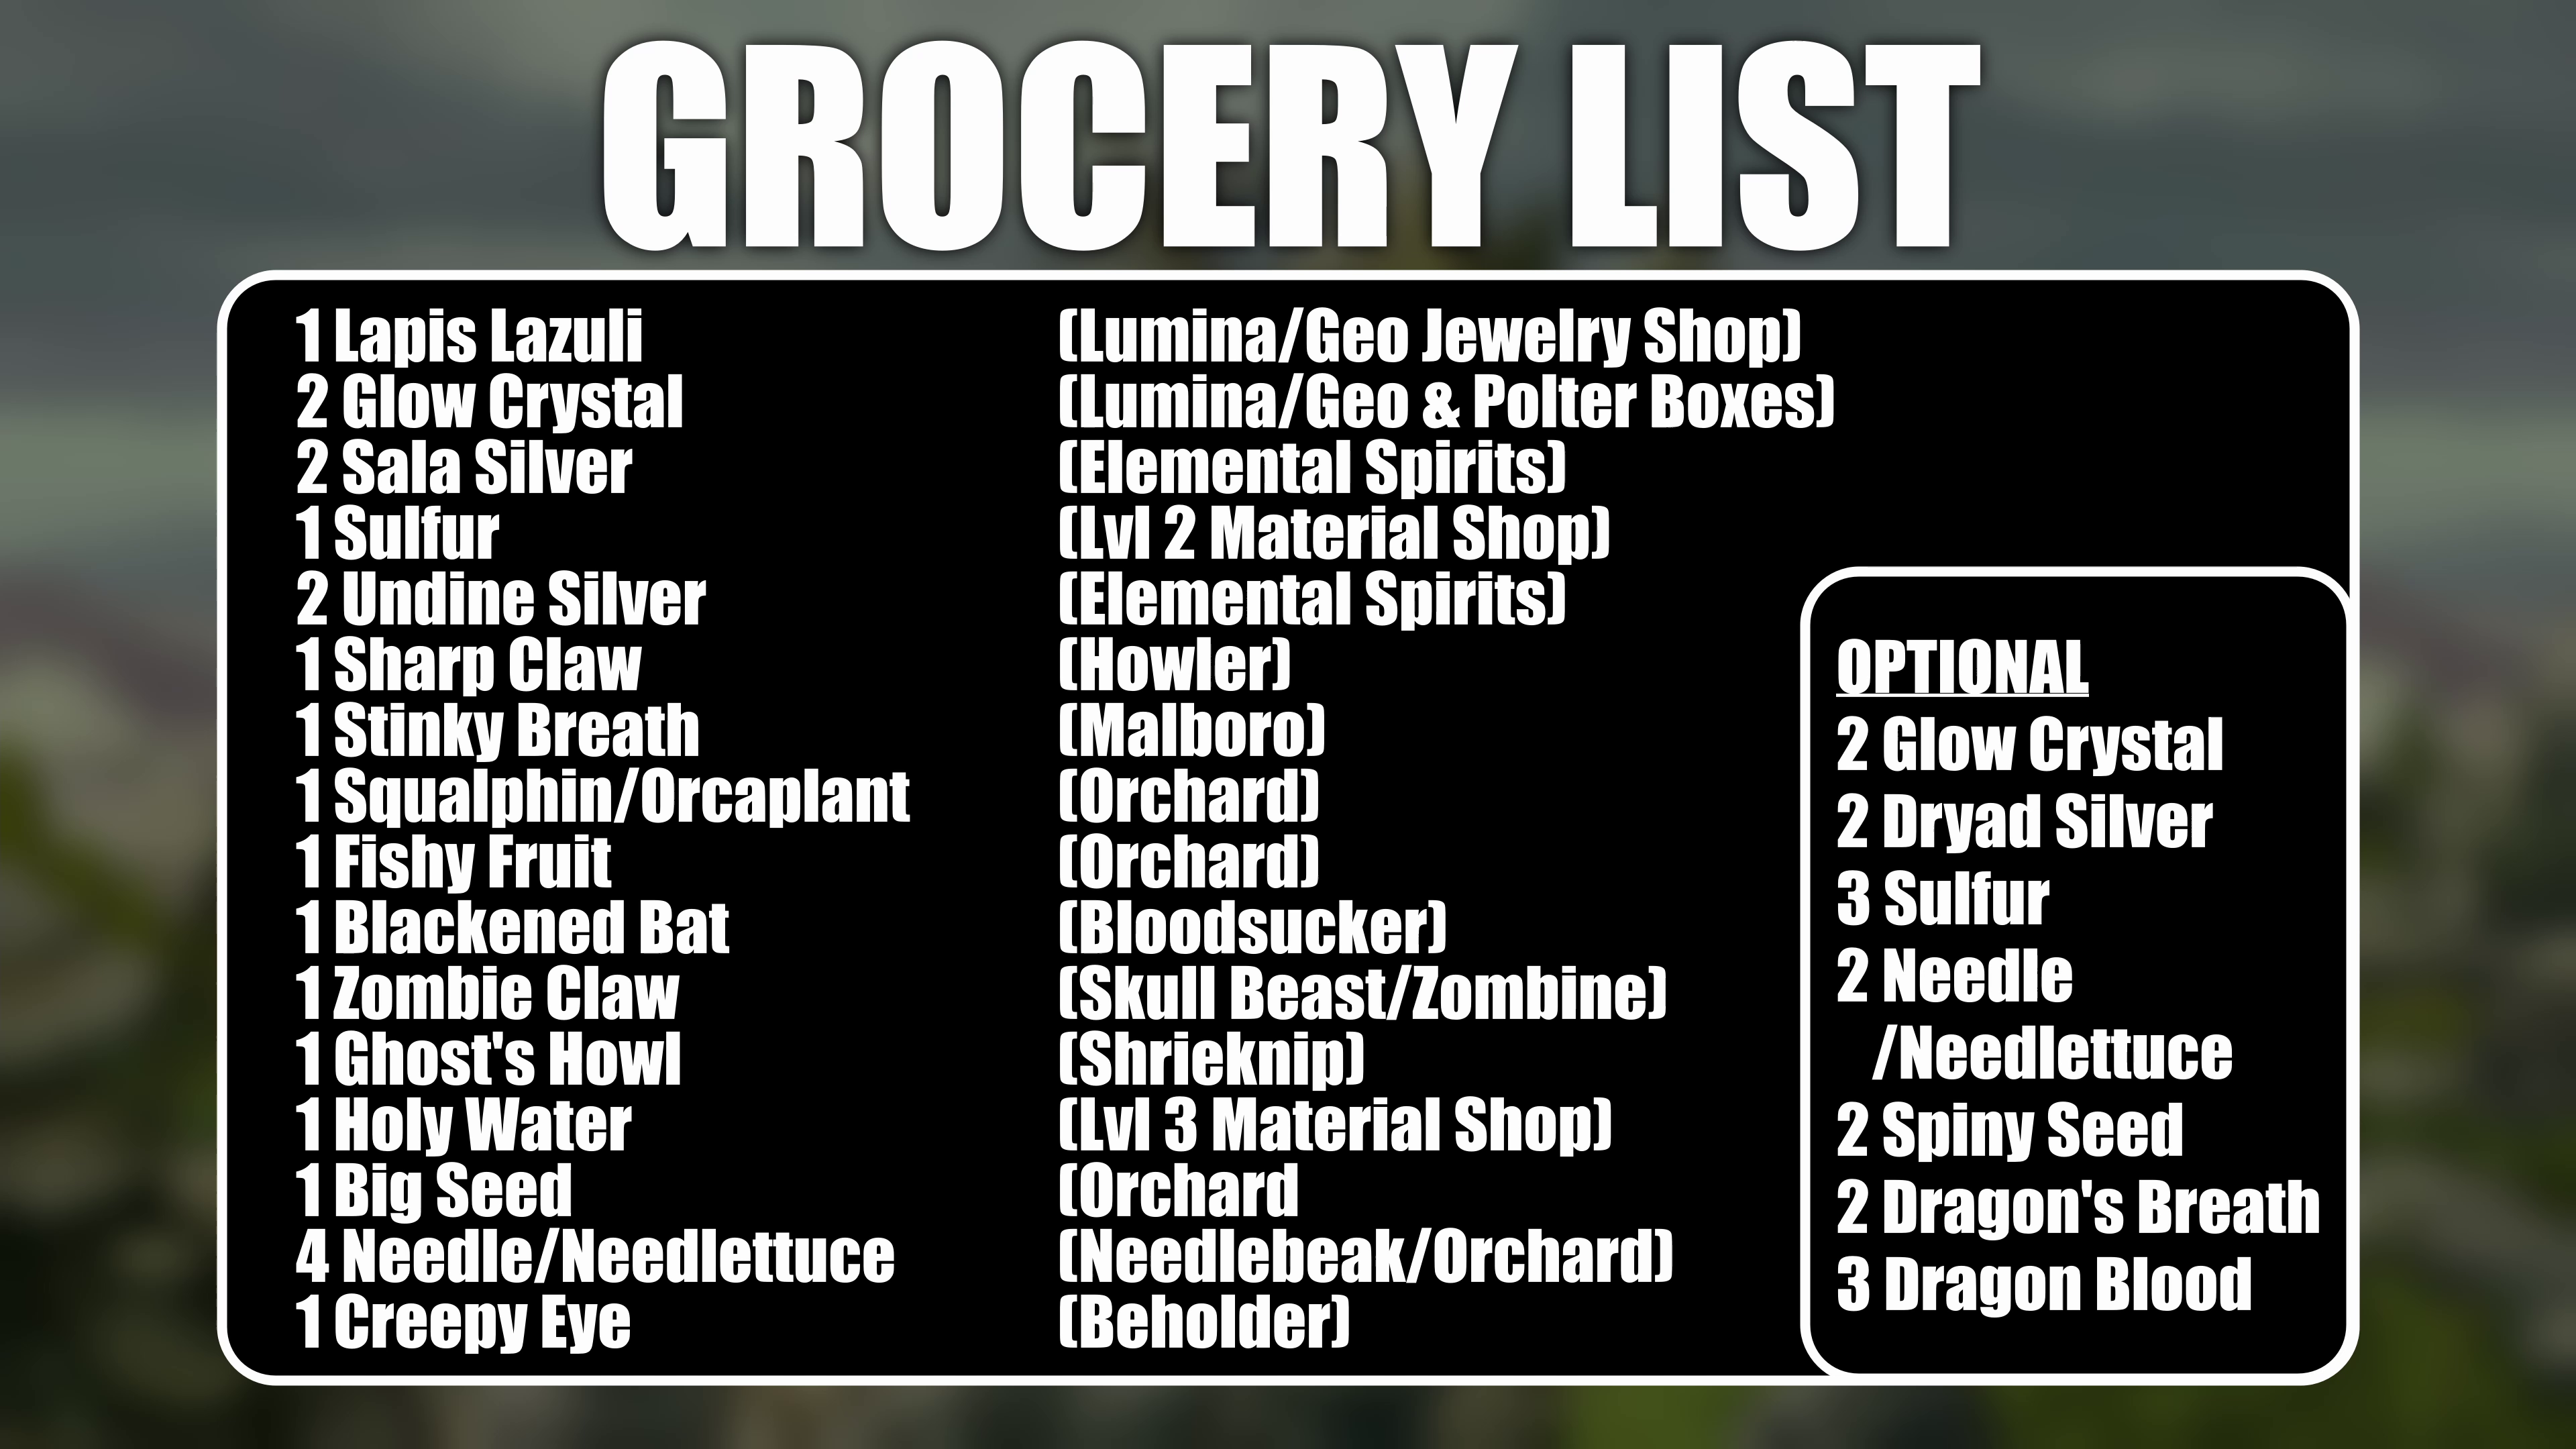
Beginner Recipes #1-3 Grocery List
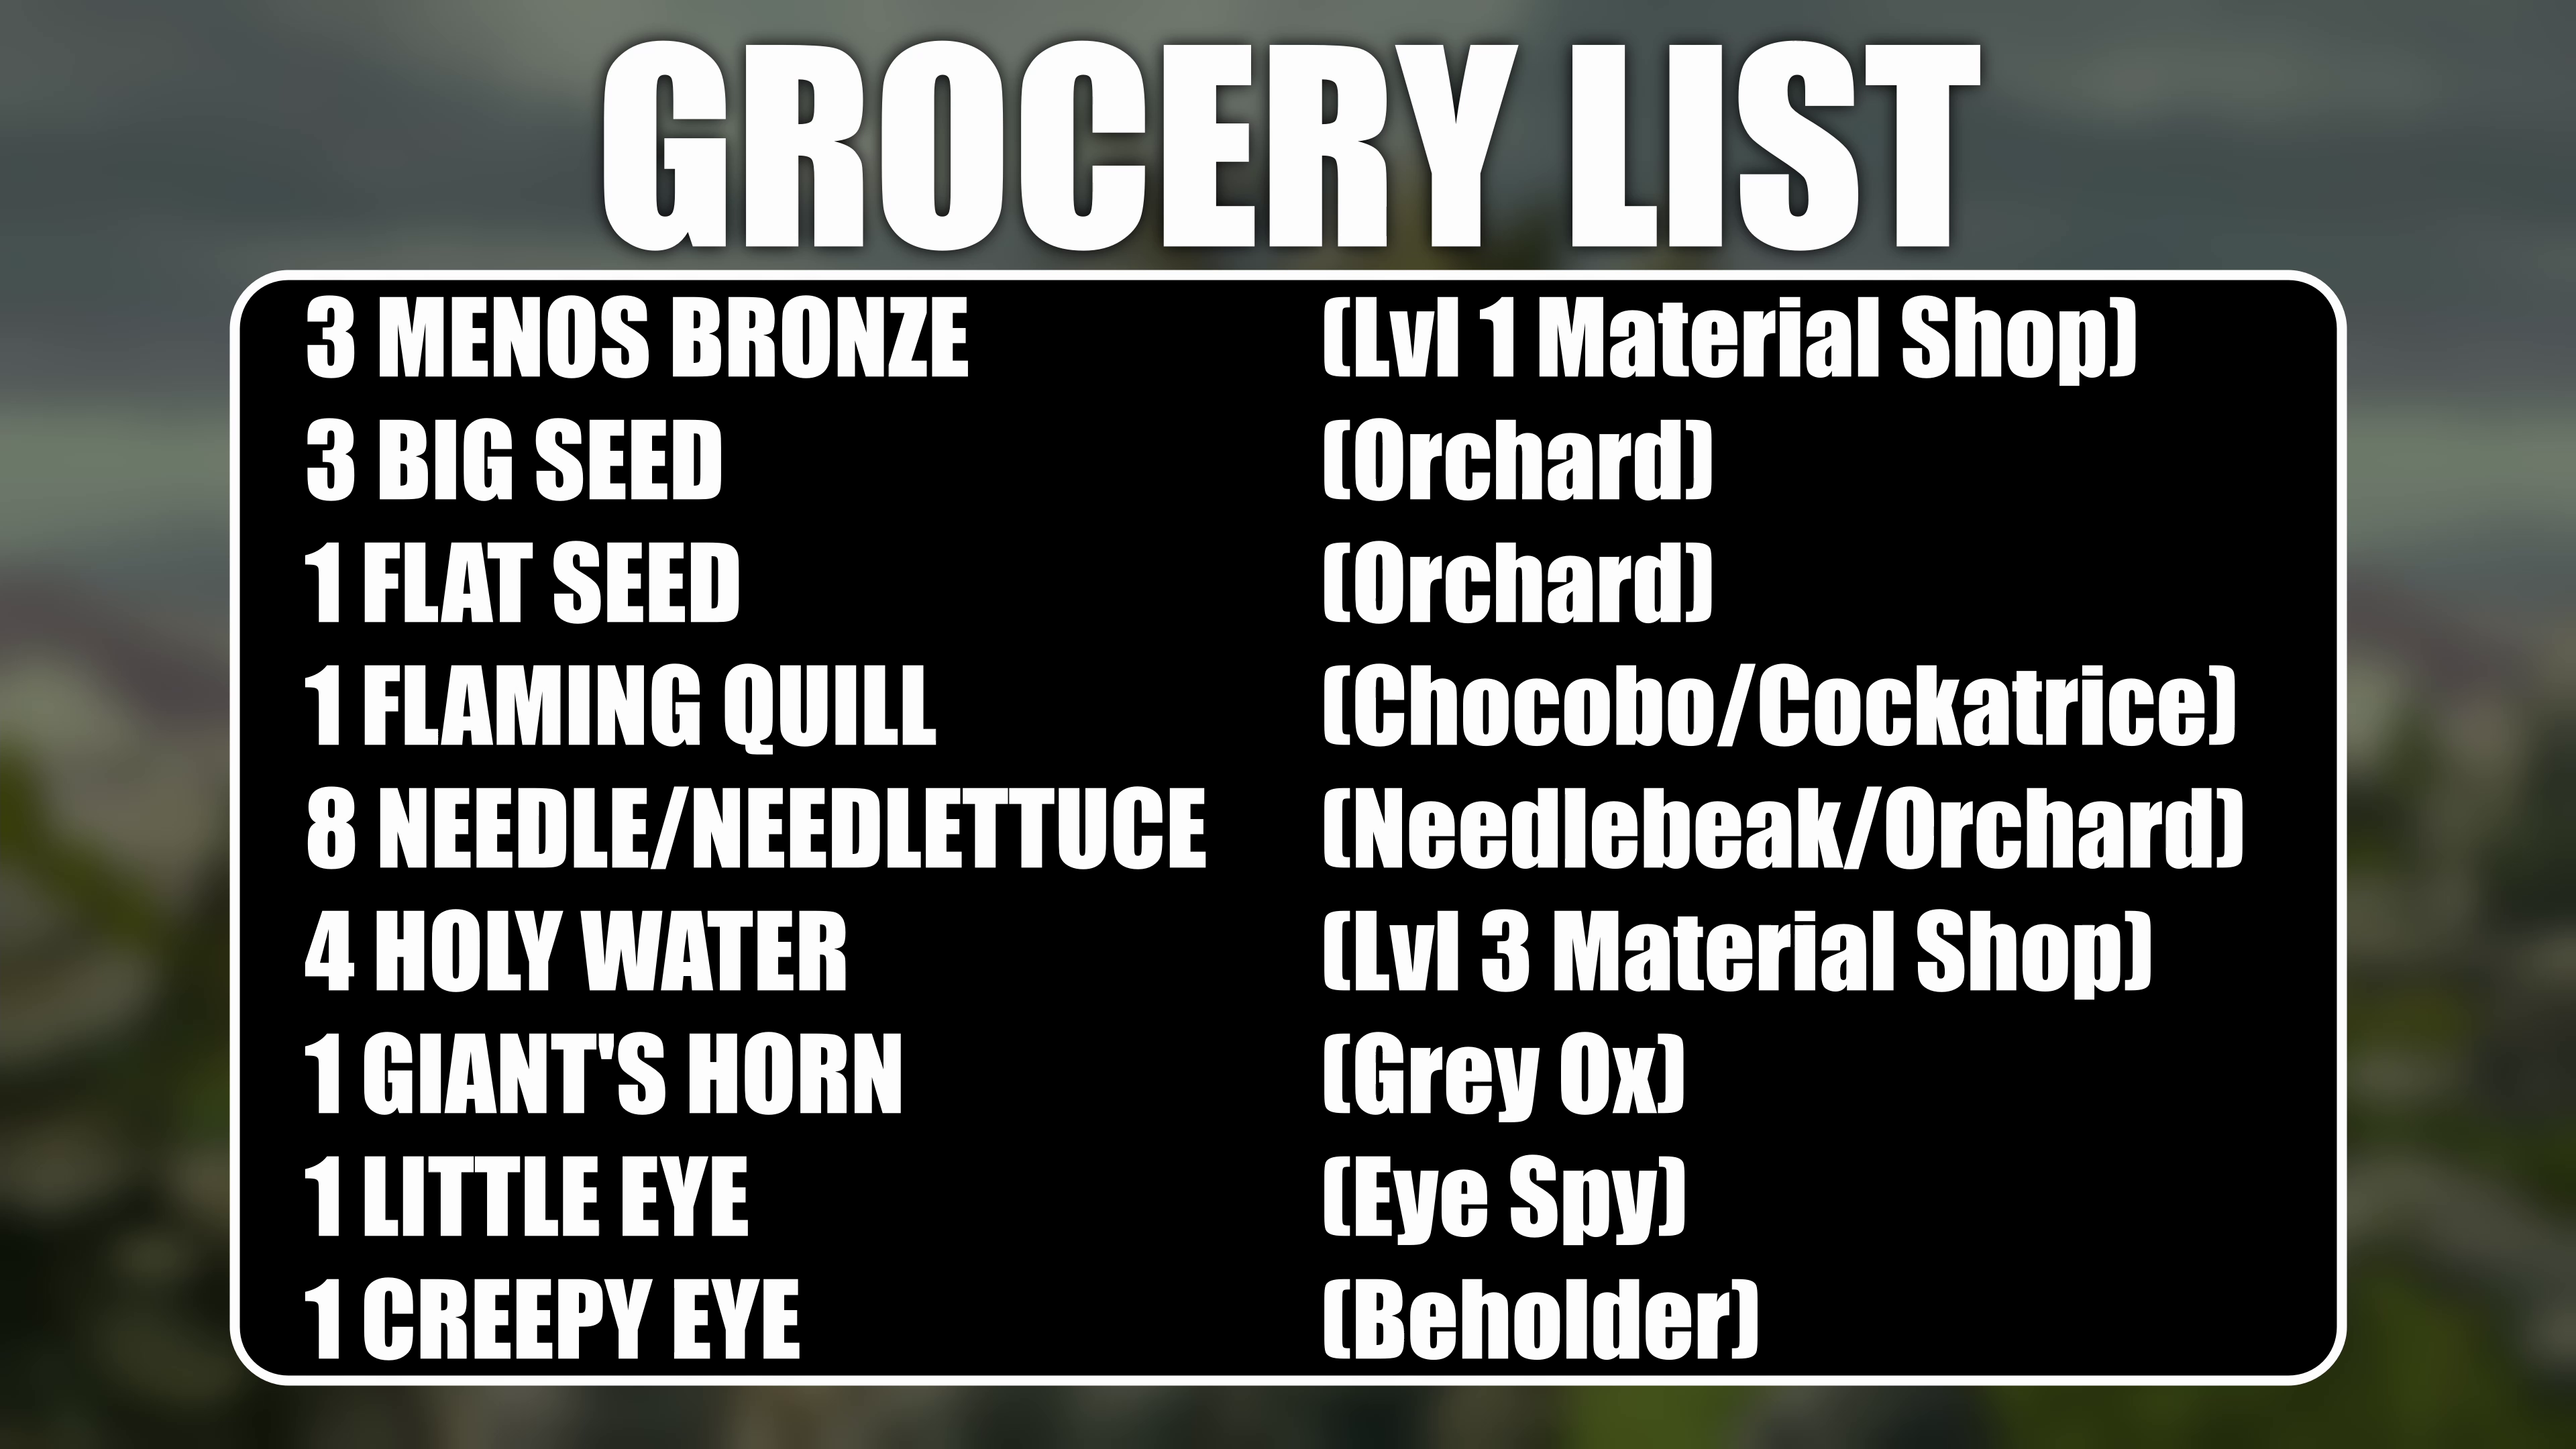
Here's the grocery list of items that you will need for the three things we're going to craft. A lot of these items are common and you should find most of them just by playing.
If you have better primary metals to do this with i recommend you do so. Like i said previously each primary material has its own resistances to elements so if these recipes aren't working it might be the material you're working with, and I'm choosing menos bronze for this because it's resistances are some of the lowest making it more malleable.
Beginner Recipe #1 - Menos Axe
Menos Bronze Axe (SIMPLIFIED) (10 Attack Power) 1 Big Seed (1 Dryad Essence) 1 Flat Seed (3 Dryad Essence) (11 Attack Power) 1 Flaming Quill (4 Dryad Essence) (12 Attack Power) 4 Holy Water (17 Attack Power) 1 Giant’s Horn (22 Attack Power)
The final two steps are referred to as 'varnishing' which means this is the capper to maximize stats with 3 mystic cards and an item effect. Varnishing effects will be removed if any further tempering is done.
Beginner Recipe #2 - Menos Armor
Menos Bronze Armor (SIMPLIFIED) [ 4, 4, 4, 0 ] 1 Big Seed 4 Needle/Needlettuce [ 13, 13, 13, 2 ] 1 Little Eye [ 13, 16, 13, 2 ]
Beginner Recipe #3 - Menos Ring
Menos Bronze Ring (SIMPLIFIED) [ 0, 0, 0, 2 ] 1 Big Seed 4 Needle/Needlettuce [ 0, 0, 0, 8 ] 1 Creepy Eye [ 0, 0, 0, 10 ]
Energy, Essence, & Mystic Cards
Assuming that you've created at least one of the beginner recipes yourself...
Tempering/Altering in LoM comes with understanding 3 things:
Energy: Granted by pretty much any secondary item, and required for raising weapon power. Some secondary items create tons of energy over others, which we'll go over in a bit.
Essence: Elemental Essence levels, shown in the second info screen on gear. This directly affects weapon attack power, but not armor values. Essence requires Energy to increase.
Mystic Cards: These take up the 3 (Actually 4) mystic powers slots in your gear when introduced with a secondary item. Elemental spirits each have their own card, but there's a whole heck of a lot more with powerful effects.
Essence Raising
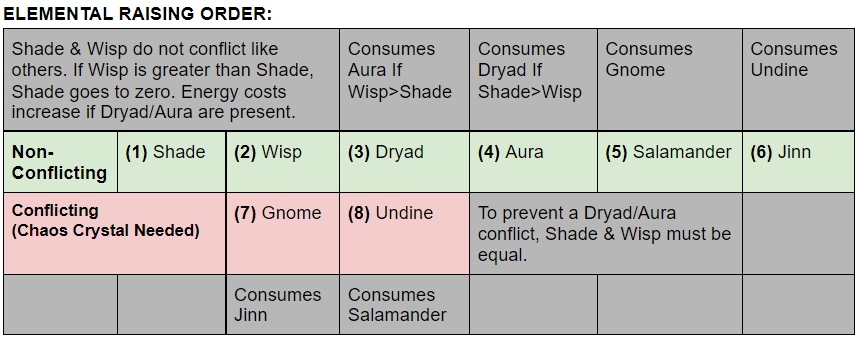
Raising Elemental Essences increases attack power in weapons, but not defenses in armor. Essences are also responsible for allowing or preventing certain mystic cards from appearing, as most have their own requirements. For example, the Bed of Thorns that we used in the beginner recipes requires a dryad above 0, which is why we used seeds to raise it.
Below is the order that I use to raise essences in gear. The Green section can be raised in that order, while the red section will require chaos crystals to increase without consumptions.
This is from my notes (which you're welcome to look at): https://docs.google.com/document/d/1IpVvtehb05lFO6E8K5gL8YwZEys7SoABZqfpiRUqmkA/edit?usp=sharing
Glow/Chaos Crystals
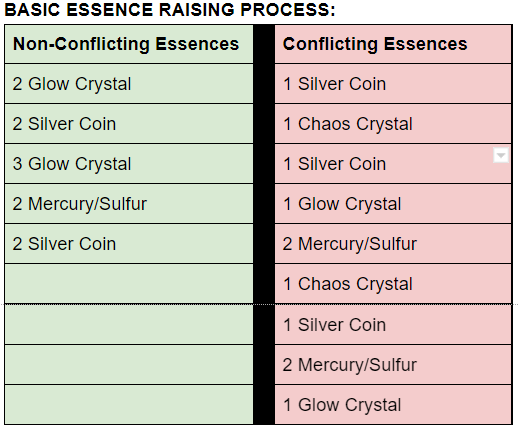
While Elemental Spirit Coins can raise essence levels on their own, energy becomes more important as you go for higher essence levels. Glow Crystals in particular, are what will help most in this process. When a Glow Crystal is tempered into a piece of equipment, the card it produces will be the Dawn Nymph. The energy gain isn’t immediate but instead when the Dawn Nymph leaves the item. This is why you’ll see many recipes put a stack of Glow Crystals in so the elemental coins can push them out. So following up glow crystals with elemental coins will increase that essence level by a sizable chunk thanks to the energy provided by Glow Crystals. Since the idea here is to raise all essence levels in weapons especially, there will be conflicts between them eventually, and that’s where the Chaos Crystals come in. Tempering in a Chaos Crystal will bring in the Ancient Moon mystic card and will put a stop to any essence conflicts as long as it’s active. There are two ways to obtain Glow and Chaos crystals, first would be from jewelry shops in Lumina and/or Geo at a cost of 2000 lucre each. The second way to get Glow Crystals would be from enemy Polter Boxes (The ones that look like mimics), which can be found in groups of 2 on the SS Buccaneer. You’ll need to ensure that enemy polter boxes are level 32 or higher to get the Polter Boxes to drop the Crystals you need. You’ll also have a much better time with item farming in general if you have a polter box pet of your own, because their synchro effect cancels out the first 2 items in enemy loot pools, increasing drop rate of the items you want.
Mercury & Sulfur
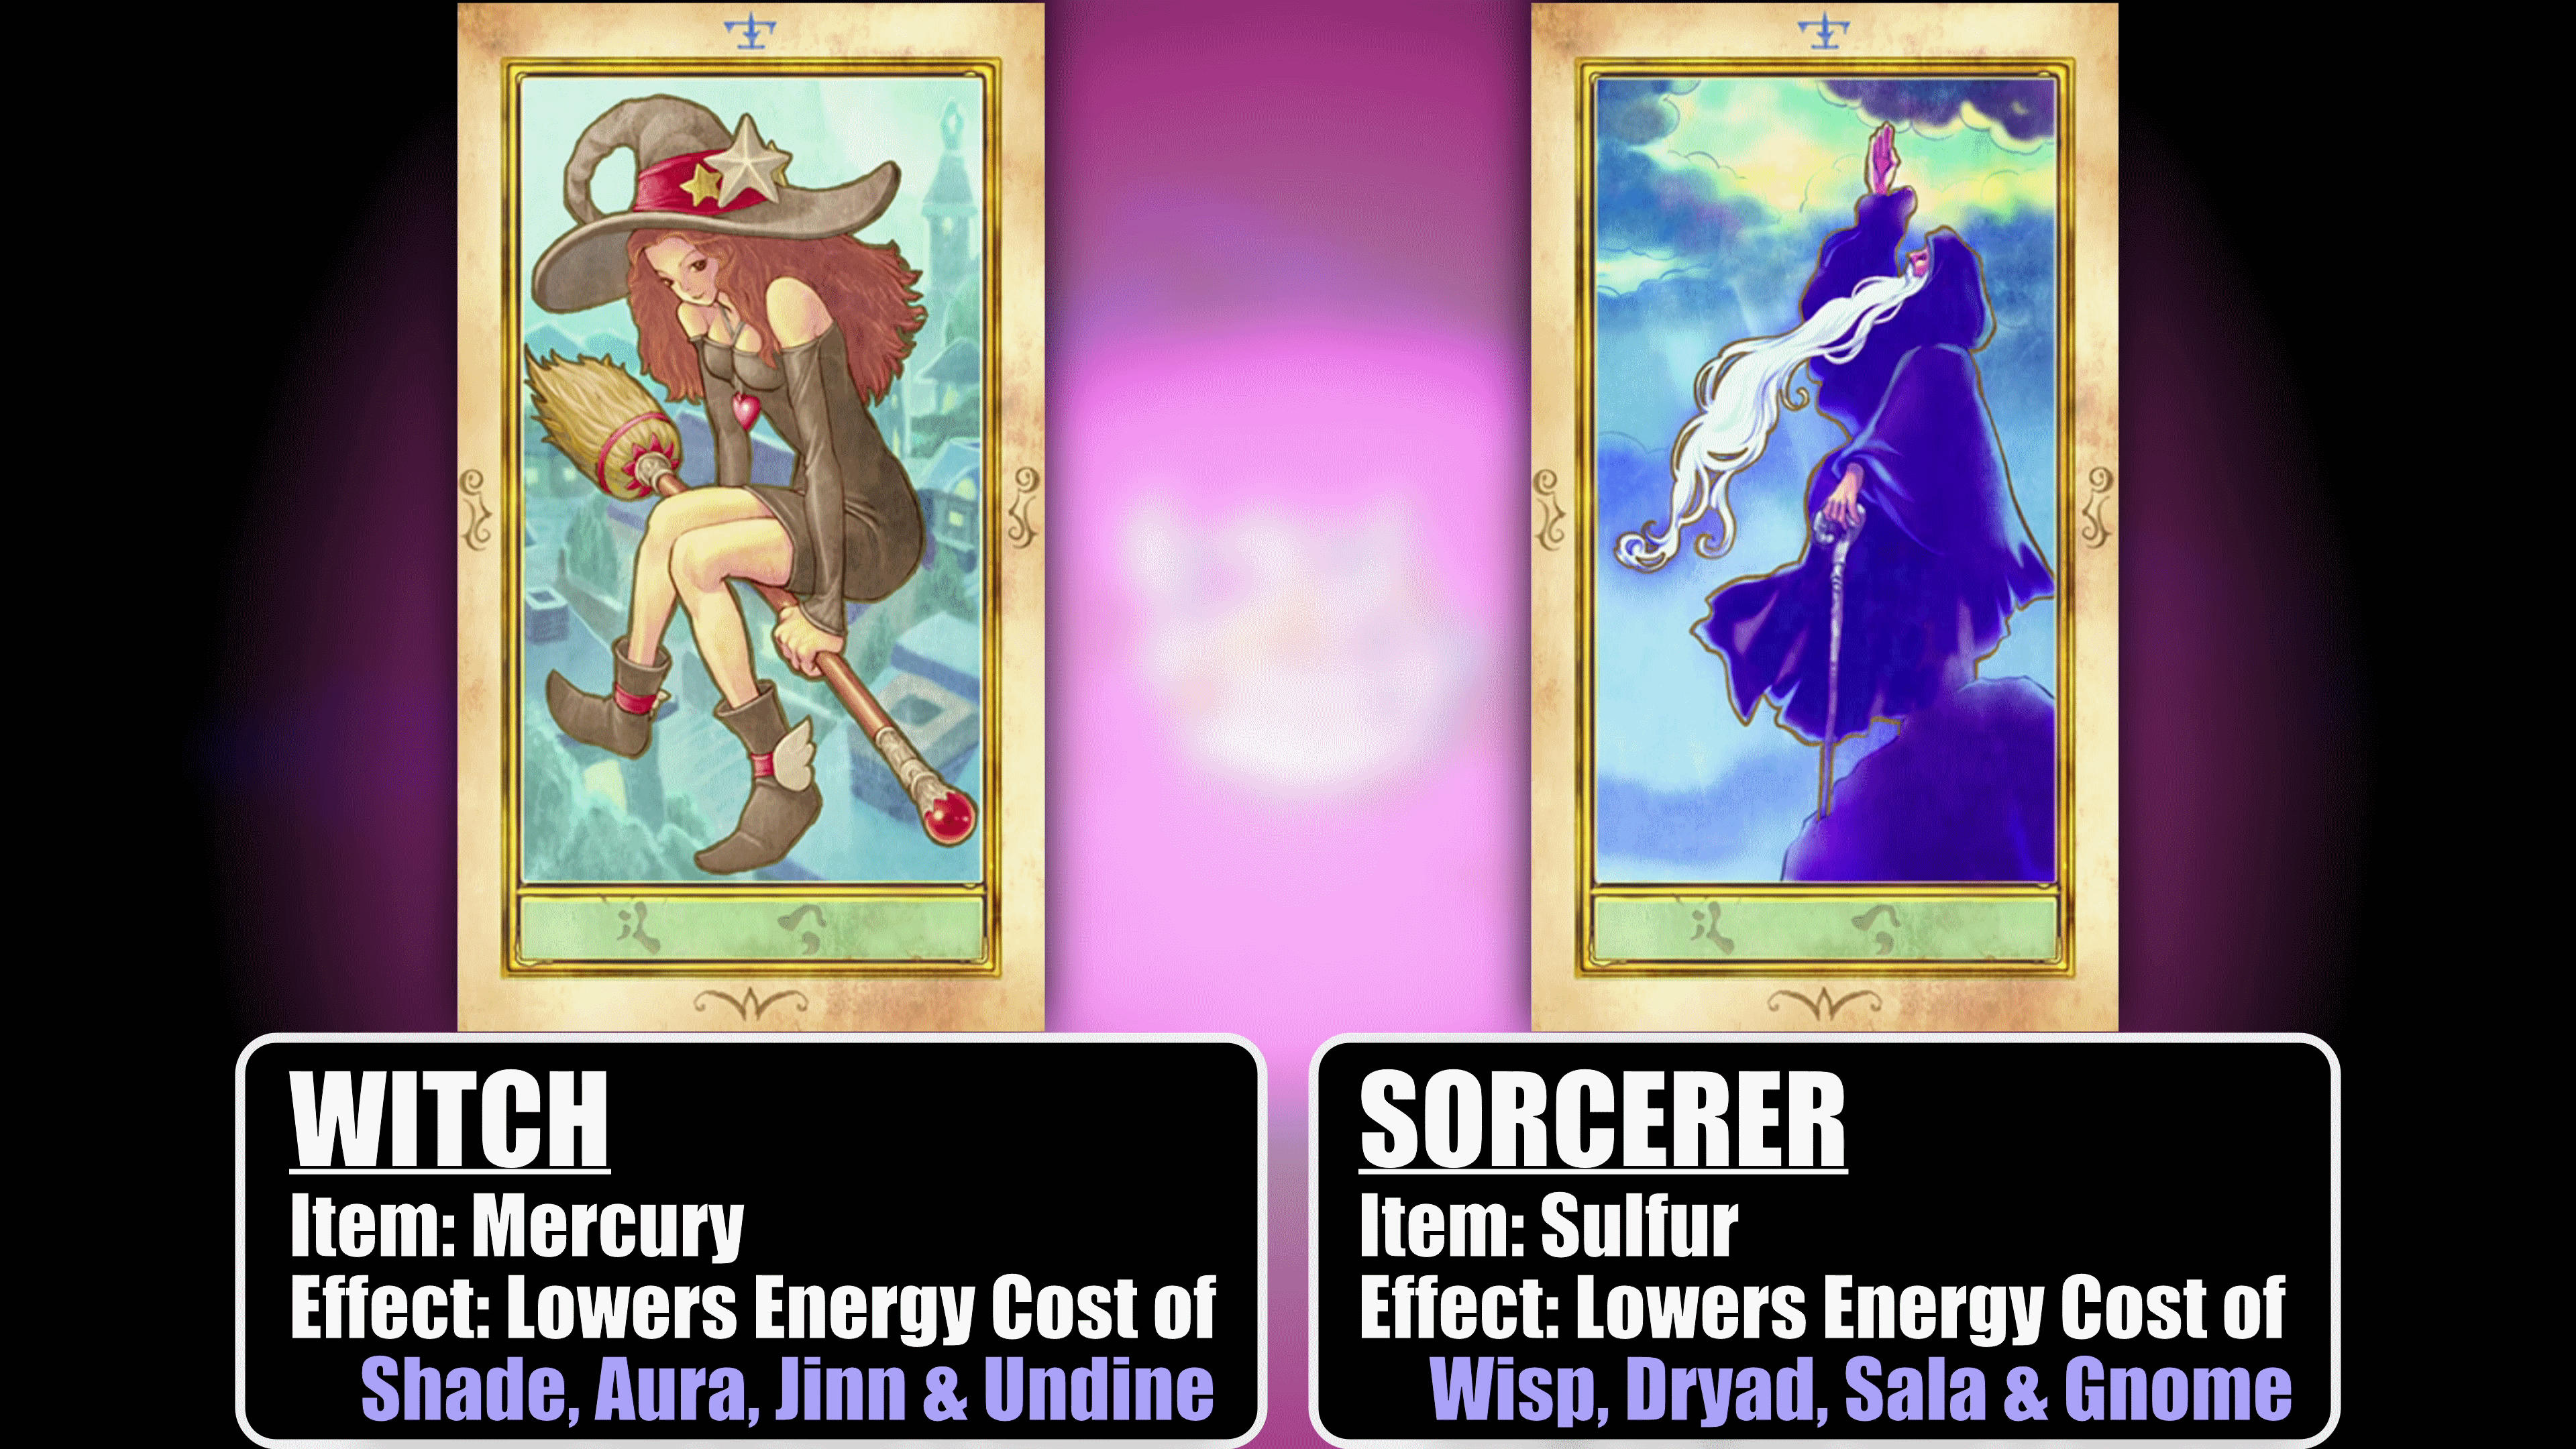
Glow Crystals are one part of the extreme energy process, while combining Mercury and Sulphur with them can improve Essence levels even more! These will reduce energy cost requirements for essences with the mystic cards they produce. Mercury, which produces the Witch mystic card, lowers energy costs for Shade, Aura, Jinn, and Undine. Sulphur on the other hand, produces the Sorcerer card, and lowers energy costs for Wisp, Dryad, Salamander, and Gnome. Mercury and Sulphur are sold for 250 lucre each from level 2 mineral shops. The level of a shop will be dependent on how far a city is placed from your home. If you don’t have a shop that provides mercury and sulphur, you’ll be stuck with the few you get from chests until your next New Game+.
Advanced Recipe #1 - Dragon Scales Weapon (Spear)
This process will work for any weapon, but the varnish needed for yours may vary.
Spear - Dragon Scales (0 Essence, 65 Power) 2 Glow Crystal 2 Shade Silver 3 Glow Crystal 2 Mercury 2 Shade Silver (7 Shade, 97 Power) 2 Glow Crystal 2 Wisp Silver 3 Glow Crystal 2 Sulfur 2 Wisp Silver (7 Wisp, 130 Power) 2 Glow Crystal 2 Dryad Silver 3 Glow Crystal 2 Sulfur 2 Dryad Silver (8 Dryad, 167 Power) 2 Glow Crystal 2 Aura Silver 3 Glow Crystal 2 Mercury 2 Aura Silver (8 Aura, 204 Power) 2 Glow Crystal 2 Sala Silver 3 Glow Crystal 2 Sulfur 2 Sala Silver (8 Sala, 241 Power) 2 Glow Crystal 2 Jinn Silver 3 Glow Crystal 2 Mercury 2 Jinn Silver (8 Jinn, 278 Power) 1 Gnome Silver 1 Chaos Crystal 1 Gnome Silver 1 Glow Crystal 2 Sulfur 1 Chaos Crystal 1 Gnome Silver 2 Sulfur 1 Glow Crystal (7 Gnome, 311 Power) 1 Undine Silver 1 Chaos Crystal 1 Undine Silver 1 Glow Crystal 2 Mercury 1 Chaos Crystal 1 Undine Silver 2 Mercury 1 Glow Crystal (7 Undine, 343 Power) 1 Squalphin/Orcaplant 3 Lillipods SPEAR VARNISH 4 Bumpkin (+50% Slash(x3) -50% Heavy(x3)) 1 Sharp Claw (711 Power)
Advanced Recipe #2 - Ribbon (Lapis Pendant)
Pendant - Lapis Lazuli [0,0,0,18] Defense 1 Glow Crystal 2 Sala Silver 1 Sulfur (5 Sala) 1 Sharp Claw 1 Stinky Breath (Poison, Confusion Immunity) (God of Destruction from Sharp Claw | Freeze Immunity) 1 Glow Crystal (Pixie from Stinky Breath) 2 Undine Silver 1 Squalphin/Orcaplant 1 Fishy Fruit (0 Sala, 3 Undine) (Ocean God from Squalphin/Orcaplant | Flame Immunity) 1 Blackened Bat (Darkness Immunity) 1 Zombie Claw (Paralysis Immunity) 1 Ghost’s Howl (Sleep Immunity) 1 Holy Water (Removes Pixie) (Sacrificed Nymph from Ghost’s Howl | Petrify Immunity) PENDANT VARNISH 1 Big Seed (Dryad+) 4 Needle/Needlettuce (Bed of Thorns x3) 1 Creepy Eye [0,0,0,78] Defense
OPTIONAL FINISH
2 Glow Crystal 1 Dryad Silver 3 Sulphur 1 Dryad Silver 2 Needle/Needlettuce 2 Spiny Seed 2 Dragon’s Breath 3 Dragon Blood [0,0,0,42] Defense (All Attributes +10)
Source: https://steamcommunity.com/sharedfiles/filedetails/?id=2548747258
More Legend of Mana guilds
- All Guilds
- Explanation of the Artifact Placement System
- Legend of Mana Guide 105
- Legend of Mana Guide 95
- LOM Player Stats
- Ability and Weapon Techniques Checkbox List
- Recipes
- Complete Unlock Guide
- Produce (A quick summery)
- Legend of Mana Guide
- Basic Missables List