
Introduction
Rebel Inc. is a difficult game. But it is possible to beat, and even to master! This guide is here to help bring you from seeing a red screen every game to being able to comfortably beat Brutal, and possibly even, one day, Mega Brutal...
Rebel Inc has a LOT of complicated underlying mechanics, and the tutorial only shows you the absolute basics. Most of them, you're going to have to discover yourself, through experimentation or asking the community. If I tried to cover EVERYTHING in this guide, it'd be massive! So this guide is going to focus on giving you a strategy you can use to win - what order to buy things, and how to manage your limited military and financial resources. Following this guide should allow you to win almost always on Normal, and from there, you can keep refining your strategy until its good enough for the higher difficulties.
This guide will be separated into three main sections: Civilian, government, and military. As your operation must be balanced between these three categories, so too will this guide!
Current Guide Version: 1.1.0
Changelog:
V1.1.0:
There's been a few updates but luckily the majority of the guide held up through the changes. It was due for a polishing, so I gave it one:
-Rewrote some parts of the civilian section based on newfound knowledge.
-Swapped out the urban stabilization strategy for garrison/soldier stabilization strategy
-Added a note on stable/insurgent zones "radiating" supporters/hostiles
-Rewrote some parts of the government section, the priorities were too skewed/rigid before and didn't give a fully accurate picture of what each initiative does
-Rewrote democratic transition section to properly emphasize how bad of an idea democracy is
-Added a new section on general tips, moved some portions of the introduction that didn't fit very well
-General proofreading/polishing of the guide
-Added a section dedicated to the shameless plugging of my own custom scenarios
V1.0.2:
-Reworded some corruption sections again, added new info on reputation loss from corruption
-Added zone intel and current insurgent zones controlled to the section on what affects insurgent fighting power
V1.0.1:
-Factual error, police chief does NOT kill 2 insurgent fighters, only one. Guide corrected.
-Gave zone concerns their own segment and added new information
-Slightly reworded section on corruption/corruption risk
V1.0:
-Guide released
General Tips/Financial Management For Governors
Before we really get started, some very general tips. These are elaborated on later.
-Keep inflation down. A big mistake new players make is spending their initial amount of money carelessly, shooting up inflation and wasting their money. A very bad habit to fall into is to wait until you have a bunch of money, then spend it all at once. You burn tons of money to inflation this way. Its better to buy 1-2 initiatives at a time. Be sure to balance between the three tabs, as well. Its best to buy at or below 5% inflation, but if you have an urgent need for an initiative its okay to buy at 6-10%. You will find your money lasts much longer this way.
-Confused about why things are a certain way? Click on the "region" tab at the bottom of the screen. It'll give you a birds-eye view of the map, showing every zone's current local support level, how close they are to stabilizing/turning green, and what they need. It'll also show you how much of the population likes you/hates you, and what your sources of reputation loss are. If you're seeing -1s to your reputation and you don't know why, this screen will tell you why.
-The key thing to remember when playing is that this game has a very strong "unstable equilibrium" element. If you do well early on, your operation's power will snowball, and victory will come easy. But if you lose a bunch of reputation early on to lack of stability or insurgent attacks, it can be almost impossible to make a comeback. Don't be afraid to restart and try a new strategy if things are going poorly.
-Tying into the above - your annual budget is based on two things, the number of stable zones you have, and your reputation. More reputation means more money, more stable zones means more money. If you stabilize zones and contain the insurgents early, you'll get money from having both stable zones and high reputation, allowing you to buy tons more upgrades. But if you lose a ton of reputation to insurgents or lack of stability, you'll have no money and won't be able to buy many upgrades. Once again, don't fear the restart button.
-If this guide just isn't clicking for you, I'd recommend watching a youtube runthrough. I absolutely need to give credit to K 2 for a lot of the stuff here, his youtube guides were what got me through mega brutal. Seriously, this guy is amazing, he beat every map with every governor on mega brutal, then got bored so he did all these crazy challenge runs. His channel is here:
https://www.youtube.com/channel/UCgx-gcrvzD3GZaZzEofXTOw
MOST IMPORTANT TAKE-AWAYS/TLDR FOR THE REST OF THE GUIDE:
-Keep inflation below 10%; buy initiatives one at a time instead of buying a bunch at once
-Buy anti-corruption early and often, don't let corruption risk exceed 45%
-Spend money on civilian initiatives even after the insurgents come, don't stop until zones start stabilizing
-Have your military focus on defense and containment early on; don't have your soldiers march into the mountains and pick a fight they can't win
-Don't be afraid to restart and try new strategies!
Civilian


Alright, let's get down to business. Civilian initiatives give stability - make zones go green, or, stabilize. You need zones to stabilize. If zones haven't stabilized by a certain point in the game, you'll start losing reputation due to "lack of stability". Presumably, your superiors need you to actually prove you can make progress in getting the region under control. Every turn you don't stabilize a zone, the amount of reputation you lose goes up, until eventually you're losing -1 reputation every tick. Not fun. But this can be prevented with the right civilian initiatives!
The most important thing to make sure of when buying civilian initiatives is that A: You are in fact buying a good number of them, even after the insurgents come and B: You're dealing with zone concerns. More on zone concerns later, but while it pays to have a strategy when buying civilian initiatives, you'll likely need to derail the strategy to deal with zone concerns.
I'm going to walk you through three civilian strategies: Roads and services as a general-purpose strategy, the School of Agriculture which relies on rural farming zones to build a solid support base, and a garrison/soldier stabilization strategy which works well when playing as general and can save a game you're about to lose to lack of stability.
Keep in mind these strategies assume you're buying appropriate government initiatives, as detailed in the next section.
OPTION 1: ROADS AND SERVICES:
This strategy relies chiefly on 2 pillars. First, the roads. You're generally going to want Main Roads I and Highways I. Why roads, you ask? They barely give any support level, right? Well, yes. But they give a LOT of other bonuses. For one thing, your troops move faster. Having your roads and highways repaired makes your troops move and fight MUCH faster, making it significantly easier to beat back the insurgents. You'll see a huge improvement in your troops fighting and moving ability with this strategy! In addition, roads also help initiatives roll out faster in their zone, so other projects you fund will reach (and thus help stabilize) that zone faster!
Keep in mind that what roads you should buy can vary depending on the map. For example, on Pistachio Forest, the highway network is very weak and much of the map uses main roads or dirt roads, so instead of buying Highways I you might want to buy Dirt Roads I or Main Roads II.
Keep in mind that road initiatives only help zones with that specific kind of road! Don't know which zones have which roads? Click on a zone to see at the bottom of the screen what type it is and what roads it has. You can also use the region map's accessibility view.
The second pillar is the services. I typically open with either medicine or education - medicine rolls out slower but gives more support, education rolls out faster but gives less support. Water and sanitation is less important and causes more corruption, but its still helpful. You can (and should) buy a lot of service initiatives with this strategy, as they are cheap and only cause a small amount of inflation and corruption.
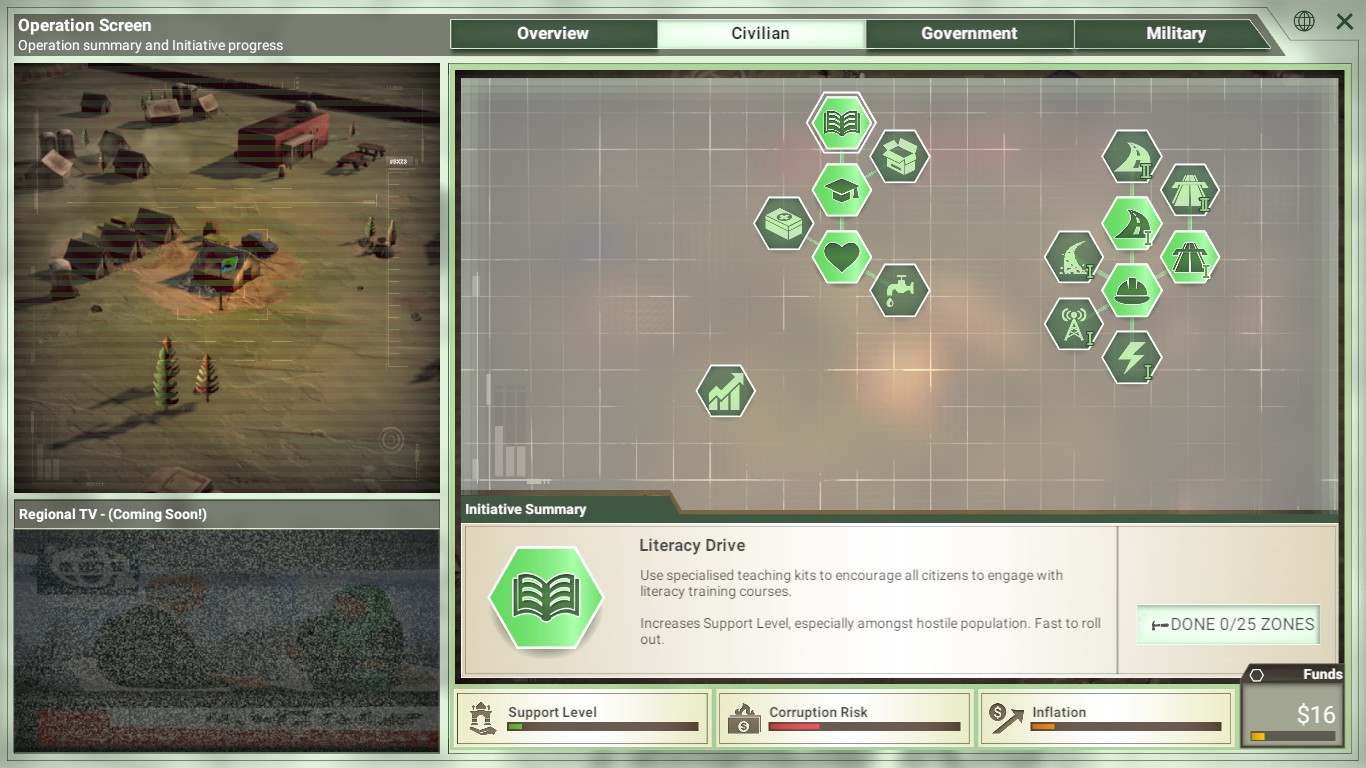
This is a good set to have once the insurgents arrive. Buy roads first as they cause the most inflation, then the education stuff. I chose Literacy Drive because it doesn't cause inflation, keeping other initiatives cheaper.
This is how you should be looking by midgame. Maybe not all these exact initiatives, but keep buying new things one at a time, and responding to zone concerns.
This strategy works on any map with almost any governor, and learning this will usually serve you well.
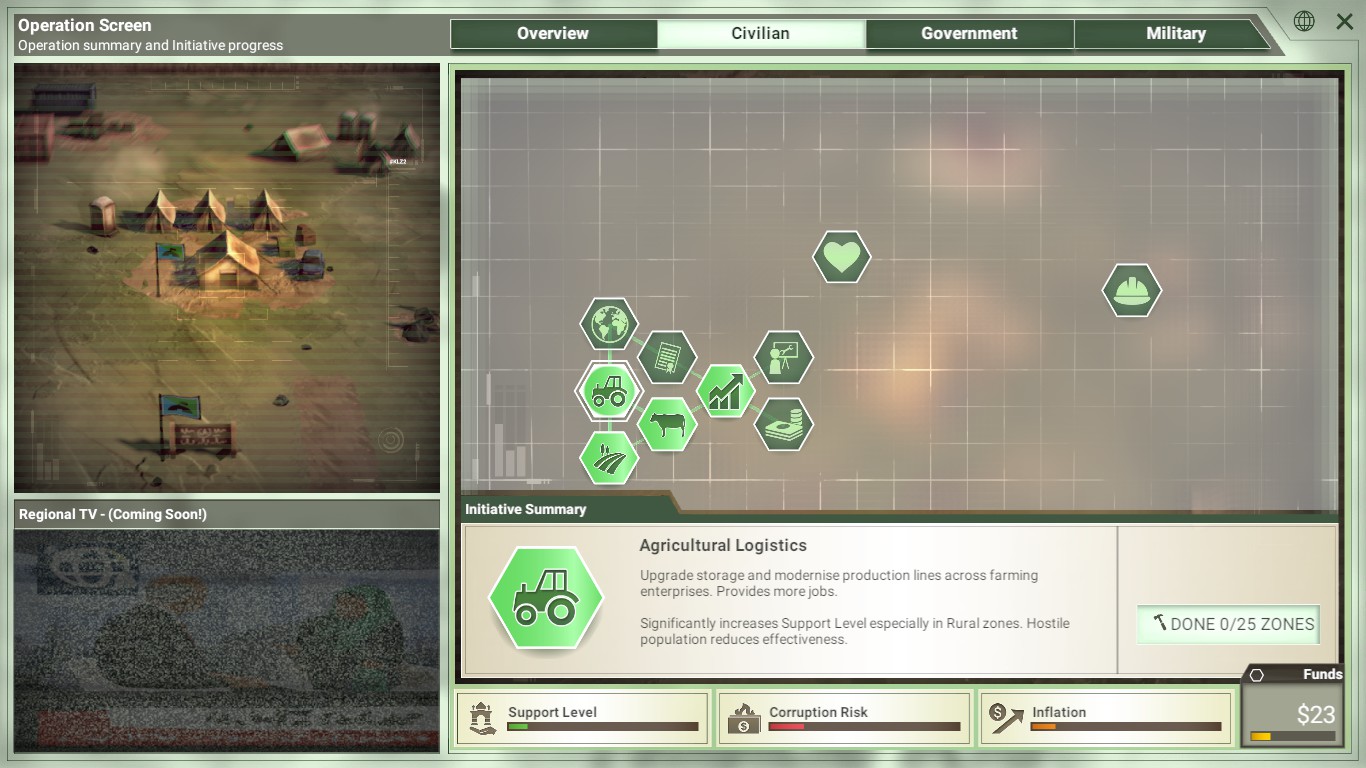
OPTION 2: SCHOOL OF AGRICULTURE
These three initiatives massively boost support level in rural zones, and you can get them all before the insurgents arrive! ...Just not all at once, that would skyrocket inflation.
This strategy is probably the most out-of-date/situational of the three strategies in here. On maps with a ton of rural zones like Saffron Fields, it works very well, while on maps like Azure Dam with only a handful of rural zones, it falls flat on its face. Do keep in mind that while these three can stabilize a few rural zones on their own before Lack of Stability starts eating you, you'll need to follow them up with either roads and infrastructure or services to be able to stabilize the rest of the map.
OPTION 3: GARRISON/SOLDIER STABILIZATION
Sometimes, you buy a bunch of civilian initiatives, but lack of stability starts mounting and you don't think any zones will stabilize in time. Well, these are the initiatives for you! The garrison support upgrade is incredibly powerful, doubling support level in any zone you have a garrison - and that includes your HQ zone! It can take a zone from 70% stable to 100% stable in a very short time. You can also combine it with the soldier support upgrades to have soldiers boost the support level even more. Move your soldiers from almost-stable zone, have them help roll out stuff until the zone stabilizes, then move them onto the next almost-stable zone, and so on until you have enough stable you don't need to worry about lack of stability.
This strategy works best with general/tank commander, who often struggle with lack of stability. Keep in mind, since the garrison support upgrade only doubles the support level you already have, if you didn't roll out enough initiatives and support is low, it won't do much.
BONUS: MORE ON LACK OF STABILITY AND HOW ZONES STABILIZE
Alright. This section of the guide is a bit more technical, but if you're interested in some of this game's deeper mechanics, I'll try to keep it readable.
There are two types of support level in this game. The first is your "main" support level, as represented by the big green bar in your operation screen. The second is your zone support level, represented as a number when you click the detailed view on a specific zone.
Zone support level is what stabilizes zones. How high or low the zone support level is affects how fast hostiles (grey) turn into neutrals (orange), and neutrals turn into supporters(green). In order to stabilize any zones, you need a certain number of supporters (green) in that zone. The more hostiles (grey) in the zone, the more supporters (green) are required to stabilize it. So long as your zone support level in any one zone is positive, it will gradually become more stable... but if it's a low number, it'll become stable really slowly.
Another way to accumulate supporters is by having stable zones nearby. Stable zones "radiate" supporters to the zones around them, meaning if you can get a cluster of stable zones, expanding stability outwards from there becomes much easier. On the other hand, insurgent-controlled zones do the opposite - nearby zones will gain more hostiles, making it harder to stabilize! Don't count on a zone stabilizing if insurgent controlled zones are nearby.
Zone support level increases when an initiative you pass - such as education or healthcare - "rolls out" in a zone. You can see initiatives rolling out being represented by the little hammers everywhere. Once rollout completes, zone support level goes up, and it stabilizes faster!
In addition, the "main" support level, the big green bar, multiplies zone support level, making stabilization happen even faster.
However, as your initiatives increase zone support level, other things can decrease it. Such as:
-Corruption
-Presence of coalition soldiers
-Presence of insurgents
-Unpopular government initiatives
-Zone Concerns (see following section)
Zone support level can even be negative! This generally happens when insurgents control a zone. It causes your supporters to turn neutral, and neutrals to turn hostile... Undoing your hard work. It can even happen without the insurgents influence, if you're playing as, say, Warlord, and pass some unpopular initiatives, or have your support decreased due to actions with the peace treaty.
Now, as for Lack of Stability specifically. If you fail to stabilize zones fast enough, it starts eating away at your reputation, and ramps up REALLY fast. If you can stabilize even one zone, it'll slow down a lot. Stabilize 3 zones, and it'll increase very slowly if its even a problem at all. Stabilize 5-7 zones, and it'll never bother you again no matter how long the game goes on.
Zone Concerns
Zone concerns are important enough to deserve their own section. When the game starts, 3-5 concerns are randomly decided, and over time, zones will become "concerned" over these things. When a zone is concerned about something, your zone support level will be reduced by a specific %, making it stabilize that much slower.
Initially, these concerns will only reduce support level by a small amount, but the longer a concern goes unmet, the more it will decrease support level. It maxes out at -99%, and how fast it reaches that point depends on your current difficulty. The only way to stop a concern is to purchase and roll-out the initiatives they want. Here are the possible types of concerns:
-Education (anything from the education tree)
-Water/Sanitation (anything from the water/sanitation tree)
-Healthcare (anything from the healthcare tree)
-Electricity (Electricity I/II)
-Telecoms (Telecoms I/II)
-Jobs (anything from the development discussions section - note that remote subsidies doesn't fulfill this concern)
Mega-Brutal adds two additional concerns:
-Roads (the corresponding road type to the concerned zone)
-Security (police initiatives - militia is usually enough, but not always)
To see zone concerns, you can either highlight the zone, and it will be shown as an icon next to the zone's road icon, or, click on the "region" tab and view the overall map, which will show you all the concerns. A darker icon means a more serious concern that's reducing your support level more.
If you let a zone be concerned for long enough, passing one initiative might not be enough to make the concern go away, though it will reduce the severity. Passing two initiatives, however, will almost always eliminate the concern. Sometimes, zones will get concerned about something ELSE after their initial concern - but usually the zone will stabilize before the new concern becomes a problem. Unless you're on mega brutal, in which case, all bets are off!
The best way to deal with concerns is by having a diverse set of civilian initiatives, rather than focusing all on one tree. After you employ one of the strategies in the previous section of the guide, you should focus on passing initiatives to counter concerns that appear. If the initiative doesn't seem to be rolling out where you want it to, buying appropriate outreach initiatives can help, though this should be a last resort. Keep a special eye on your HQ's concern, as you need your HQ to stabilize early to prevent Lack of Stability.
Now, go out there, and get those zones stable!
Government

Government initiatives are completely vital to your operation. This section is going to teach you which ones are important and which ones you can skip, and how police initiatives work. If you want more information on corruption and fighting it, visit the next section.
While civilian initiatives are about having a strategy for stabilizing initiatives and sticking to it, government initiatives are about providing support for everything else the operation is doing. There's much less room for variation, and so its much easier to get a specific "buy order" of initiatives.
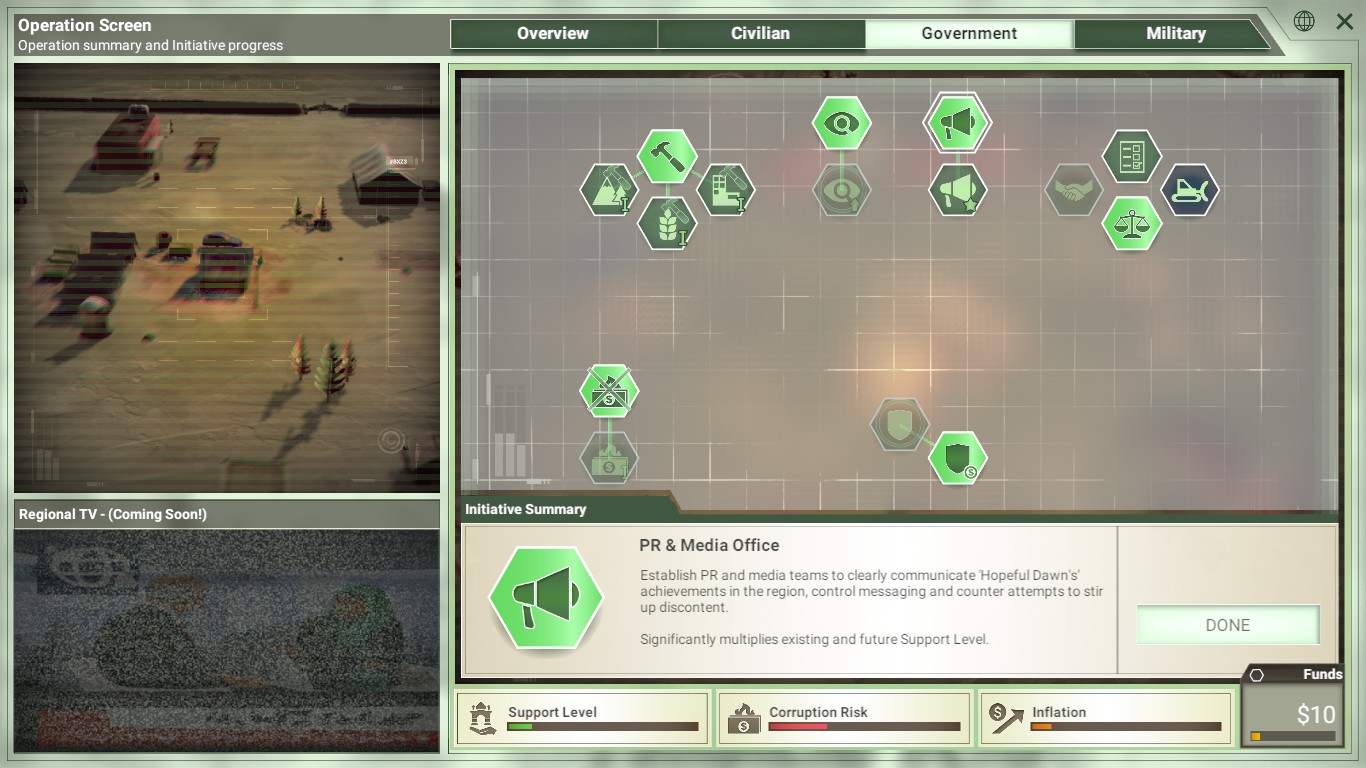
This is what your government tab should look like when the insurgents come:
Early Game Initiatives
Let's walk through these in order of priority:
District Representatives and Effective Procurement should be your first purchase on any given game. District Representatives is needed for A: Intel collection and B: Unlocking the rest of the government initiatives. Outreach office, and the 4 misc. initiatives you see in the top-right corner can't ever be unlocked without District Representatives! Effective Procurement, meanwhile, cuts corruption caused by funding all initiatives by 10%. However, it also increases the price of all civilian initiatives by 10%. Its a good idea to get it before you start buying the corruption-heavy national soldiers and roads, but its also a good idea to get anti-corruption 1 before the insurgents come.
Public Relations Office is utterly vital, and be purchased either before, or slightly after insurgents come. It gives a massive boost to your support level, and its extremely difficult to stabilize zones without it. If you're following the civilian guide and still can't stabilize zones - make sure you're buying Public Relations! Level 2 can wait until the middle of the game, more civilian initiatives tends to be better for stabilizing during the early parts of the game.
Outreach Office helps roll out initiatives faster, but its also important because it unlocks other initiatives for purchasing earlier. It isn't expensive, and it helps stabilize zones a bit faster, and you need it to unlock Universal Justice (otherwise, you can unlock it by buying Police Level I, which is much more expensive), so it's a good buy.
Universal Justice gives you 3 reputation, and a big support level boost to help stabilize zones - almost as much as another level of PR! The only downside is that for certain decisions, such as the abusive police chief, it can restrict your options, as you'll lose the support level if you go against your pledge of justice. Simple enough; just don't be evil.
For information about police, see the last part of this section.
Midgame InitiativesDuring the middle part of the game, these are the government initiatives you need to build towards:
Anti-Corruption, all 4 levels, is a must-have. During the early part of the game, its okay to delay buying these as its more important to get your support level high and zones stabilized. But once the insurgents come and you need to buy national soldiers, corruption will absolutely murder you unless you make an active effort towards fighting it. I'd suggest have at least 2, but preferably 3 levels of Anti-Corruption before buying your first National Soldier. Get it all the way to level 4 ASAP. Then, you won't ever have to activate corruption purges. See the section below for more information.
Foreign Relations Office is best bought as soon as the event that needs it ("Foreign Rival Supporting Insurgents") shows up. As it gets more effective over time, you might think to buy it early, but it costs $11, which is a lot of money! Most of the game, you need that money more for anticorruption initiatives or soldiers, rather than small reductions to insurgent capability. Its better to use your money for that until you absolutely need to buy the office.
Other Initiatives:
Higher levels of outreach office: These provide extra teams for rolling out initiatives and can help zones stabilize much faster, but your money might be better spent on giving your teams more initiatives to roll out in the first place. Not useless, but I usually hold off on buying any of these until the later parts of the game when I need to stabilize remote zones.
NGOs/Foreign Aid: If bought, these should be set to Funding Only. ALWAYS. If you let them have access, you will spend the entire game drowning in an unstoppable tide of inflation and corruption, and every dollar you save with free initiatives will have to be paid back - and more - to higher inflation costs and corruption purges! Funding Only, meanwhile, gives you a cool $4 added to your annual budget each year. Not bad, but to take advantage of it you need to buy it towards the start of the game, when you need the money for other things. When I cut it out from my strategy, I didn't miss it.
Democratic Transition: Democracy is bad and you shouldn't do it. Let me explain. This initiative gives you 2 Reputation right away, but also pops up an event which asks for an extra $10-12 to plan the elections - if you pay it, you get 2 more reputation, but if you can't pay, you lose the 2 reputation you just gained! It's much more expensive than it looks. Not only that, but the game's promise of a "steady source of reputation over time" is a complete lie. Democracy is anything but steady - you're condemning your reputation to eternally be in the RNG's hands for the rest of the game.
The election events will always have a high chance of failure unless you already destroyed the insurgents. You can still expect to see 20-30% chances of insurgents disrupting elections even when you're doing well. If you succeed in the first election, you get 5 reputation. But if the RNG doesn't favor you and you fail, you lose a crippling 9 reputation. That alone is bad enough, but the elections keep coming. In the second election, if you succeed, you only gain 4 reputation, but if you fail, you lose 13 reputation! And it only gets worse from there. The short term rep gain is never worth it. "Just say no" to democracy.
POLICE
Police seem unassuming. Makes it harder for the insurgents to take over? Okay. But police are actually one of the best things in the game, and you should usually buy at least militia before the insurgents come.
Police do two things. First, they slow down the insurgents taking over a zone. Of course, you probably knew that. But they ALSO can kill insurgents for you. All on their own!
Here's how it works. When insurgents take over a zone, they generally destroy initiatives in the process, such as your roads and economic development. However, when they destroy the police initiatives, the police will "revenge kill" 1 insurgent fighter each time! Each level of police can kill 1 insurgent fighter. So a zone with militia, regular police, and police expansion all rolled out will have 340% security, meaning it'll take a long time for insurgents to take over, and as the insurgents attack, the police will destroy 3 of the insurgent fighters! 4 fighters w/garrison!
If a 1-strength insurgent attacks a rural zone with militia and police level 1 rolled out (150% security), then you don't even need to move troops in. The police will kill the insurgent all on their own. However, afterwards, they'll be destroyed and need time to get rolled out again, so don't expect them to do all the heavy lifting for you.
Do note that this strategy should not be employed with urban zones even if they have police, as insurgents still deal reputation damage attacking urban zones even if they haven't taken them over yet.
BONUS: CORRUPTION - HOW DOES IT WORK??


Once again, this section of the guide will get a bit technical. All you really need to know is to buy anti-corruption, but if you're curious about more, this part can help.
There are two core stats that define corruption at any given point in the game. The first is Corruption. The second is Corruption Risk.
Corruption risk defines the highest corruption can become at any given time.
Corruption slowly increases to the maximum that the current corruption risk will allow. The higher your current difficulty, the faster it increases. On Mega-Brutal, it reaches the maximum almost instantly, keeping corruption and corruption risk the exact same for most of the game!
Corruption risk is shown as the big red bar, which goes up with most initiative purchases. It can also be seen as a percentage next to the inflation percentage on the main map screen. Now, this is the important part:
Corruption is revealed by the green/red icons above the three bars - the palaces and burning money - how much its eating away at your support level. As it increases, it reduces your support level more and more (making it harder to stabilize zones), and deals damage to your reputation, based on both how high corruption currently is, plus how long corruption has been there and how high its been previously. At high levels, corruption can easily take 2-3 reputation per month, and give you -1s just like lack of stability. Obviously, right now its way too high! Only Smuggler should ever be dealing with corruption amounts this big.
Let me show you with some helpful graphs from the game:
This is from a game with Smuggler on Casual, intentionally neglecting Anti-Corruption measures:
(Sorry about the horrible editing)
As you can see, corruption - the reddish section - rises to hit the current limit set by corruption risk - the pinkish section. As its on casual, it takes a significant amount of time to grow. Using purges or Temporary Crackdown to reduce Corruption will cause drops in corruption, slowing down its climb to be where corruption risk is. Purges reduce corruption risk as well, lowering the maximum corruption can reach - but Temporary Crackdown does not.
The higher the difficulty, the faster corruption rises. Let's jump right up to Mega-Brutal and see how the graph looks:
As you can see, the pinkish area no longer really exists, as corruption in Mega Brutal is always equal to corruption risk, always the worst that it can possibly be, and so is always a massive problem. While corruption purges still help a little due to reducing risk, Temporary Crackdown is completely useless, as corruption just rises back to where it was before immediately.
I have also compiled a small table of maximum corruption at various risk levels, and how much it affects your operation's support:
10% corruption risk: -1% support level maximum
20% corruption risk: -5% support level maximum
30% corruption risk: -11% support level maximum
40% corruption risk: -19% support level maximum
50% corruption risk: -30% support level maximum
60% corruption risk: -43% support level maximum
(Note: These are estimates and aren't exact, but should be close to right. Smuggler has their support affected by corruption more than other governors, as well.)
And from here, it only gets worse. As you can see, it isn't linear. The more corruption you already have, the more additional corruption will hurt you! The effect of this is that corruption "sneaks up" on you - if you ignore it in the early game, it won't seem so bad, but then you'll suddenly go from 10% support reduction to 40% reduction, and your reputation will start taking huge hits!
What does this all mean? Well, it means you're best off relying on your long-term corruption reduction initiatives, and taking a proactive stance against corruption during the middle and early parts of the game. The long-term initiatives slowly reduce corruption risk (and thus the maximum amount of corruption) over time. If you do it right, even on Mega-Brutal you will usually not need to buy Purge upgrades. That said, they absolutely are on the table if you really need them, but keep in mind that each corruption purge upgrade makes every civilian initiative cost $1 more, so you shouldn't use them unless you have to!
Generally, a "comfortable" level of corruption risk on the higher difficulties is in the 30-40% range, where reputation and support damage is manageable. Sometimes, you'll need to go into the 40-50% range simply out of necessity. If you go over 50% corruption risk, you've done something wrong.
Military/Three-Step Plan
This is going to be the most complicated section, as it isn't about what initiatives to buy as much as how to make your troops actually fight off the insurgents. A lot of players make mistakes managing their troops early on and then have a hard time later. So, I'm going to take you over my 3-step plan for getting you through the middle of the game to the lategame!
It should be noted that all three steps of this plan should be implemented at the same time.
STEP 1: CONTAIN

This is a good way to start on Saffron fields. The insurgents are in the mountains, so I have my soldier wait outside the mountains. He won't act unless the insurgents try to come out of the mountains, in which case he'll beat them back.
You might think "oh, is that soldier sitting there doing nothing? Why not have him charge up into the mountains and take the fight to the insurgents?" This is a common mistake new players make. Trying to take the fight to the insurgents at the start of the game is a sure way to give everything over to the insurgents and have them overrun the entire region!
Let me explain. Insurgents naturally try and take more zones as time goes on. However, their fighting strength (as well as yours) is based on a number of factors. Here are some of the factors that affect how well insurgents fight:
-Insurgent capability (starts at a full 100%)
-Who was in the zone first (your soldiers fight better if they're in the zone before the insurgents are)
-Number of hostiles/supporters in the zone currently (more hostiles means the insurgents are stronger, more supporters makes you stronger)
-Zone type (Urban, rural, remote - insurgents fight best in the mountains and worst in the cities)
-Zone security (Your militia/police, if you've rolled them out, help you fight)
-Zone intel (Soldiers gather intel, whether fighting or not, in zones they're deployed in automatically. They need to have 1/3 to 1/2 zone intel to start fighting at all, and they don't fight well unless they have full intel.)
-Current zones controlled by insurgents (Insurgents gain momentum as they spread)
-Combat support, from garrisons or other soldiers
At the start of the game, the insurgents are in remote zones which you lack intel on, there are tons of people hostile towards you, those zones don't have security in them, insurgent capability is at or above 100%, you have little to no garrisons and only a few soldiers. In other words, everything starts out in favor of the insurgents. You CANNOT go in guns blazing to try and "take out the insurgents early" and expect to win, or even make any progress. If you try, any soldiers you send to fight will have the bar turn completely red. And when its completely red and your soldiers are losing, the insurgents will simply ignore your soldiers and charge into other zones - zones your soldiers aren't there to defend, because you got them tied up in the mountains! Plenty of people made this mistake in the real-life afghanistan, so don't replicate that mistake here!
Your soldiers should defend the areas that insurgents don't have, not try to take the ones they do. At least, at the start. As time goes on, your army will gradually approach being powerful enough to fight back. Now, on Saffron Fields this is easy, as the insurgents almost always come from the mountains. On the other maps, you'll often have to contain multiple pockets of insurgents, which can be difficult. But don't worry, you'll get the hang of it as time goes on.
TIPS FOR EFFECTIVE INSURGENT CONTAINMENT:
1: Focus on protecting urban and rural zones. The amount of reputation you lose for insurgents controlling zones is decided by the amount of the population that live in that zone, and very few people live in the mountains. They want the mountains, or the forests, or the desert? Sure, let them have a few! Protect the farmland and the cities. You can take back the remote zones later, when you're stronger.
2: Rely on coalition soldiers. Generally, you should purchase 2-3 coalition soldiers before you even start national troops, and double-extend a soldier's deployment at least one time. In the early game, nationals have a hard time fighting... anything, really, and they take forever to get places. You need the power and speed of the coalition soldiers, so you should be spending on them. This also gives you more time to get anti-corruption measures in place, as otherwise national soldiers can overwhelm you with corruption.
3: Upgrade roads. If insurgents pop up somewhere new on the map, you'll probably need to move soldiers over there. Having roads makes your troop response both faster and more effective when they get there. This goes with point 4...
4: Don't panic at seeing 2 separate insurgent attacks. In fact, having the insurgents locked up in 2 separate places can actually be a good thing. Insurgent zones cause less reputation damage when they aren't connected. Insurgents having one group of 2 remote zones and one group of 3 remote zones will cause less reputation damage than them having 5 remote zones in a big clump. You just need to have troops nearby and be prepared to keep them fenced in, wherever they are.
5: Don't be afraid to cut your losses and retreat. Sometimes, your soldiers just end up in a fight they can't win, and the bar goes completely red. Yes, it hurts to see that -1 rep when you retreat and have the game tell you that the insurgents got a morale boost, but if your soldiers don't focus on fights they can win, then the insurgents will take more zones, causing you much more reputation loss and increasing their capability even more. Sometimes, its better to just cut, run, and put your soldiers where they can actually do some good.
6: Conserve coalition fighting power. Coalition soldiers use up their deployments faster when they're fighting, as compared to when they're supporting or doing nothing. When possible, its better to have national soldiers fight while coalition soldiers give support. Don't do it if the national soldiers will lose, but otherwise, careful usage of the coalition soldiers can keep them around much longer. This is another reason why you shouldn't have the coalition soldiers march into the mountains at the start of the game, they'll withdraw much sooner.
STEP 2: REDUCE INSURGENT POWER
Insurgents strength at any given time is defined by their capability %, which can be seen in your region screen. Insurgents actually have a limited number of fighters and camps they can have at any given time - they can't just have however many they want. This limit is decided by insurgent capability - so more capability means more fighters and camps, and less capability means less. So, its absolutely vital to reduce insurgent capability!
There are several ways of doing this. Let me outline the biggest ones.
DESTROY CAMPS:
Each insurgent camp destroyed sets them back and makes them weaker. Now, when insurgents surprise attack, they usually do it in a zone NEXT to the one with a camp, not the actual zone containing a camp. With this in mind, you can often predict where camps are based on the locations of their surprise attacks, and send soldiers to where they are. If you guess right, the soldiers can destroy the camp the insurgents came from, making the insurgents weaker!
Insurgents are more likely to spawn camps in remote zones and zones with a lot of hostiles (ie mountains). Having security initiatives (police) in a zone also reduces the chance of a camp spawning there.
I said earlier that you should keep your soldiers out of the mountains at the start - this is the exception. If (and only if) insurgents aren't already in the zone, its okay to send your coalition soldiers into the mountains to try and take out a camp. But only if they can destroy the camp before the insurgents try and take the zone! Otherwise, they might need to retreat and that costs you reputation.
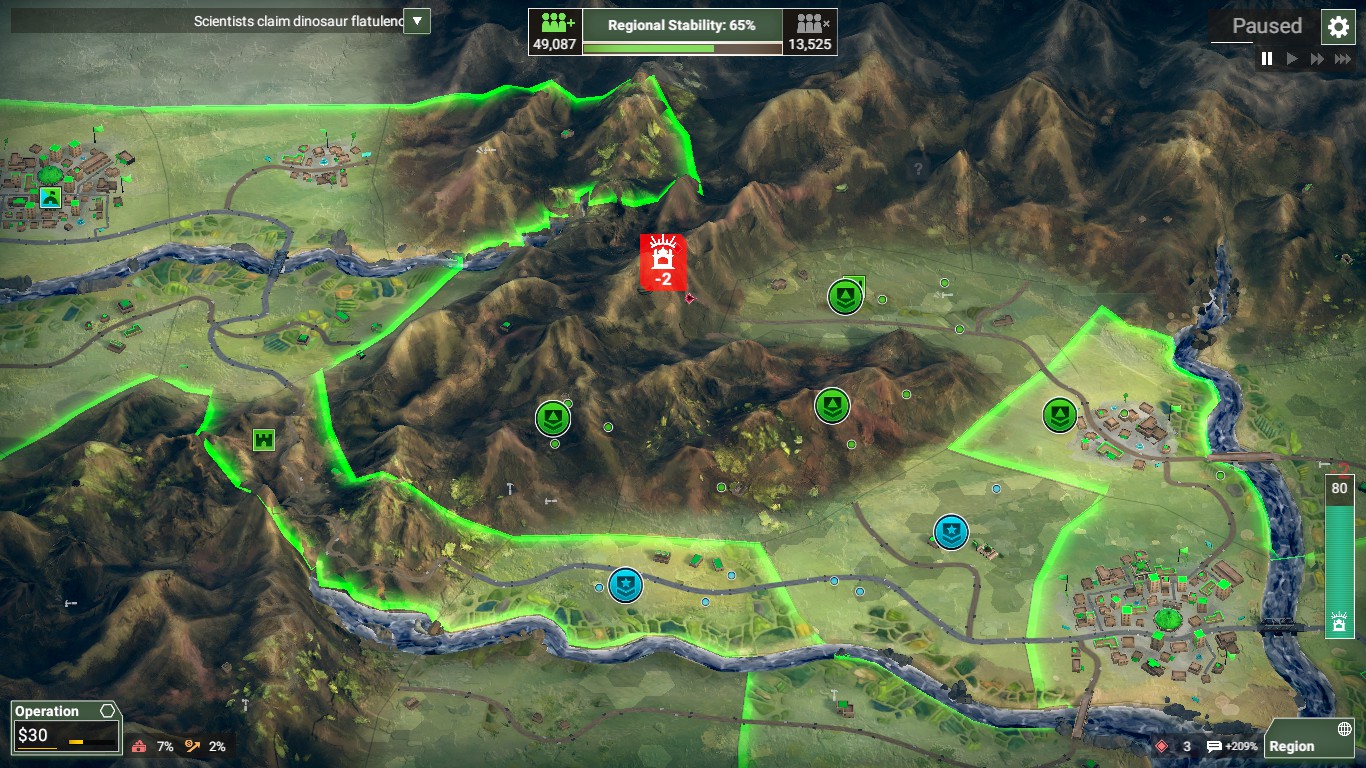
Camps can also be discovered by appearing on the map as little blocks with a question mark inside them. Can you spot them? Here's a picture with a camp in it:
In a real game, as time goes on, the square gradually becomes more opaque and easier to see. Once you get soldiers into the zone, you'll discover the camp properly and you can take it out!
STABILIZE ZONES:
Each zone you stabilize reduces insurgent capability by 3.5%. With Religious leader, this becomes 7%! This is why continuing to buy civilian and government initiatives to stabilize more and more of the region is still important, even once you have enough to prevent lack of stability. In any given game, this will be your very best way of reducing the insurgent's power. The faster you stabilize zones, the faster the tide turns against the insurgents!
EVENTS/FOREIGN RELATIONS OFFICE:
Using the Foreign Relations Office, you can gradually shave away at insurgent capability whenever the event comes up. This is good to do, and while it isn't a top priority it is good to try to get the Foreign Relations Office as soon as you're in a position to do so. However, if the event comes up, and you have just enough money for Counter-Strike but not enough for Foreign Relations office... bite the bullet and publicly accuse, even if you know it will fail. Spending all that money on a counter-strike for a very minor benefit won't help. Save it up and buy the foreign relations office as soon as you can. How soon the event comes really varies, and sometimes it can take much longer than you'd expect. Once you have the office, you should almost always take subtle pressure - over time, it'll have a 100% chance of significantly reducing capability, and become even more powerful than a public accusation.
STEP 3: GROW YOUR OWN POWER


While you're containing the insurgents, you also need to build up your own military. Eventually, you'll be ready to actually take the fight to the insurgents, and able to do it without losing. How do you build up your army? This section will teach you what's most important.
And what's most important... are NUMBERS. Numbers are much more important than power. If you have a lot of soldiers, you can have them support each other, which can easily make up for a small amount of ability upgrades. Your top priority with military should be getting more boots on the ground - 2-3 coalition soldiers first, then start on national soldiers. While 2 national soldiers at a time will let you build up to 4 soldiers the fastest, I prefer to do one soldier - soldiers train fastest when you're only doing one at a time, and doing one soldier at a time allows for easier management of corruption.
This is the kind of situation you want to strive for in the middle of the game. The insurgents are trapped in 1-2 small pockets of zones, your soldiers are preventing them from escaping, and every day, your army grows stronger and your supporters grow more numerous.
Which military upgrades are cool and which are junk?
The rule is: Keep it simple! Don't bother with the fancy stuff until the end of the game, when you have a lot of extra money.
You should almost exclusively be focused on getting more soldiers, and getting more upgrades for those soldiers. Keep in mind that as these upgrades tend to cause a LOT of corruption, its a good idea to space them out! Don't get so caught up in building a strong army you forget to make it a noble army, (mostly) free from greedy corrupt monetary incentives and influences!
Obviously, national soldiers and their strength upgrades are vital. But what about the other stuff? I'll run through them briefly:
Interpreters and Guides is a good idea. It makes your soldiers gather intel MUCH faster, and they can't fight at all if you don't have intel on the zone! It also reduces the penalty coalition soldiers give to the zones they occupy by about 2/3rds. If coalition soldiers sit in a zone for long time, it causes the population to become more and more hostile - which will make your soldiers have a harder time fighting when the insurgents enter. This upgrade makes that happen slower.
Human Terrain System is decent and situationally good, but not always a top priority. It makes intel gathering almost immediate and almost entirely removes the penalty coalition soldiers have for staying in zones, so get it if you need coalitions to stay in a zone for the long haul.
Community support/integration isn't very important, and you usually shouldn't get it until the end of the game. Soldiers should be spending their time fighting, your civilian initiatives should be doing the stabilizing.
Garrisons are a good investment, as they help keep the front lines stable during the middle of the game and eradicate insurgents at the end of the game. Soldiers are more important, but garrisons are a great choice as soon as you can spare the cash. They have useful upgrades and work a little like police, in that if insurgents destroy them they take some insurgents down with them. The game will always try to place them near insurgents, but other than that their placement is random.
As for garrison upgrades... Security Checkpoints are okay and can help keep your garrisons from getting destroyed, as they slow down insurgents taking the zone, but the money might be better spent on another police initiative. Garrison Support works on HQ, and can be helpful for General dealing with lack of stability early game, but otherwise you're better off buying civilian initiatives to help every zone. Combat Reinforcements is a very effective upgrade, and a good choice if you need more strength for your troops but you can't get any more national army upgrades.
Drones, Airstrikes - Are they any good?
Drones and Airstrikes look cool, sound cool, and are cool. Airstrikes kill insurgents, and destroy camps. Drones help find camps. Together, they make an incredible combo. A drone will scan a zone with a camp in it, then an airstrike will take out the camp! This combo can reduce insurgent capability % by a lot - and your troops don't need to lift a finger!
...But... getting them up and running costs $25+... during a period of the game when you desperately need every last dollar for more troops and anticorruption. They are VERY expensive, and... even if they are really cool... it just isn't worth it to sink all that money when you could be buying more practical things. Especially if you want their upgrades - it costs almost $100 to upgrade airstrikes to the maximum!
Generally, if you're in a period where you have money, and due to needing to wait for corruption or inflation you find yourself unable or unwilling to fund other initiatives, take these guys. Just don't put off buying anticorruption or building your national army to get them. It isn't worth it.
This concludes the three-step plan. As the game goes on, you need to keep the insurgents contained, weaken them, and get your army and operation in shape for the long haul. Then, and only then, can you begin pushing back the insurgents, and claim the entire region for yourself!
Advisers

Advisers are important and helpful, so don't feel the need to challenge yourself by forgoing their benefits. You'll need to win 30 games to have them all, but I'll tell you which ones are most worth having. If you don't have these unlocked, don't worry, advisers aren't needed to win. At least, before Mega Brutal. The game expects you to be using advisers on Mega Brutal difficulty.
SUPPORT (ORANGE):
Doctor is usually the best choice. Insurgents capture zones faster and are stronger in zones with more hostile population (grey people), so having less of those helps your soldiers fight.
However, if you're using a strategy contingent on specific zones stabilizing early, Town Planner or Farmer may be worth considering. Journalist barely does anything, and Village Elder isn't helpful because remote zones are always going to not like you very much.
MISCELLANEOUS (PURPLE):
Celebrity is almost always the best choice. Extra support level, plain and simple.
Armchair architect can seem like an appealing choice, especially for governors like Banker. You can even keep hitting "restart" in the pause menu until you get the zone you want! But, doing that is really annoying, and they only give $4-6, which is enough to buy 2 more civilian initiatives... which gives you about as much extra support as having celebrity gives you. Save yourself the trouble.
Trained Monkey and Impulsive Shopper are very odd, they seem designed for challenge runs, even though no other advisers are like that. And Tourist isn't bad per se... they're just... not as helpful as Celebrity.
MILITARY (GREEN):
This one depends on your governor and strategy. Chef is usually a good choice, as they let you keep your blue coalition soldiers on the field for longer before you have to fork over a lot of reputation. If you really have something against Coalition soldiers for some reason, Drill Sergeant is my second choice, he lets you get your national army into shape faster.
However, for Smuggler and Warlord, who can get their national soldiers out faster (Smuggler via Cut Corners), Arms Dealer can be a good pick for them. That said, they need Coalitions too, so Chef is still good.
Instructor is useless because if you twiddle your thumbs while waiting for your nationals to train, insurgents will take the entire region. General can start his nationals right away using this guy which is nice, but they won't be finished before the insurgents come.
Observer's effect is very weak compared to the others.
COUNTERINSURGENCY (PINK):
Religious Leader is the best choice. Normally, when zones stabilize, Insurgent capability decreases by 3.5%. This guy doubles it to a whopping 7%. You can make the insurgency much weaker, much faster with him around.
Tribal Elder is fine, but doesn't have the long-term effects of the other advisers. He only buys you a month, that's a few ticks of time, and on Mega-Brutal, he barely appears to have any effect.
Negotiator, Police Chief, and Militia Chief don't do much. By the time you can start peace negotiations, you've essentially won the game anyways. Militia chief has a negative effect with his corruption, which isn't worth the positive they give. Police Chief only slightly slows down the insurgents, if anything. Religious Leader's weakening effect already slows down the insurgents, so its better to go with him.
ECONOMY (YELLOW):
Tax Collector is the best long-term choice. Normally, stable zones add $1 to your annual budget. With this guy, they add $2. Over the long-term, that is a LOT of money. Just make sure you stabilize zones!
Private Donor is another good choice, particularly for Banker. Who doesn't want more starting money?
Realist is okay with governors that have a hard time stabilizing, like General and Tank Commander, but why not take Private Donor instead and buy more civilian initiatives?
Investigative reporter is good. If you plan on using Development Director with their experts' "creative procurement", maybe you can take this one.
Wealthy Exile? Sounds like "planning to fail"! We don't want that!
INTERNAL AFFAIRS (CYAN):
Censor is my personal choice. He helps you in an uncomplicated way, but don't expect him to save you when an urban zone gets captured for the third time... he shouldn't be relied upon!
Some people swear by Logistics Expert, saying he's a replacement for roads. Generally, the places where insurgents are isn't where the stable zones are, so I have trouble seeing it.
If your strategy involves buying airstrikes early, Pilot can be a good choice. Otherwise don't bother.
Tactician and Engineer aren't that helpful. Garrisons still cost money that might be better spent on more troops, and with Tactician, insurgent retreat casualties are already so random and unlikely that its hard to tell when - or if - he's actually helping.
This is what I'd consider an optimal set of Advisers.
CONCLUSION
Thank you for reading! I hope you use the knowledge gained in this guide to go out and finally win a few games of Rebel Inc! While this guide gives general-purpose knowledge, many maps will require you to change your tactics to account for new variables, or the specific strengths/weaknesses of the governor you're using. Doing that is up to you, so don't be afraid to experiment!
As time goes by and the game updates, I'll try to update this guide if new information shows - but I might be too lazy, so no promises!
If you have questions, comments, or feedback/suggested changes, don't hesitate to leave a comment. I'll try and reply if I can, and this guide will hopefully be edited as time goes by.
CREDITS/ACKNOWLEDGEMENTS:
-K 2 and his excellent youtube channel (linked in introduction)
-The wonderful people on the Rebel Inc/Plague Inc Discord - find the link on the Rebel Inc subreddit!
Shameless Scenario Plugging
Like this guide? Then try out the various scenarios I've created and am shamelessly advertising here:
Insurgent Initiatives: https://steamcommunity.com/sharedfiles/filedetails/?id=2598423305&searchtext=Insurgent
Insurgents get initiatives instead of you.
Garrison Heaven: https://steamcommunity.com/sharedfiles/filedetails/?id=2600249532&searchtext=Garrison
Imagine if you played Rebel Inc, but it was just garrisons. This one I'm the most proud of.
Dual War: https://steamcommunity.com/sharedfiles/filedetails/?id=2604226564&searchtext=Dual+War
The map is split in two and you have to wait for a supersoldier to train up. Has the least custom content of any of the scenarios I've made.
And also plugging somebody else's scenario because I think its great:
The French Algerian War: https://steamcommunity.com/sharedfiles/filedetails/?id=2587406398&searchtext=French
Scenario was made by Transport. Without a doubt, the most carefully balanced scenario of anything I've played on the workshop.
May add more scenarios here in the future if I see any particularly worthy of mention.
Source: https://steamcommunity.com/sharedfiles/filedetails/?id=1971611915
More Rebel Inc: Escalation guilds
- All Guilds
- Transport's Guide To Rebel Inc: Escalation
- Initiatives(0.7.3.0)
- Rebel Inc para idiotas
- Guide 7
- 'Super Squirrel' - Achievement Guide
- 'Infectious' - Achievement Guide
- Guide 2
- Warlord [Brutal]