
Preface
This guide mainly explains solid strategies in surviving Lone Wolf on the hardest difficulty setting (Hard Survival). However, there are many concepts and tips in this guide that apply to any difficulty, and though easier difficulties or non-Lone-Wolf starts may play a little differently, applying the same concepts can almost guarantee success.
This guide is not a tutorial on how to play. It assumes you understand most of the basic mechanics of the game and how many things work.
If you find this guide useful, please rate it so others are more likely to see it.
This guide is being actively updated. It was last updated to Update #2, v0.6.2.8.
Map Type
Valley
Easy surviving, difficult defending. Very difficult to defend due to the severe lack of defensible natural terrain. The easiest map to find earlygame food on, however. Also the easiest map type to create moats.
Hillside
A healthy mix of Mountain and Valley, and in my opinion the most balanced/entertaining.
Mountain
Difficult surviving, easy defending. The easiest to defend due to very defensible natural terrain and accessibility to durable building materials. Very easy to construct bottlenecks and defensible positions. If you can find enough food to survive winter, Mountain is easy to succeed on. It is worth noting that underground bases are largely not viable on Mountain maps due to labor/time costs.
Set Map Size to large, as there is no reason not to. Attacks take longer to reach your base, trebuchets have more difficulty reaching your buildings, and you have more base-location and terrain-defense options.
Character Creation
These examinations of character stats adhere to character creation only. As you collect more settlers you will generate a healthier spread of skills and fill in gaps in your townsfolk's expertise. Almost every skill is useful in some way and you will want to have them later, but this is what you should prioritize with your first settler.
(Those playing on starts other than Lone Wolf can adhere loosely to these guidelines, as more settlers means prioritizing these particular traits isn't as important as targeting a healthier skill spread).
Skills
Backgrounds and pseudonyms just affect skill values, so refer to here when estimating their worth.
Animal Handling 98% useless, only for hunting and butchering efficiency/efficacy. Botany Useful. Very versatile and often-used skill. Carpentry Not very useful. Can make slightly better earlygame bows. Construction Very useful, and the majority of your first settler's work. Urgent. Culinary Somewhat useful. Affects mealmaking yield. Intellectual Useful. Your first settler will spend a fair amount of time researching. Marksman Absolutely necessary. You need a Marksman skill of at least 10 to survive early attacks comfortably. Medicine Not useful. Melee 100% useless earlygame, as your primary mode of defense should be ranged for most of the game. Any points in melee are points wasted. Mining Marginally useful, not urgent. Smithing Useless earlygame. Speechcraft Not very useful. Tailoring Useless earlygame.
Passion stars
Animal Handling Useless. Botany Very useful. A passionate botanist grants you timely access to important crops even if you get unlucky botany stats on your first few settlers, reduces your chance to ruin tree/crop harvests, increases harvest yield, and saves you lots of time since Botany is a multipurpose skill. Carpentry Somewhat useful. Will grant you timely access to higher quality bows. Construction Very useful. Can substitute for a mediocre construction skill since your first settler constructs so much. Culinary Not very useful. Worth having around, though. Intellectual Reasonably useful. Your first settler will research often and passion may make them into a strong researcher. Marksman Very useful. Will significantly increase your chances of surviving attacks, as your first settler will turn into a high-damage bowman quickly. Medicine Not useful. Melee Completely useless for the same reason as the Melee skill. Mining Marginally useful. Smithing Deceptively useful. Your greatest midgame progression wall will be someone with Smithing 20 to craft mechanical parts, otherwise you will need to trade (which is slow and unreliable). Also useful for mass-deconstruction of enemy loot after earlygame. Speechcraft Not very useful. Tailoring Also deceptively useful. A strong tailor makes great early/mid-game armor and clothing. Many settlers dislike low-quality clothing.
Character Creation (cont.)
Perks
Anything with a creation point cost of 0 only affects mood and is more or less negligible, so they are not included.
Positive Perks
Austere Not very useful. Does significantly decrease food intake. Benevolent Not very useful. Brawler Not useful. Brawny Extremely useful, and your main stat priority. Extreme boost to productivity. Congenial Not very useful. Settler will be happier. Erudite Useful. Extra EXP gain and points in Intellectual. Fair Not very useful. Fleet Footed Very useful. Boosts productivity. Forty Winks Useful. Early Bird but without negatives. Lets your settler work more and sleep less. Gobbler Useless. Gourmet Not very useful. Green Thumb Extremely useful all the way until lategame. Hefty Slightly unfavorable. Industrious Extremely useful. Boosts productivity. Iron Stomach Useless. Night Owl Useful. A better Forty Winks. Lets your settler work more and sleep less. Outgoing Not very useful. Settler will be happier. Ravishing Not very useful. Robust Somewhat useful. Motor function boosts productivity. Vigorous Useless. Whirlwind Very useful. Boosts productivity. Wicche Useless. Winsome Not very useful. Wise Useful. A worse Erudite.
Neutral perks
Early Bird Useful. Lets your settler work more and sleep less with proper scheduling. Gluttonous Useless. Ruthless Not very useful. Somnolent Useful. Nearly identical to Early Bird. Lets your settler work more and sleep less with proper scheduling.
Negative Perks
Churl Unfavorable, but not unmanageable. Settler is more prone to unhappiness. Contemplative Unfavorable, but not unmanageable. Settler is more prone to unhappiness. Disfigured Ignorable. Dullard Unfavorable. Avoid. Less EXP and higher chance to fail tasks. Elf Shot Unfavorable, but not unmanageable. Lowers productivity. Ill-favoured Ignorable. Infirm Unfavorable, but ignorable. Slightly lowers productivity. Laggardly Extremely unfavorable. Avoid at all costs. Severely reduces productivity. Listless Ignorable. Moribound Unfavorable. Infirm but worse. Avoid if you can. Sluggardly Extremely unfavorable. Avoid at all costs. Severely reduces productivity. Stout Unfavorable, but not unmanageable. Slightly lowers productivity and increases food intake. Vulnerable Ignorable. Slightly lowers productivity.
Religious alignment is ignorable. All religiosity really affects is how long a settler needs to pray to be happy. You should actually avoid building religious statues early, as backgammon costs less to build and isn't limited to certain religions (and the unhappiness for low religious activity is identical to low entertainment). You should also be building a table and chair for happiness before everything else because it is cheap, quick, and takes minimal additional Leisure time to use.
All other stats/specifics are aesthetic or negligible.
Your optimal starting settler should have Brawny and a formidable Marksman stat. I would not recommend any other substitute.
Other useful perks to have include Fleet Footed, Industrious, and Whirlwind. Somnolent, Early Bird, Night Owl, and Forty Winks are not urgent but nice to have.
Other useful skills to have points in are Botany, Construction, and Intellectual.
Useful skills to have passion in are Botany, Construction, Intellectual, and Marksman. Smithing or Tailoring are less urgent but nice to have.
Starting Out
When you load into your map, here is what you should do:Set your settler's schedule to 100% work. You want them to do nothing but follow commands until they have a place to sleep. This is very important on Lone Wolf's winter starts, as sleeping outside will not only make them unhappy but also make them cold.
Uncheck the disallow for the Packaged Meals, equip the bow, and equip the cap. Ignore the shield and spear. The shield is useless without a one-handed weapon (which you don't have) and can rot away. The spear will still be there when your second settler arrives.
Harvest all mature mushrooms within a large radius. Mushrooms expire to cold temperatures extremely quickly. You will lose them within hours if you do not harvest them. (Mountain starts will probably not have mushrooms. You can substitute this step with Building a butchering table and hunting an animal or two).
Harvest ~150 hay for beds. Do this only after there are no mushrooms left, as mature long grass does not disappear to cold as easily as mushrooms.
Figure out where to situate your base.
Where To Put A Base

General placementYour biggest concern is a place to grow crops. This generally applies only to Mountain maps, as other maps have prolific grass tiles. Do not pick a place where you cannot grow crops nearby, or your midgame/lategame efficiency will suffer greatly.
How much effort it takes to isolate your buildings from attackers is your next biggest concern. Consider moating, walling, or underground building. Moating and walling are EXTREMELY broken. Enemies currently have no way over gaps or over walls, and will path straight to the nearest entrance. If you only make one entrance that accesses the outside, enemies will always end up attacking it. Put your defenses here.
Your next biggest concern is expandability, especially places to build large structures. Vertical building gives you a lot more flexibility with this than you may think.
Natural defensesPits are your greatest ally. Removing all of the entrance ramps and building a staircase out is all you need to bottleneck enemies where you please. Build inside the pit as you see fit. Pits are also easy to expand on non-rocky maps.
Peninsulas are your second greatest ally. You only need to wall/moat one side.
Natural terraces are your third greatest ally. You only need to wall/moat two sides.
The less walls you have to build or moats you have to dig, the more likely you are to survive earlygame. The less time you spend making defenses, the more time you spend kickstarting your infrastructure. The sooner your infrastructure and production picks up, the faster you progress.
Other areas are potentially defensible if you can manage the first few attacks. Keep in mind you can easily bottleneck enemy pathing by walling/moating off areas. It is possible to section off huge areas of land just by walling tiny sections, depending on the terrain generation.
High ground is also nice. Building your town on a large hill is actually reasonably effective, as enemies often have to path a ways while inside your archers' range before hitting your doors, and you do not have to manually build much high ground for archers.
Looking to lategame
It is very useful to pick a place with natural defense to trebuchets. Areas that are defended on a side by a mountain or nested under a steep cliff can provide extremely useful natural defense against trebuchet attacks. Also consider areas that require less walling to defend against trebuchets, if you can't completely defend via terrain.
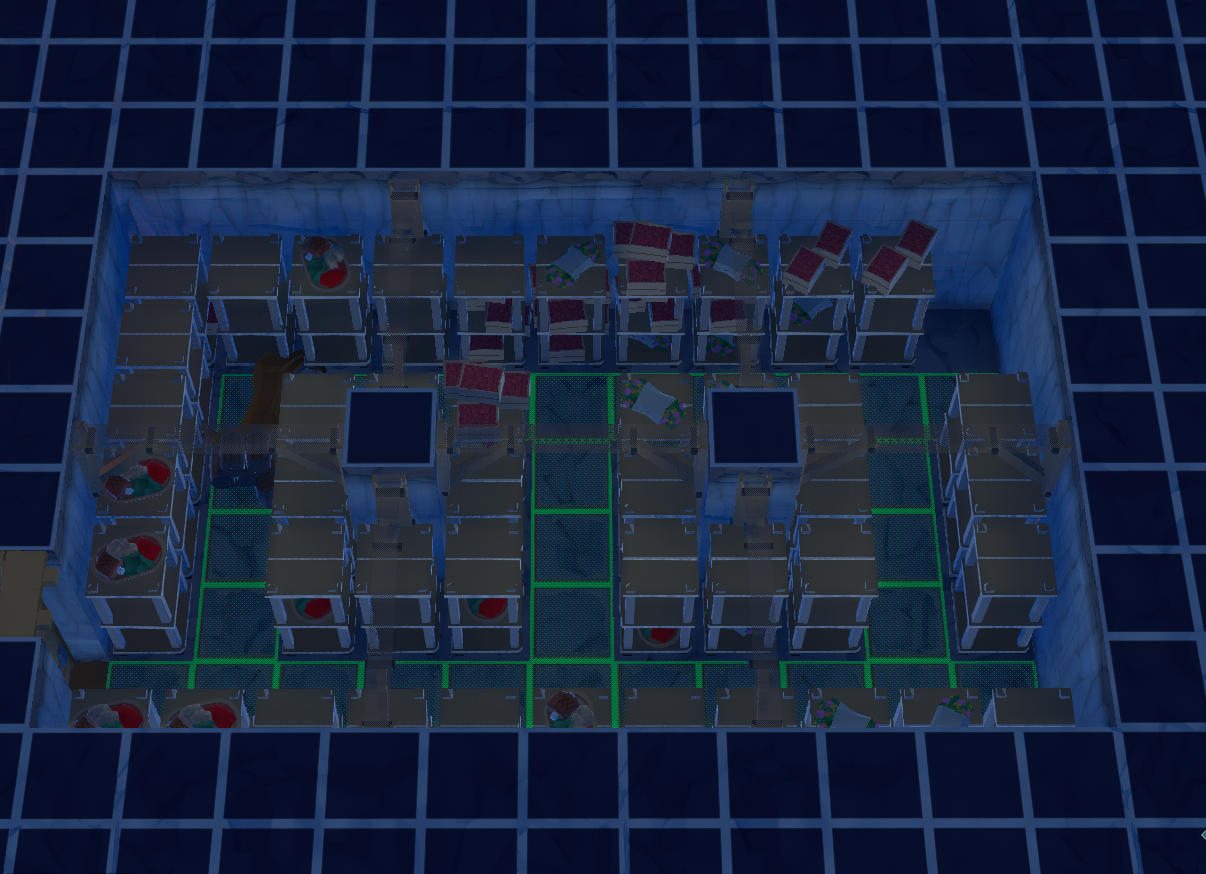
If you are on an easily terraformable map like Valley (or sometimes Hillside) and can't find a good place for natural defense, consider building an underground town. Underground towns are virtually immune to trebuchets but take considerable additional labor to construct as well as knowledge of stability. Here is a quick and easy tileable layout that ensures maximum stability at all times:
This particular room was used as a cellar, but works for other rooms. Pillars should not be more than 3 spaces away from any other pillars or walls, and all sides of the pillar should have beams connecting them to the nearest pillar/wall. This layout is maximally stable, and all ground above it remains stability 4. It is infinitely expandable as long as you follow those rules.
Do not bother with underground building (except cellars and other exceptions) on Mountain maps. It takes far longer to mine stone than dirt, and you will have so much spare limestone anyways that you can mass-produce limestone blocks before you even hit midgame. Limestone block structures are very durable and you can easily resist trebuchet attacks if you build rudimentary walls with them.
What To Do
After your initial harvesting and base locating, do each of these in order. Chop trees as necessary, but don't waste time chopping too many extra.
Create a general stockpile at your base location. Disable human corpses.
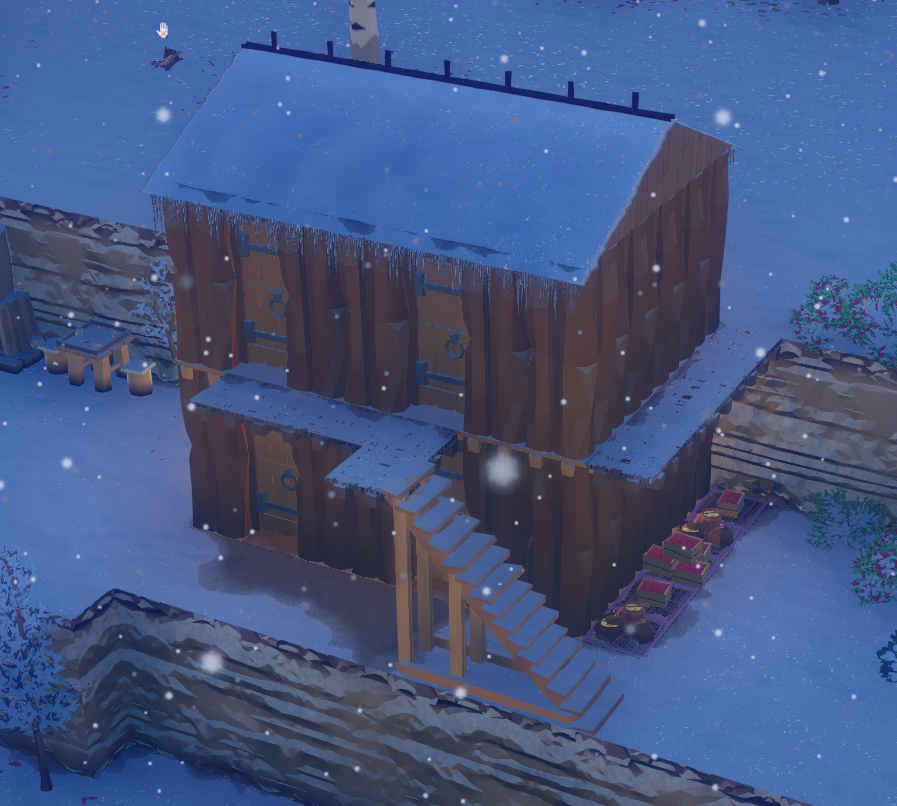
Build housing for one. Set an inside stockpile (high priority) to books and optionally medicine. (You cannot set this to food if you are starting Lone Wolf, as you will have a brazier inside and the room will have heat decay. It is better to put them outside [see below]). Do not use hay for roofing. You need it for beds. Use sticks, you'll get a ton of them by chopping trees.
Yes, it's ugly. But functional.
The rooms are 3x2 because hay beds (the wooden ones. Not hay sleeping spots) are 3 tiles long, and you will upgrade to them eventually. Individual rooms like these (Bedrooms) provide a large mood bonus to those who use them.
(Lone Wolf starts in winter, but the season doesn't matter. Citizens will get a nasty negative mood modifier for sleeping outside. Your highest priority other than not dying is keeping your settlers happy. Your settlers are very happiness-volatile early on, as Initial Optimism (+25) only lasts a few days and you do not have established Leisure buildings. If your first settler goes rebellious before your first two defenses, chances are you may not survive).
Build a sheltered and floored food stockpile off of the side of your housing. Set this stockpile to food and animal carcasses only and take off stimulants and bones. In winter (Lone Wolf), this will grant full rot immunity. On other difficulties that don't start in Winter, it should still be functional enough to work.
Build a campfire. Disable coal and wood for fuel. Start making meals before your packaged meals run out so your settler doesn't grow unhappy eating raw food.
Terraforming defense. Begin to wall off or moat sections to isolate your base area and offer only one entrance. This will bottleneck enemies into one spot with 100% reliability and let you build your defenses there. (On Mountain maps you should be building walls instead of moating, as it takes far less time).
2nd house. Copy the first, and use the first's walls to reduce cost. This will be the start of your longhouse, as you can expand housing the same way. Keeping all housing in one area is generally a good idea.
Proper defense. Build a small tower to secure your only entrance. This should consist of a small one-story archer tower (with merlons) overlooking a set of three doors. Make sure that walls do not obstruct an archer's view of the door. This will otherwise prevent your archers from hitting anyone bashing down your doors. Enemies will prioritize attacking doors over walls, and will try to path through your entrance. Your archers behind your merlons can take them down safely.
You can abuse cliffs and create doors where attackers are always visible.
Your second settler will arrive soon, if not already. Always, always accept settlers, even if their stats are trash. The firepower is absolutely necessary and you will severely struggle to defend attacks if you refuse even one settler.
Build a research table. Shelter it with wicker floors the same way you sheltered your food, except on a different wall.
Build a small wooden table and stool. This is 30 wood for +4 mood every time settlers eat. Cheap happiness.
Build backgammon. Is not limited to only one religion and is actually cheaper than a shrine.
Spend the rest of your time researching between cooking as necessary. Hunt if you have little foraged food (also increases Marksman skill!). You have a little room to do as you please here--build more housing, start digging an underground food cellar, etc.
At some point, a lone trader may arrive. Trade a few meals for their drinkable alcohol if you need the happiness boost.
First Attack
The first attack will inevitably come after your second settler arrives. Fortunately, this is fairly straightforward.Send your one archer to your merlon-protected tower. Your other settler should have the spear you left on the ground just in case things go awry.
As the enemies arrive, it is most wise to focus the archer--not only because they are the only one who can harm you, but because you want the bow they drop for your other citizen to use.
Focus enemies at the doors if you have to. Enemies with certain weapons (e.g. axes) will do high damage to your doors. Kill them at all costs.This should be enough to kill one or two enemies, which--combined with the amount of time they'll spend bashing down your doors--should repel the attack.
AdvancedYou can increase the fire rate of your archer by pausing the moment after your archer fires and then targeting your archer off and back onto your target. The latter 1/3 or so of the attack animation will get cancelled by the command and the attack animation will reset from 0, allowing you to bypass the wind-down archers have. This greatly boosts your damage output early on.
If your melee settler has a speed of at least 3.4 (the higher the better), you can reliably use them to bait the melee attackers. Attackers will focus nearby settlers instead of your doors, so you can have your melee settler run wide circles in front of your archer tower. This will at minimum buy you enough time to take out the archer(s), but if executed well you can survive the first attack without taking any door damage or settler damage.
Here is also a good time to mention body dumping. It is far easier, faster, and less resource-costly to simply dump dead bodies in a (very-high priority) enemy-corpse-only stockpile somewhere outside your base (where settlers will not come within 10 or so tiles of it) than it is to build pyres or dig unmarked graves. Once attacks are done, select a worker or two and have them prioritize nothing but hauling bodies until they are all cleared out. The only caveat is you will need to clear the bones when the bodies rot, but that is little more than a bones stockpile nearby.
If you are desperate for food, you can butcher the corpses instead.
Beyond Attack #1
Congratulations, chances are you have survived attack number one. Now what?
By now you should have enough research to access Agriculture. This is the first research you should pursue. If you don't have enough research, keep researching. Build a second research table if you have to. Optimally, you should have this tech by late Winter so you can start planting the moment the temperature rises enough (which is often before Winter ends).
Food
Chances are you should be running out of food sources, and/or your Currant bushes are running out of harvests. Hunting is often a very unreliable food generation method due to animals' nature to flee as well as generally bad animal spawn/roam locations. As mentioned above, you should already be well on your way to Agriculture, which is your solution to this issue. Immediately begin growing Currant bushes--there is literally almost no reason you shouldn't be growing Currants.Mathematically, most crop yields sit around 1.25 food per day (except for carrots. Don't grow carrots). Currants are almost 1.6. (10 days until first harvest + 3 days between additional harvests = 22 total days. 35 total Currant yield / 22 days = ~1.6 Currants per day)
Currants take the least labor. Currants are planted once and harvested five times. Other crops would be planted five times, harvested five times. Currants save you a lot of planting, which would otherwise take a lot of time--time which could be spent doing other things.
Currants give sticks. You will be using sticks for roofing and fuel, as well as wicker floors for very inexpensive paths or flooring.
Currants are more versatile--on top of meals, they are used to make rough wine, your early-game alcohol.
The only negative to Currants is the long time it takes until they're first harvestable (10 days)--if this is truly an issue and you need food urgently, offset this by planting a few plots of cabbage, the quickest-growing crop. Cabbage will grant you a harvest in 5 days, so a small couple of plots should last you until your Currants are done.
(Note that Currants can be grown on rocky soil, where most other crops cannot. If you are on a Mountain map and crop space is tight, save grass tiles for other crops and put Currants on rocky soil instead. Trees and long grass can also be planted on rocky soil).
Plan ahead and plant a healthy ~40 bushes. By the time they complete, you should be well on your way to cellar preservation. Settlers eat a meal a day; 1 meal = 12 raw food; 12 raw food / 1.6 Currant yield per day = 7.5 Currant bushes to feed one settler. Planning ahead for your next two settlers makes a minimum requirement of 30 bushes--add an extra 10 for safety and alcohol brewing. You will likely need space to store a few hundred berries, which comes next.
Cellar
Make sure you have one before you start harvesting your Currants. It should be spring (or summer on easier difficulties), and your food will spoil without one. Make sure it is at least two layers deep underground to ensure temps cold enough to permanently preserve. This guide is a great place to learn more about optimizing cellar temperature: https://steamcommunity.com/sharedfiles/filedetails/?id=2506438750
Note: You can completely avoid building floors (and thus keep a room colder) by building shelves after researching Preserving Food. Shelves are also 3x more space-efficient than putting things on the floor.
This same cellar is a great example of where to start. You can store stimulants on the extra ground space if you desire, as they won't decay. Carcasses will decay but will last long enough for you to butcher them.
More housing
Expand housing for a third settler if you haven't already. Verticality is your friend--build double-decker housing to save space. Build a fourth room if you're feeling comfortable.
Spare room
Build a large spare room. Plan ahead and determine what it will end up being in mid-game before you build--will it eventually be a library? More housing? Your choice, just avoid having to tear down/rebuild as much as possible. Efficiency is key, and time is not to be squandered. On that note, plan ahead and minimize travel time between buildings. Your production should be near your storage, your farms should be near your cellar, etc. A strong infrastructure is built off of maximizing production and minimizing everything else.
Put any and all stray workstations in this room for a moderate production speed bonus.
Upgrading defenses
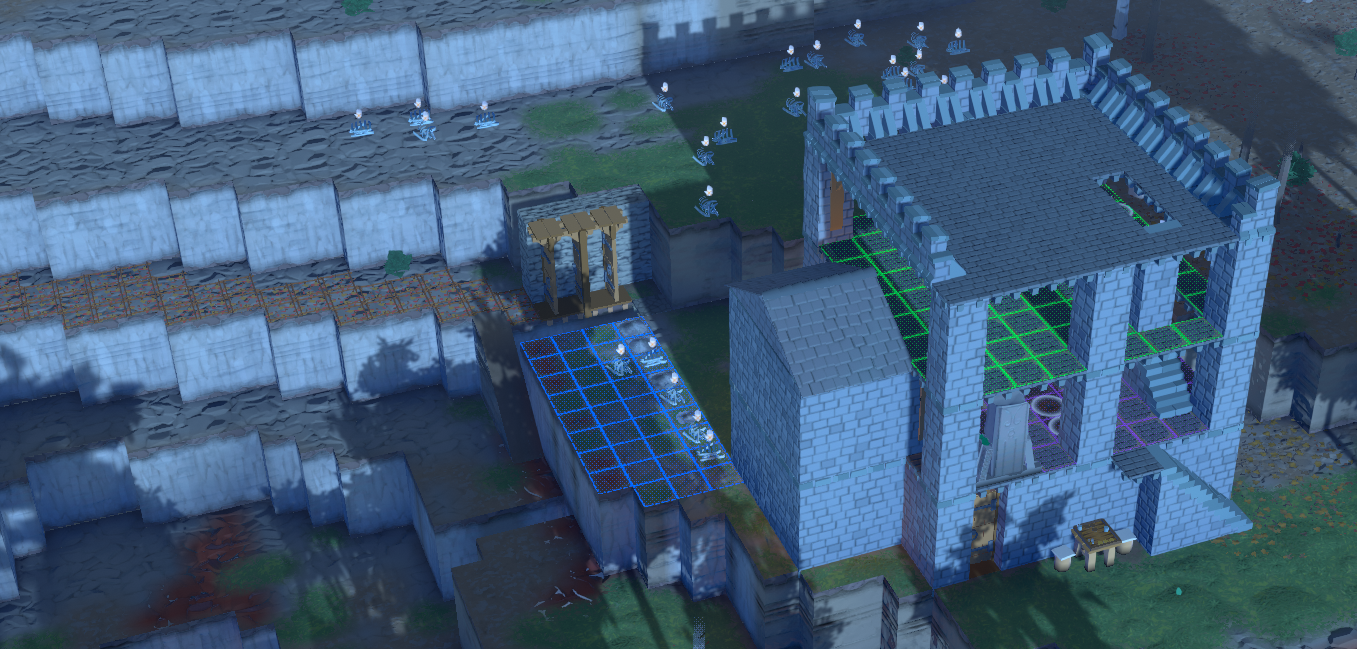
Somewhat optional. It is possible to survive another one or two attacks with your initial defense, but you will have to upgrade eventually. Follow the same premise (archer tower overlooking doors) for simple success. Be careful to not obstruct your archers' line of fire with walls. 2-story high towers are better than 1-story. Again, merlons are your best friend for keeping you safe. The only thing that can kill you is other archers--take them out first unless your doors are under urgent attack. It is generally helpful to build a small "safe box" atop an archer tower for any gravely-injured archers to hide in so they don't die. Stick traps, an obscene number of fences, or long grass in front of your doors are cheap and can severely slow down melee attackers to buy you valuable time during defenses.
A basic midgame defense. The lowest floors of the tower are housing and a workshop for deconstructing.
Do NOT use melee. Melee is useless until endgame, especially on higher difficulties. Attacks ramp up very quickly and you will be almost always outnumbered at least 2 to 1, if not 4 to 1 at times. Melee settlers will get overwhelmed, injured, and die almost instantly without extremely good armor and shields, and even then a merlon-protected archer has more range and takes less damage. The only meaningful use for melee is dispatching trebuchets with a stealthy flank or cleaning up attacks after most enemies are dead. Melee does do more damage, but do not be deceived. Safety and reliability is far more important than damage.
Midgame And Beyond
Congratulations if you've made it this far. The hardest part is over. You should now have the backbone of a stable infrastructure--farming, food preservation, housing, the like.
Due to the variance of each player and each map, this is unfortunately where the hand-holding ends. You are somewhat on your own from here, but there are a number of general concepts that will immensely help you succeed.
Plan ahead
Building, expanding, it doesn't matter. Make every decision only after thinking "will I have to revert this later?" The less time you spend rebuilding, rearranging, or reverting is more time spent progressing.
Technology is king
Do not neglect research. The faster you unlock better tech, the more tools you will have to progress. On Survival, the enemies do not wait for you to advance before strengthening--you have to match them. If they have crossbows and you don't, why not? Don't lag behind, or you may find yourself too unprepared to defend lategame attacks.
Trebuchet defense
Hopefully you should have used some natural terrain to defend against trebuchets. If not, you have a few solid options:Build underground - This was mentioned in "Where to put a base." Do not build underground on Mountain maps--simply start producing limestone bricks early on. Also be familiar with how stability works. This guide is also great for not only cellars but stability: https://steamcommunity.com/sharedfiles/filedetails/?id=2506438750
Walling - A wall is also one of the most reliable ways to defend against trebuchet projectiles. A two-high wall is buildable from ground-level and will defend against most trebuchet projectiles unless the trebuchets have significant high ground. Higher walls may be necessary depending on map type.
Bait building - You can bait trebuchets into attacking certain structures, given that they seem legitimate. A moderate-sized room with a bed, floor, and roof (and maybe a workbench or two) seems to reliably pull trebuchet aggro, though it's a little finicky at times and depends on a few different things. I have not tested it extensively myself, but if you build a building with these (or more) traits outside of your main settlement, it is very likely that trebuchets will attack it if it's closest to them. In a worst-case scenario, you may have to build these on all sides of your base. If you are considering this strategy, you might as well just build walls.
More traditional cheese methods such as production stations outside your walls and/or holes in your walls no longer work, as raiders will now man trebuchets regardless of anything. Your only real way to stop trebuchet fire is to send a hitsquad at them after the main enemy group branches off.
Trade for intermediate resources
Especially metals and mechanical components. If a trader is offering good deals or is overvaluing your proffer, abuse it. Every good trade saves you time and effort, whether it be smelting iron, crafting mechanical components, or otherwise. If you see something you think you could use and you know you're getting away with a good deal, never refuse.
Meals are very cheap to make after early game and are usually valued highly. Even moreso if you can supply the textiles to make packaged meals.
Around this time you may want to start considering sparing settlers and time for trading. This can easily boost your infrastructure if you know what you need and know what to trade.
General Tips
Scheduling
This is very important. Scheduling poorly can make your citizens unhappy no matter what you do.
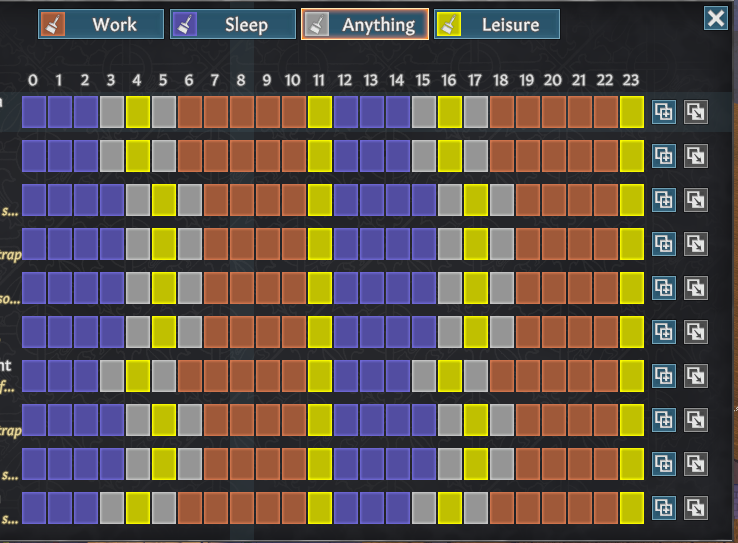
Here is the layout that I have found works best. The 4/5 and 16/17 leisure slots can be exchanged for "Anything" if your workers are not getting enough sleep, but I usually don't find this a problem and would prefer to force leisure to ensure citizens are happy.
Your leisure structures need to be as close as possible to your housing for this to work. All housing you build should have adequate leisure of all types (Entertainment, Religion, and [if not unreasonable] Food & Drink). This means that your Great Hall should be right next to your cellar and store both food and drink, and your housing should be as close to your Great Hall as possible.
Here is how this layout works:
The day starts with 4 hours of sleep. You can reduce this to 3 hours of sleep with settlers who have Sleep Recovery perks like Early Bird, as they will gain roughly the same amount of sleep. Sleep Recovery perks often also increase sleep depletion, but with sleep every 12 hours this ends up virtually negated.
Next comes 1 hour of "Anything." You want this so any stray settlers who miss sleep or need extra sleep can effectively sleep in. If they are low on sleep, they will use this "Anything" time to sleep more. Other settlers who don't need extra sleep will usually wake up and simply do Leisure.
Next comes 1 hour of Leisure. The "Anything" time before this is almost always used for Leisure, and even if it's used for work it will usually be nearby/quick. As such, this is effectively just some extra (forced) Leisure time to keep settlers happy.
Another hour of "Anything." This is just like the first hour of "Anything," except this is to give settlers extra Leisure time if they need it instead of sleep time. Most settlers will actually use this for Work, but it keeps those who don't from becoming annoyed.
Work until 10.
An hour of Leisure. This is not actually for Leisure--this is to force your settlers back near housing so they miss minimal sleep. Any settlers nearby will use it for Leisure, which makes them more likely to use their "Anything" hours for work, so there is no loss of labor time.
Repeat this entire process for the latter half of the day. As mentioned before, splitting sleep in two like this allows settlers with bad Sleep Depletion perks to stay happy, settlers with good Sleep Recovery perks to work more, and all settlers in general to keep out of the nasty low-sleep mood modifiers. You will really only ever have low-sleep settlers when you are using sleep time to defend against attacks.
Haulers
Just because someone has trash skill values doesn't mean they're useless. In midgame and especially lategame you will need citizens who are most often Hauling or Crafting in order to keep up with demand. Without proper Haulers, you may find your harvested crops sitting in your fields, chopped trees not ending up in stockpiles, or other infrastructure slowdowns. Haulers are just as important as skilled workers, as haulers maximize the time skilled workers spend working.
Green Thumb
This gets its own special category because it is so important. Any settler with this trait should instantly be a designated Botanist and harvester, no exceptions. +35% harvest quantity and -50% harvest ruin chance is a ridiculous buff to your productivity and you are mindless to ignore it.
If you get a settler with Green Thumb, immediately make Harvesting their only #1 priority. Nothing else should be above a 2. Most often, a Green Thumb will have Harvesting on #1 and all other Botany skills on #2, and everything else on #3 or higher. You should also immediately downgrade Harvesting priority on every other citizen (or completely disable Harvesting) to ensure every crop is harvested by the settler with this +35% yield. Harvesting large crop fields may seem slow, but unless you're in endgame (where this buff begins to lose usefulness due to raw production quantity and manpower), it is far more efficient for you to let your Green Thumb settler harvest.
General Tips (cont.)

Minimize travel timeHousing next to Great Hall. Maximizes the efficacy of post-sleep Leisure time. Minimizes time settlers spend from housing to leisure.
Great Hall next to cellar. This often means it will be underground. Minimizes time settlers spend from food to table.
Farms next to cellar. Minimizes the time cost of hauling. Farms can otherwise become labor nightmares for your haulers.
Brewing stations next to cellar. Self-explanatory, and keep in mind you need fuel. It is sometimes worth building a storage room full of Barley-only shelves right next to your brewing stations. Barley does not spoil to temperature, so this will save valuable cellar space as well as potentially eliminate a small amount of travel time. These shelves should be close to your farms. A roofed, outside pavilion with shelves is also viable for storing Barley.
Kitchens next to cellar. Not as important since food takes less workstations, workers, and labor to produce en masse. Keep in mind you need fuel.
Workstations next to general storage. Stonecutting, Tailoring, Blacksmithing, Woodworking, etc. all heavily utilizes your general materials storage.
Deconstructing stations next to archer tower. Will drastically reduce your deconstructers' travel time and maximize their production and exp-gain efficiency. Armourer's Tables can deconstruct both textile and metal items, so you may prefer building those instead of other stations.
Libraries can go anywhere since Researchers spend all their time researching and virtually zero time hauling. There is little need to optimize travel times, and their storage (bookshelves) will be in the same room anyways in order to create a Library.
Also build beds near far-away stations or outposts. Losing sleep can make your settlers very unhappy. The low-sleep mood penalty can go as low as -15, which can easily make an unhappy settler instantly rebellious. Place adequate housing near ANY often-used stations that are a significant distance away from your main base, otherwise settlers will waste much of their allocated sleep schedule running back.
Oftentimes it is worth building very small high-priority stockpiles of raw materials next to relevant workstations (like a tile or two of Limestone storage next to a Stonemason's bench. This can often boost productivity not only because the raw materials are closer, but because workers hauling to a stockpile carry all they can whereas a worker hauling to a station carries only as much as they need to work. With proper haulers, these stockpiles will be filled more often than not. This applies even moreso the lighter the resource is, as haulers can carry more en masse.
Hauling a huge bundle of sticks to a Kitchen for fuel is probably the best example of this. A single hauler can haul 200 sticks, which will save you what would otherwise be 200 trips (since cooking fuel is used one at a time). Other potential considerations are brewing ingredients to brewing stations, metal to blacksmithing, textiles to tailors (shelves!), limestone to stone block cutting, clay to clay brick making, etc.
Prioritize passionate skills
It may seem counterintuitive to put priority #1 on a low-point skill, but you should if it has passion stars. The EXP multiplier for passionate skills is 2.5x (1 star) or 4x (2 star)--this buff is obscene, and there is no reason you shouldn't utilize it. Someone with 1 star and 0 points in a skill can reach 20 points in no time flat. Settlers with passion in skills also gain significant mood boosts when they work those skills. So not only are you getting free insane EXP boosts, but free happiness as well. Additionally, you will almost never reach extreme skill values on anyone without passion stars. If you have never seen this outline on a job priority box, you probably don't prioritize passionate skills enough.
This was actually a level 40 midgame Botanist. I had not even reached 10 citizens.
Small exceptions exist where you may prefer a more even job distribution. Though, anyone with passion in a skill should almost always have priority over other settlers without passion no matter what their existing skill value is. The EXP difference adds up quickly over time. The only major exception to this rule is for skills that don't receive a lot of use, like Tending or Hunting. These skills may not get used/trained enough for the EXP bonus to make a measurable difference, and you may prefer someone already competent in the skill perform the task for efficiency's and efficacy's sake.
Smithing, Carpentry, and Tailoring may seem underused, but do not neglect the passion rule. These are actually the most important of them all, as skills in these jobs directly translate to armor and weapon quality. You will suffer lategame if you do not have skilled Smiths, Carpenters, or Tailors, as you will still be stuck with low-quality gear and/or damaged enemy hand-me-downs. Mass-deconstructing enemy gear drops will give you plenty of work for citizens to gain EXP fast.
Recommended Tech Path
Here is a suggested tech path if you are struggling with what to research. It is not a necessity, and every individual settlement's needs may demand slight changes to this order.
Early Game
Architecture (before first attack)
Agriculture (after first attack, near Winter end)
Preserving Food (enables cellar creation via shelves)
Brewing and Furniture (alcohol for happiness, hay beds for happiness, bookshelves for library)
Optional: Wooden Weaponry (if you are in dire need of bows)
Approaching Midgame
Decorative Structures (specialized rooms for productivity boosts, Great Hall for happiness boost)
Clay Brick Making or Stone Block Cutting (higher-grade building materials. Obtaining these sooner means rebuilding less structures)
Tailoring, Armourer (for deconstructing enemy gear)
Fletching II (for more powerful bows)
Midgame
Cooking
Cartography
Smelting
Blacksmithing
Research II
Crossbows I
Preserving Food II (mostly for the increased trading value. Packaging meals is functionally useless if you have a proper cellar)
Endgame
Research III
Crossbows II
Armourer II
Chemistry
Distilling
Steel
Armourer III
All others
Source: https://steamcommunity.com/sharedfiles/filedetails/?id=2677289388
More Going Medieval guilds
- All Guilds
- Going Medieval Trke Rehber.
- How to Dismantle Items Effectively
- Character creation guide [BR/EN]
- Traduzione Italiana Going Medieval
- Going Medieval
- Creating Cold Cellars
- All Science Points u need.
- Easy Fermentation (let the settlers do the work)
- Creating drawbridge
- Settlers not Hauling? Here's how to fix that!