
Game Tips And Tricks


Apiaries work best around arborist buildings. They work around farm plots also but orchards are best for now. They also work great around your blueberry bushes. Move the blue berry bushes to a group and place a beehive near it.
For best production, make sure the travel time between storage, home and workplace is kept to a minimum. It does no good if the worker has to go across town to get a material they need to make something. His or her work time is eaten up by walking.
Build farm plots in groups of 3. One farm in the group should always grow clover for 1 year out of 3. This helps to keep the fertility up.
Certain farm choices are worse for fertility than others. The worst ones can remove up to 10 points from your fertility rate, meaning it can take 2 clover plantings to bring the soil back to even- maybe depending on the +/-5 each planting season gets added to the base -5. One planting of wheat can cost from 0 to -10 fertility while clover can cover the opposite spectrum 0 to +10. All depends on that random extra +/-5 thrown in. This metric has since been changed to a flat % instead of +-x system.
Early game wood/stone setup = work camp, temp shelter and well. At the moment the check box remove mature trees only is buggy. Keep moving the circle to not clear cut an area.
Don't skimp on wells. Villagers use them to put out fires.
Once a farm plot is built and you already have a couple producing food, set the 3 year schedule to field maintenance work and clover for the first 3 years. Get that fertility rate up, and get the rockiness and weeds under control.
Use the F key to see where to place farm plots. Darker green the area, the better fertility it has.
Keyboard Shortcuts


Starting Out The Town Center And Finding A Location


When the game starts, it shows you a parcel of land that you will call home. There is no time passing during this period until you place the center.
Use the directional keys to scout out good locations.
First off lets look at fertility since many of our farms are going to need this. Use the F key to bring up the overlay. Scout around to find the areas that have good fertility rates. Make a mental note of the sites.
https://steamcommunity.com/sharedfiles/filedetails/?id=2854803052&insideModal=1
Lets now look at our water as this is mandatory for any functioning society. Use the I key to turn on the overlay. Again look for good spots to drop wells.
And last, lets look at the desirability of the lands. Housing uses this metric as part of the housing upgrades/tier system.
During this looking over the map phase, also take note of water/lakes/ponds edges for fishing, clay nodes, iron and other resources that will be valuable in due time. Stone and wood is also of primary concern.
Once you have found an area that satisfies the above, plop down the Town Center.
Its time to start gathering materials like wood and stone to construct our first few buildings. There are 3 things we need to consider ASAP. Food, water and housing are our 3 things we need to survive long term.
The Early Years


Hey, so you found a new home for your people. I think they want to build you a statue. A commemorative statue for the bravery and heroism you showed for getting us out of the land of the lost. Ohhh?!?!?! We don't have any stone you say?
Looks like it is time to get to work. Again, we have 3 objectives to meet in short order. Food stocks, housing and fresh water.
You placed the Town Center and now it is time to grow. Lets start by placing 1 main road just to give the town an axis to follow initially. A main street per se.
Things to consider when laying out a framework of the town
1 - Water for wells.
2- A place for noisy dirty business to do be away from the desirable sections of town.
3 - A place for homes to appreciate in value and free from noise, dirt or pollution. Prime real estate.
4 - A section for food growing and gathering.
5 - Where to place storage so it helps reduce travel time.
6 - Where are the natural resources you need to grow?
Hopefully you put your TC in a location so that you can build our housing near it for the boost in value to desirability. Sometimes starting with a giant X for roads and setting each quadrant to a section of the economy. Housing, production (storage), food (storage) and support buildings (schools, healers etc...).
https://steamcommunity.com/sharedfiles/filedetails/?id=2854803052
When laying out your town, don't place everything side by side. You will want to space stuff out because as we research/unlock new things, we will get new buildings- so plan ahead for them.
The town has a place for WATER, has 4x HOUSES being built and has a HUNTERS LODGE for food. All 3 of the must haves. There is a spot set aside for a fisherman house as well. We have a short time to get us enough food to get through the winter. A foragers hut is also needed. That will give us a few types of food and the population happiness will need these diverse foods later.
As the first snow is starting to fall, lets look over the town to see how far we have come in 1 year. We have added some storage, 2x farm plots and a gatherers hut. The food is a bit touchy as the homes should have enough in them to get thru the winter. The towns food stocks are in dire needs.
During the 2nd year, I gathered more wood and stone to add a fishing hut, 1 of the farm fields is finished and growing some veggies and the 2nd field is almost ready to go. We had to install a fence up north to stop the deer from raiding our farms.
This is the basis for a town to continue on and grow for the foreseeable future.
There is going to be a balance you need to find between growth spurts and having to go add a couple more support type buildings- since as you grow, so do the needs of the population. Feeding 50 people sure is different than feeding 500. 1 healer can only see so many patients in one day.
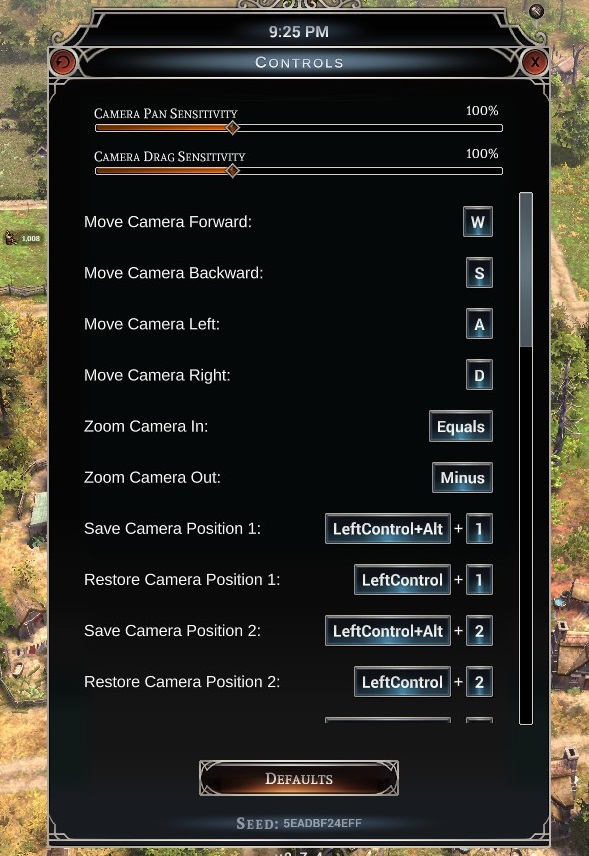
The UI Elements And Controls You Have Available To Use


Most of the popup windows have some useful controls right on the panel. Some are very useful to our needs.
The Town Center Info Screen
Early on before you get any military, you may get raided by either raiders, or by wild animals. There is a bell you can ring to tell your residents to seek shelter. A bonus is applied to residents who shot arrows out of the Town Center.
There is also shown the requirements of what you need to upgrade this building.
The Professions Screen
You can monitor all jobs you currently have from one spot. Hire/fire with very granular controls. Lets you fine tune your economy or move folks around the jobs. Some job sites can have 2 to 6 residents. You can turn off slots you dont want yet as your town is still to small to take advantage of more workers.
Inventory
Happiness // Needs
Zones Of Influence
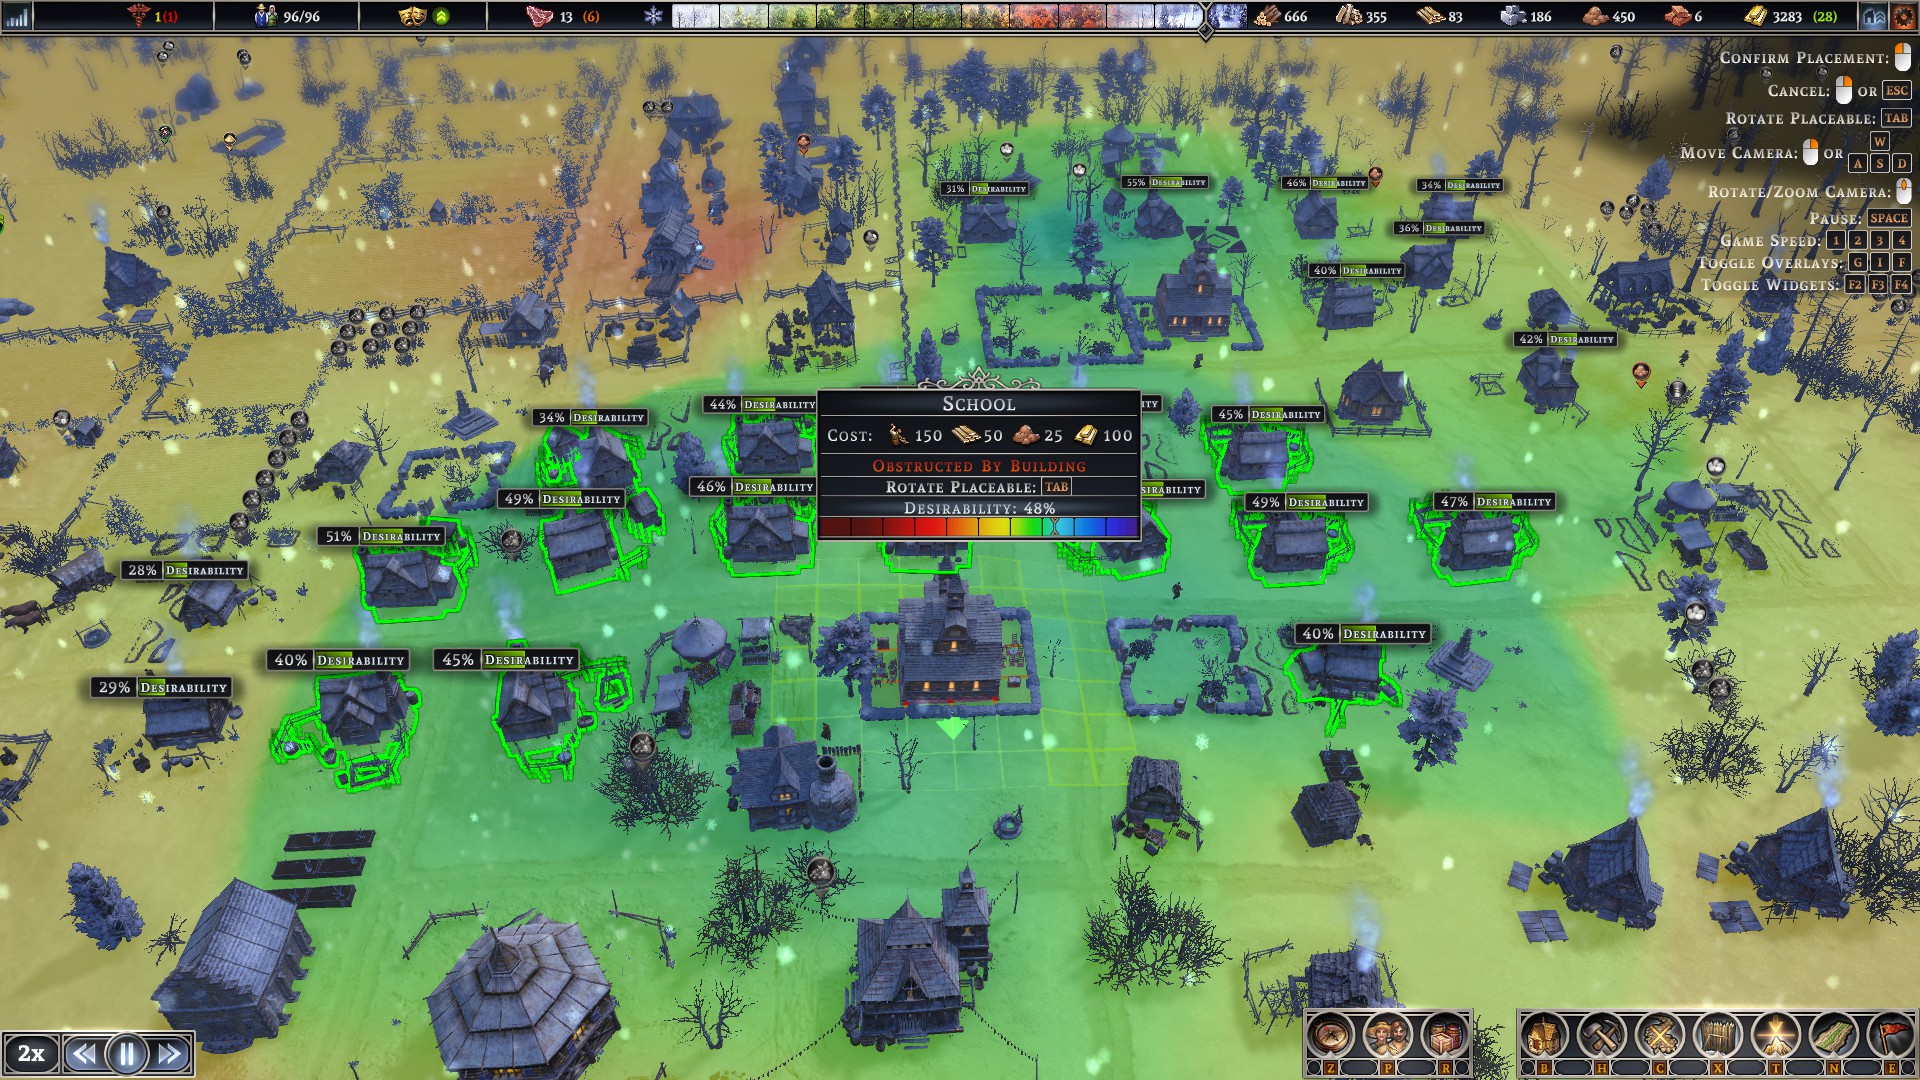


There seems to be lots of confusion over the buildings range circles and what they do. I have heard of some really odd things that some claim they do.
All buildings will have a yellow circle around them when you are in the building phase and deciding where to build. When you place the building shadow at a site, the circle that extends from it is its catchment area. That means it will interact on its own with any building in that area. Anything outside of this area, a building will not interact with on its own. Buildings outside this area usually have a family member travel to a business and obtain or drop off something and return home to store it. Some buildings have small circles (houses) and interact with very few limited buildings. Other buildings have a large circles (markets) and interact with many buildings.
This is positive influence with a building. Notice the green outlines amongst the buildings around it?
.
This is negative influence with other buildings. Notice how they outline in red?
.
When you select a market, you can see the range of its effect as seen here.
.
It is very possible a house's small circle does not overlap a market, so the house has no access to a market.
The house above does happen to fall under the market's circle, so the house will be given access by the market instead.
As long as a service building's circle overlaps a house, the house has coverage whether or not the house circle overlaps with the service building.
Some items are special and have additional actions available to use.
For instance, this blueberry bush can be moved and replanted in another location.
.
.
.
Do not like the way the neighborhood looks? Lets change it. Select a building such as a forager's hut and use the little button top right. Select a new location and set the building down. Wait for the labor that needs to happen to clear out the new location so the building can be moved. You can technically move your whole town a bit at a time like this. Its just gonna cost allot of labor.
Farm Plots And The Fertility And Soil Mechanics


Some of this changed in 7.5f - will update soon
Farming is the staple of life that feeds the world. Without farms, food would be scarce. People will have a hard time finding food throughout the winters. Along with farms, we need a way to store it so it does rot so fast. Use rootcellars for this purpose. Its a good idea to build them close to each other, farms and rootcellars.
There will be a schedule for 3 years you setup once the farmers finish tilling the fields. (fig 1)
You can select what to do each year by selecting the year row which should show a popup window to the right. This window has several crop plants and 2 maintenance modes to choose from. Each plant has a certain soil fertility level that the soil needs to match so you get the most yield. The trick is to try to come out ahead on the fertility scale at the end of the year. At least break even is desired. (fig 2)
You should also setup a compost yard so you can use the end process to add fertilizer the plots.
Over time we can apply sand or clay to adjust the fertility of the soil. The crops you plant need to have a soil affinity, meaning the soil and crops should be similar otherwise you will get consistently low yields.
After looking at both of those screens, we have 2 systems to deal with, fertility of the soil.
Soil compatibility is huge in order to get top harvests. Look at the center bottom of figure one. You see a multicolored strip with red yellow and green. You want the crops soil preferred type to be in the green on this scale. The farther away you are from the sweet spot, the lower and lower your yield will be. I try to plant the same type of crops on this plot so I don't have to mess with the clay/sand to balance it out.
Over time we can apply sand or clay to adjust the fertility of the soil. The crops you plant need to have a soil affinity, meaning the soil and crops should be similar otherwise you will get consistently low yields.
I tend to make 3 plots in a group and decide what each plot will grow and set the soil and leave it. Each plot is slightly different so the crops grown will be different. The alternative is to set it in the winter so that spring the mix will be added. You should also setup a compost yard so you can use the end process to add fertilizer the plots. The compost is also applied in the spring each year if available.
To use compost, over time a sybol will appear over your compost yard. Click on the yard and you will see a green button to press to be able to select the field to apply it to.
The 2nd part of this farm mechanic is also tied to fertility. So we had soil compatibility and soil fertility, both separate yet both needs attention to get bumper crops each year.
(figure 3)
Notice when you use the F key you get a fertility overlay that shows where the good soil is. This is where you want to put your farms. (I have yet to test for orchards.) During the very early phase, at least start a farm plot of 5x5 or 6x6. It takes them a year to build it so best start it early. Place wooden fencing around it if you have animals nearby such as deer who will happily relive you of your reward for your hard work.
As long as you start it on very fertile ground you will have a few good growing years before it decays to a yellow tint on the F overlay.
The trick is to keep it there and don't let it degrade at all. There are 2 metrics, rocks and weeds, that you need to use the hoeing skill on until they are gone or less than 2 or 3 %. In the following years, if you plant clover and are careful which crops you plant, your ground can stay fertile a very long time with no compost needed. You MUST leave a field fallow or growing clover 2 out of the 3 years, depending on what you grow.
There is one more metric to keep in mind. Down towards the bottom of fig 2 is a stat called Impacts Fertility. Most crops damage this number which means its lowering your fertility by sucking out all the nutrients such as wheat. Look at that whooping -5 for starters and then on top of that there is another -1 to -5 added to that. 1 wheat crop can knock off 10 points, meaning you need at least 2 clover crops to fix that deterioration. Its possible if you grow 3 wheat crops in 3 straight years to really knock a good deal out of the soil.
This game treats the grains as one once they leave the fields and hit storage. Here we have 3 types of grain - wheat, buckwheat and rye. Check out the impact fertility to see wheat is most destructive.
This is my field after its built. I added the first year of crop to plant and need to add the next 2.
See all those weeds and rocks? The maintenance option to hoe the field will reduce those 2 negative metrics. If you have enough food production from hunters, fishers and a forager hut, I would recommend to grow clover and hoe in the first 2 or 3 years to get the weeds and rocks very low. It will up your yields.
After hoeing and clover for 2 years, I set the 2nd year to grow spring peas and then back to clover. We can safely remove the hoeing operations from the schedule and add in food there now. Just be careful you don't undo all that work in a couple years. Add clover in once each year and a crop each year. You will get consistent high yields this way.
Look at the crop info screen and notice another metric called weed suppression. Some crops will stop the weed cold and others will allow them to grow fast. Its all a balancing act.
1 - Make 3 fields 5x5, 6x6 or 10x10. Early game small fields work best and later game its okay to build bigger fields. Just beware that diseases require you to rotate different crop types on the field so you don't let the disease get out of control and wreck that field or fields. It can move from 1 field to another if the crop type is the same. ROTATE those crop types each year.
There is one more mechanic to bee aware of- Apiaries. Place one in the middle of a field as its farmers that take care of the hives. They are not considered food, but you can sell the honey on the market to help get your trade going. You want the wax to make candles for your town, plus you can sell any over stock to traders as well.
There is rumors that it helps crop yields but I have not seen any evidence that its a big gain. You can also place apiaries near your arborist fruit tree farms, or if you gather your blueberries into a patches near your forager huts.
Here is some screenshots of a a couple plots of 2 groups with 3 plots each. This 1st screen shows a new field that has my set rotation for new fields after we have established a secure food supply. We have no need to rush so get those fields right so they can blast some food out.
This shot shows the difference in fertility to my other group that has gone thru my rotation to get that fertility up.
This last shot shows what one of my plots looks like after the 3 years of continuous maint/clover.
Icons Found On The Maps


There are many icons showing locations of various resource deposits, plants, wildlife, and resources worth gathering to help in our survival. The ones we look for most are resources that are in limited quantities like coal, iron or some other resource that can limit our growth without us having to go outside our hamlet for items we cant make ourselves.
So we need raw materials to produce items which in turn serve 3 purposes. 1 - employment, 2 - population needs, 3 - trade excess for gold
Icons to look out for.
Clay
Coal
Deer
Fish
Gold
Iron
Sand
Willow Bush
Worker Slot Empty
Wood And Stone
*** Important ***
Wood and stone will be under going changes - will add more or correct after the changes.
At the moment the present meta is to build 1 work camp, 1 temporary housing and 1 well (for fires) in an area near the resources you need wood and/or stone.
The stone will run out presently but a future update is supposed to rectify this issue. Mega rocks can now be found on maps with a pile containing 1200 large as I have seen so far. Still a T5 building to come later.
As long as you don't clear cut wood in an area, it grows back faster over time. I practice cutting only mature trees or trees under the footprints for construction. I move the circle on the work camp around so in a couple years I put it back for a season. I rotate my areas.
The wainwright will bring supplies to the temp house (soap will be included in a future update) so the villagers don't bother doing that while they work at the camp - its supplied for them.
Water And Its Missing Interactions
Early on Crate tried to do some water stuff like bridges and other things. They have stated that water related buildings have been put on hold due to some difficulties they did not go into detail on.
Zantai (dev) mentioned it most likely will end up as a dlc in the future.
Bugs Or Issues
Currently there seems to be a building integrity problem. They are not getting repaired and eventually they fail due to condemnation. This issue appears fixed in 7.5f
Hunter lvl 2 building traps are stuck at default of 4.
Seems once in awhile that stuff just stops moving, laborers or builders just wander around.
Tiers And Building Requirements
The games progression is based on buildings and the tiers in which they fall. As you increase the Town Hall tier level, you also open up new buildings and services for your populations. This is important as some aspects of the game (like barrels for storage) is mid game technology. You will lose food due to spoilage until you can build and operate a cooperage building.
The Town Center building is the center of it all. From this very building our empire will grow until it breaks our PC and it begs us to stop.... that's beside the point... 1 more building.... 1 more building, it can handle it (1 fps).. cough cough ...
When you open the TC screen, in the top sections you see 2 window panes. The one that looks like a bell is the emergency return home to the population alarm bell (left side top), and a window pane that has the requirements needed to UPGRADE to the next tier.
T1 Buildings
T2 Buildings
T3 Buildings
T4 Buildings
Trading


Howdy Mr Mayor, we need some heavy machine parts to build that wind mill! Our cheap stuff is just gonna break over and over. We need to find a trade partner to help us out.
Mr Mayor - Well how about we christen this land right over there and build us a trading post so them fellas from far off can come and sell us over priced stuff so we feel happy inside yea!!!
Townsfolk - Mr Mayor that is a brilliant idea - let us build you another statue because you are so smart !!
So there is gonna come a time in game when we need something to make something and we cant produce it. Enter the trading post. Each spring at least 2 traders will visit out of a pool of 5 I think I counted. They each carry different items and ask for different items to buy from you.
I am supposing Mr Mayor can tell by the names of these folks what wares they be pushing.
The trade building works a little bit different than some games.
As you can see I have moved a few items into the building so I have few things to start. We have little gold in the beginning as we are a fledgling town living on the edge for now.
1 - You will need to add items to the building stock to be able to trade it. You can not enter a trade agreement unless the goods are located in the trading post. Use the transfer goods button along the left side for the items you want to move and select the amount. Wait until the worker has gathered the stuff as it might be awhile depending on the distance they need to go to stock the building. We might consider adding the 2nd worker for a short time to boost the gathering rate. Just remove the 2nd person later on.
2 - Transfer a starting pool of gold to the building as well. Its seed money. Again the worker will have to retrieve it from your treasury to add into the building.
3 - The trader comes and you enter the trade screen and look over the offers of what they want to buy and what they want to sell. I try to sell some of my items first to grow my seed money.
4 - Click on the offers you want to take and work thru the buy/sell screen.
5 - Restock any wares you sold before the next merchant arrives if you can. They stay about 60 days and then they move on to the next destination.
How Much Food Is Enough
I have been trying to track the amount of food per person per month.
I am currently using the foods produced screen as it has the production, consumed and spoiled metrics all in 1 place.
I run a stable population of 64 for a couple years to let stuff stabilize and farm plots to get some fertility built up. I typically notate the numbers once a year over a 3 year period each spring when the new year screen announcement pops up.
Pause the game and add up all consumed food (all types) for the previous year. Divide this by 64 (population) and again divide by 12 (months) to get a value. Add these 3 years together and average to get the food per month.
My last time I did a run, the number hovered around 3.3 units of food per month.
My questions so far - does different food have different nutritional weighting or is 1 piece equal to 1 piece no matter the food group type.
Source: https://steamcommunity.com/sharedfiles/filedetails/?id=2850015818
More Farthest Frontier guilds
- All Guilds
- How to create your own mod with MelonLoader
- Beyond-the-beginner tips and info [v0.9.4]
- Big Agriculture : Set-n-Forget Food Processing Complex
- Creating Town in First 5 Years
- Farthest Frontier Guide 38
- Optimal residential area layout
- Advanced Landscaping Guide
- Temple Relics [v0.9.0]
- [v0.7.5] - Field / Farming