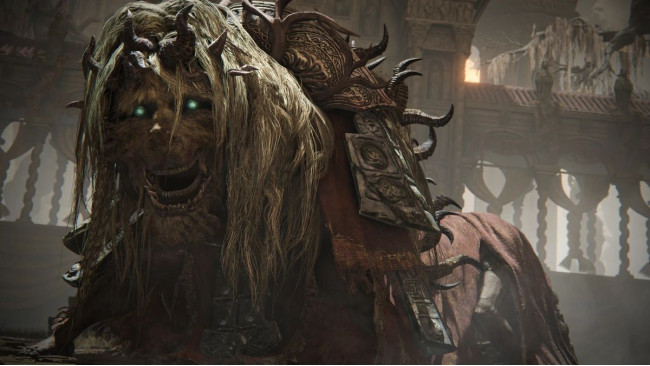
How To Beat Divine Beast Dancing Lion


The Divine Beast Dancing Lion in Shadow of the Erdtree is at the very top of Belurat, and likely one of the first bosses you encounter, unless you run into the Erdtree Ghostflame Dragon first. The Lands Between have turned the difficulty up to 11, as every foe hits far harder than you're used to, and that includes this Dancing Lion, who is not easy to reach in the first place.
However, once you do make it to the site of grace at the very top of the tower, past the scorpions, birds, soldiers, and more standing in the way, you'll be facing the Divine Beast Dancing Lion. He's the first on our list of Shadow of the Erdtree main bosses in order so there's not getting away from taking him on. Here's everything you need to know in order to beat it.
First off, make sure you take full advantage of the NPC summon to the left of the entrance to the boss. This will summon Redmane Freyja, who is an absolute asset in this fight, since she can absorb a lot of aggro and stay alive for the majority of the encounter. I'd also recommend using your most powerful Spirit Ash - I succeeded with the Mimic Tear, which is widely considered to be one of the best in the game - mostly due to the fact it can also take away some aggro and allow you to back off and heal.
When you enter the fight, the Dancing Lion will either stay in the middle of the arena and unleash a smoke attack from afar, or start trotting to you slowly. If it's the former, you'll want to immediately start dodging to the side as it has a wide range,then waiting until the boss is aggroed on Redmane Freyja before summoning a Spirit Ash.
For the most part, the first half of the fight is fairly straightforward: if the Dancing Lion is focused on attacking you, focus solely on dodging. It will perform a variety of melee attacks so keep your target lock on and be ready to roll away as soon as it comes swooping in.
Watch out when the Lion spirals into the air, as it's about to unleash a circular smoke attack that can be a pain to dodge. You can avoid being hit by being directly underneath it as there is a small area of safety, or you should dodge away from the boss as quickly as possible. As you approach the halfway point, the Lion will jump into the sky and enter one of three elemental forms: lightning, wind, or ice, then proceed to switch between the three every 20-30 seconds or so for the rest of the fight. The lightning form will send out lightning bolts which are easy to dodge at first, but keep an eye out for the lingering sparks on the ground afterwards, as more bolts will come down in those locations.
In the wind form, the Lion will emit wind projectiles that deal a surprisingly high amount of damage if they connect but are fairly simple to dodge, plus tornadoes that are much bigger, but travel slower. The ice form can cause you to build up frostbite along with creating ice spikes over the arena surface. Make sure you keep rolling, through the lightning and wind attacks, and the ice spikes on the ground can be jumped over.
Overall, your strategy should be to stay mobile and take advantage of the fact Redmane Freyja will absorb a lot of the aggro, allowing you to pounce from behind. When the Lion rears up, it may be about to grab you in its mouth which can be an insta-kill, so while it's easy to dodge and obviously telegraphed, a mistake here is fatal.
Taking down the Divine Beast Dancing Lion will net you 90,000 runes, the Remembrance of the Dancing Lion, and the Divine Beast Head, which is a very solid helmet with decent defensive stats.
How To Beat Rellana, Twin Moon Knight


When you first meet Rellana, you would be forgiven for thinking that you're about to fight a horseless Loretta—and just like Loretta, she'll fling sorceries at you in between sword slashes.
A dual sword-wielding knight, Rellana's attacks and combos may look intimidating, but they are relatively easy to dodge, once you get the rhythm down. And that's where the main problem comes in—she's aggressive and her combos can be pretty lengthy so you might struggle to find windows to get any hits in. Thankfully, the boss has relatively low poise and can be staggered pretty easily with heavy or jumping attacks.
Here are a few more tips to help you beat Rellana:
She likes to follow up her sorceries by closing with you, so be careful not to dodge away from the projectile and into her sword.
The blue arc can be easily dodged by rolling towards it.
At half health, she'll light up her swords. If she starts swinging the fire sword, move away from her quickly to avoid the eruptions.
When she powers up the blue sword, roll to the side to dodge the overhead hit, then forward to avoid the horizontal sweep that follows it.
If she floats into the air and casts her twin moons sorcery, get away from her. You can time a jump when the moons hit the floor to avoid the explosions, but her follow-up slam can be harder to avoid.
Elden Ring Rellana
If you're still having trouble, splitting her aggro with either Leda or Dryleaf Dane is an option—their summon signs are right outside the door. I wouldn't summon both, however, as that will push Rellana's health pool up considerably which will just make the fight drag on for longer than it needs to.
Once you beat her, you'll receive the Remembrance of the Twin Moon Knight which can be exchanged for Rellana's Twinblade or her sorcery, Rellana's Twin Moons.
How To Beat Golden Hippopotamus


Yeah why not, a giant hippo is guarding the main gate of the Shadow Keep. This big guy is about as straightforward as bosses get. He bites, tackles, and swings his head around and all you have to do is dodge. However, due to his massive size and the relatively small arena that isn’t always as easy as it sounds.
The hippo does not have a wide range of attacks but even with multiple Scadutree Blessings he can still kill you with 2-4 hits. Most of his attacks are single hits, so wait for the big swing and do not get baited into panic rolling.The hippo almost always begins the battle by charging at you with his mouth open. This grab attack results in him biting you multiple times, dealing big damage.The bite is slow but has huge range and will often grab you even if you roll past, so I recommend just strafing around and attacking him in the side as his charge comes to an end. Most of his attacks leave enough time for one charged attack or a short combo before he strikes again, don’t get greedy!
The rest of his moveset basically consists of various bites and head swings. When he swings his head up while keeping his front feet on the ground, he is going to do a double chin slam. Roll past both before the moment of impact.
When he stands up on his back legs he is going to do a full body slam. You can avoid this by rolling into it at the last second, or more simply by stepping to the side and jumping as the hits the ground. This way you can land a jumping attack combo as he gets up off the ground.
When he dips his head down, he is going to do an upward horn swing. This one has a slight delay before the attack and deals massive damage, so wait for the swing to begin before rolling toward and through his head. This one has a long cooldown, so use the opening to attack.
If you are attacking him from the side he often reacts with a side step / bite attack where he attempts to bump you away from him. As you might expect, you need to roll through the tackle. Watch his body movements close and dodge as he moves in.
His bite attacks are a bit more straightforward. He telegraphs them by opening his mouth wide, then dashes forward as he attempts to chomp down on you. Roll into the bite as his mouth closes and you can avoid them. Just be careful, he loves to combo these quick bites into other attacks like the head uppercut.
Like most big beast enemies the hippo is susceptible to bleed, and of course staggers. Try and use charge attacks whenever you have an opening to build toward a knock down.
At about 60% health the hippo will glow gold, signaling the start of phase two. Long quills will burst from his back, shooting needles into the ground around him. When you see him start to glow you can get a couple of attacks in before the transformation, staying close to him seems to avoid the most of the needle rain.
The hippo’s attacks do not change at all in phase two, except he has one new attack. After glowing gold, the hippo slams himself into the ground and shoots needles out around him. Dodge roll away from the impact, then dodge roll again to avoid the blast of needles. You can quickly get some attacks in as he is standing back up.
Watch carefully, keep calm, and never panic roll! Keep up the steady counterattacks until the hippo is defeated.
Your reward is the Aspects of the Crucible - Thorns, Scadutree Fragment x2, and 200,000 Runes.
How To Beat Romina In Elden Ring


The first thing to consider when challenging Romina is what armor you will use. Much like Melinia, Romina uses Rot as her offense so you’ll want to take armor with high immunity to counter it.
For the fight itself, Phase 1 is tricky but fairly simple. You’re going to deal with long-swiping combinations. These can either be two or three long, however, you can roll into them to avoid taking damage. Sometimes she can end a combination with a rolling attack which can also be avoided, so just be careful if you see her start to spin.
From a distance, she will attempt to strike you with her scorpion tales, but you can avoid these by closing the gap and rolling as they are about to make an impact. You’re better off staying close to the boss if possible as her close-range moves in Phase 1 are easy to avoid and it leaves an opening for you to deal damage.
In Phase 2 all of the same moves still apply, but she starts to use one ultimate move. This new ability will create a whirlwind of butterflies around her that can be lethal if you’re close. Run away from her when you see this ability start, but be careful as the whole arena will now have butterflies floating around. You need to find a spot with no butterflies to avoid taking damage or use your shield to lessen the blow.
From here it’s back to basic, simply follow the tips from Phase 1 and use them to avoid taking any damage while getting in shots of your own. Eventually, you will beat this boss and get access to the next area.
Last Resorts
If you’re really struggling you can use Spirit Ashes to help out in the battle, and as usual, the best of these is the Mimic Tear. This clone can help you deal damage, but also tank damage for you and provide opportunities to get behind and safely attack.
You can use summons to bring in another player to help, but we would suggest trying Mimic Tear first as it doesn’t increase the boss’s health in the same way that a player or NPC summon would.
How To Beat Messmer The Impaler


The first thing you need to take into account before even entering the arena is that Messmer the Impaler employs Fire-based attacks alongside his general sword swipes. Therefore, having a Talisman equipped that helps to negate Fire damage is crucial here. If you have the Flamedrake Talisman +3, this is going to help you massively. You'll simply be able to survive for longer — end of.
What's also important to understand that given how aggressive Messmer the Impaler is — across both of his phases (yes, there are two) — you should treat this encounter more as a battle of attrition rather than one you strategically handle. Yes, you must retreat to restore your HP when needed, but here, you kind of need to fight fire with fire (quite literally in this case) by going all out yourself. Don't let the boss have a moment's rest; call in your Mimic Tear Ashes and go to town on him. It's unlikely you'll have enough Poise to break him out of his own attacks, but applying Bleed damage and eventually staggering him works wonders.
In the first phase, Messmer the Impaler utilises a very long sword that he uses to prod and swing at you. There are combos where he'll lunge forward three times in quick succession and others where he swings the sword around the arena. You can block these, but since they're imbued with Fire, you're still going to take a bit of damage no matter how strong your Talisman is. As such, it's best to roll out of the way. Then, the boss will call upon Fire itself, covering the arena in fireballs within his immediate vicinity. He takes a second to activate this attack, giving you the chance to retreat to safety. There's also a grapple move where he'll stick you on the end of his sword and deal heavy damage.
You need to accept you're going to get hit a lot in this fight; it's the best way of dealing with the encounter as you essentially race his health pool against yours, hoping you have more before the battle is over. You'll do better if you're aggressive yourself.
When his health bar reaches halfway, a cutscene will trigger where Messmer the Impaler pulls his right eyeball out of his socket, granting him access to the powers of the snake accompanying him. Surprisingly, in our experience, this second phase is actually slightly easier than the first.
Now known as Base Serpent Messmer, he will at points turn into a snake and dive down from above at you up to three times. If he's targeting your Mimic Tear Ashes, you kind of don't need to worry about the move. Even better, once he's slammed to the ground three times, Messmer leaves himself open for a flurry of attacks as he slowly stands back up. This is your chance to deal heavy damage as he approaches death in this second phase.
Once again, remain aggressive in your approach and you should beat him before too long.
How To Beat Needle Knight Leda

Fighting Leda, the Needle Knight and her allies can be tricky, however, with the right strategy this can be made into one of the easiest battles in Shadow of the Erdtree.
Before entering the battle notice that there is a gold summoning sign next to Leda’s red battle sign, this will provide you with an ally who will appear midway through the fight. We strongly recommend using this summon, as you’ll be fighting multiple enemies alone otherwise.
For your build, we would suggest taking something with heavy Bleed or Frost build-ups as all three of the enemies you’ll face do have access to health pots, and as such killing them as fast as possible is the optimal way to win.
Your first opponent will use two curved blades as their weapon and as such you simply need to roll out of the way and punish when combinations are over. If you can get behind them then a backstab is available which will do major damage. There’s nothing too important to note here other than the fact that if you take too long a second enemy, Dryleaf Dane will arrive.
Dryleaf Dane is tough to fight as he has incredible hand-to-hand skills, but also access to casting abilities that can cause you trouble from range. Your best bet is to finish off the first opponent before turning focus to Dane. Not long after he arrives, your own reinforcements will arrive if you use the summoning sign before entering the battle.
Use your ally to take agro from Dane allowing you to get behind and deal a backstab for critical damage. It’s in your best interests to try to eliminate Dane as fast as possible before Leda arrives, but if she gets there too soon then we’d suggest letting your summon battle one while you finish the other.
Leda uses a combination of close and long-range attacks. We’d suggest fighting her from in close if possible as you can typically roll her combinations fairly easily and be ready to counter. If your NPC helper is still alive then you can use the previous strategy of getting behind and using backstabs to quickly slay this warrior.
Last Resorts
If you’re still having trouble with this fight then we suggest using the Mimic Tear Ashes. With a third companion to help in the battle, these fights become a breeze and by the end, it will seem like cheating. All of the same strategies still apply, but it will just make staying safe a lot easier.
How To Defeat Promised Consort Radahn


The Promised Consort Radahn fight is reminiscent of Pontiff Sulyvahn and is incredibly aggressive. When you walk into the area, Radahn will usually charge up his gravity magic and spin toward the entrance. Dodge as soon as he makes it over to you or you will lose most of your health. After dodging the spin, it’s time to get ready for an onslaught of attacks.
Nearly all of Radahn’s attacks are in groups of five or six swings that go from fast to delayed. The main combo will end in a ground slam that has an aftershock. Even after you doidge all of those attacks, you have a couple of seconds to dish out damage before the fight starts again. With the swords, Radahn will do his swings that you should dodge into, or he will do two flips back to back with more slams.
Tips to Beat Promised Consort Radahn in Elden Ring:
Dodge the initial spin attack as the fight begins.
Evade into the boss during the six-attack sword combos.
Try to dodge the purple gravity pull to avoid thorns.
Don’t use more than one or two attacks at a time.
Make use of Spirit Ashes.
Outside of the swords, Radahn has two main Gravity Magic attacks that deal a ton of damage. In the first one, he will fly into the air and surround himself with small meteors. Then they all get tossed at you, followed by another slam. Dodging these is difficult. But if you can get past them, his other Gravity attack pulls you in and summons thorns all around Radahn. This is a real test of dodge discipline and timing.
I used the Dark Moon Greatsword for this fight and I used Spirit Ashes. My goal was to get Promised Consort Radahn to about 60% health so the second phase could start. Considering I was at level 11 for the Scadutree Blessing, I needed any advantage I could get.
How to Beat Radahn, Consort of Miquella in Elden Ring
Radahn, Consort of Miquella has tons of Holy Damage mixed with the attacks from the first phase of the fight. Holy Damage explosions appear everywhere as Miquella attempts to help Radahn win the battle. But they aren’t all as bad as they look. You need to start phase 2 in a circle in the arena until the explosions stop. After that, the real onslaught begins.
Radahn and Miquella will use tons of illusions that don’t actually do much at all. For example, Radahn and Miquella will go in the air and project four slam attacks. You really only need to dodge the last slam, which is the real one. That’s the case for a few different attacks in phase 2 and they all leave trails of Holy Damage.
Simply put, this fight is a test of stamina management and your ability to dodge. I highly recommend using Spirit Ashes to get some of the heat off you, but if you refuse, learning the timing of the Holy attacks will save you. Before you know it, Radahn, Consort of Miquella will be beaten and you knocked a God off the list for Elden Lords.
My Thoughts

The Eldree DLC is an intense and challenging expansion for the popular action-adventure game. It introduces new, powerful enemies and bosses that test even the most skilled players. With its high difficulty level, the DLC demands strategic thinking, precise combat skills, and perseverance, offering a rewarding experience for those seeking to push their gaming abilities to the limit.
My Personal Attempts On All The Main Bosses
Divine Beast Dancing Lion. 2 attempts
Rellana, Twin Moon Knight. 11 attempts
Golden Hippopotamus.7 attempts
Romina, Saint of the Bud. 13 attempts
Messmer the Impaler. 17 attempts
Needle Knight Leda (and allies) 3 attempts
Promised Consort Radahn. 23 attempts
Overall, the whole DLC was really good. I enjoyed all of the bosses; some gave me a lot of trouble, but others were really easy. I haven't explored the entire DLC world yet, but after defeating all the bosses, I'm going to explore every corner of the DLC.
Source: https://steamcommunity.com/sharedfiles/filedetails/?id=3272317079
More ELDEN RING guilds
- All Guilds
- ELDEN RING Guide 1888
- How to wife Malenia - Chad Edition
- Take 80% Less Damage In The DLC
- Reduce stuttering - permanent ER and EAC process priority settings
- How to get to the DLC quickly from a NG+
- My female character preset Step-By-Step 2
- How to undo NG+
- ELDEN RING Guide 1873
- ELDEN RING Guide 1870