Classes, Perks, Gear, Items & Strategy


It is completely RNG if you get crushers or praetorian the entire run. Crushers are definitely harder to hold the spot with so keep that in mind with crushers you will be kiting more frequently
Classes
You can clear it with whatever you like, for the most part, but you can end up kiting alot.
So we stuck with 2 technicians for CC and the extra turret and 1 gunner for dps boosting. We prefer to hold our ground, so take that into account. I will go more into detail about who does what and overviewing gear & items.
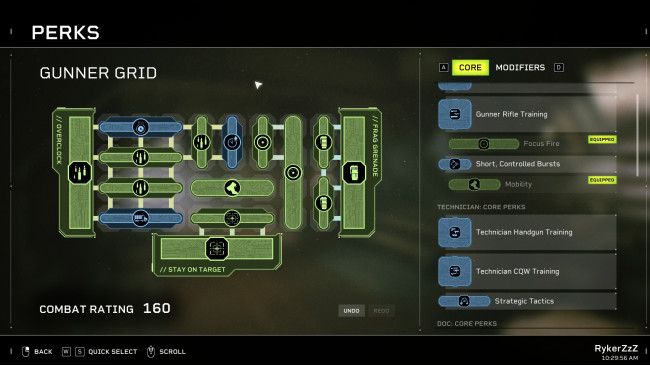
Perk Builds
Feel free to change it up I just enjoi min maxing per slot
Weapons
All 3 of you should 100% without a doubt be running the pump action (M37A3). Technician can go with type 95 or kramer magnum i prefer the magnum. Gunner can run pulse rifle or the M42A2 DMR. DMR has better burst and time to kill for when you would be using it which isn't often. Again you will be using the shotgun about 90% of the run since it is by far the best gun in the game. Tell your teammates when you resupply for ammo since keeping everyone aware of wats happening is key.
Items & ingame items
MedKits: Try not healing if your above 500-700 hp its risky but pays off. If you do need to heal go for the far medpacks and keep the close ones for dire moments. The number of med packs that spawn is constant, ~1 every 2 waves.
Who brings what is not really important its all about when you use it and communicating wat you have and when you're using them.
Player 1: Cryo Grids + Vuln drone
Player 2: Cryo Grids + Vuln drone
Player 3: Cryo Grids + Electro Turrets
You will only start using items on about wave ~6. At that point, you can almost freely use drones and cryo grids, 1 at a time (its not the end of the world if you pop something early but it does hurt in the long run). The 2 who brought drones will buy electro grids from the vendor and turret person will buy flame turrets. Use turrets and electro grids at your discretion. They just make your life easier. Try to place the grids at the top of stairs or small chokes where they jump over things. Wave 9 is arguably harder then 10 so don't be afraid to burn more stuff on wave 9. Avoid placing things early so runners don't trigger and waste it. If you want a reference just go watch the last waves of the video(linked at the end) we all call out item usage.
Individual Class Strategie
Gunner: Your job is simply blast away and kill everything. Use your ability generously and keep in mind that horde mode has mostly static spawns. Someimtes irradiated spitters vs more spitters &/or crushers vs praetorians. BURSTERS, bursters will make you lose more ground then almost anything so you defi want to use your boost and or grenade on them. Spam grenades. The CD isn't that bad and keep in mind that the spawns are static u can somewhat memorize and know when you need to save your cooldowns. May sound pretty basic but ppl don't use their abilities enough. Always try calling out specials and if you need help. Also tell your team when you are popping your ability or grenades as it will help everyone setup for max dps.
Gunner will play the Right side (which is not fun ;) )
Left side Technician: Always try and have 2 coils on the ground and 1 as a backup and ALWAYS land coils on the big elites. The slow down is massive and just blast away with the shotgun and cover your turret. No need to stay near it, but you can. You will always stay on the left side of the group when you're holding and this position is meant to improve crossfire and minimize friendly fire. Even when you backup into a corner and are about to call a kite still try and hold your positions for the most part
Turret Placement Left technician : For the most part you will always be combo'ing your turret with the other technician so you have specific spots to drop it and try paying attention to your radar to see where the wave is coming from.
Later you will pull them back a bit
Don't forget to use your coils generously. You have 6 total
Middle Technician: Same thing for the most part except focus on helping the side that needs it. When you can spare the time your turret placements are abit different but in the middle they all become the same. Also don't die trying to put it down in some ideal spot. Sometimes just getting it down in a pinch is simply better, you can always put it down after the wave :P.
Middle/right turret placements: Again try and pay attention which side its coming from and re-position accordingly. Be flexible overall as a team.
When to kite & pathing
Kite Path: Works in reverse can be slightly changed. Don't cross paths you will wipe
https://streamable.com/dvhxel
What determines if you're going to kite is basically if your getting pushed back hard and you hear a sound queue for the next spawn in that wave, its better to kite than to die but its also risky so always try to retake the main position after a loop. Coils and turrets help alot with a safe kite especially with multiple elites.
Target Prio's
1.Bursters -goes for turrets alot when placed in middle
2.Prowlers - goes for turrets alot when placed in middle
3.Warrior - Coil
4.Praetorian - Crusher -Coil (use the little island part of the hold to kite them much safer)
5.Spitters -try to coil them if they are killing u (mainly try to LOS them when you can it forces them to come onto the platform)
Source: https://steamcommunity.com/sharedfiles/filedetails/?id=2626290906
More Aliens: Fireteam Elite guilds
- All Guilds
- 2024 ( DLC Pathogen)
- discord- ("" "")
- Aliens: Fireteam Elite Guide 454
- Aliens: Fireteam Elite Guide 448
- Comprehensive Recon Guide
- Challenge Cards
- A Unofficial Troubleshooting Guide
- Class builds for Extreme and Insane(Pathogen DLC required)
- All Weapon Damage Ranking(reload factored in)
- The general UACM Marine guide