
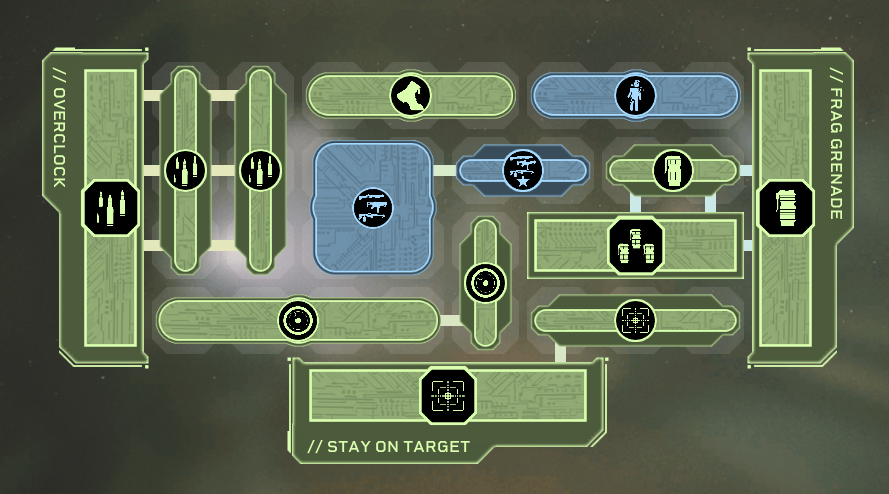
• Gunner
Perks
Core Perks Quickload Interlink - increase your teammate dps too
Thermal Venting - 25% more rate of fire during overclock
Focus Fire - 10% more damage
Suppressing Fire - slow your target by 25%
Targets Acquired - the only recharge speed perk you need
Mobility - synergize with Targets Acquired for more frequent CD reduction
Disorienting Blast - knock down targets
Mini-Grenades - knock down targets 3 times more frequent
Down & Out - increased burst dps to targets after you knock them downOptional/Flexibility Perks(6 slots)personally I use these for maximum shotgun burst dps for killing high-threat targets after knocking them down with grenade or activating overclock
Tech CQW Training - 15% accuracy and reload
Gunner CQW Mastery - 15% accuracy and rate of fireor you could just use two 20% recharge speed perk for the grenade
Gameplay TipsPersonal Tips
Keep the stacks on your passive ability Stay On Target to the max as much as possible for more recharge speed.
When there's more than 3 enemies nearby when you reload, throw a grenade first then reload
When Drones or elites show up, wait till they get closer before using grenades and activating Overclock. Make sure they are in range for your shotgun to do optimal burst dmg.Common sense tips
Mutants(blue) gets too close for comfort warrants a grenade
Use grenade to save grappled teammates
Use Overclock when your teammate is about to get overwhelmed(forced to move away) by multiple mutants
Memorize when elite targets(orange) spawn in each map and make sure your Overclock is ready when they appear
Use grenade to probe the blind spots where Crawlers could be hiding. Or at least hold a grenade in your hand when you peek into those spots
• Demolisher
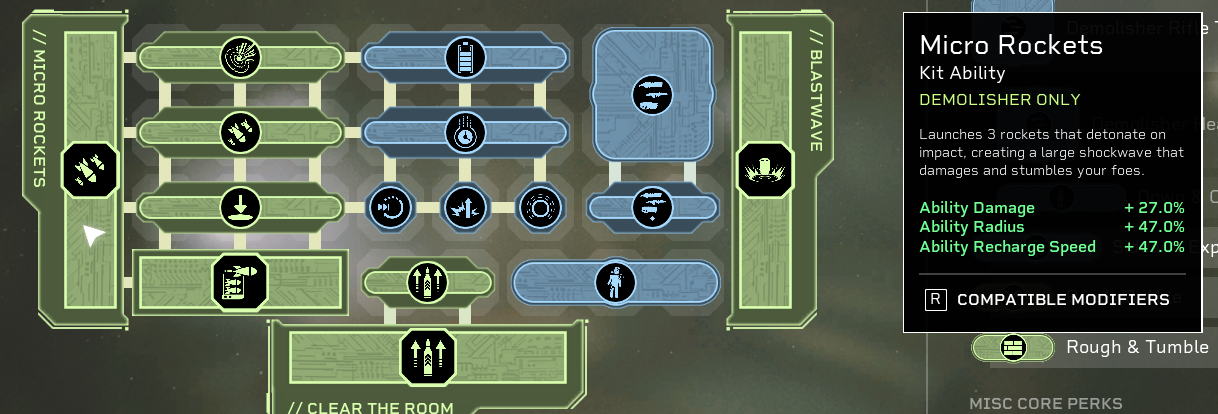
PerksCore Perks(Everything on Micro Rocket) Precision Rocket - turn the most broken class in the game into the most broken-op class in the game
Quick & Dirty - synergize with Precision Rocket for triple skill cooldown efficiency
Loud & Clear - 20% more damage and synergize with Quick & Dirty for more cooldown
Fire & Forget - increase targets' damage taken by 25% with your rocket
Bigger & Better - 40% more blast radius
Batteries Included - 20% recharge speed
Rapid Deployment - 20% recharge speedOptional/Flexibility Perks(9 slots)No.1
This build leaning towards weapon performance, only works with a Recon in your team
Down & Out - 20% more damage on knocked down targets
Demo Heavy Training - 20% max ammo, 15% reload speed
Demo Heavy Expertise - 20% explosive radius, 15% damage(the only perk in the game that directly increases weapon damage)
3 more slots to buff the rocket a bit more. I used three tier I perk cuz it gives tier I gives more stats value
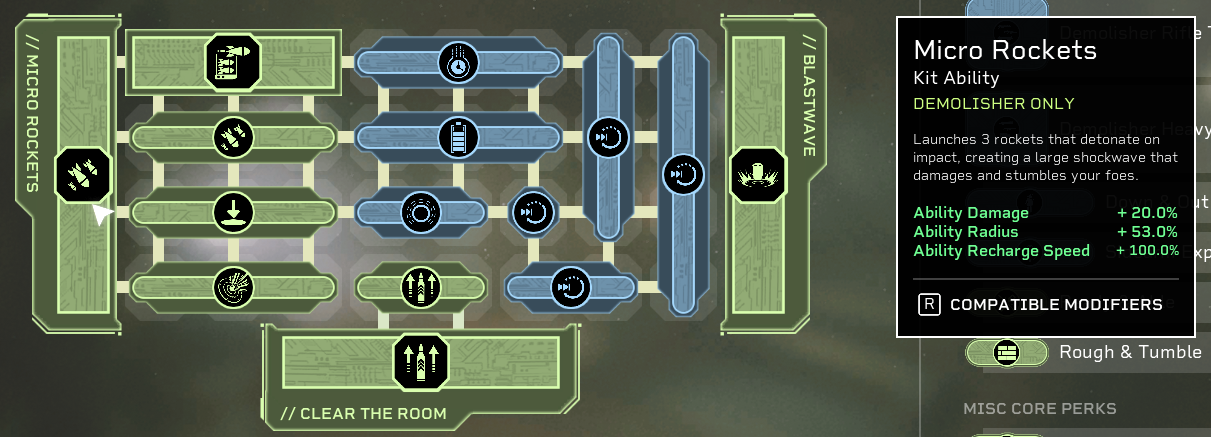
No.2
This is my favorite build, the rocketeer
All four Quick Recharge - ended up 100% recharge speed, halved cooldown.
Tier II Enhanced Reach - more blase radius = more target hits = more cooldown, also you can worry less about nearby targets when you are trying to focus on a elite target
Gameplay Tips Throw a rocket when there're 3 or more enemies
Use rocket to probe blind spot for hidden Crawlers
Dont use Blastwave too indulgently as its cooldown time is kinda long. Save it for crucial moments such as saving grappled teammates, knock down high-threat targets as someone about to get hurt badly etc.
Recommend using rifles that can be equipped with anti-material break for knockdowns. Demo is not needing much weapon damage
• Technician
Perks
Core Perks Dynamic Delivery System - 10% turret rate of fire, 25% more damage to armor
Parasocial Relationship - 20% more damage to targets your turret recently damaged
Creative Pain Point Solutions - both you and turret deal 15% damage to slowed targets
Particle Turret - much better than incinerator because its longer range makes Parasocial Relationship much easier to trigger, and it has slow so Creative Pain Point Solutions can trigger outside your charged coils. Also, no visual obstruction from all those flames. And an extra bonus for tryhards as incinerator turrets seem to have a bug of not registering its damage as your damage dealt in the mission performance in the end
Compatibility Matrix(Charged Coils) - 10% extra damage for each active coil
Maximized Retention - Stun targets that entered your coil by 2s. It says 33% chance but actually feels like 100%
Down & Out - 20% more damage on targets stunned by Maximized Retention or your teammates
Rapid Deployment(Charged Coils) - 20% recharge speed
Quick Recharge II(Charged Coils) - 13% recharge speed. With 33% total recharge speed, the cooldown is 15s, exacly the same as it's duration meaning you can have at least one coil active 100% of the timeOptional/Flexbility Perks(9 slots)My personal build:
Resonating Impact - Stumbled targets take increased damage from all sources for 6s
Deep Leverage - When you or turrets shoots a target affected by Resonating Impact they get knocked down every 10s(15% chance but it happens in a second or two considering how frequently they get hit)
Hyperlocal Logistics - 10% more turret rate of fire when you stand near it
Force Multiplier I and II(Turret) - The particle turret deals considerable damage and definitely deserves a damage buff or two.Other build:
Scalable Machine Learning - up to 50% reload speed bonus as your turrets kills enemies(triggers easily)
Modular Integration - 25% accuracy and rate of fire on top of that 50% reload
3 slots for either turret damage or coil recharge speedMachine learning vs Resonating Impact:
In my opinion Resonating Impact is much better:
- targets are easily stumbled, it triggers quite frequently
- it provides frequent crowd control effect, cc is the the key in beating extreme and insane
- it increases damage dealt to target, increasing the damage of every bullet you shoot instead of allowing you to shoot more bullet, which means it saves ammo
- it increases damage dealt by all sources, your teammates too, not just you
Gameplay Tips Throw coil to save grappled teammates(mostly for hidden crawlers. Doesnt work if the enemy is already being affected by a coil)
Use coil to probe blind spot for Crawlers
Try aim the coil at elite enemy's body, stick it on them
Each active coil gets you 10% dmg, but only use 1 coil at a time and save the rest for emergencies. When your team are forced to move or when a new high-threat target appear, you'd be happy that you have more coils ready to use
After combat, reclaim your turrets manually if it's not too far. Hit Q again may seem convenient but that 15s cooldown may screw you up if more enemies show up
When traveling, if enemies pop up, throw a coil first. If more enemies pop up after throwing a coil, then put down your turret. In that order.
• Doc
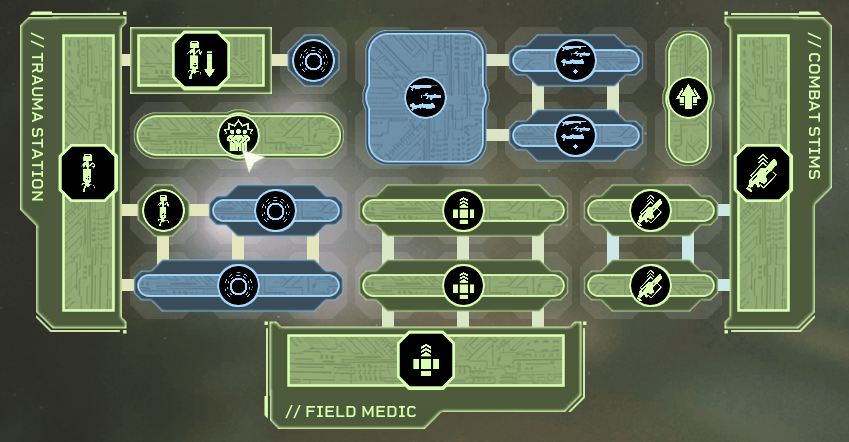
Perks
Core Perks Suppression Station - slows enemies
Peace of Mind - increase slow radius by 20%
Enhanced Reach I II and III - increase radius further to a total of 58%
Doctor's Orders - each member higher than 75% health gives you 5% dmg, total of 15%
Strength In Numbers - each nearby teammate gives you 5% damage
Support System - you heal 20% more, teammates near you gets 15% all ability recharge speed
Readiness - increase reload 20%
Charitable Glow - ability now increase your damage by 15%
Overdose - run faster, last longer. Longer cooldown but it's an ability you dont use that much so it's a great trade offOptional/Flexbility Perks(8 slots)If you are confident with your shooting skill go with rifle perks
Recon Rifle Training - 20% ammo, 15% weak point damage
Recon Rifle Expertise - 10% rate of fire, stability and accuracy
Gunner Rifle Expertise - 15% rate of fire and stability
If you dont prefer damage then go with defense
Bedside Manner - revive twice as fast and bleed out time 25% longer
Rapid Recovery - give more hp when you revive them and bleed out time another 25% longerFor the other 4 slots it's really just personal preference. You get the luxury-level flexibility because tbh Doc is not a very useful class(very useful in specific missions) so his/her skill slots are not that valuable compare to other classes:
You can use Anesthesiologist - 10% current hp as shield
Surgeon's Hands
Or Enhanced Reach IV - EVEN BIGGER SLOW RADIUS
Or Fitness Training - increase max hp and amount of heal you receives
Gameplay Tips Trauma Station's purpose is not to heal but to slow enemies. Do not be discourage to deploy it for the sake of conserving healing charges.
Even station with 0 healing charge left can still slow enemies
This slow is stackable with other crowd control effect
You shouldn't ignore it's healing completely neither. If combat is not too intense and your team can afford to care for details: let two team member heal using the station and the have the other member, preferable most injured one, avoid being healed by the station, and heal him/her when hp drops low enough.
Most important time to use Combat Stims is when team member(s) on the move with enemies around, such as moving towards mission objectives during combat; disengaging from enemies when being overwhelmed etc; leading away enemies and running back to revive downed teammates etc.Missions that are great with Doc: 2-3: The level where Doc actually shines for their ability to heal. And you can tank synthetic with Anesthesiologist perk. Just take cover quickly to regain shield once it's depleted.
DLC-3: Another level in dire need of extra heal. Also If your team is very experienced with that mission and well-coordinated, you can potentially use Doc's Combat Stim to rush through the first maze
Any mission with double hp card.All mission above work better with Anesthesiologist equipped.
• Recon
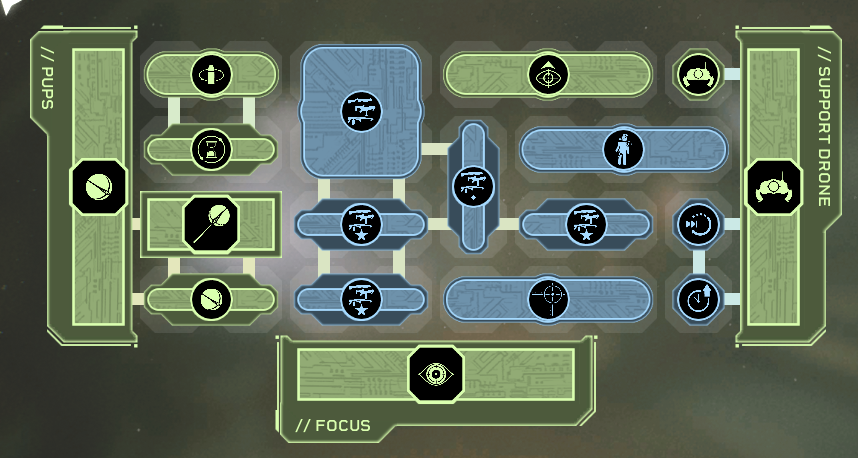
Perks
Core Perks Red is Dead - most op skill in the game. Your team gets 10% increased damage all the time(yes, all the time. See weapon sections)
Got Your Back - instant reload when you killed an enemy that's targeting them
Back in the Fight - on top of reloading you both also gets 10% skill cooldown reduction
Down Range - increase far distance damage by 20%. You're gonna be in the back most of the time
Down & Out - the universal 20% damage increase perk. You cant stun/knock down enemies, but your teammates still can
Distracting Howl - slows target marked by PUPS
Blood Hound - lowers marked enemy's defense. It's strategically the best variation of PUPS.
- Since your team is gonna equip laser sight guns, the only purpose of default version PUPS is to - make targets visible for better player visual acquisition;
- Guard Dog has decent crowd control but it's point-defense not AOE, it's not guaranteed to slow all enemies unlike other cc like tech or doc(but best for fighting synth);
- Best friend only provides more dps but no cc which is a deadly disadvantage compare to other variations;
- Blood Hound not only slows the enemies but reducing enemy defense, achieving cc and dps increase at the same time, and most of all, it has unlimited duration and no cooldown so you can free up skill perks for other skills. Yes it only weakens one target but why do you need to weaken every other enemies that takes less than 1s to kill and possess no threat to you what so ever, and when a 2nd high-threat target shows up you ended up in cooldown and unable to use it again?Optional/Flexbility Perks(15 slots)Despite being the best support class and almost a must-have for extreme and insane, it has the most flexible skill perks due to it's abilities doesnt need any blue perks to buff them.
Personally I'm going all out on CQW perks. CQW Shotguns dps are only second by heavy weapons, and such investment yield insane damage:
Tech CQW Training - 15% reload and accuracy
Gunner CQW Expertise - 15% rate of fire and accuracy
Tech CQW Expertise - 15% rate of fire and stability
Recon CQW Expertise - 15% weak point damage
Lancer CQW Expertise - 10% weak point damage
Adrenaline Rush - Drone can actually heal quite a lot(10 base heal per enemy)
Quick Recharge I - 7% recharge
Extended Duration I - 7% duration
If you are confident with teammate's damage output and dont feel like playing so aggressively, I recommend
Bedside Manner - revive twice as fast
Surgeon's Hands - cant be interrupted during interactions
Perks that gives Support Drone duration and recharge speed
Gameplay TipsPersonal tips
When there're multiple mutants(blue) at close range, do not try to mark them one by one, just shoot them all. The time it takes to mark one mutant is enough to shoot off 1/4 of it's hp, which means you ended up killing them slower if you tried marking them
Between a spitter and an elite(orange), mark the spitter and kill it asap then mark the elite. Unless the elite is chasing you and your teammate is not attacking the spitter
During horde fights, stay in the back in order for Got Your Back to trigger properlyCommon sense tips
Dont mark runners, only mutants and elites
Drop ammo as soon as it's ready when the team stays in position or passing through an area that you are going to visit again.
• Phalanx
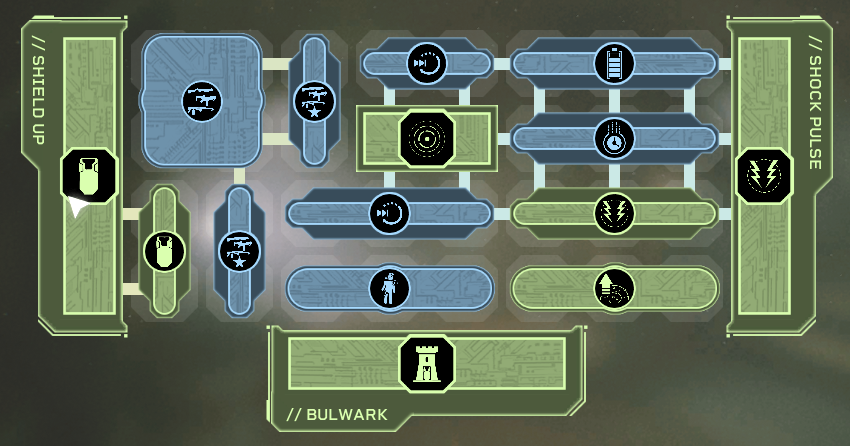
PerksFirst I apologize for not being very experience with phalanx, neither with its build nor gameplay, and I havent beaten much extreme/insane mission with it. I'm just gonna write down what I have. Consider checking other people's guide if you are really into phalanx builds
Shield Bash - shield melee attack stuns target, use it on the one that grapples
Take A Stand - each nearby enemies increase your damage by 3%
Aftershock - leaves a small slowing field after using skill
Concussion Pulse - larger radius, knocks down targets
Rapid Deployment - 20% recharge
Batteries Included - 20% recharge
Quick Charge III and II - a total of 71% recharge speed
Down & Out - 20% more damage you knocked down
Tech CQW Training - 15% reload and accuracy
Tech CQW Expertise - 15% rate of fire and stability
Gunner CQW Expertise - 15% rate of fire and accuracy(I thought about using Shell Shock but feel like 4s duration is a bit short, I'd rather have higher RoF on my shotguns)
Gameplay Tips Learn to identify which animation/sound effect of the enemies that indicates grapple attack and slam it with shield melee or trigger shockwave before it grapples
Enemies gain period of immunity to stun after shield melee, so only use the slam when you want to interrupt grapple
Shockwave have a very long starting animation, it can be tricky to time if you want to interrupt grapple, especially on Drones with it's high movement speed.
Keep a distance from the rest of your teammate(though in most cases it's your teammate needs to keep a distance from you) so the enemies lock on to you. ESPECIALLY WHEN FIGHTING PATHOGENS, if the exploding bugs failed to lock on to you and moved past you towards your teammate then exploded, both you and your teammate will take damage.
Your shield blocks friendly fire so feel free to use the U1A2 grenade launcher to blast the ground in front of you while holding a shield to kill surrounding enemies.
• Lancer
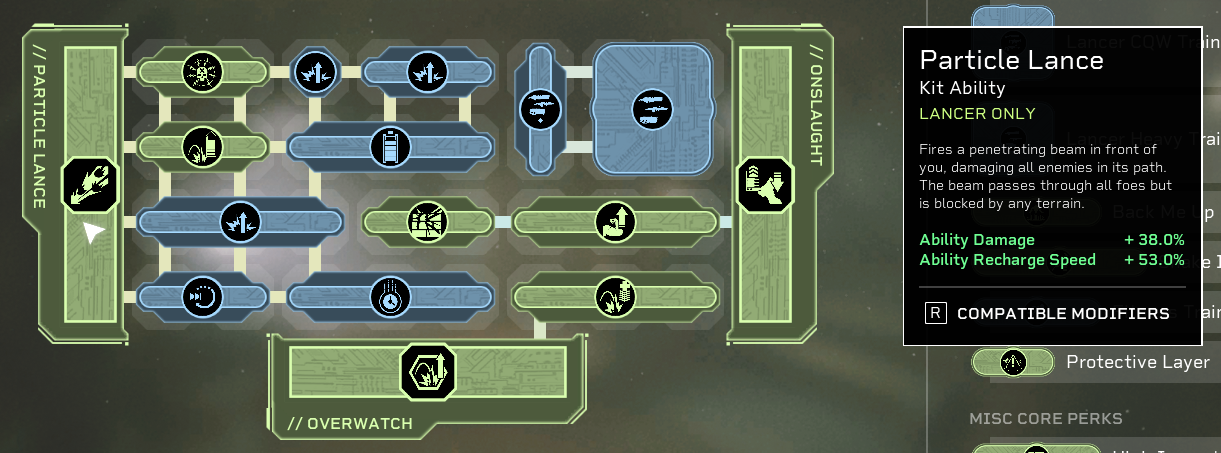
Perks
Core Perks Rapid Assessment(Particle lance) - max stack passive upon use
Residual Charge - leaves electric pool for 4s upon kill
Omniscience - increase massive passive stack from 4 to 6 and slows down stack decrease
Tenacious - 5% damage increase, ability lasts longer
Relentless Advance - passive stack doesnt decrease during ability
Rapid Deployment(Particle lance) - 20% recharge
Batteries Included(Particle lance) - 20% recharge
Quick Charge II(Particle lance) - a total of 53% recharge speed
Force Multiplier I II and III(Particle lance) - a total of 38% damage increase
Demo Heavy Training - 20% ammo, 15% reload
Demo Heavy Expertise - 15% explosive radius, 10% damage, the only perk that directly increase weapon damageThe reason I do not use particle pulse is that it does not bring out the strength in lancer. Particle pulse is all about crowd control and much smaller damage, with the skill takes somewhat long time to initiate and you cannot fire weapons during casting skills, unlike demo's rocket, you lose a portion of dps when using the skill and enemies recovers quickly due to gaining immunity period after being stunned, and the slow effect only last for 5 second(3 second if you account for skill casting time). It just makes lancer a weak crowd control and low skill dps, jack of all trade with a discount.
Compare to damage build default lance, which takes out 3/4 hp of Crawler/Burster, 1/3 hp of spitter on insane, with only 20s cooldown, makes him quite a day saver and damage dealer
No Optional/Flexbility PerksBecause lancer's particle lance is very perk dependent, and he/she needs the heavy weapon perk for ammo and damage, leaves lancer little to no flexibility in the skill perks
If you have to take off something then I'd say maybe the Residual Charge.
Gameplay Tips Use lance skill on spitters, or group of mutants(blue), or a train of runners. Only use it on elites(orange) if no more mutants spawns. Make sure you wait for the right moment for lining up shots against multiple enemies.
When using Onslaught to kill elites, if they are close enough, use the shotgun instead of heavy.
When a random mutants spawn during travel, wait for a few second before using the lance, because they tend to spawn in group of 4, especially on insane, and you want to make sure they all finished spawning and make your lance hit most or all of them.
Best Weapons
First there's another guide detailing damage performance ranking of every weapon in the game if you are interested:
https://steamcommunity.com/sharedfiles/filedetails/?id=3006393203
Weapons can equip laser sight for a consistent 10% extra damage when a recon is in the team.
Now to summarize best weapons to use:
RiflesWhen a Recon in the team:
L36 Halberd - the best overall performance rifle
M41A2 Pulse - same non crit dmg ad Halberd, but 10% less crit dmg. However it has a larger mag which would synergize better with recon's mag refill skill.
Type 88 Heavy - higher dmg and crit dmg than both, but it's accuracy and recoil is bad
EVI-87 Plasma - as high dmg/crit dmg as type 88, but it's dmg drop quick over long rangeWithout a Recon:
Kramer - highest damage without recon buff
4C2 Astra - almost as high damage as Kramer but with much better accuracyRecon doesnt matter here:
L33 Pike - tailor-made anti-synth weapon. It even have the best damage performance, as good as CQW - if only if you can headshot every time and able to shoot right away without wasting time to aim the scope
CQWsWhen a Recon in the team:
Type 21 Tactical - the best damage
EDS-93 Plasma - Almost as good as Type 21, but it can sacrifice some dps to it's ability to knock down target with Anti-Material BarrelWithout a Recon:
M37A3 Pump - highest crit dmg without recon, despite being single reload it's total reload speed is actually pretty fast
M51 Breach - highest non crit dmg without recon
Type 76 Auto - also very decent damage, but during overlock it could be a bit tricky to handleRecon doesnt matter here:
X1 Fireball - best AOE in CQW weapons, better than the Incinerator. Only use if you do not intent on dps with shotguns.
PistolsRecon doesnt matter here.
Type 95 Combat - despite not having laser sight it still has excellent performance due to it's high mag size, accuracy, low recoil and long range. Easy to get frequent headshots
Type 78 Burst - only if you rely on pistol for dps. It's low accuracy but high dps makes it an alternative for shotgun in close range dps. But why use it when you can use a shotgun?
U1A2 Grenade - being the only AOE weapon in pistol slot. If you have a CQW as dps weapon with decent crowd control ability
HeavyRecon doesnt matter here.
L59 Minigun - highest dps, 2nd highest crit dps, and able to equip Anti-Material barrel for knockdown, but only good at close range because its bad accuracy makes it had to maintain headshots
P.649 Hel - dmg second by minigun but highest crit dmg, best against synth and elite(orange) xenos as spitters. Great at all range single target dps
2B1 Varja - 3nd place dmg amoung all heavy weapons, but it's the only heavy weapon capable of applying additional slow effect(with 4 star) and makes it god tier crowd control dps weapon. Being an AOE means it can clears runners but it also means risk of friendly fire.
Best Attachment
Instead of listing them one by one(except the special ones), I'll explain stats priorities you'll be looking for.
Rate of Fire - get it right away
Weak point damage - get it right away
Accuracy - for all CQW, and for rifles that has lower accuracy than 77(Pulse rifle's accuracy, which I find is the minimum acceptable accuracy for long range consistent headshot)
Stability - only concerned when gunner's overclock is involved, for high rate of fire weapons only
Max ammo - if you are not playing with a recon, you are gonna need all max ammo you can find. Even when you are playing with a recon, extra max ammo cant hurt.
Reload - good to have
Mag size - less important than reload
Stumble chance - can be ignored. All guns stumbles if you shoot them enough times
Handling - is a joke. It increase the speed you switch weapons and enter ADS.
The Special Ones(ones you want to put on every weapon):
Laser Sight(Medium Optics) - Reveals target synergize with Recon's Read is Dead skill, and it has weak point dmg and accuracy, all desired stats, the no.1 god tier attachment in this game.
Miller Twist Rifling(Barrel) - slows targets by 50% indefinitely. It's the thing that makes AOE and heavy weapon shine aside from their high damage. It has 20% chance to trigger and last 10s but you usually trigger in 1 or 2 seconds and it's duration refreshes all the time. It's not good for M12 Rocket or other rocket but seriously nobody use those on Insane unless you want to literally one shot the whole team or ended up 5k+ friendly fire in performance.
Anti-Material Break(Large Muzzle) - knocks down targets every 10s. Has 25% chance to trigger but again it happens in just a second.
Assault Break(Medium Muzzle) - its stats are just broken.
Tactical Scope(Large Optics) - counterparts to the laser sight for snipers
Duel Rail Booster(Barrel) - ONLY for P.649 Hel. This weapon is the highest single target dps in the game and almost all high-threat targets have armor, and this barrel increase it's dmg by a mile.
Overall/Important Tips
Important Tips When an elite(orange) got too close, or there're too many other enemies, NEVER have all 3 team member firing on the elite at the same time(unless someone is using AOE as dps) as it would allow other enemies to pass through your chock point, break your defense formation and put the whole team at risk. What you should do is,
1. identify which team member it's locked on,
2. whoever gets locked on starts retreating and lead the elite away from the team while the rest 2 members keep holding the line(having an elite walking past by right next to you may seems terrifying but keep calm as long as you keep focus on other enemies and the one it locked on keeps attack and attracting it, the elite wont bother you one bit)
3. focus on killing the remaining elite after no other enemies appear
however if your team just got overwhelming firepower and tons of crowd control effect, cryo traps, etc. then great, vaporize it where it stand.
When a spitter is spotted, kill it asap. If you can't, then move out of it's line of sight asap. Never stay put giving it another opportunity to shoot at you.
Spitters are THE most threatening units in extreme and insane,. They always attack you when your focus is locked on other enemies, then take out a third or half your hp with one spit. So camp where spitter doesnt have a clear shot on you, force them to come closer where you can see them and easily kill them.
If someone with a shotgun is at a closer range ready to kill a drone or elite, the best thing you can do is to move out of his way, dont risk friendly fire, only support with crowd control skills and more importantly help cleaning up enemies around the shotgunner allowing him/her to burst dps that target with no interruption.
Ideally, let whoever the target locked on be the short-range dps
Overall/Common sense tips Your ability to score weak point shots is crucial. Keep practicing.
Door holding is having the rest of the team stay by a door while someone go to the mission objective and trigger the horde, then run back to the door and use the chock point to fight the horde.
If no one is holding the door, some doors will shut for good. Even when it's opened by enemy reinforcement later on, an invisible barrier will still prevent you from going back.
Most objectives wont trigger until all members stepped inside the room for a certain distance. You'd need to get deep enough into the room to trigger the object while stay close enough to the door to keep it opened. Move slowly, one step at a time.
I lost count how many times people who think they are smart but failed to realize this, I signaled them to step inside to trigger objectives, then they left, thinking I was telling them to not hide behind a door :)
Objectives telling you to Rally or Gather cannot hold doors. It needs all of you inside, you cant stop the door from locking up.
Learn these info:
- where to camp
- which doors to hold
- crawler locations
- when/where elite enemies spawn
- when/where drones spawn
- when/where hordes that spawn as soon as you walked to a certain place
- how to dodge elite enemies's attack so you can solo them/lead them away with no problem
If you are not completely familiar with those information, you must have someone in your team who does. Knowledge is power.
Dont waste med kits. Amount of meds drastically decrease on higher difficulties. Depends on your awareness of your own skill(and your network lag if you're a guest player), only use med kits when your hp fall below a threshold of risking of being downed. However, this threshold should be higher before an intense battle where you probably wont even get the chance to heal.(Personally I heal myself only when below 300 health on insane difficulty, and when below 500 before an intense battle)
Card Tier List
Cards that can be useful on extreme and insane. I may have missed some card here.
God Tier:
Half CD card with 100% rocket recharge Demo can stun any xeno enemies indefinitely(5 rocket, 1 shockwave, repeat, no cooldown gap). Nothing can touch you other than spitters. And you can shoot them while spawning rockets and shockwaves, you are basically a walking war machine.
Demoralized weakens Insane difficulty elite enemies to the strength of Intense difficultyS-Tier:
Synthetic assist card also on this tier, sorry for not having the image
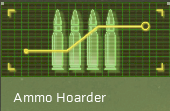
Ammo drop and Half Speed both effectively double your total ammo and mag size. Though half speed might take some getting used to. But once you do, you'll find it's lower recoil and slower crosshair spread very appealing especially during overclock
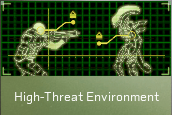
High Threat Env provides 50% dmg for both weapon and ability damage, outperforming any other damage card by a ton. It just takes skills to use. Wont hurt being a glass cannon if you dont get hit. Just dont use it on levels with pathogens or synth(guns and exploding bugs, both hard to avoid taking damage).
Double HP is just a no brainer and works very good with doc(temporary hp shield), and work even better when fighting synth or pathogens.A-Tier:
50% ability dmg, lancer > demo > gunner > tech
35% weapon dmg, gunner > recon > tech > lancer > demo
Heavy synth card may be risky to use because the spawn is random but it works wonder in some places, especially pathogen levels. In DLC-3 if it spawns in the boss room then it'll draw away all the attention of runner spawns.B-Tier:
Those are better than no cards.
Dodge allows you to dodge consecutively which can be very helpful in certain rooms. On Insane if you get hit you lose like 300 health, but that much health allows you to dodge 12 times.
Acid immune cannot block damage from the direct hit of spitter projectiles, but it can block dmg from the acid pool formed below you after the hit. Work best with Phalanx.
If You Dont Know What's Crowd Control Referring To
or cc for short, it means any effect that stuns, slows, knocks down or stumbles enemy targets
Source: https://steamcommunity.com/sharedfiles/filedetails/?id=3011377902
More Aliens: Fireteam Elite guilds
- All Guilds
- 100% Intel (collectibles/collectables) Guide - Full Campaign + DLC
- How to move well
- Aliens: Fireteam Elite
- [RUS] 100% Aliens: Fireteam Elite
- 2024 ( DLC Pathogen)
- discord- ("" "")
- Aliens: Fireteam Elite Guide 454
- Aliens: Fireteam Elite Guide 448
- Comprehensive Recon Guide
- Challenge Cards