
Little History
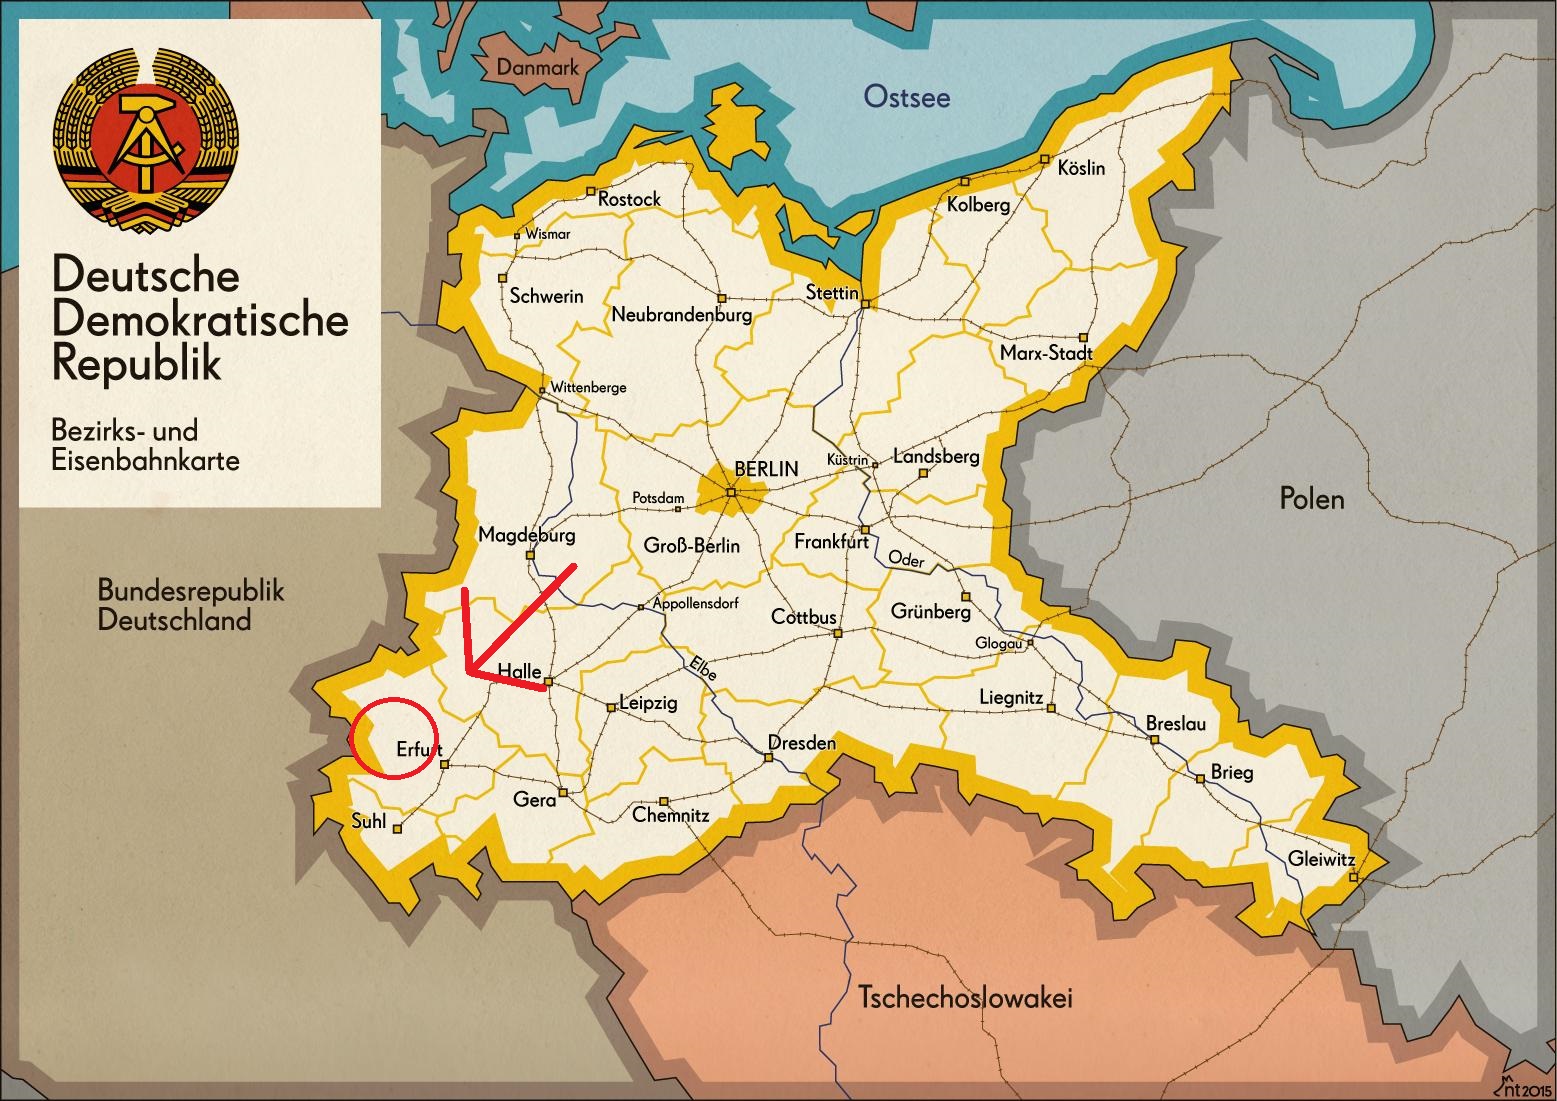
The 119th Independent Tank Regiment was stationed in Bad Langensalza little north-west of Erfut.
It was part of the 8th Guards Combined Arms Army,their day to day job was to guard the DDR states borders like the other independents tank regiments at the time,counter to intuitive thought these tank regiments were not supposed to be the first armored fist to brake through NATO lines rather to be the second echelon units,and would be send to exploit a breakthrough or to reinforce the first echelon units in the front lines in case its needed.
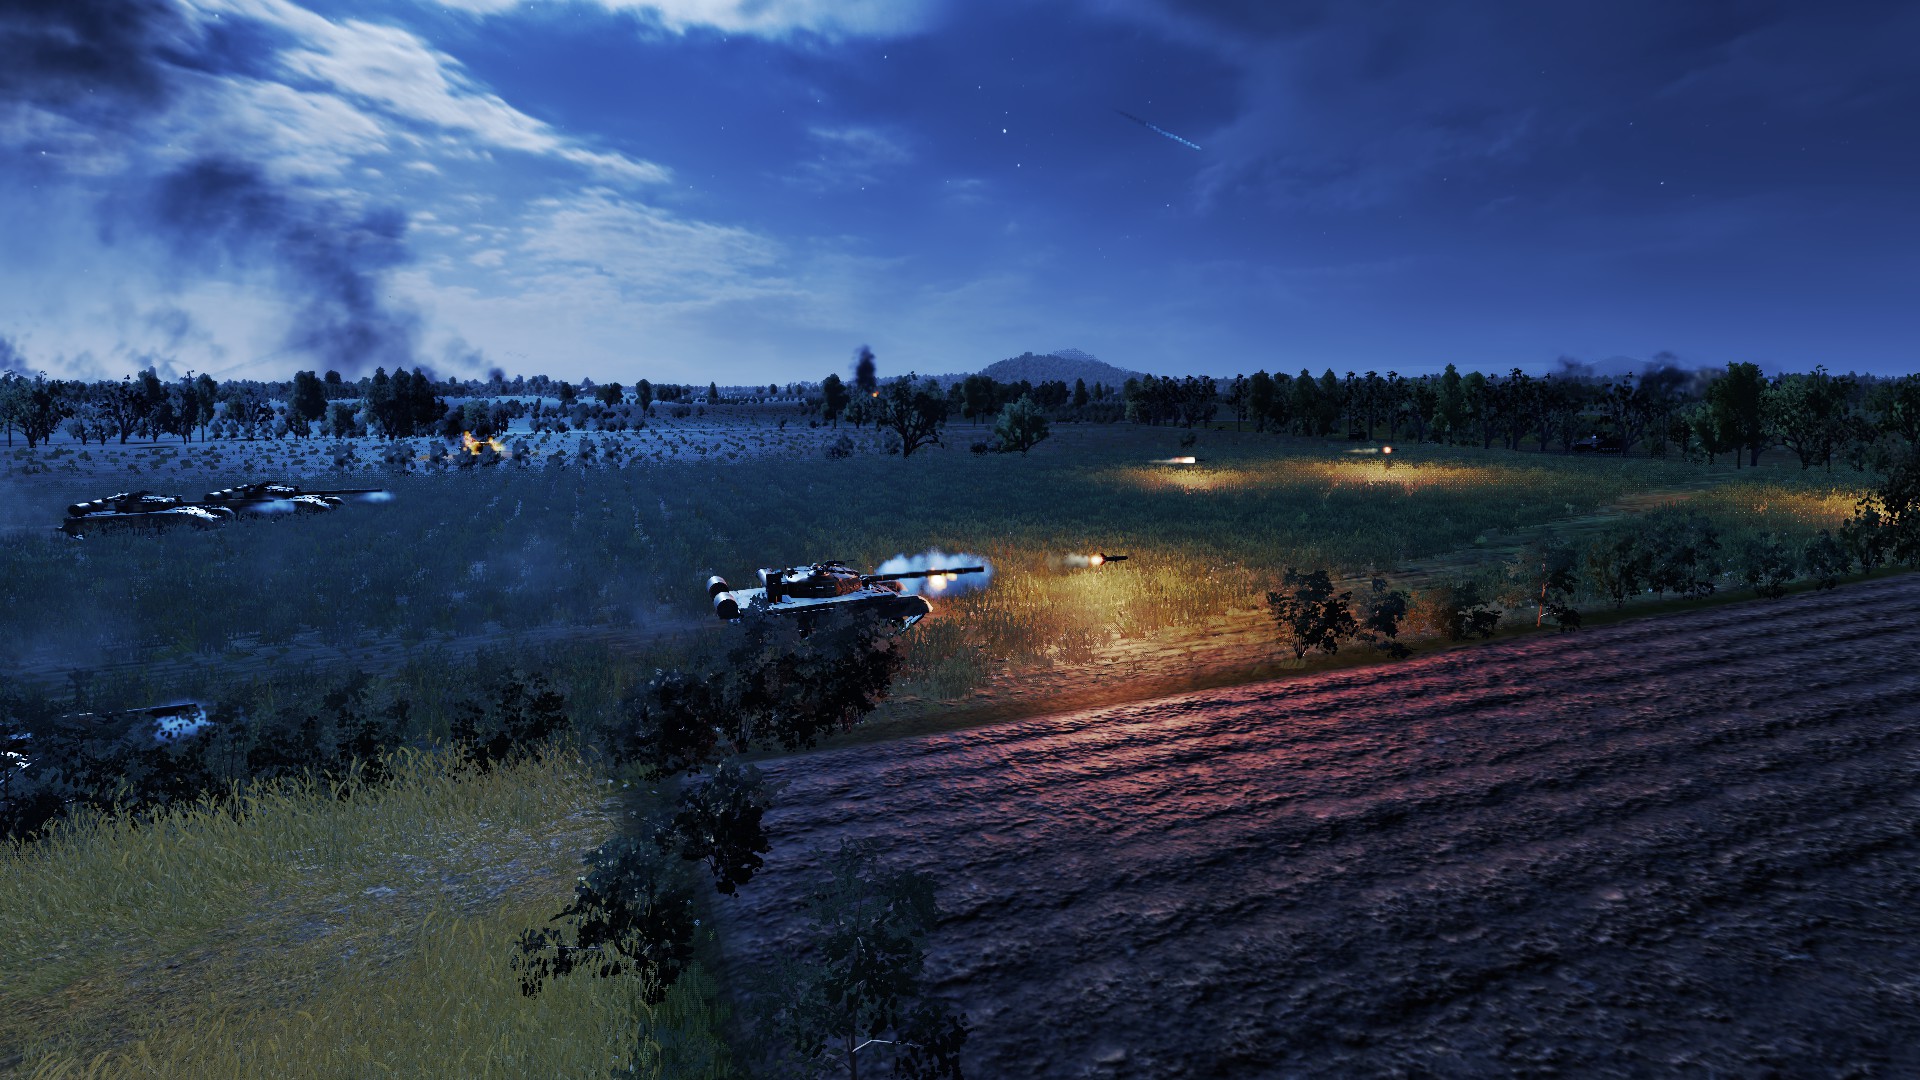
While in game the battle-group enjoys the luxury of having the most advanced soviet tanks like
the T-80U and the T80-UD, which where never in eastern Europe to begin with, in real life the independents tank regiments where given older tank models,
for example the T-64 and the older T-80 models like the T-80B and so on.
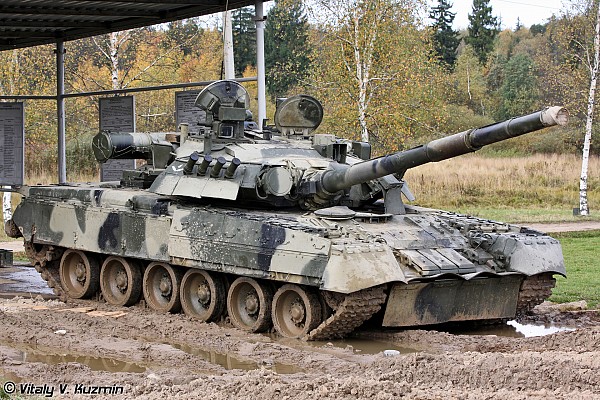
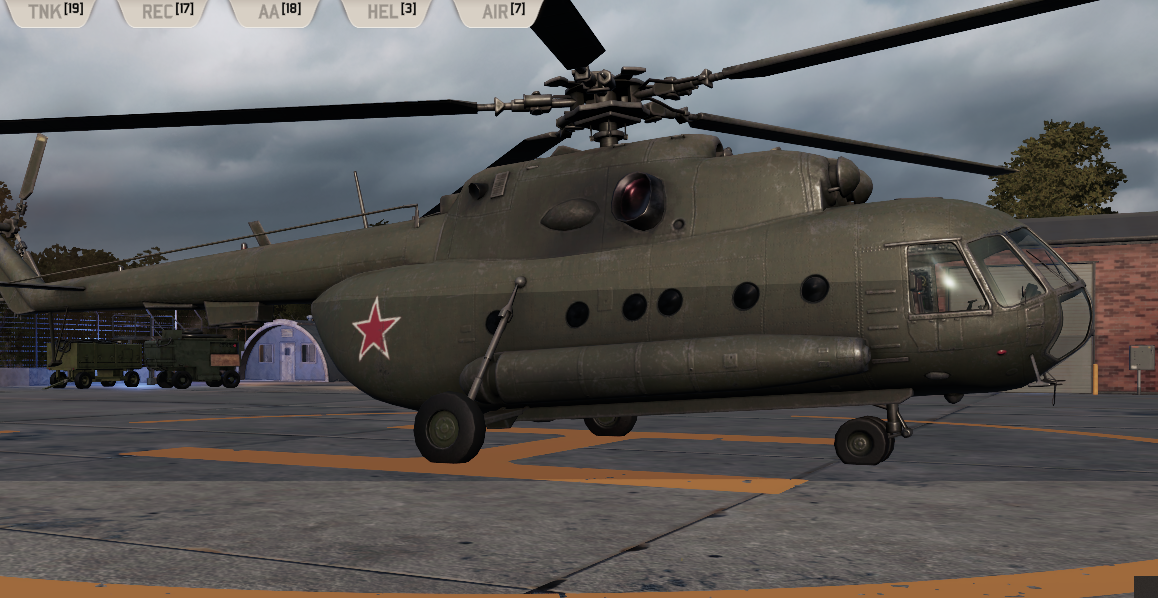
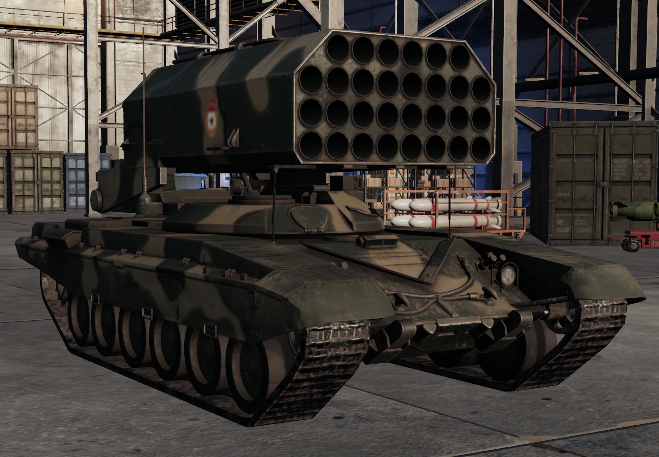
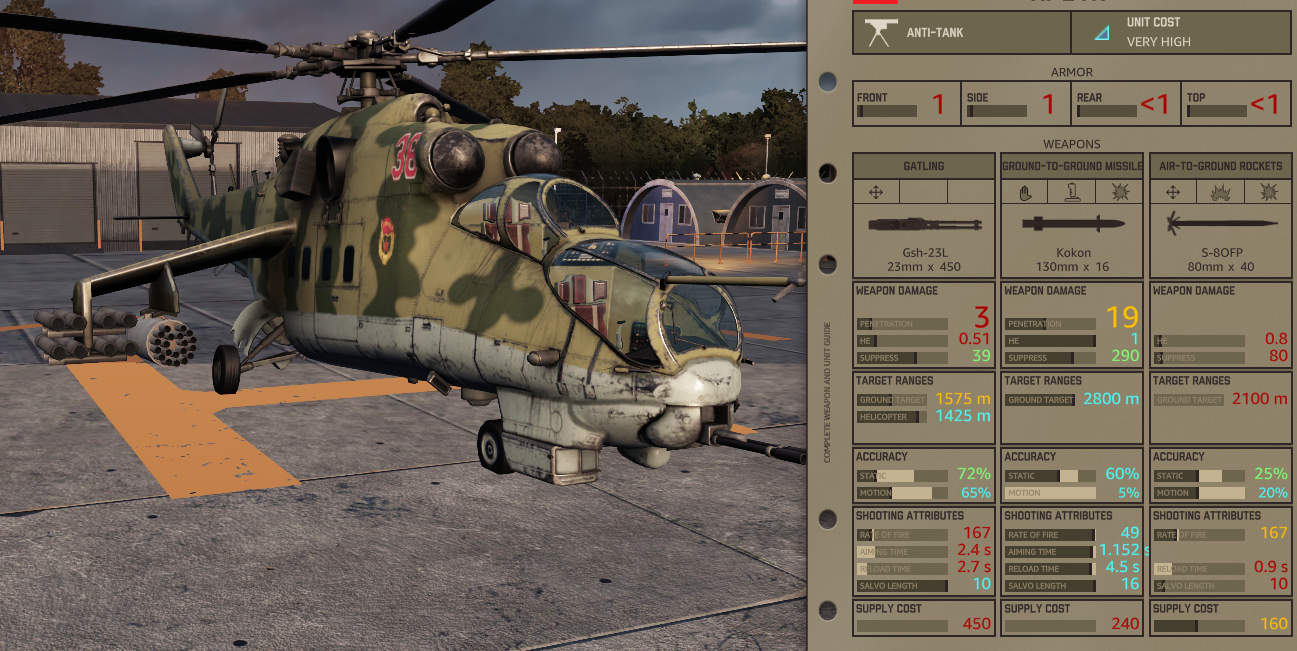
The T-80U(object 219AS), T-80UD (Bereza) were an upgrade to the T-80BV,
The T-80U had several improvements over the T-80BV, First a better turret,Kontakt-5 explosive reactive armor,better gunner sight, and a new 9K120 Svir system which allows to fire the Svir ATGM and in 1990 the 9K119 Refleks system.
T-80U:
The T-80UD is a Ukrainian version of the T-80U but with some improvements but mainly a better engine.
Ground Components Part One
Logistics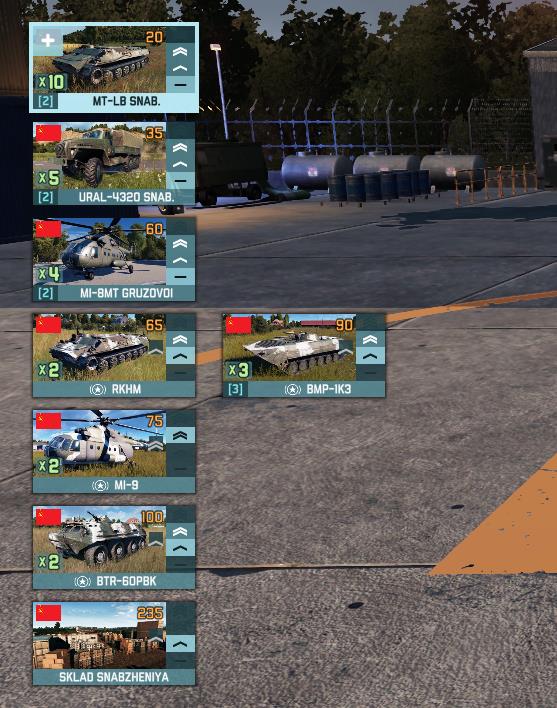
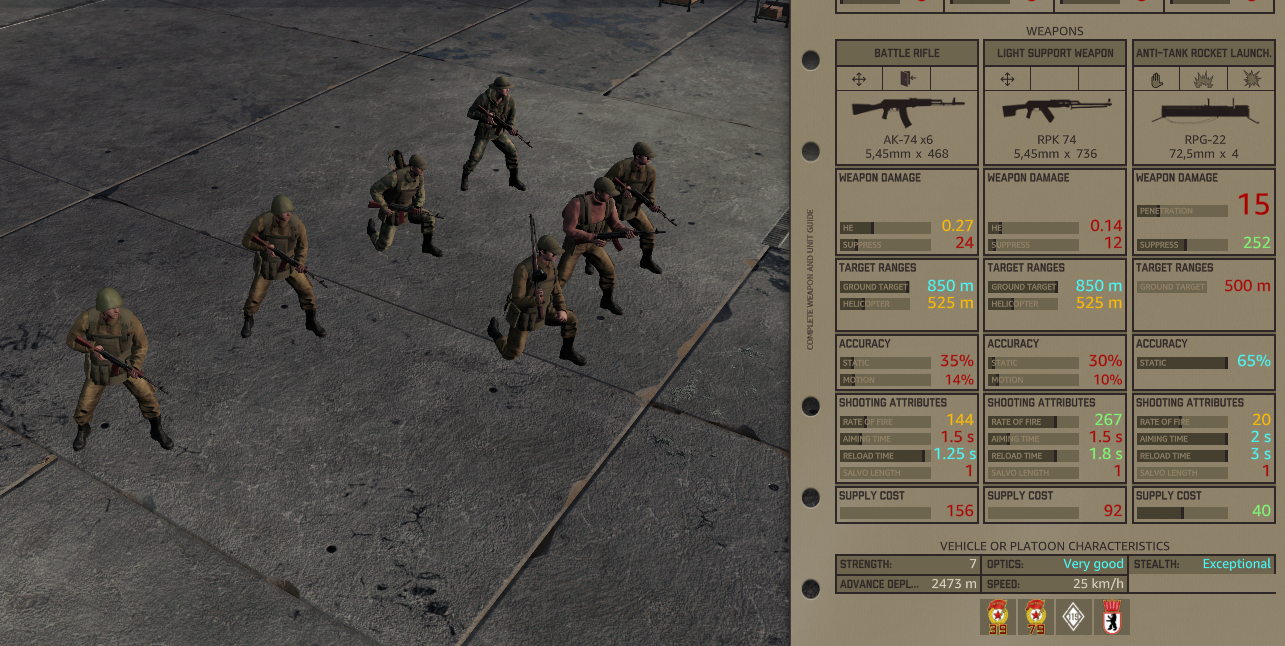
 Infantry
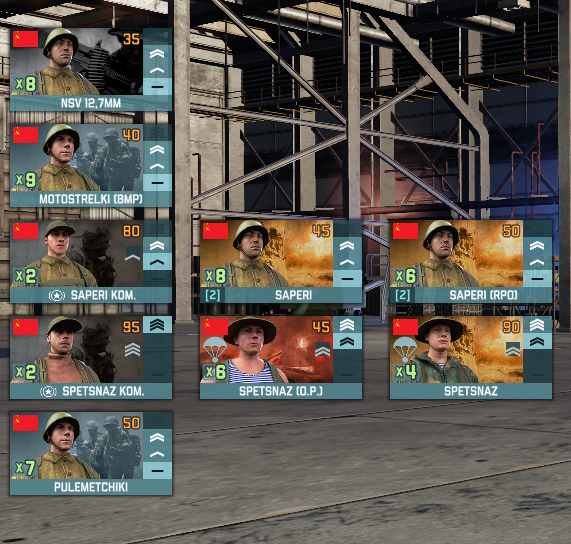


 Artillery
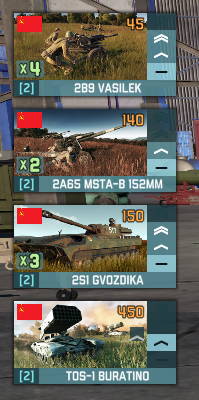

In game the battlegroup has the best tanks in the game so far (3/2024), but of course the most expensive tanks , thus the 119th has limited infantry and no long range radar AA for balance reasons.
If you are familiar with the units and already have a deck you like you can skip to the battle theory section BUT it is still suggested you read the building theory segment of the tank tab in the Ground Components Part Two section.
Lets start with the most impotent thing LOGISTICS!!.
Why is the most impotent?, because your tanks will require a lot and I mean A LOT of supply,
we will come back to it in the Battle Theory section.
in the logistic tab you have the next available units(lowest experience):
20 points MT-LB SNAB 500 supply APC
35 points URAL-4320 SNAB 1000 supply truck
60 points MI-8MT GRUZOVOI 1500 helicopter
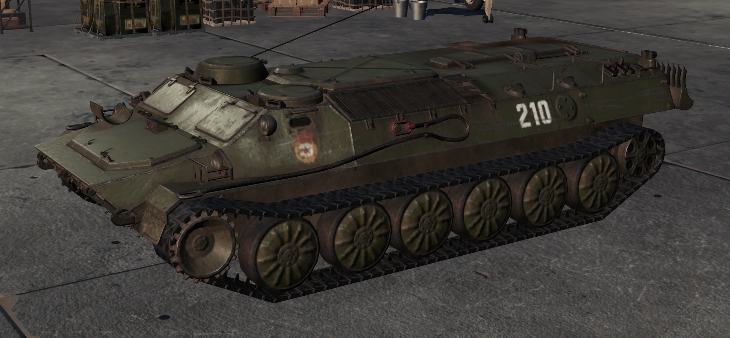
65 points RKHM APC CV
90 points BMP-1K3 IFV CV
75 points MI-9 helicopter CV
100 points BTR-60PBK wheeled APC CV
235 points SKLAD SNABZHENIYA FOB
The logistic tab gives you many options but the 3 main cards you will need are an FOB a supply vehicle and last a supply helicopter,why is a CV is not a requirement?, well in the tank tab we will have 4 CV's and I do take a CV in the LOG tab but not for the reason you may think, you will see in the next section of the guide.
My tip for a supply vehicle is the MT-LB SNAB APC because you will get 10 of them and if some are destroyed you can rest a sure you will have a replacement and they have little bit of armor and can withstand some artillery shots.
The reason I bring a supply helicopter is for fast resupply of the MT-LB SNAB because you will need to repair your tanks in quick succession and you don't want to wait for your supply APC's to come back from the FOB all the way back at spawn, and *spoiler alert* you will have nice amount of artillery so your supply helicopters will work extra that's where your supply micro will come in handy, but we will touch it in the next section of the guide.
Last is the FOB you must have a fob without it you will run out of supply very fast and your tanks will just run out of ammo or worst FUEL!!, so always be sure you bring one.
This is how I build my LOG tab
To sum up the logistic tab, it gives you everything you need and more but you will have to micro your supply very well and more impotent keep it SAFE!
As mentioned above the infantry tab is somewhat limited as you will see but not bad.
Limited is the word do describe this tab, but you have what it takes to fight some inf and even the best of NATO's infantry units.
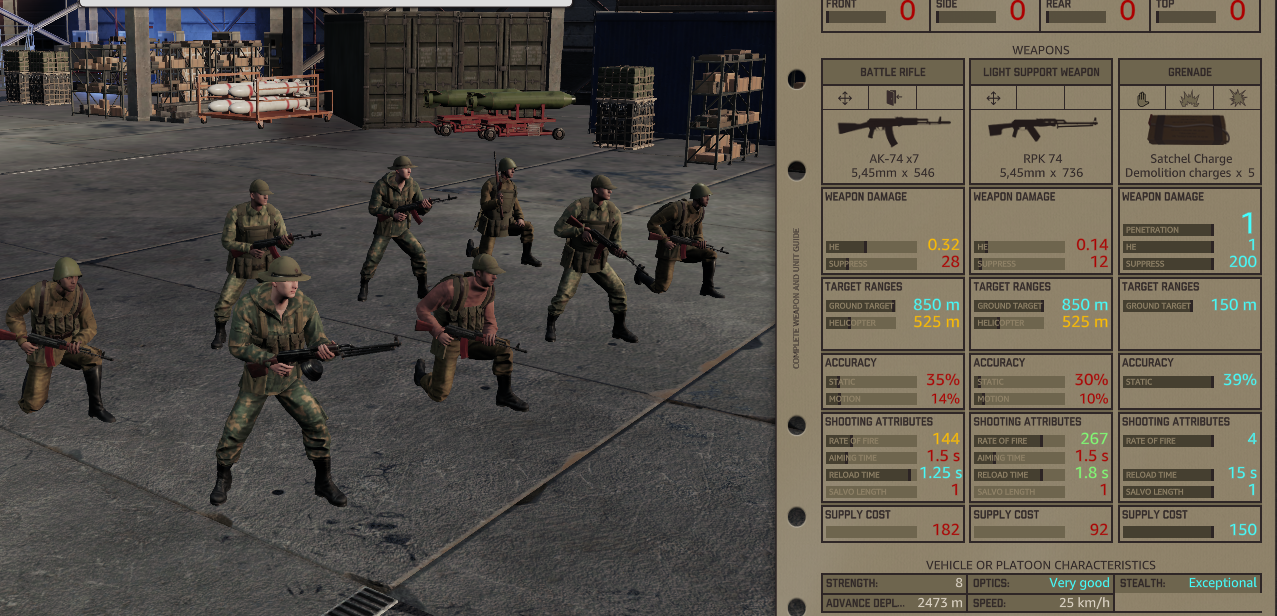
lets start with the creme de la creme the Spetsnaz line of cards.
You will have 1 card of Spetsnaz infantry with 4x units and 1 Spetsnaz O.P card with 6x units and 1 card of SPETSNAZ KOM CV with 2x units.
if you combine them together they will be a formidable force in urban and forested battle sector.
but be aware they are limited in numbers
and sadly they don't come in an APC or IFV so no support but they have the airborne stat so you can spawn them further in the deployment phase of the game.
Next is the Saperi line which gives you even more combat power in urban and forested while not elite like the Spetsnaz they can get the job done plus they come with BTR-60 APC so they are supported.
There are 2 card of Saperi with 8x units each and 2 card of Saperi(RPO) with 6x units each and 1 card of Saperi KOM CV with 2x units.
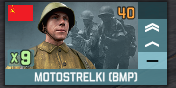
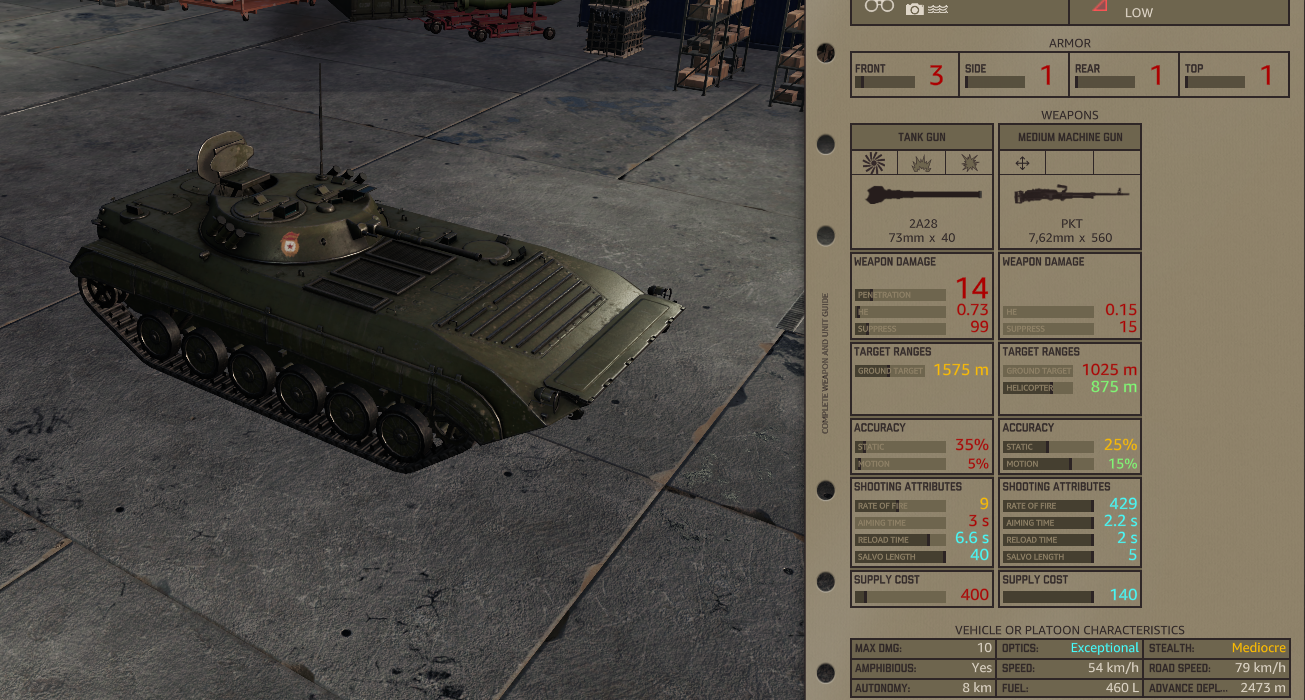
The tab also gives you access to 1 card of Motostrelki(BMP) with 9x units,
and they come with the BMP-1P while not great inf squads they are great for holding flanks and supporting pushes to urban areas.
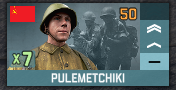
next are the Pulemetchki
they are little better then the Motostrelki but have worse anti tank weapon and they don't have the BMP-1P.
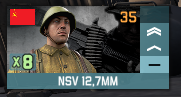
last is the NSV 12,7 MM support gun
I don't use it because they die easily and in this battle group you will use your tanks as support.
This is the infantry line up I prefer
Summing up the infantry in this battlegroup is good but you don't have very much of it so you have to be cautious.
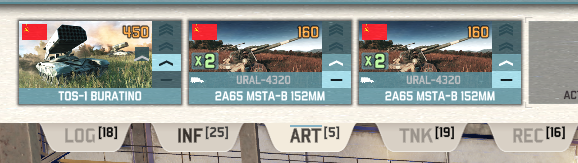
The artillery tab gives you access to really good artillery pieces and they will be a vital part of you path to victory.
As you can see you will get(lowest experience):
2 cards of 2B9 VASILEK mortars with 4x units each
2 cards of 2A65 MSTA-B 152MM howitzers with 2x units each
2 cards of 2S1 gvozdika with 3x units each
2 cards of TOS-1 BURATINO with 1x unit each
All of them are good artillery pieces, lets dive deeper into each one.
First the vasilek,
its a very special mortar because its automatic mortar and can fire rounds down the range really quick but the accuracy is somewhat poor, but if you are looking to stress the enemy units its the mortar for the job.
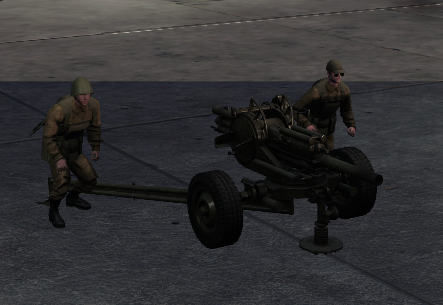
Next is my favorite the MSTA-B,
it has really good accuracy ,damage and range and you get 4 of them,the only down side of it is its towed which means you need to move it around with a truck so don't sell them!.
The 2s1 GVOZDIKA
its a solid artillery piece with decent range and damage while the accuracy can seem under whelming you get 3 of them each card you can get 6 of them at this point accuracy does not really matter plus its mobile.
TOS-1 BURATINO
expansive really expansive (450_points) but can *tos* out a lot of damage(see what i did there? :)).
and you can make deadly traps to enemy tanks as I will show you.
My line up for the artillery tab(told you the MSTA-B is my favorite)
To sum up this tab gives you a lot of good units to throw lots of damage on your enemy and to destroy strong holds.
Ground Components Part Two
Armor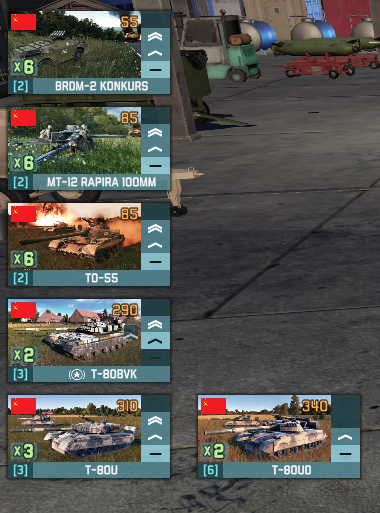
 Recon
Recon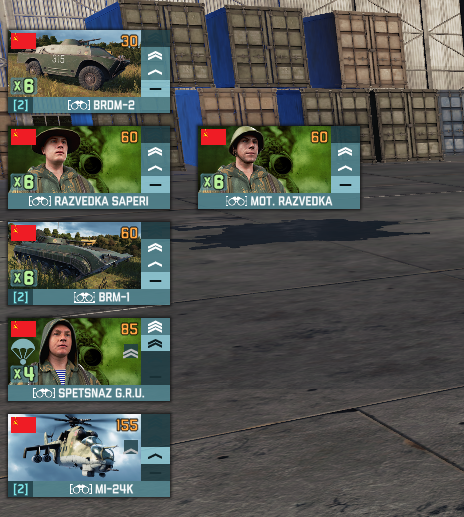


 Anti-Air
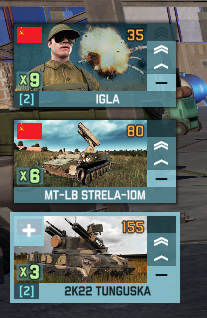
Well this is the tab that this battle group is known for,
in the tank tab you have the following (lowest experience):
2 cards of BRDM-2 KONKURS with 6x units each
2 cards of MT-12 RAPIRA 100MM with 6x units each
2 cards of T0-55 with 6x units each
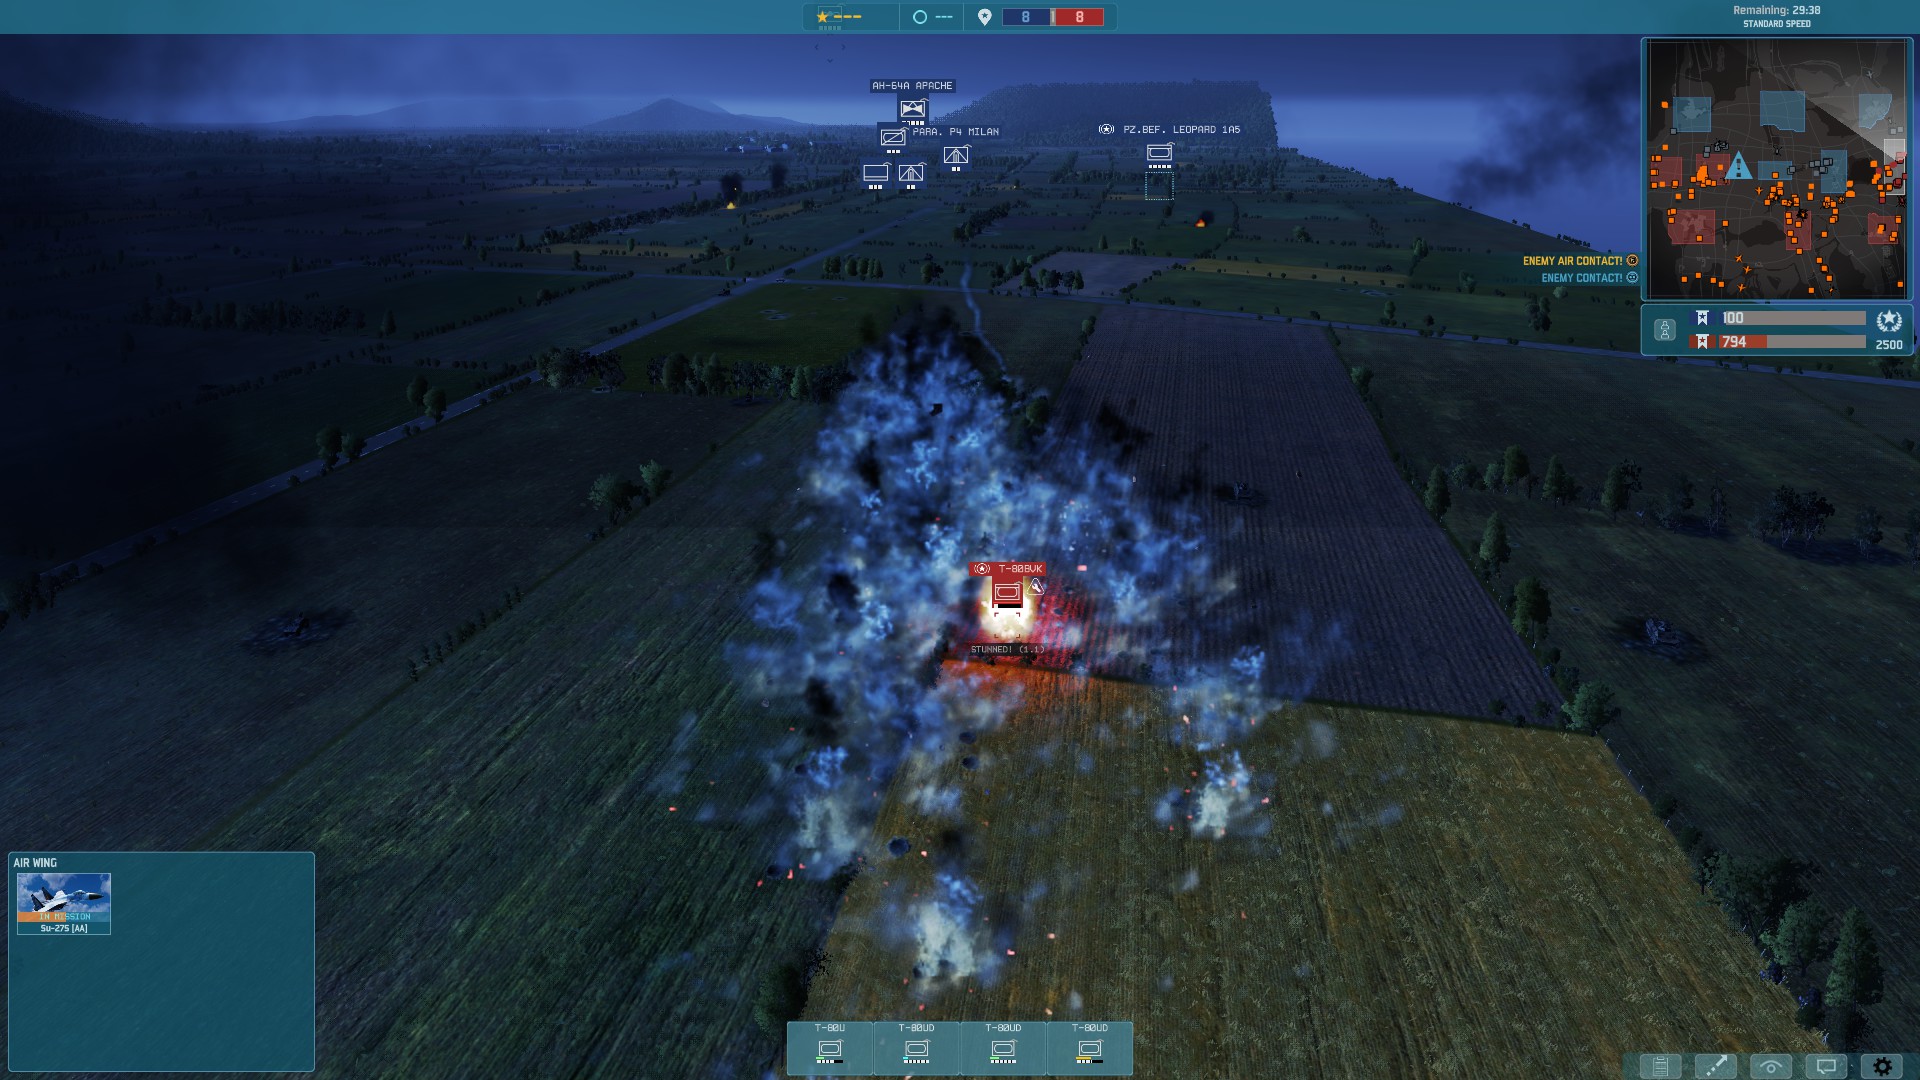
3 cards of T-80BVK CV with 2x units each
3 card of T-80U with 3x units each
6 card of T-80UD with 2x units each
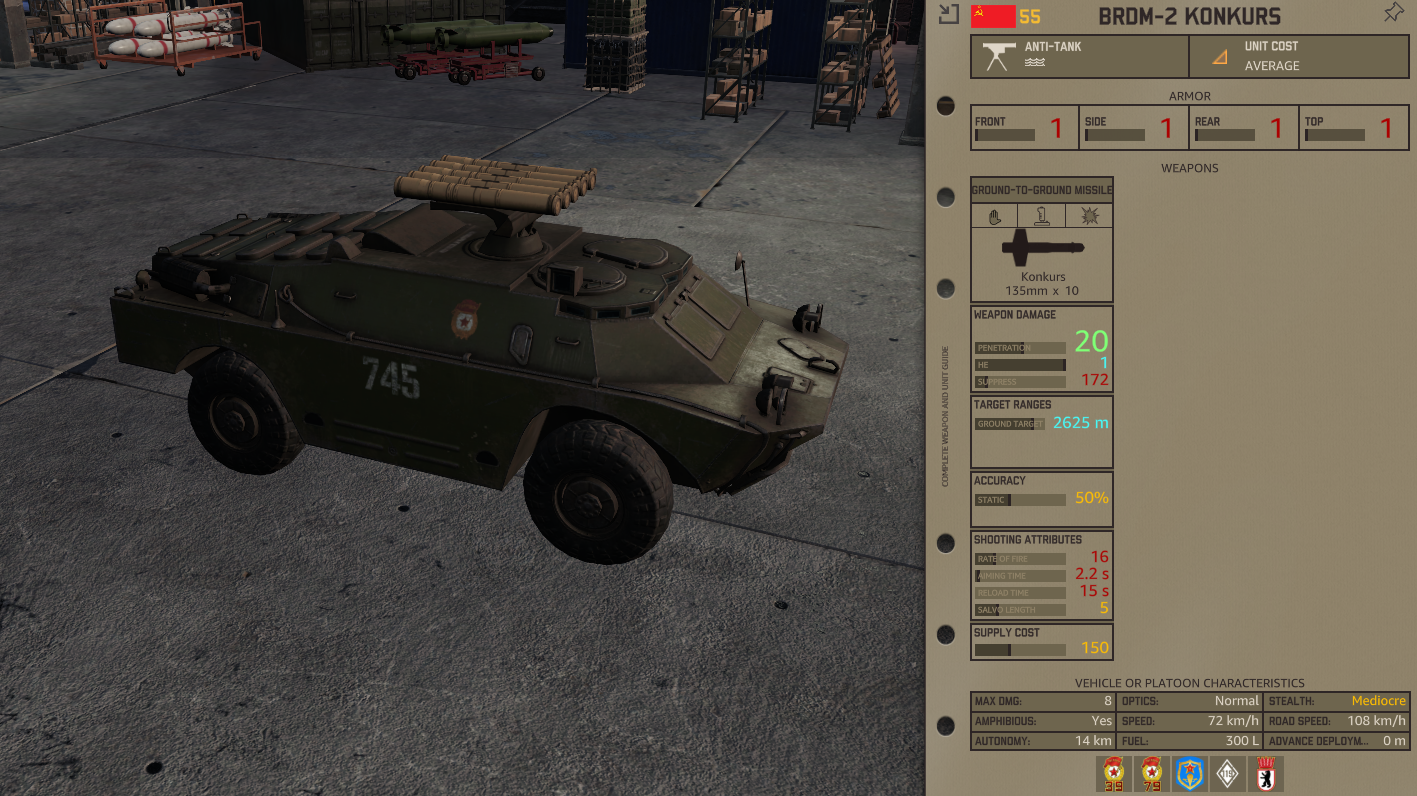
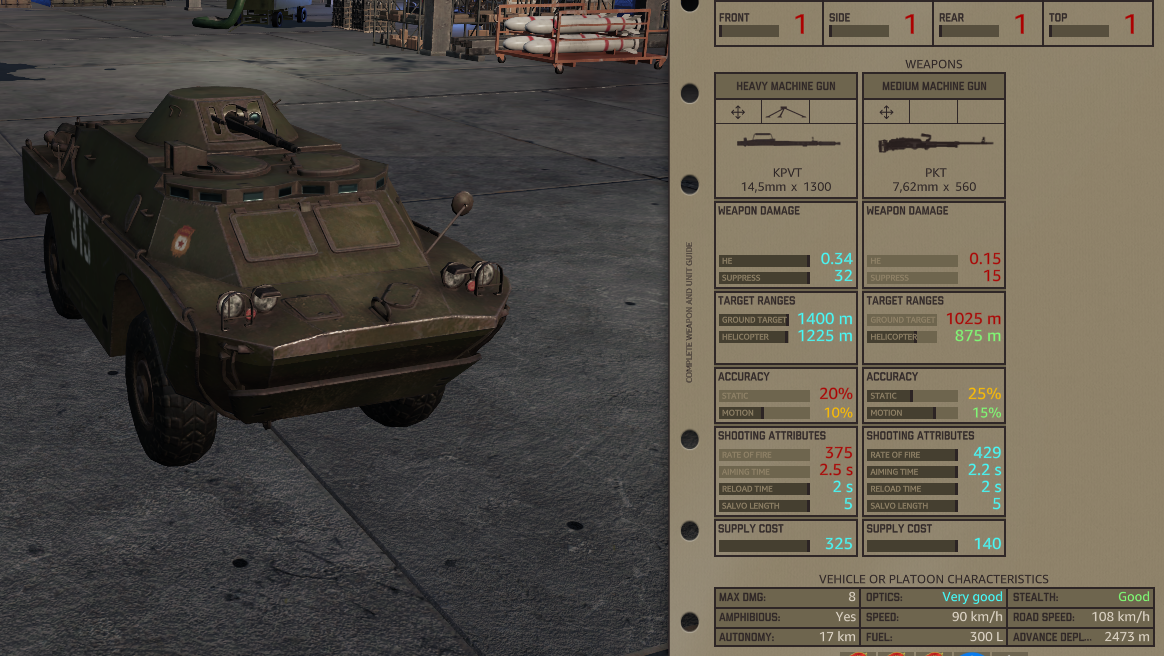
The BRDM-2 KONKURS
[/previewiconthe BRDM-2 is an ATGMcarrier that can carry 10 konkurs,
this unit is not great and it feels like its not meant to be in this battlegroup,
the missile is slow and the range does no give it the time to fire another one with out being in range of most tanks cannons.
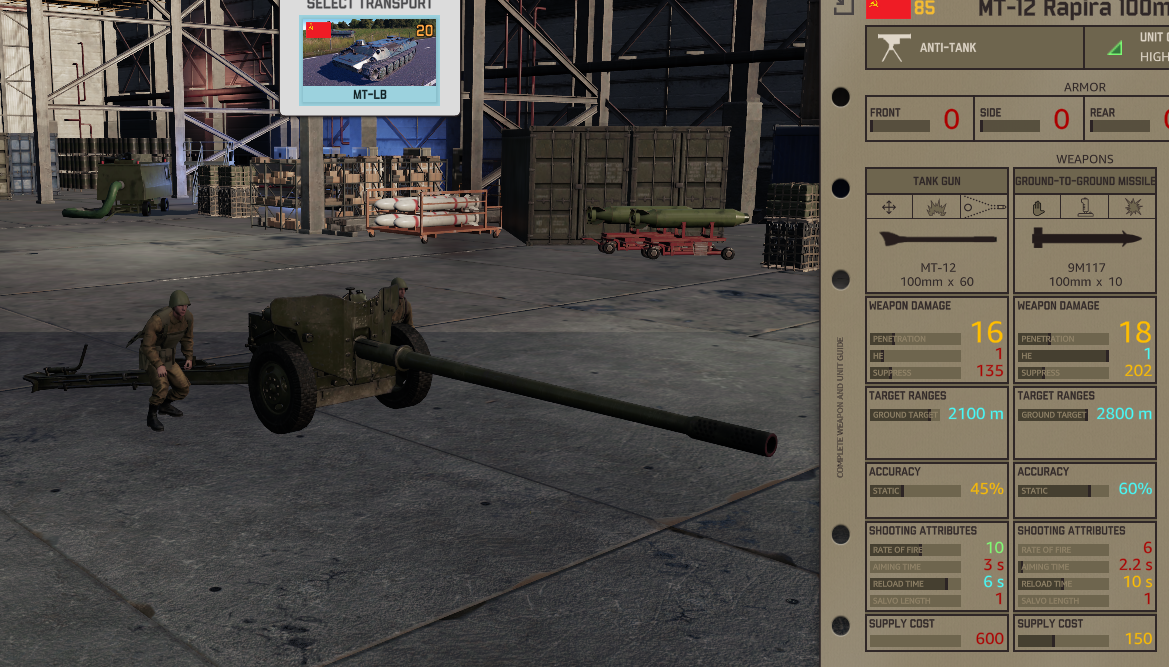
The MT-12 RAPRIA 100M
the MT-12 is anti-tank gun with a good ATGM missile 9M117 with 2800M range and its really fast,
but like the BRDM-2 it feels like its not meant to be it this battlegroup maybe for second line units in case you need to retreat with your tanks.
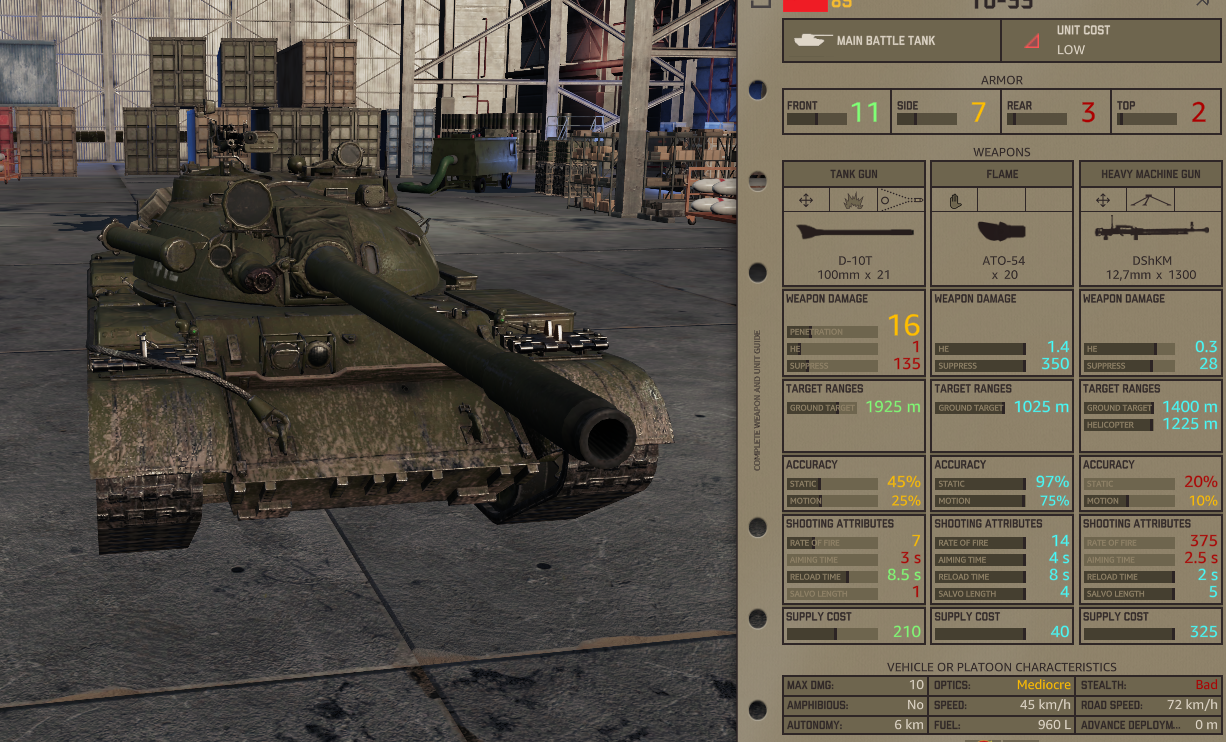
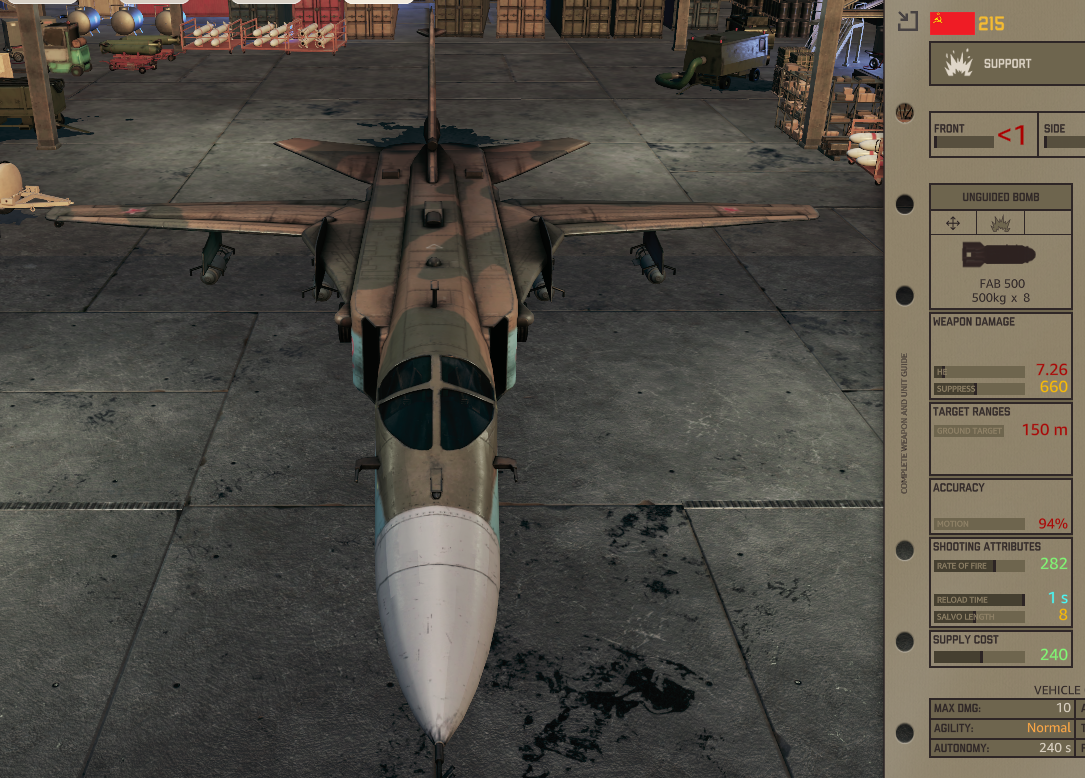
The T0-55
the T0-55 is an old tank with a flamethrower, the down side is the range 1025M and its really slow by the time it will get in range it will be to late,and its not well armored.
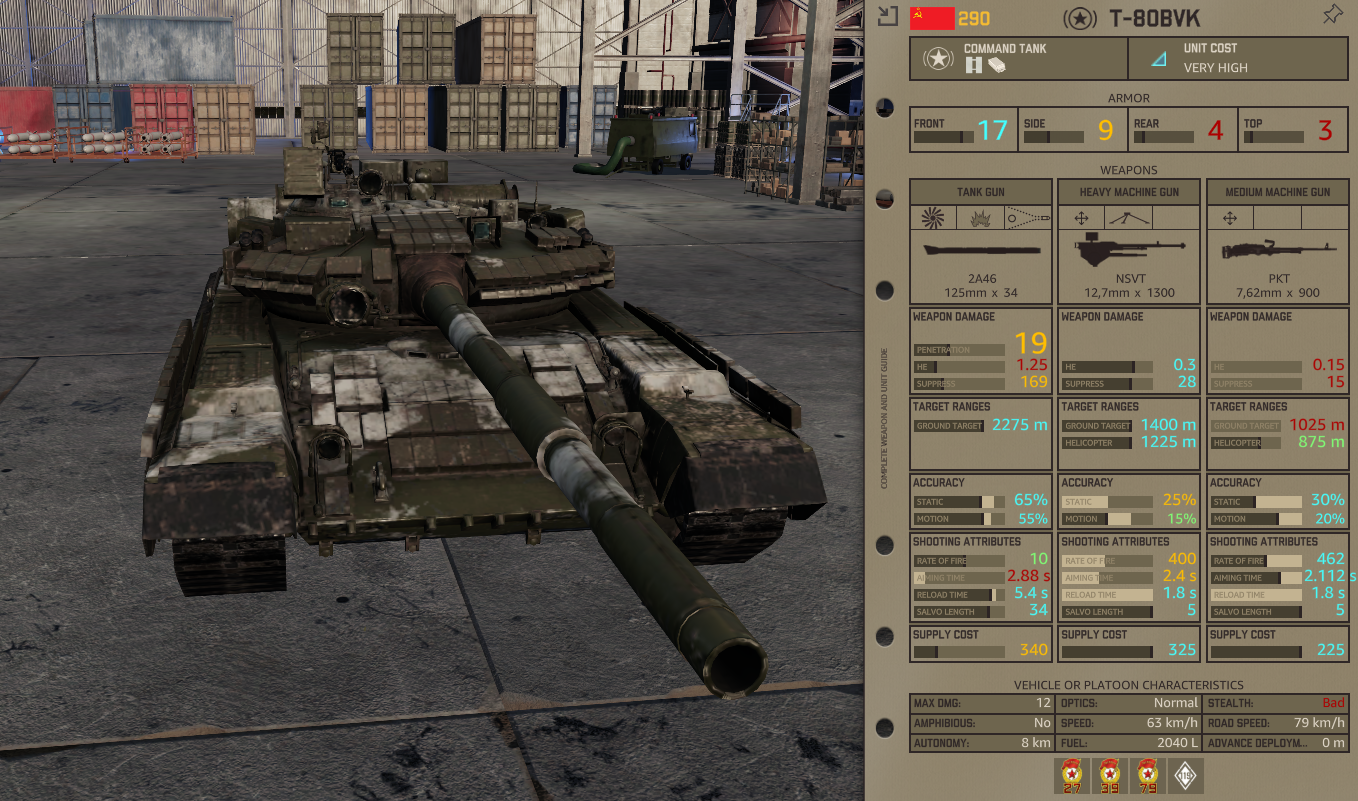
The T-80BVK CV
the T-80BVK is main battle tank cv with good armor and a good gun, better to bring him with a pack of T-80U/UD'S so he will boost their stats.
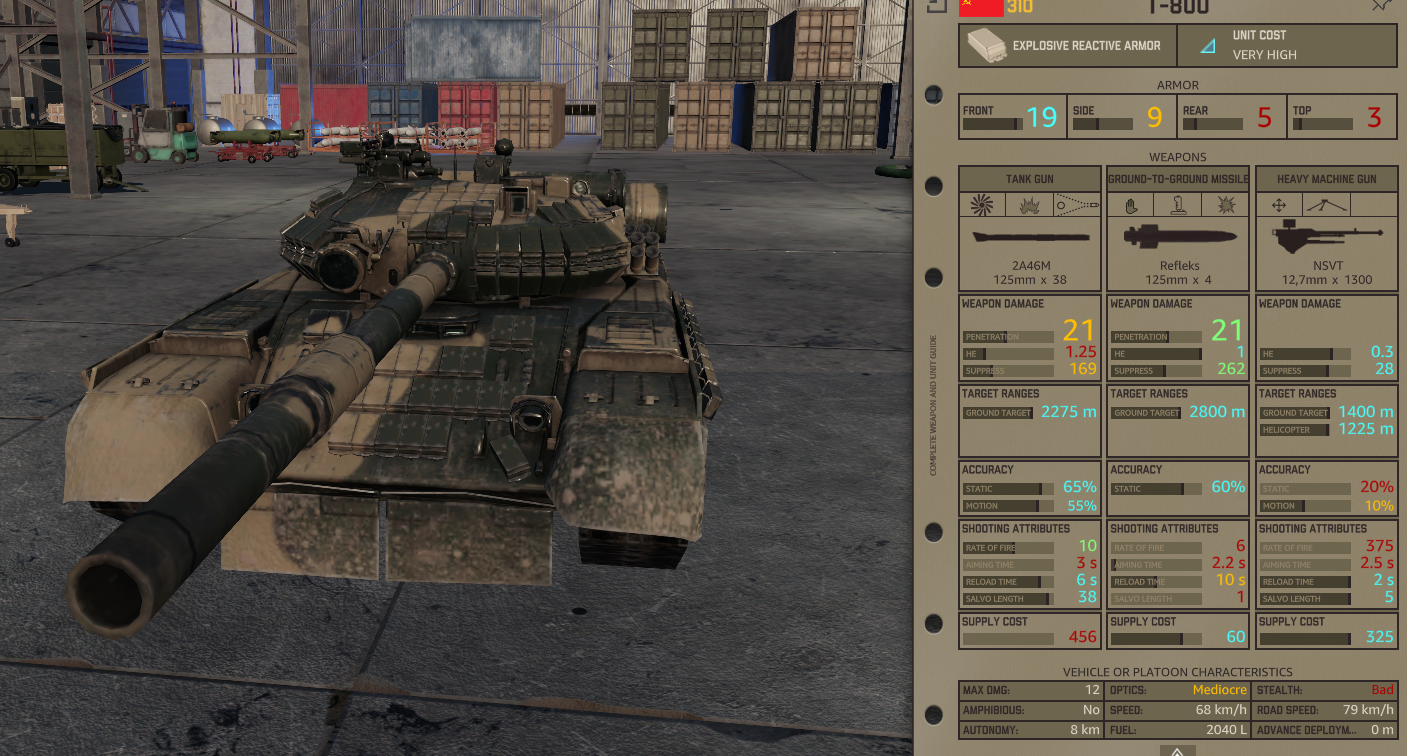
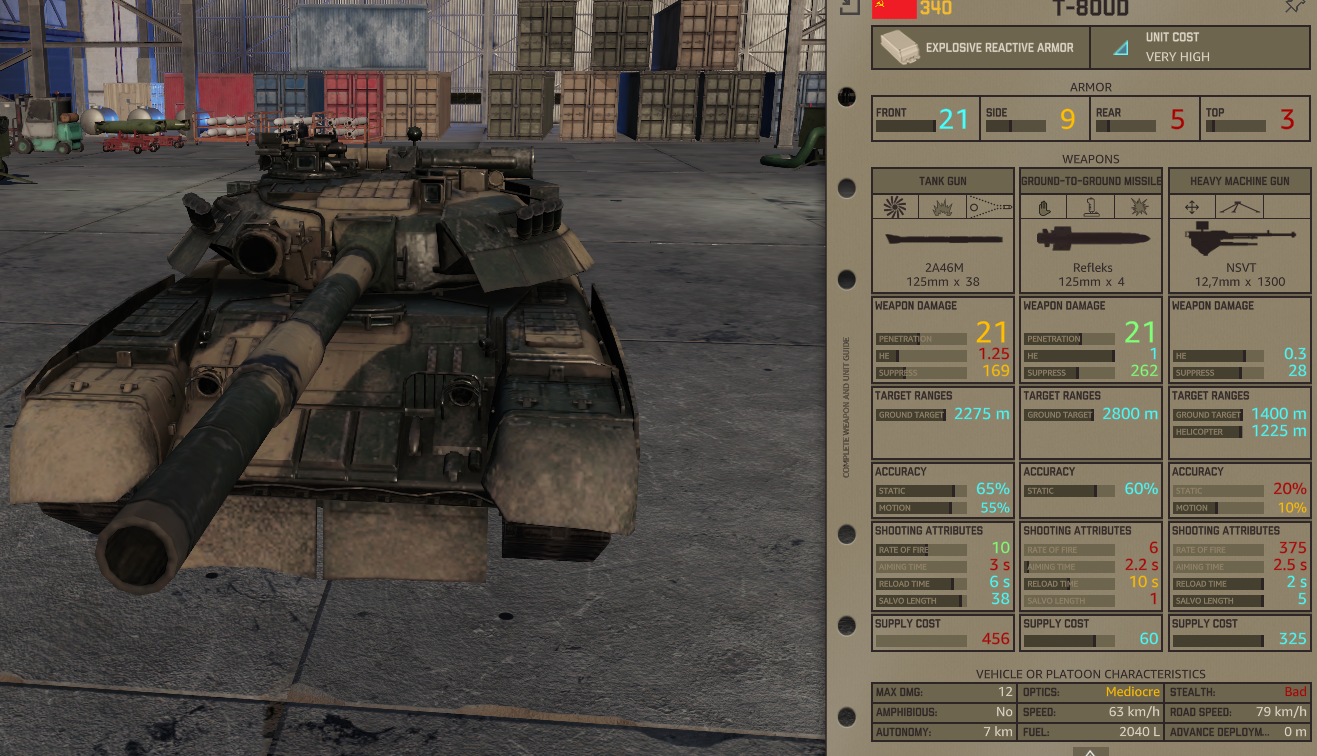
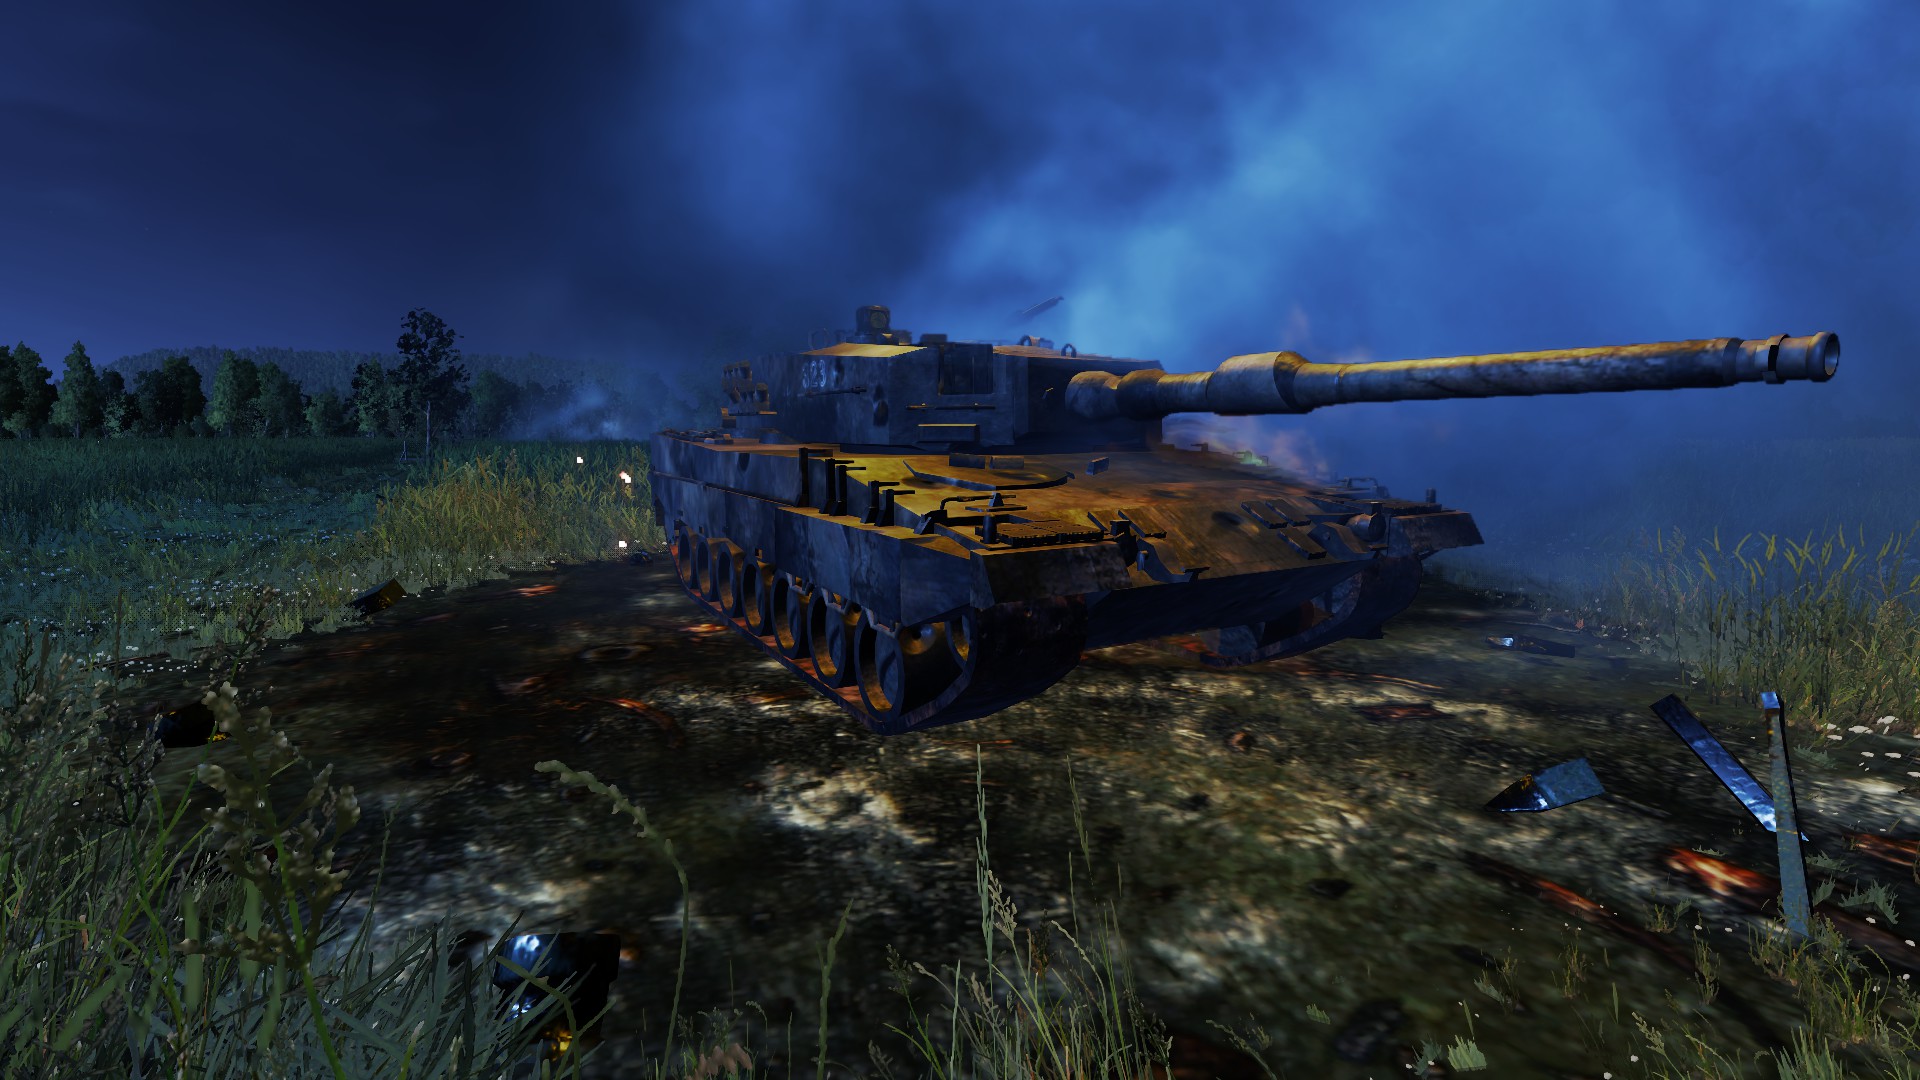
The T-80U
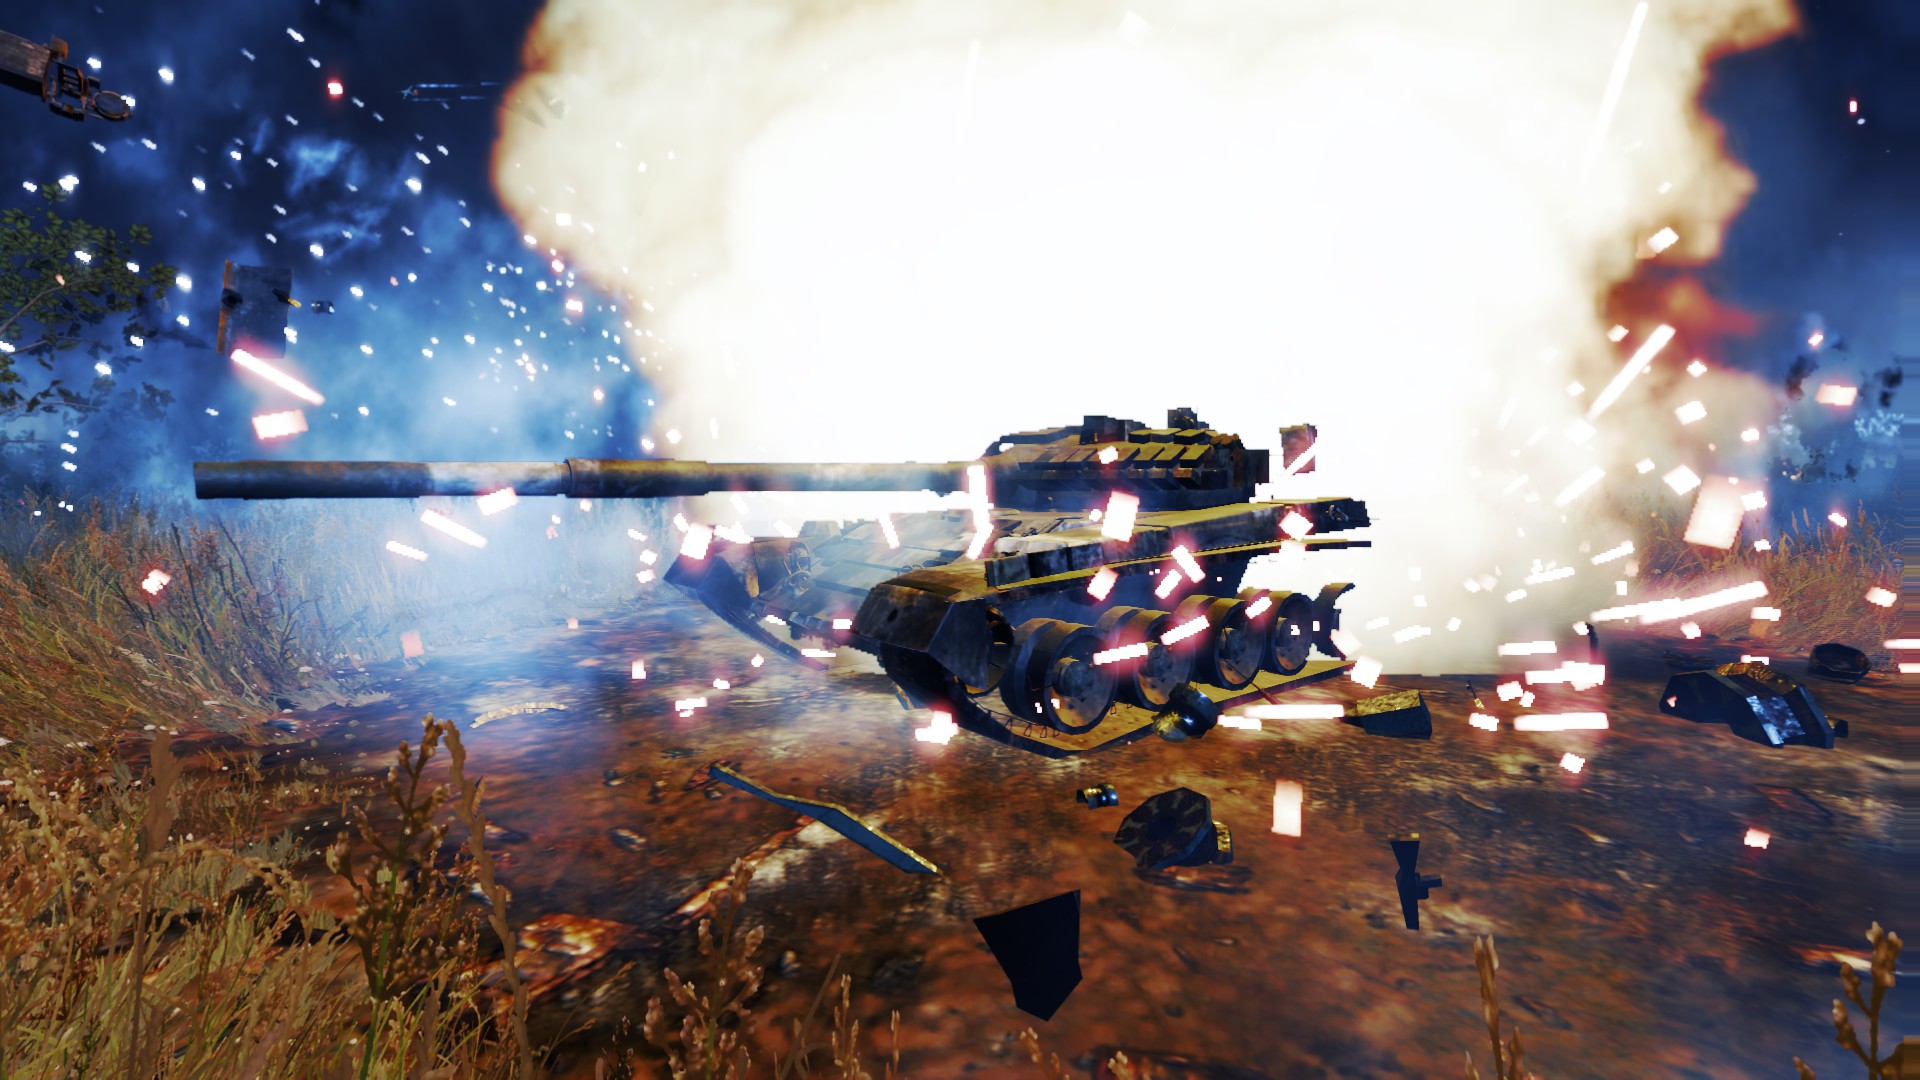
the T-80U has a really good gun has very good armor which make him a formidable unit to face against also he has a 2800m rage Refleks missile, and if that is not enough he is fast too,the only down side is this tank is thirsty.
The T-80UD
the creme de la creme of the soviet tank line,while having the same gun as the T-80U the tank features better armor by 2 points, its a little slower and drinks more fuel then the T-80U,
Building Theory
This tab is where your main combat power is the T-80s,here you have two ways of thinking,
one begin quality ,the other is quantity, that is in the first way you bring "better" tanks with better stats to the battle so they will hit more of their shots and will not get stressed easily, but the down side of this choice is you loss availability and will have less tanks in the long run,on the other hand the second way is bringing more tanks and playing into the long game and you can handle more losses and plus if you have a CV near them for example (T-80BVK) you can buff their stats,that's why I think the second option is much more robust and is better when you start playing this battlegroup, but of course if you fell good about your micro and think you can avoid losses the first way of thinking might better suit you.
This is how I build this tab with only 1 card T-80BVK but for beginners i suggest bring 2 card even if it takes you the place of a T-80U/UD
This bring you the eyes and ears for your tanks without them you are blind and deaf, recon will be a vital part and you can not lose them or no bring them.
the tab gives you a lot of options and they are all good in their own way,
2 cards of BRDM-2 recon vehicle with 6x units each
1 card of RAZVEDKA SAPERI infantry squad with 6x units
1 card of MOT.RAZVEDKA infantry squad with 6x units
2 cards of BRM-1 an IFV with exceptional optics
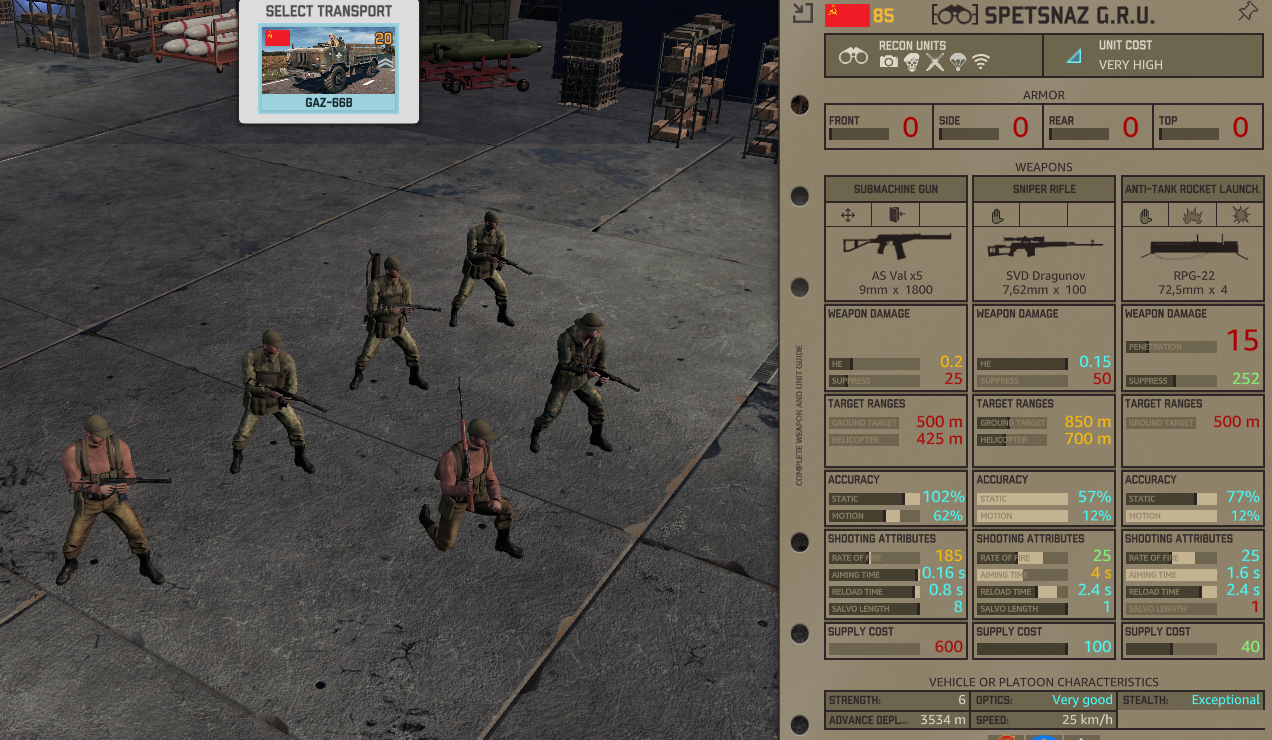
1 card if SPETNAZ G.R.U an elite recon infantry squad, 4x units
2 card of MI-24K recon helicopter with 1x unit each
The BRDM-2
this vehicle is great for cheap flank covering tasks but if you put it in the front lines it will die really fast.
The RAZVEDKA SAPERI infantry squad
this recon unit will give the eyes and ears you need and can also fight other inf units with ease but will suffer against armored units. The unit can come with and GAZ-66 truck ,BTR-60B APC or an MI-2T helicopter.
The MOT.RAZVEDKA infantry squad
this unit is the same as the RAZVEDKA SAPERI but lacks one ak-74
and the satchel charges are replaced with RPG-22,the unit has more options for transport vehicles also,the GAZ-66 truck, recon BMP-1P IFV, MI-2T ,MI-8T,MI-8T that comes with rockets.
The BRM-1
this recon unit offers with some gun support but mainly an exceptional optics mobile capable unit,
the best way to use them is them to ride along side your tanks to give them the some more recon and they can also detect (sometimes) ATGM units for your tanks to destroy them.
The SPETNAZ G.R.U infantry squad
they are your best recon unit, they have the GSR trait which gives them exceptional optics(only when standing still, and they are an elite unit that can deal with most infantry units,while they do have the RPG-22 its not the best and against highly armored vehicles they will have some troubles,
you may think they are a front line combat unit that fights the enemy head-on, they are best for reconnaissance work because they can stay hidden really close to the enemy front lines and they have exceptional optics which make them much more valuable then just throwing them away to fight.
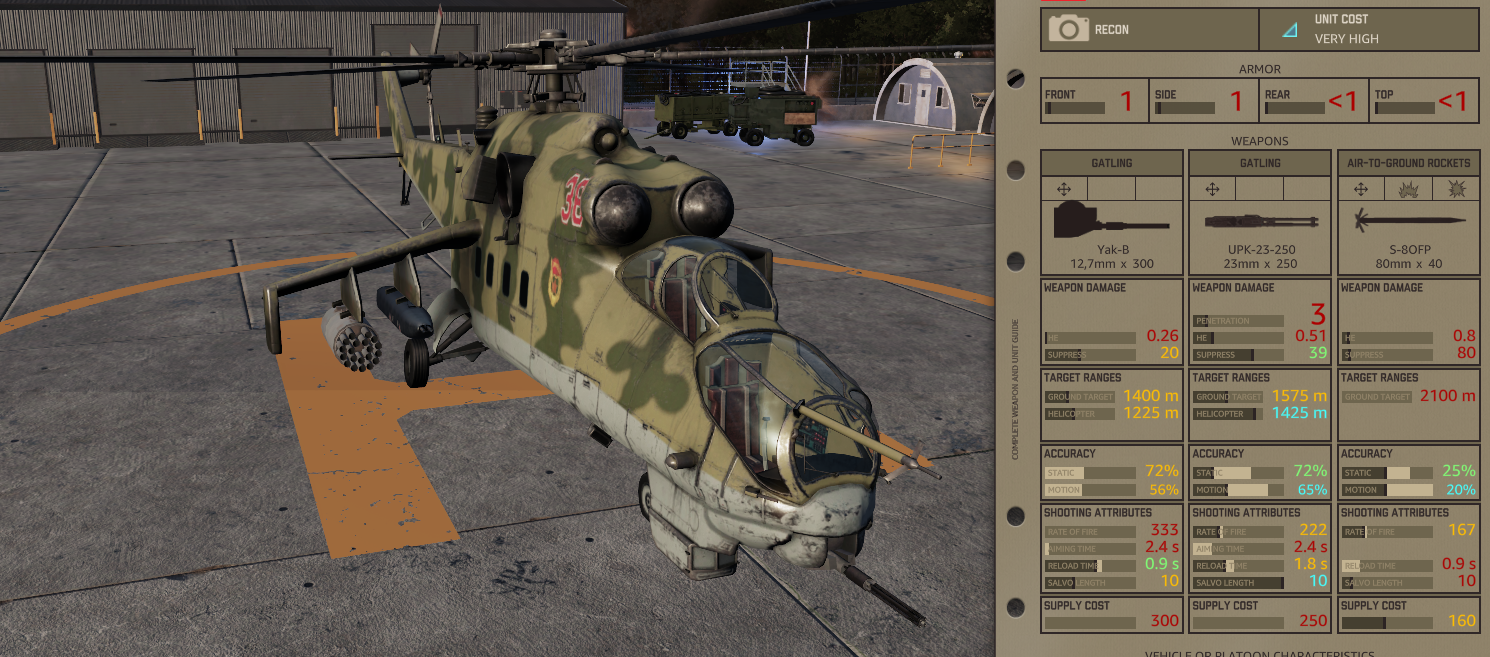
The MI-24K
good helicopter of the start of the game can cause some troubles to enemy recon or airborne units,but if they have fighter jets they will just perish and they lack any ATMG and ECM which make them really vulnerable ,in the middle to the late game period they are best suited as quick reaction units for flanking units.
you can build this tab however you want just make sure to put some infantry recon squad
or 2.
Anti air is very impotent to your tanks because every player in the other team will see your threat and your 300+ points tanks and will send aircraft helicopters you name it ,you need to have good anti air cover which is challenging because you don't have long rang AA,but that where numbers come in.
You will get the following:
2 card of 2 men IGLA team manpad(Man-portable air-defense system) with 9x units each
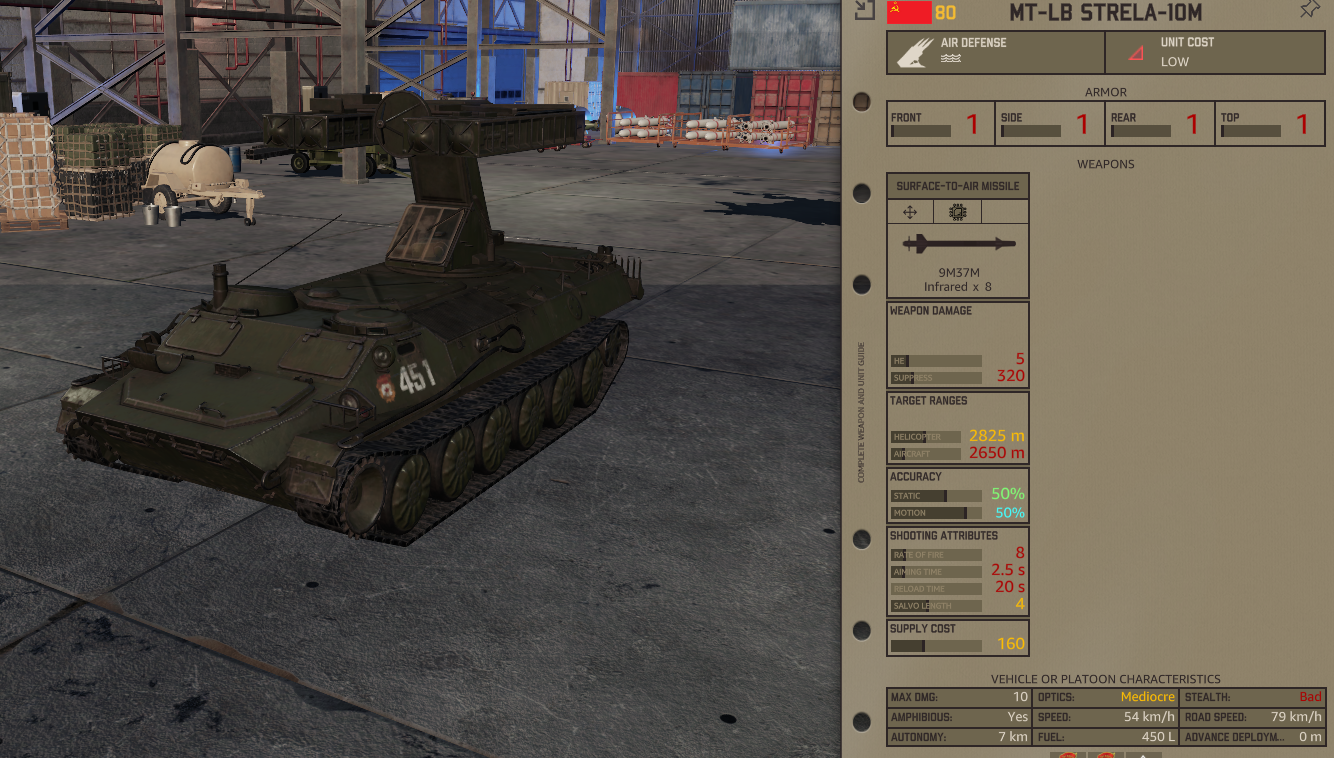
1 card of MT-LB STRELA-1OM mobile anti air system with 6x units
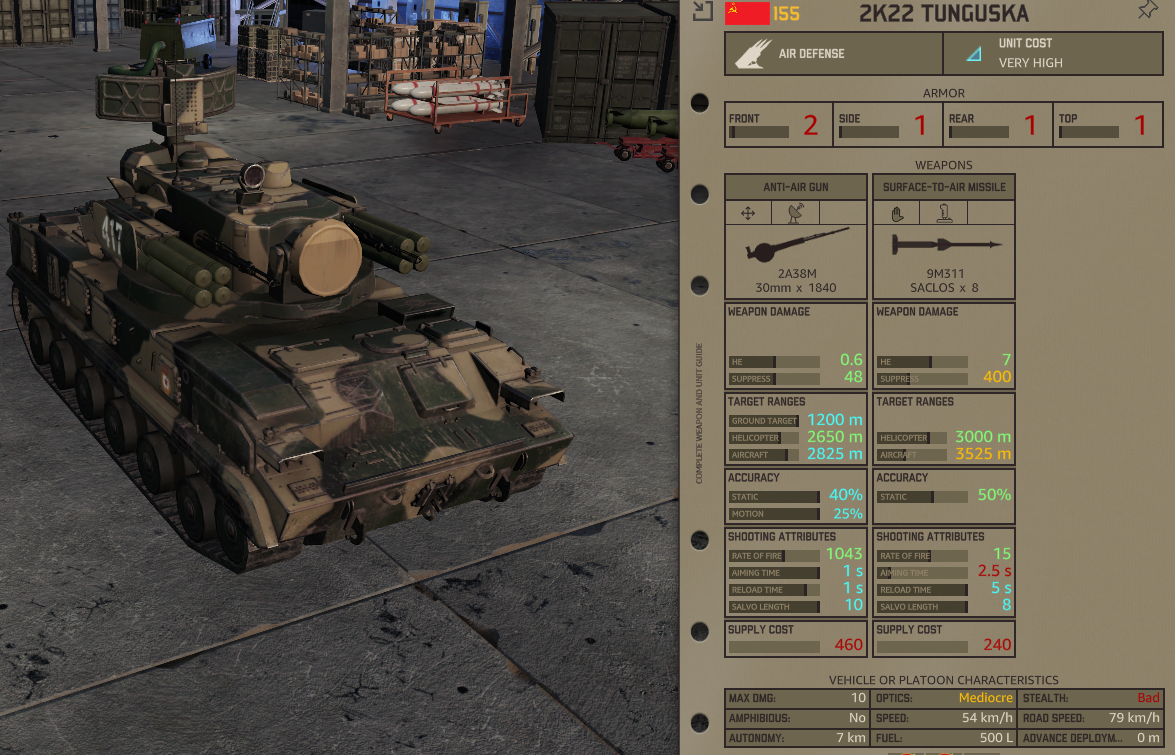
2 card of 2K22 TUNGUSKA tracked self-propelled anti-aircraft gun armed with a surface-to-air gun and missile system. with 3x units each
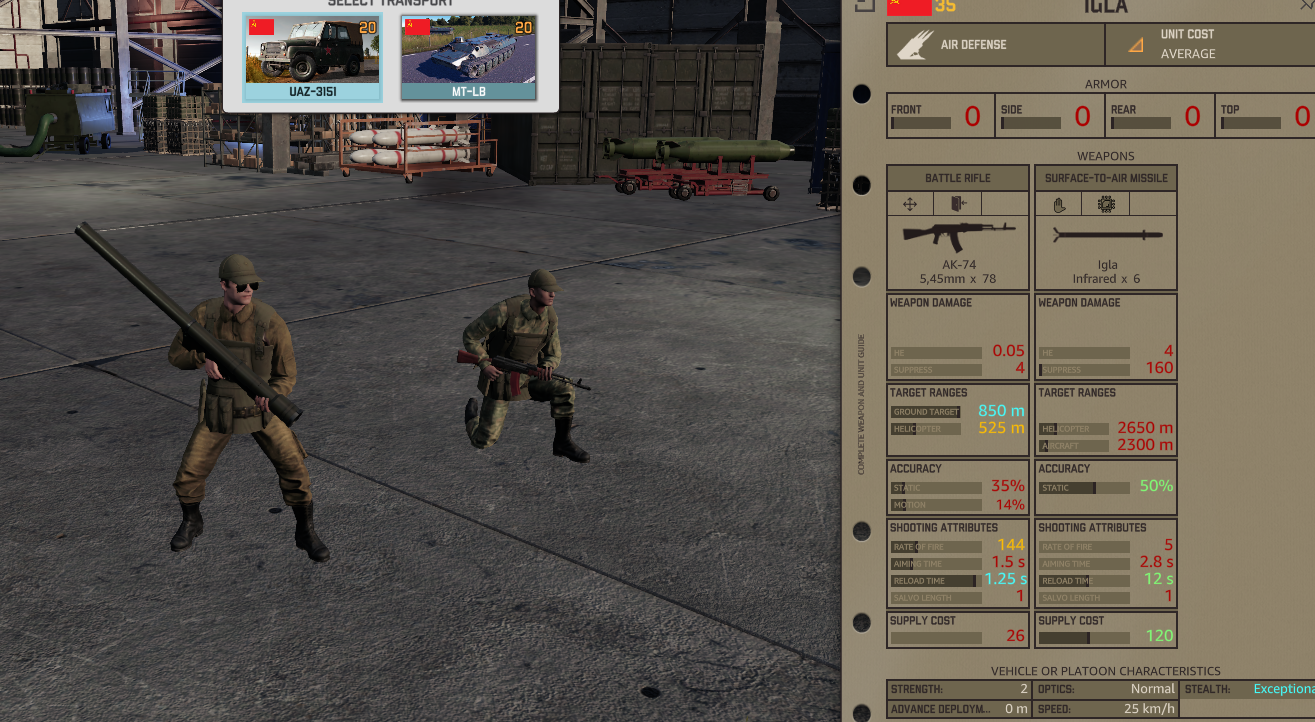
The IGLA manpad team
this unit will be the backbone of your anti air coverage because of its availability they have only 50% accuracy but the more you have the better are the chances of getting a hit and shooting down a plane.
The MT-LB STRELA-10M
good mobile anti air system can shoot while moving with the same accuracy, best used with close proximity with your tanks for better air cover.
The 2K22 TUNGUSKA
the best AA unit in this deck with a radar anti air gun and elctro-optic guided missiles,the down side of having the gun on is its radared an then the unit can be tar by SEED planes so you will have to micro it a bit.
Air Components
 Aircrafts
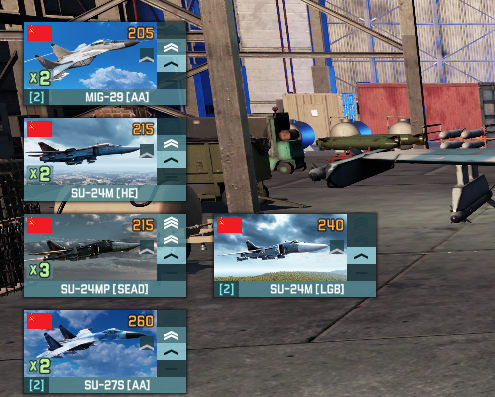


This battlegroup offers a variety of aircraft and helicopters, while yes the power of the division are mostly its armored units, the air power is no less,but you have to use it right and micro it well, we will touch on how to use them in the battle theory section of this guide, here we will discuses the air units of this battlegroup.
Helicopters
The way I see best to use helicopters are as support or quick reaction units and in the helicopter tab you get everything you need for this.
In the helicopter tab you have access to the MI-24(Hind) helicopter and many of its variants,
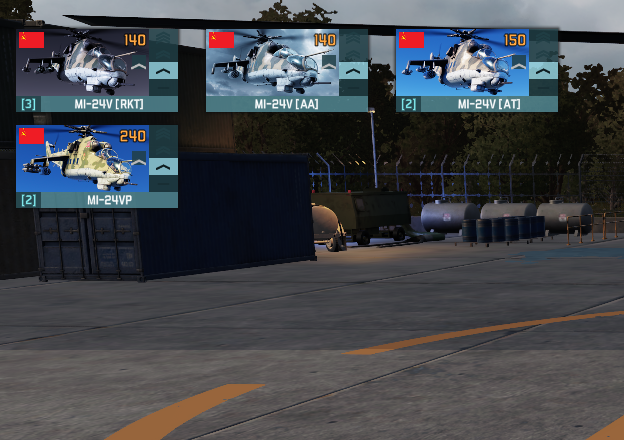
as shown you get:
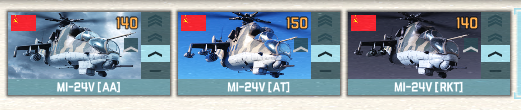
3 cards of the MI-24V(RKT) a real fine helicopter with 1 unit each
1 card if the MI-24V(AA) good helicopter with AA missiles
2 cards of the MI-24V(AT) really good helicopter that can help you very much
2 cards of the MI-24VP expensive but can stay in the battle for longer for it has twice the amount of ATGM's then the MI-24V(AT)
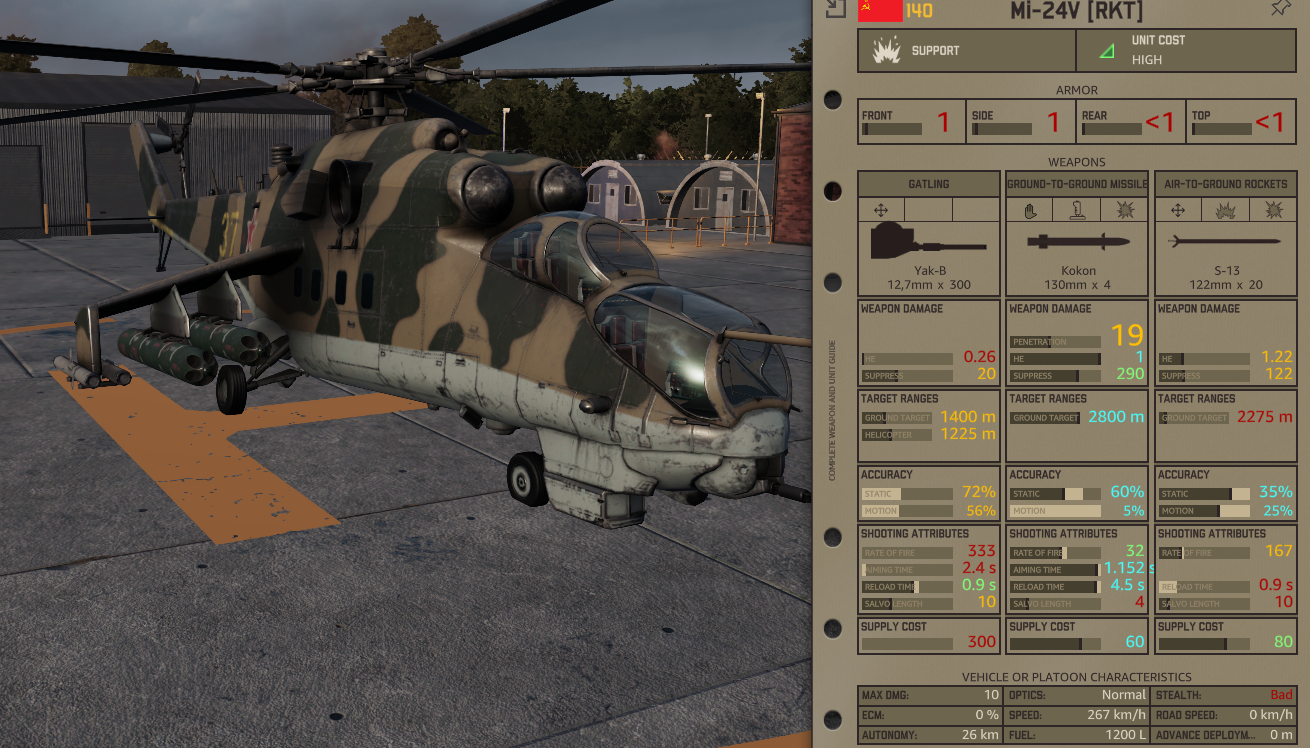
The MI-24V(RKT)
this helicopter can help your units to demolish enemy infantry squads with ease thanks to its 122MM rockets but it has only 20 of them so it will have to resupply a lot of times but all in all a really good support helicopter.
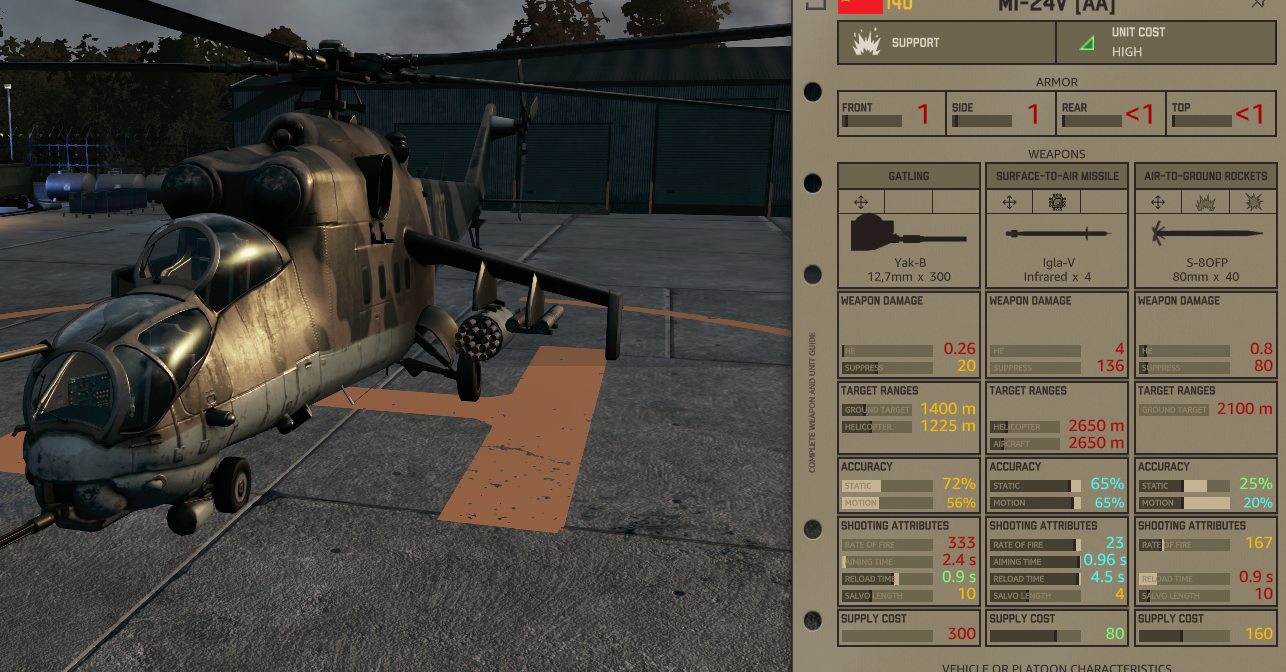
The MI-24V(AA)
while not having ATGM's he can help you with those annoying NATO helicopters that fly around trying to flank you or push to your tanks,if that happens and your anti air in the ground can't answer, this helicopter sure can,plus it can punish infantry squads also with his 40x 80mm rockets.
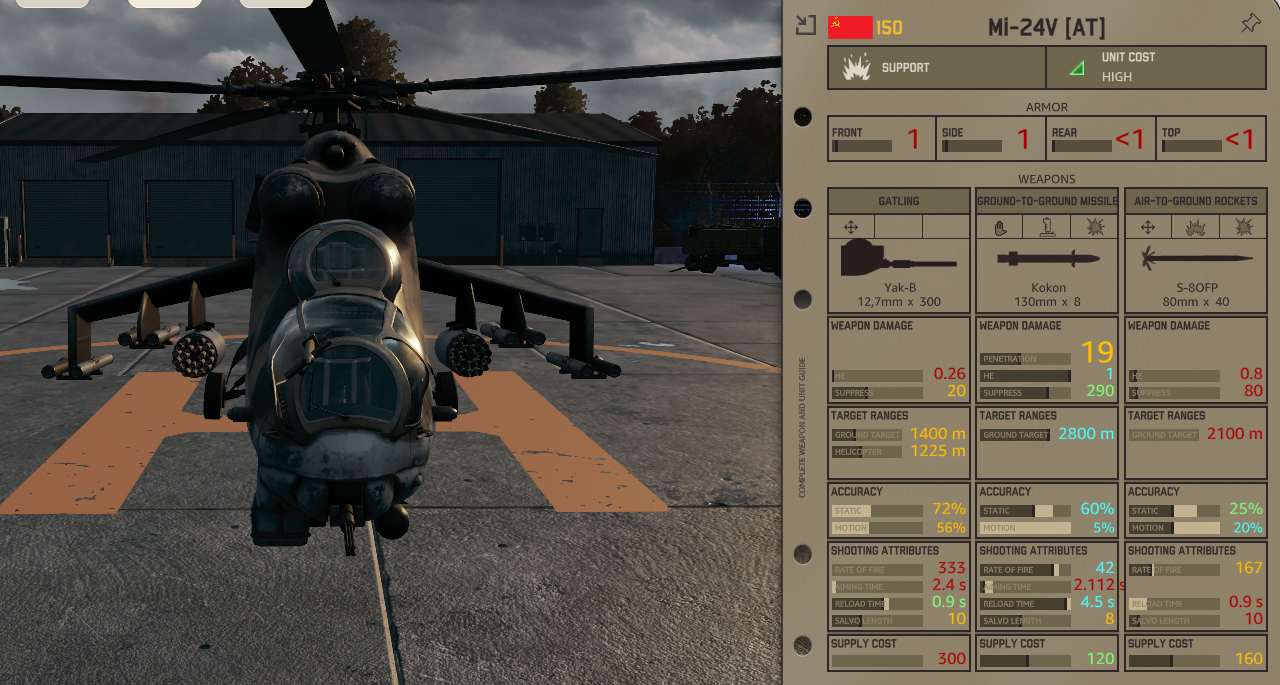
The MI-24V(AT)
this is the jack of all treads in this line of helicopters while not having the 122mm rockets it does have 40x 80mm rockets that can still deal good amount of damge an also having 8x 130mm Kokon ATGM's and only cost 150 points.
The MI-24VP
this helicopter has said before has 16x 130mm Kokon ATGM's and also the only one in this line up that has the Gsh-23L cannon over the Yak-b 12,7mm gatling gun and the only one having 20% ECM,while it sounds amazing and it is it costs 240 points and it is still an helicopter its still an easy target and it will no use it 16 missils in one run so you better just use the MI-24V that offers the same thing but cost much less.
The way I prefer to build my lineup of helicopters is to bring 1 of every variant except the MI-24VP
but you do as you see fit to your play-style
The aircraft tab gives you really good air superiority planes but lacks in the CAS(close air support) department,don't get me wrong you get really good aircraft with amazing armament but with very poor flying characteristics which means they will die every sortie because they fly over all the enemy's AA possible, but there is something you can do about it we will touch in the next section of this guide.
This tab gives you access to the following:
2 cards of the MIG-29 air superiority fighter jet with 2x units each
1 card of the SU-24M bomber jet with 2x units
1 card of the SU-24MP SEAD variant with 3x units
2 cards of the SU-24M(LGB) variant with laser guided bombs 1x unit each
2 cards of the SU-27S air superiority fighter jet with 2x units each(my favorite jet)
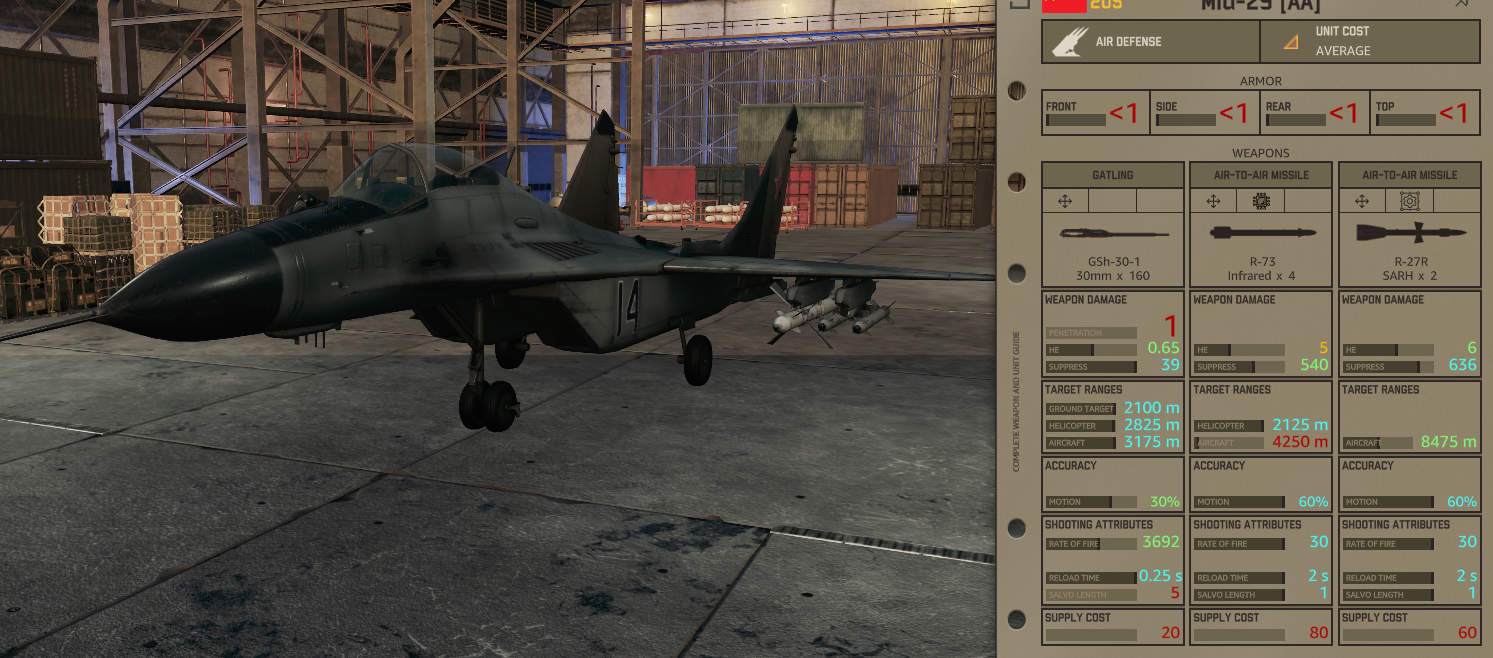
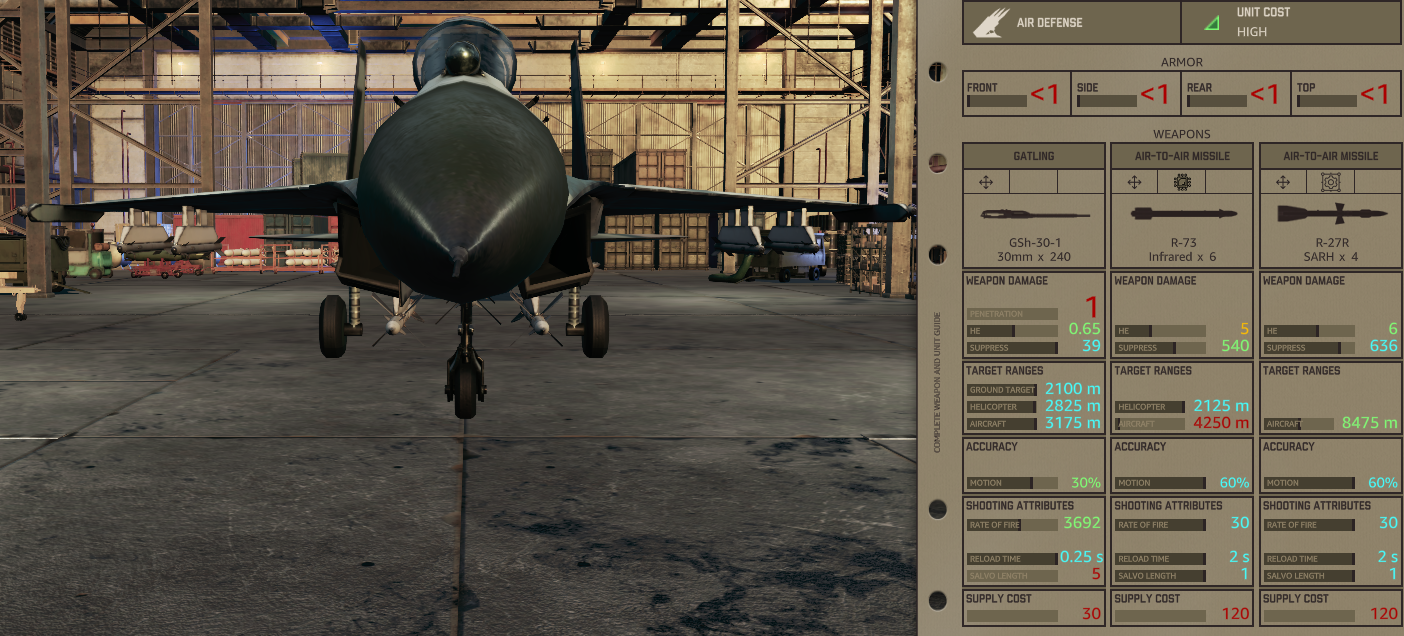
The MIG-29
this fighter jet has 4x R-73 close range heat seeking missiles and 2 long range R-27R radar guided missiles, the Mig can give you the ability to intercept everything and its cheap the only down side it has only 2 long rang missiles that means it can only intercept one or 2 planes before needing to evacuate.
The SU-24M
if you want a neighborhood gone it is the right choice with its 8x 500kg FAB bombs it will make quick work of any entrenched units in houses or forest but as said before it flies like a brick and has a very poor turn rate which means it will fly over every AA unit possible.
The SU-24MP(SEAD)
this plane is SEAD plane (Suppression of Enemy Air Defenses) equipped with radiation seeking missiles that tracks radar AA units it can help you reduce the amount of AA your opponent have but only if it turns on, and once again it flies like a brick so don't let it get to far above enemy territory.
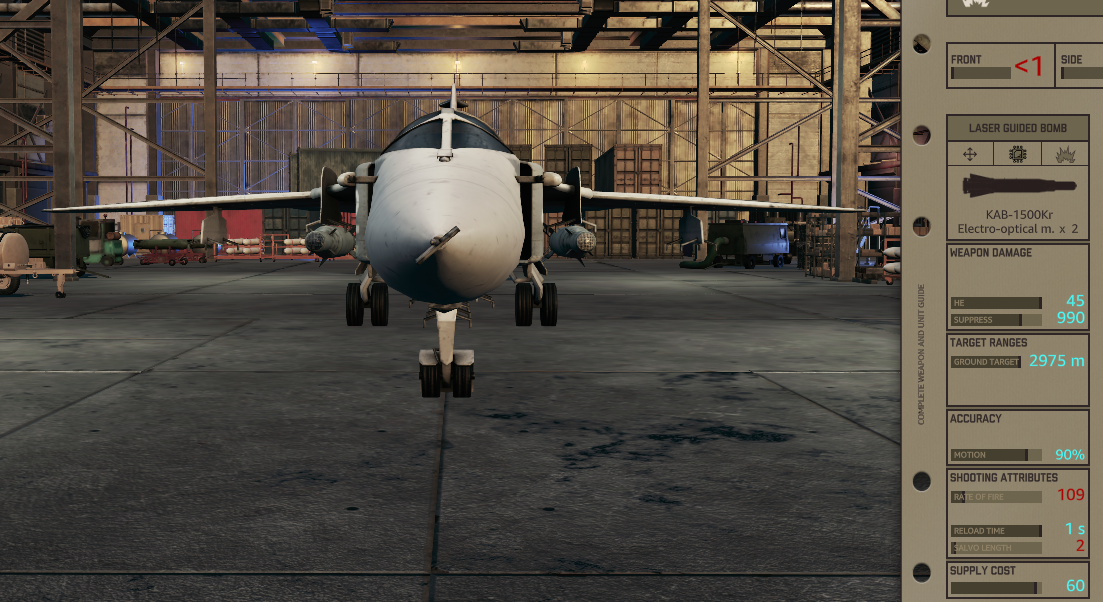
The SU-24M(LGB)
this planes carries the largest laser guided bomb in the game so far the KAB-1500KR that weighs 1500 kg and it carries 2 of them. this plane is perfect of destroying high armored enemy tanks but as all of the SU-24 family it flies like a brick an will sure be in range of all the enemy AA units.
The SU-27S
this is the one of the best fighter jets in the warsaw pact and im a sucker for it that's why I take it over the Mig-29,it has 6x R-73 close range heat seeking missiles and 4x R-27R long range radar guided missiles this plane can stay much more time over the battlefield and can intercept more planes then the Mig-29 BUT it cost much more and as warno air combat goes it will most likely intercept one and will get hit and will have to evacuate so the price is not that justified and it does not have better missiles then the Mig and thus the latter can do pretty much the same with less points that's way the Mig is a better choice after all but I just love this plane and I will take it every time
The air tab gives you decent CAS options but most importantly it covers what your AA tab lacks with its good air superiority fighters AIR COVER!
This is line up i found works best with the tactic I employ that we will talk about in the next section.
Battle-Theory Part One

 Holding The Line And Building Up
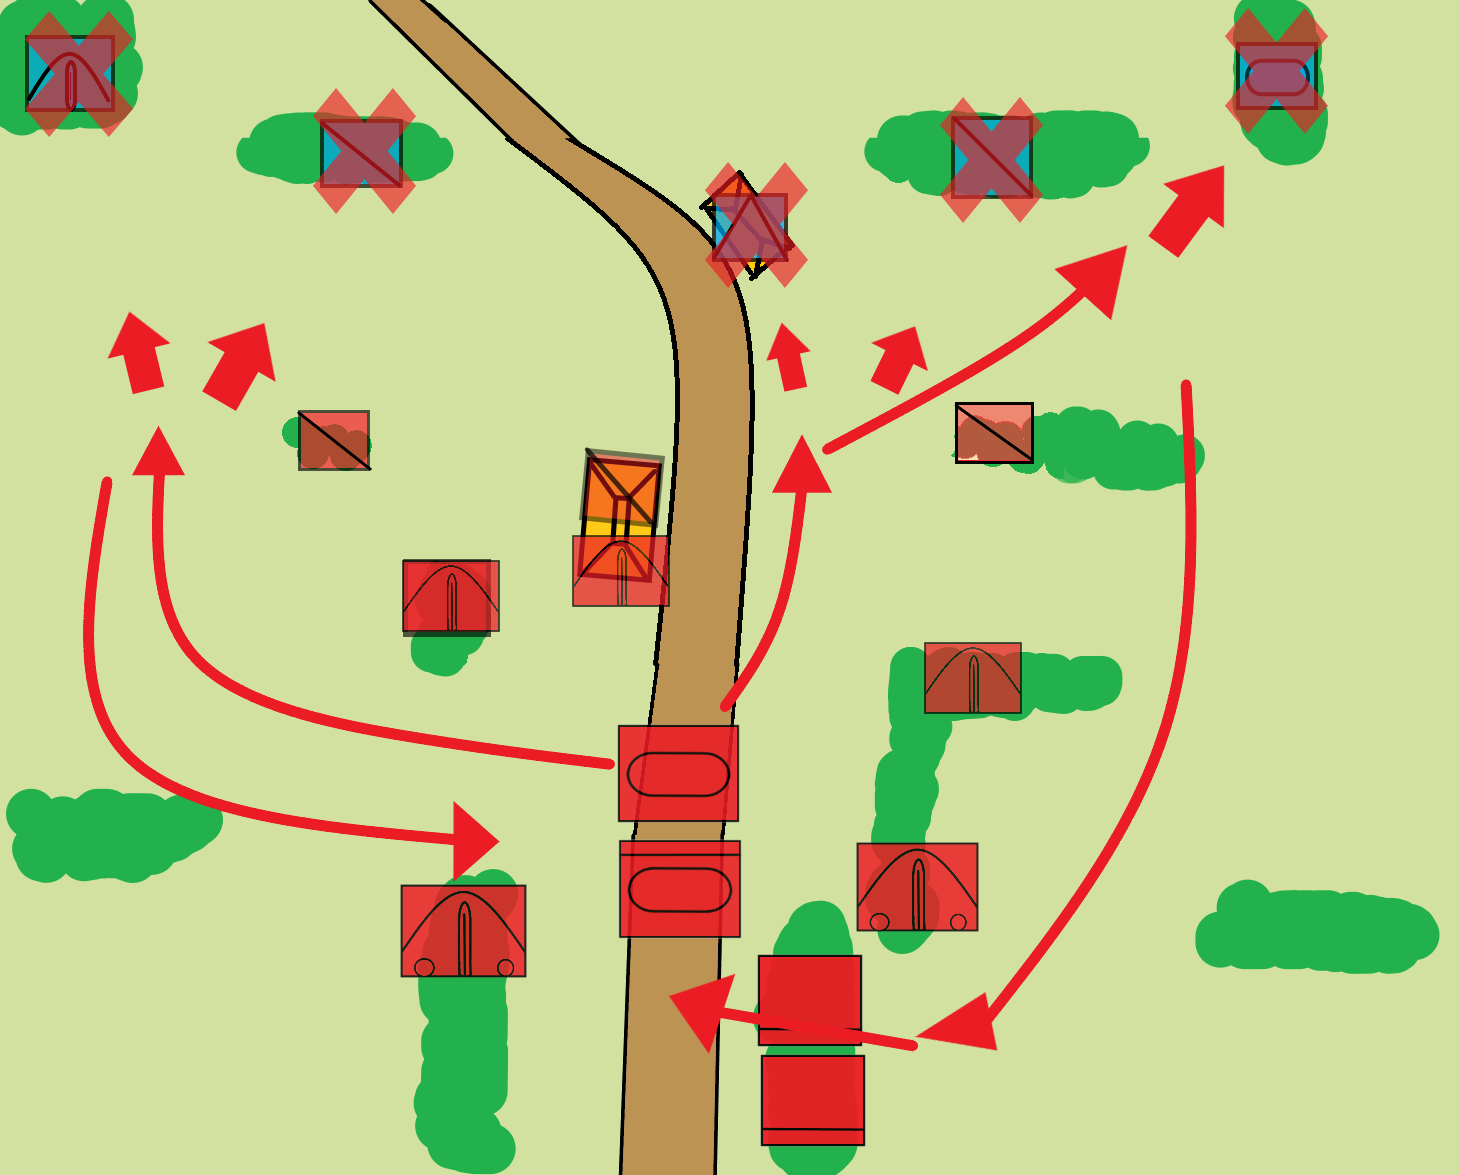
In this section we will talk about the theory of battle and how to best use this battle group and achieve victory.
first in this section I will present my ideas with highly sophisticated state of the art mapping tools best known as Paint so sit tight and lets continue
The Battle-Theory consist of three parts:
The First Step Into The Battlefield
Pushing and Taking Ground
The First Step Into The Battlefield
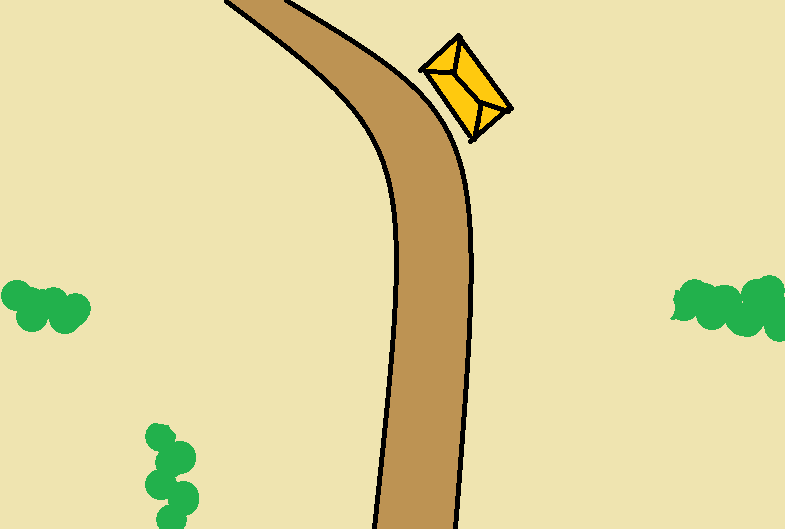
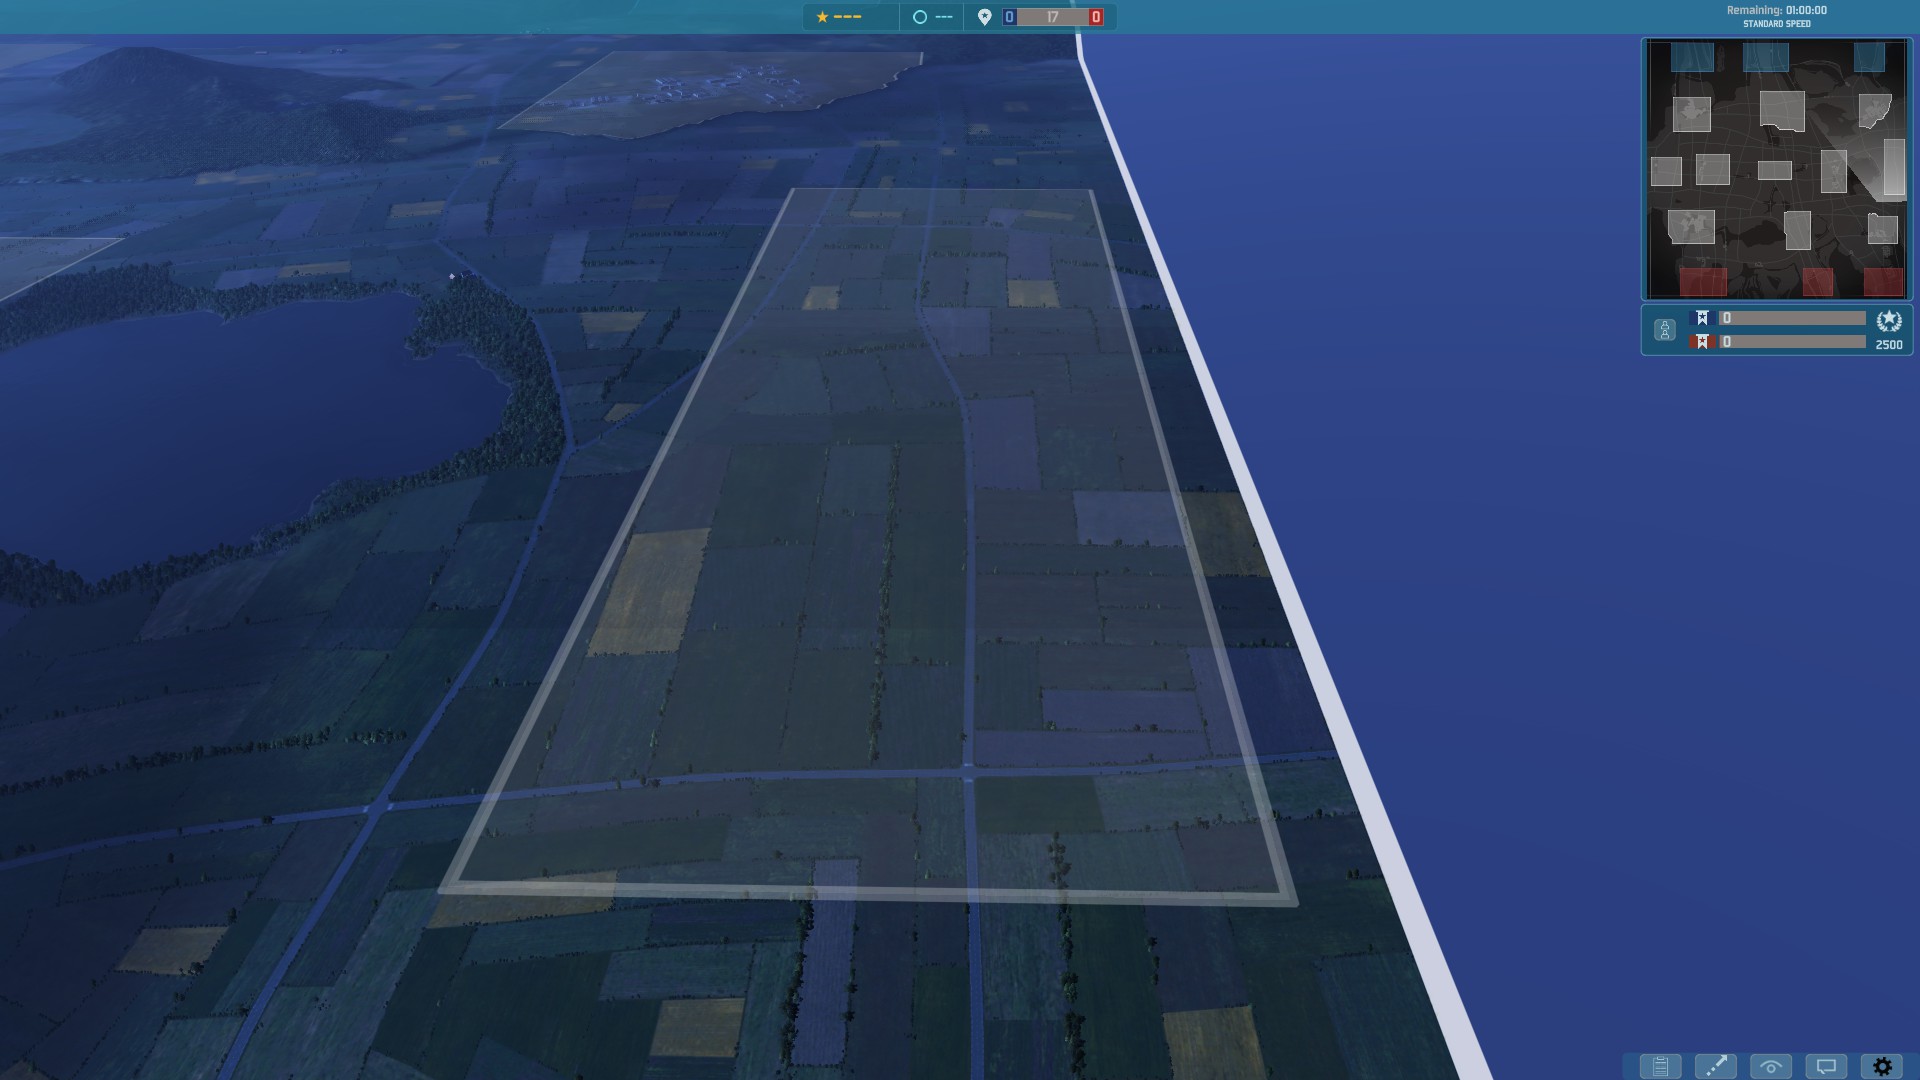
Picking the Right Terrain The first thing you need to do is to decide where to fight, choosing the right terrain for your tanks is very impotent, because your tanks work best in open fields for they can use their cannons and not get hit or worst get flanked. so lets start in how to pick the best terrain to fight in.
As said above your tanks are most effective in open ground not in a forest or worst an urban terrain, so you will need to take into account the layout of the land, at the start of the game look at the map and ask yourself where your tank will have the best time in?
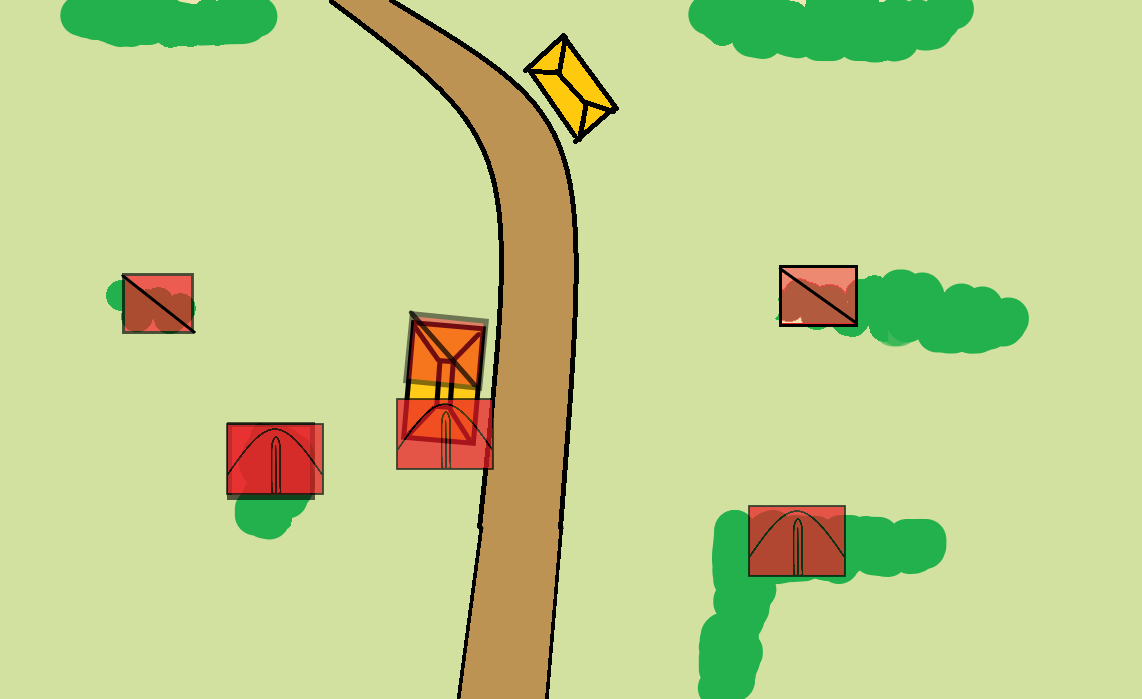
for example here are 3 pictures in which one of the pictures listed below your tanks will be most effective?
1.
2.
3.
that's right!! 3,your tanks will be most effective at a flat plain with minimal obstacles,where they can wreak havoc on the battlefield.
Setting Up
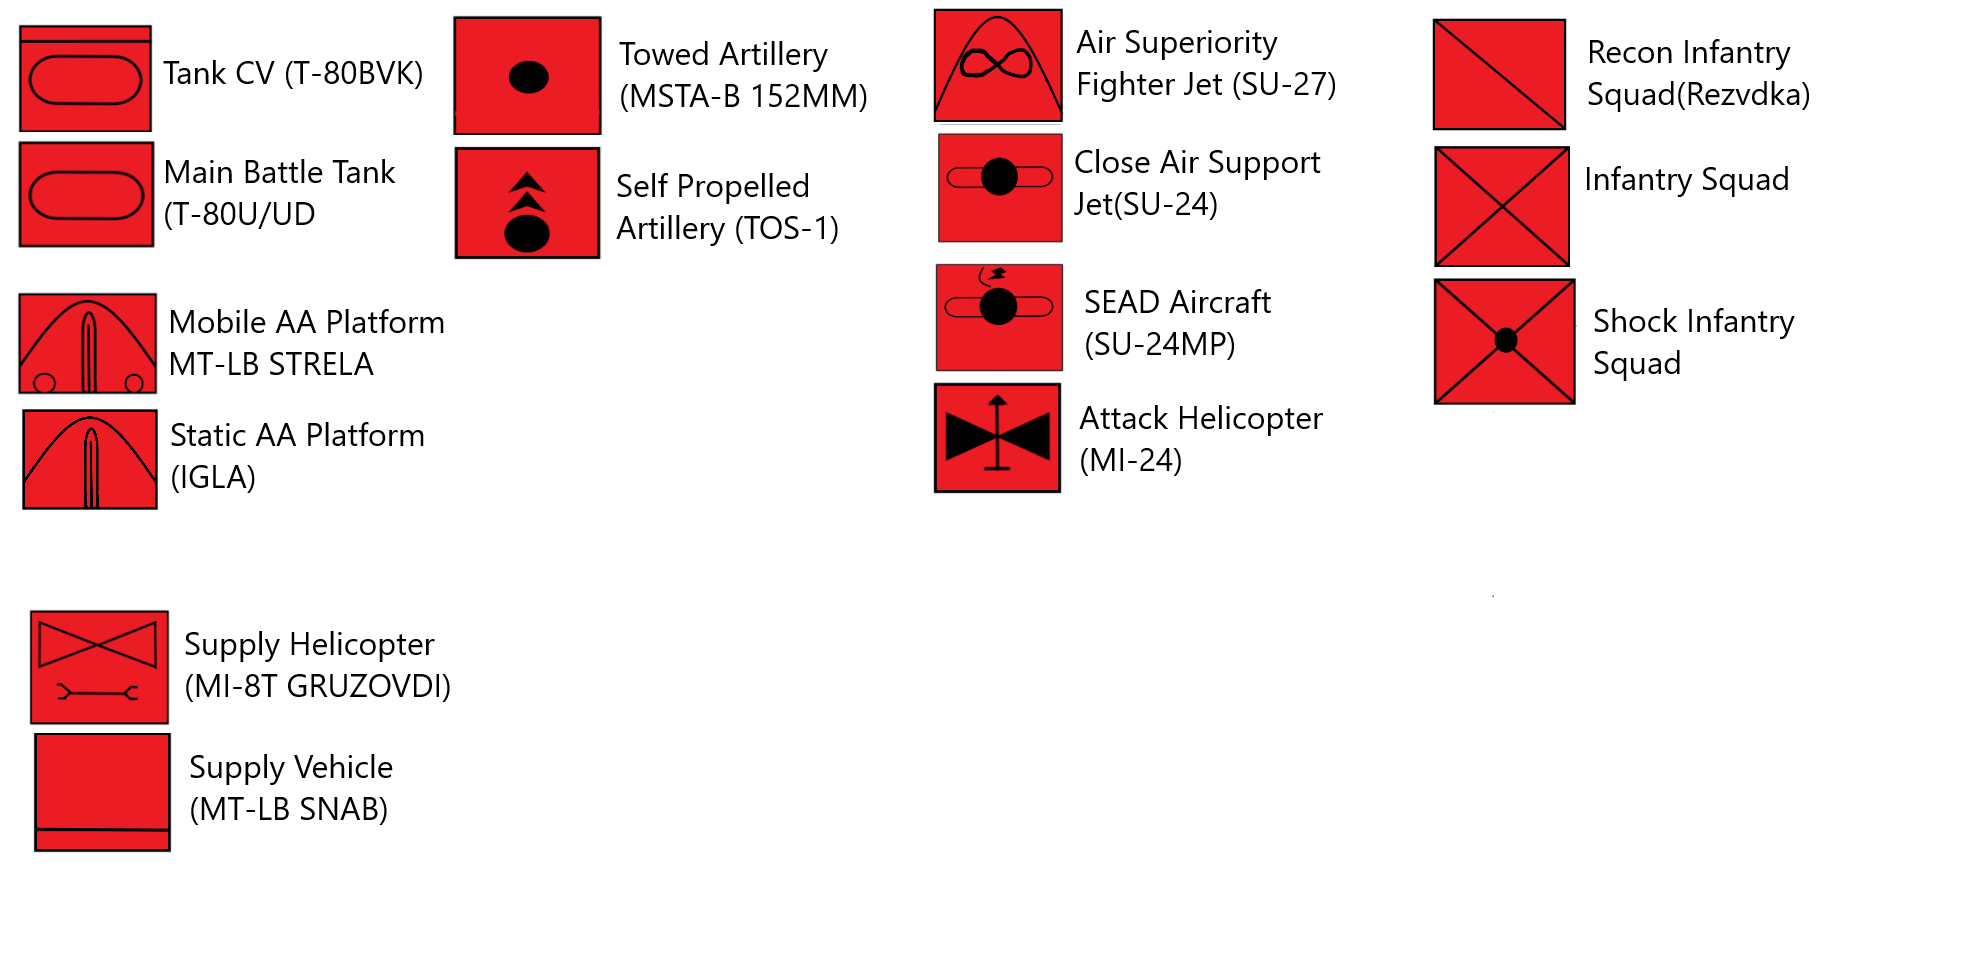
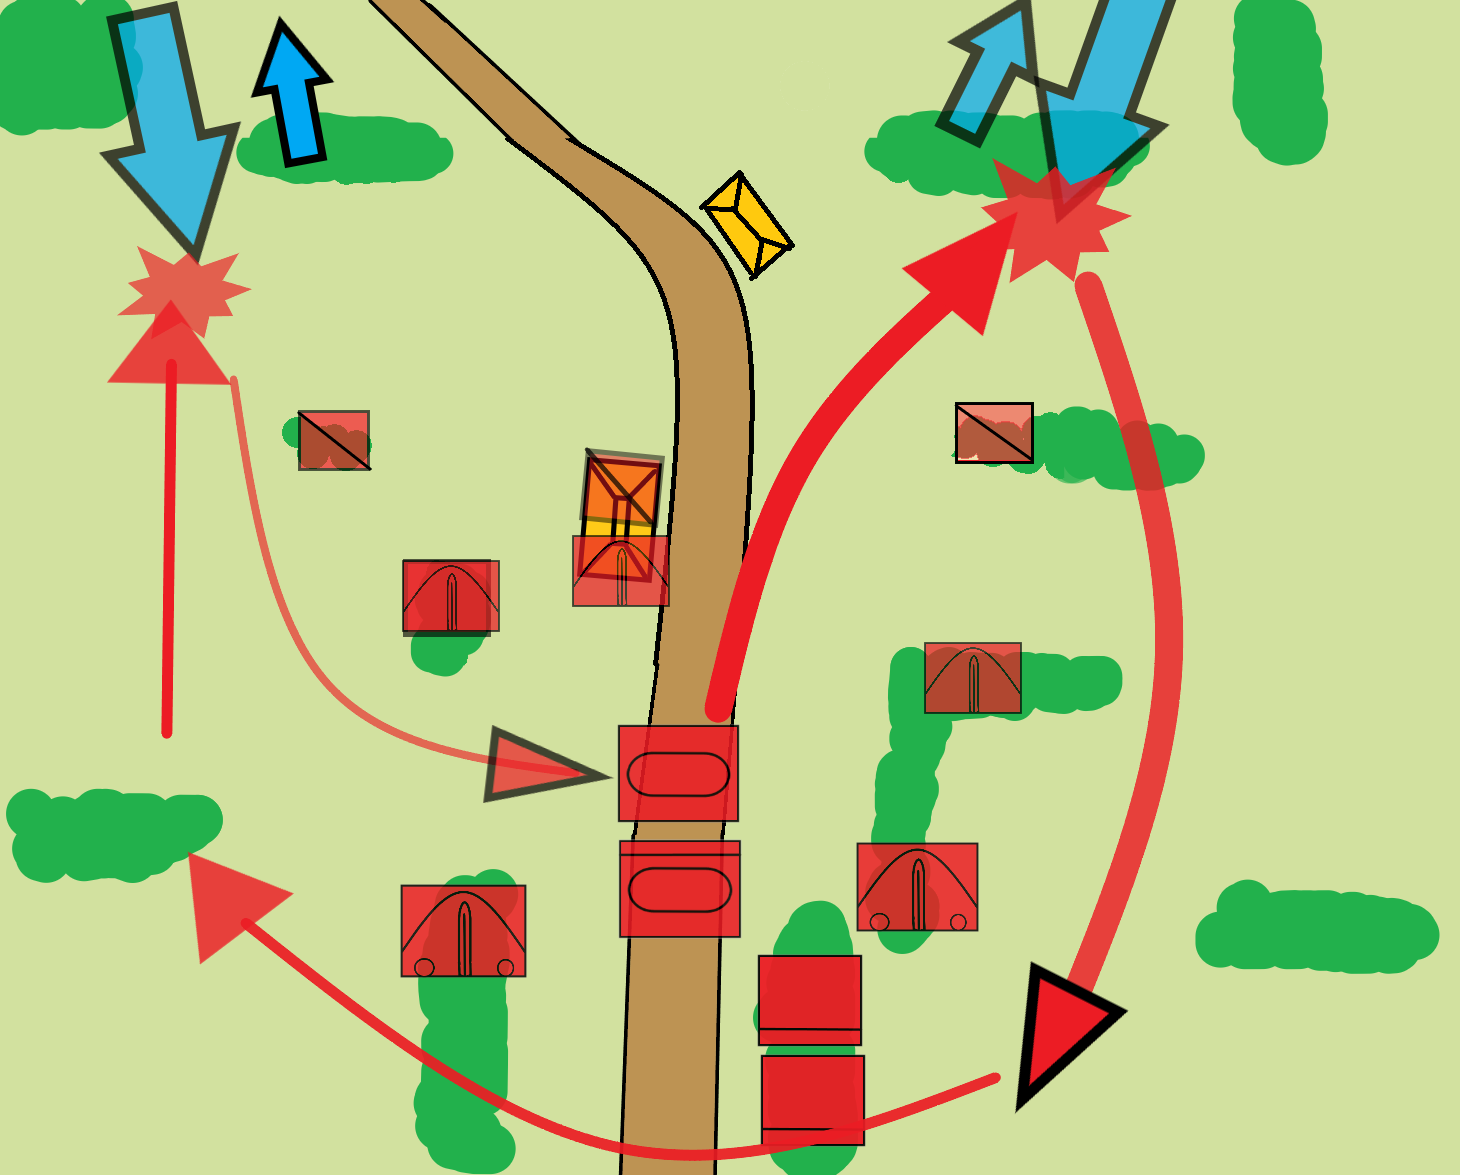
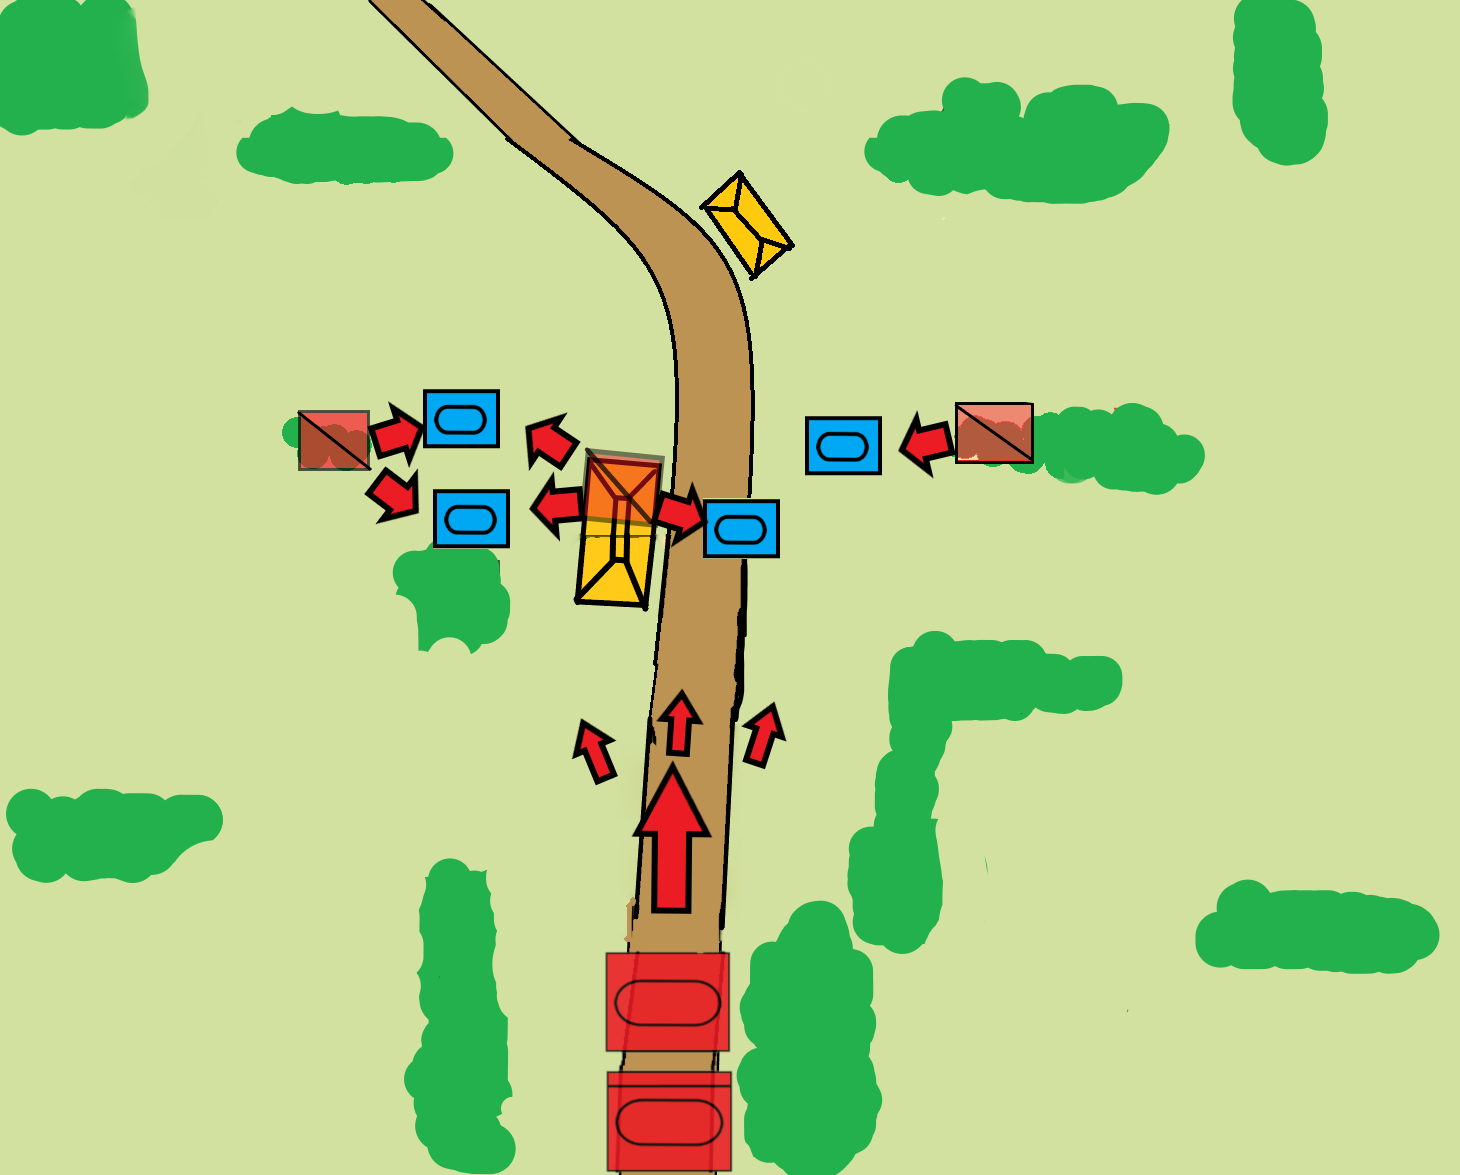
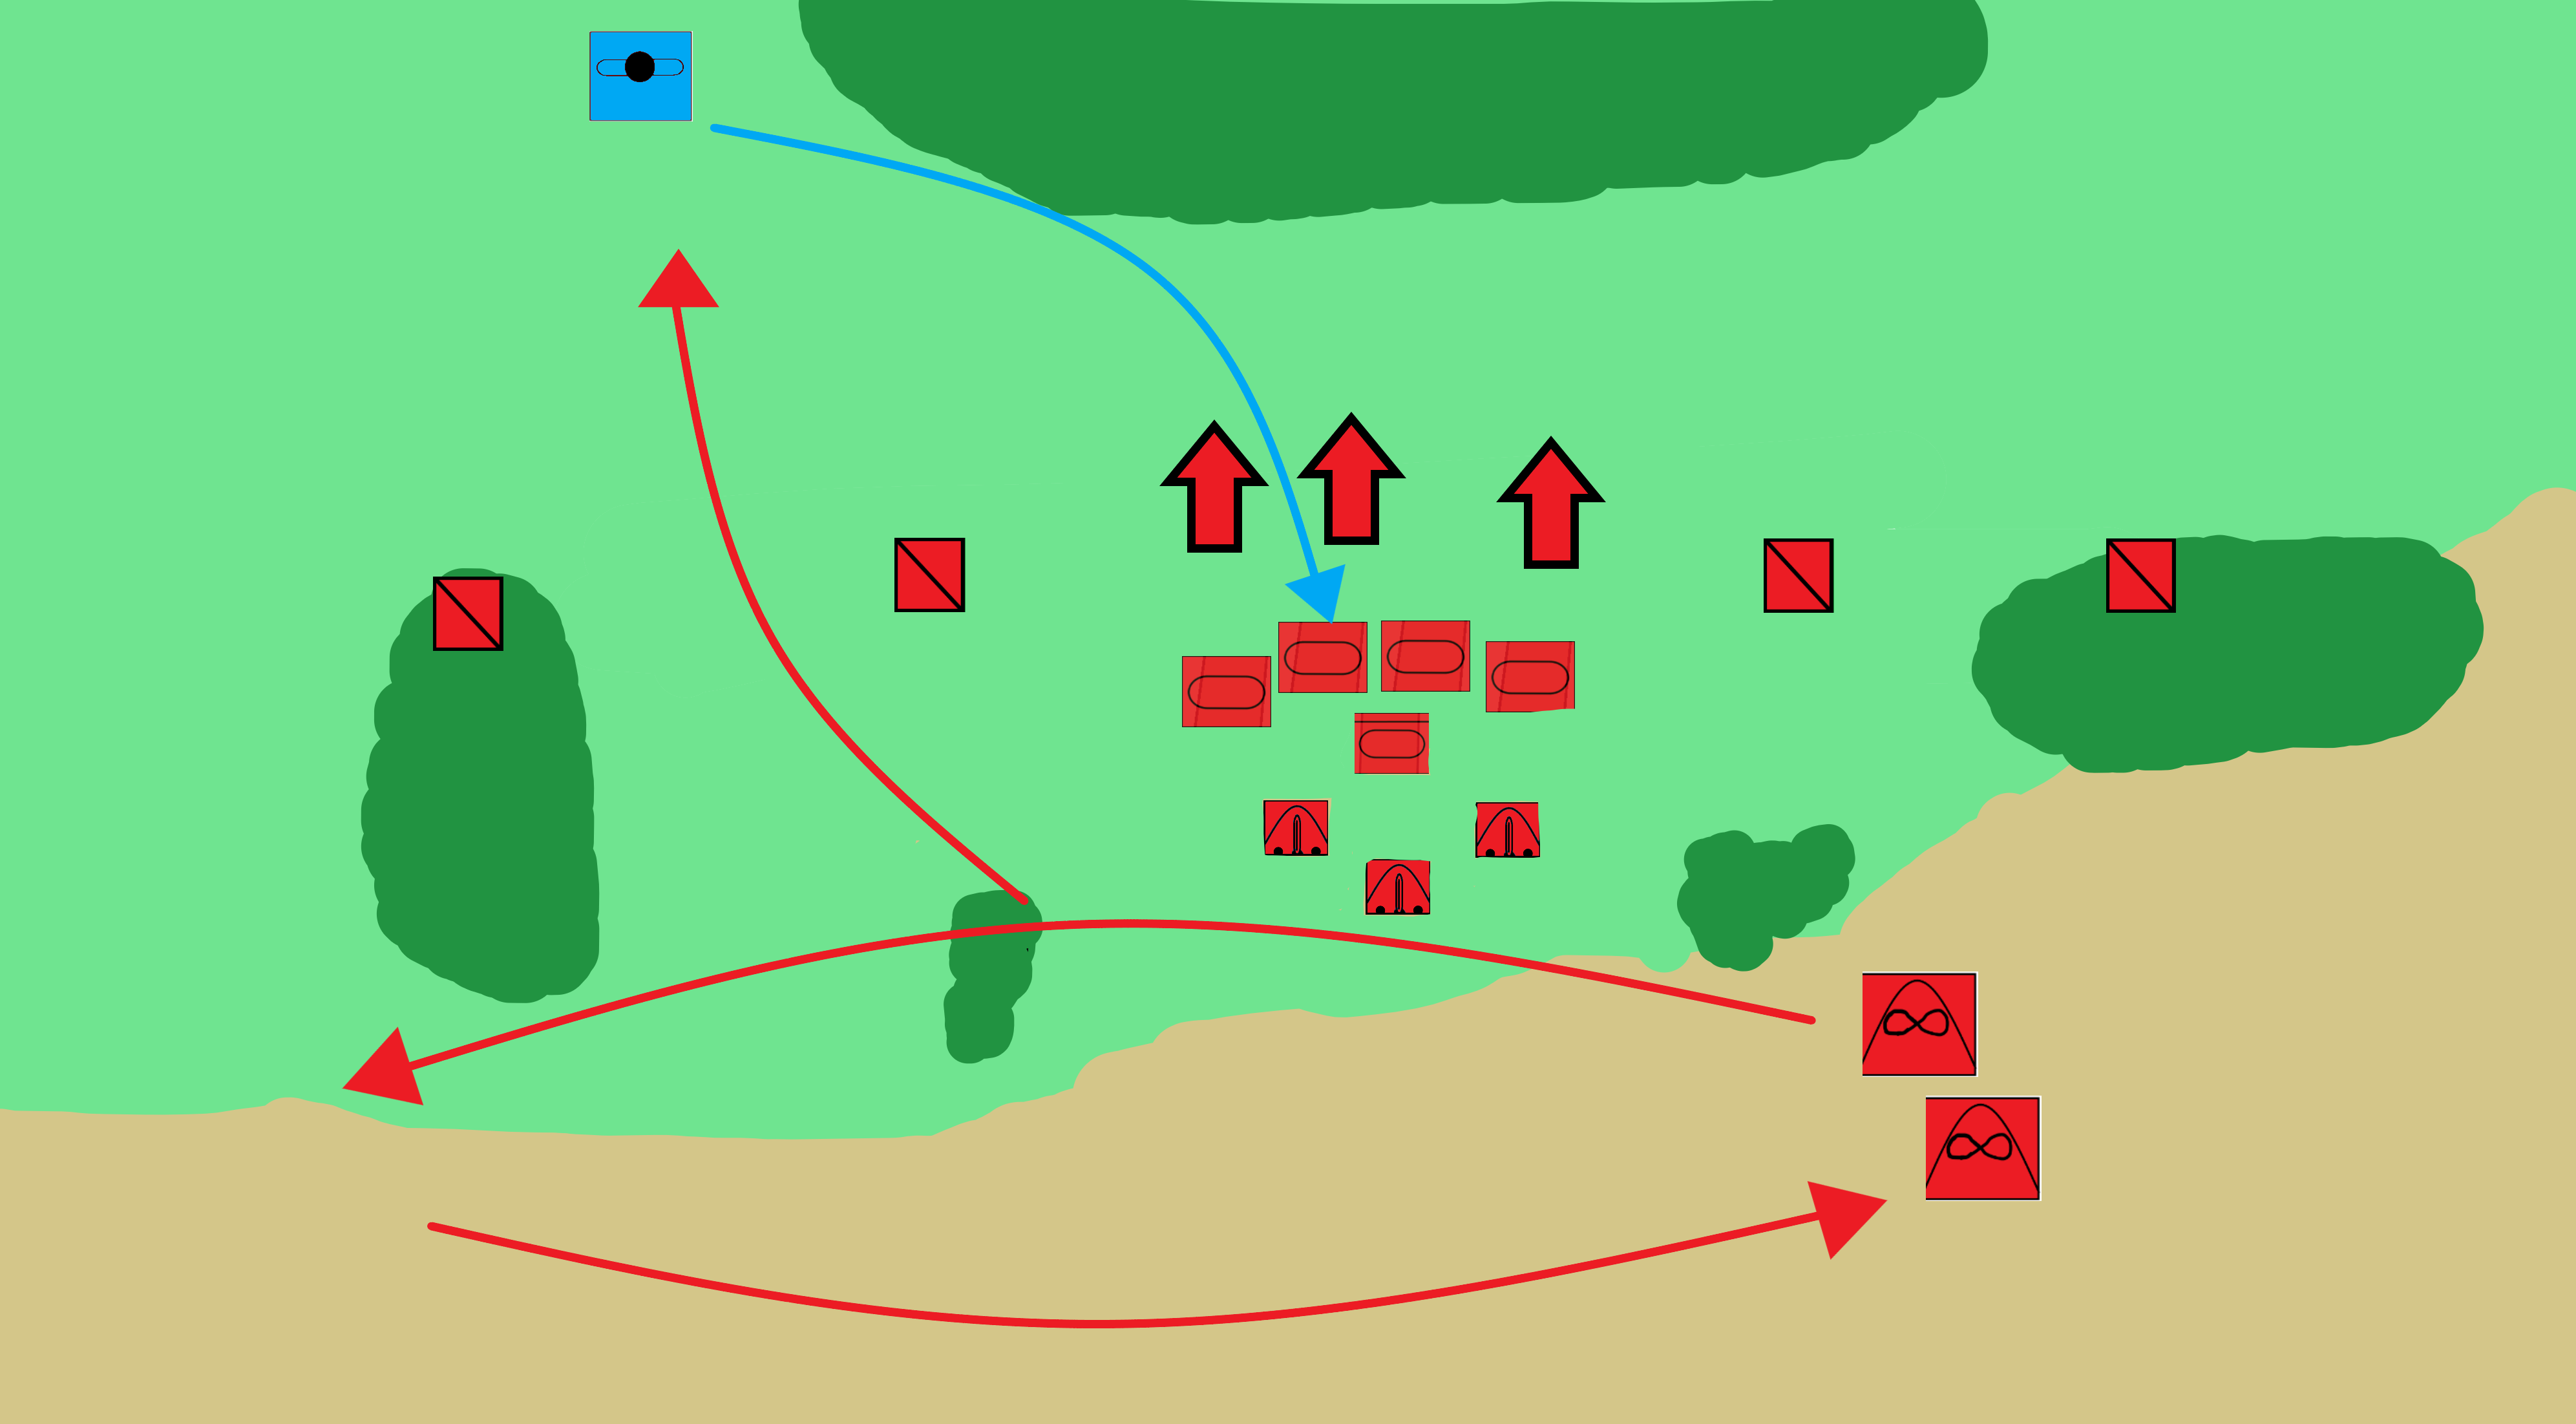
Before we begin here is the symbology of the units in the maps shown ahead.
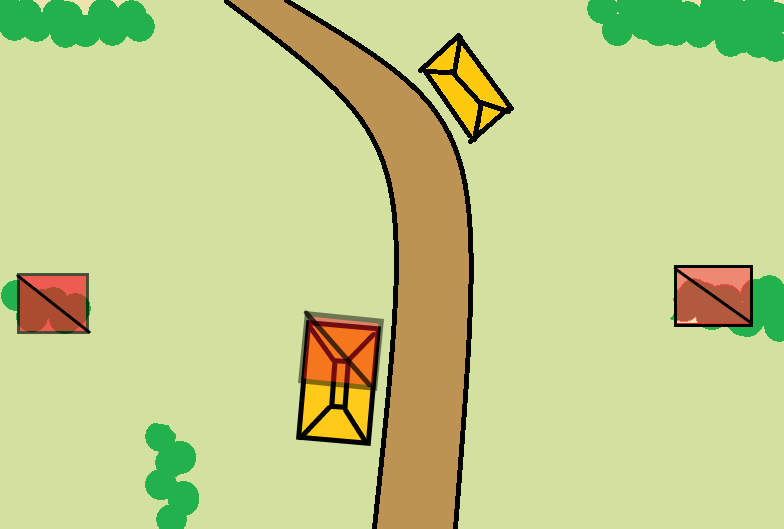
Your first units to step foot on the battle filed should be your recon units, your eyes an ears,
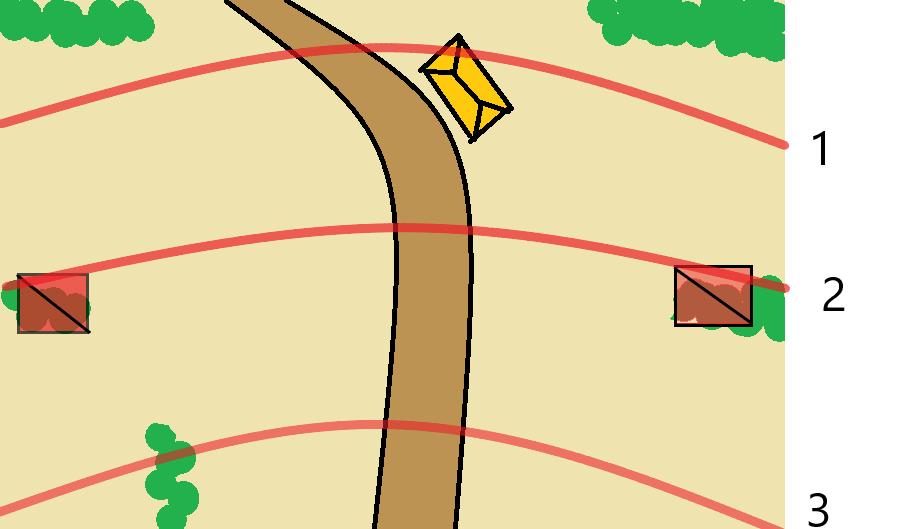
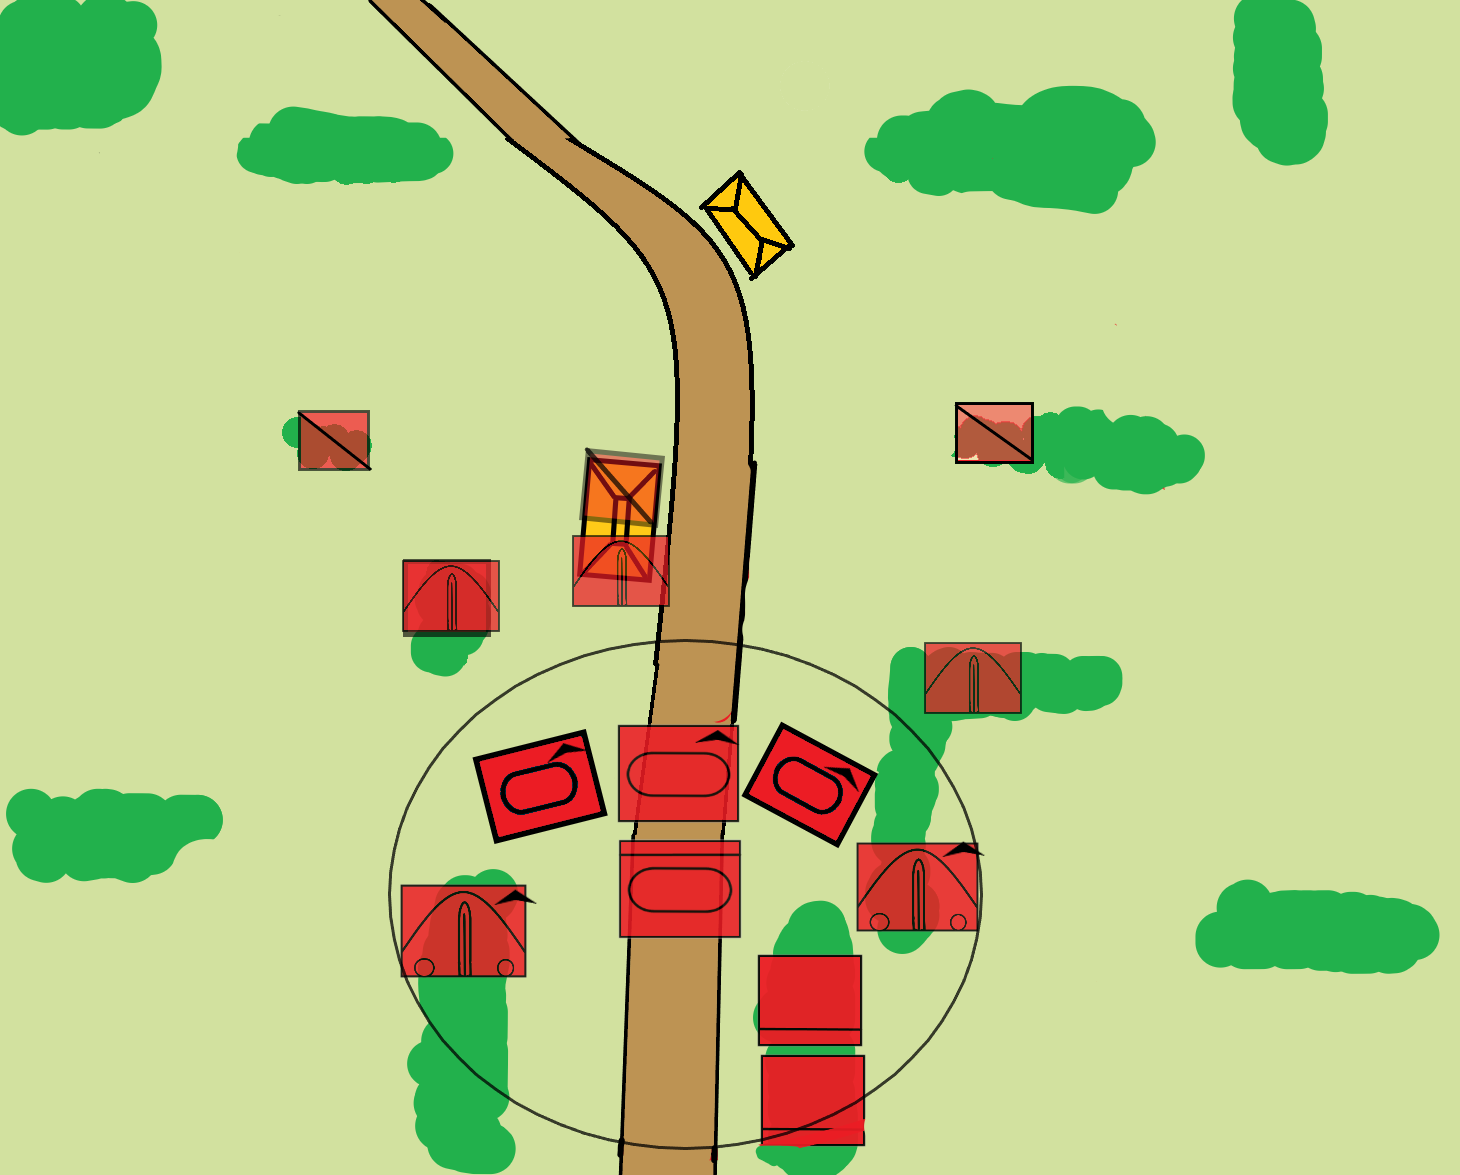
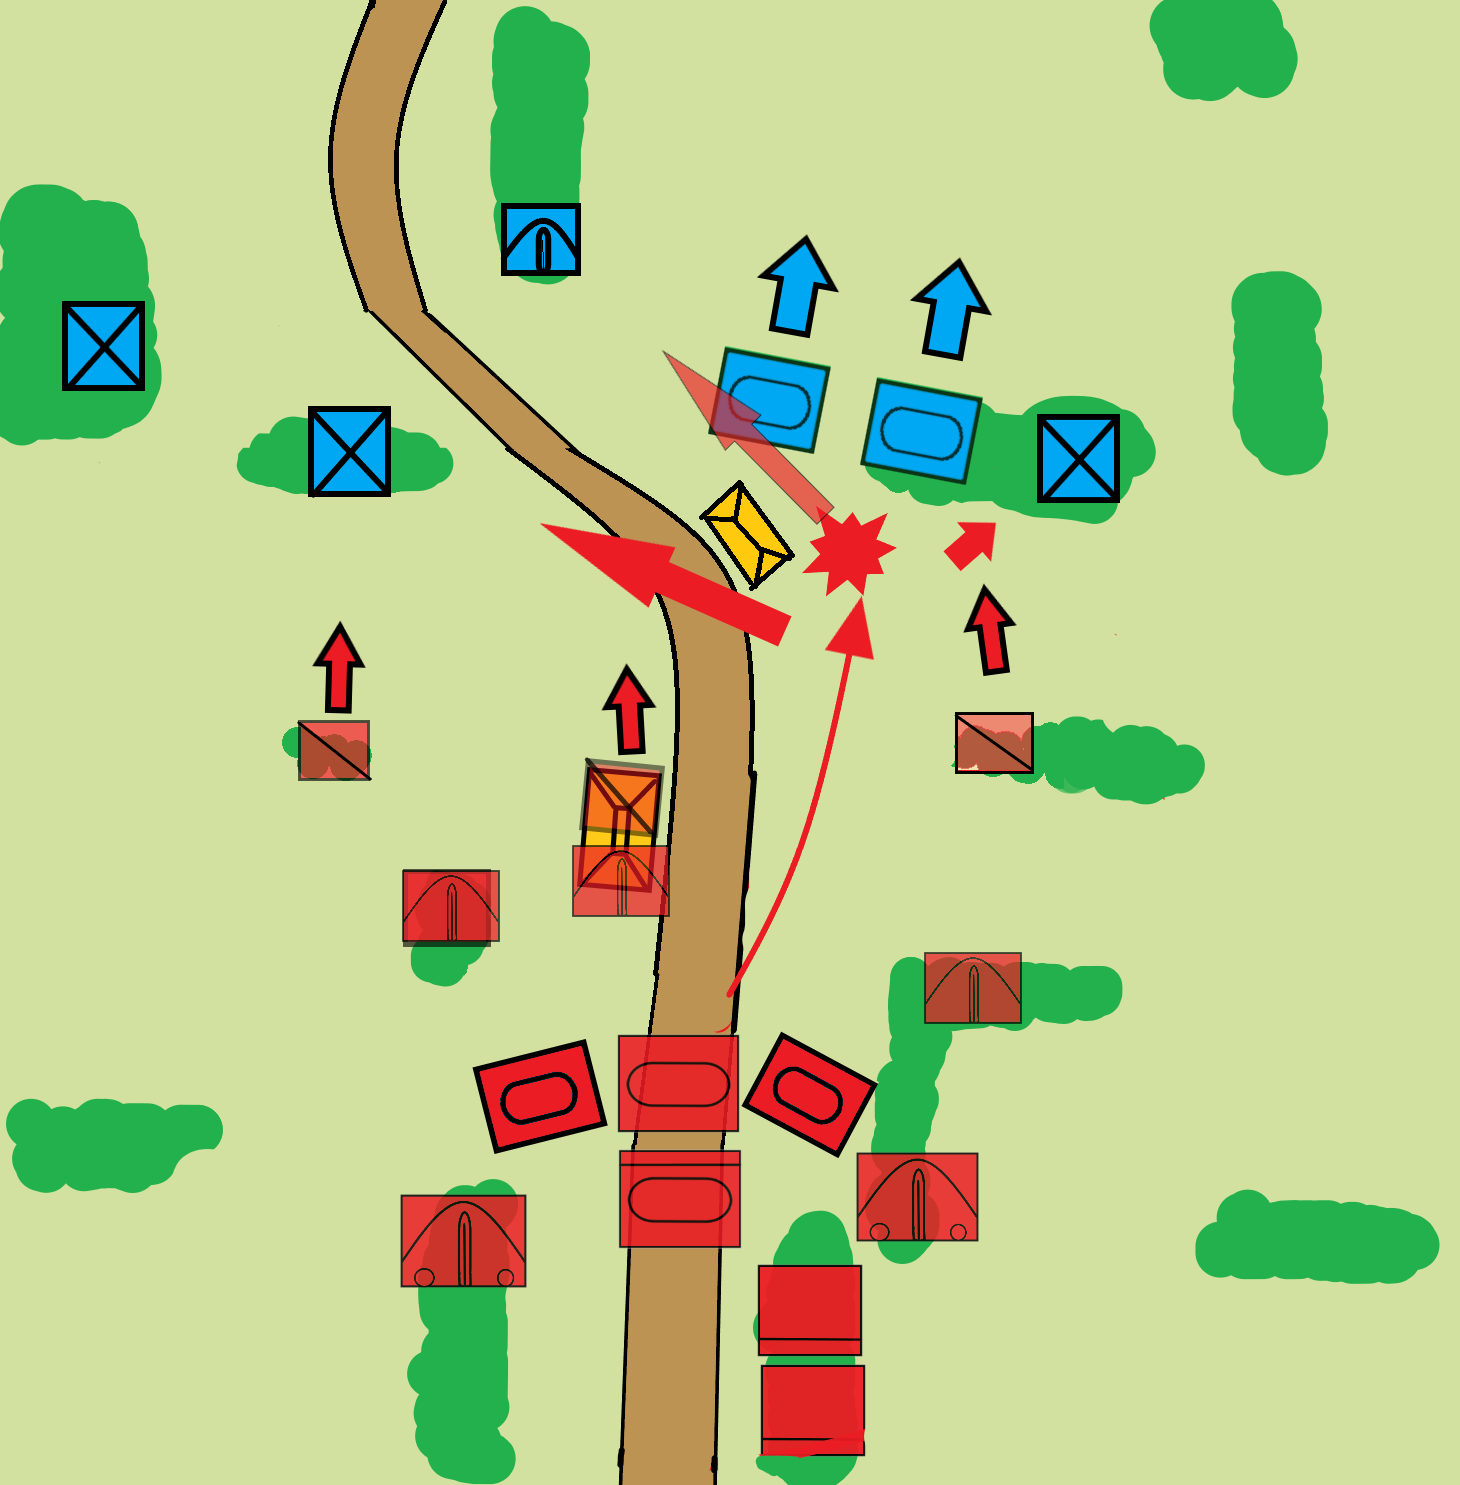
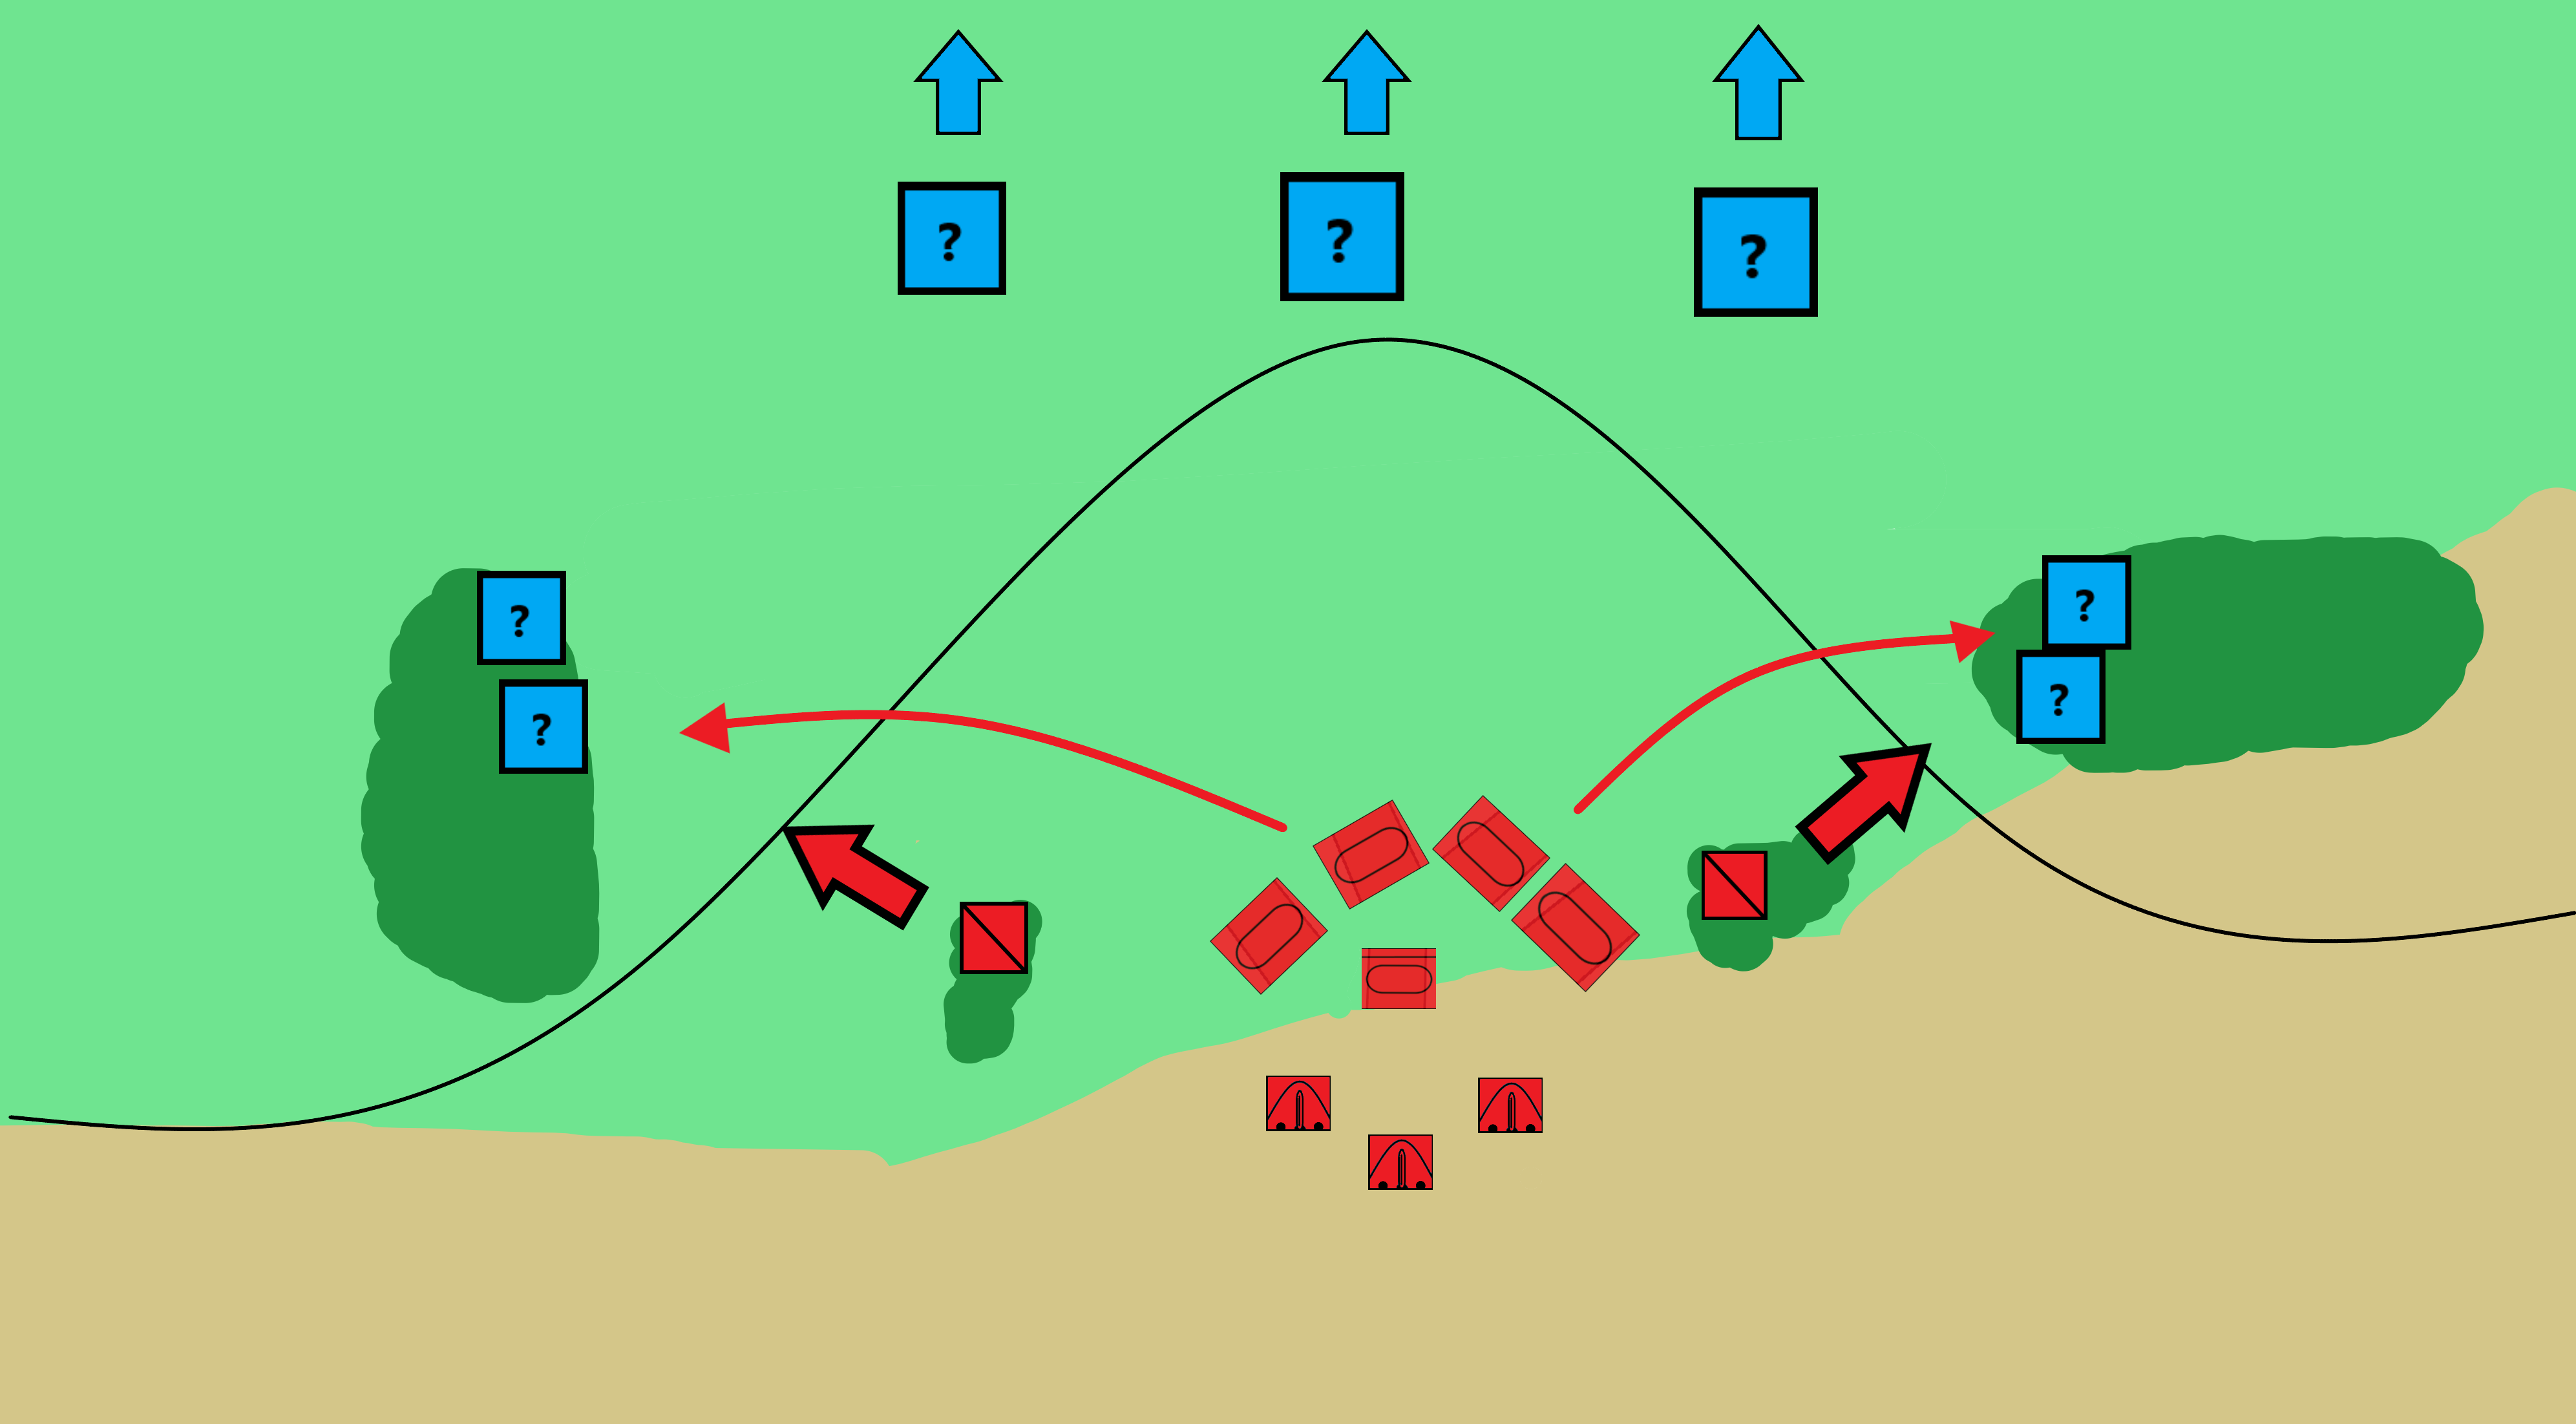
I grown to like the Speztnas G.R.U for their exceptional optics but using the Rezvdka is not a bad choice, their job is to give you an idea where the enemy units are and what his plans are,this brings us to the setup of the recon units in the battlefield,your recon should stay hidden but be close to the enemy,they define the front line ,not your tanks, for example in the picture below which line represent the front line?
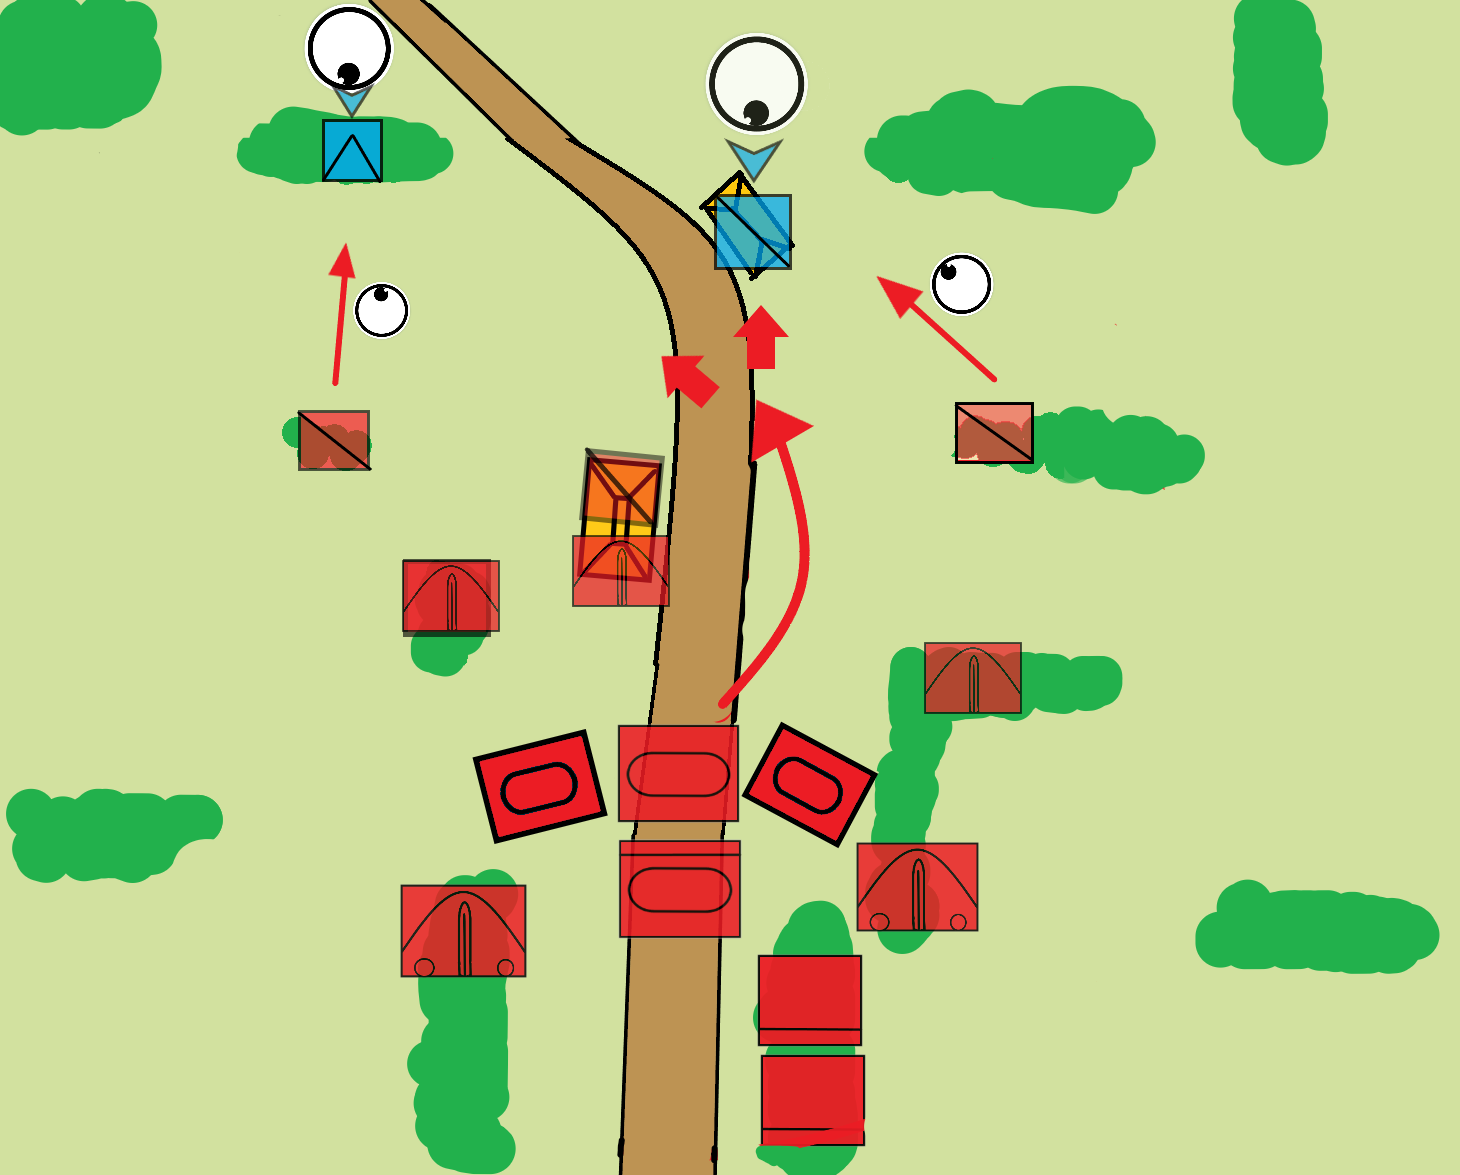
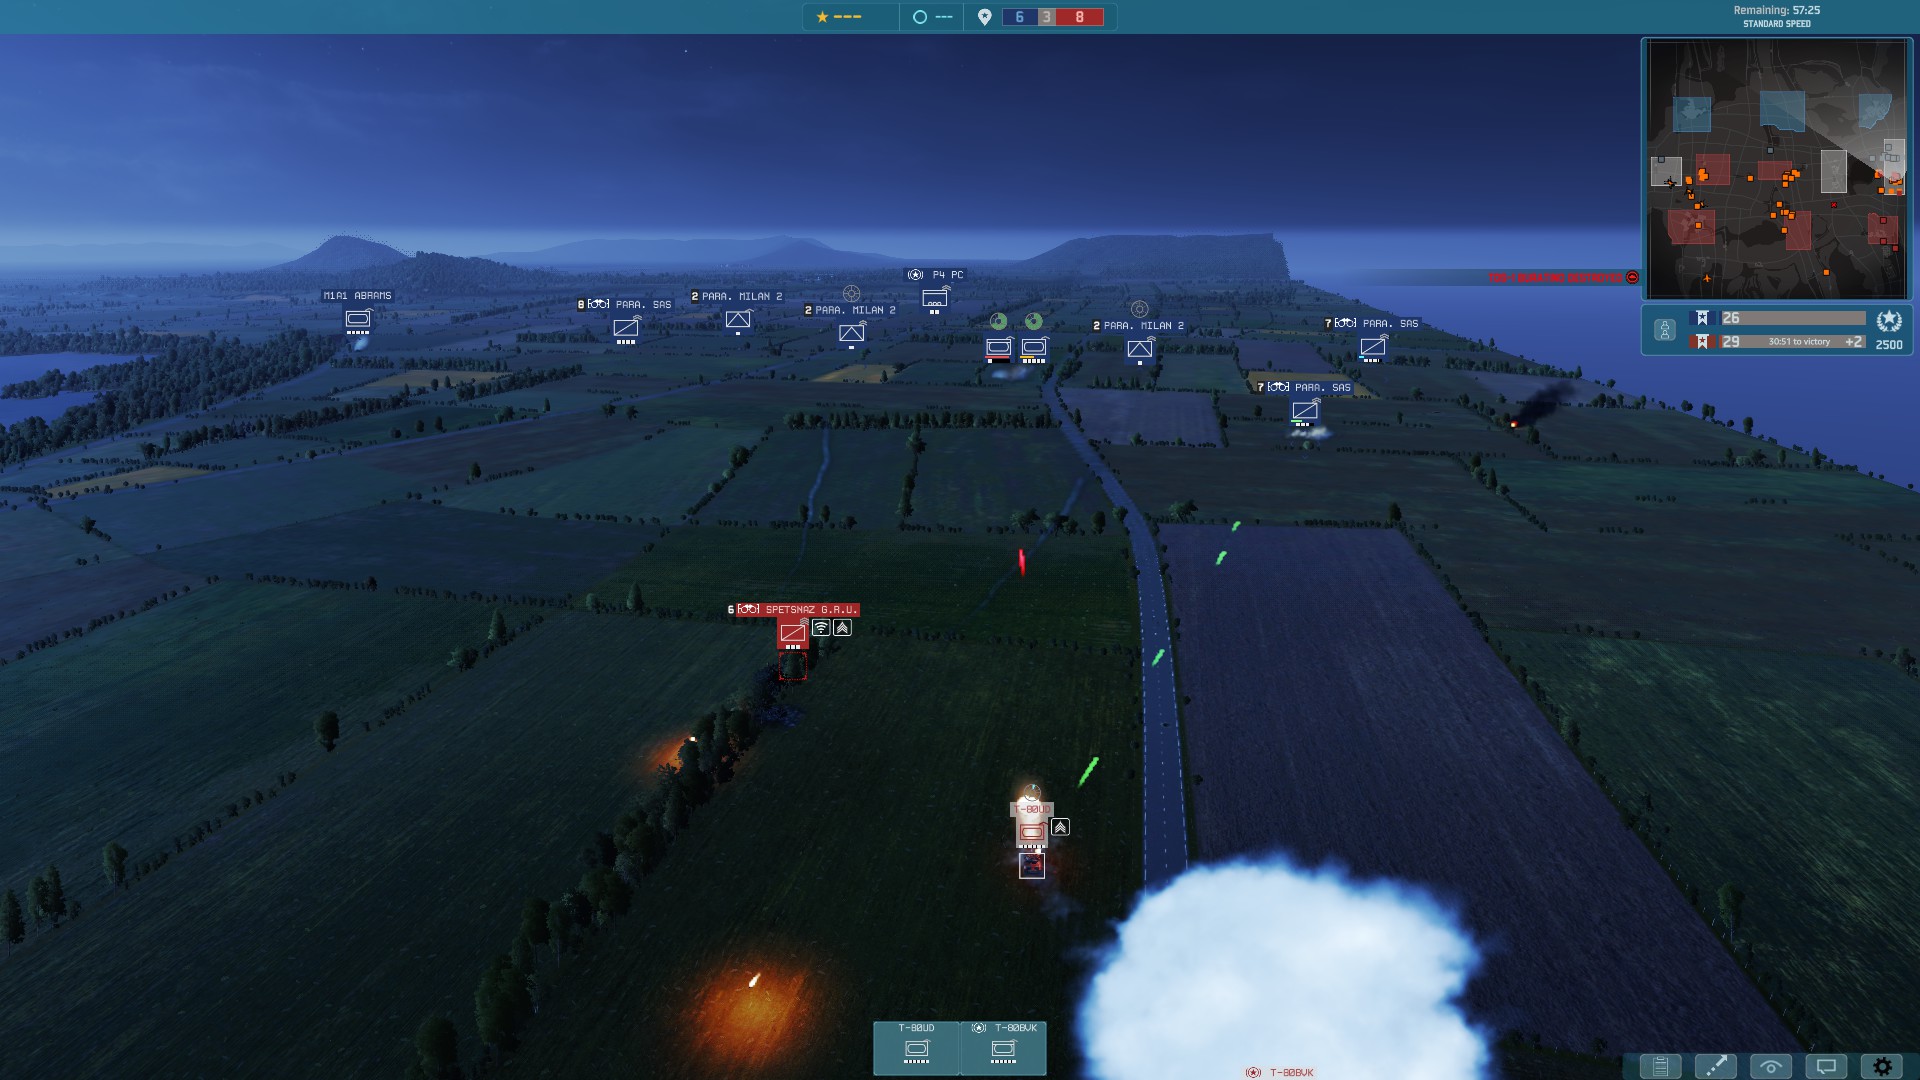
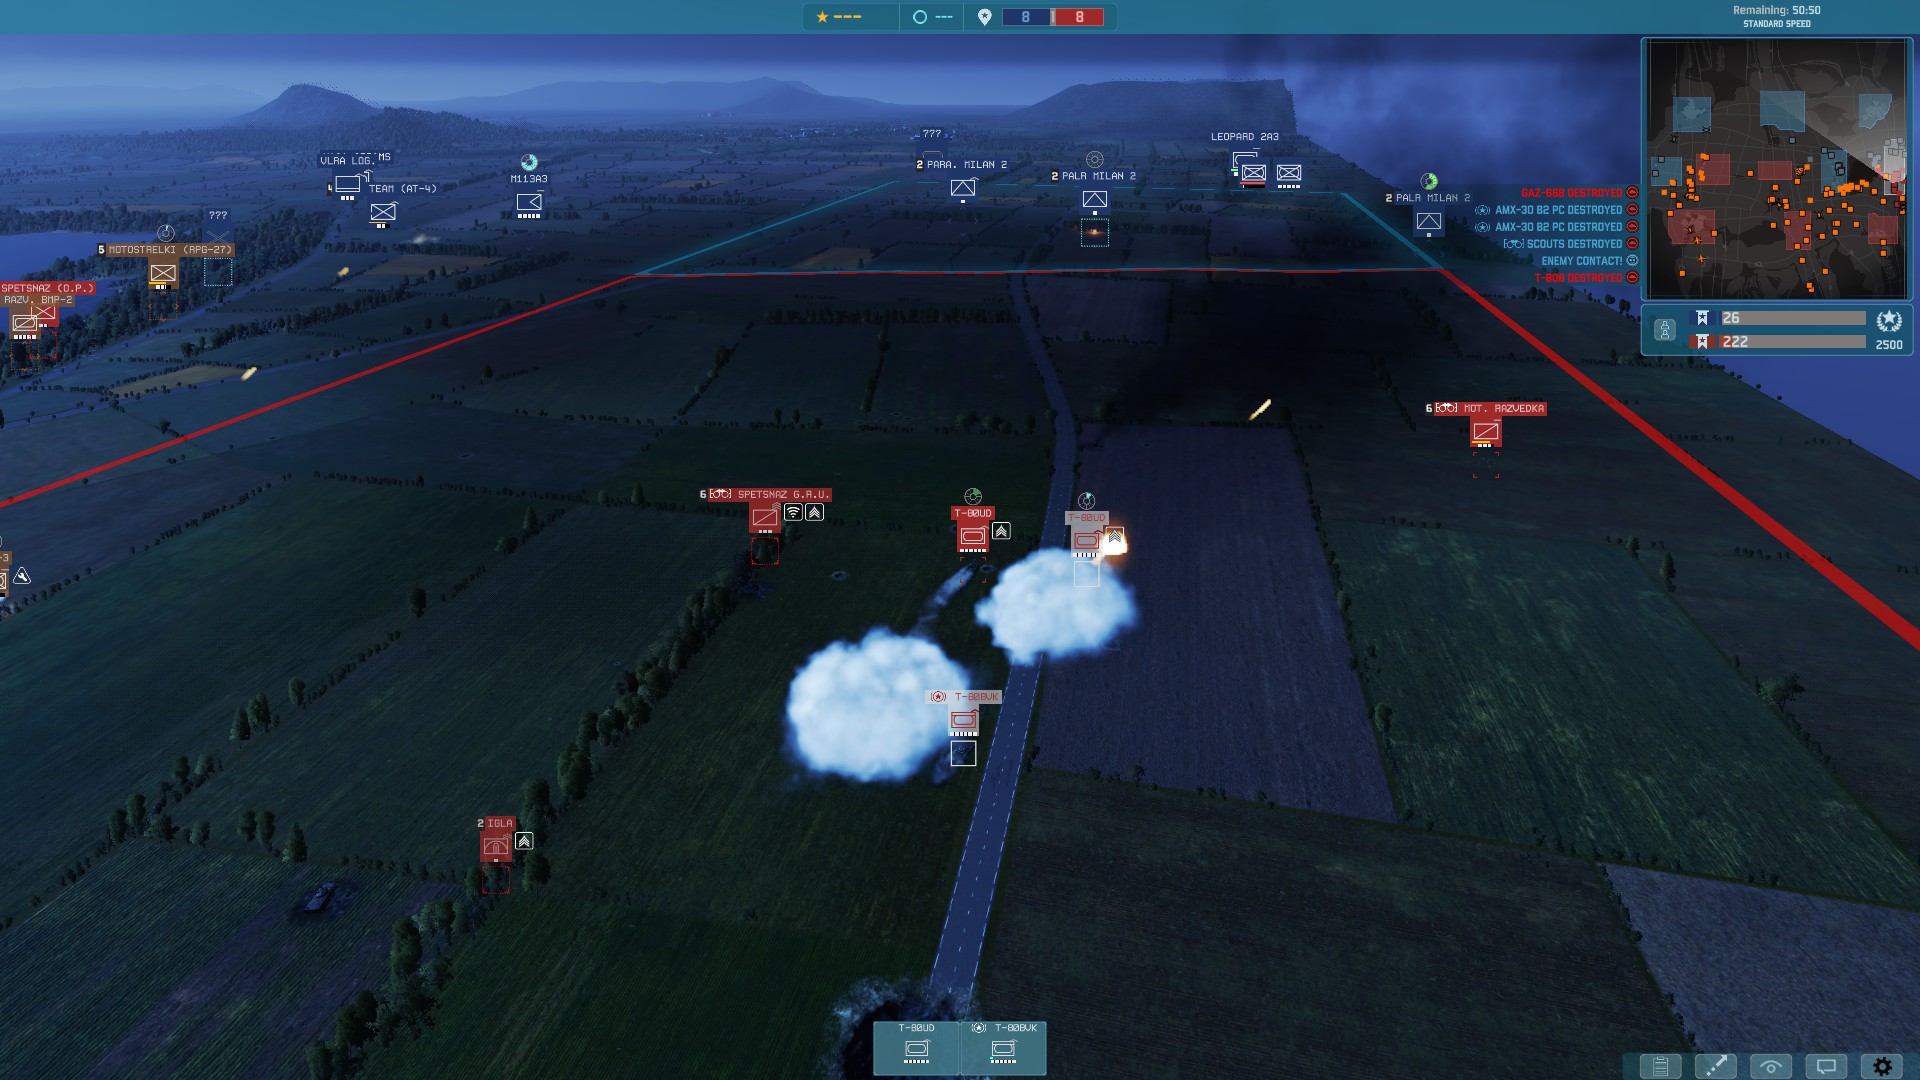
that's right 1!! ,just kidding of course its 2 the first contact of the enemy will be your recon units of course they are not suppose to be detected your tanks will engage the enemy units advancing but as a rule of thumb if the enemy got passed your recon units your front line is broken or your recon units over starched and got them self in troubles, so your recon set up should look like this:
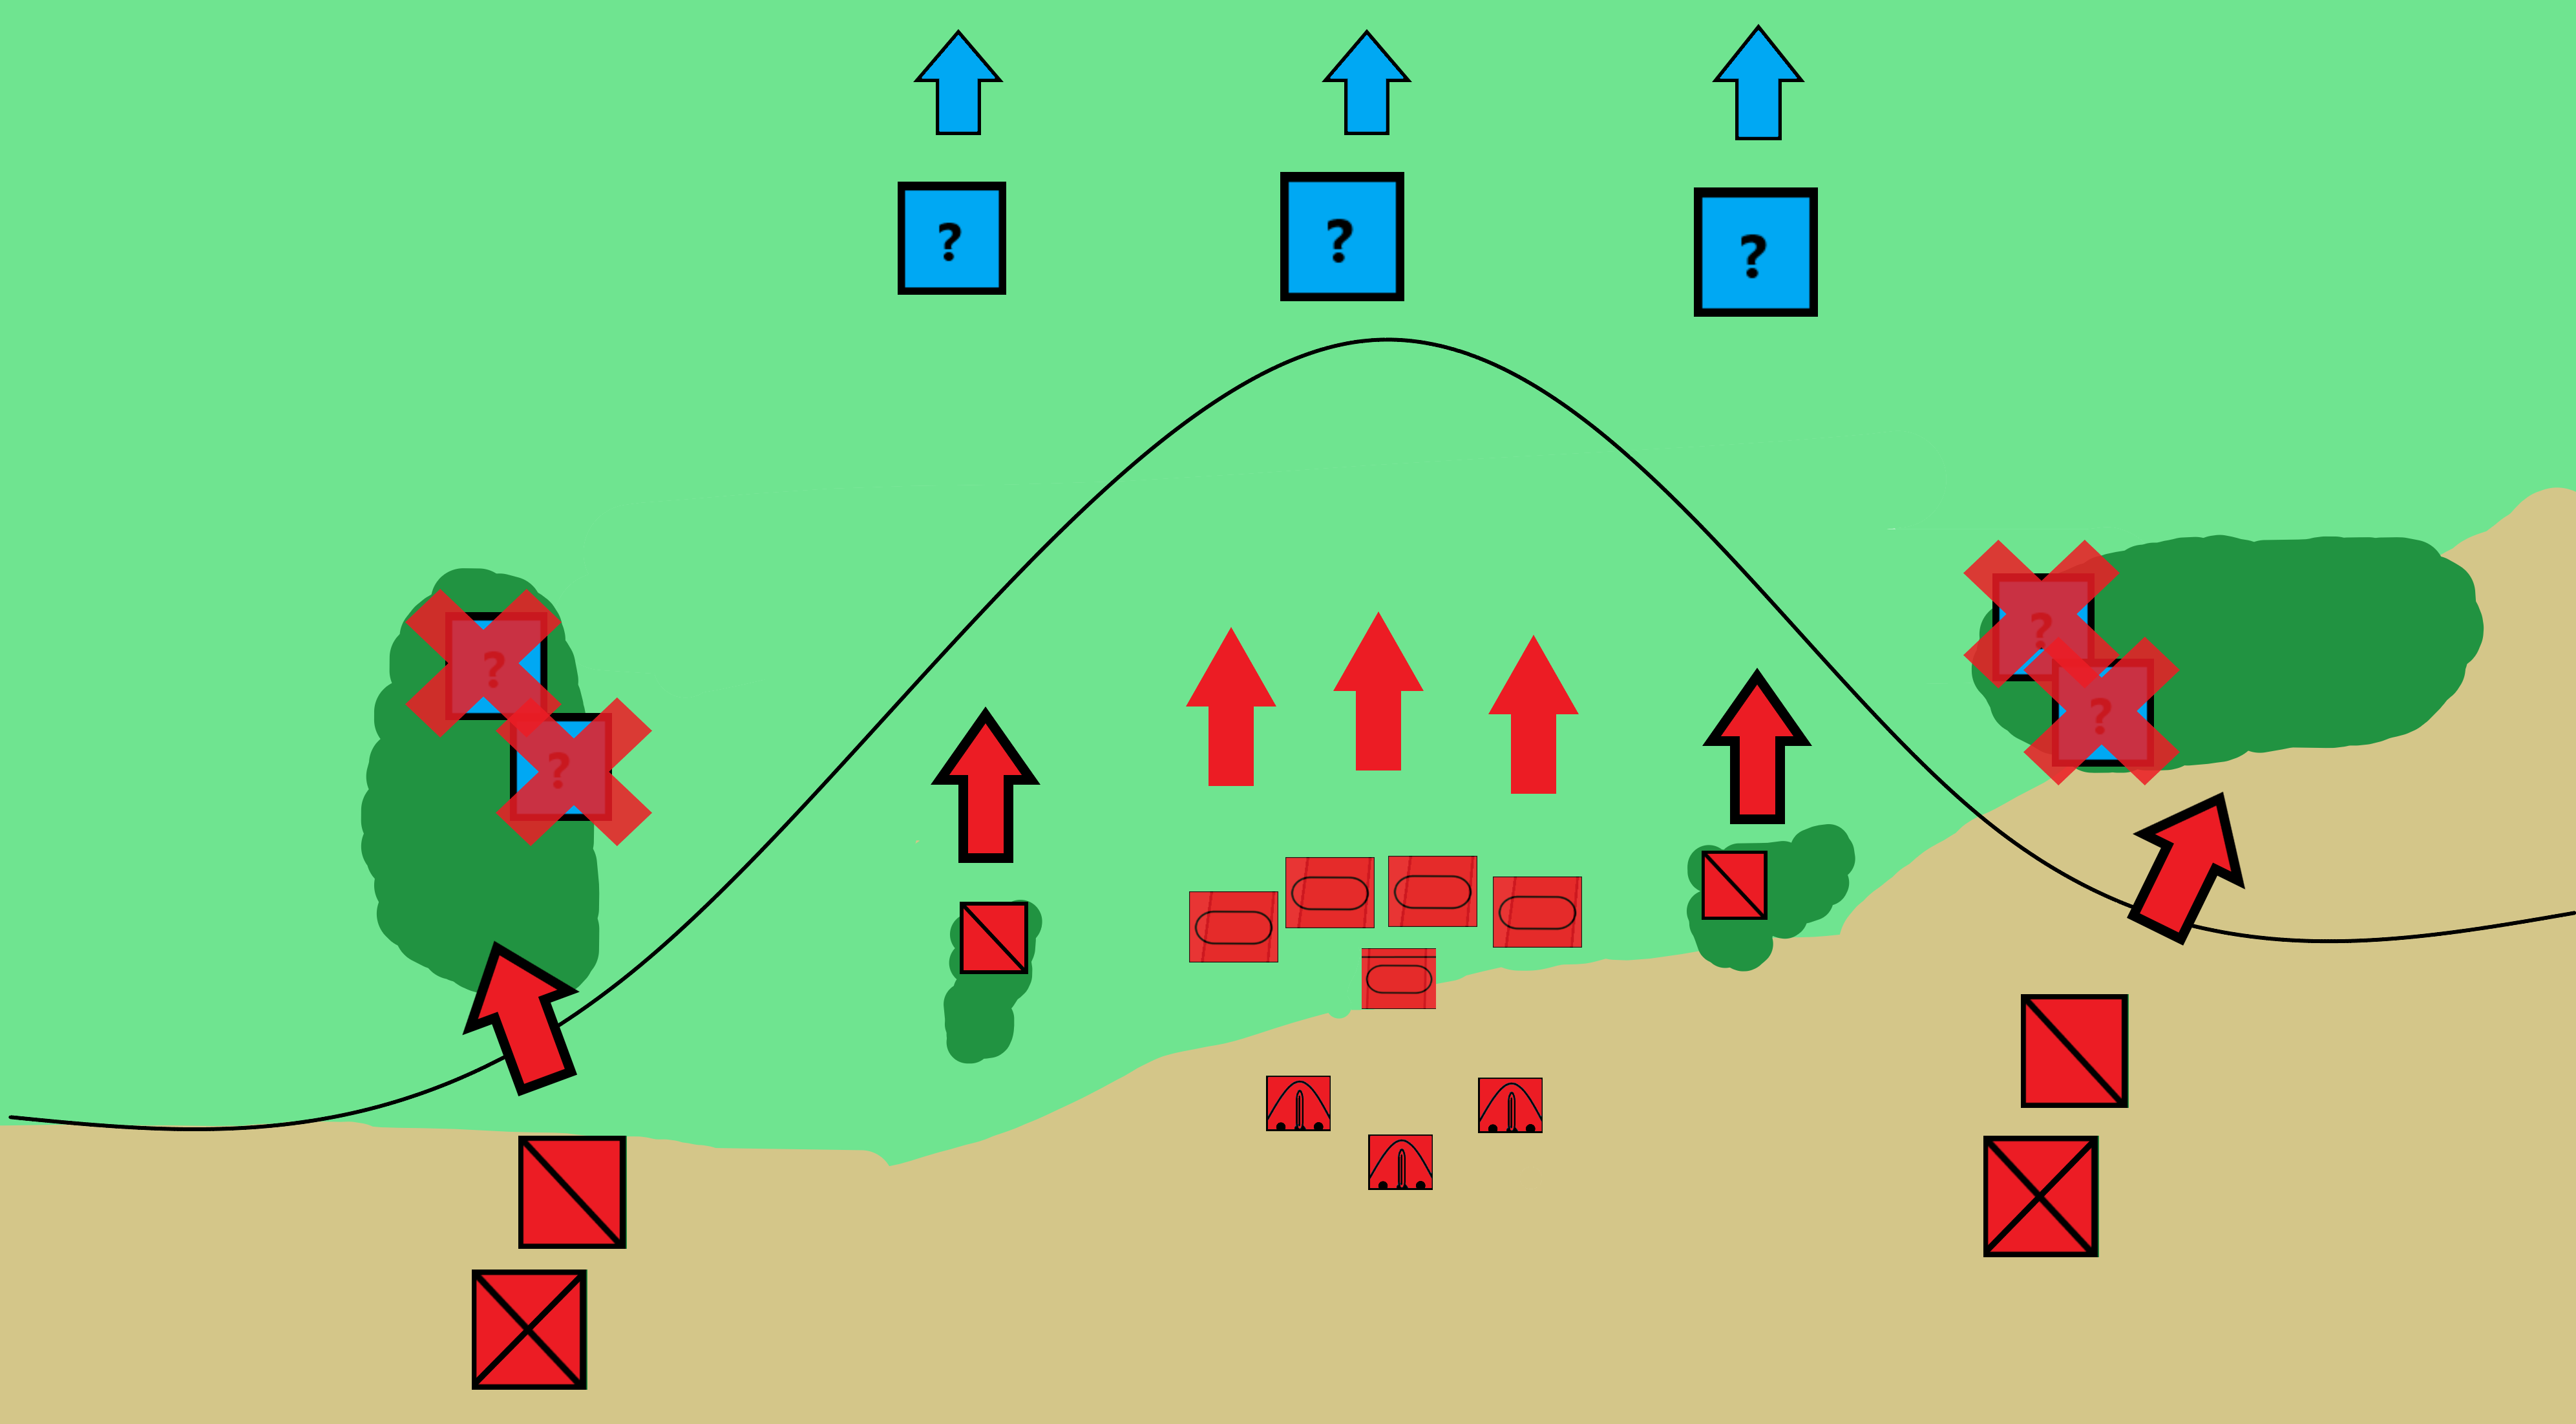
next are your 2 men IGLA manpad teams they are the backbone of your air cover they should be hidden in the bushes or small building pretty close to the front lines to deter any helicopters and help shoot down planes,should look something like this:
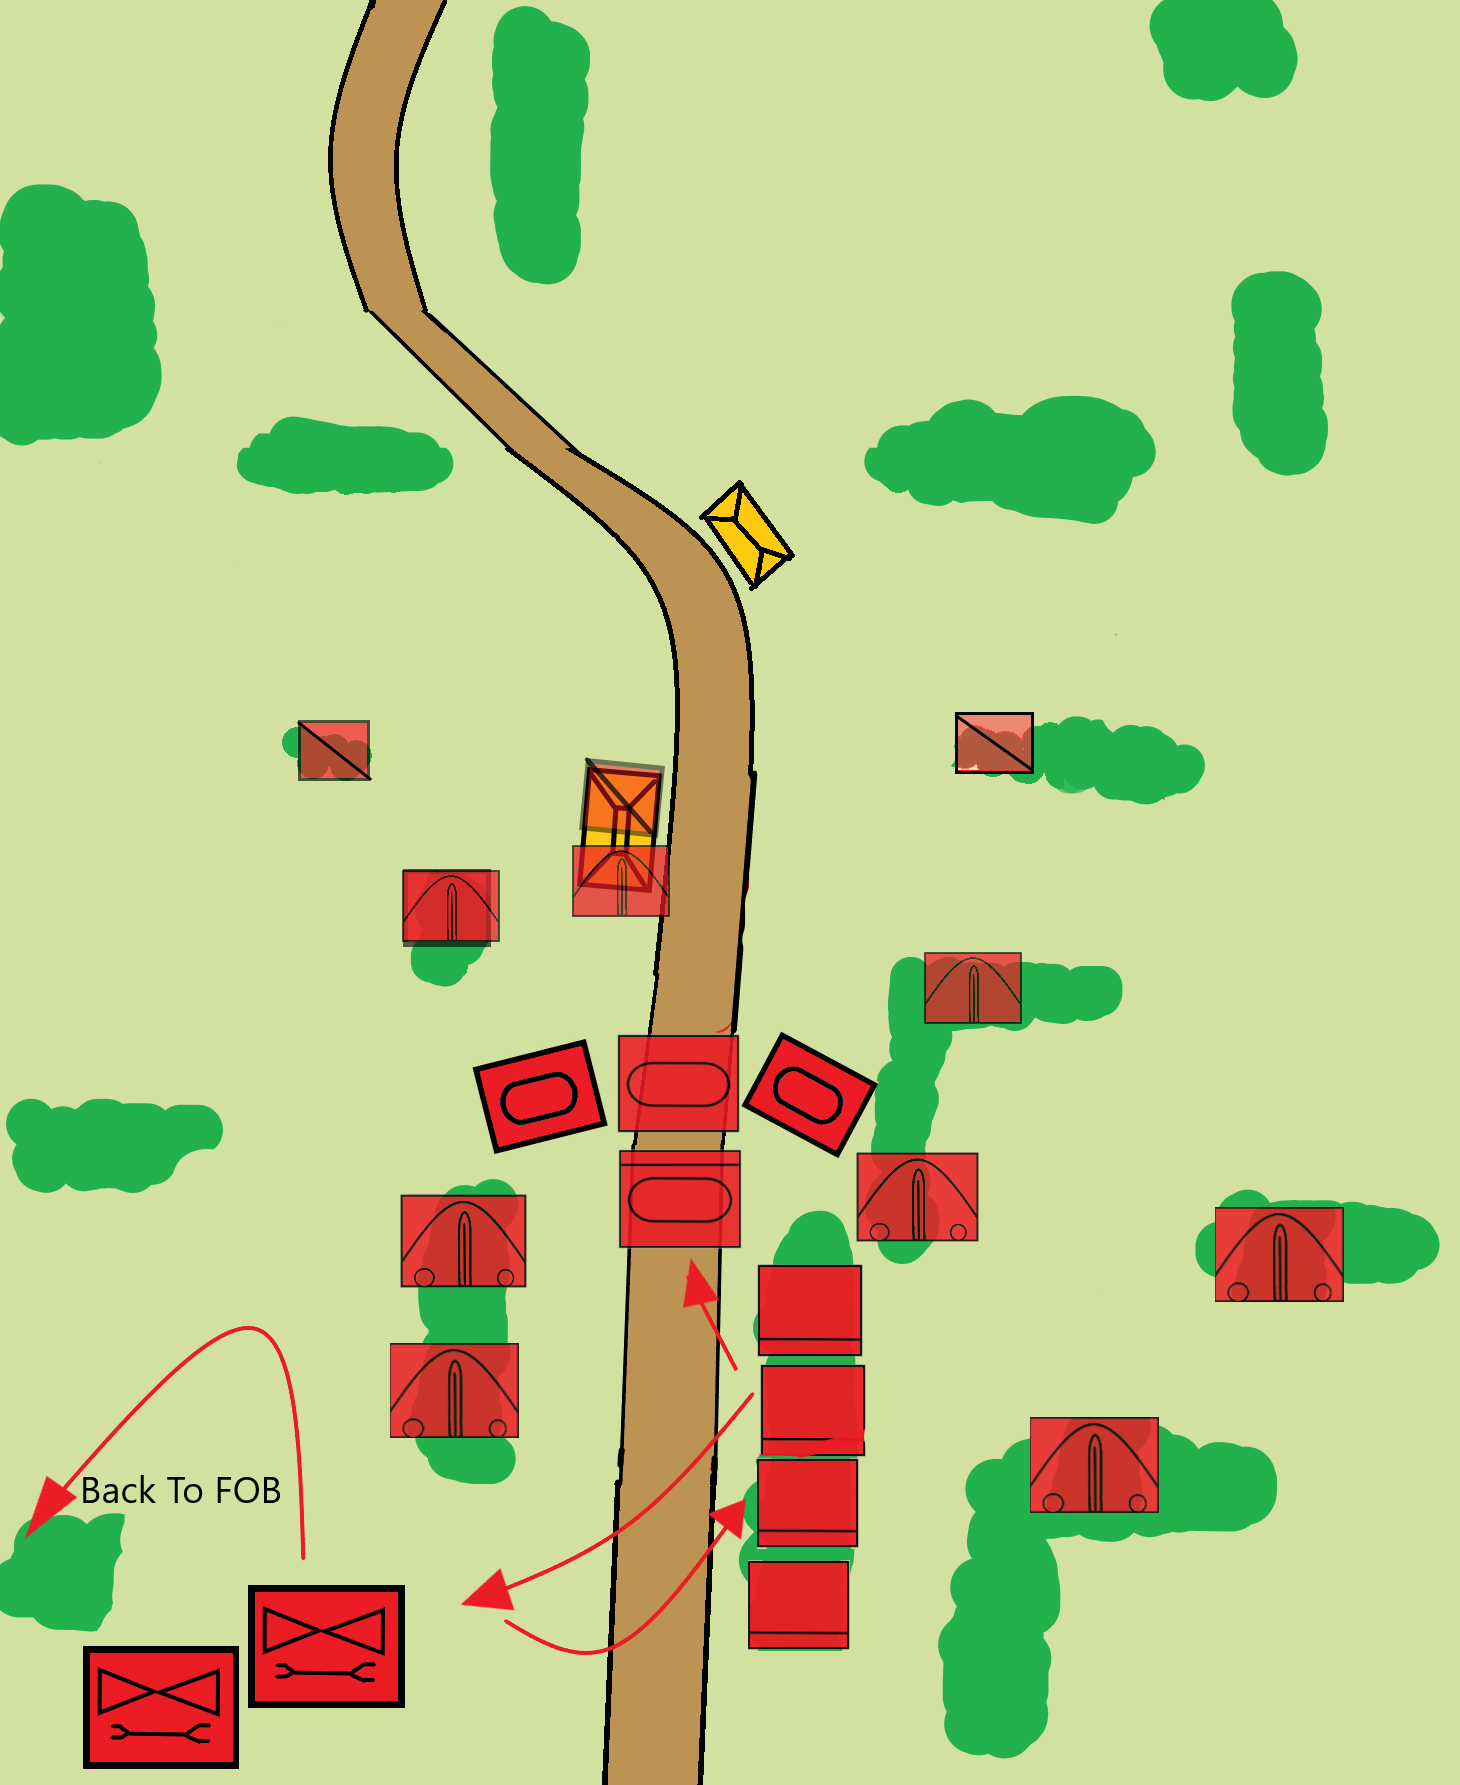
Next are your first echelon units which should consist of at least one T-80U/UD a T-80BVK CV one or two MOBILE AA (MT-LB STRELA-10M/2K22 TUNGUSKA) units and at least 2x supply vehicles I suggest the MT-LB SNAB APC.
it will take some time for them to arrive but once they have arrived you should have a front line defined by your recon units and some AA cover from your manpad's teams,
the tanks should take the rule of a "quick reaction unit" what does it mean?, well you tank should not stay at the front for the enemy to see for they will just get targeted by artillery and aircraft,rather they should stay hidden a little back and go out when they enemy tries to advance,
the mobile AA units should stay some what back but still in range to quickly come into the rescue of your tanks in case any helicopters would come,
the supply vehicles just stay back and will be a supply depot for your tank to come after each dash to stop an enemy push re resupply.
At the end of setting up your battle formation would look like this:
This brings us to the next segment:
After the arrival of the first echelon and after a skirmish or two you will know the strength and the composition of the enemy units and by this point you have one of three choices:
Push and take territory
Stay put and hold the line
Fall back for a stronger position or because of over whelming enemy units
The first option is ONLY viable if the enemy is further back or he lost significant forces in the first engagement, don't push aggressively if the enemy is strong, there are many ways this can go wrong you don't have the number of units to push and and not enough AA cover. BUT,
you can chose the second option and make it look like your pushing, if your recon spots large number of units and your tanks can attack them from a safe distance, don't give the luxury of sitting there and enjoy the nice weather
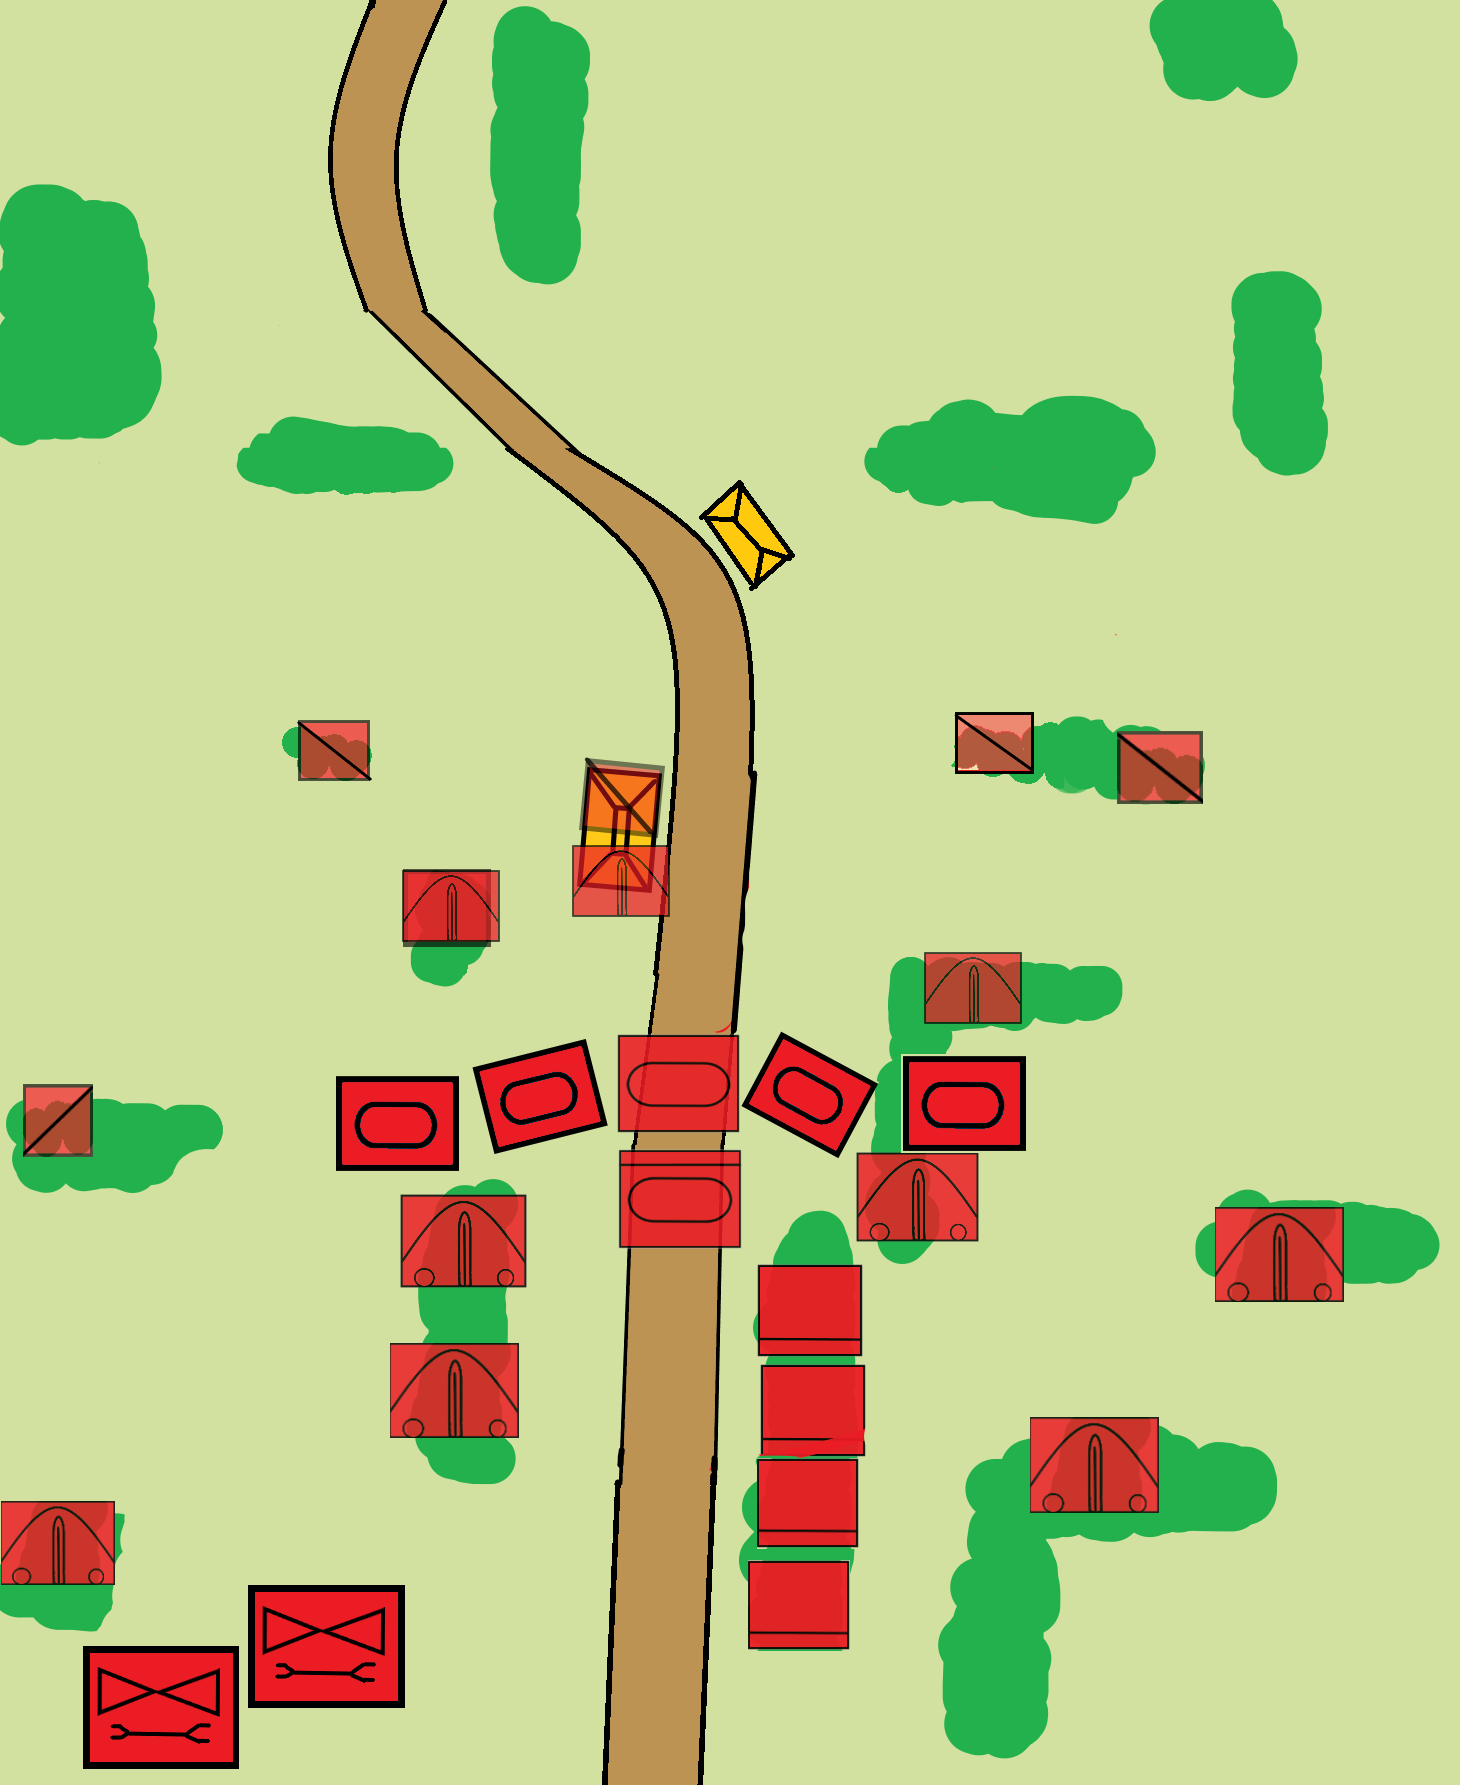
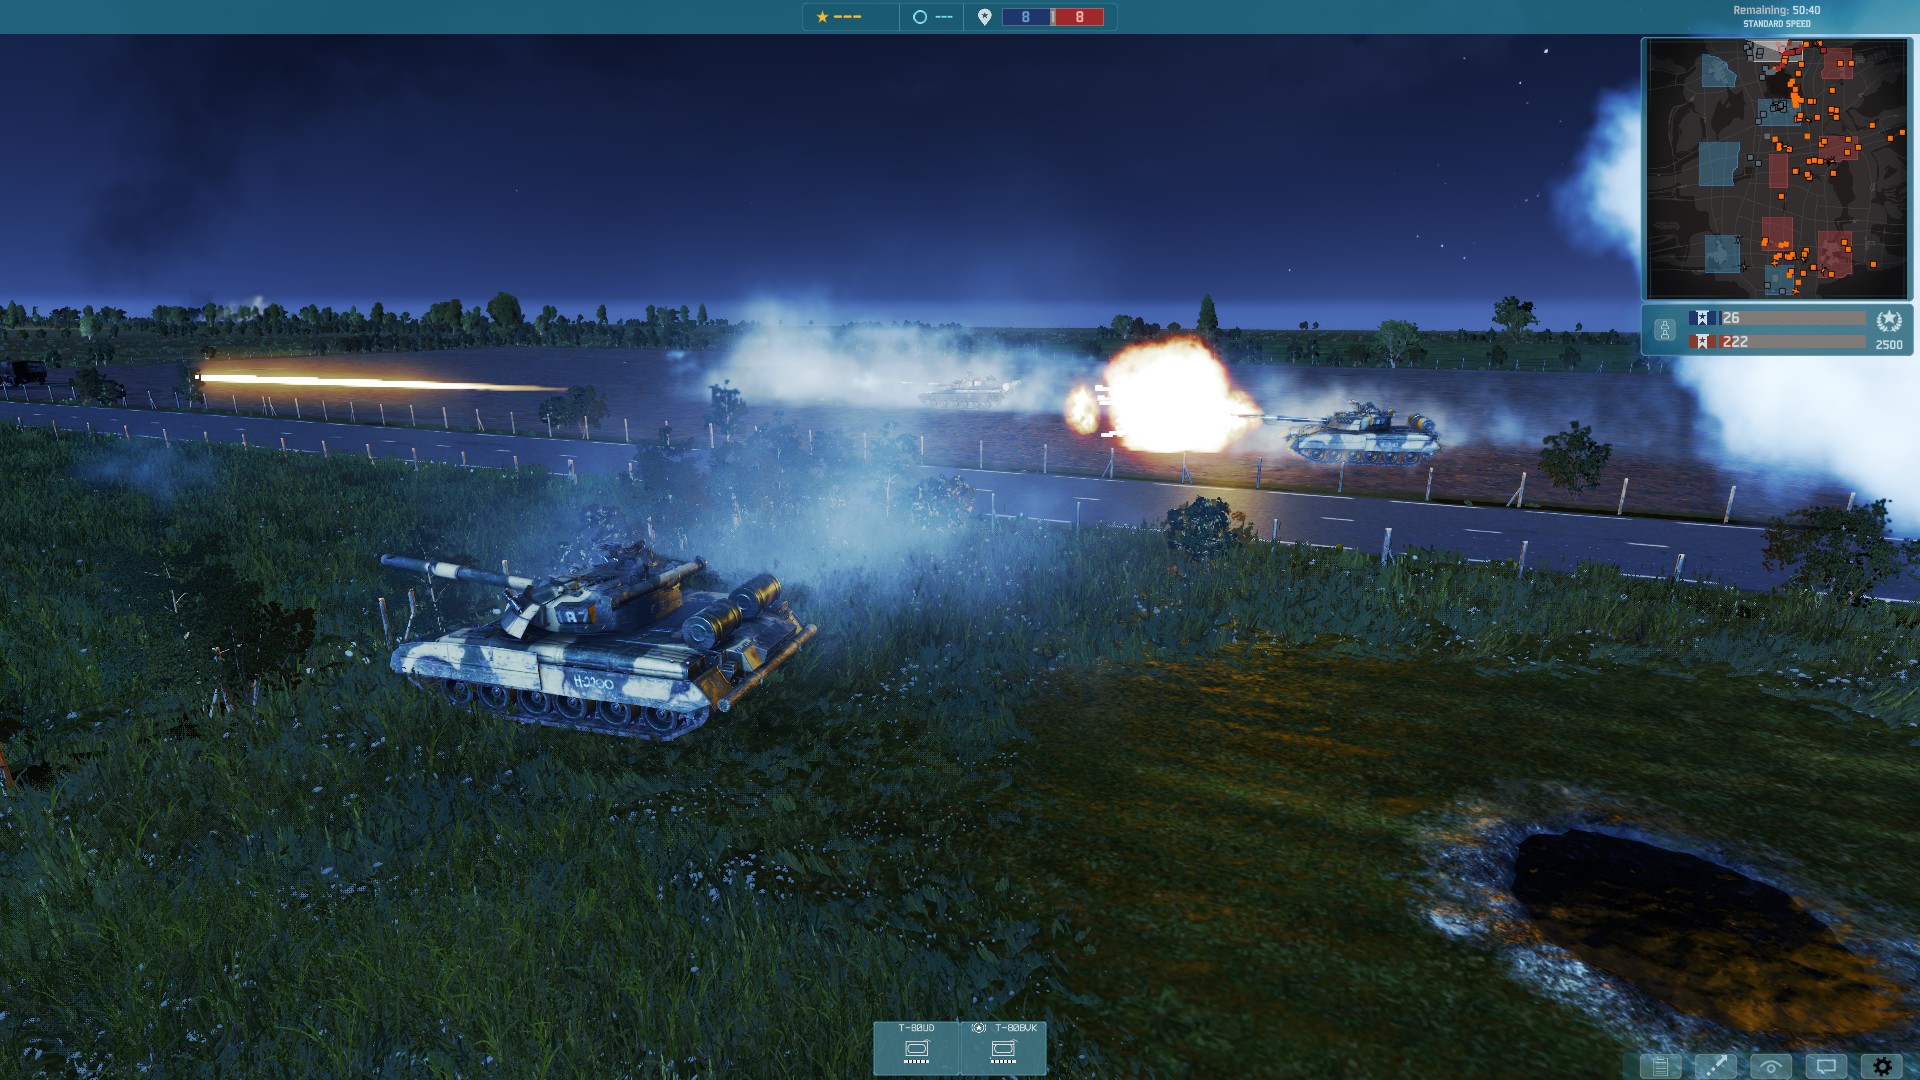
make your tank attack them from the maximum distance and if you destroy said units wander full,
your enemy will have to waste points to replace them and not build up, at the end its always the numbers game. like this:
The third option is when all things go bad, for example if you are facing more then 1 opponent and they have the high end tanks of NATO like the Leopard 2A3/4, M1A1 HA, on mass your 2 tanks will have some trouble,
to avoid ultimate defeat you should fall back to a better potion and try to use the fact that they are over starched and bleed their tanks, don't try to go for the kill don't let all of their tanks attack your 2 lonely tanks,
after a while they will realize that they are over starched and fall back by that time you are more regrouped and ready for their next attack.
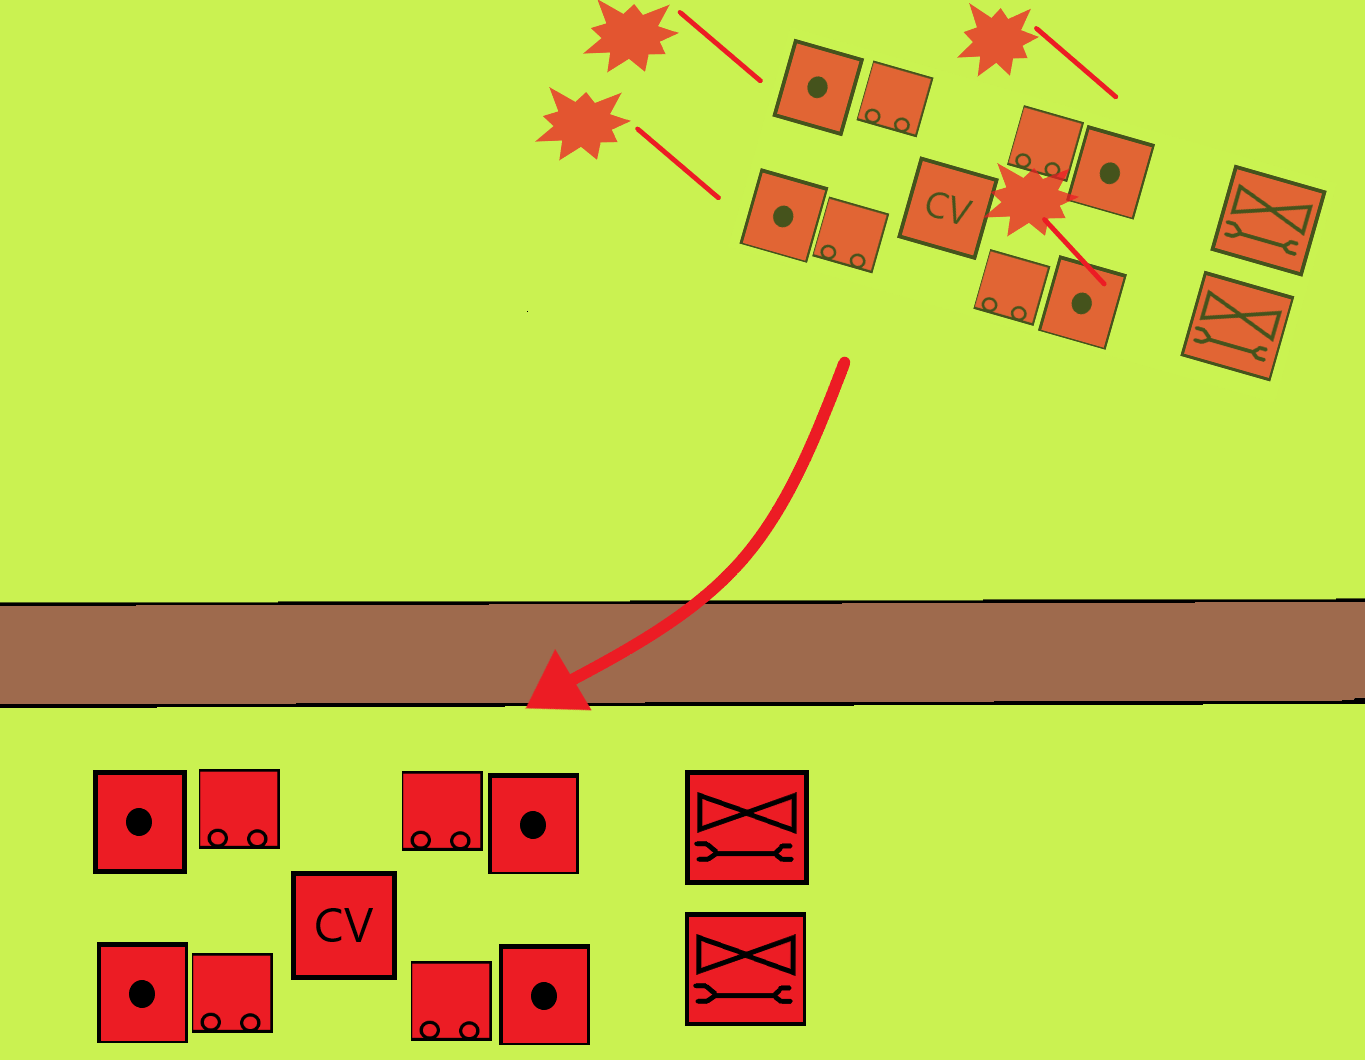
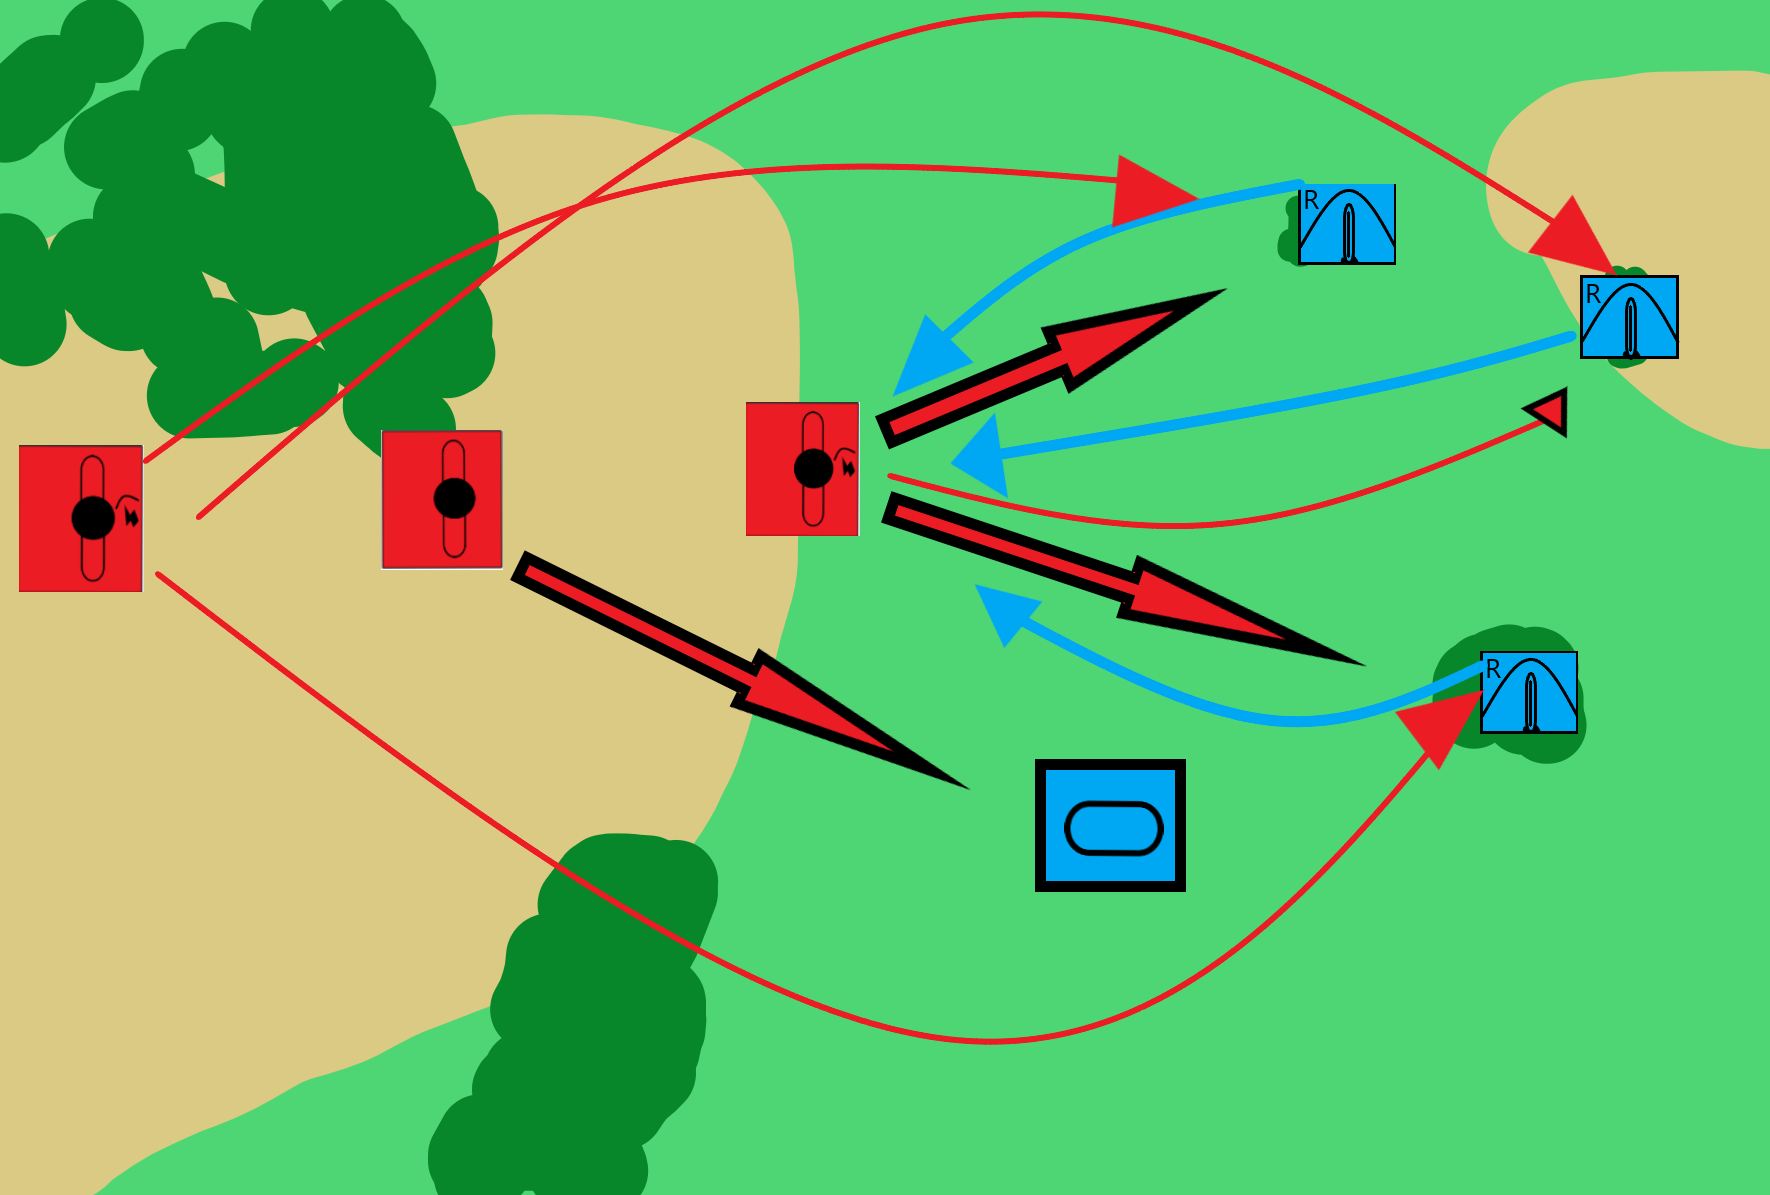
you might be asking yourself how do I that?, well first thing first your retreat should be organized let you tanks skirmish a bit with the advancing NATO units buy time for your other units to retreat,then your tanks should fall back,
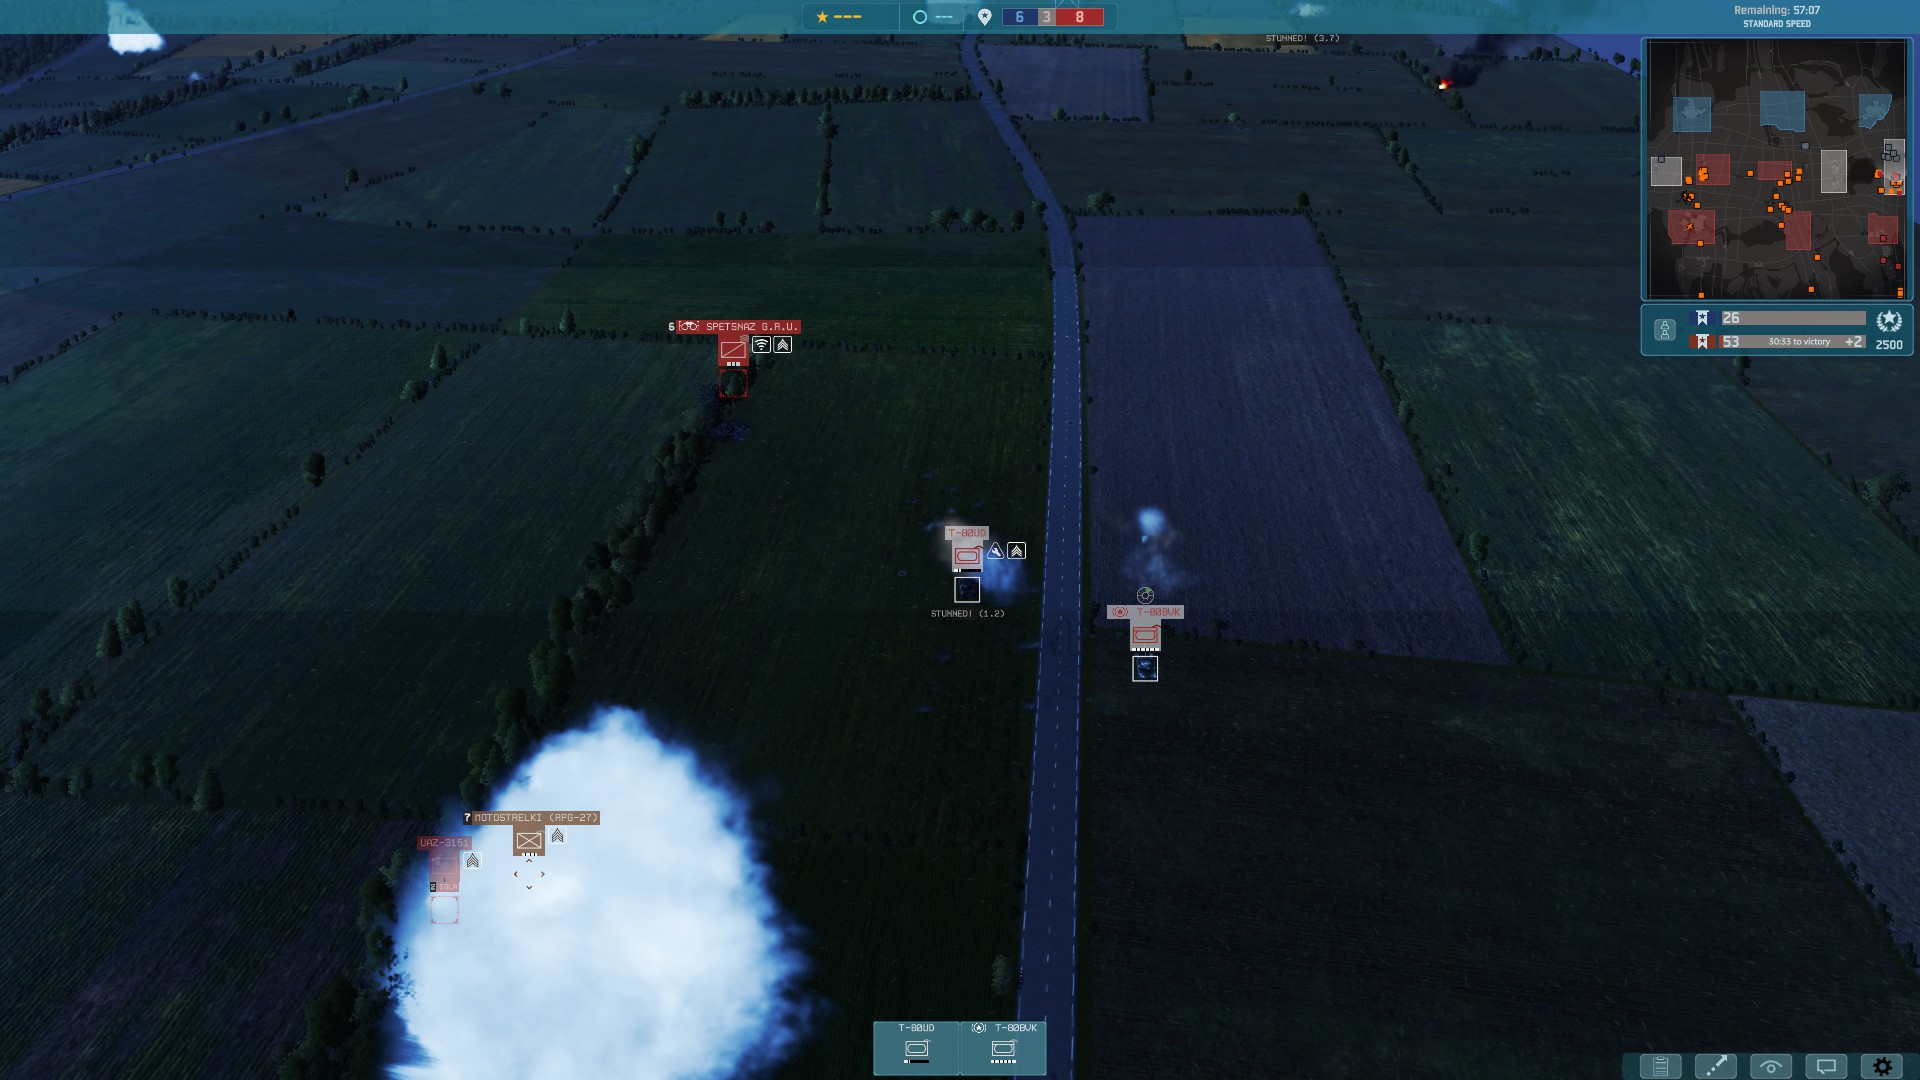
at this point there is a trap I like to do (it will not always work but it will buy time) your recon units can set up ambushes to the enemy tanks,
remember tanks are blind without recon and if the enemy pushes the tanks only with no recon support they are vulnerable to ambushes (IMPOTENT your recon should attack the enemy tank only from the sides or the back you should use the return fire option and remove it when the time is right) and don't leave your recon units alone when they execute an ambush its the perfect time for your tanks to attack they can even use their Savir missile from long range and the enemy tank is stunned and can't deploy smoke to save it self,
but be ready to lose some recon units.
a proper retreat would look something like this:
if the enemy pushes the tank without recon you can execute a nice ambush like this:
Of course this is easier said then done but as you will start looking at the battle with this point of view you start seeing better results
Most of the time you will have to chose the second options of holding the line for the enemy is not weak or strong enough for the other option to take place.
This brings us to the next chapter:
Battle-Theory Part Two
Building Up
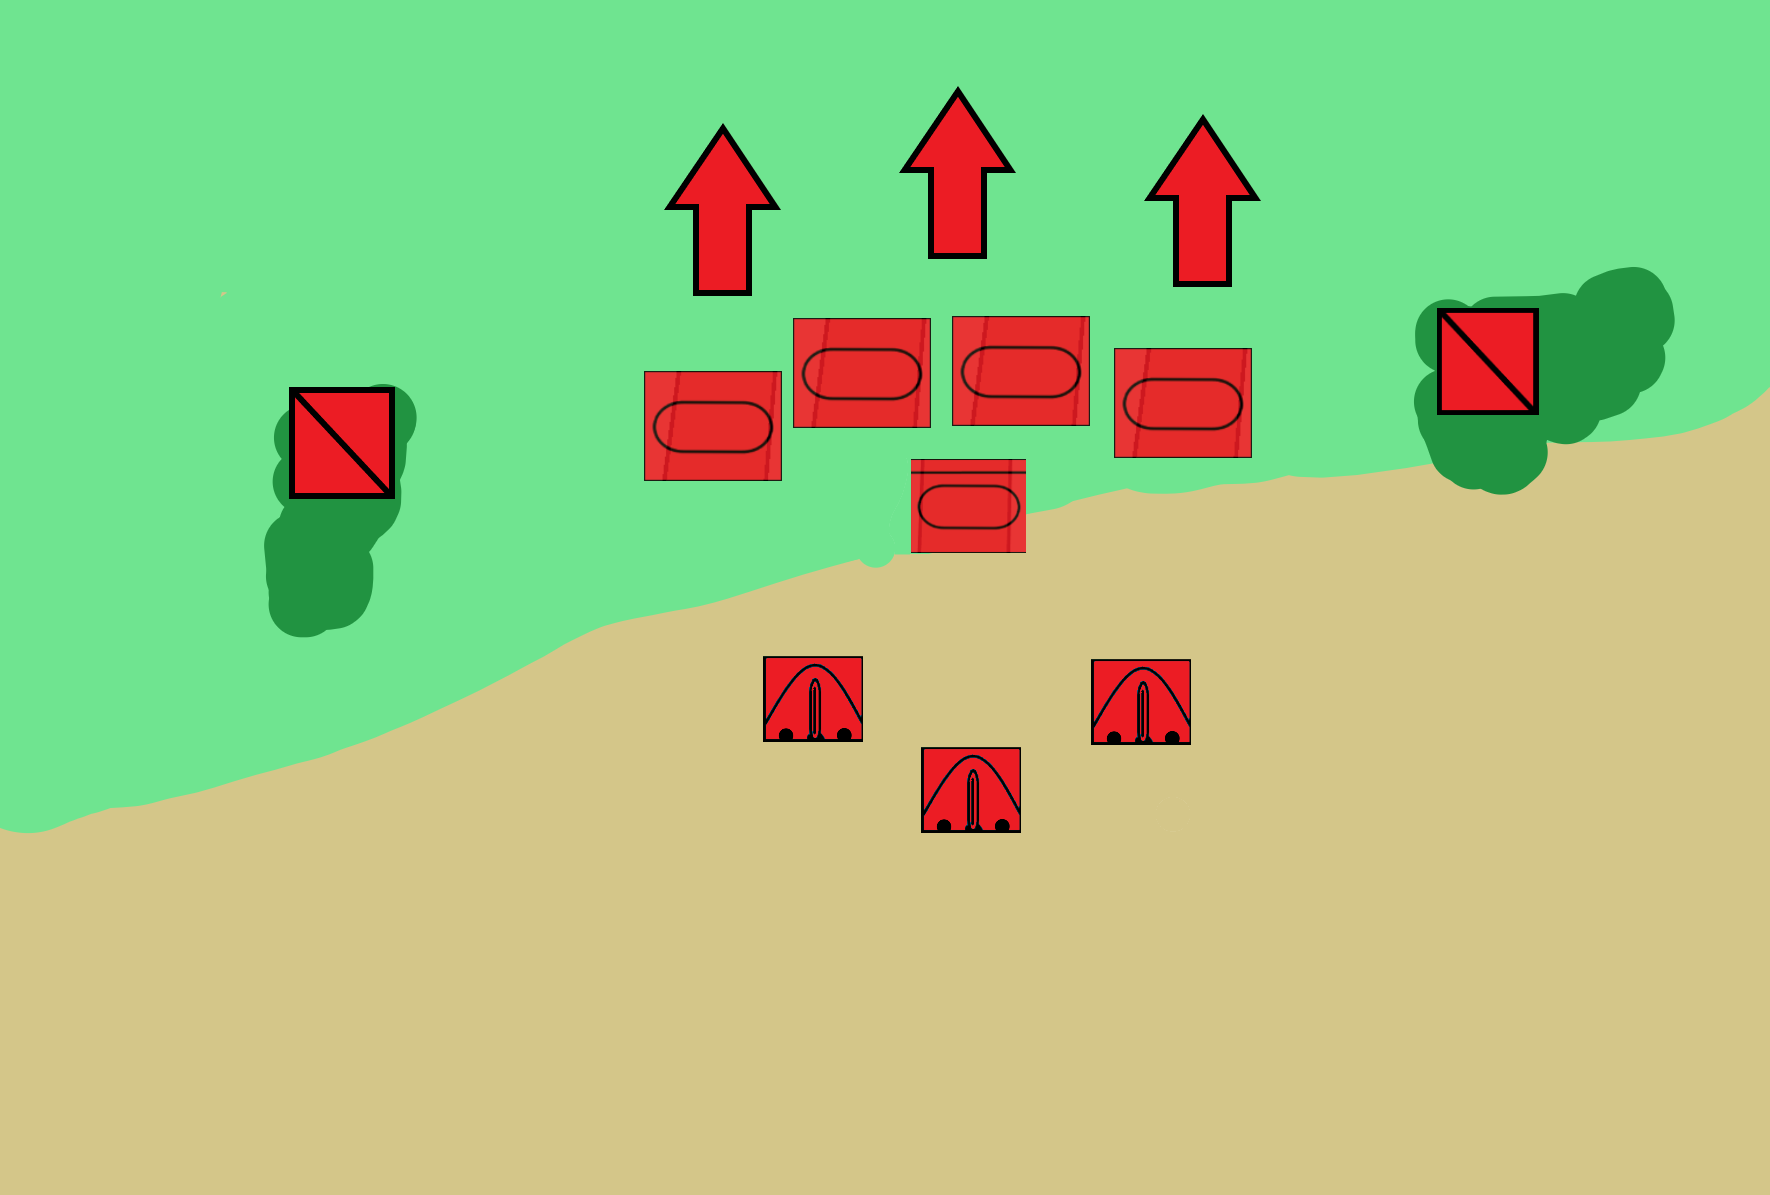
After the first skirmish your front line should look something like this :
as written in the guide a little earlier you should already know the enemy unit composition,and you should build up accordingly,for example if the enemy focus is more in armor and infantry units you should emphasize on building up your armored forces ,you have the better tanks don't let them get the number advantage,or if the enemy focus is more in air power planes, helicopters etc you should build up your AA more but still buy more tanks, if I can put it in numbers in will be:
Armor focus:
Tanks=50%
AA=20%
Supply=10%
Others=20%
AA focus:
Tanks=40%
AA=30%
Supply=10%
Others=20%
your tanks are the main combat power of your battle group they should always be a top priority.
Now how does one hold the line?
your main focus should be a defensive play until you gather enough force to push the enemy but we will get to the attacking part,as I said before your tanks should take the rule of a quick reaction unit most of the time,(the suggested combo for your tanks should be a T-80BVK CV and the- T-80U/UD'S in front the command trait of the T-80BVK buffs the stats of the T-80U/UD'S and they will hit more their shots and would suffer less stress if hit).
A picture of the command trait in action,notice the little arrow in the top right of the symbol in game its a sign for 1+ veterancy:
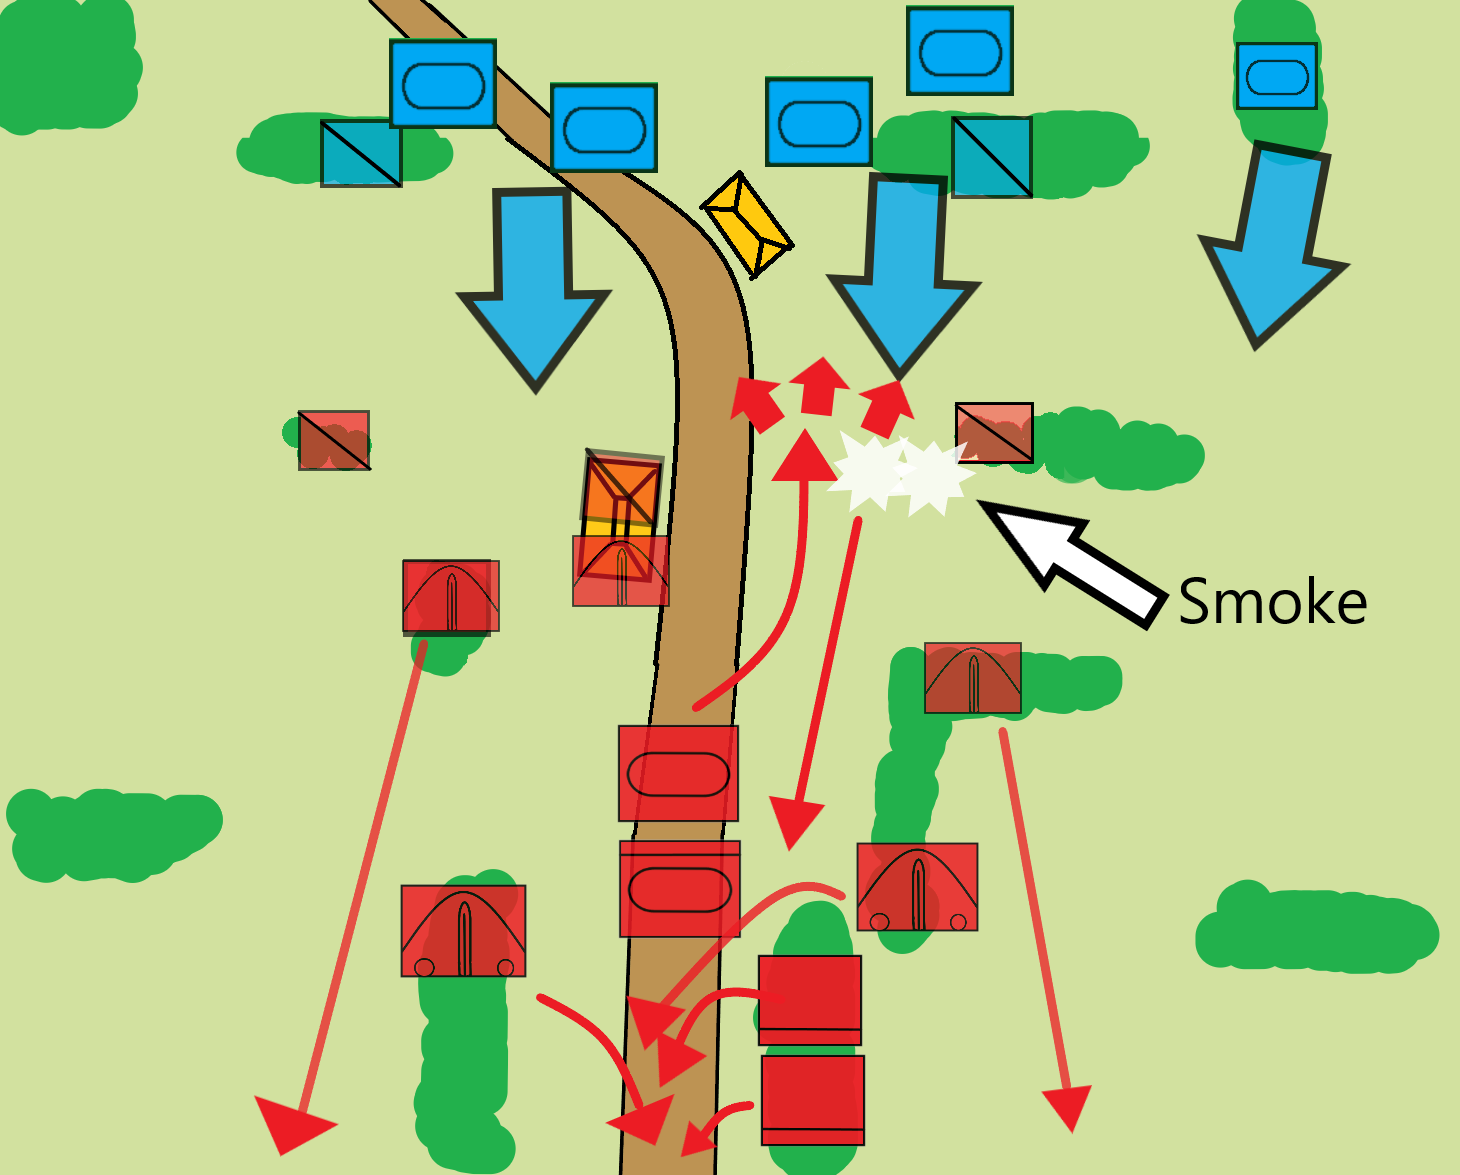
One more thing your tanks have the ability to deploy smoke charges that will create a smoke screen in FRONT to use this ability once the tanks are selected you can press B on your keyboard.
Your enemy should not know where are your tanks exactly all of the time, as a rule of thumb if you don't see any enemy units don't push your tanks,
but if your recon spots a unit then go for the kill,dont lose your tanks you have to keep them alive and you should get more tanks!!.
Now this is only true for the early part of this phase,after getting some more T-80U/UD'S at least 3,
you should be a little more aggressive, just advance your recon so you will spot more units and send your tanks do kill and then pull back and repeat.
I suggest target enemy recon units and ATGM's units this will break their lines little by little,
if the enemy has armor engage them but with caution, if they fall back don't chase them advance your recon a little and engage enemy soft targets after their tanks fall back.
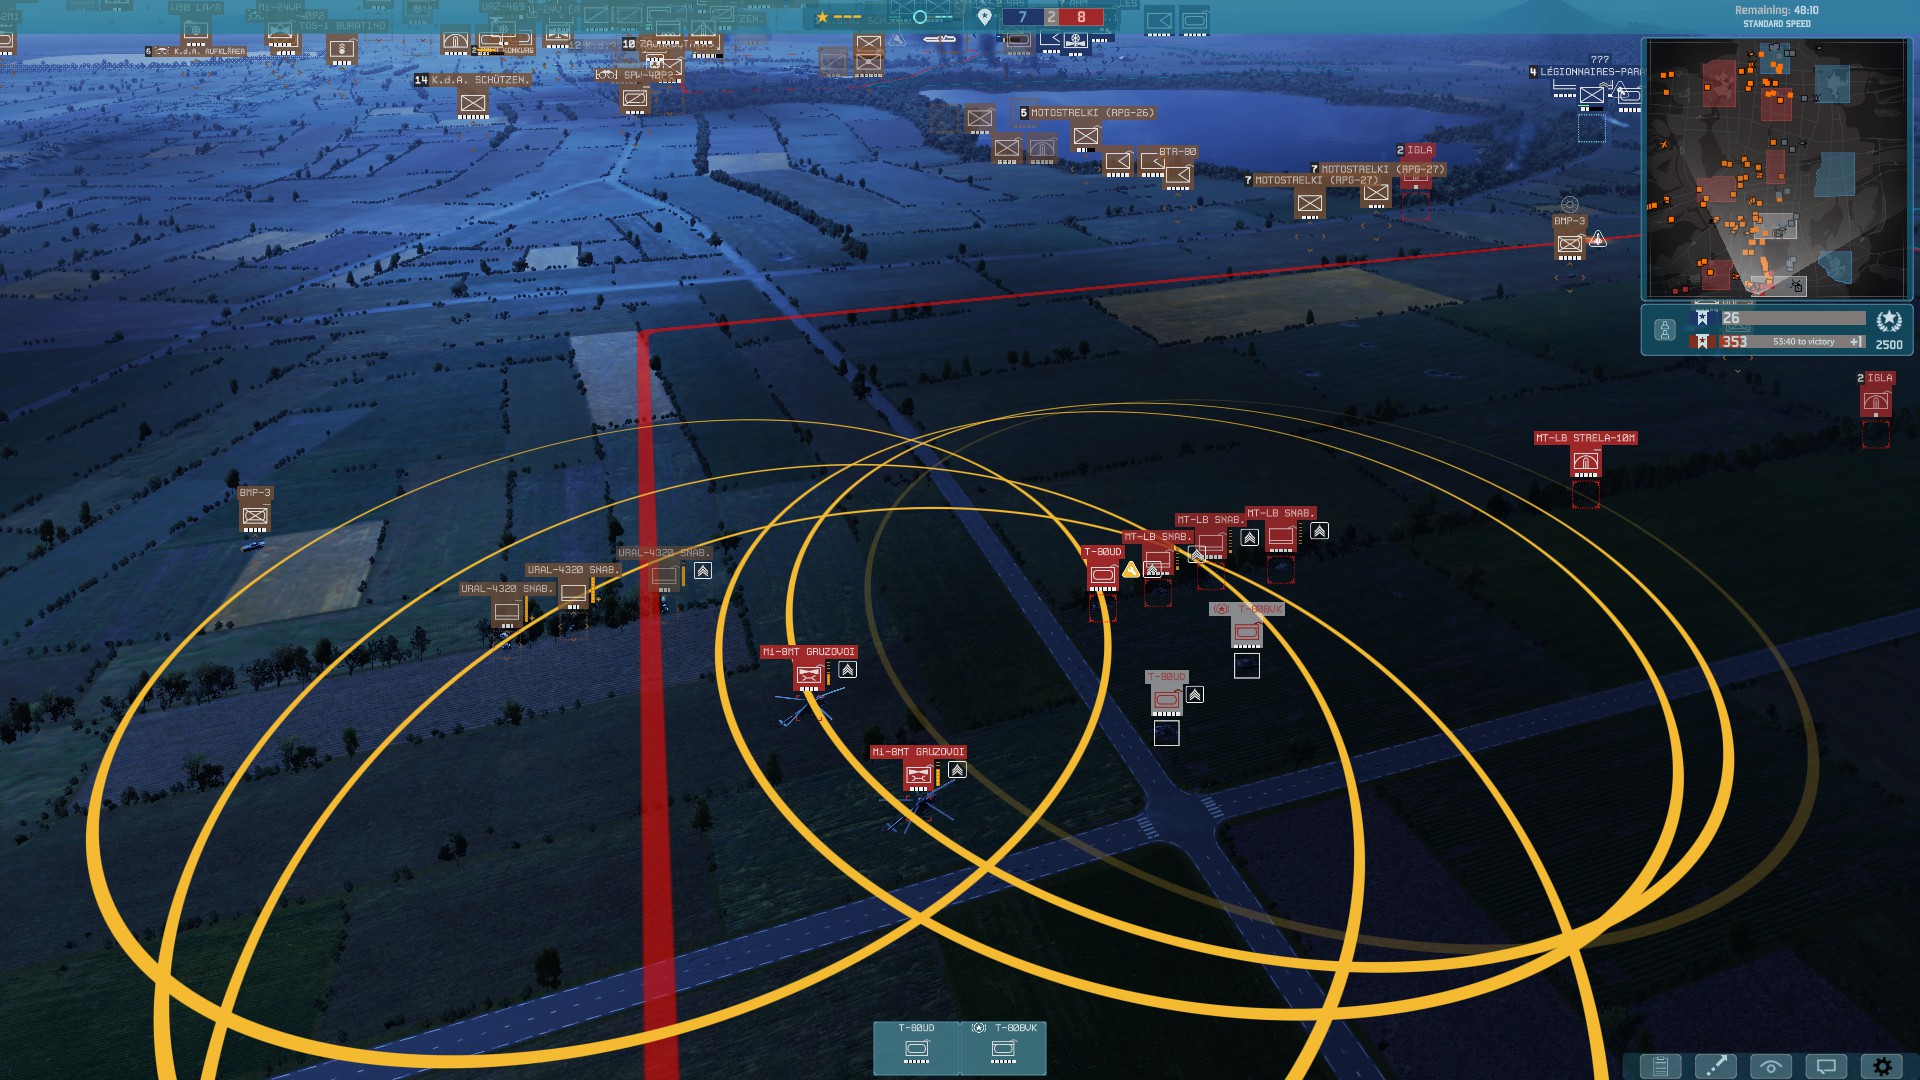
Now your tanks are hungry beasts that require a lot of supply and you have the resources to accomplish that, at the start of the game you should always bring a fob then try to get an MI-8T supply helicopter that will fly to the fob and back to supply your 2 MT-LB supply APC's.
so when your tanks fall back to resupply they will always have the supply they need, this will take some micro and will be annoying an first but you can make your life easier by selecting the helicopter then hold left shift on the keyboard and tell it to fly to he FOB and then back and he will do it one after the other(be sure you press the FOB and not near it!,it will fly near the fob and not even land to resupply and then fly back empty)
after some time of proper buildup and defending and probing the enemy line your front line should look some thing like this:
your next focus should be artillery, while it is not a requirement ,I won plenty of games without artillery, it will make everything easier.
your artillery would play the rule of suppressing the enemy positions, destroying ATGM teams, recon units that your tanks can't reach plus counter artillery of the enemy.
now how do you position your artillery currently?.
you should focus on shot and move tactic so to not get counter artillery,plus I recommend bringing along side the artillery 2 supply MI-8T supply helicopters and a CV vehicle to boost their stats,
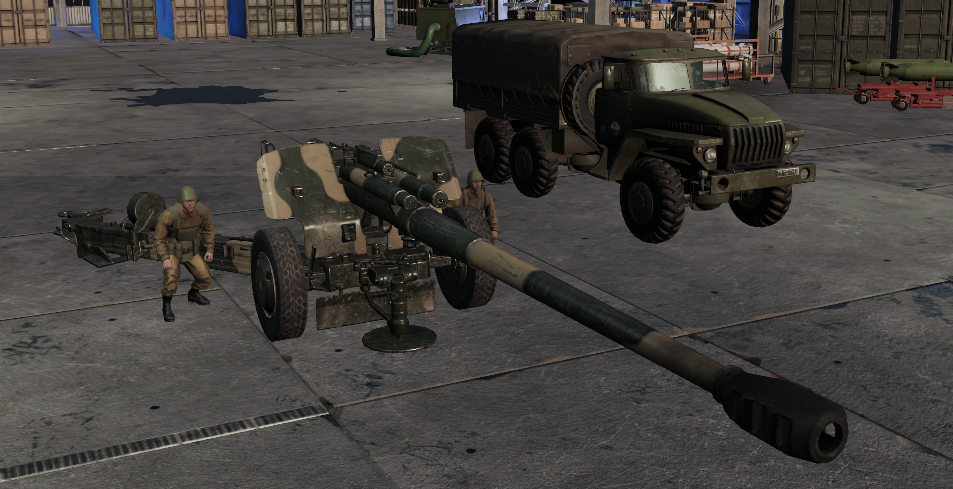
also if you bring towed artillery it will add a little more micro of units but don't worry you can select all of the artillery pieces together with their trucks and just press right click on the truck and they will tow themselves to the trucks
It would look something like this:
Use of Air Power
You should only buy aircrafts in the start only in two situations emergency or your ground forces are strong enough to hold and the opponent is focusing on air power and your AA cant answer this threat,
emergency?, an emergency is when an enemy armor is about to destroy your tanks or to breach too deep into your front lines, you should not have gotten yourself in that situation to begin with but every thing can happen here you should target the most threatening enemy unit, be it an helicopter, tank, infantry you name it.
The chance of the aircraft to come back is slim but there is a chance.
The second situation is when your opponent is focusing on air power and your AA is having trouble here your MIG'S OR SU-27'S can deal with it or at least dater the enemy aircrafts to close in on your air space.
Dont think your air power is only viable in emergency striations,
after a decent build up of your ground forces you can use your aircrafts in attacking and destroying enemy positions and high value targets that you don't want risk your tanks to take out.
now there is a way to send your aircrafts,do not send just one plane to destroy a target and expect it to come back, you should send the main payload plane with backup mainly SEAD planes if you are able also jet fighters would be helpful,
but they should fly in a formation I found this formation to be most effective:
still the chance of all of them coming back is slim ,but it will make it possible for some of them to come back safely, the theory behind this formation is that the SEAD plane in the front of the formation will take all the initial fire of the AA and also enrage RADAR AA and then the second plane which the bomber would deliver its payload on the target, and finally after all the enemy radar AA is turned on the last plane which is a SEAD plane will engage some of it, if your opponent will focus on infra red AA your SEAD plane with their above average ECM(electronic counter masseurs) will draw all the fire and have better chance of survival.
Usage of Helicopters
I found that helicopters are most effective as quick flank guard reaction units,you can use them as a front-line support unit but they are really vulnerable to AA and fighter jets.they can answer many threats in your flanks be it infantry or tanks they can handle it or at least buy you time to bring forces to said flank.
Next is the finale part of the theory:
Battle-Theory Part Three
Pushing And Taking Ground After Buildup Of Force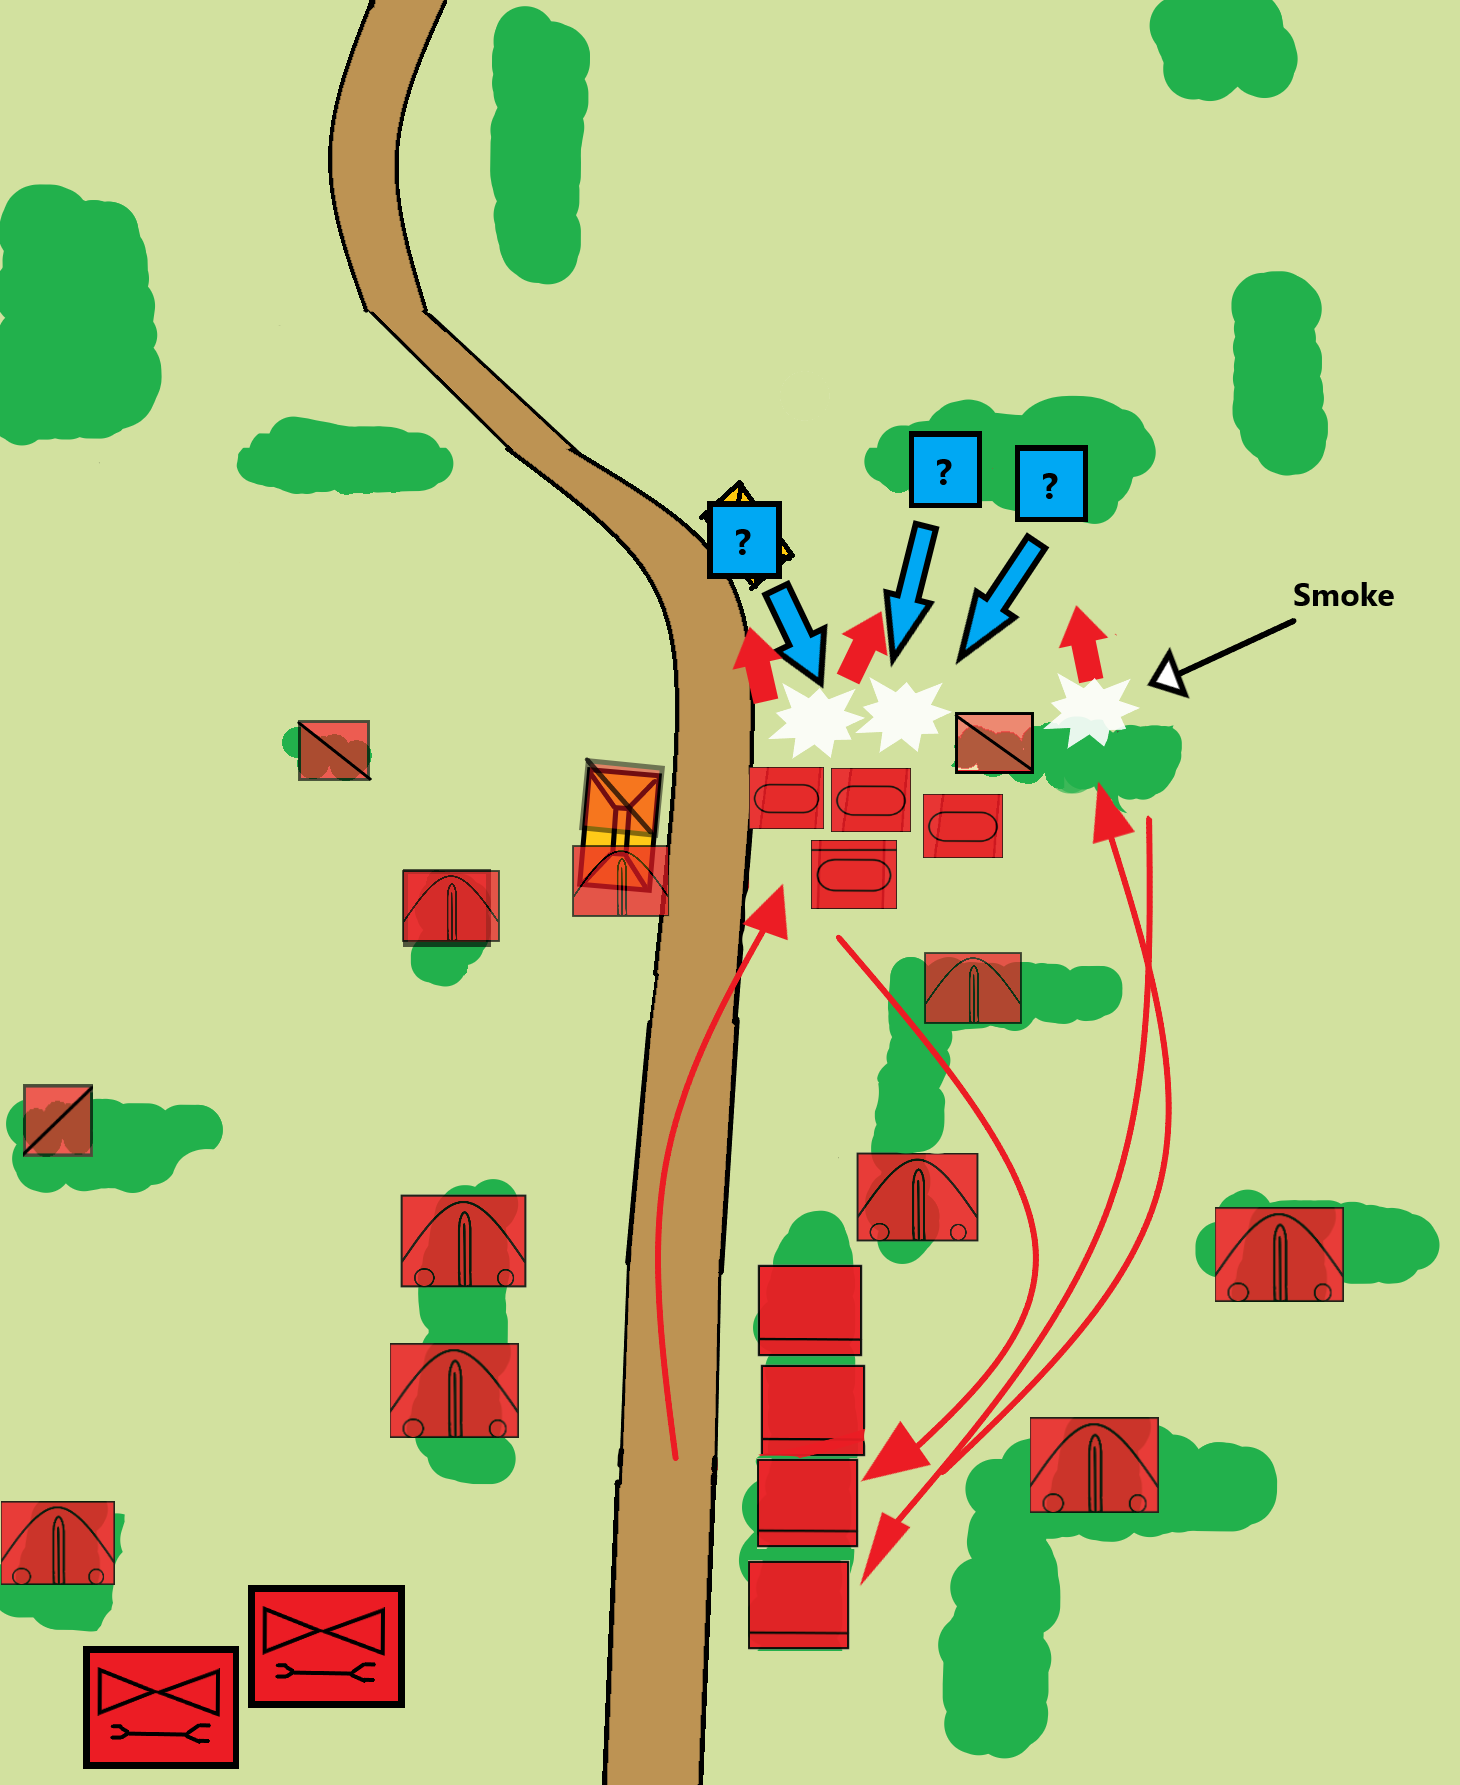

Now this part would most likely be at the late game ,but you can push anytime you think you have the upper hand and you have a proper force to push, after you have build up your force, the first thing you should do is to destroy your enemy eyes and ears(recon units),after that you should focus on destroying or make the threats to your tanks retreat be it ATGM's other tanks or AT infantry units, then you should push and establish a front line in case a counter attack would come,to simplify,
it would look something like this:
1-neutralize enemy recon units
2-neutralize enemy threats to your tanks
3-push and take ground
4-establish a front-line in case a counter attack comes
now this easier said then done if the enemy has a strong defensive line you should destroy little by little don't throw your tanks out there to die, instead do prob attacks to find enemy weak points or areas where you are met with only a small part of the enemy force so you can destroy this small force and advance to the next.
How to prob attack?
prob attack should be at maximum range and should focus of finding enemy support units like recon ATGM's and so on so you can destroy them,here you would use your smoke discharges a lot
and would drive in reverse most of the time (the way to tell them to drive reverse is to press G on the keyboard and tell them where to go), to save your tanks from unneeded damage,and your tanks should work closely with your recon so you can see said units more clearly it would look something like this:
Attack,Spot,Engage,Retreat(with smoke cover),Resupply,Repeat
This way you will break the enemy front line in little steps and you would preserving your combat power.
By the way you should use your tanks to do the heavy lifting but it does not mean they should not get some help, you have artillery and planes you should use them if you dont want to risk your tanks,
for example lets say there's a lot of ATGM's you could just fire with your artillery on their position and get rid of them, they are very easy to kill, one more thing I want to talk about, in the artillery tab I said I would show you how to make a trap to enemy armor units with the TOS-1,the way to achieve this is to bait the enemy tanks to a fight and make them think they are winning,there are many ways to do that like only sending part of your tank force and then after getting hit some time, retreat and make the enemy units advance to your pre-aimed TOS-1-
(by pressing the button HOLD-FIRE the TOS-1 would still aim but after finishing the aiming process he will not fire until that order is removed it would be easy to pick a spot before the engagement to have better chances)
-position and unleash hell on them, then you can push safely with you having the only armored units in the filed for a while.
after the enemy line is disorganized and weaker you can attack with full force the enemy positions,
but because you will advance you will need to bring all your support units with you, like AA ,Recon ,Supply, and else.
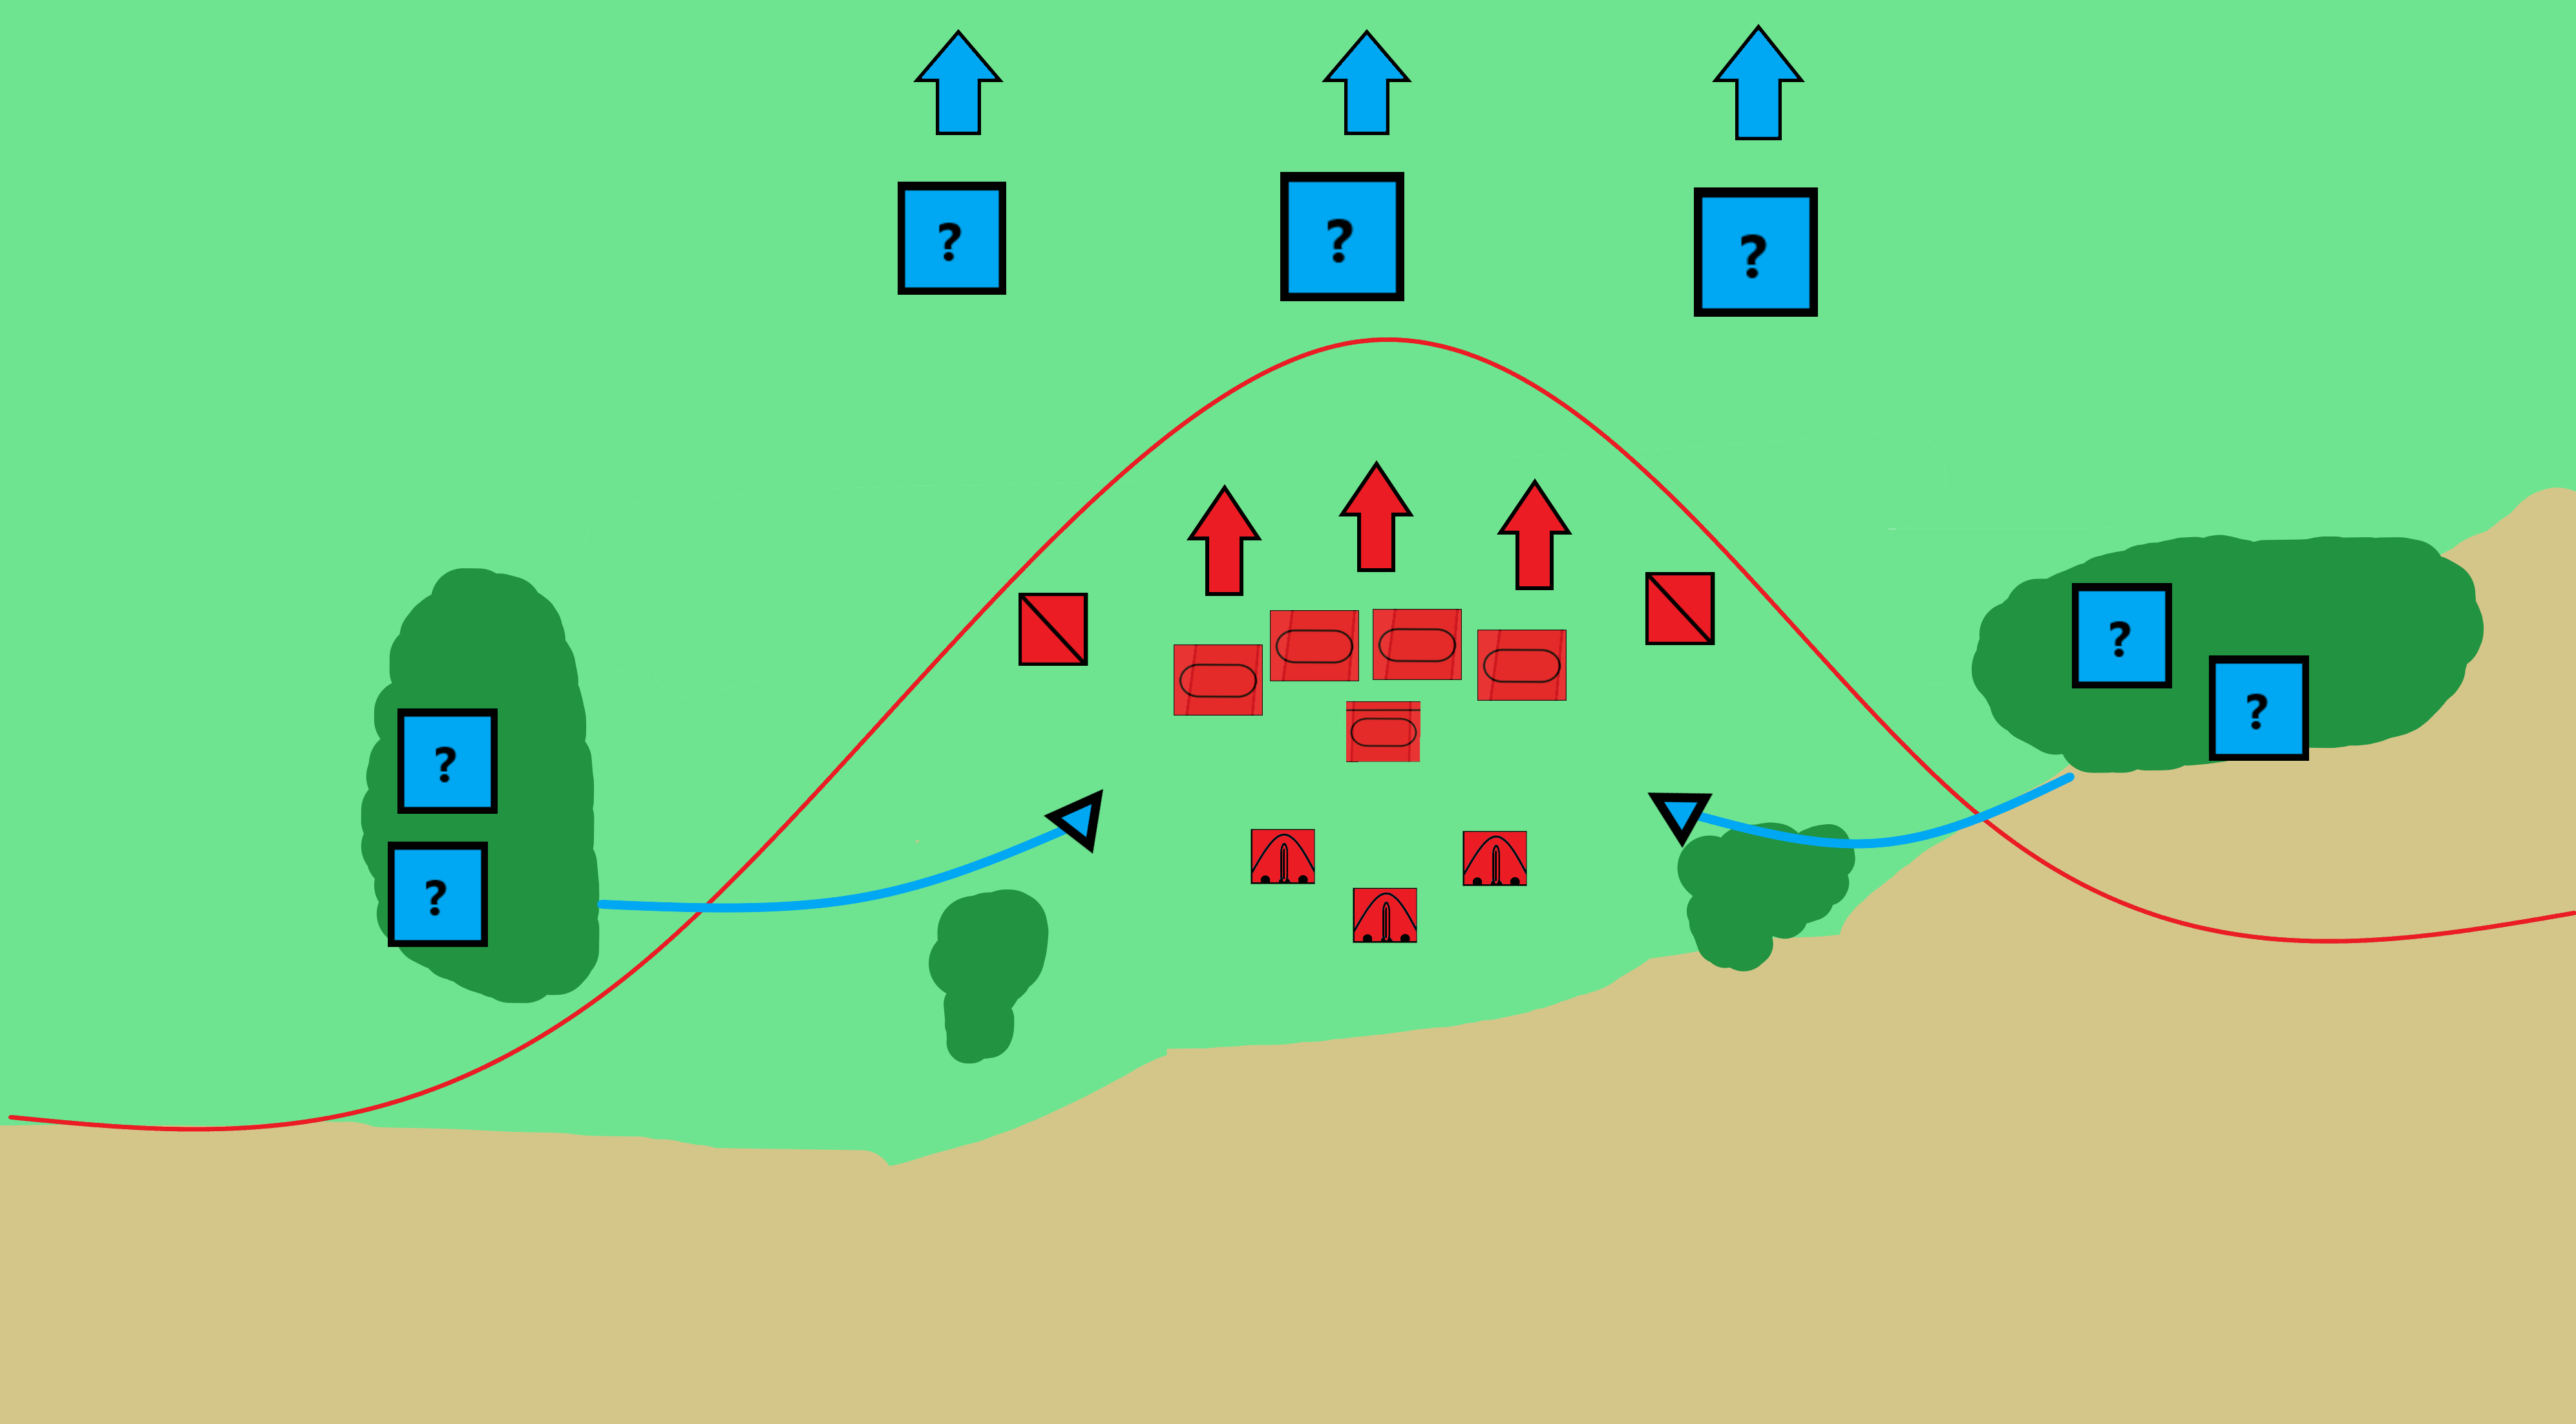
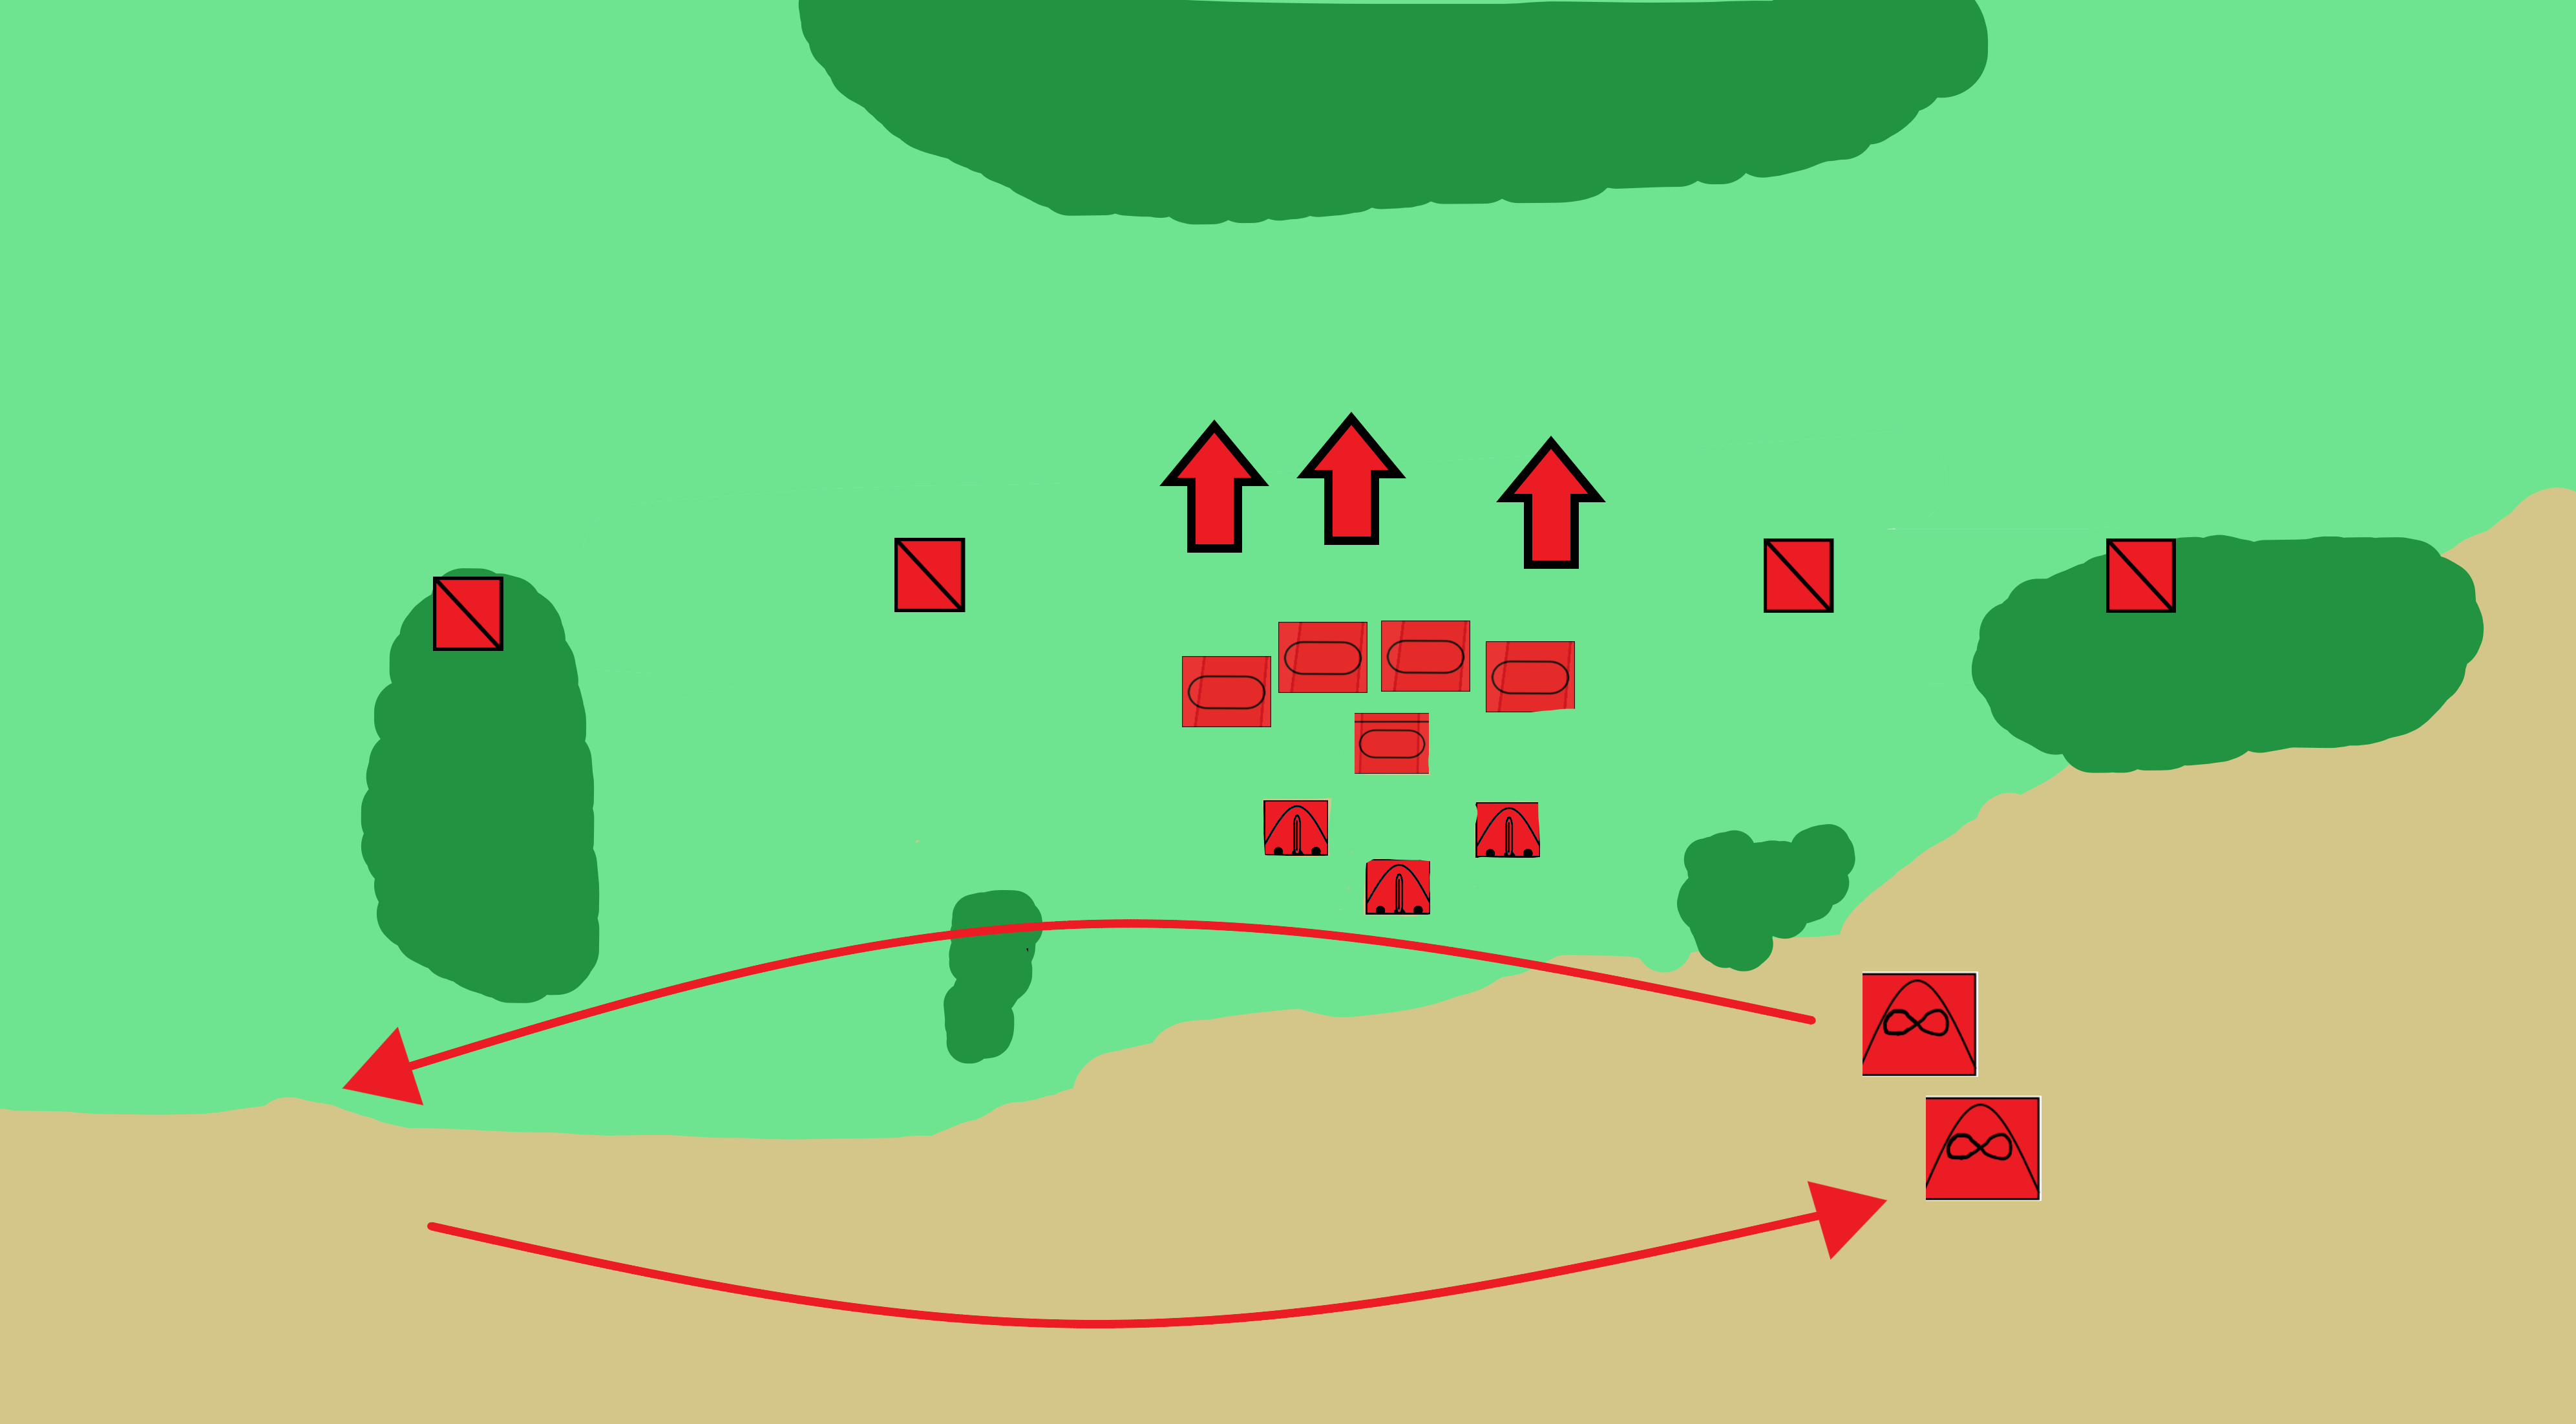
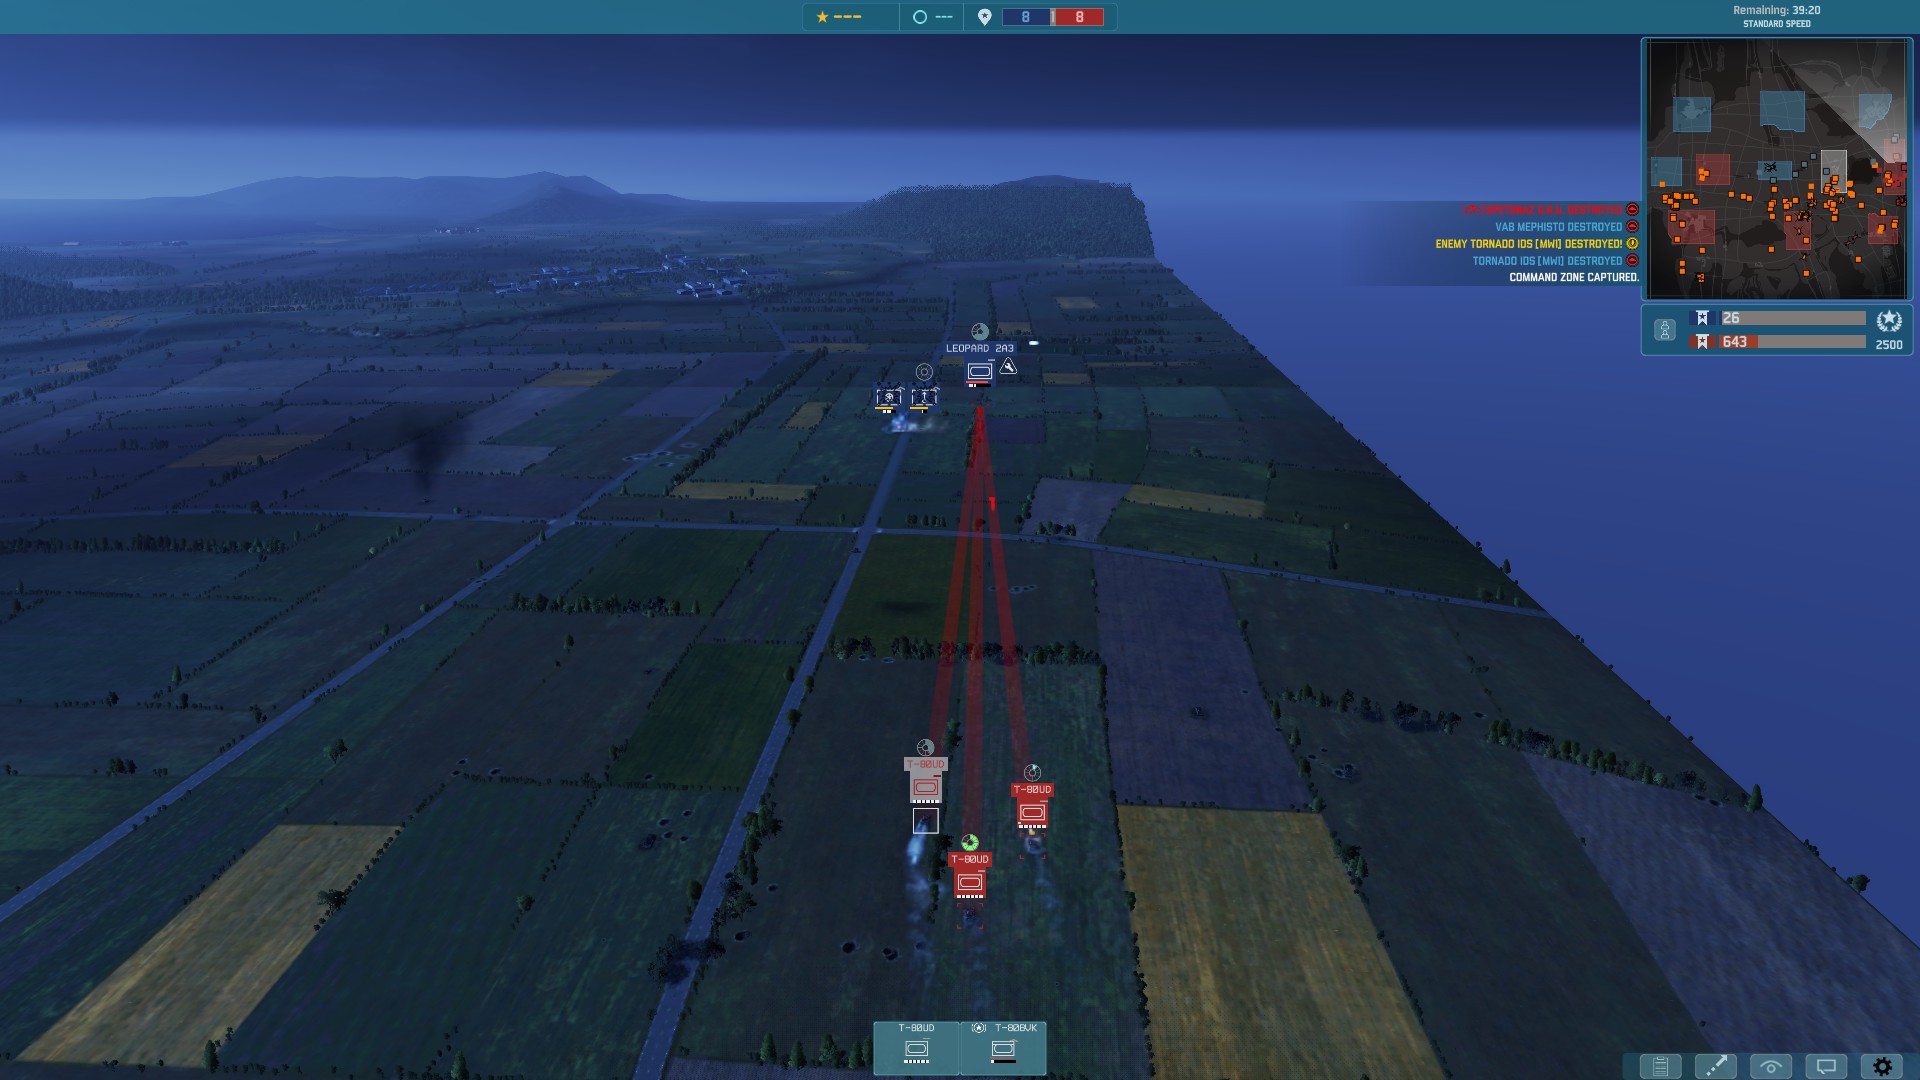
here you will need to build with your tanks an "IRON FIST" formation with your tanks acting as a spearhead and your recon as a spotter. and AA in the center to provide AA cover,like so
after you made your breakthrough you will need to watch over 2 things your flanks,and over stretching,
lets talk first about the flanks:
after you have made your push you will naturally develop a bulge in the front lines. and that bulge would be vulnerable to enemy flank attacks,
here you can see that ,yes, there was a breakthrough and the enemy is retreating but the flanks are about to be attacked and the entire red force is about to be heavily damaged or worst destroyed, to avoid this from happening,after the breakthrough don't rush after the retreating enemy secure your flanks by clearing locations that enemy forces can hide, in the picture above, after the breakthrough I could have sent my recon to the sides an spot the enemy and let my tanks do the rest and then build a garrison force be it infantry or spare tanks.
little note your flank guard should always have a recon unit.
overstretching
overstretching is pushing too much and too fast,its the perfect way to get deorganized and lose your support along the way,remember the more you push your supply routs are getting longer and the enemy's are getting shorter, if you will not establish a proper front line your enemy will be able to push and flank you you should always push with caution so your support force can catch up.
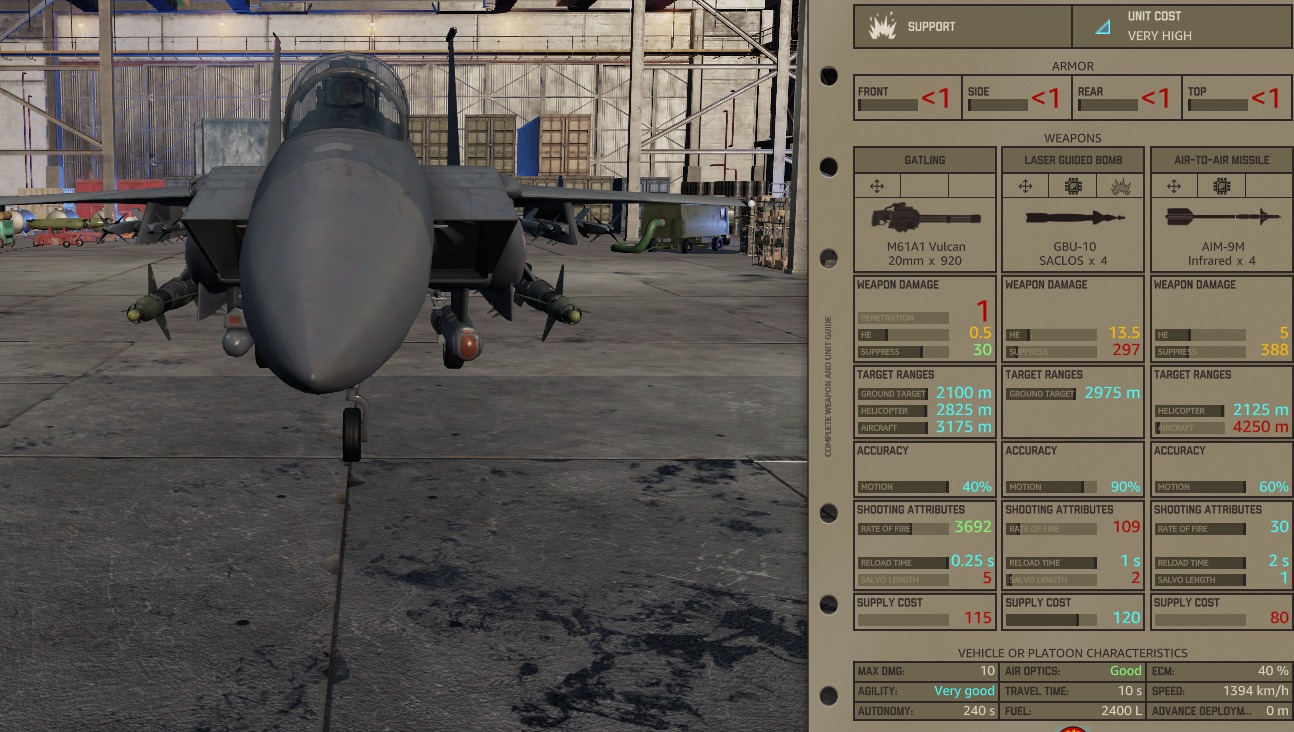
Air CoverThe last thing I want to cover is AIR usage in the offensive mainly how to deter enemy air crafts from running your day,especially one aircraft one scary aircraft,the F15E Strike Eagle, this plane can destroy 2 of your tanks in one go with its 4 GBU-10 and the opponent can have 2 of them and he has crazy amount of ECM 40%
so you will have trouble hitting it with your AA,
you fighter jets should always be in the air behind your front line but close enough to engage the enemy jets when conducting an assault but watch out for enemy AA,
it would not be easy to play against someone with the F15E but hey its FUN.
little note to before the end:
If you manged to push the enemy out of the wanted sectors, congratulations!,you should stop!,here is the hardest part, stopping when you are so deep in the enemy line,you should push but defend here the enemy got the advantage because he is closer to his spawn and can spam units and you will need to wait until your units will get to the front,so its better to defend and bleed his points dry.
This is the end of the battle theory section of this guide, I know a lot to read but I didn't want to leave anything out, the next section will be a multiplayer 10v10 walk through using the theory that was explained here.
In-game Walkthrough
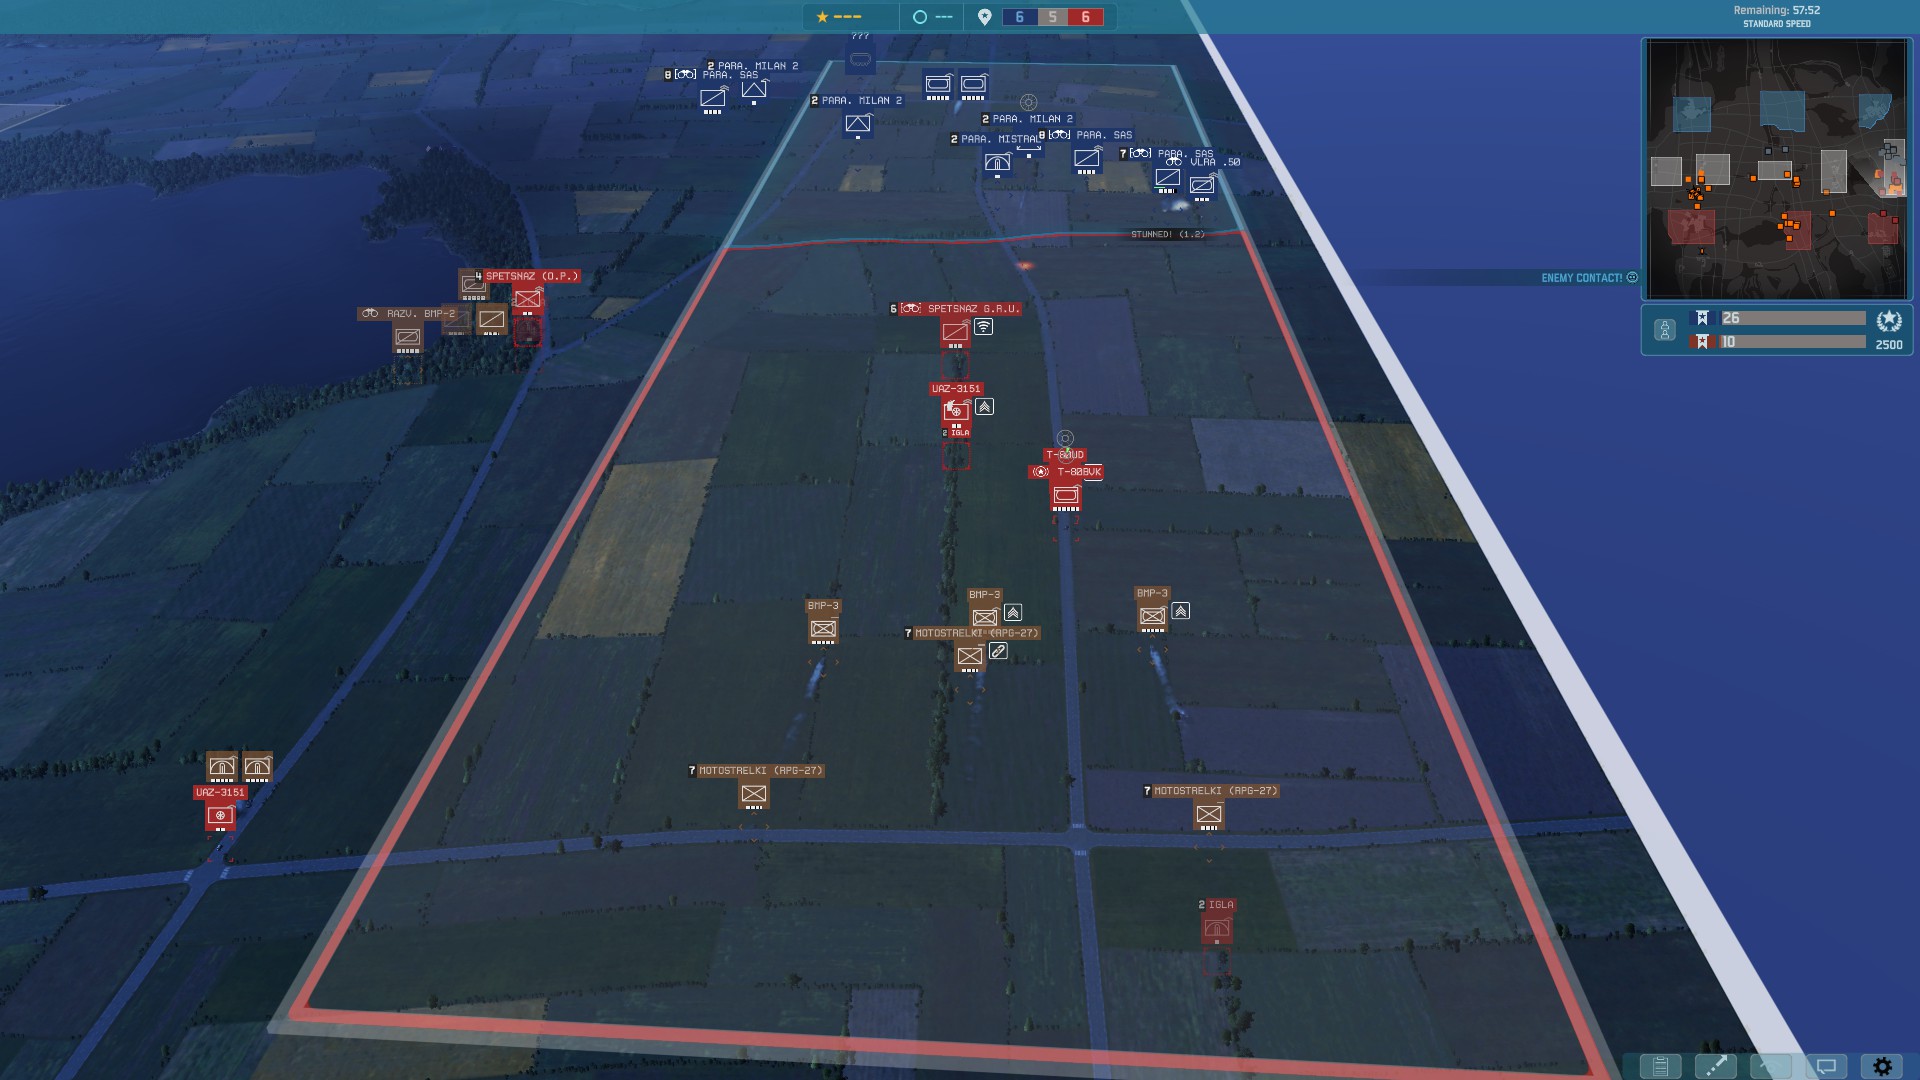

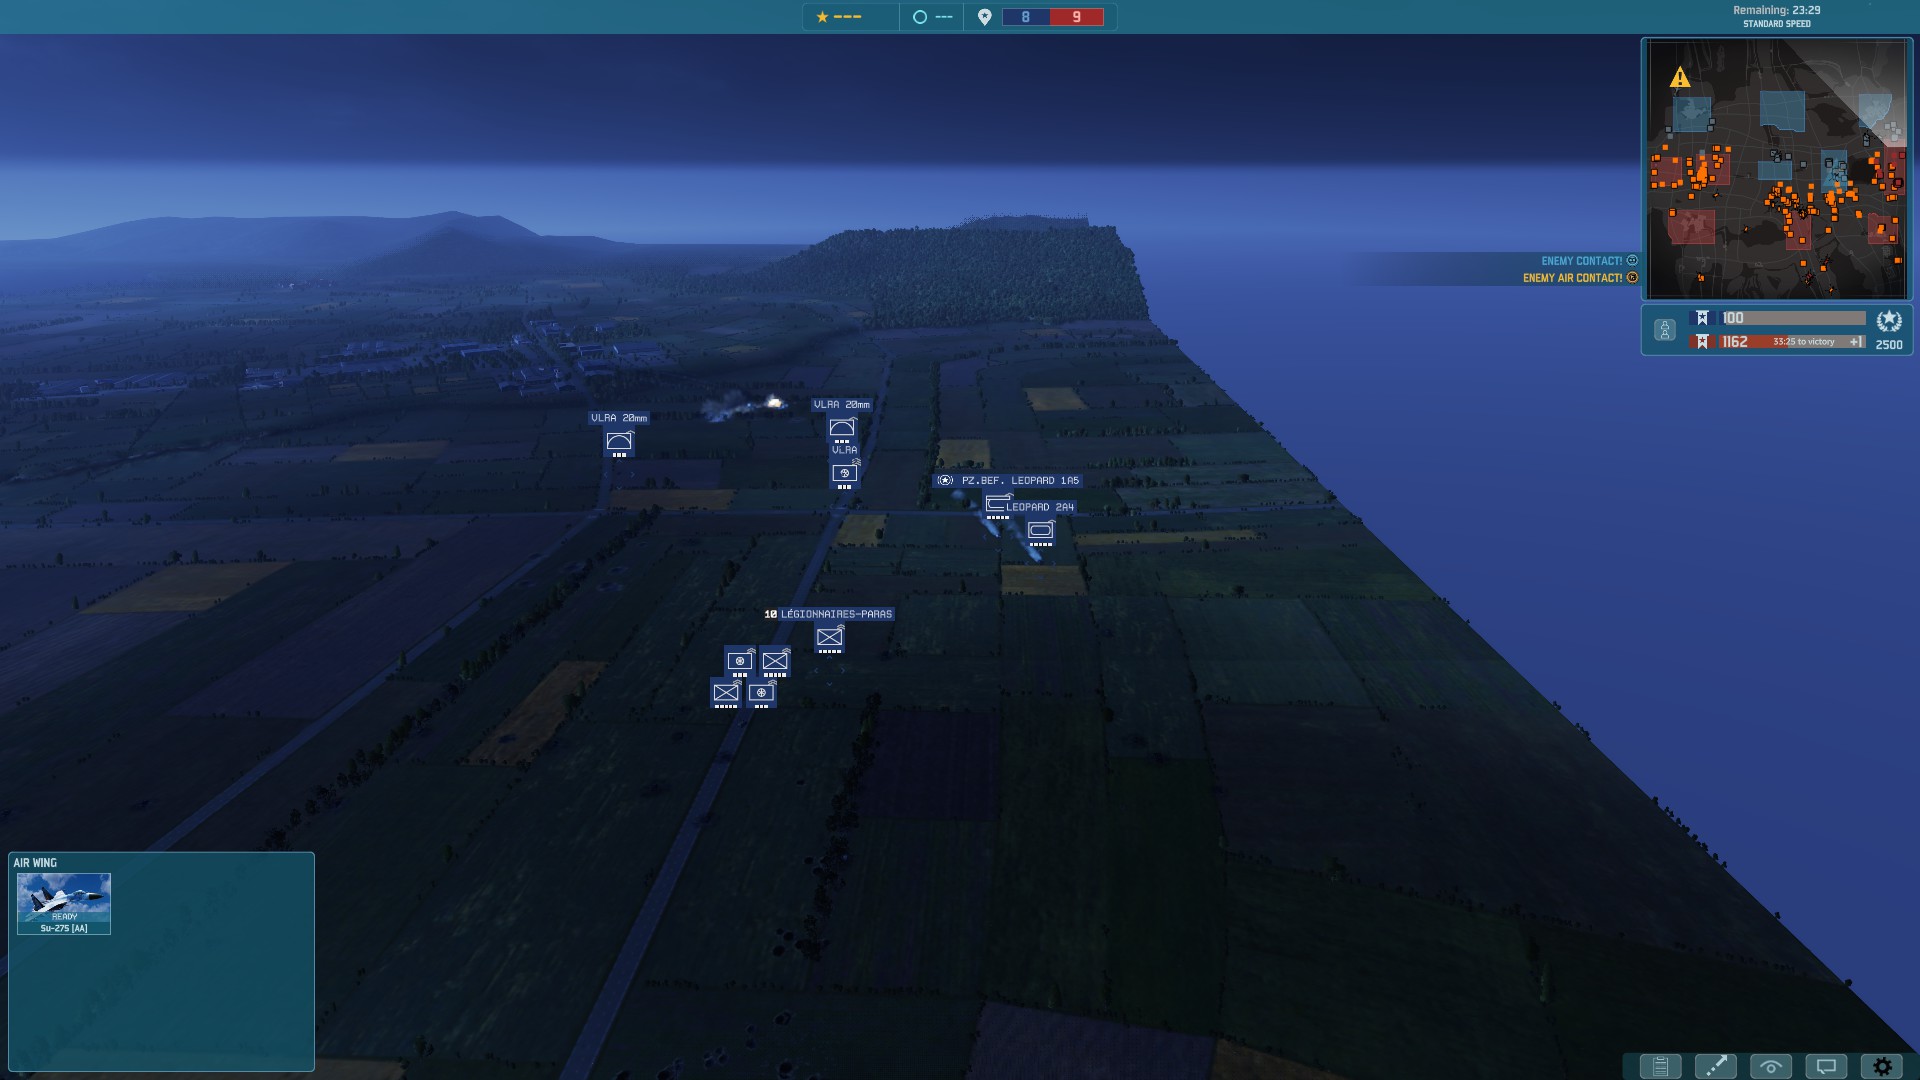
This game was a "Tactical" 10v10 in the Rift map, so not a lot of points, only 1000, this map is great for tank combat,huge open flat filed, me with another player were going to the right of the map to the Alpha sector.
I was playing the 119th and the other player ,we will call him Bob, played the 27th GV.MOTOSTRELK division. We faced 2 players one played the 5th Panzer, the other 11e parachutiste.
Because the lack of points i could only afford 1 T-80UD and a T-80BVK CV and I was without a FOB ,I had 1 recon unit Spetznaz G.R.U that I decided to put in the middle of the sector, one
Spetznaz D.P in the left flank inside the forest, and 3 AA Igla teams.
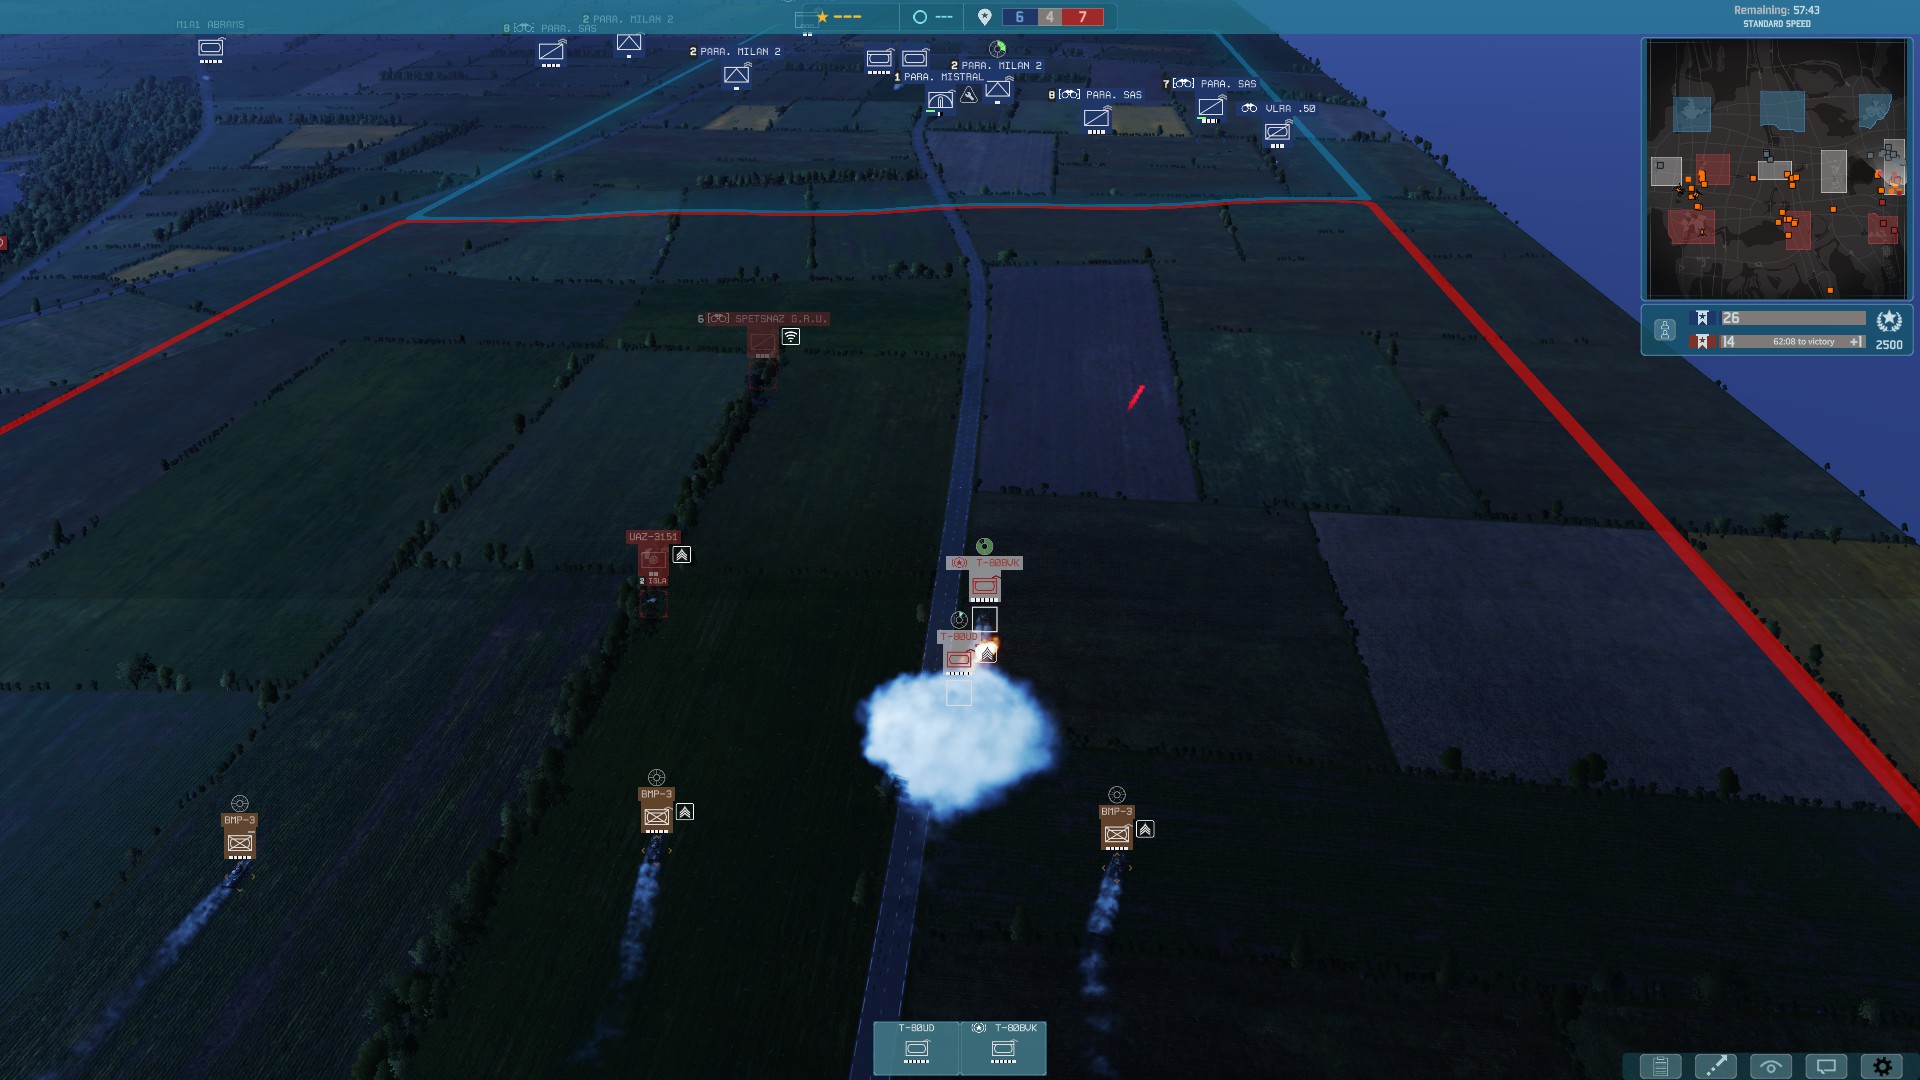
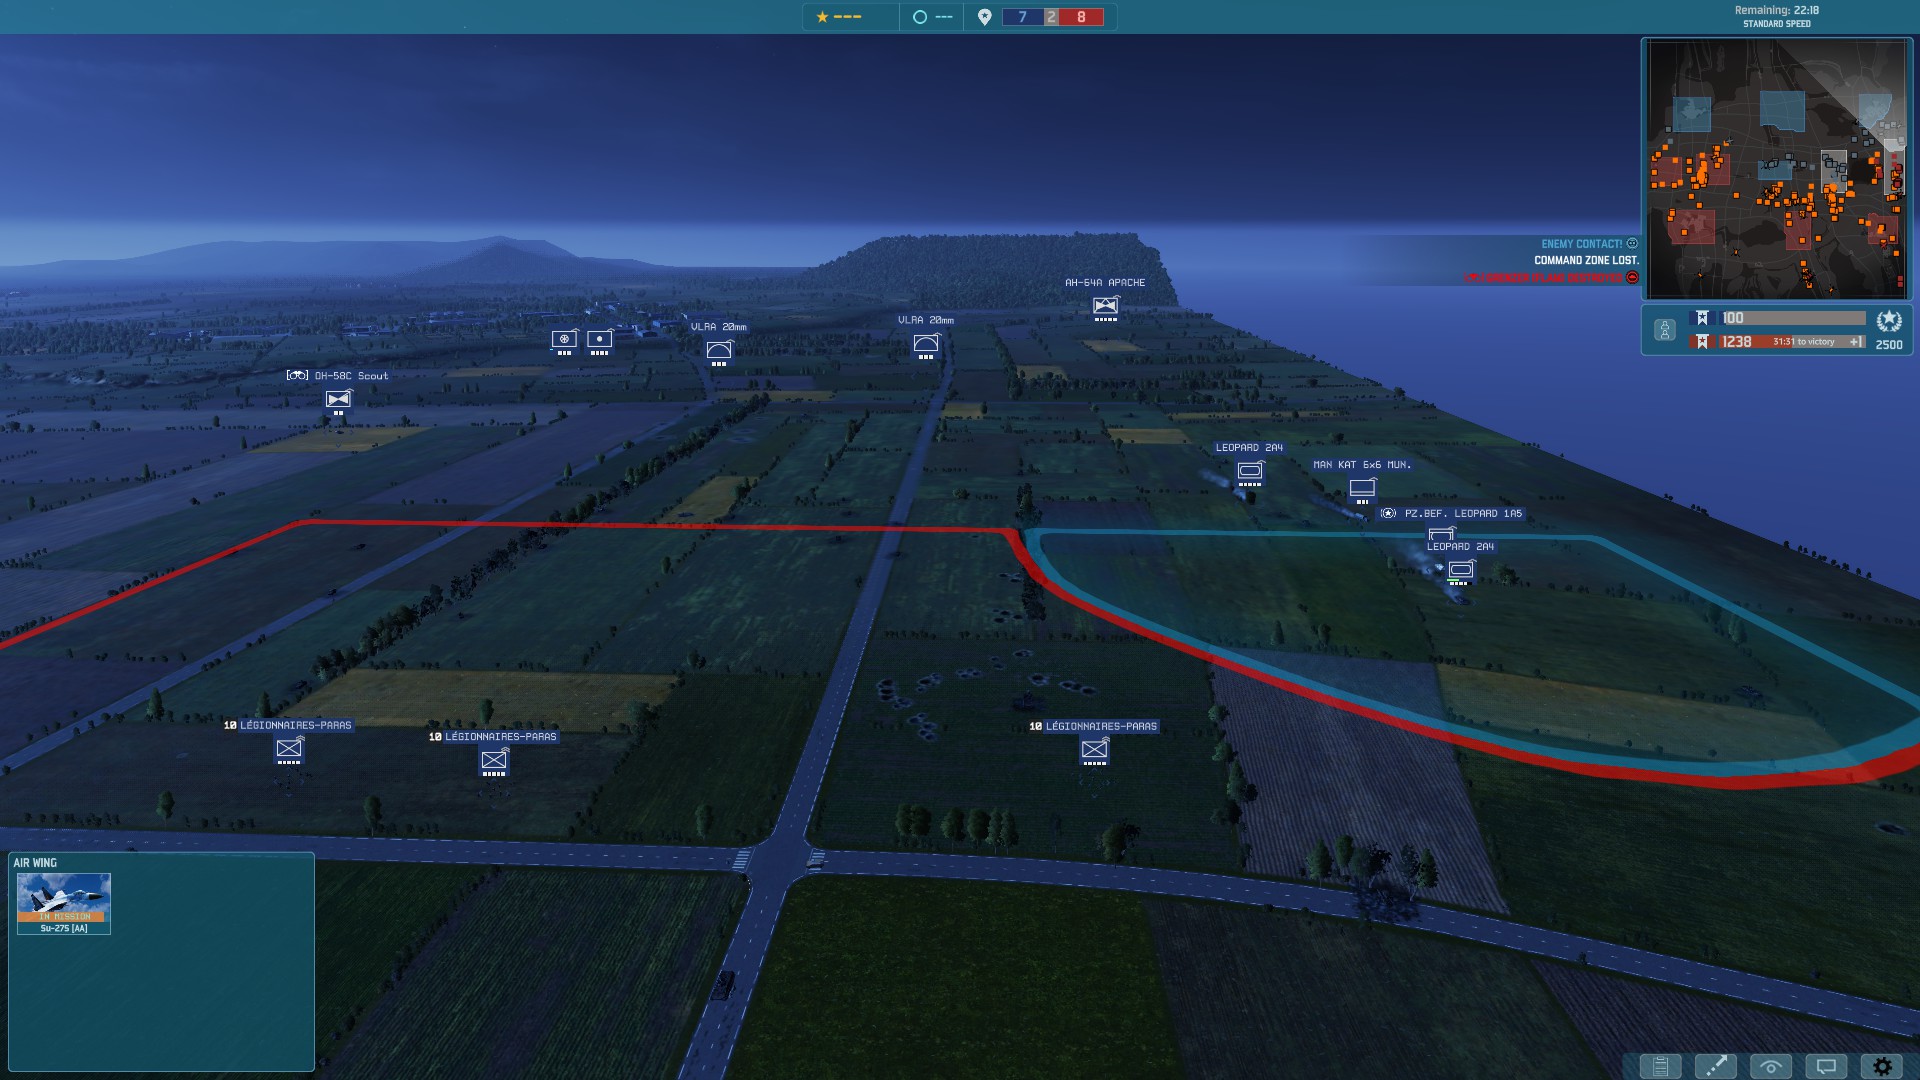
the enemy strated strong with Recon units ATGM's and strated pushing toward my units, so right when my T-80s came they started engaging the enemy units, of course the ATGM threat was felt so they where Top priority, And I did a little smoke tactic that you have 2 tanks one behind the other and when the missiles are about to hit the first tank i smoke him and push the second tank and then when he is targeted I deploy his smoke charges and push the second tank so he will shot and I fall back with both of them,this tactic will cripple his ATGM's ammo and units for they are getting shot by my tanks.
But soon after 2 tanks where up in the horizon 1 Leopard 2A3 CV and another Leopard 2A3, here with out the help if Bob I would have retreated and fall back but his BMP-3 saved the day,they manged to hit several missiles on the Leopard 2A3 CV and brought it to low health and my tanks got the final shot and took it out the other Leo 2A3 fall back.
I also noticed a third player with the 3RD ARMORED DIVISION.
but because my tanks pushed out to destroy the Leo they where exposed to the ATGMS, and my
T-80UD suffered a lot of damage but i mange to pull him back and repair.
there was a set back until supply arrived but the situation was dire we where up against 3 players and the supply was still on its way, but the enemy was to scared to push that was our luck.
after the supply came with another T-80UD I decided to push and prob attack.
meanwhile I brought 2 MI-8MT supply helicopter and establish a small FOB for my tanks.
after sometime of back and fourth I manged to bring 1 more T-80UD and take the sector after pushing and finding out that the enemy front line was much weaker then I thought, so much that I pushed without recon and destroyed another Leo 2A3
but I had to retreat because I had over extended and the enemy have brought out reinforcement,
but I still manged to advance a little with my support units.
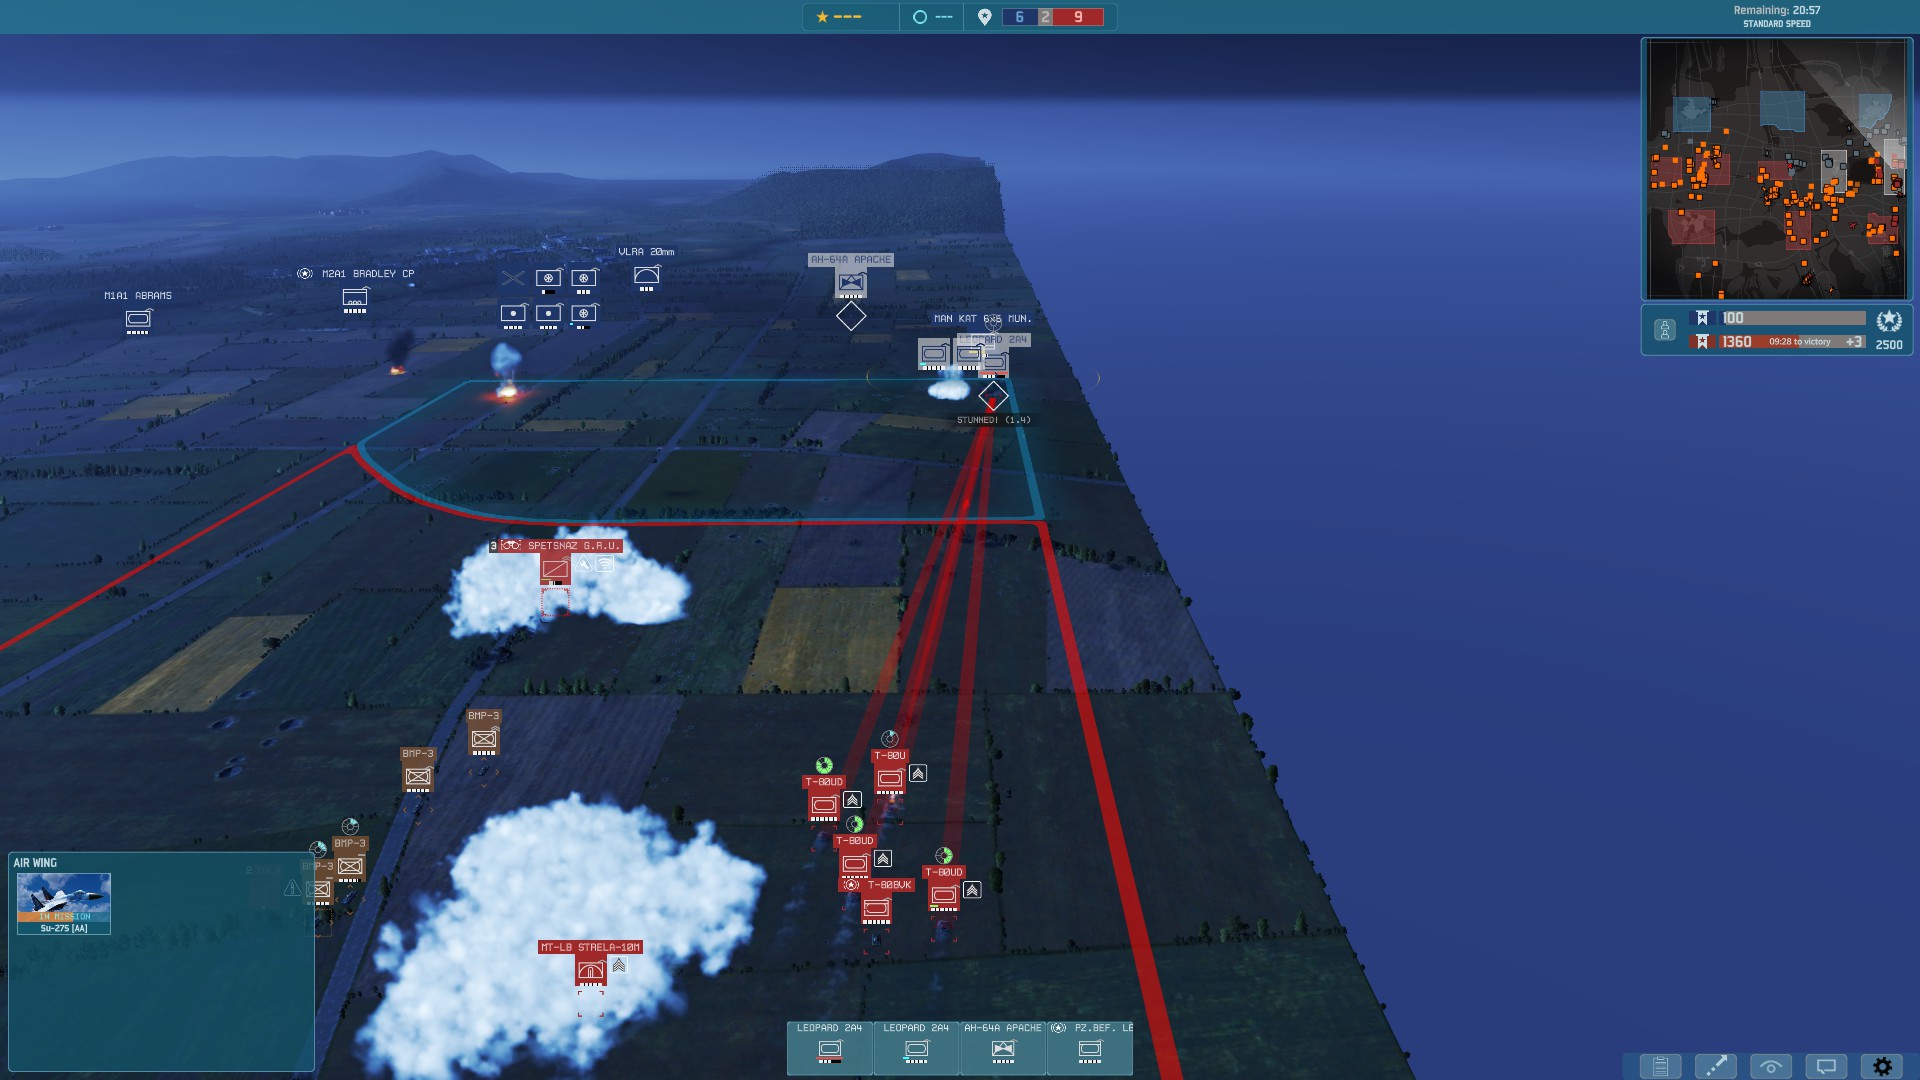
After sometime I brought out a T-80U and my recon noticed a new tank on the battle-filed the
Leo 2A4 and 2 of them, also they where pushing, I had to engage to save my recon, In the engagement I destroyed both of them.
but I have lost a T-80BVK in the retreat because I had done a terrible mistake that I did not have my MT-LB Strela's in the back of the tank formation and they have sent 2 cluster planes and an Apache helicopter,RIP, but I brought another one soon after.
eventually we pushed them out of the sector completely but they tried to counter attack with a
Leo-2A4 and a Leo-1a5 CV and some infantry.
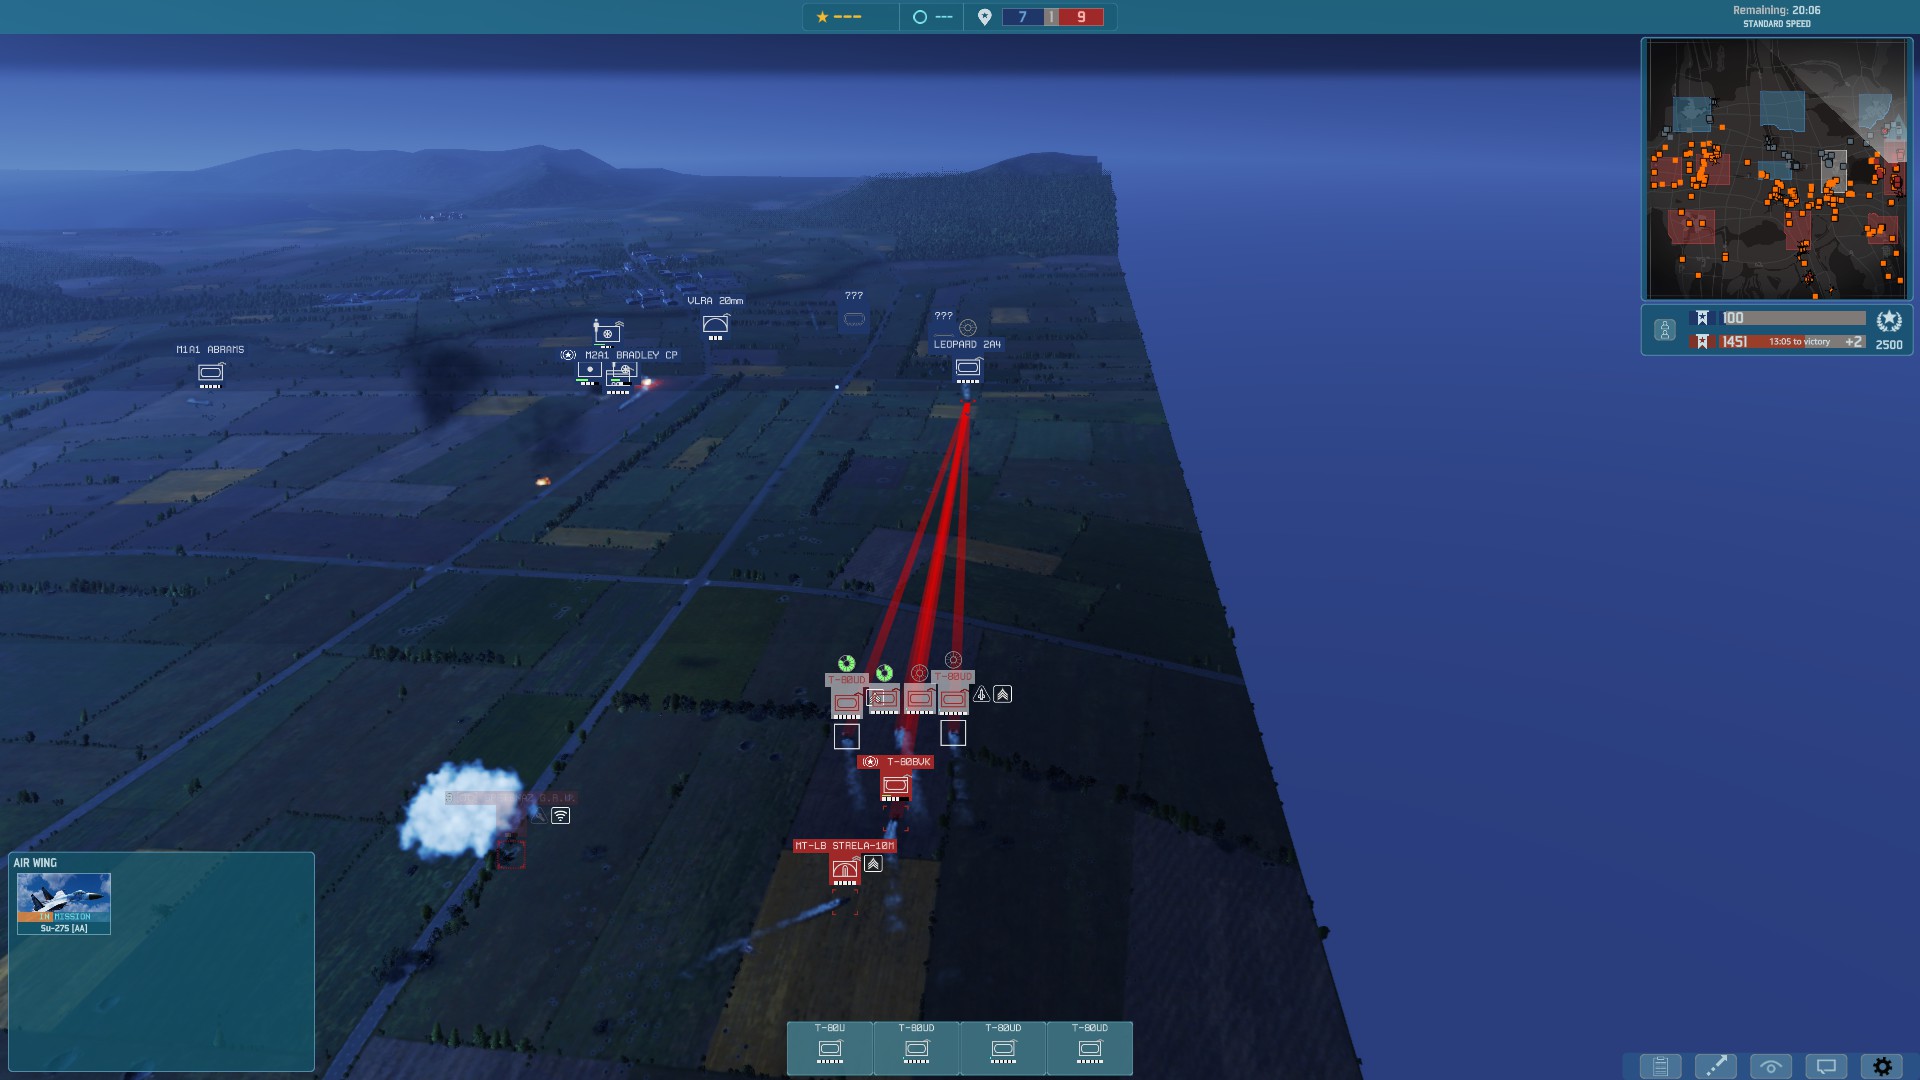
they manged to get into the sector and to bring one more Leo-2A4 then my tanks went on the attack.
My tanks first took out the infantry and then tried to take out one Leo-2A4 , they hit it badly but they manged to fall back but I wanted to go for the kill so I pushed on the open filed to find them and they decided to attack,but my tanks destroyed the 2 Leo-2A4's
or so I thought they brought another Leo-2A4 and the first Leo-2A4 that was spotted was still alive but low on health
after this point the 5th panzer player surrendered and we had complete control of the sector and our team also did great in the far left of the map after a hard battle they manged to push them out of all of the sectors at this point it was game over.
Yes, I did manged to destroy more tanks and units but its of the AI and the AI just pushes and dies. so cant say much about it but I can say that I didn't lose any T-80U/UD in this game.
One more thing the battle-theory ,as the name, is a theory, its more of a guideline you are not required to follow it so strictly.
This was a 40 minutes game and a lot of stuff happened and I cant talk on all of it so ,I am sorry, I just wanted to show how the battle was won using the battle theory, of course I have to say thanks to Bob without him things where a lot and I mean A LOT harder and not so clean so thank you.
Conclusion
If I can sum up this guide.
From a strategic point of view
It's all about preserving your combat power and damaging the opponent's power, so in the long game you will have the upper hand.
And in tactical view
The proper use of combined arms and the impotence of formation and battle tactics to achieve victory in the filed
I am aware that its a long read, BUT I believe that if you will adopt this doctrine when playing this battle group you will see that you will become an unstoppable force.
By the way I will gladly take constructive criticism about everything ,about whats written in the guide and the way that the guide is written.
and if you liked this guide I would be happy to make more about all of the battle groups in the game :).
THANK YOU FOR READING MY GUIDE!!
and I wish you good luck commander in your upcoming battles go and destroy NATO divisions!!
Source: https://steamcommunity.com/sharedfiles/filedetails/?id=3133382099
More WARNO guilds
- All Guilds
- Is it a dive bomber? [PACT]
- WARNO - The complete map modding guide
- WARNO modding guide
- EASY FRONT [WARNO]
- Username Symbols, Flags, and Colors
- Blkler
- RebsFRAGO Mod Guide
- KE and HEAT Damage Tables
- Game mechanics, hidden and non-obvious
- Game mechanics, hidden and non-obvious [Rus]