Information And Rewards
The skulls will award 100 plasteel for the first time you pick them up, and 20 for subsequent pick ups.
The penance categories divide the missions up by the following zones:
Chasm Terminus: Hab Dreyko - Partner Puzzle
Chasm Station HL-16-11 - Solo Puzzle
Chasm Logistratum - Solo Parkour
Ascension Riser 31 - Partner Puzzle
The Torrent:Vigil Station Oblivium - Solo Parkour
Magistrati Oubliette TM8-707 - Partner Puzzle
Silo Cluster 18-66A - Solo Puzzle
Metalfab 36:Consignment Yard - Solo Puzzle
Smelter Complex HL17-36 - Solo Parkour
Power Matrix HL-17-36 - Solo Puzzle
The Hourglass:Excise Vault Spireside-13 - Partner Puzzle
Refinery Delta - Solo Puzzle
Relay Station TRS-150 - Solo Puzzle
Throneside:Enclavum Baross - Solo Puzzle
Comms-Plex 154/2f - Solo Puzzle
Archivum Sycorax - Partner Parkour
The Carnival:Mercantile HL-70-04 - Solo parkour
Warren 6-19 - Solo puzzle
There will be 5 partner activities and 13 solo activities total.
Finding a skull awards a penance for the map worth 10 points and contributes to the maps exploration completion title
Colour Coding
Generally i will try to use green for the "puzzle" path, then white for keys/buttons/skulls, generally intractable type things. I will sometimes try to use blue for shortcuts
Chasm Terminus (Hab Dreyko)


Partner Puzzle
Go through the map like normal until you enter this building:
Once inside, go right towards the code or go towards the blue line and jump inside the window.
The code is 213, from here you can either jump through the window on the desk, and into the window with the blue mark, or follow along the green path for the scenic route
Once inside, enter the code 213. This code does not change. The next picture has the buttons labled by the order you press them in: the middle button you press first and it has a 2 on it, the left button you press second and it has a 1 on it, and the right button you press third and it has a 3 on it.
Once the code is entered, one person will hold the lever that was marked "hold" in the previous picture. This will power the cells on the left-side of the pictures. A second person will press the button labled "press" in the previous picture, and "partner action" in the next picture.
The skull will be in the left cell
Chasm Terminus (Chasm Station)


Solo Puzzle
Go through the map until you get to this point, go underneath the floor and behind the stairs
Hit the valve, then double back and go towards the set of stairs that goes into the lower room
At the bottom of that staircase, there will be another valve. Turn it and go towards the hallway past another set of stairs
Hit this valve, turn around and go up the stairs we just passed
At the top of the stairs, go to the far wall for the other valve
Hit the valve, then proceed up the stairs again.
Once at the top of the stairs, hit the valve and go into the room on the left of the picture
Once inside, the skull is on the right wall
Chasm Terminus (Chasm Logistratum)


Solo Parkour
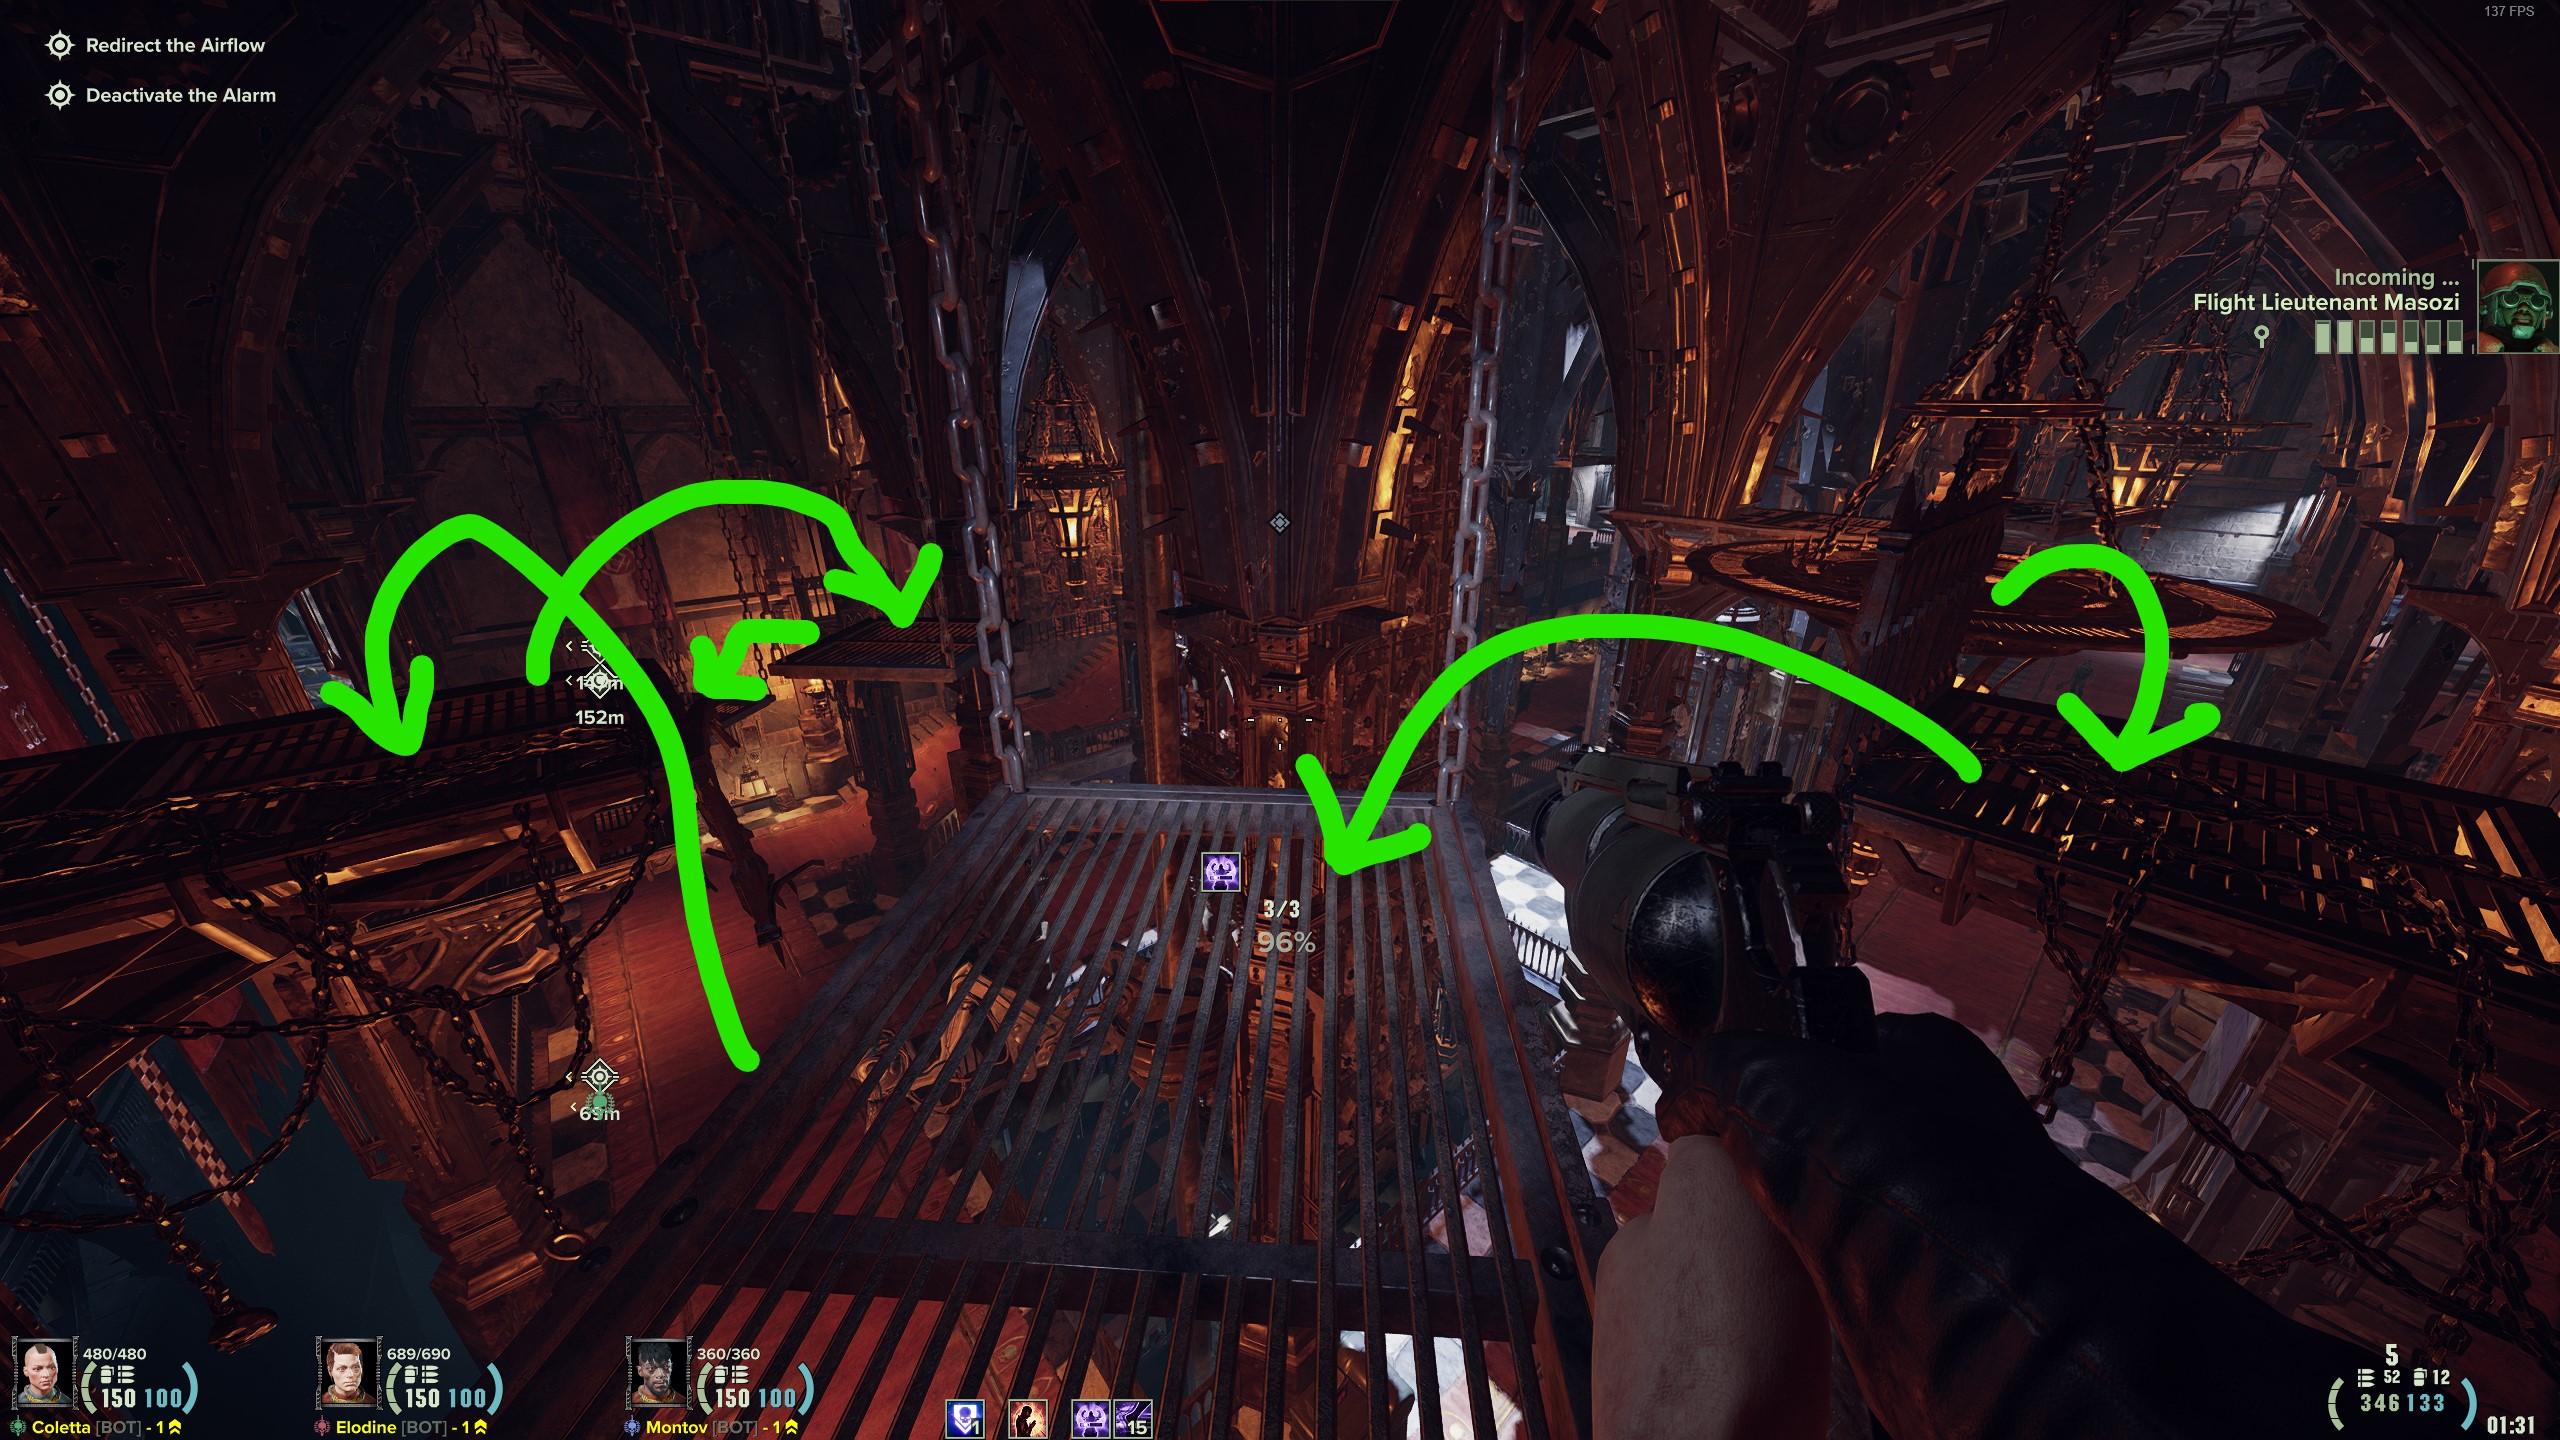
Go through the map until you get to the train tunnel, once you dropdown the first time, take an immediate left, jump up on the small platform on the left and onto the wall section.
Once on the wall section, on the left there will be two small metal platforms, jump from one to the next one, and then jump down next to the lantern on the metal platform.
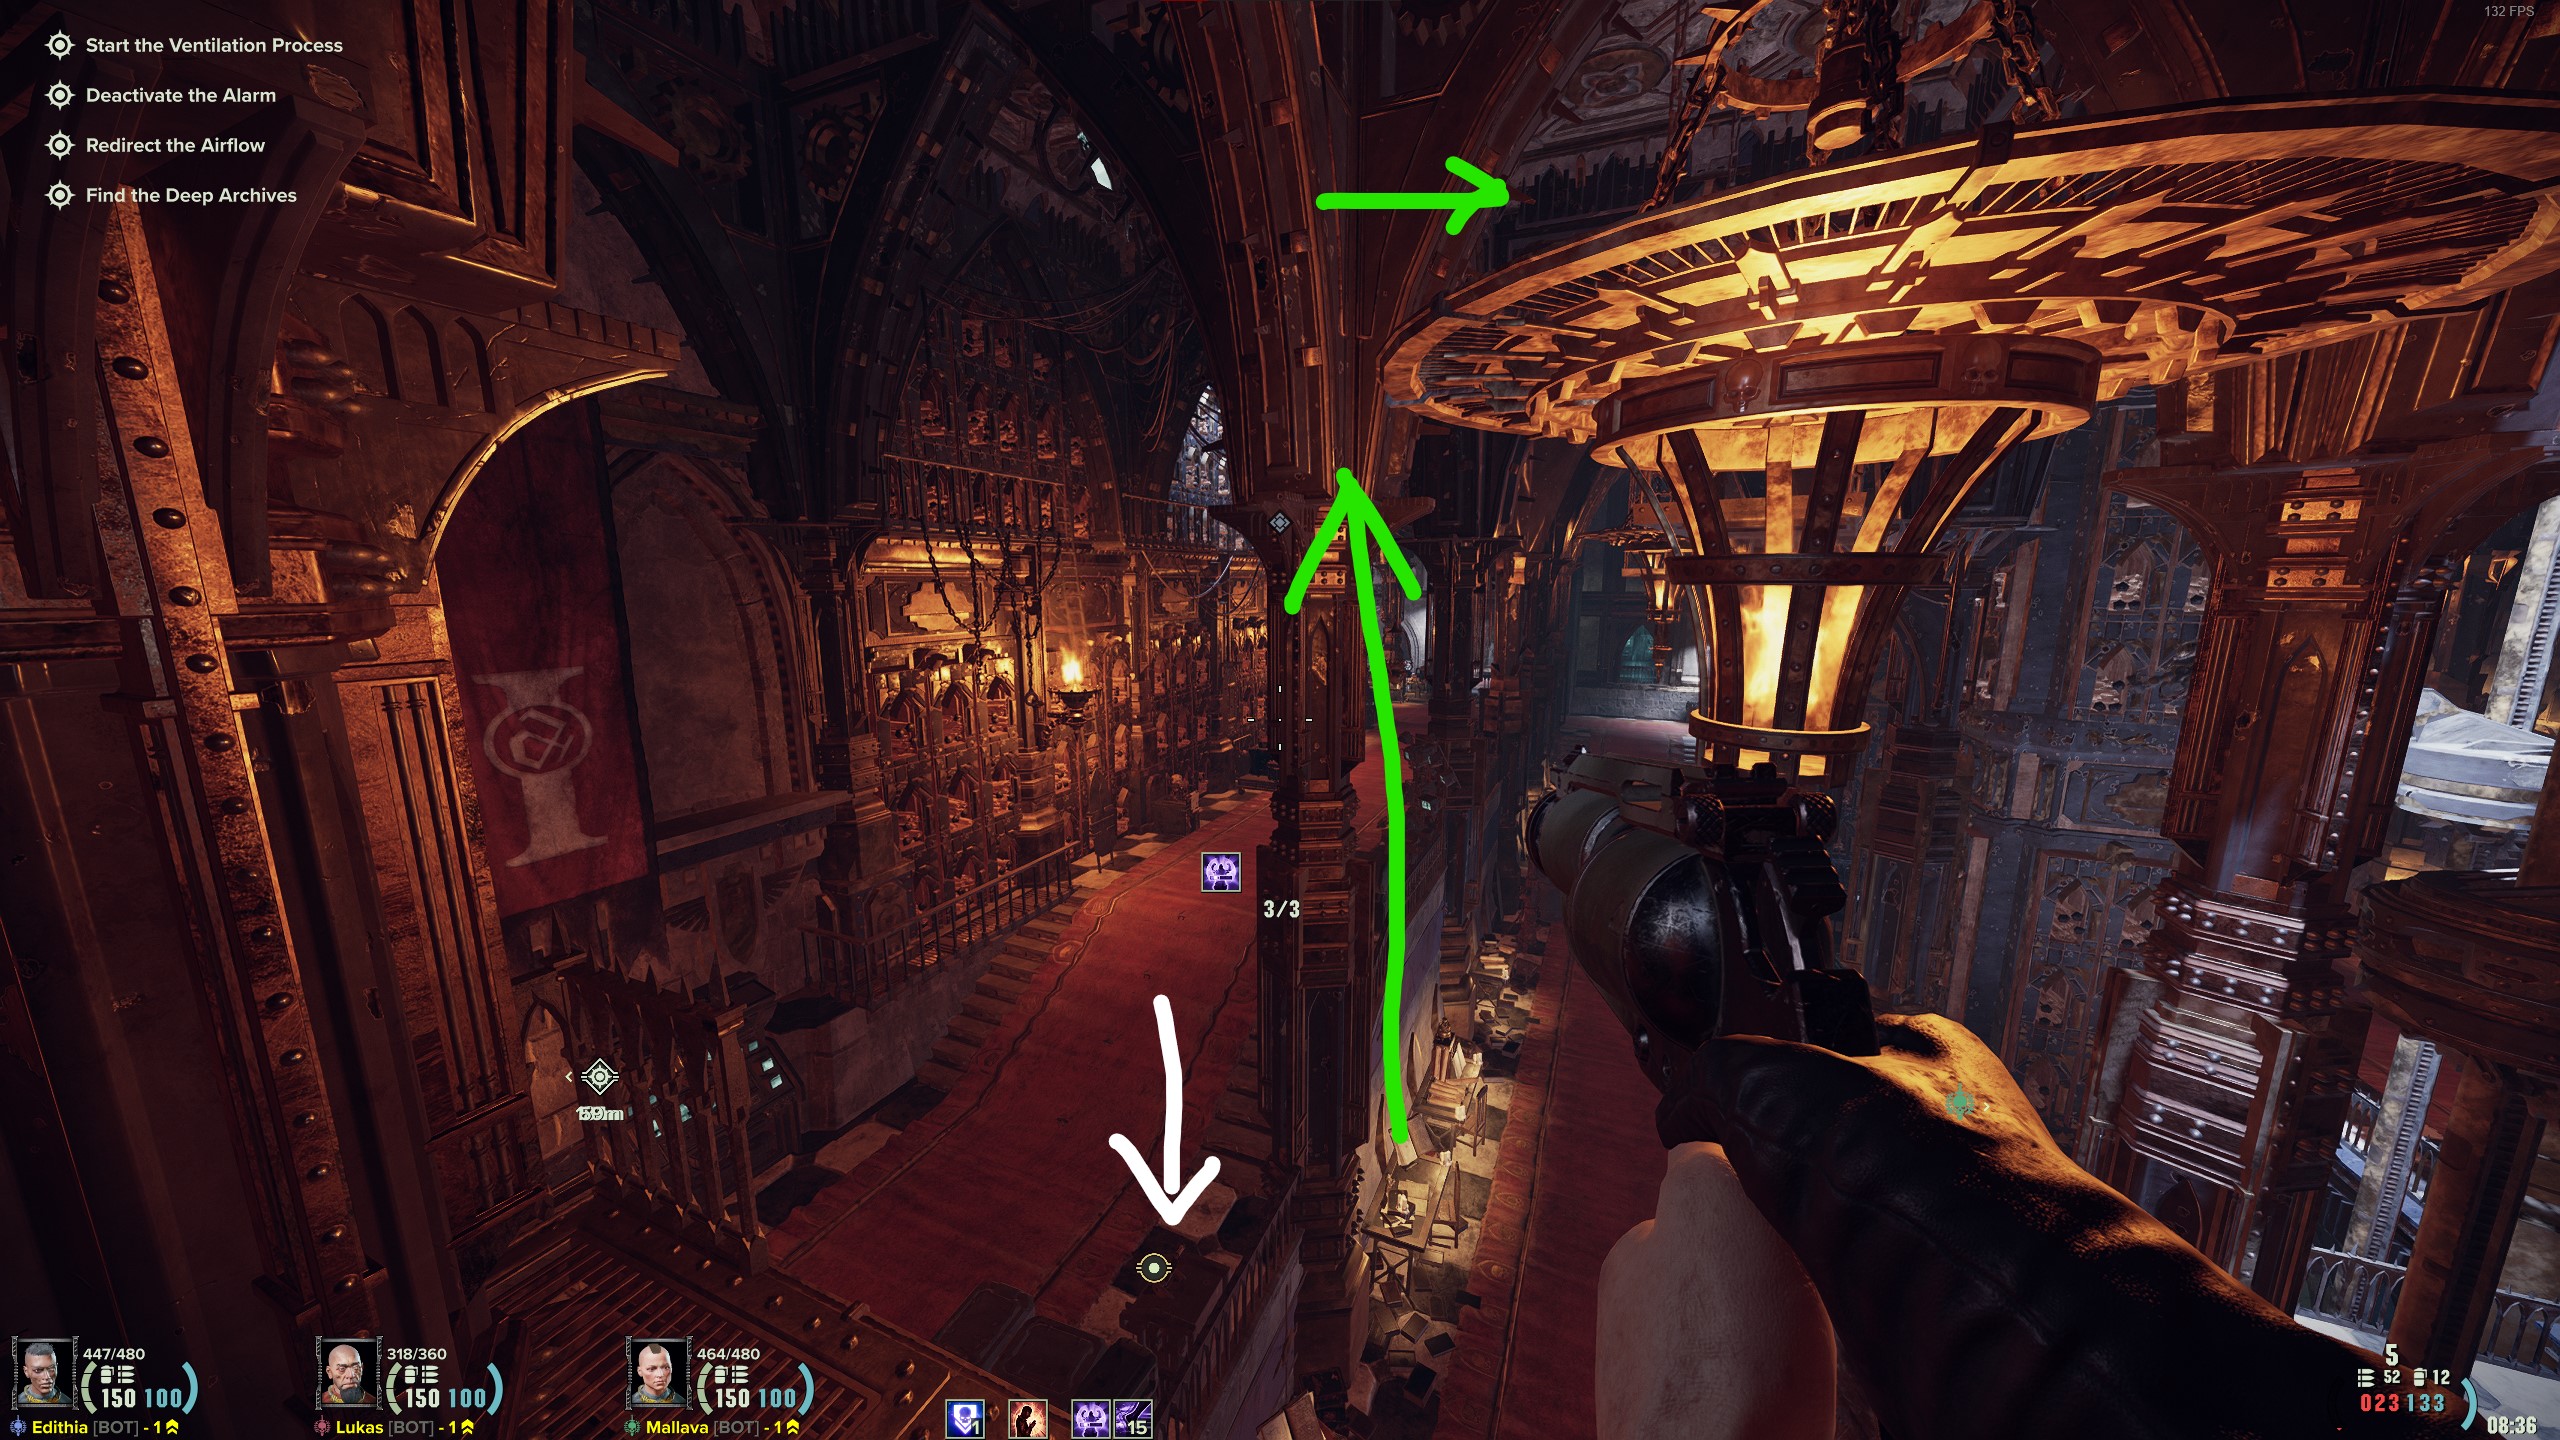
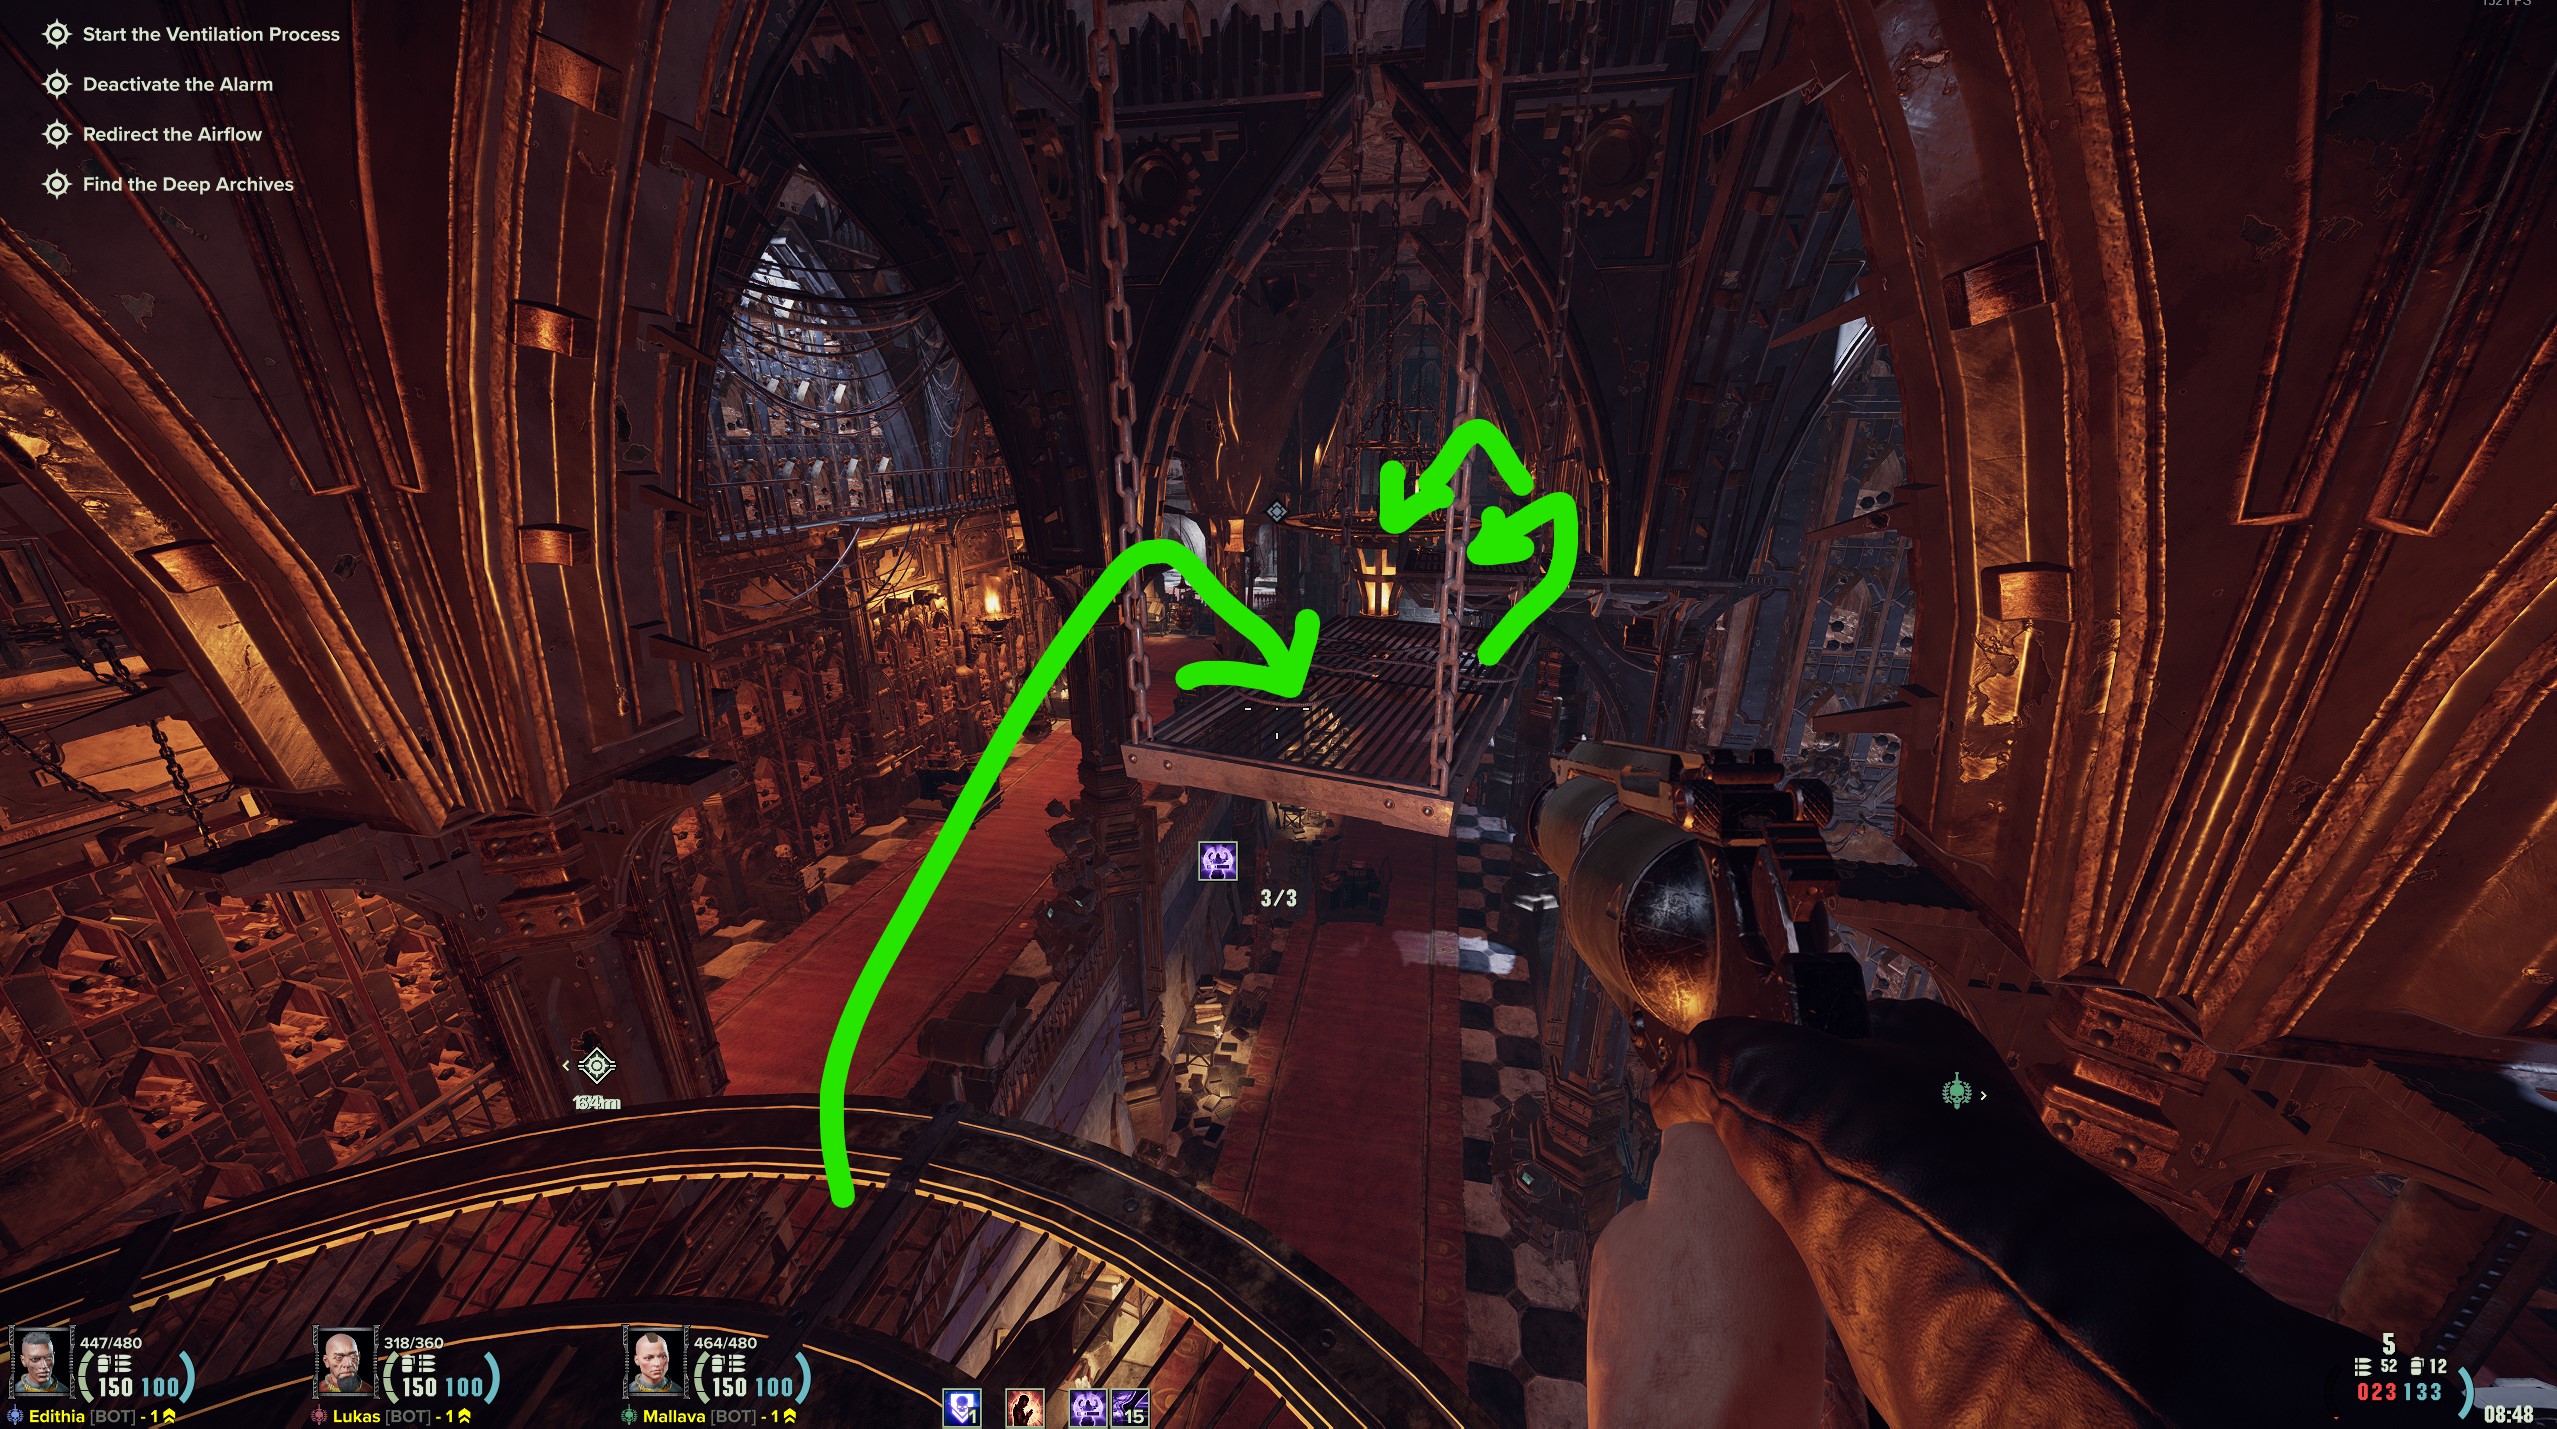
Once you jump down next to the lantern, you will see another, fallen lantern in the darkness. Jump on the platform that the lantern is on and then jump towards the catwalk that the candles sit on.
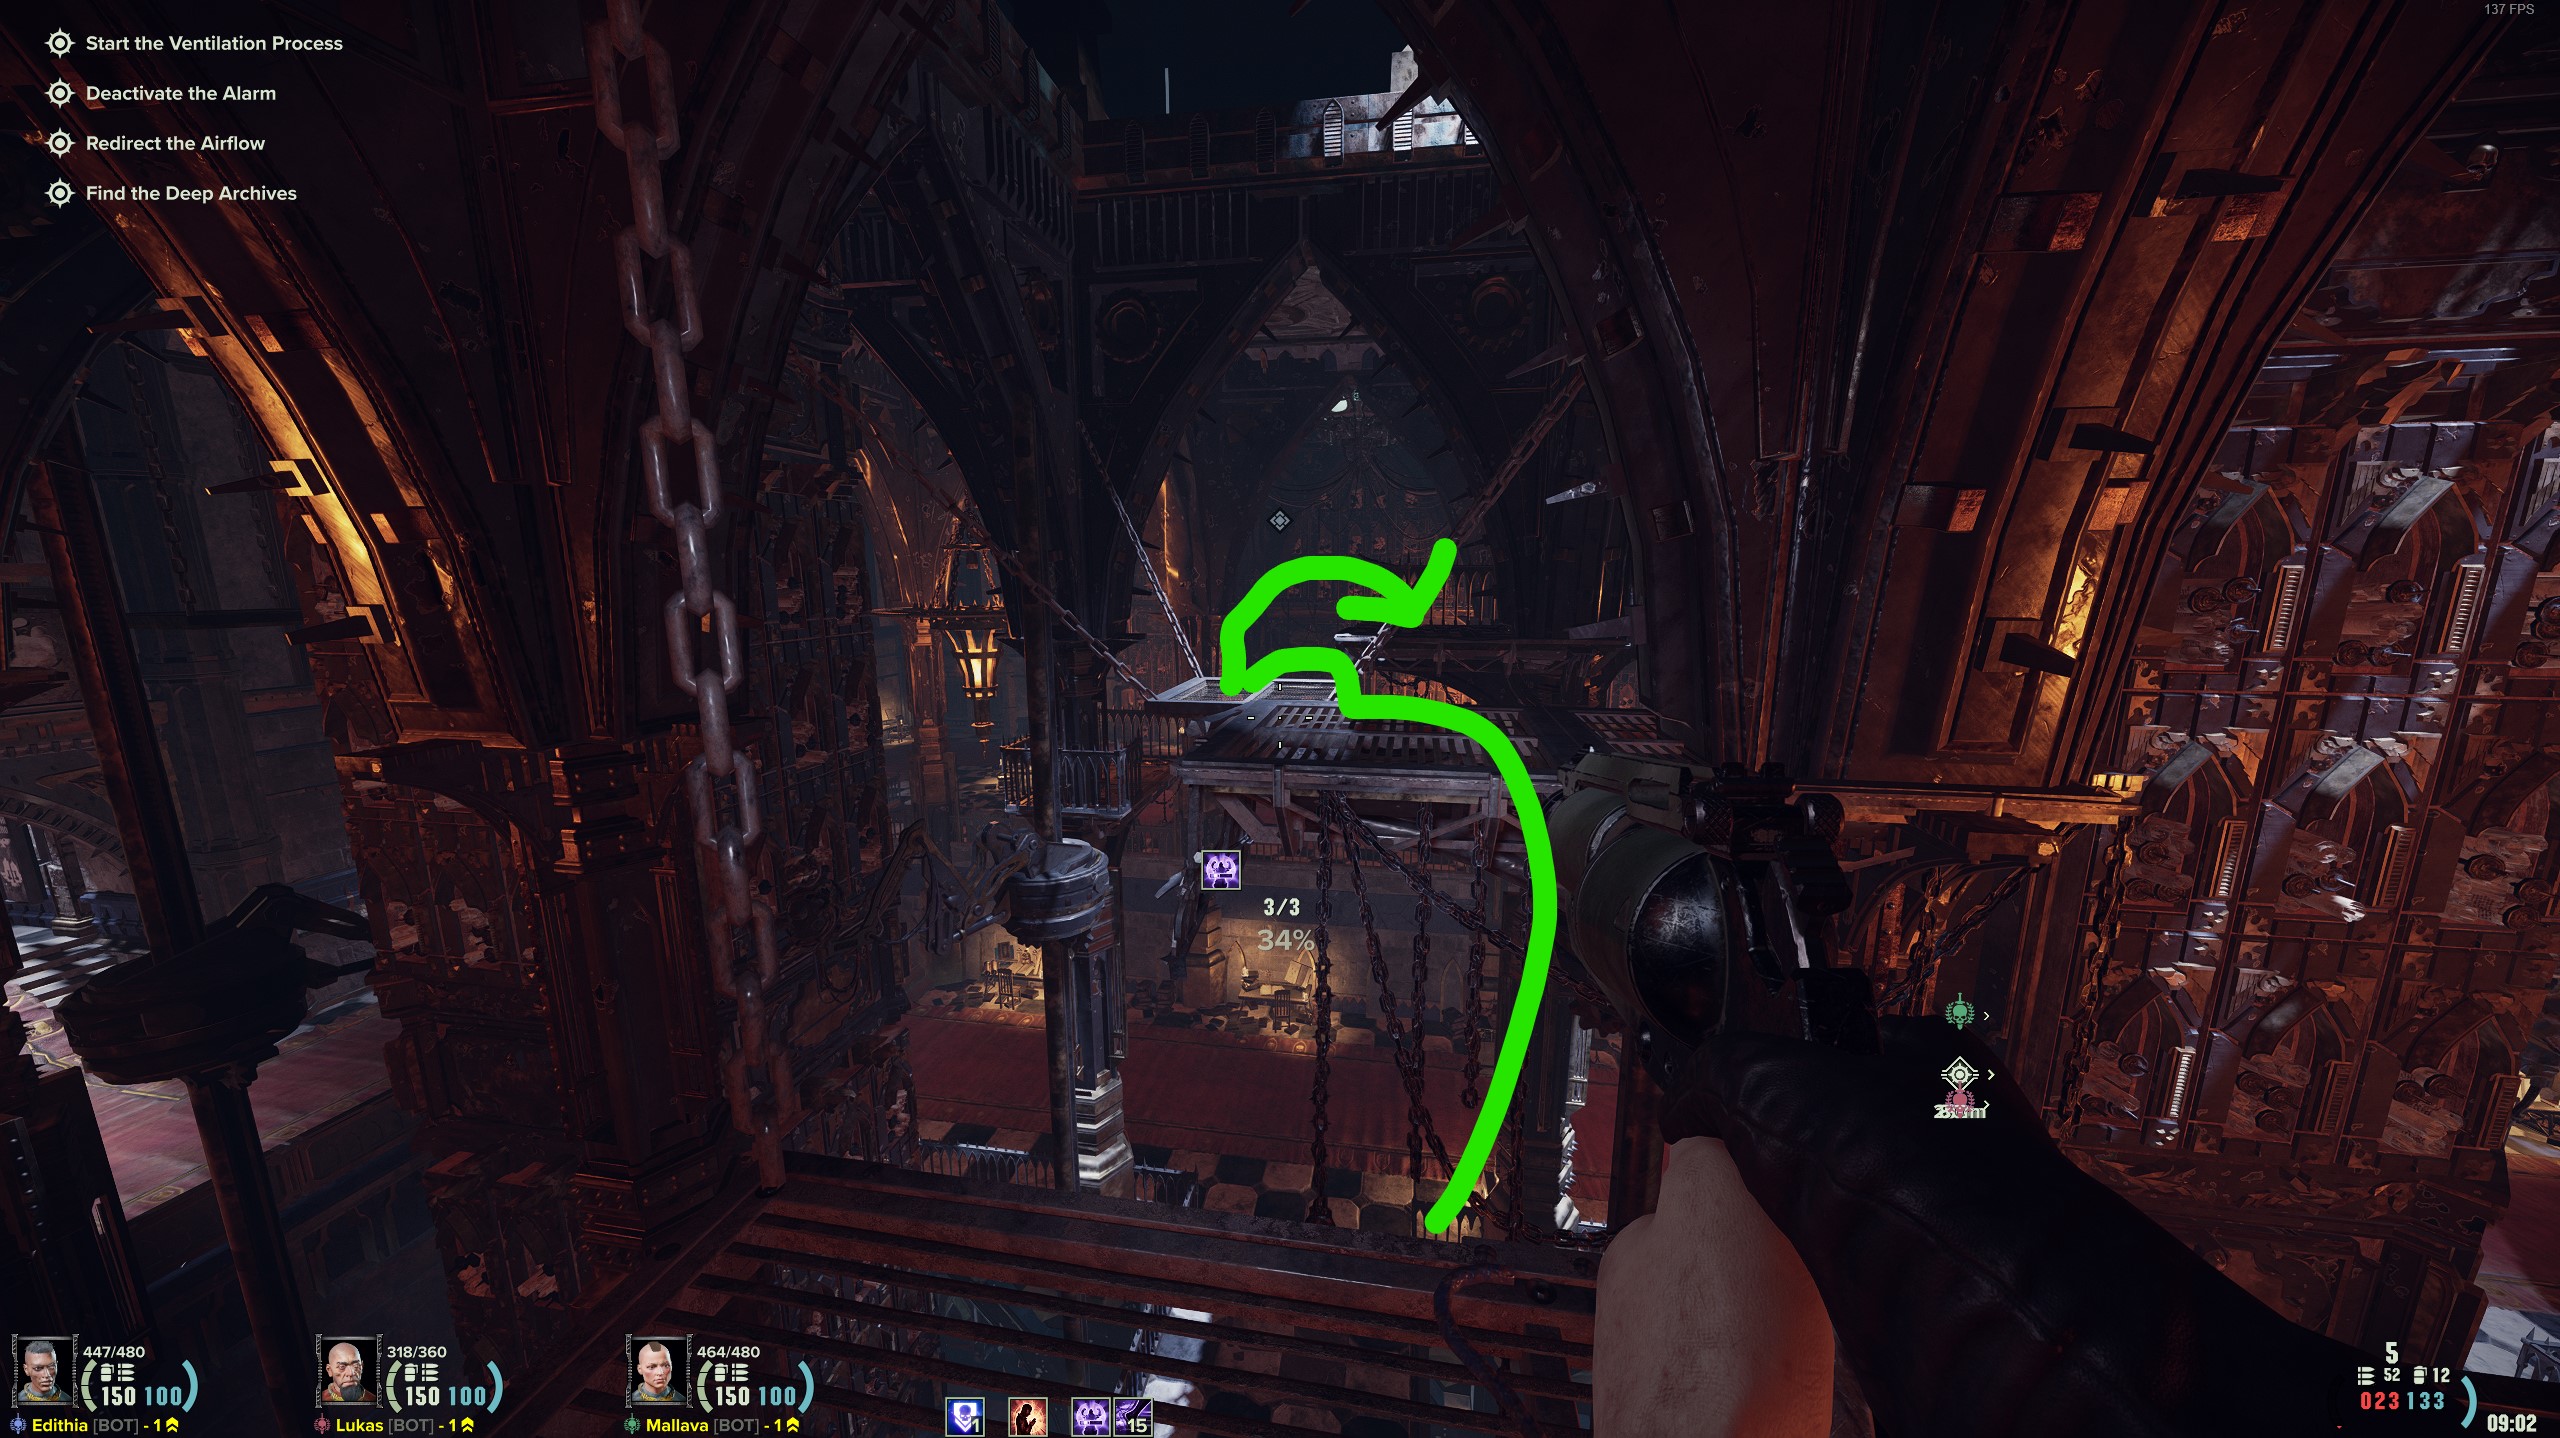
Once you are on the catwalk, go forward a little bit and look to the left. Jump towards the lantern on the wooden platform, then walk across the metal beam and jump towards the metal plate. From there you can walk, and follow the platforms towards the candle and the skull.
Chasm Terminus (Ascension Riser 31)


Partner Puzzle
Proceed past the mid event until you get to this point. Go through the large door.
Once inside, you should see a blue light in a container showing where a power cell is. Grab it and place it in the nearby glowing receptacle.
Once the power cell has been inserted, one person will hold the lever to power the elevator and the other person will activate the elevator to go up.
At the top, you will see a powercell. Throw it down and your partner will place it in the other glowing receptacle.
One person will hold the lever, and the other person will activate the elevator.
Once the elevator reaches the bottom, you can go through it to the skull.
The Torrent (Vigil Station)


Solo Parkour
Proceed through the level until you get to this bridge, then go right.
Just before the door, there will be a dumpster you can jump on. After jumping on the dumpster, jump onto the container. Walk to the edge of the container, and jump onto the next container
From there you will jump onto a platform with corrugated metal. Jump onto the protruding metal beam, and continue to jump along the protruding metal platforms
Once you get around the corner, youll jump towards a grated metal platform, and then inside the building where the skull is.
The Torrent (Magistrati Oubliette TM8-707)


Partner Puzzle
Proceed through the mission until you get to this room. You will press the button on your immediate left. One person will stay here and go to the panel with the five buttons with symbols, and the other person will backtrack to the scan room. The buttons with the symbols can each be pressed once, there would only be one button that requires coordination which is the last one and for that one both players will hit the same symbol at the same time. Communication isnt needed because a light will light up to indicate a button is pressed
Next to the scan room is a cell with a hole in the wall that is now accessible, go inside.
Once inside, look above the barred door and communicate the symbol to your partner. Your partner will press the button that correlates to the symbol. The symbol is random. You will repeat this step for the second door.
For the third door, the symbol will be covered. You can shoot the debris covering the symbol and it will be destroyed. It might take multiple shots. Communicate the symbol and move on
This part requires some timing. You will communicate the symbol to your partner, this can be done with the button to the right of the door. They will press the corresponding button once the door is at its most open state. The next door will require you to both press the button at the same time
Once you go through the fifth door, the skull is in the room directly ahead. You can take a left and follow the hallway to open up a door leading to the room with the button where your partner will be.
The Torrent (Silo Cluster 18-66A)


Solo Puzzle
Proceed through the level until this area. You will be moving the platform circled by white along the unbroken tracks. Drop down to the left and go into the side room.
In the side room, there should be a barrel next to a broken railing that leads to some stairs. Go up the barrel, onto the platform, and up the stairs
Hit the buttons in this order: down, right, right, down, left. This order does not change. The skull will be on the platform
Metalfab 36 (Consignment Yard)


Consignment Yard:Solo Puzzle
Go through the map until you reach the showers.
This puzzle will involve turning on the marked showers, the first one will be on the immediate left.
The second is in the first row of showers on the right. The first shower is circled for reference
The third shower is in the middle row of showers. With the last shower marked in the last row of showers.
The last shower in the last row of showers
Skull is through the door that opens, next to the medicae
Metalfab 36 (Smelter Complex HL17-36)


Solo Parkour
Get to this area, and open the door by destroying the corruption
Once the door is open, on your immediate left next to the wall will be a jump up to a catwalk.
Proceed into the room, and then go through the next doorway. Jump across the metal platforms until you get to the room with the mini corruptors.
Once there, shoot the corruptor at the top, walk to the other side of the little room and shoot the two corruptors in the hole
After all three corruptors have been shot, you can walk forward and drop down. The door to the skull will now be accessible.
Metalfab 36 (Power Matrix HL-17-36)


Solo Puzzle
Go through the map until this point and go inside the siderooms.
Next to the doorway, youll see a barrel and boxes. Climb up them and jump onto the scaffolding
On the scaffolding there will be a dead body with a key in his hand. Grab it and jump down and leave the room.
Go back across the bridge, and enter the side room
Open the locker in the room to reveal the skull. The puzzle here was to follow the blood trail to figure out where the key led to.
The Hourglass (Excise Vault)


Excise Vault Spireside-13:Partner Puzzle
Get to this point of the map and continue along the walkway
One player will enter the elevator on the left which will go down a level, and the other player will enter the elevator on the right which will go up to another room.
At the top of the right elevator, go inside the room and grab the power cell.
You will bring the powercell back down to the glowing receptacle which on the floor you started on. It will open a door to reveal the skull
The Hourglass (Refinery Delta)


Solo Puzzle
Proceed through the level until this point in the map, near the finale. Enter the room in the corner, through either doorway or from the top.
Open the door in the room, and look above the door on the other side of the small bridge for the symbols.
Input those symbols in the consoles on both sides of the door. Left symbol for the left door, and right symbol for the right door.
Once you have done it, the button next to the door with the symbols above it will light up blue and the skull will be inside.
The Hourglass (Relay Station TRS-150)


Solo Puzzle
Get to this point in the map and take a left.
Once you get past the fence doorway, there will be a dumpster on the right. You can push it over to reveal a weight.
This weight will be used at the right side of a door. Go forward in the map a bit, and once you reach the little room ahead of the dumpster with the 3 windows and 2 doorways, take a right and there should be a doorway to your left.
The skull will be past the door which opens once you place the weight on the chain. The puzzle here is that you would see the door first, and the puddle of blood underneath the chain. You would follow the trail of blood to a body beside the dumpster and from there you could find the skull with some investigating.
Throneside (Enclavum Baross)


Solo Puzzle
Get to this point in the map and take a right just after the bridge but before the stairs.
You will see some valves, theses valves control the pipes on the wall down below. From left to right, spin the valves: 3 times, 1 time, 2 times, 3 times. I have made a small diagram in the top left corner, with coloured pipes and put splotches of colour on the valve so you can identify which valve moves which pipe. The order should be the same every time
Once the pipes are lined up, the door below will open up. You can jump over the valves to get down. The skull will be beyond the door.
Throneside (Comms-Plex 154/2f)


Solo Puzzle
Go through the map until you get to this room, just before the mid-event.
Go past the lit up board, and look on the other side of it. In the bottom right corner, there will be two symbols. They have been expertly recreated for visual clarity. Continue moving to the wall on the far side of the drop.
There will be a circle of candles and symbols. Find the two corresponding symbols and light them.
Once the candles are lit, a door across from the candles will open. Inside will be the skull
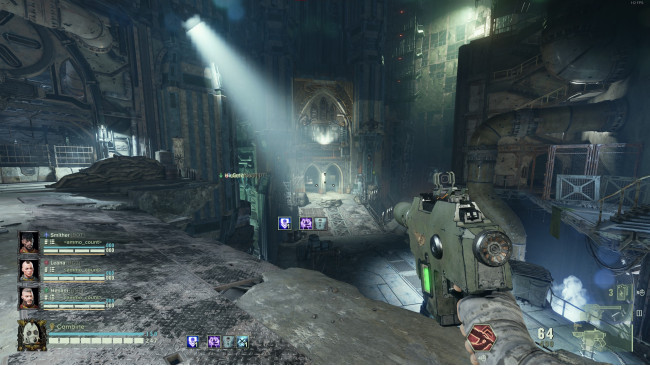
Throneside (Archivum Sycorax)

Partner Parkour
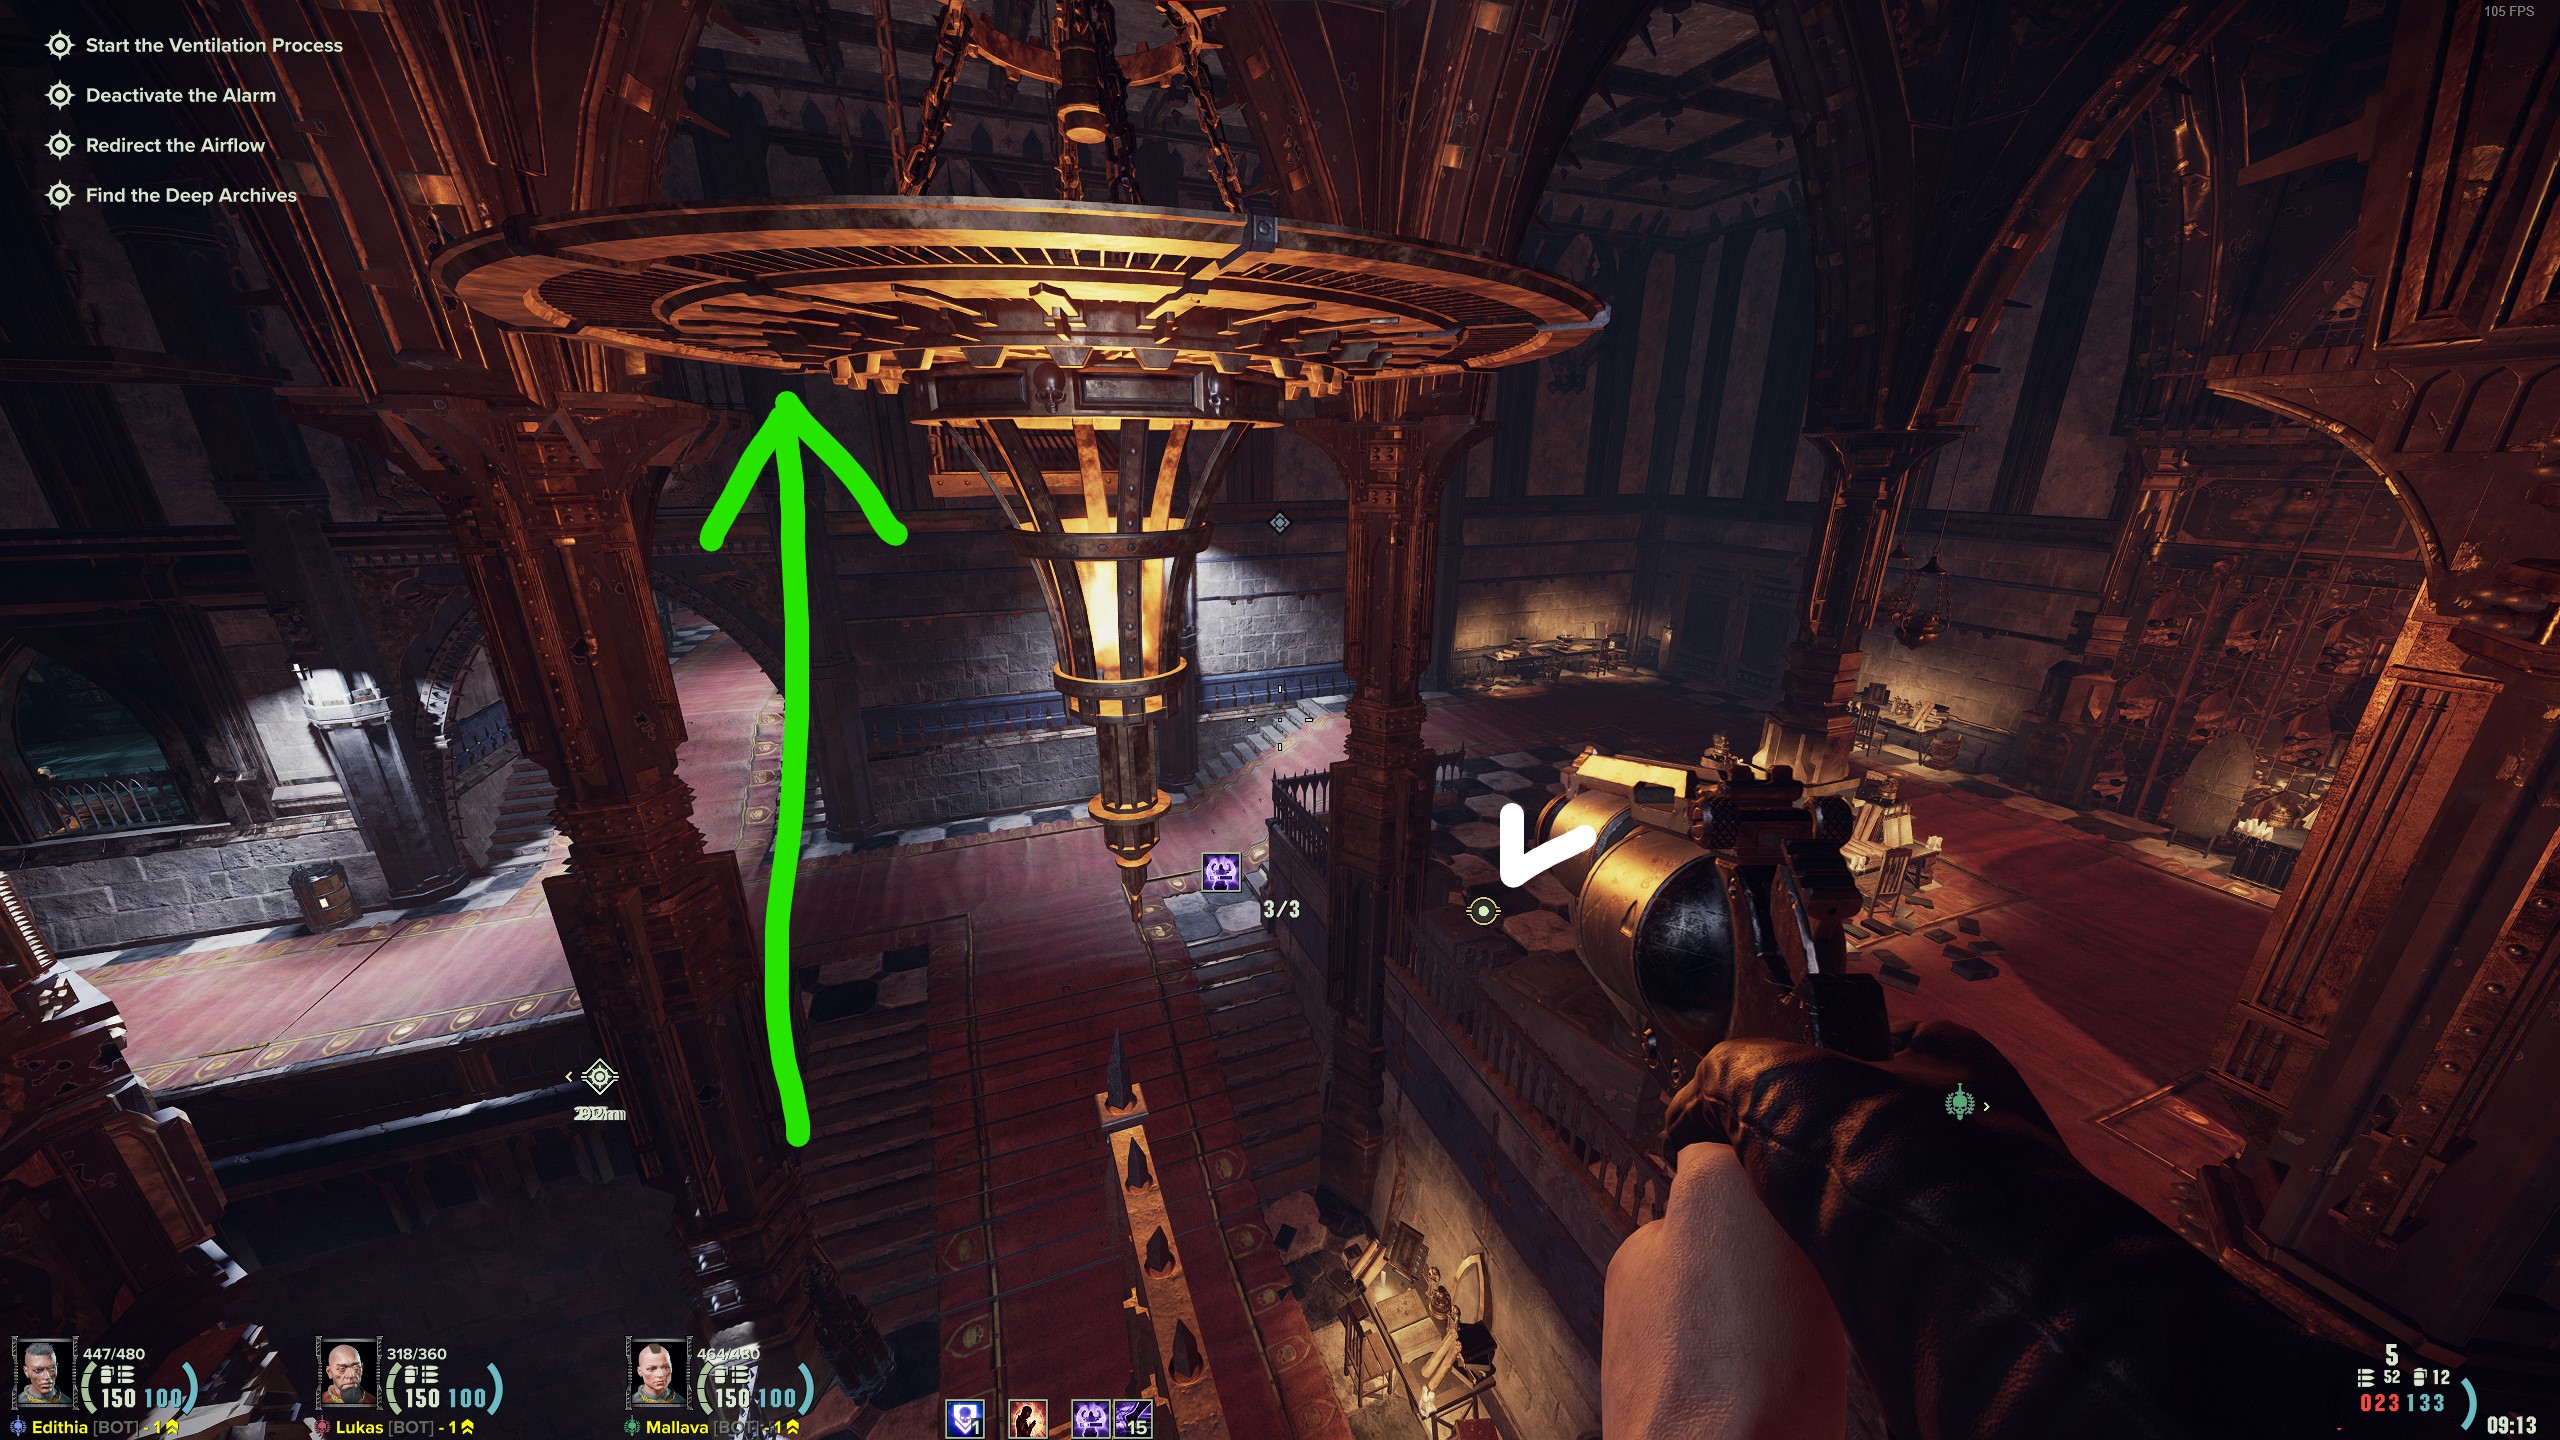
Get to this large room, there will be buttons that can be pressed and chandeliers that will raise and lower in response. We will first lower this chandelier, then someone will get on. The other person will hit the lever and raise the chandelier.
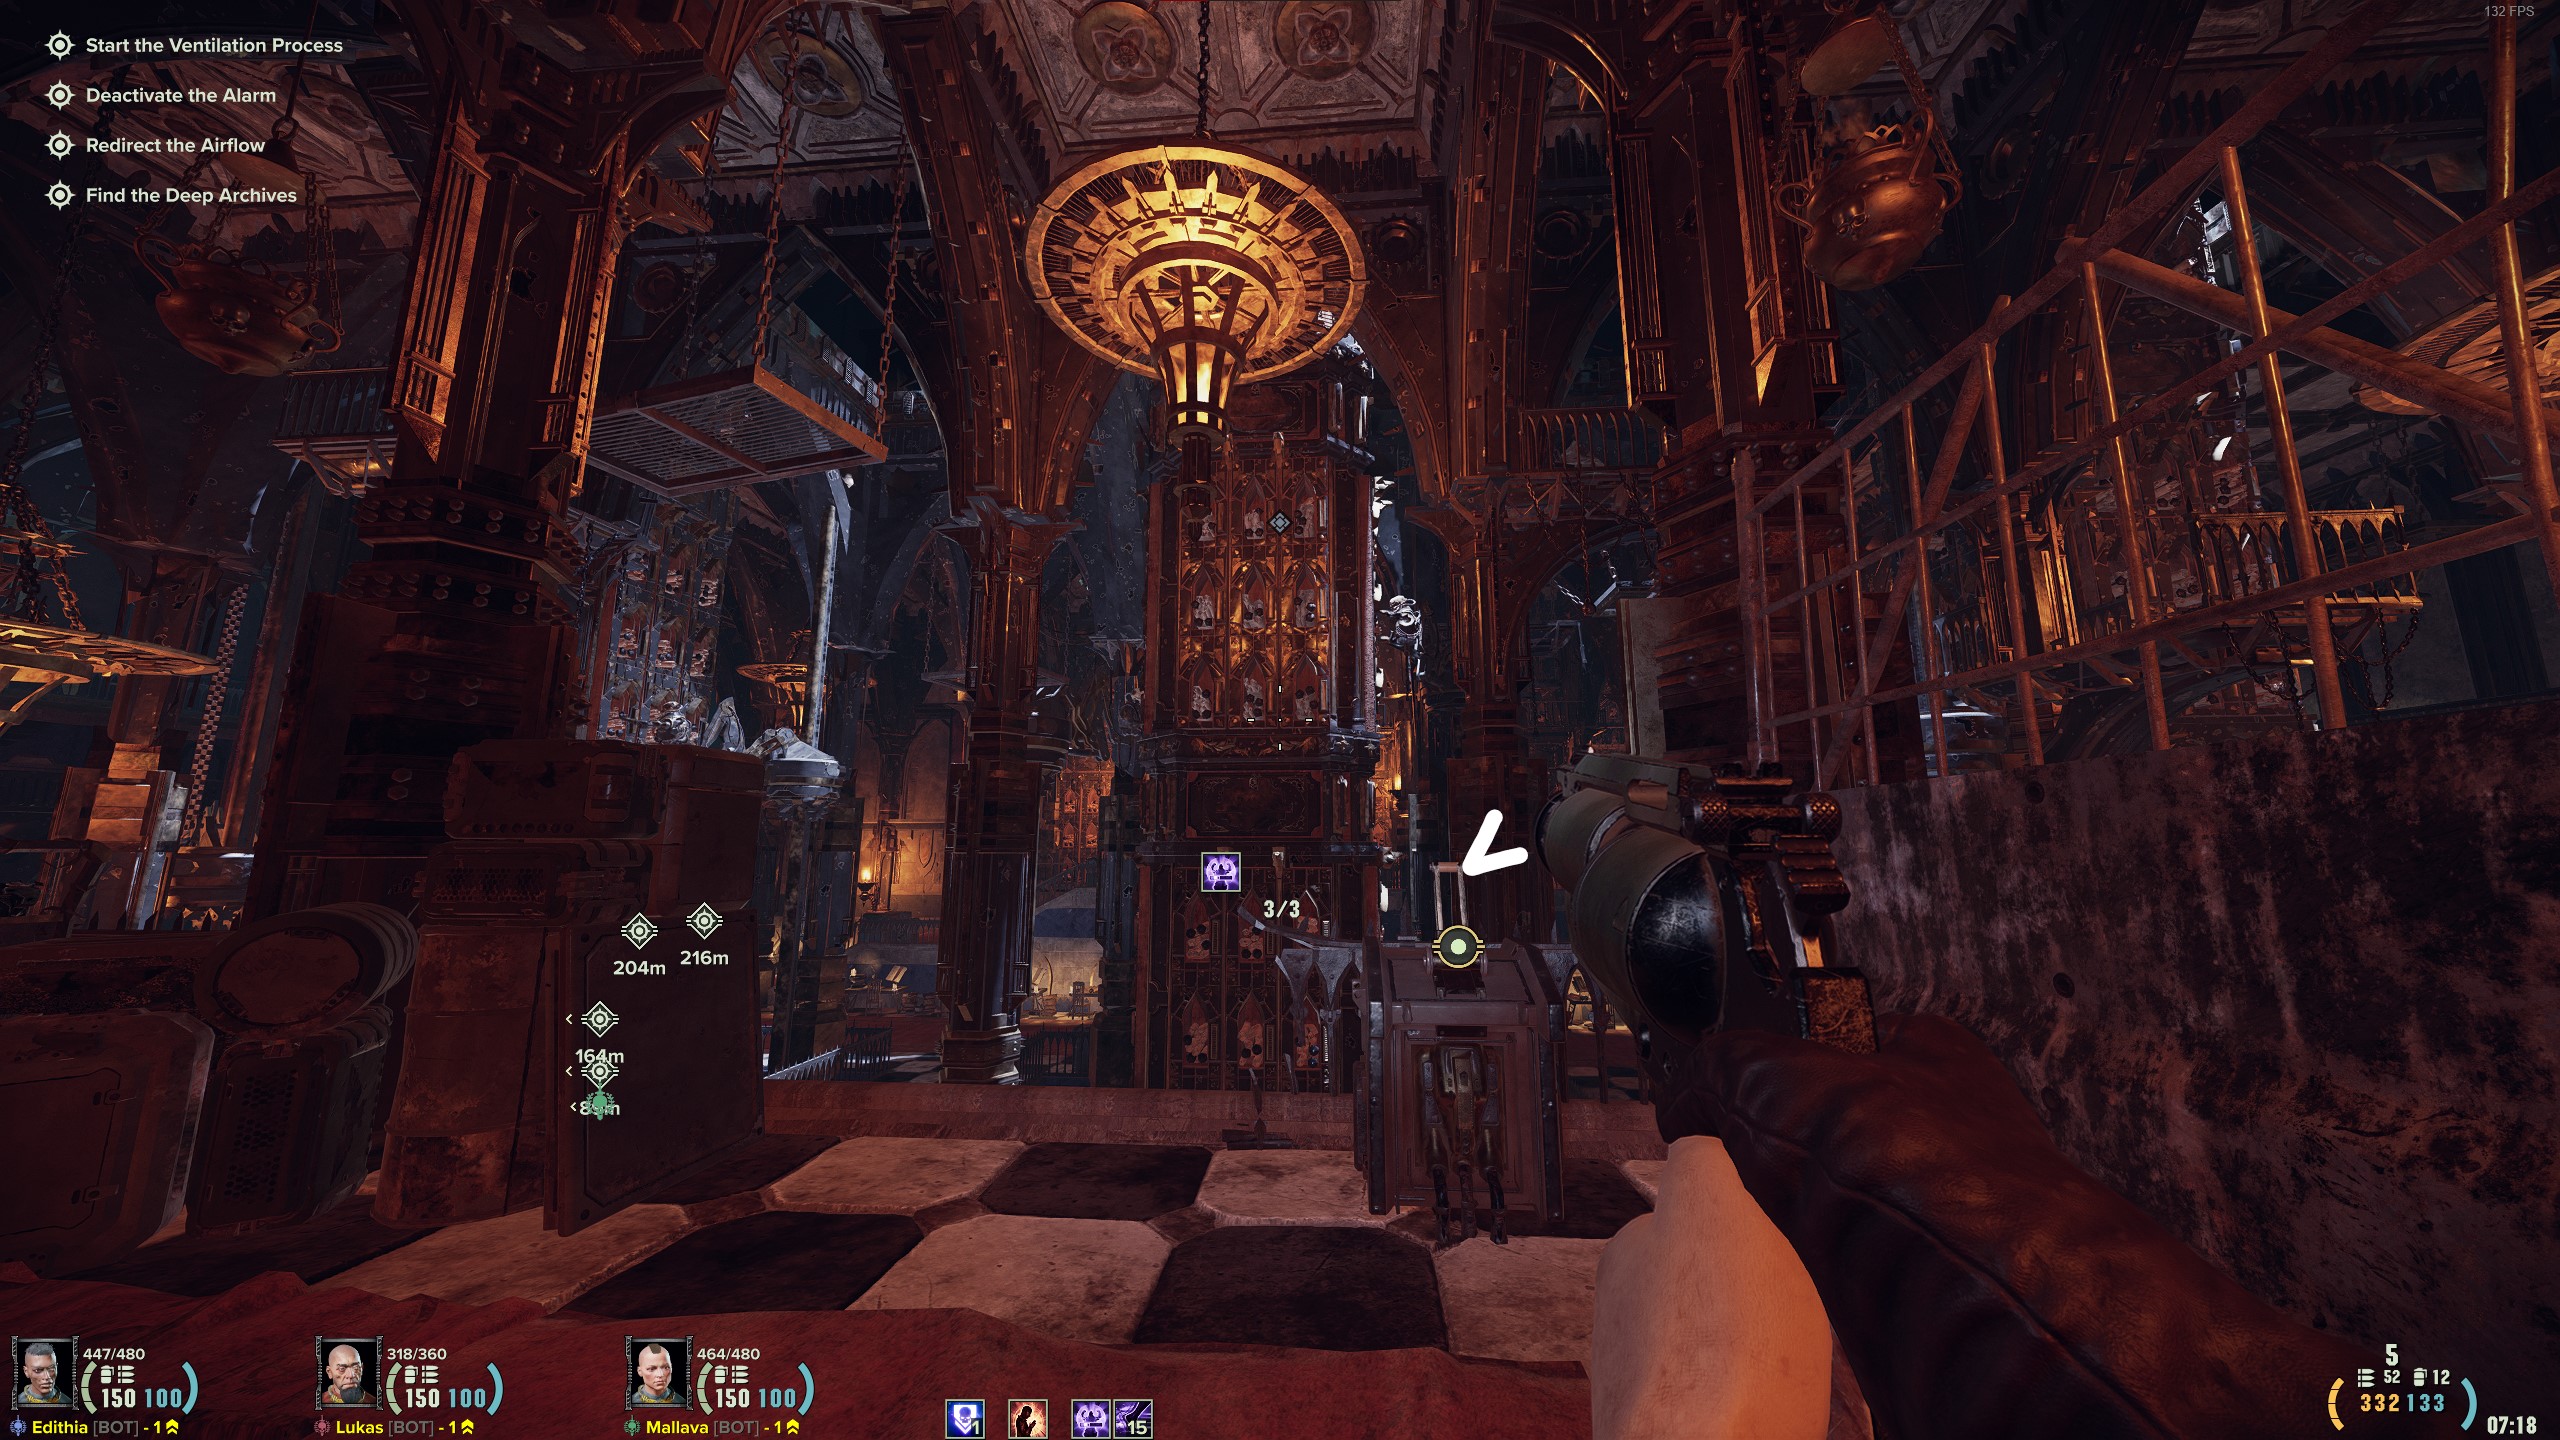
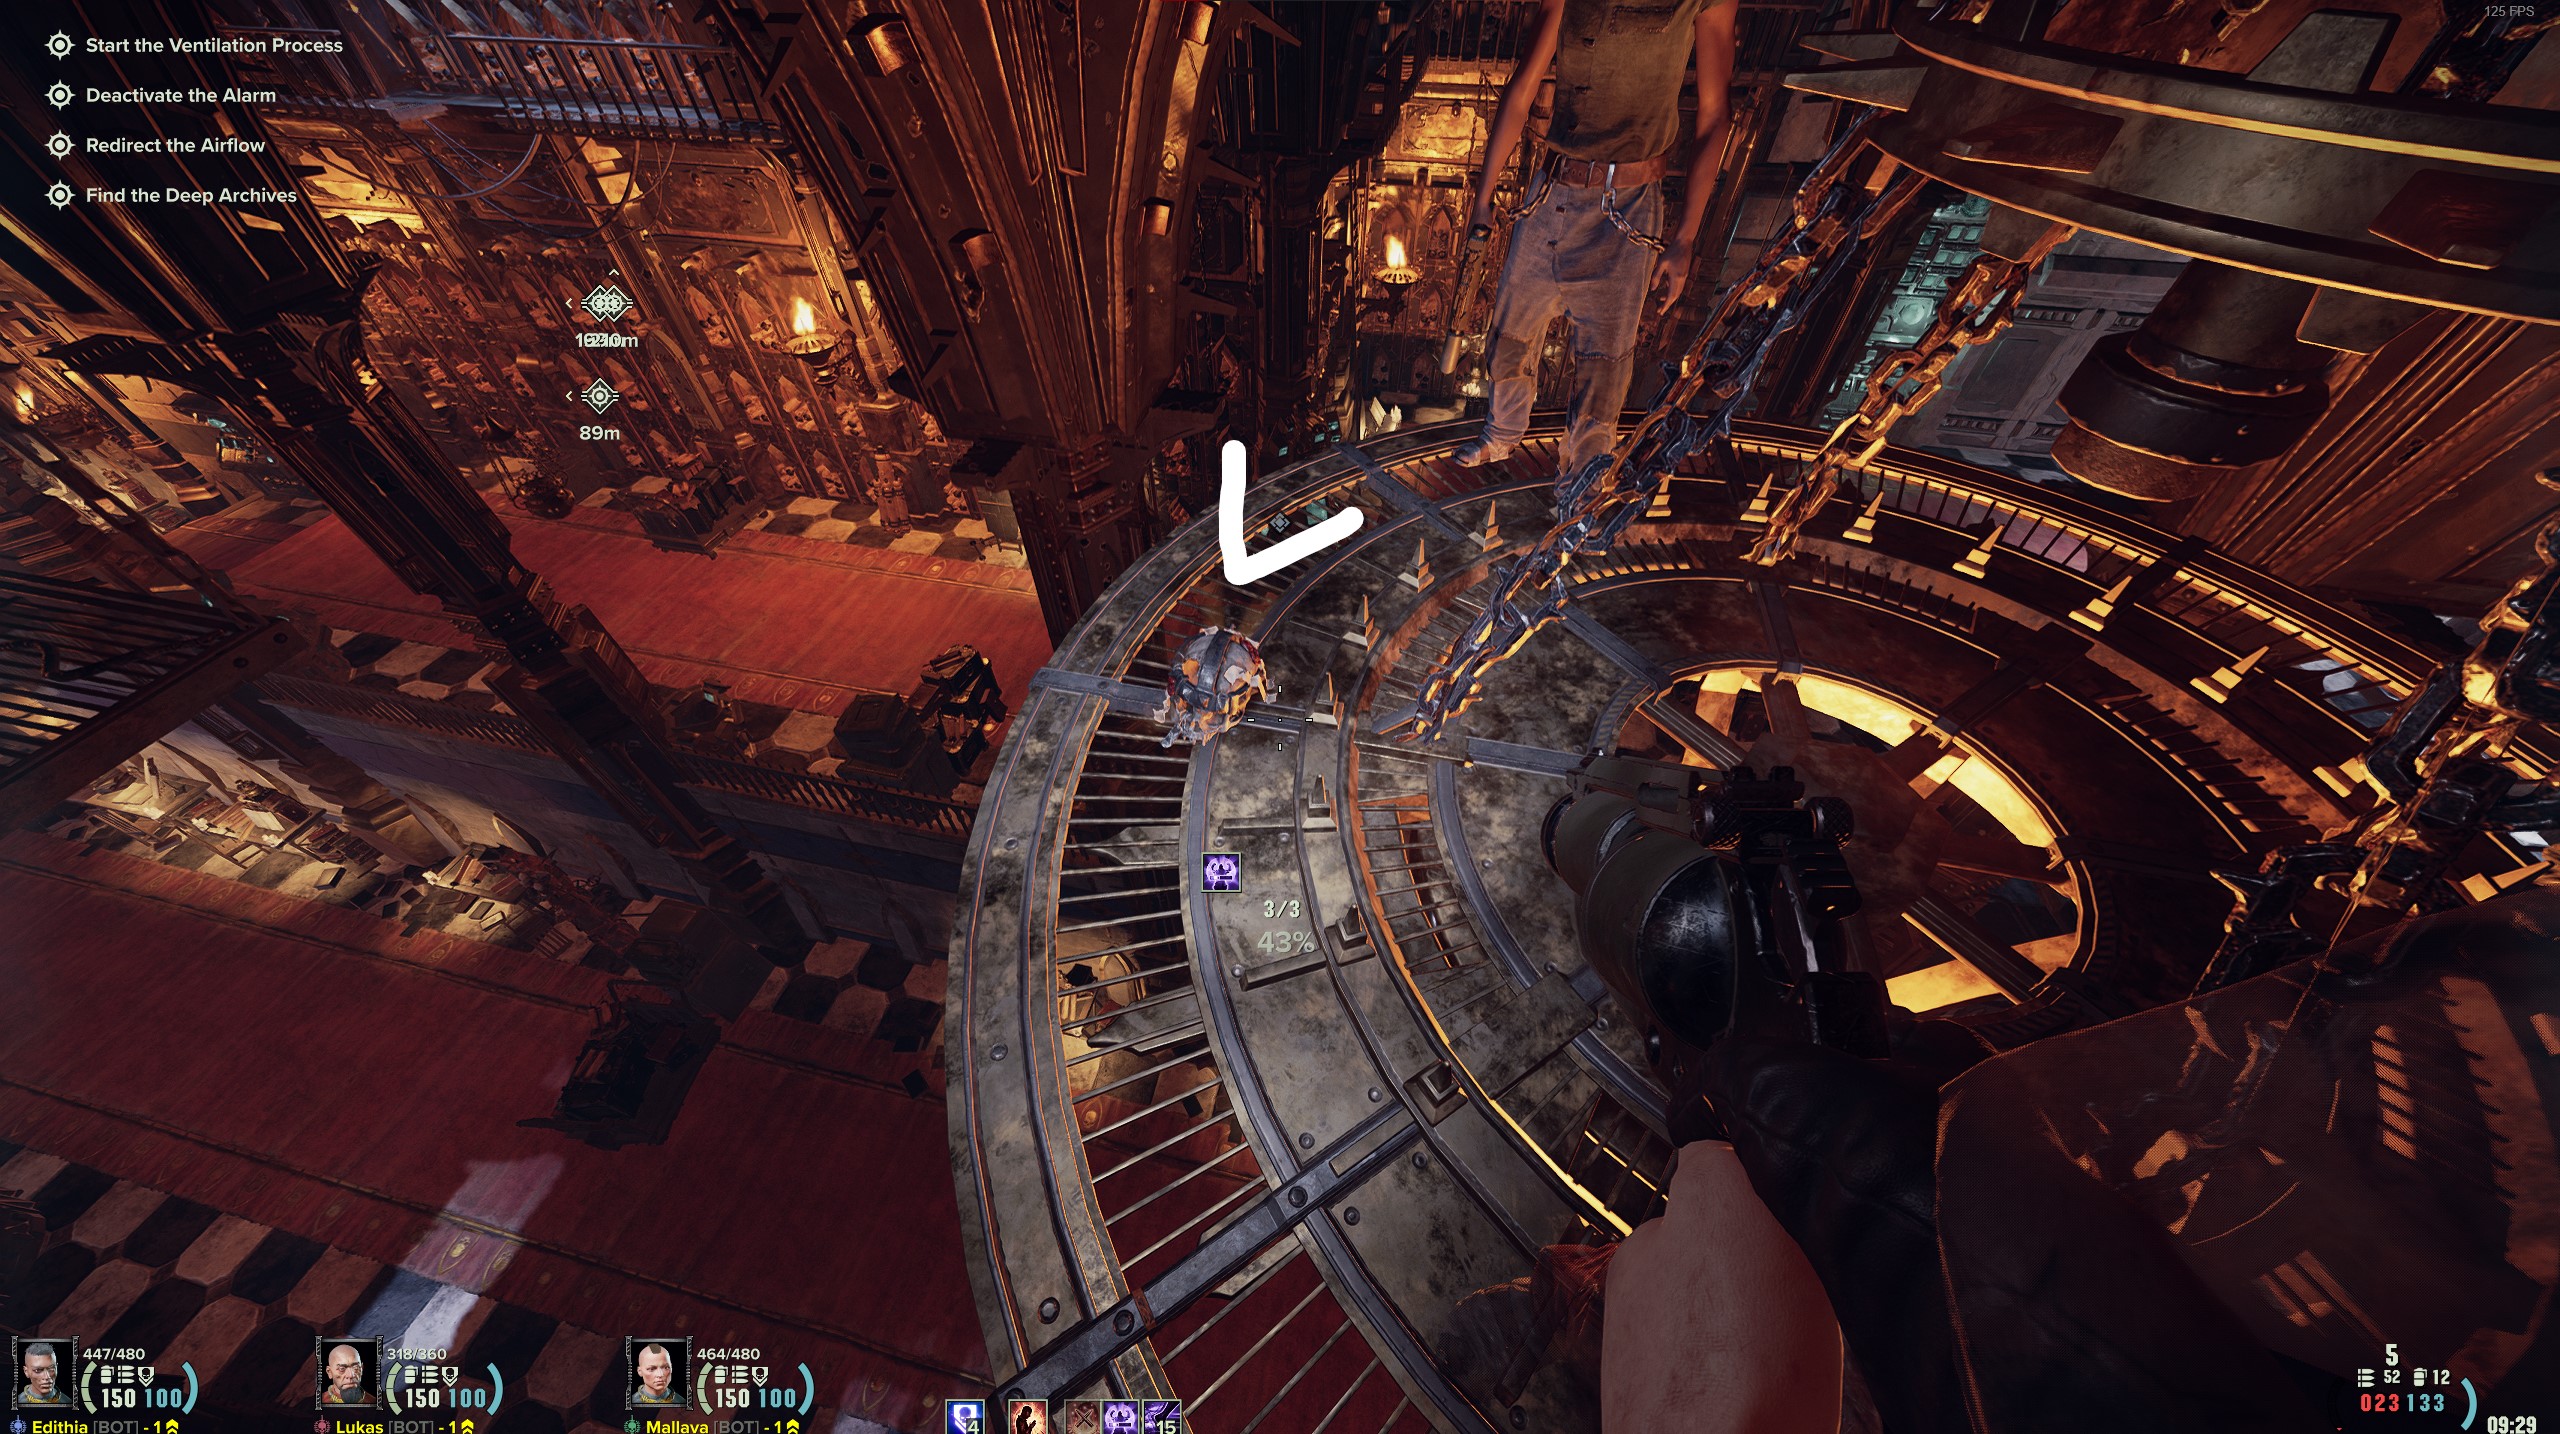
From here you will continue until you get to a lowered chandelier, the other person will raise it so you can continue along the parkour path.
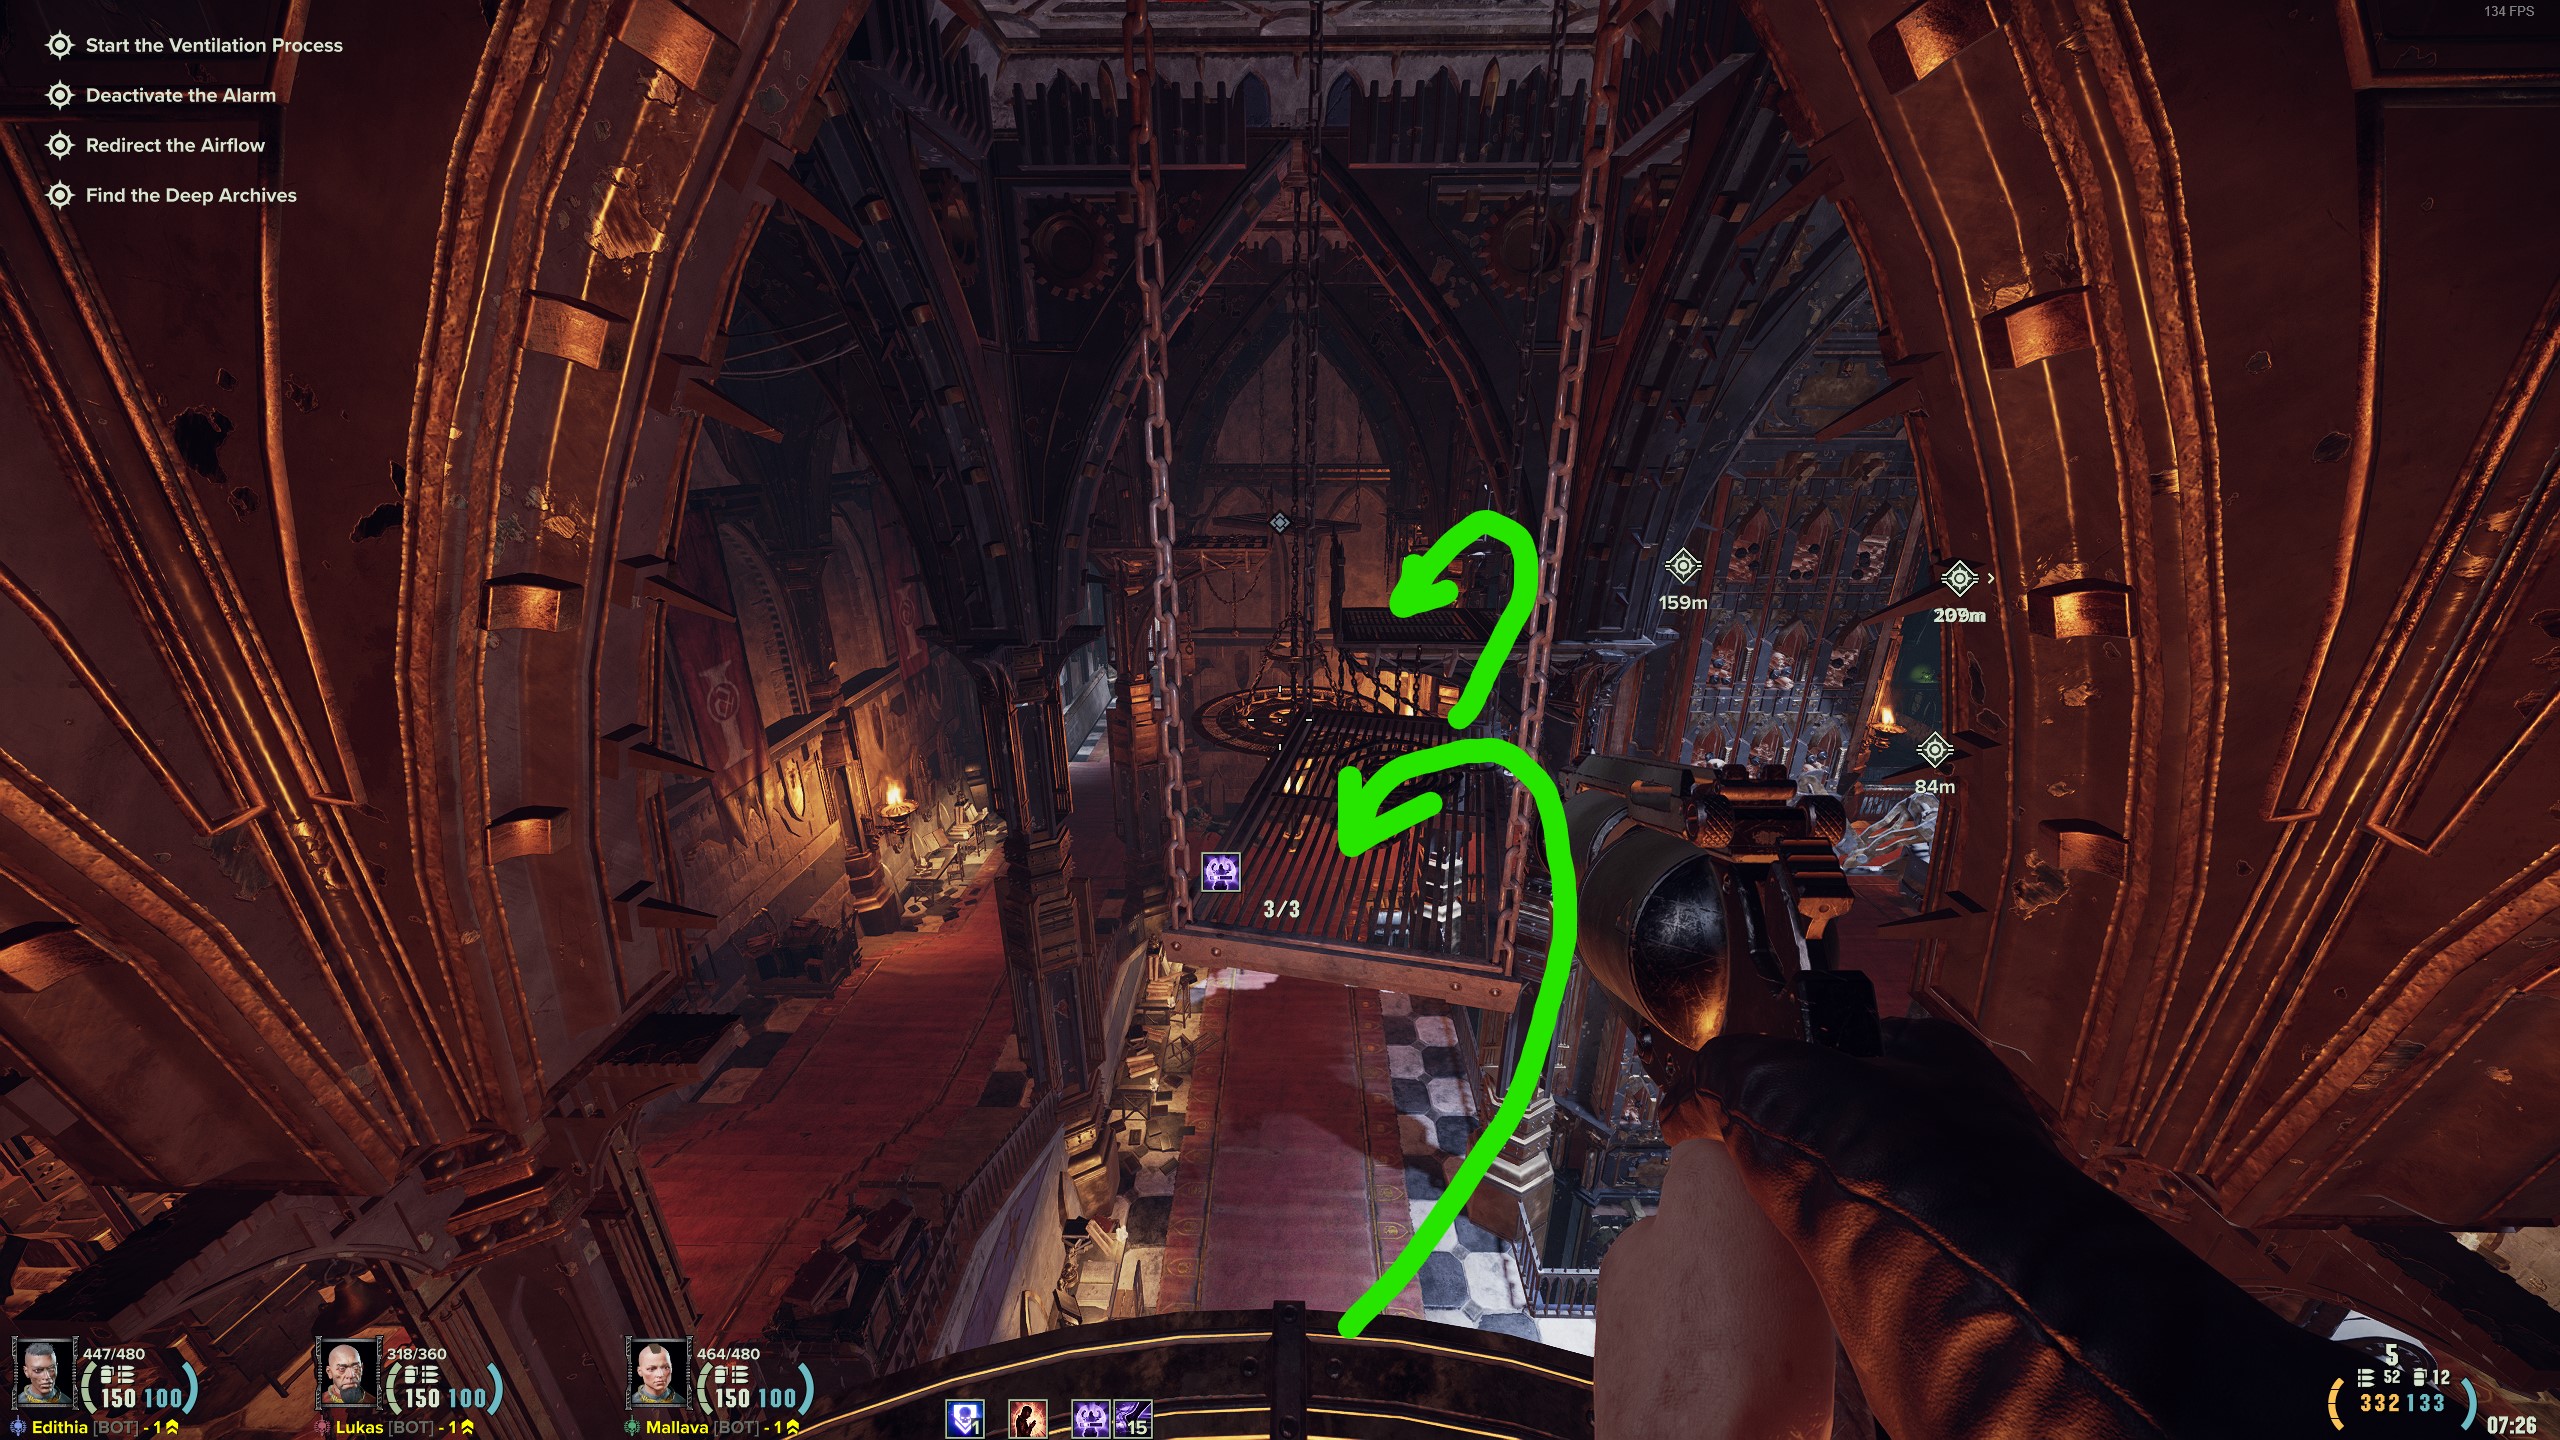
You will get to another chandelier, this time your partner will have to lower it so you can hop on then raise it so you can continue along the path.
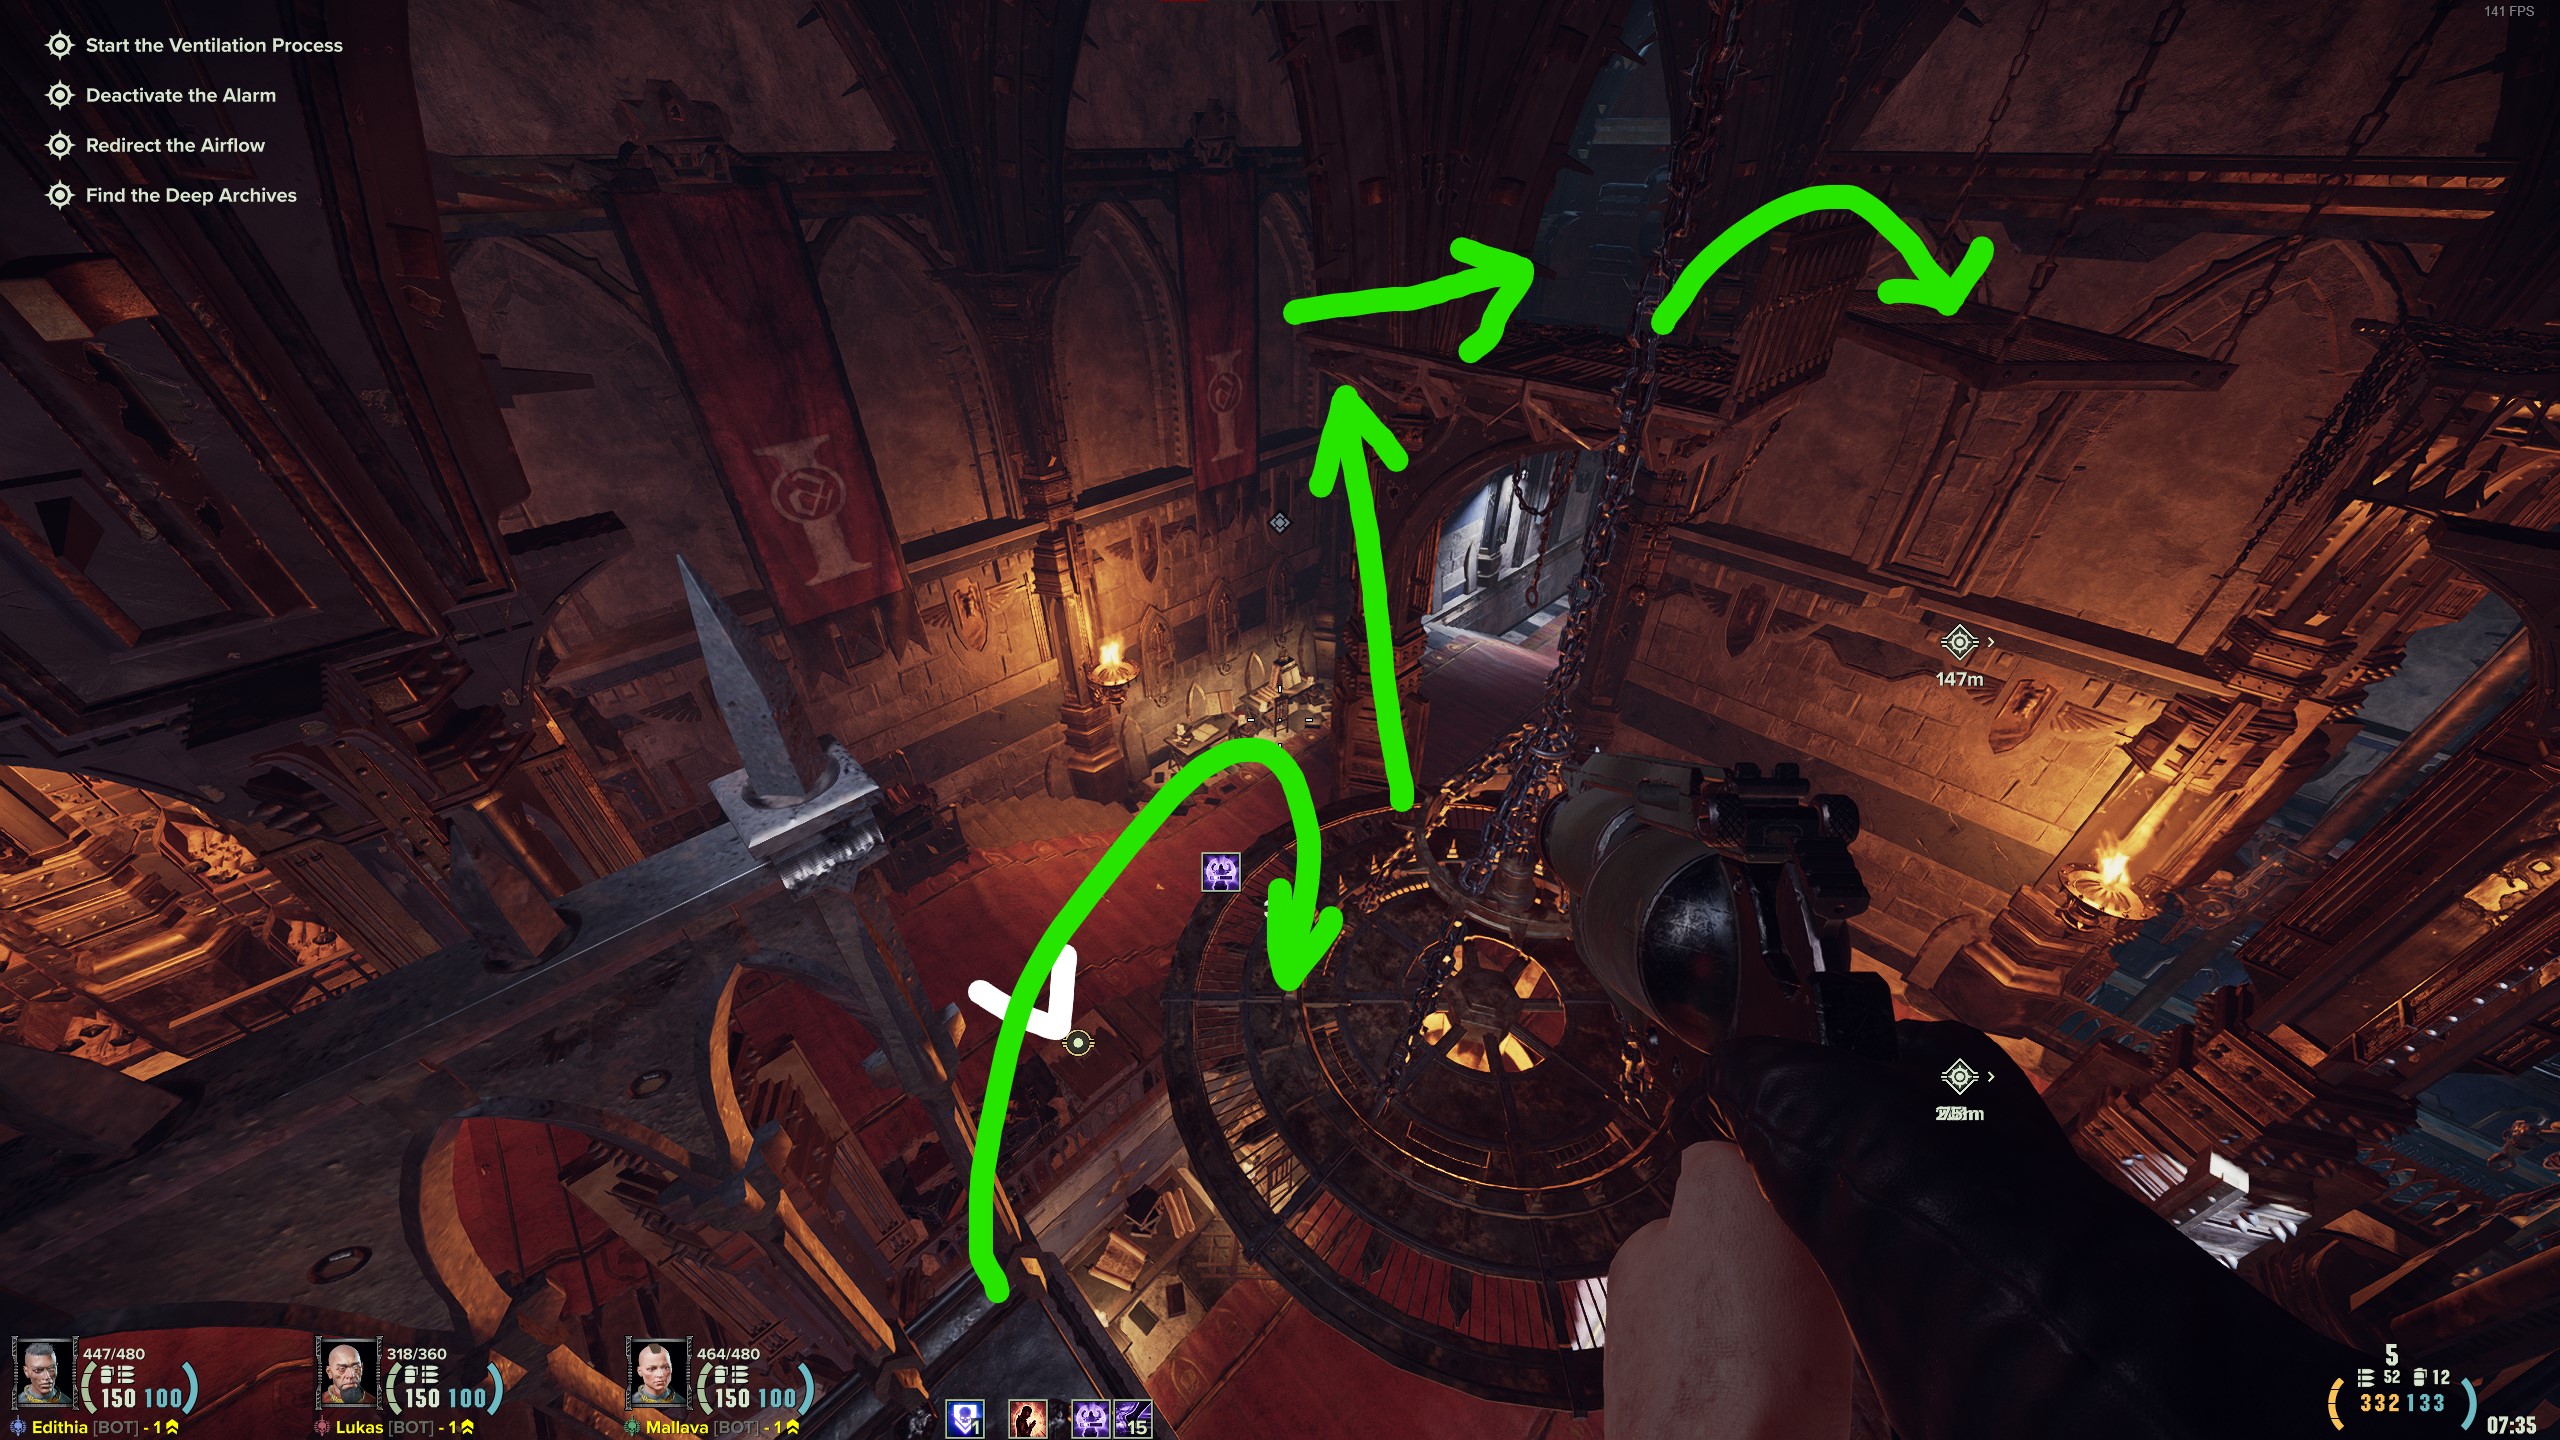
You will get to another chandelier that will need to be lowered, then raised. This will be the last partner action since the skull is on the chandelier after it.
The Carnival (Mercantile, Warren)


Solo parkour
Get to this area, and go in the building on the right of the picture.
Once inside, turn the valve and exit. We will then move into the nook with a bunch of trash
Once we are in the trash corner, we will climb the dumpster and barrels to get to the walkway
Follow the walkway, turn left, and pick up the power cell.
Put it into the glowing receptacle, and hit the lever beside it.
Once the lever has been switched, the door inside the building should be powered on. Go inside, press the button and just past the door will be the skull
The Carnival (Warren 6-19)


Solo puzzle
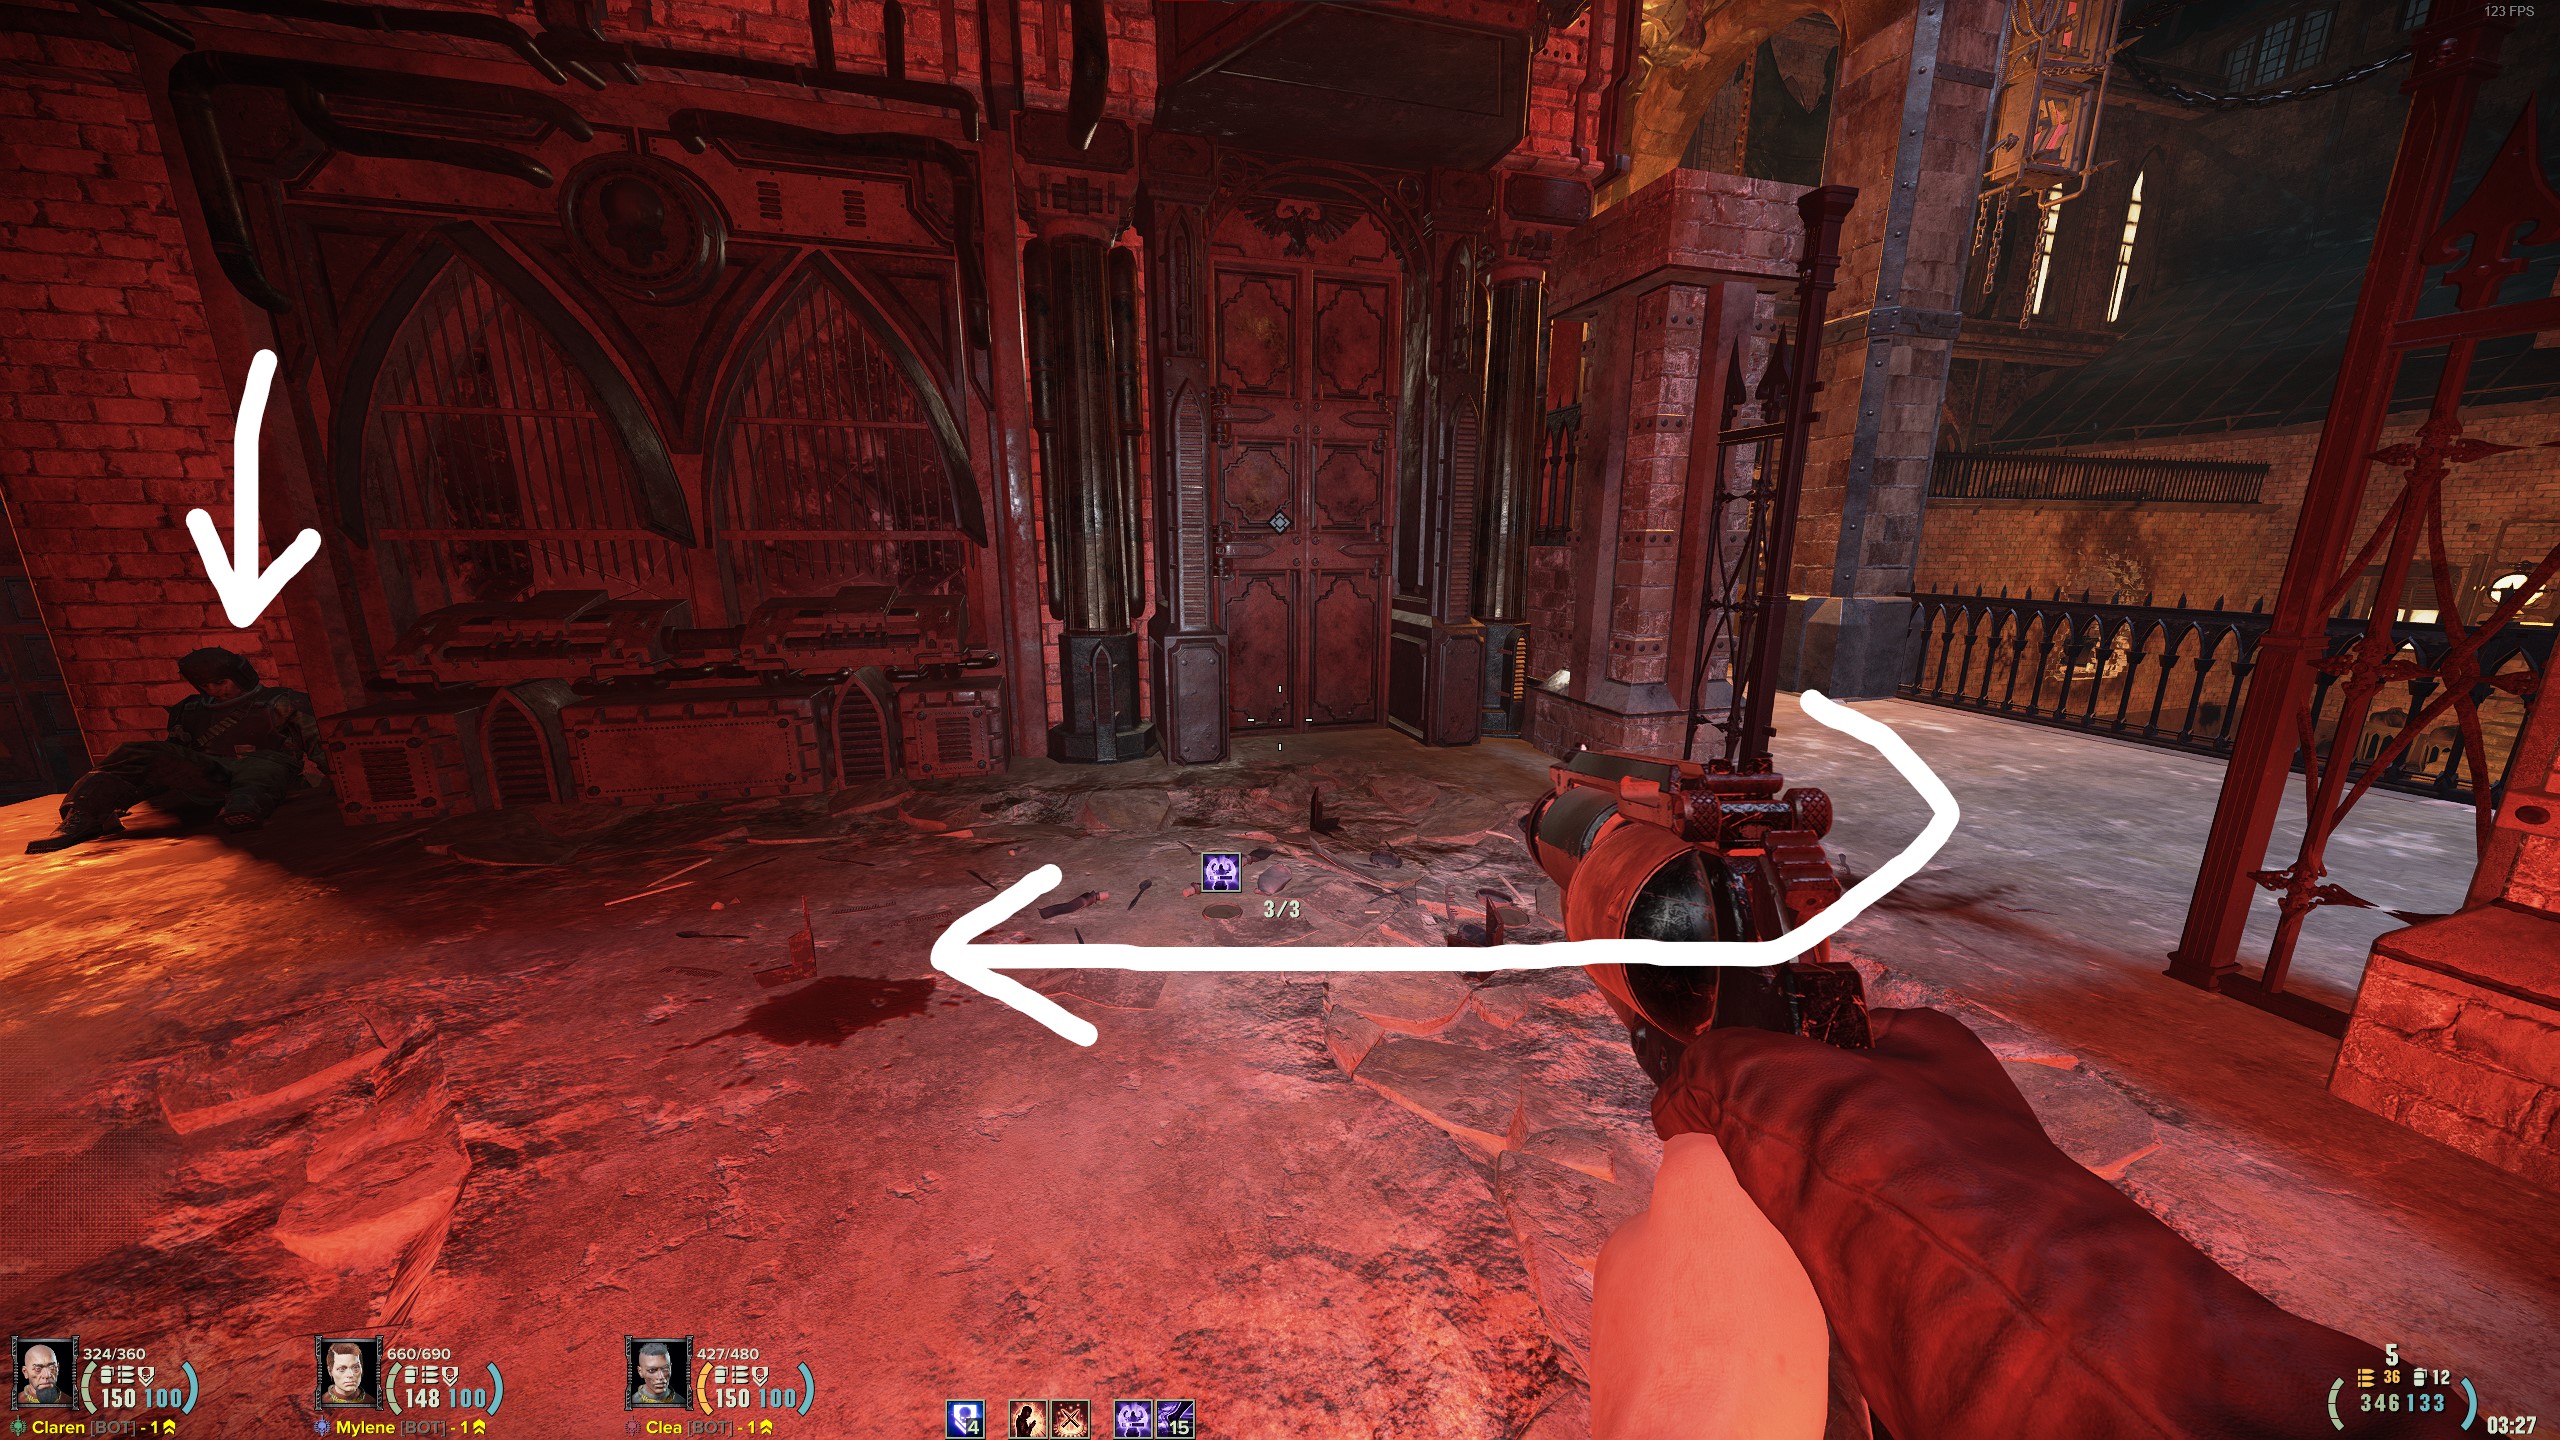
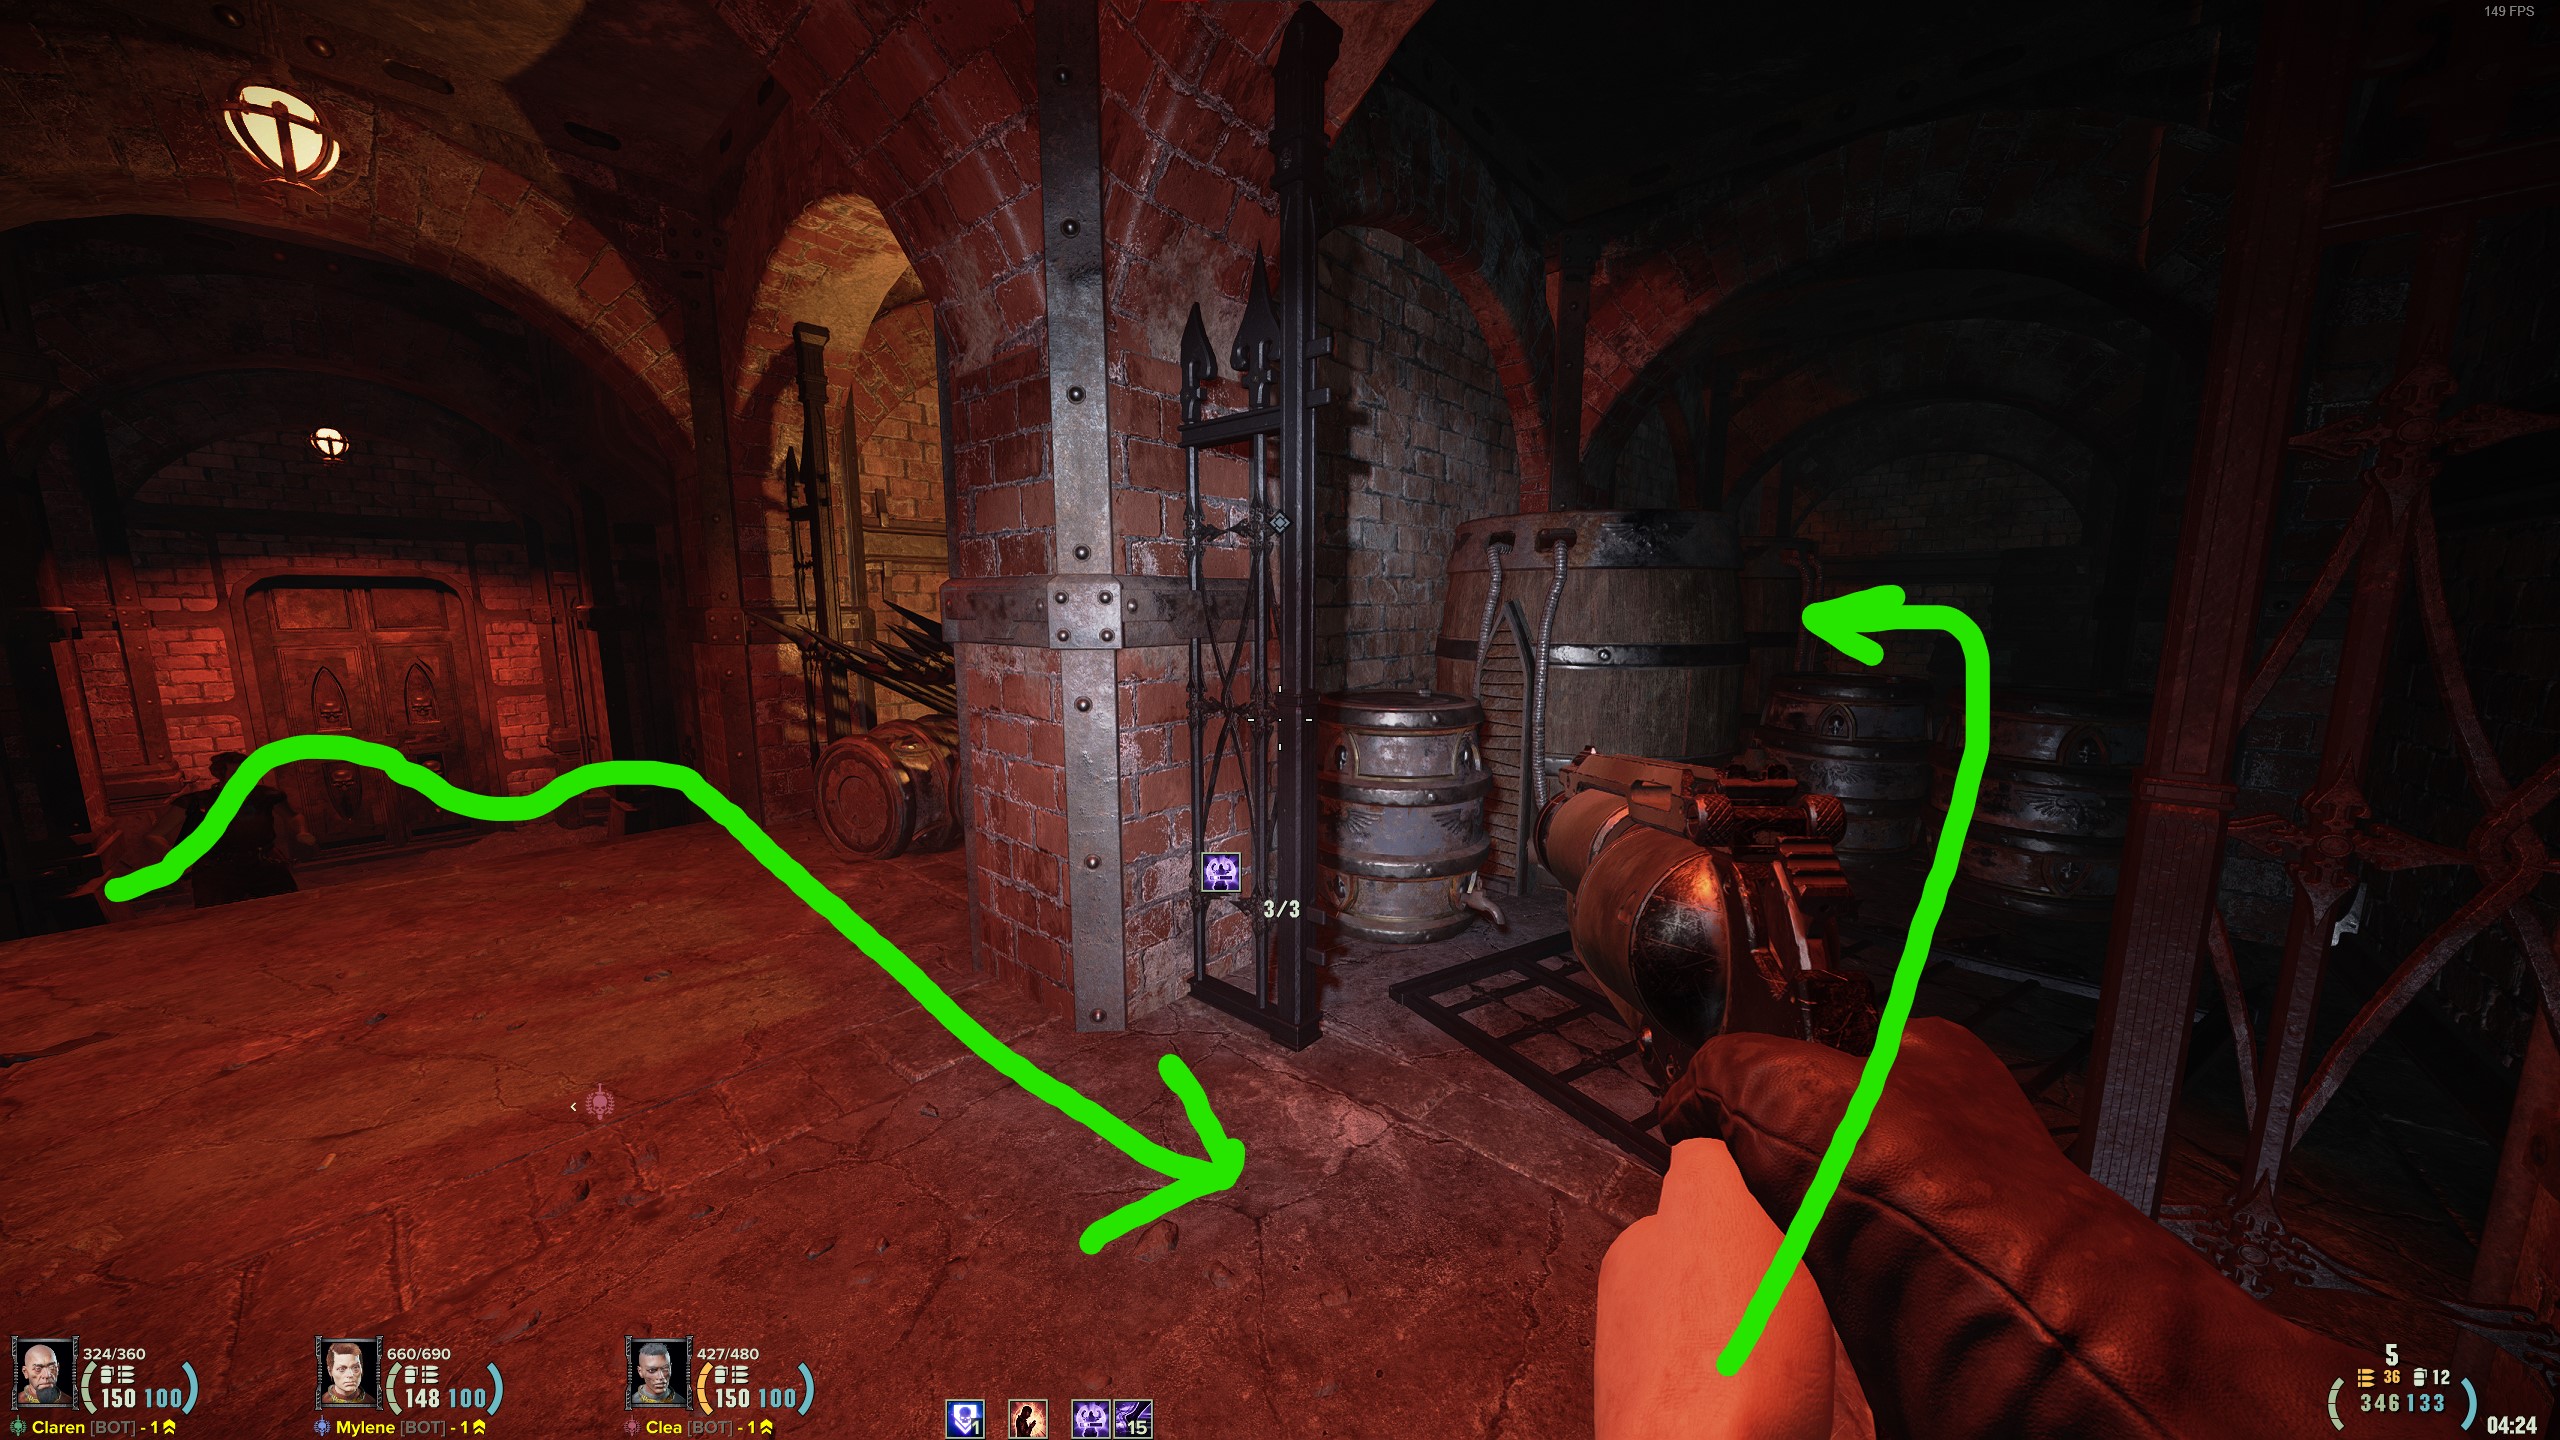
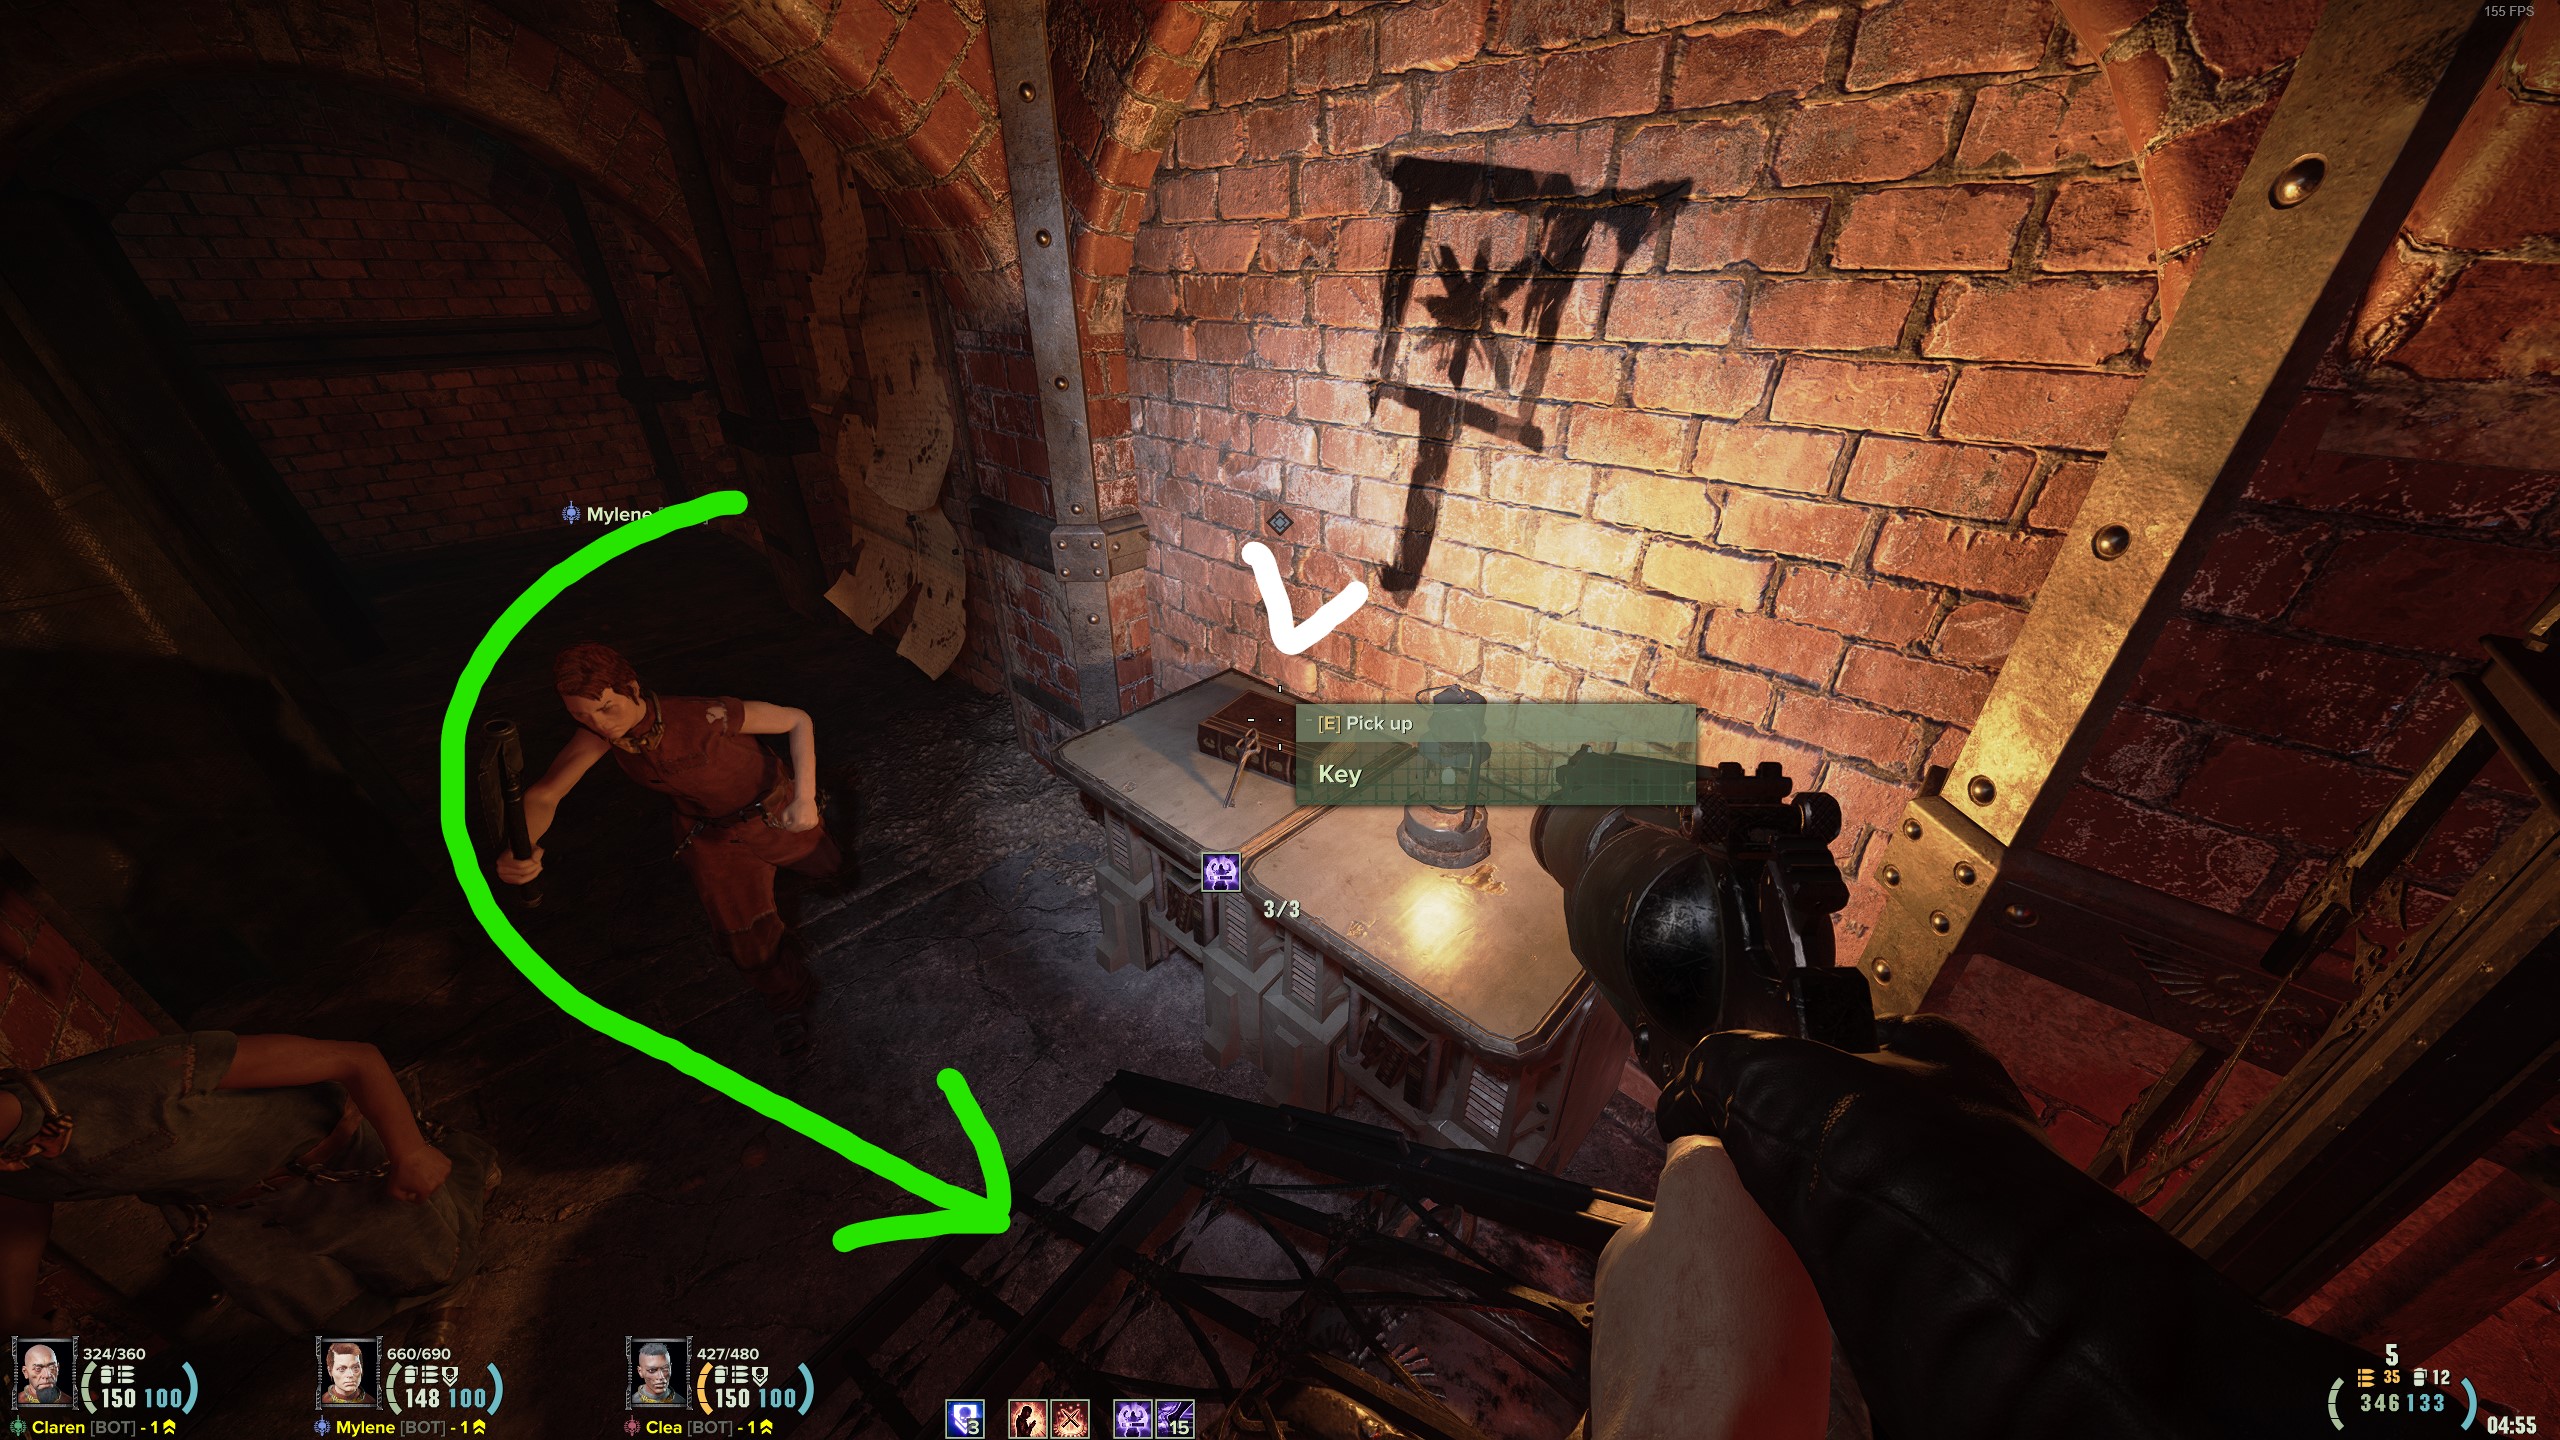
Proceed through the map until just before the bar just before the midevent. There will be an alley outside of it, with a dead body and a key.
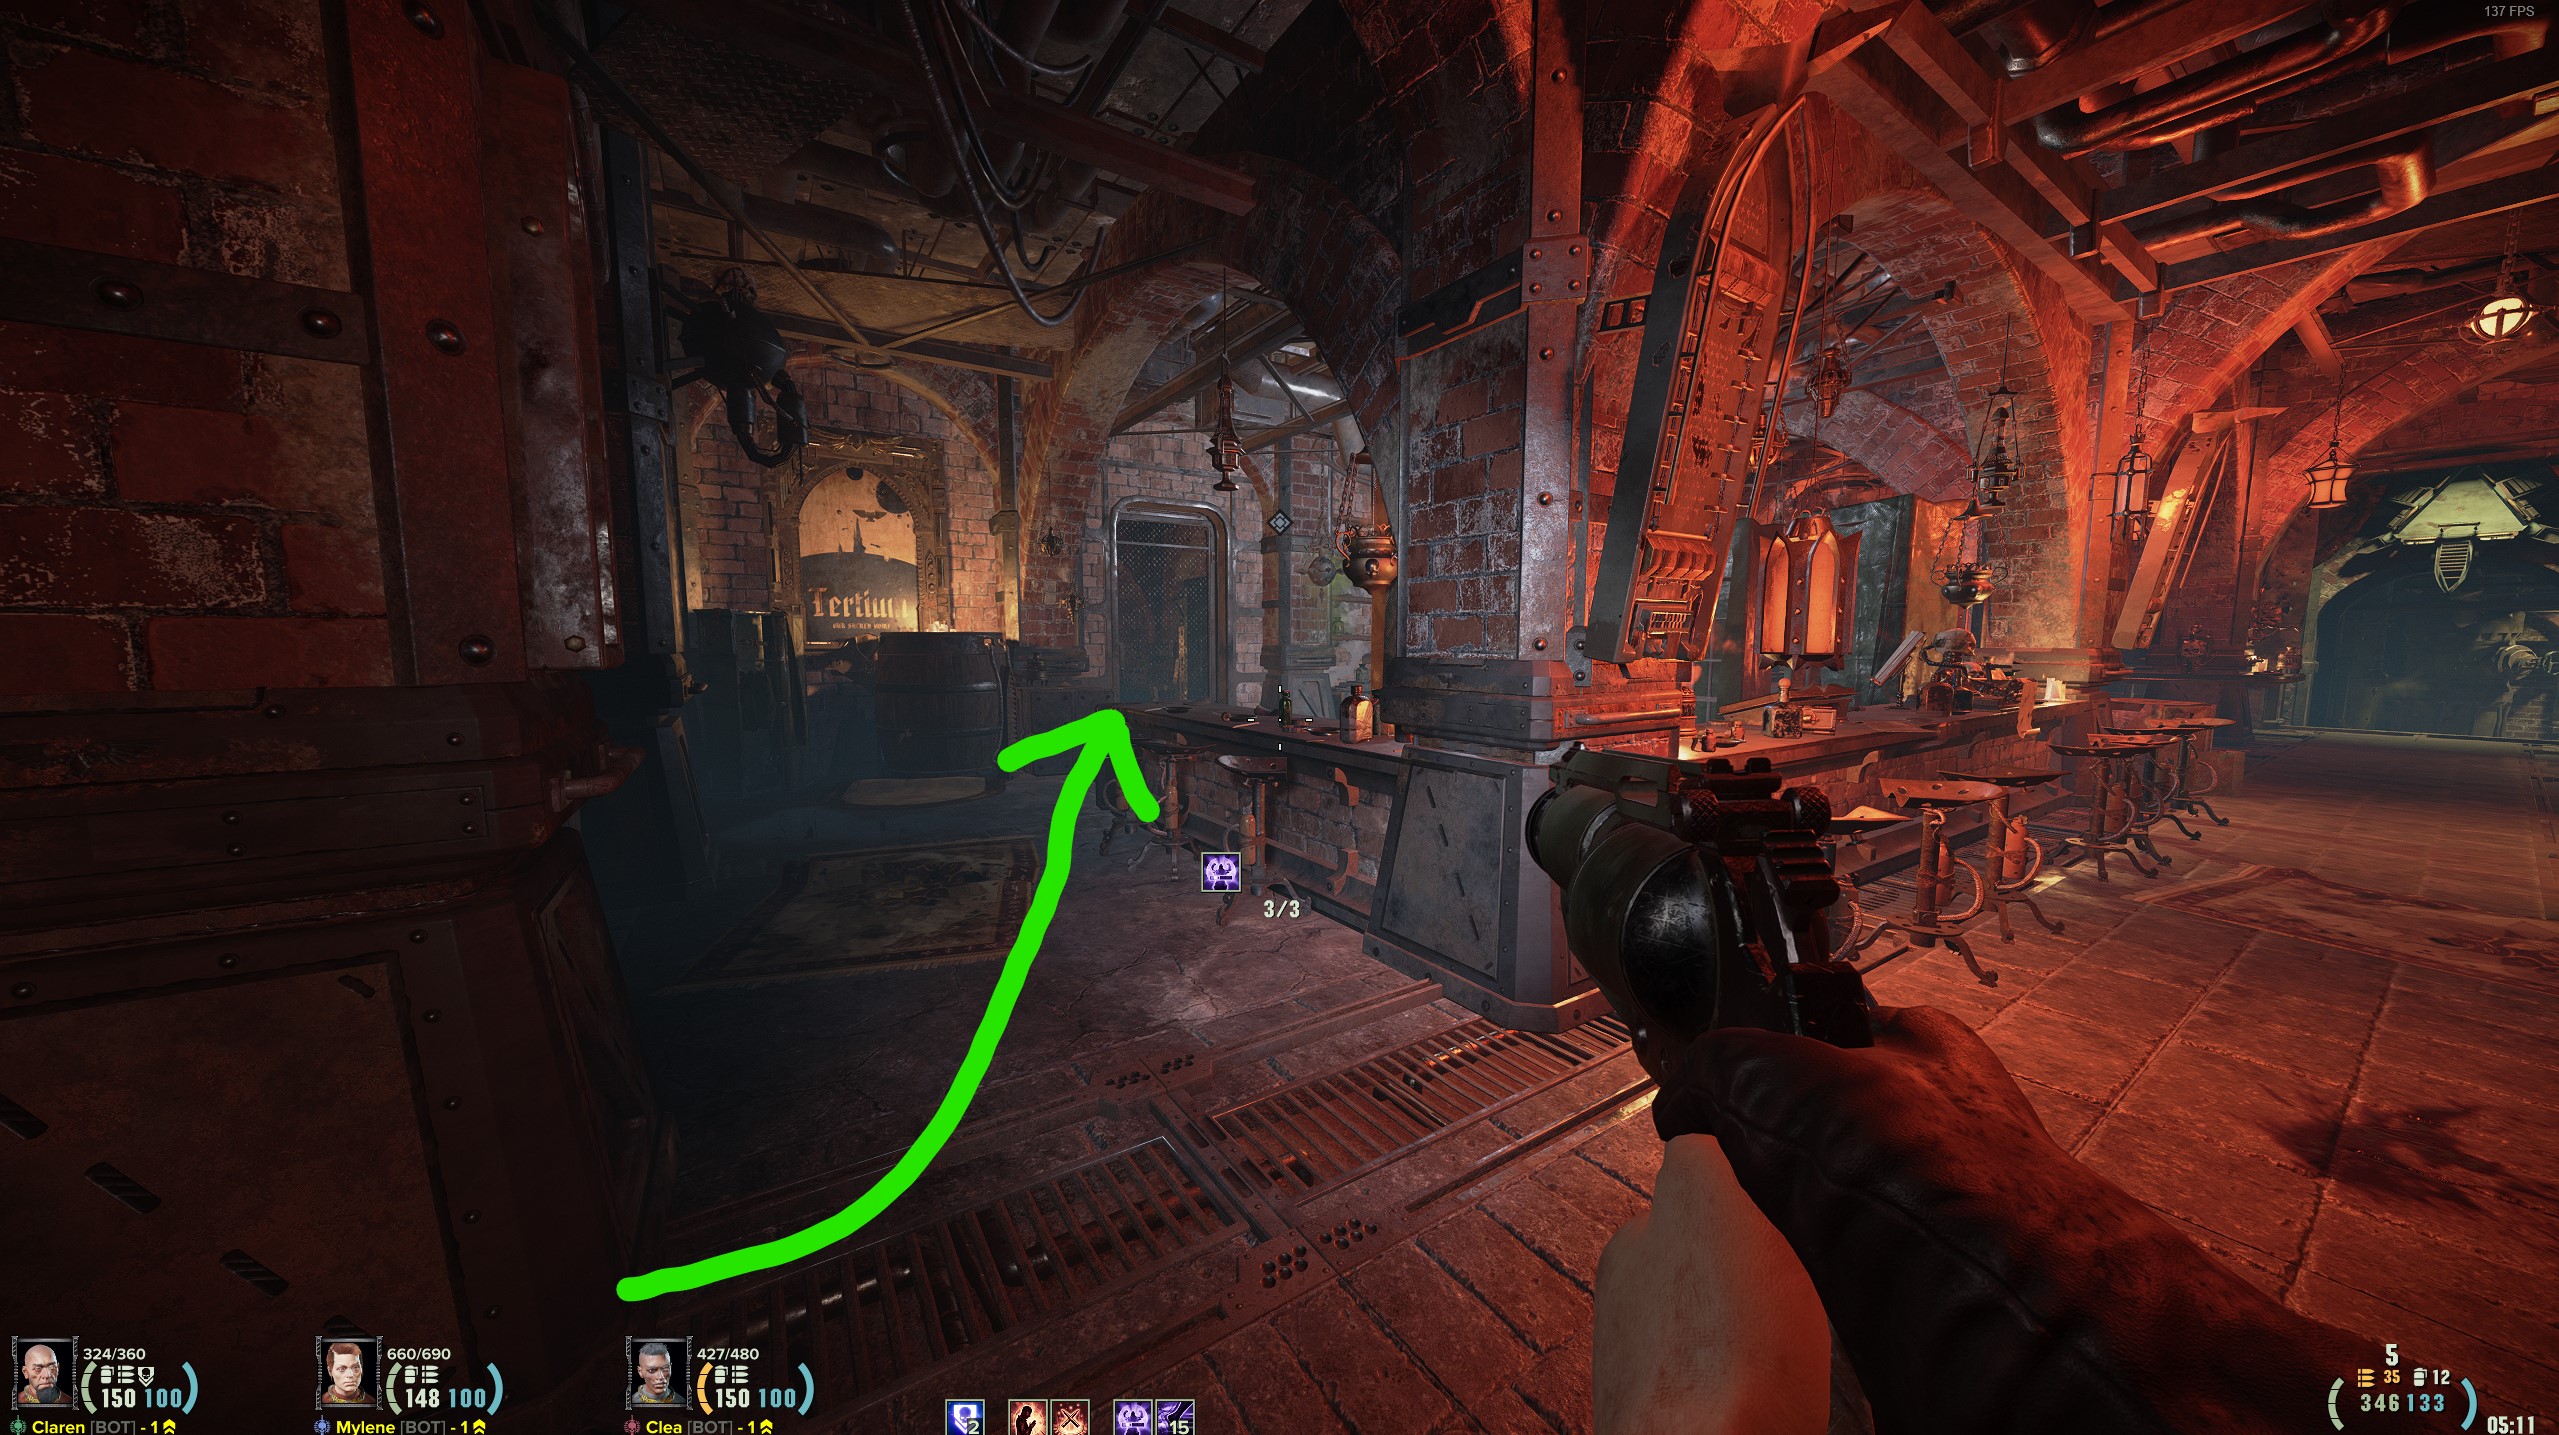
After getting the key, go inside the bar and go to the left side. There will be a locked gate that you can now open with that key.
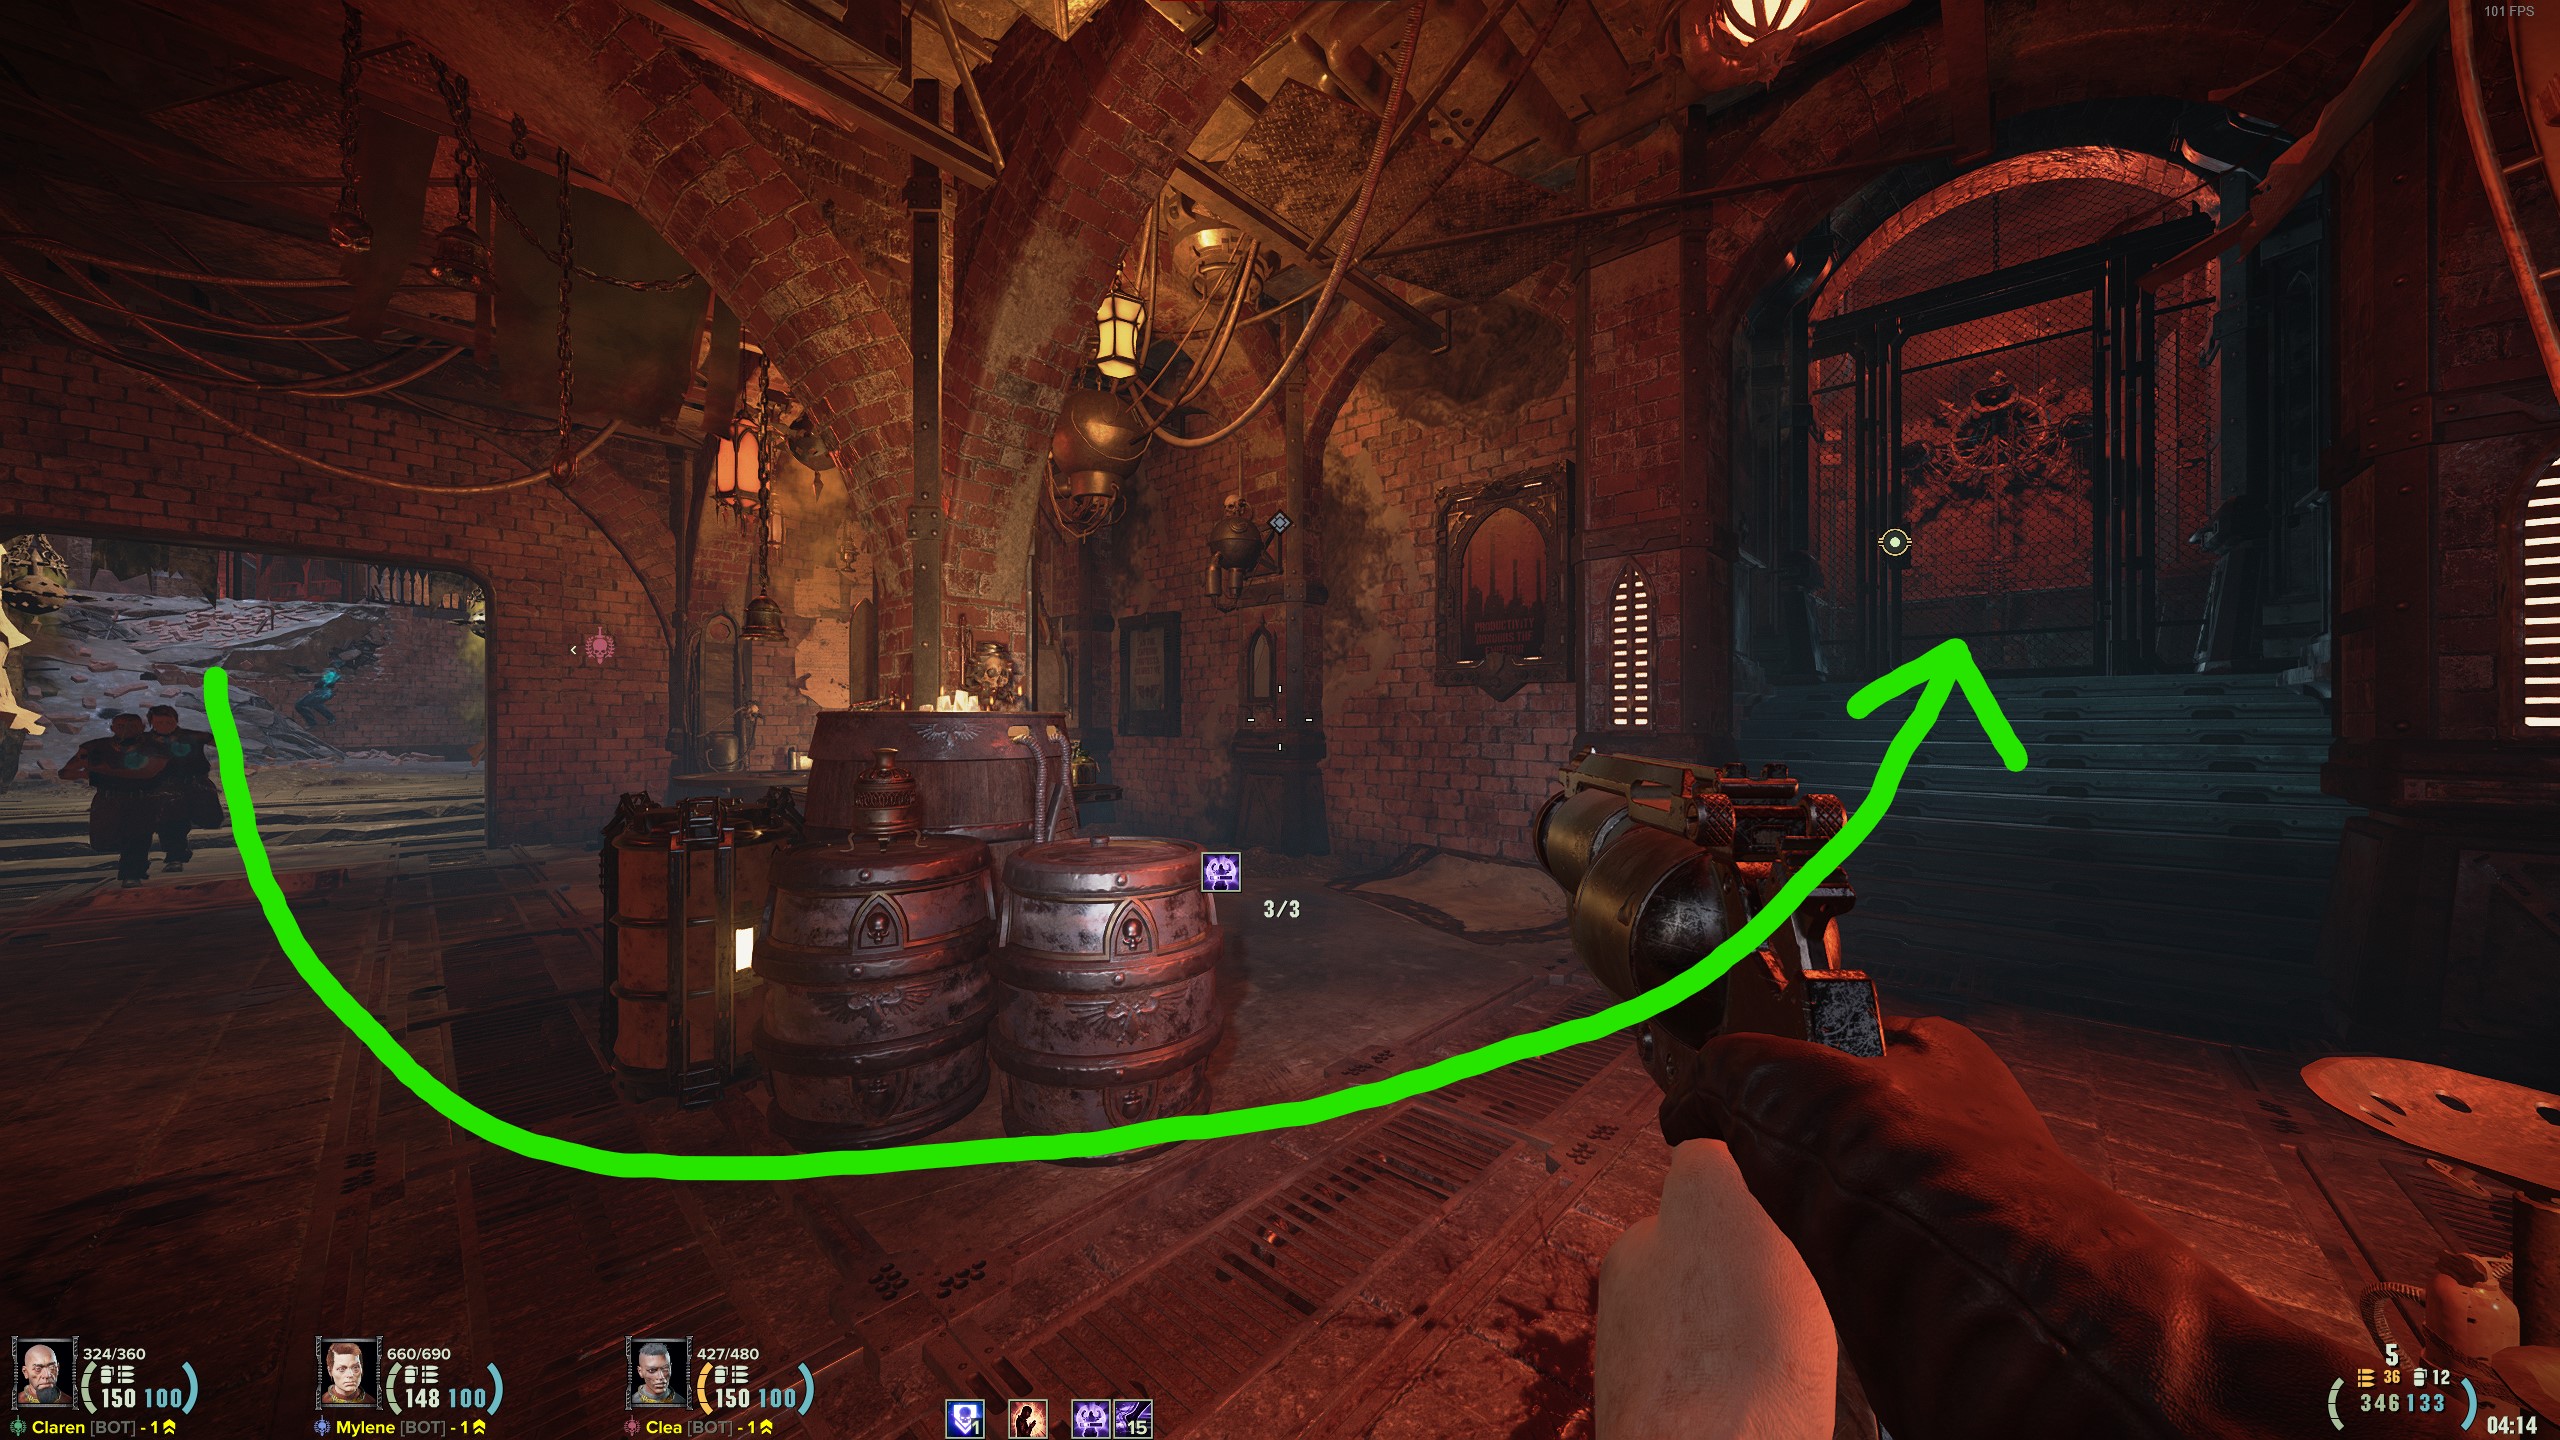
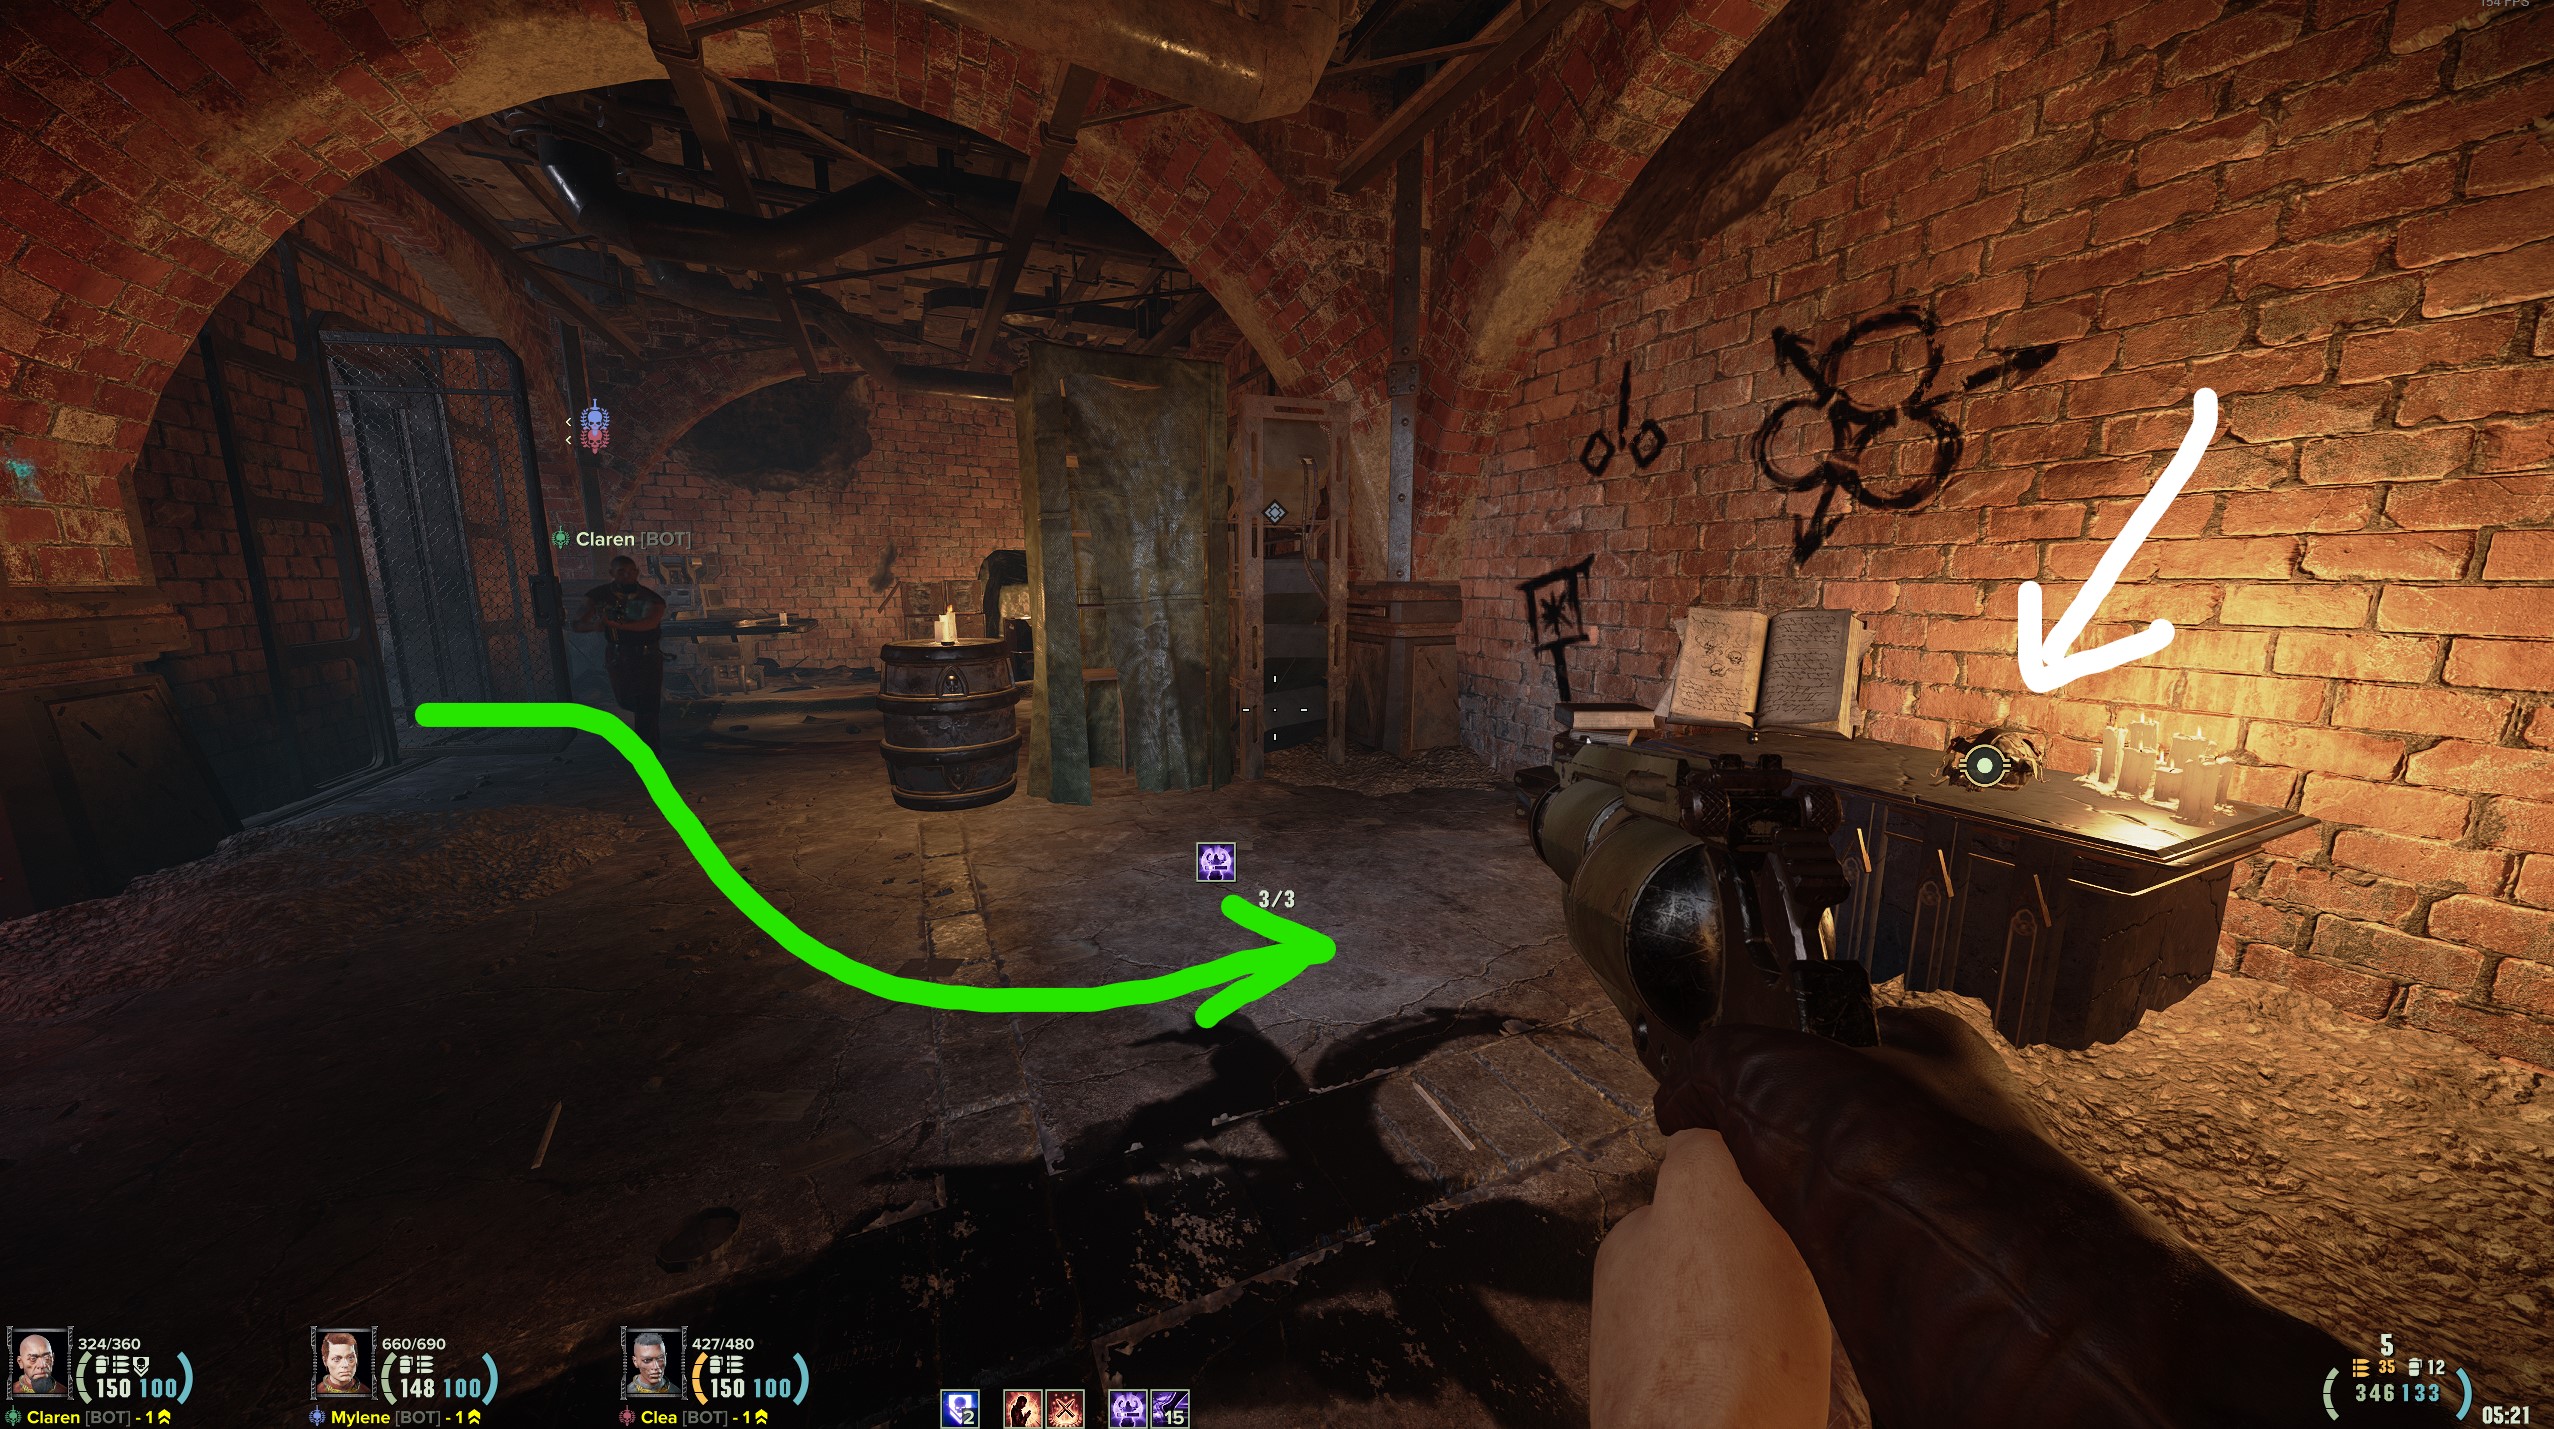
Go through the hallways until you get to a breachable wall, breach it and grab the key
Exit this section, and return to the bar. Behind the bar is another chainlink gate. Open it and the skull is at the back.
Source: https://steamcommunity.com/sharedfiles/filedetails/?id=3194249338
More Warhammer 40,000: Darktide guilds
- All Guilds
- Warhammer 40,000: Darktide Guide 900
- Warhammer 40K: Darktide Martyr skull locations
- Beginners guide
- Quick reference maps - Heretical Idols, Martyr Skulls and other locations
- Veteran: One Shot, One Crusher
- It IS ALWAYS THE SAmE In Every Game :)
- How to change the "reload mods" bind
- Warhammer 40,000: Darktide Guide 858
- [Solved] Controller and mouse conflict