
Yes, helicopter. Let's learn how to fly it smartly.
Your Mission
Transportation
With extremely good mobility, you can carry a fully loaded infantry squad to anywhere on the battlefield in minutes. The greatest advantage of helicopter are its speed and maneuverability, you can literally send troops in short time to anywhere regardless of terrain conditions.
For the typical AAS mode, helicopter can make friendly forces attack from where opponents never think of, or even making a squad sitting on the flag before enemy could set up their defense at next cap.
Logistics Resupply & FOB Construction
Being able to carry 1500 supply points, one can set up a FOB easily with a helicopter. Resupplying FOBs are even faster, it takes no more than 5 minutes for helicopter to do a round trip between Main Base and Forward FOB. The potential capabilities of helicopter could never be underestimated.
Sending helicopter to behind enemy lines could also be a great move for squad leaders, if you made it successfully, there will be a fully operational FOB behind your opponents. Surprise attacks are the key to winning the match.
Recon
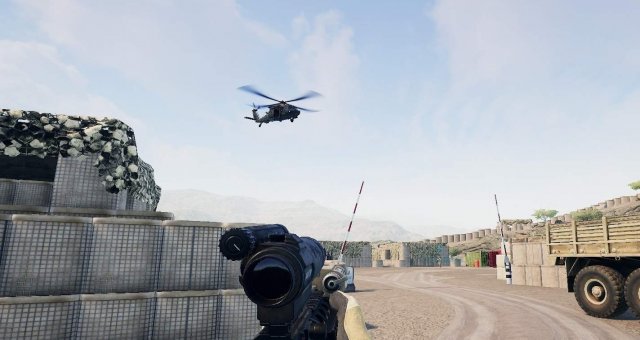
Want to know if there’s a FOB in the forest? Feeling suspicious that there may be a tank moving behind friendly line? Providing reconnaissance service is also one of the benefits from helicopter. Since you are high above everyone, it’s easy to locate and confirm hostile forces.
However, such task is much more hazardous than previous two. If you can see enemies, it means that you’re also within their line of sight! If you cannot make sure that you won’t be shot down by AA weapon, don’t risk it since your main tasks are transportation and logistics.
Know Your Heli
- Both type of helicopters have maximum speed around 90~95 KIAS in level flight at ground level.
- That's 2X times faster than a logi truck.
- Both can carry 1,500 units of supply and 10x soldiers (pilot included).
- 5 Tickets each and spawn timer at 6 minutes.
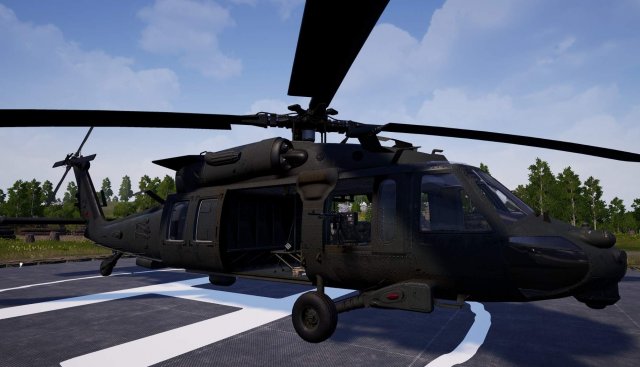
UH-60M Black Hawk
Black Hawk is the main transportation helicopter of US Army and British Army. Equipped with 2x M240 machine gun for self defense, which is operated by 2 door gunners.
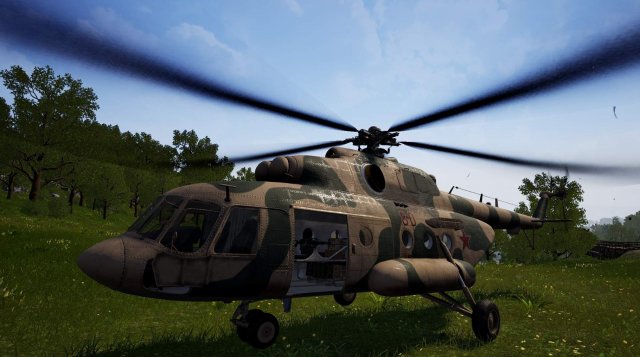
Mi-8 Hip
As main air transportation vehicle of Russian Ground Forces, Hip looks a bit bulkier when compared with Blackhawk, also equipped with 2x PKP Pecheneg machine gun.
For Friendly Or Foe Identification:- Mi-8 has huge main landing gear struts on both side of its fuselage.
- Mi-8's tail section is designed to have a back cargo door, which makes it less laminar.
- UH-60 has a tail wheel, while Mi-8 got a nose wheel (tricycle landing gear design).
- Main Hull
- Engine
- Main Rotor
- Tail Rotor
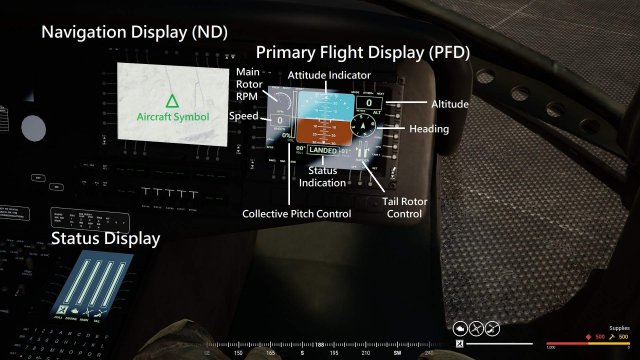
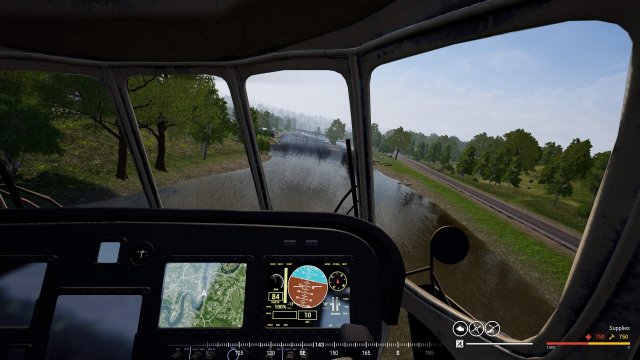
Cockpit Instruments
Primary Flight Display
- Attitude: The angle between your aircraft and horizon. Pitch and bank are indicated on the artificial horizon with an fixed aircraft mark. As you can see on the instrument, it simply projects the horizon for you.
- Airspeed: Indicated how fast you go relative to the air, since we're flying at low altitude and there's no wind effect in Squad, this numbers is almost the same as actual ground speed. Its unit is in knots, 1 knot = 1.852 km/h.
- Altitude: Indicates the absolute altitude (height) between you and ground, it's believed to be a radio altimeter. Its unit is in meters.
- Heading: The direction your helicopter points at.
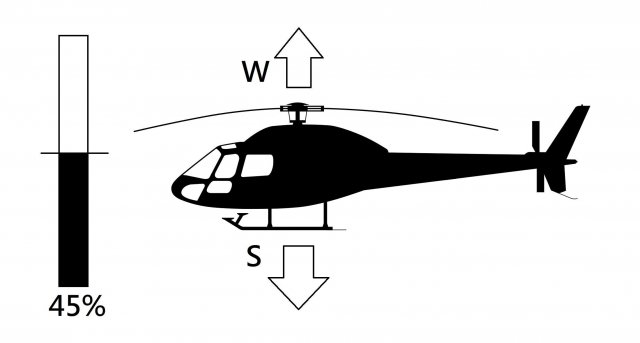
- Collective Pitch Control: It tells how much lift is being generated by your main rotor, 45% is the predefined value for hover flight.
- Main Rotor RPM: Tells you if the rotor is working in normal RPM range.
- Status Indication: "Landed" icon both indicates the helicopter is ready for takeoff or it's landed safely.
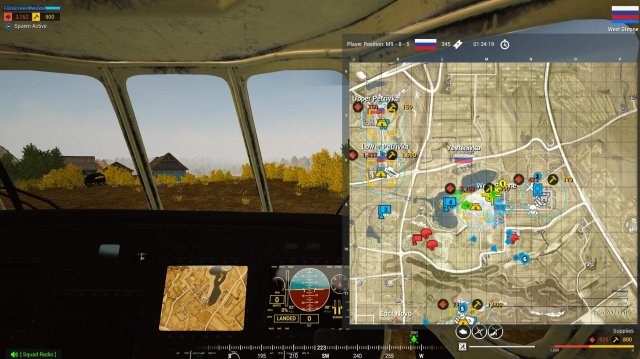
Navigation Display
- Location of helicopter on 2D map.
Status Display
Having damaged compartments can have strong impact on passenger comfort.
- Hull: Your helicopter will blow up when it reaches zero.
- Main Rotor: You cannot fly with destroyed blades.
- Tail Rotor: You will lose directional control (not simulated in V16).
- Engine: You will lose performance and being less maneuverable, or even go straight down.
When hearing warning siren and having flashing red light in cabin, your first action will be "get the hell out of here and fly to a safe place, in order to repair your helicopter".
Please refer to in game training scenario for more details.
Basic Maneuvers For Normal Operation
Those skills shall be practiced in training range, do not join actual matches as an incompetent pilot. You will be the burden of your team if you keep crashing helicopters every time.
Get your a*s out of seat if you cannot fly it safely.
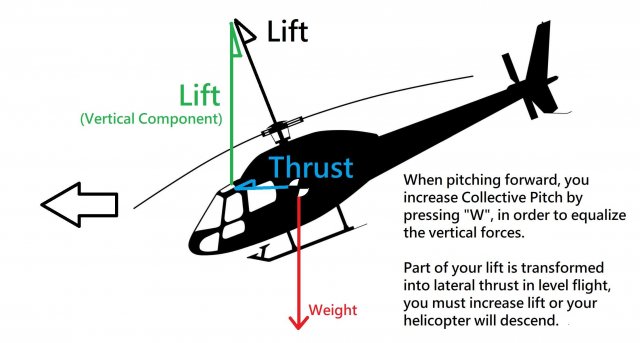
W and S controls your Collective Pitch, this decides how much air your rotor blade “bites” per rotation. If you raise collective pitch by pressing W, blade pitch is increased so more lift is generated, the helicopter goes up. 45% is the predefined value for hover flight, maintaining this value shall give you fixed altitude with zero airspeed.
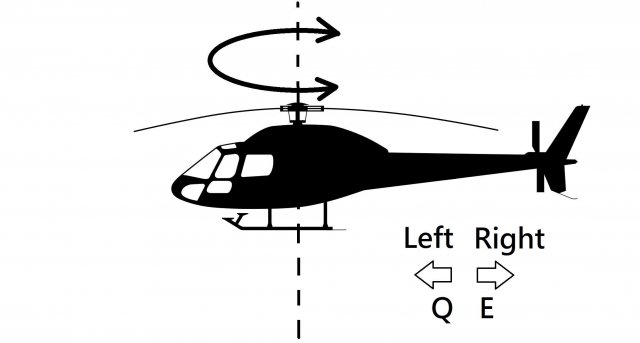
Q and E are for tail rotor control, your nose will yaw (veer) to the left or right. This is used to change your heading rapidly or coordinating turns.
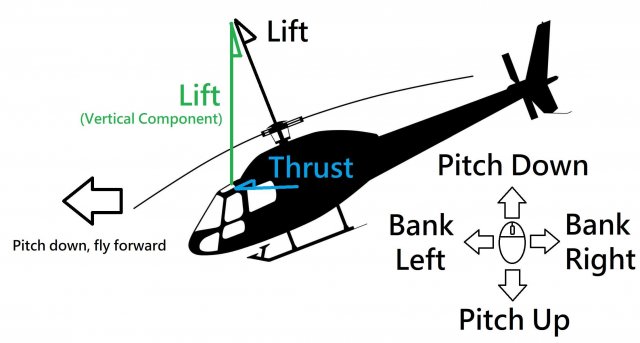
Your mouse controls pitch and bank angle (Cyclic Control). Based on physical design of rotor blade, the helicopter will fly along the direction where it’s tilted to. So you may fly forward, backwards, or horizontally to left or right. Just tilt your helicopter to that direction. But you will lose altitude because lift on vertical axis is transformed into horizontal force as thrust.
Takeoff
Increase your collective control to get airborne, gain altitude first and pitch forward for speed. Watch out for obstacles nearby, it’s recommended to gain a safety altitude first before starting to fly away. Remember, your blades will become a pile of broken debris when they hit any obstacles!
Straight And Level
Maintain a fixed height and direction, refer to your attitude indicator (artificial horizon) to keep wings level. Tilting forward (Decrease pitch) will increase your speed, and upward (Increase pitch) will decrease your speed.
The effects of controls are a bit weird at this moment, normally a helicopter will gain more lift from rotor blades with increasing airspeed, so your altitude will increase given a constant collective pitch setting but increased airspeed. However, this effect is merely noticeable on Squad’s helicopter.
Level Turn
Turning the helicopter could be realized by two ways, applying tail rotor control or by banking the helicopter. For low speed flight, by pressing Q or E, effect of tail rotor is strong enough to make you turn. However, as airspeed increases, you have to bank the aircraft into the direction you want to turn. This causes lift from your rotor blade to generate a horizontal force, then you will enter a turn due to the combination of forward and horizontal speed.
Hovering & Landing
Hovering can be maintained by selecting 45% of collective pitch control and maintaining level flight (no pitch and no bank angle). To transfer from forward flight into level flight, pitch up to reduce airspeed and lower your collective control in order to maintain altitude. Once the helicopter slowed down, adjust accordingly to make it a complete stop in midair.
Landing the helicopter can be performed after entering hover, decrease your collective pitch slowly and establish descent. Make sure you don't fall too fast before touch down or you may damage the hull.
Advanced Combat Maneuvers
Terrain Following
In order to avoid being spotted, you should fly as low as possible. Just few meters above treetops will be the best condition. However, you have to take your maneuverability into account to not get too close to ground obstacles. So going full speed at treetop height may not be the best answer, since the safety margin for your terrain clearance reduces with decreased altitude and increased airspeed. Evaluate the risk and your skill, do not let your confidence catch up with your actual piloting capability.
My solution is taking a moderate speed, like just a bit faster than wheeled APCs, but maintain low altitude as initial condition. Speed up when you have open ground ahead, and slow down before entering complex terrain. It’s always better to take your time and adapt to terrain than flying into a big tree or rock, embarrassing yourself.
When practicing terrain following flight, look well ahead and check your speed regularly. Looking out helps you analyze terrain conditions, and checking speed enables you to evaluate your closure rate with ground obstacles. Find the optimum speed for you, this speed shall make you avoid obstacles safely and maintain a good forward pace.
Hot Drop / Hot Pickup
Dropping troops or supplies into a hot area is risky, but sometimes you will have to do it. For example: Sending reinforcements to defensive cap, or resupplying friendly FOB, or picking friendly infantry up from battlefield.
To make yourself safe, approach-landing-takeoff time shall be as short as possible. Doing so minimizes the exposure time under possible enemy fire. What’s more, do not land if there are enemy armored vehicles nearby, even an APC can make you bleed and subsequently kill you because its impossible to patch yourself up in flight.
Ask friendly units nearby for fire support when doing so could greatly increase your chance of survival. What’s more, it’s also a good idea to ask the safest direction to approach landing zone from ground troops.
Survival Tips
Avoid conflict zone as much as you can.
Remember it: You are flying a transportation helicopter, it’s not an Apache or Havoc. If you got painted by enemy fire, do not linger but get the hell out of there as fast as possible. Door gunners only provide you with minimum self defense, it’s not even a 50.cal. The longer you stay under enemy fire, the less chance of survival.
When flying from Main Base to Forward FOB, avoid any enemy controlled flags as much as possible. You will never know what is waiting you below. Anti-Air gun, RPG, Guided Missile or other armored vehicles. If you got caught, the worst condition is being one-shot wasted.
This means that your route may be away from the center of map, flying far away from active areas may take more time, but it’s always better to stay safe.
Fly as low as possible and keep maneuvering.
Practice terrain following flights often can safe you and your teammates’ life. The lower and fast you fly, the more difficult for enemy units to track you and hunt you down. Remember, as long as you keep moving, enemies will have to calculate lead and distance continuously. However, flying low and fast is dangerous, that’s why practicing low altitude flying is essential.
Make your landing time as short as possible, do not linger.
The longer you stay on ground, the more dangerous it is. You’re simply a chewy target for everyone who has line of sight on you. Just fly in, land, dump people and supplies out, then GTFO. Leave as fast as you can, your presence may have already drew tons of enemy’s attention, they are on the way to set up traps for you.
Reject stupid orders which lead you to death, be able to pull out of danger in advance.
A squad leader who wants you to pick his men up in front of freaking enemy tanks? Or he wants you to land on top of enemy HAB? Don’t do that, evaluate potential hazards and act accordingly. Following orders does not mean committing suicide blindly.
Sometimes you may be asked to hold position to wait for friendly spawn, you should be checking map continuously for any sign of hostile forces nearby. Take off and fly away if you feel unsafe to stay on the ground.
Avoiding And Escaping Different Types Of Threats
Tank Gun / Auto Cannon
A tank has perfect firepower to destroy anything around it, the biggest threat is its main gun. You can definitely get one shot by it, there's no possibility to survive it. (If Squad's buggy physical engine decides to help you out, you may take no damage...) Auto cannon on IFV/APCs are also dangerous, your rotor or engine may be completely disabled after a few hitting shots.
If you run into a armored vehicle within visible range, the best way is to lower altitude, increase speed and fly perpendicularly to hostile line of sight. This creates a big horizontal movement of target picture for the gunner, because he has to calculate lead for a flying object manually. Flying lower also increase the chance of having terrain obstacles between you and enemy tank, blocking gunner's line of sight. Once you are on escape course (putting enemy tank at 6'o clock), consider doing small S-turns until completely clear of danger.
Flying high above enemy tank is ill advised since most of the tanks have commander's anti-air heavy machine gun, and you increase the chance of getting caught by other hostiles anti-air units after raising altitude. (Additionally, most IFV/APC's have very good elevation for their auto cannons).
Anti-Tank Missile
Getting hit by guided weapon is not fun. Yeah, you will get one-shot by missiles. They are fast and difficult to dodge, what's more, you often don't see where it's coming from. T-72B3 Tank, Bradley and BMP IFV, Spandrel, TOW MRAP and stationary ATGM launcher are the deadliest threat in the battlefield. You have no counter to that type of threat.
If you confirm that you are being engaged by guided missile, lower altitude and place a obstacle between you and possible direction of threat. Missile is a line-of-sight weapon, if the missile operator cannot see you, the chance of getting hit will be greatly lowered. Flying perpendicularly to the missile launcher may not work since it's guided.
That's why terrain following flight skill is essential!
Infantry's Rocket
Stay away from those rockets, they are unguided but can ruin your day easily when used by trained soldier. (Please refer to BF4/BF3 gameplay video in order to feel the frustration)
The damage model is yet to be improved, I once shot a Black Hawk with RPG-7 Tandem and it only did half damage. But who knows if it can shot you out of sky with just one hit? If you are being painted by small arms fire, it may indicates someone with rocket is preparing to knock you down. It should be fine if you maintain a good distance between yourself and enemy personnel.
AA Gun / Stationary MG Turret
AA Gun should be the greatest threat to helicopters, but the ZU-23-2 AA Gun is nerfed too much. It doesn't have a sight, and it deals little damage to heli. The chance of shooting down a helicopter at distance is pretty low.
This is unrealistic, but AA GUN is a smaller threat when compared to those above.
Source: https://gameplay.tips/guides/5575-squad.html
More Squad guilds
- All Guilds
- BLOG - MARCINEK
- 1101...
- Bug fix with Radial-Supply-Menu (you can't get in, get out, unload, load).
- Squad Guide 7
- Squad Guide 6
- Gua Squad Latam
- Squad - Scout Guide
- Squad - Close Quarters Mortarman Guide (All Factions)
- Squad - RAAS Meta Explained