
1.) Introduction
Welcome! Thank you for visiting! I hope you didn't have any trouble getting here, the internet can be quite disorienting these days. Well, let us get to business!
Assuming you've read the guide's description, you should already know that contained within is a very affordable Cleric build to face that daunting Realm Instability 5. Why would we want to do that anyway? Because doing so will give us way more loot, thus allowing us to build other teams more freely, without having to worry that much about resources anymore! It will also allow us to progress at a very quick pace and unlock post-game content much sooner (time-wise)!
This guide is intended for those
who struggle with the game after finishing the story.
who paid real money for commissioned content and want to see that stuff ASAP.
who don't have much time to play on their hands and simply want to cut the time spent on farming junk.
who like to realize their own elaborate builds, but don't have the resources to do so.
who like to try something other than the more popular specializations for a change.
who want to know a bit more about how a powerful build may look like.
That being said, I do encourage you, or rather expect from you, to experiment with different specializations, whenever the chance presents itself. The game is way more fun, if you avoid sticking with one build for too long and instead try to come up with your own hideously overpowered build.
Or you can do whatever. Not that I'd be able to do anything about it. ¯\_(ツ)_/¯
I assume you are already familiar with the basic mechanics of the game. If anything seems outlandish to you, you may always refer to our trusty ingame codex (I recommend paying special attention to the Combat section), however I will give it my best to properly explain the more intransparent mechanics contained within this guide.
One additional thing I usually take for granted: Make sure to set battle speed to "Ultra" and disable all animations and combat messages! This build does a lot of things each turn and I think you will greatly benefit from not having to sit through all that stuff. You can always check the battle history, if something unusual happens.
This guide was created during game version 1.0.5.
Abbreviations that will be used include:
rd = Realm Depth
RI = Realm Instability
AoE = Area of Effect
t0 = Turn 0 (before the start of turn 1)
t1 = Turn 1
GotG = Gate of the Gods (mid-game spoiler)
Disclaimer
I'm not responsible for any damage to your person, property and/or loved ones resulting from reading this guide or appying its contents in real life.
Any references to third-party brands, franchises and other properties, physical and/or intellectual, are of a purely parodic nature. Please don't sue.
Do not post this guide on another site and claim it as your own. That would make me very sad. :c
2.) Meet Our Mons!


Yay, pictures! This guide is pretty text-heavy, so I'm glad we get to have something lighter to start with. This build can be fully recreated from rd135, but you can potentially go for a weaker version from rd75 as well.
Left-click the images to enlarge. Alright, without further ado...
(early post-story spoilers ahead!)
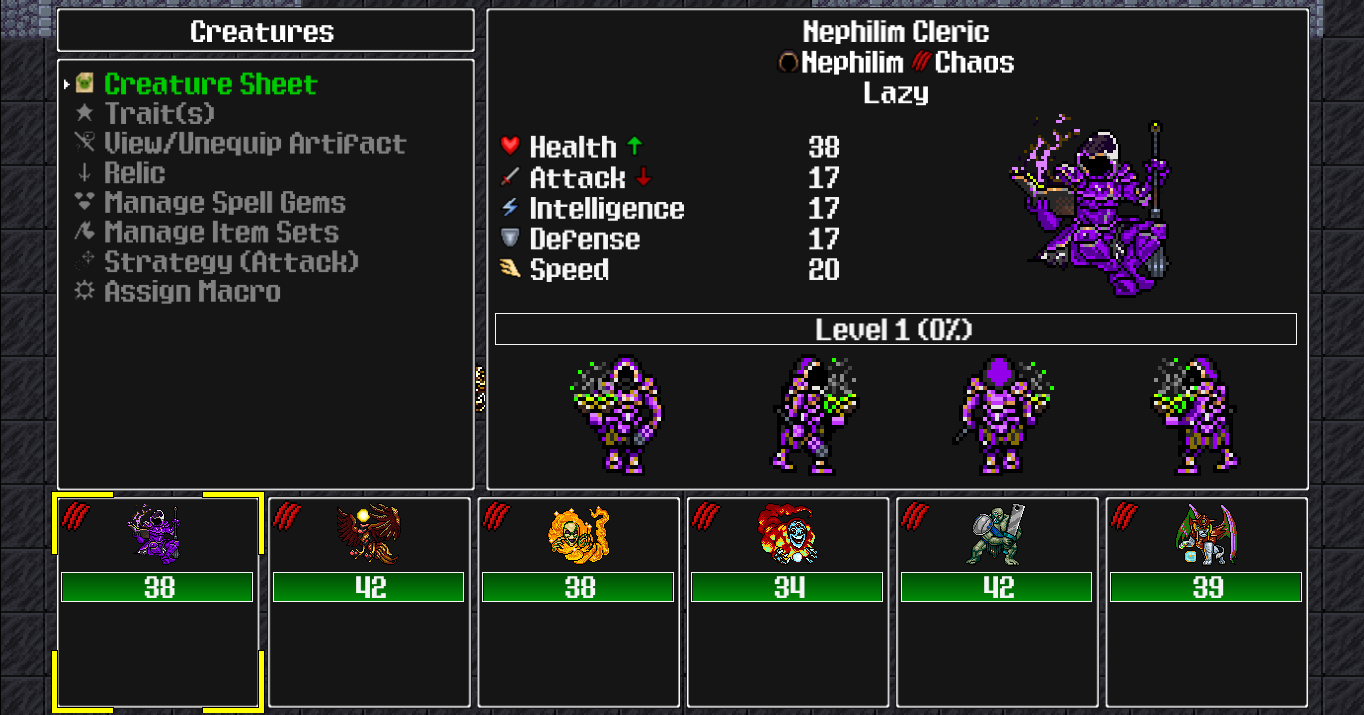
Nephilim Cleric, fused with Diabolic Nemesis
Availability:
Nephilim Cleric can be found from rd60 in Refuge of the Magi or Sanctum Umbra.
Diabolic Nemesis can be found from rd105 in Kingdom of Heretics.
Traits:
Mender's Oath - After your creatures are healed, they heal your other creatures for 25% of this amount. Your creatures receive 50% less healing. This trait does not stack.
Diabolic Link - At the start of battle, your Diabolic Horde share their Maximum Health with each other. Then, their Maximum Health is decreased by 75%.
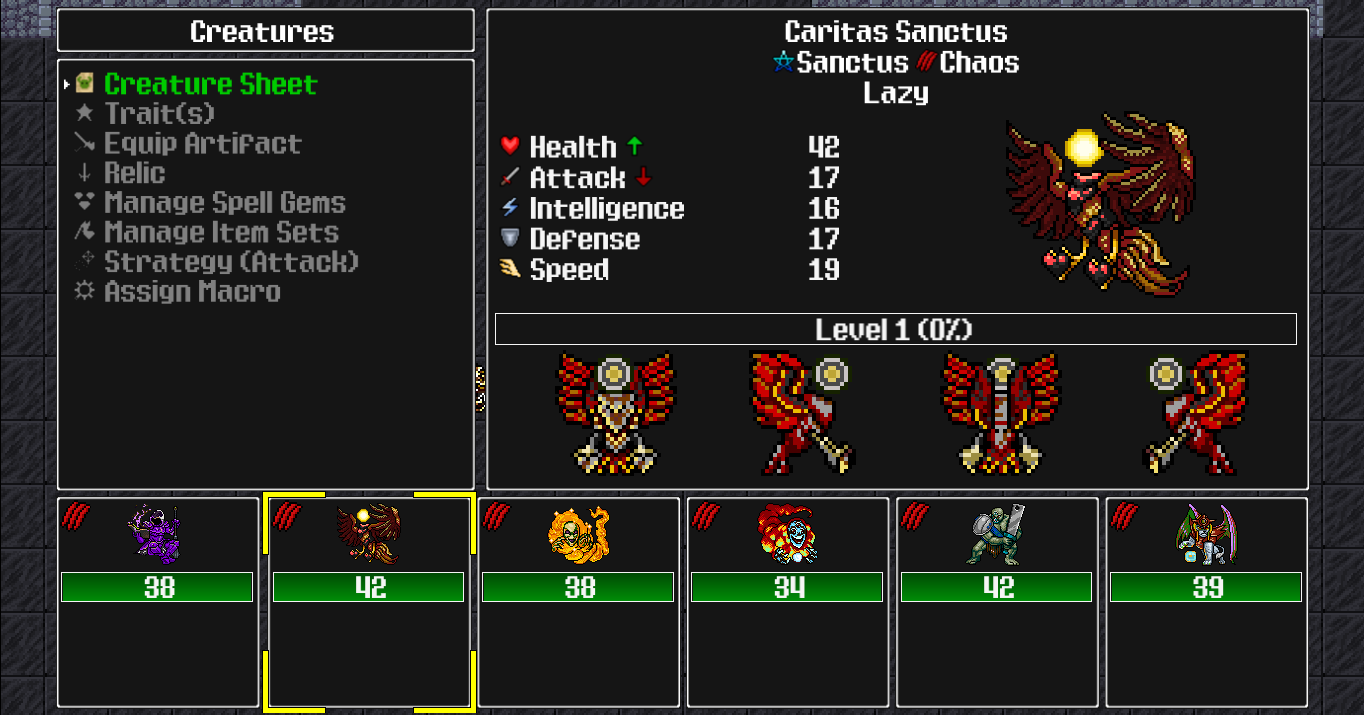
Caritas Sanctus, fused with Diabolic Commander
Availability:
Caritas Sanctus can be found from rd30 in Azure Dream or Astral Gallery .
Diabolic Commander can be found from rd60 in Kingdom of Heretics.
Traits:
Charity - After this creature is healed, it heals one of your other creatures for 300% of this amount. This trait does not heal creatures that also have this trait.
Diabolic Fortitude - Your Diabolic Horde have 10% more Health for each Diabolic Horde fighting on your side. This trait does not stack.
Clairvoyant Spirit, fused with Mimic
Availability:
Clairvoyant Spirit can be found from rd75 in Frostbite Caverns or Fae Lands .
Mimic can be found randomly at any realm depth. Defeating one rewards you with 5% mana toward summoning it. I recommend farming the Arachnid's Nest, since this creature appears relatively often in that realm.
Traits:
Abnegation - After your creatures are healed, a random enemy takes damage equal to 50% of the amount of Health recovered. This trait does not stack.
Surprise! - This creature always starts battle at the top of the timeline. [As an enemy, also has 5 random buffs.]
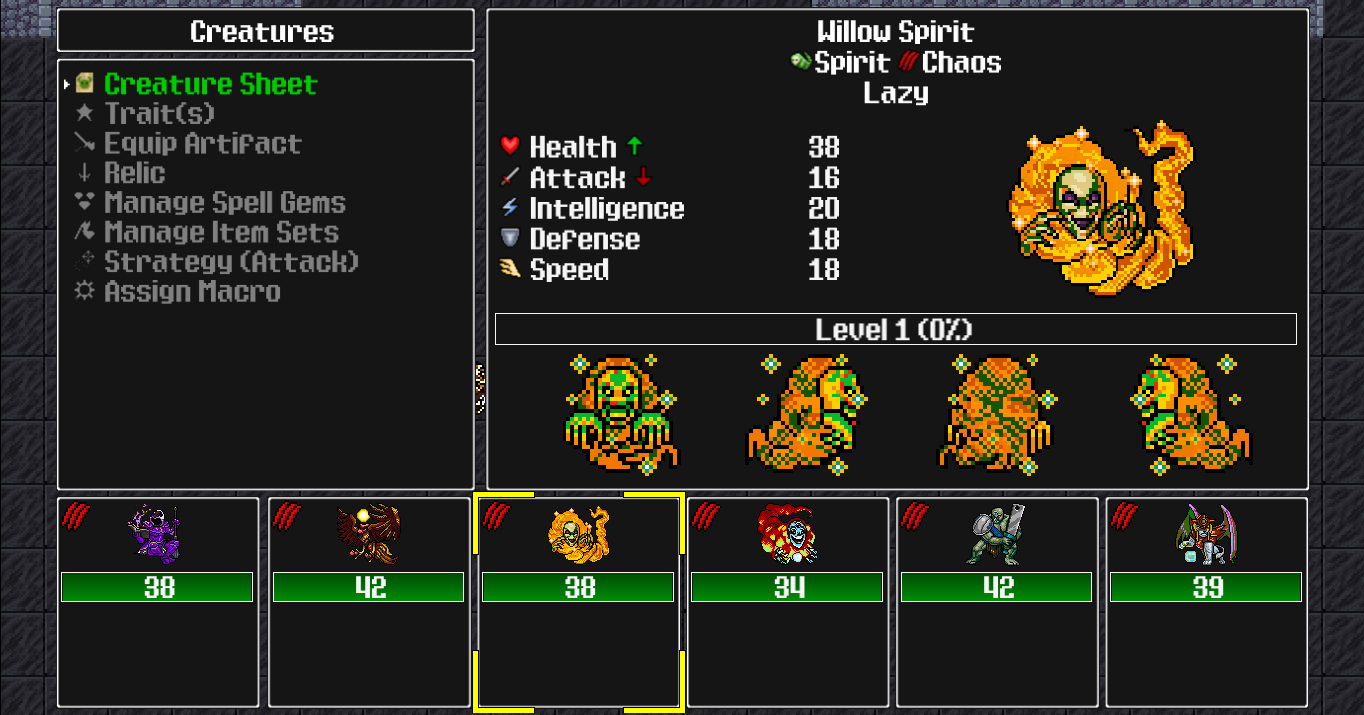
Willow Spirit, fused with Clamorous Cockatrice
Availability:
Willow Spirit can be found from rd45 in Frostbite Caverns or Fae Lands .
Clamorous Cockatrice can be found from rd30 in Arachnid's Nest or Amalgam Gardens .
Traits:
Everglow - Your creatures recover 100% more health from healing effects. This trait does not stack.
Odd One - Your creatures' traits, spells and other effects that are affected by the number of creatures that belong to a certain race act as if they had 2 more of those creatures fighting on your side. This trait does not stack.
Doombringer Koloss, fused with Diabolic Observer
Availability:
Doombringer Koloss can be found from rd30 in Frostbite Caverns or Titan's Wound.
Diabolic Observer can be found from rd75 in Kingdom of Heretics.
Traits:
Rise Above - After your creatures are healed, they gain 5% of that amount as Maximum Health as well. This trait does not stack.
Diabolic Protection - Your Diabolic Horde take 5% less damage for each Diabolic Horde fighting on your side. This trait does not stack.
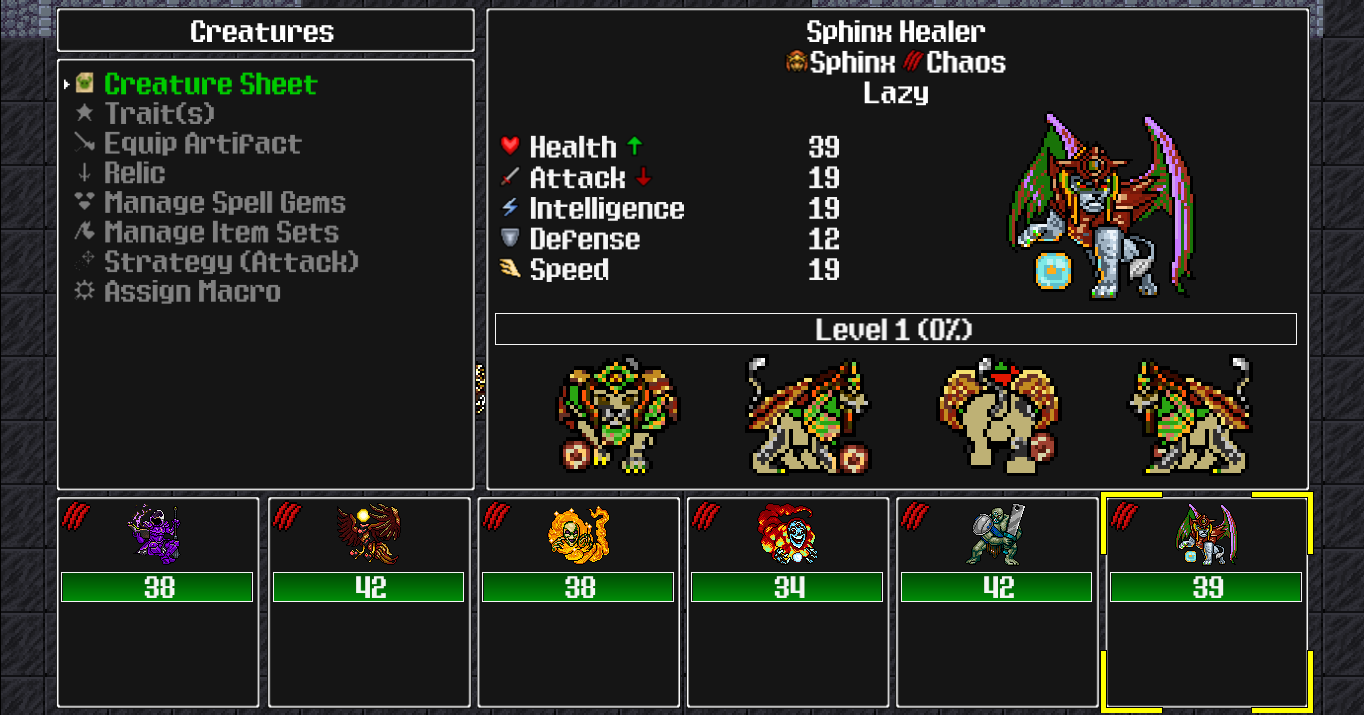
Sphinx Healer, fused with Diabolic Rebel
Availability:
Sphinx Healer can be purchased from Yseros' god shop in The Barrens for 10 emblems (favor rank 8 required).
Diabolic Rebel can be found from rd135 in Kingdom of Heretics.
Traits:
Rejuvenation - At the start of your creatures' turns, they recover 12% Health for each creature of the same class fighting on your side. This trait does not stack.
Diabolic Revolution - Your creatures' Diabolic Horde traits act as if your party contains 3 more Diabolic Horde. This trait does not stack.
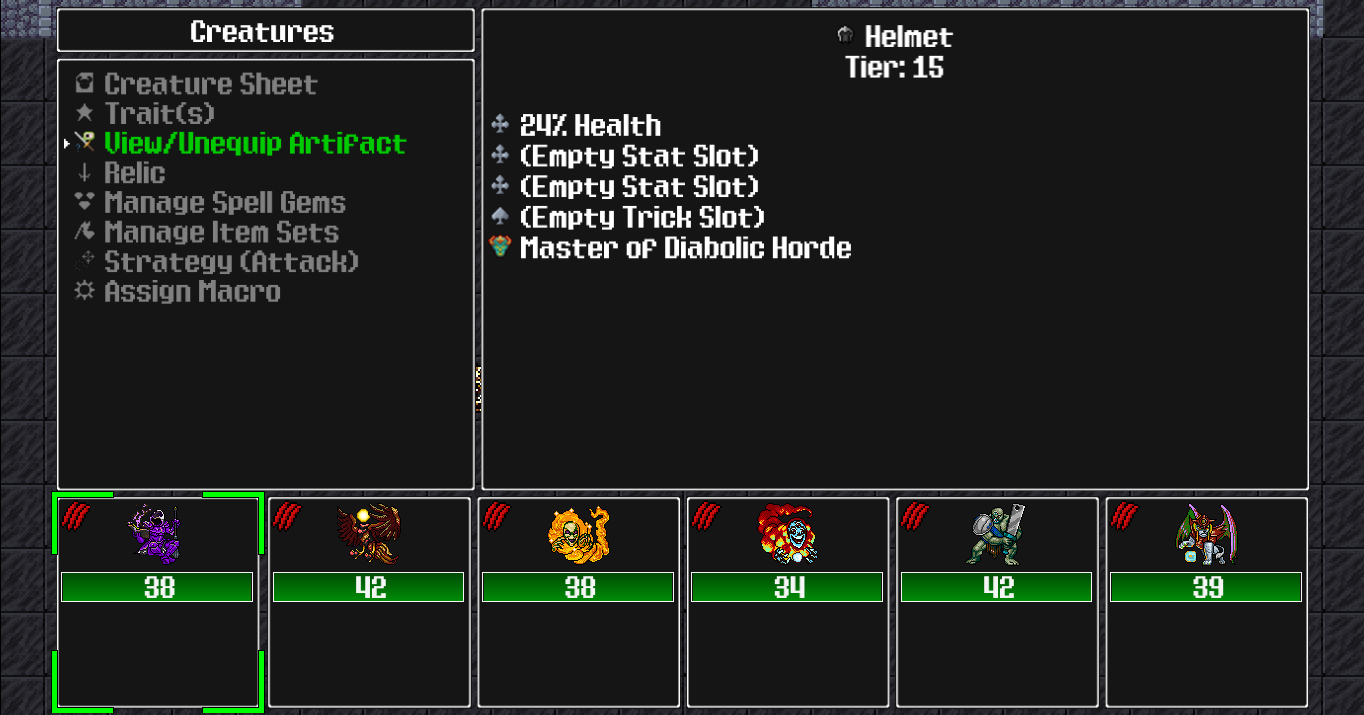
Our necessary artifact
Availability:
As soon as you fight Master of Diabolic Hordes for the first time. You can find him in Kingdom of Heretics. Save up a bit of Brimstone before that.
Trait:
Master of Diabolic Horde - At the start of battle, your creatures' races are changed to Diabolic Horde.
For your convenience, here's the team on berated-bert's Siralim Planner:
https://berated-bert.github.io/siralim-planner/?b=255cb156d2de805acd9a79b60639c4_f1ca4b4a40c1_eee546a42acc_87eac15d9001_98eabafbdb5e_&s=CL&r=______
Feel free to switch things around as you please, but do consider that we want our creatures to be of a single class, other than Life or Nature. Read further to understand why.
Pro tip for the vain:
If you're not satisfied with how your creatures look, there's an easy way to expand your cosmetic options: creature skins!
Not only can you apply a skin to a fused creature, you can also apply a skin to the secondary creature before fusion. Doing so will give you different options too choose from, when selecting the colour scheme of your fused creature!
3.) What This Build Does And How It Works
Well, Cleric is all about healing, right? So we milk those heals for all their money's worth!
The heart of this build lies in six core components: Nephilim Cleric's Mender's Oath, Caritas Sanctus' Charity, Willow Spirit's Everglow and our trusty perks Consecrated Ground, Greater Healing & Overheal.
You don't really need to bother with Cleric's other perks. Inner Light, Radiance and Guardian Angel are good to have and can be taken without worry, but the others are either situational or can even be a hindrance to our build (e.g. Revelation). Simply reset your perk points at the Wardrobe and redistribute them accordingly.
A clean floor
Let's get the most basic thing out of the way. The Blighted debuff turns our heals into damage. We don't want that. That's why we need immunity to this debuff (just so you know: resistant ≠ immune) and have to bring the Consecrated Ground perk. This perk provides full immunity to Blighted (with one late-game exception) and ensures that all the things that follow will actually work.
A humble Nephilim
A first look at Nephilim Cleric doesn't exactly inspire awe. Giving single-target heals a weakened AoE effect is decent and all, but that 50% less healing received is simply terrible.
I'll give you an example: Let's say we heal a creature for 100% of its Maximum Health.
Mender's Oath cuts that heal in half, so our creature is only healed for 50% of its Maximum Health.
Our other creatures receive healing equal to 25% of that previously mentioned amount (essentially 12.5% of the first creature's Maximum Health), BUT since Mender's Oath lets all our creatures receive healing at just 50% efficiency, we actually end up with only 12.5% (6.25% of the first creature's Maximum Health).
Or simply put:
Heal(gross)*0.5 = Heal(net), Heal(net)*0.25 = Spread(gross), Spread(gross)*0.5 = Spread(net)
Just look at all those multipliers smaller than one! No wonder Mender's Oath is such a great tool against damage from Blighted!
Oh well, let us increase those numbers now. c:
Getting into the healing spirit
Willow Spirit is not only really nice and sparkly, it also doubles all healing our creatures receive, effectively negating the penalty imposed by Mender's Oath.
So now, when we heal a creature for 100% of its Maximum Health, it will be healed for that same amount and spread the full 25% to its allies. So far, so good.
No receiving without giving!
Greater Healing is indeed great for us. Not only does it increase the amount of healing our creatures receive by 100%, but the amount of healing they give as well!
Let's try to express this in (probably formally incorrect) numbers:
Heal(gross)*2 = Heal(net), Heal(net)*0.25 = Spread(gross), Spread(gross)*2 = Spread(net)
In consequence, if we heal a creature for 100% Maximum Health, it will receive healing equal to 200% of its Maximum Health.
Then, it will heal its allies for 25% of that amount.
Since all creatures also receive 100% more healing, our other creatures end up with a heal equal to 100% of the first creature's Maximum Health.
Ultimately, one heal for 100% of a creature's Maximum Health results in one being healed by 200%, while the others receive 100% of that amount. Neat!
Looping Louie got nothing on us!
Since we're likely starting out piss-poor, we will have to depend on Charity. Lucky for us, our Caritas Sanctus is a very generous creature indeed.
Whenever Caritas Sanctus receives healing, it heals another creature (without the Charity trait) for 300% of the received amount! I hope you are aware where this is going...
We heal a creature for 100% of its Maximum Health. All our creatures (safe for one being healed for 200%) end up being healed by 100% of the first creature's Maximum Health.
Caritas Sanctus says "Hello there. Did you drop this? I like an honest person. I will give you something better in return.".
A random ally is healed for 300% of the healing received, or rather 600%, because we give 100% more healing.
However, since we also receive 100% more healing, that ally ends up being healed by 1200% of the amount Caritas Sanctus received.
We start with a teamwide heal of 100% Maximum Health.
Caritas Sanctus heals an ally for 1200% of that amount.
We continue with a teamwide heal of 1200% Maximum Health.
Caritas Sanctus heals for 14,400%.
Teamwide heal of 14,400%.
Then 172,800%.
2,073,600%.
24,883,200%.
You get the idea.
We don't simply cure, we overtreat!
It should be clear by now why we need the Overheal perk. We didn't set up this elaborate healing treadmill to patch up our ouchies and booboos. This is about big, BIG numbers.
What about the rest?
We simply use the Rise Above trait to get a whole lot of powerful Maximum Health gains. The Health gains make sure that our loop is able to scale itself up even further, but for that we need a source of healing that scales with our Maximum Health. It's good that we just happen to have brought one.
Rejuvenation provides us with a high amount of healing at the start of each of our creatures' turns (72% of a creatures' Maximum Health in the given setup), so we don't have to do anything to keep the loop going.
(late-game spoiler ahead)
Since Misery Nemesis is not too uncommon of a threat, we use Diabolic Link & Diabolic Fortitude to give us a little headstart, otherwise we couldn't quite handle those (without Censure anointment or Plague Phlebotomist's Blood and Power anyway) .
The Master of Diabolic Horde trait ensures that all our creatures can benefit from those juicy Diabolic Horde traits.
Odd One & Diabolic Revolution not only empowers our t0 Maximum Health gain with Diabolic Fortitude, but also increases damage reduction provided by Diabolic Protection (from a good 30% to an even better 55%).
Abnegation turns our healing loop into an unceasing artillery of indirect damage (the other existing types being spell & attack damage).
Since there are a few situations where this type of damage can't accomplish anything* (other than blocking our attack & spell damage), I recommend bringing means to easily kill your Abnegation creature. The Dark Ritual spell is only one such example. Then move on to cast a damaging spell enchanted with 'Potency based on X% maximum health'.
*The loop will likely cause Abnegation to hit each enemy about 15 times per turn, capping out the limit on the times every enemy creature is allowed to take damage each turn. Be aware that 0 damage hits count toward said limit!
To end battles more quickly, we bring Mimic's Surprise! trait, since our loop only triggers on our own turns.
Conclusion
So yeah, we heal like crazy and turn our creatures into humongous sponges, while we also fire a snowballing barrage of indirect damage at our foes.
While this build's insanity is evidently visible, there are plenty of other overpowered builds that work in more subtle ways (e.g. Suicide-Imler/Imling Pyromancer or a well thought-out Witch Doctor build). Rest assured that we are not at the peak of our game here; These are just the first few steps down the rabbit hole...
4.) What Spells To Take Along?
Before we get to the spells themselves, let me give you a quick overview of the enchanting materials we will require:
Opal enables our spell gems to swap classes. It can be found at Aurum's god shop (Temple of Lies) for 10 emblems at favor rank 4
Tourmaline lets our spell gems base part of their potency on our creatures' Maximum Health. It can be found at Mortem's god shop (Titan's Wound) for 10 emblems at favor rank 4
Jade gives a basic ethereal copy, with one charge, of the enchanted spell gem to all allies of the creature equipped with the enchanted spell gem. It can be found at Azural's god shop (Frostbite Caverns) for 10 emblems at favor rank 4Don't worry about the other materials and don't buy more material than you actually need. We will receive more than enough from random loot sources.
Damaging spells
Pumpkin King's Wrath (Chaos) - Enemies take a moderate amount of damage two times.
Our best option to begin with, since it matches our creatures' classes and only needs to be upgraded to level 5, so we can enchant it with 'Potency based on X% Health'.
We need to put it on all our creatures, except Clairvoyant Spirit, since we only use this spell whenever Abnegation has no use to us (so five copies total).
Unlockable Damaging spells
Death Blossom (Death) - Enemies take a small amount of damage three times.
Fully upgrading this spell gem, according to our needs, is more expensive than simply using the aforementioned spell. I personally prefer to use this one, because it is more likely to hit an enemy with the Repelling buff.
Get it, if you want to. If not, don't worry. It's not mandatory.
Source: Tenebris' god shop (Bastion of the Void) for 10 emblems (favor rank 6 required)
(late-game spoiler)
Angry Orchard (Nature) - Enemies take a moderate amount of damage four times.
Odds are you already have plenty of resources when unlocking this spell. Its naturally low number of charges may be a little off-putting, but if you have read section 8.) of this guide, you'll understand that bringing two or three 'Generous' copies can potentially be more than enough. Definitely one of the best regular damaging spells in the game.
Source: Nature Guild
Utility spells
Greater Dispel (Sorcery) - Remove all your creatures' debuffs, remove all enemy buffs. 'nuff said.
Astral Dimension (Sorcery) - Unseal all your creatures' spell gems. This spell gem cannot be sealed.
Having your spell gems sealed can leave you in a dire situation, so we should bring at least one or two copies enchanted with 'Generous'.
This spell is even more important, if your creatures have a lot of ethereal spell gems; One enemy cast of Spell Leak can severely cripple you, if you don't bring this spell along.
Requiem (Life) - Revive all your dead creatures with a moderate amount of Health.
It's always good to have a mass resurrection option for emergencies. Another great candidate for a 'Generous' enchantment. Bring at least two and hope you never have to use it.
Recharge (Sorcery) - Caster's spell gems gain 3 charges.
The best way to manage spell gems charges, when you don't have anything better. Casting this spell also recharges itself, so one copy with 'Generous' should suffice.
(contains a mid-game spoiler)
Contagion (Death) - Remove all enemy minions and afflict a random debuff for each minion removed.
You mostly use this spell to inflict a whole lot of debuffs on King Andrick & Muse , but it does have an occasional use outside of these situations. One 'Generous' copy is enough.
However, I strongly advise against bringing this spell regularly when playing a minion based build (use caution, Necromancer!). The reason for this is the 'Copy your spell gems' RI modifier. While it is nice to have this spell in the aforementioned fights, RI can make it backfire BADLY.
Dark Ritual (Death) - Target is killed (ally only) and the caster receives all its buffs and 100% of its Attack and Speed.
I've mentioned this spell before (and will do so many more times), so you may remember why we take it with us: To kill Clairvoyant Spirit!
Some opponents are immune to indirect damage and because Abnegation is likely to exhaust the limit on suffering damage per turn for each enemy, we may end up in unwinnable situations, if we don't bring this spell into battle.
One or two 'Generous' copies will suffice.
Oh, one more thing: Make sure the caster is not afflicted with the Blind debuff! You don't want to accidently kill the wrong critter.
Unlockable utility spells
(minor early post-story spoiler)
Dying Wish (Death) - Target is sent to the top of the timeline and the caster is killed.
Since Dark Ritual can't target the caster, we need one copy of this spell on Clairvoyant Spirit. As a bonus, we may immediately act again and likely keep the enemy from trying anything funny.
Again, beware the Blind debuff!
Source: Ariamaki's god shop (Land of Breath & Balance) for 10 emblems (favor rank 6 required)
(minor early post-story spoiler)
Wormhole (Sorcery) - Caster and target switch positions on the timeline.
Great for switching turns among teammates and abusing the heck out of start-of-turn effects (e.g. our auto-heal). However, be aware of the following:
This spell targets enemies by default, so auto-casting this one is out of the question. Unless you really want to give your enemies more turns, I guess.
As a single-target spell, its use can be severely messed with by things such as the Blind debuff.Source: T'mere M'rgo's god shop (Amalgam Gardens) for 10 emblems (favor rank 2 required)
(late-game spoiler)
Chaos Orb (Chaos) - Enemies take a large amount of damage and their buffs & minions are removed.
While this spell is technically a damaging spell, I think of it more as a late utility spell. Not direly needed, but very handy in some situations where enemies just have too many buffs & minions.
Source: drops from False God Caliban
5.) Potential Dangers, Or: "Ach! Hans, Run!"
Despite our ridiculous amount of Maximum Health and damage, we are by no means invincible. There are things out there that may ruin our day, if we're not prepared!
Also, I will not provide an accurate description of dangerous enemy traits. Look them up for yourself, if you're that interested.
Dangerous enemies
Bard Trovatore (Hymn of Panic) - Our musical hydrocephalus here just loves to mess with the timeline. While our Surprise! trait should usually ensure we get the first turn, this guy messes everything up by shuffling the timeline at the start of battle! How rude!
Battrap (Debacle) - This chiropteran pitcher plant can be a serious danger to us, if we can't somehow trigger our loop outside of our own turn. Whenever an enemy gains stats (*gulp*) this creature has a 25% chance to send it to the bottom of the timeline. Fortunately, this creature is mostly exclusive to the Overgrown Temple realm. Avoid visiting the deity of piggies, until you can do something about this.
Alluring Snaptrap (Atrophy) - Same problem as the previous creature, with the difference being that its trait works with heals instead. Aw shucks! I wanted to go hug the big piggy... :c
Nix Imposter (Starless) - This horrible highwayman prevents each creature from gaining stats. While we have the means to deal with this, this trait shouldn't be underestimated, since it prevents us from snowballing our stats and damage.
Misery Nemesis - Chances are you have already met a group of Nemesis creatures. In short, they are a team of regular creatures that come with an in-battle effect unique to their type. This one prevents our creatures from gaining any buffs or stats. Similar to Nix Imposter, we can actually deal with those creatures thanks to our powerful t0 Maximum Health gains (they remain unaffected). We should be able to rack up enough damage to quickly kill this Nemesis. Just don't say I didn't warn you.
Satyr Dominator (Rough Recovery) - An ill-tempered goatman that allows our creatures to be healed only once per turn. I consider this one to be more dangerous than the former two entries. Not only does it severely cripple our ability to scale our stats & damage, but it also stops our loop dead in its tracks. When encountered, try to kill it ASAP!
Lappet Beacon (Due Recompense) - Not a danger to this build, but a good reason to not bring creatures of the Nature class. Whenever an enemy Nature creature (that means ours) would gain stats, this nasty bugger causes them to lose the same amount of stats instead!
Pellucid Beacon (Purity and Emptiness) - Another on of those, but again no issue for the build in its current form. Just avoid bringing Life class creatures. Whenever an enemy Life creature (its us again) would heal an ally, this little kleptomaniac steals the heal for its own party!
Otherworldly Visitor (Love Thyself) - An Exotic creature, probably commissioned by someone with a grudge against Maximum-Health-gain builds. Encountering this creature is naturally a rare occasion and it will most likely be killed, before it can do any serious harm. This guy is no reason to loose sleep over, I just wanted to give him an honorable mention.
Master of Phase Warriors, Chroma, Flubris & Aspects of Meraxis - I'm giving all of them a single entry, because the main problem these creatures pose is the same: They are immune to indirect damage!
Because Chroma, Flubris and Aspects of Meraxis won't ever get the jump on us (hurray for boss preview!), we may prepare accordingly. Either leave Clairvoyant Spirit back at the castle or make sure to bring means to kill it in battle. You can deal with those bosses with a damaging spell enchanted with 'Potency based on X% Health' instead (Chroma and Flubris may require a bit of patience).
Master of Phase Warriors is exclusive to the realm Refuge of the Magi, so either avoid it entirely or kill Clairvoyant Spirit during the fight. Then win by applying the previously mentioned strategy.
(major late-game spoiler)
Saint Althea - We simply can't beat this one. To learn more, check section 7.2.2.).
Other dangers
RI modifier 'Less Healing: X%' - Please just avoid this one. Our build may be able to deal with regular enemies, despite this modifier, but once we have to face something stronger, we're outright screwed. Luckily, this modifier can't be a hidden one, so you should have no trouble avoiding it.
RI modifier 'Damage every turn: X% Health' - This is the reason why we need to bring at least some degree of damage mitigation. The damage scales with our Maximum Health, so going out unprepared can prove to be a deadly mistake. This modifier can be hidden, so watch your back!
Vitality Explosion spell - This can potentially wipe our whole team, if we don't bring enough damage mitigation. The damage this spell causes is based on the difference between our creatures' increased amount of Maximum Health minus the amount they would normally start battle with. You likely only die to this one once in a blue moon, if ever.
Our own loop - I'm being completely serious here. While you realistically won't ever die to your own stat gains in normal battles, you may be tempted to find out just how far you can push it. Don't worry, even after your creatures' displayed number of Health turns into "!?!?", you still have plenty of time to come to your senses and stop this insanity.
However, once those numbers exceed the value the game is able to keep track of, all your creatures will self-destruct. You don't believe me? Go try it for yourself then! Make screenshots. Tell your friends. Put it on your résumé.
6.) (minor Mid-game Spoilers) What Else Can We Add?
That's for you to decide...
Alright, just a few recommendations... >n>
Trait recommendations:
Katarina's Return (boss material) - After your creatures take damage, they recover 30% Health. This trait does not stack.
This trait lets you trigger the loop whenever one of your creatures takes damage. That means enemies will be likely to power you up by merely punching you. In order to unlock this trait, you need to defeat the boss Katarina three times after finishing the story. Then you can purchase its material at the Nether Shop (if you can't find it in your castle, go into decoration mode an check the Utility/NPC section). Be warned, it costs A LOT of Brimstone.
Rapid Regeneration (Sand Giant) - At the start of each creature's turn, this creature recovers 10% of its missing Health.
Unless you're fighting a Misery Nemesis or a creature with the Starless trait, your creatures' Current Health will always be at less than their maximum amount. While it allows you to kick off the loop at the start of every turn, it does interfere a bit with Rejuvenation. I generally recommend the trait I mentioned prior to this one... at least for this version of the loop. ;D
Blessing of Sands (Sphinx Ordainer) - Your creatures' traits and other effects act as if your party contains three more creatures that belong to the same class. This trait does not stack.
Good to increase the start-of-turn heal by Rejuvenation and empowering the loop at its root.
Strength in Numbers (Carrion Cockatrice) - Your creatures' traits, spells and other effects that are affected by the number of creatures that belong to a certain class act as if they have two more of those creatures fightig on your side. This trait does not stack.
Sphinx Ordainer has already proven to us, that one can phrase this trait less awkwardly. Be that as it may... This trait essentially does the same thing as the trait listed before it, only a bit worse. They both stack with each other, if you're into that. Otherwise, go for Blessing of Sands, instead of this one.
Bloodlust (Oculum Leech) - Your creatures always have Leeching and receive 30% more healing.
While we're not particularly interested in the permanent Leeching buff, we do benefit greatly from the bonus to healing received. Besides, Oculum Leech has a fantastic amount of base Maximum Health, so you may want to swap things around a bit when choosing to take it with you.
Emerald Blessings (backer material) - This creature gives and receives 100% more healing.
Put this trait on Caritas Sanctus to give our loop some extra OOMPH!
Endurance Aura (Phase Knight) - Your creatures take 70% less damage from all sources other than attacks and spells. This trait does not stack.
Damage based on our Maximum Health, which is usually indirect, is one of the greatest dangers to our survivability. A definitive recommendation.
Nature Transformation (Nature Shapeshifter) - When your creatures deal damage to each other, they are instead healed for 50% of the damage they would have received. This trait does not stack.
This trait may not do a lot for the build in its basic form, but it may become vital once we have access to some later features (as listed in section 8.)) and hits from ourselves may become MUCH more painful.
If you're at a relatively early point in the game, you don't really need to bother, just keep in mind that it's there.
Relic recommendations:
While I'm not too fond of Relics in general, I do have to admit that some have pretty nice effects. A few of them can even be major components of a build!
I don't want to get too deep into this topic (I'll safe it for another potential guide), but I will recommend one for this particular build: Arbiter, Holy Shield of Surathli (rank 60, but rank 20 is also fine)
The effects we are interested in are the 100% increases to healing received and healing given for its bearer. Guess who benefits most from this Relic? Caritas Sanctus, of course!
Put this and the Emerald Blessings trait on our holy chicken and we're in for a wild ride.
Artifact recommendations:
We like to have loads and loads of Maximum Health. Naturally, we equip each of our faithful companions with a Helmet.
We don't really have much use for an increased Defense stat, so we go for pure Health with our Stat slots.
And our Trick slots? I'd personally go for Damage Reduction and More Spell Gem Slots. I don't recommend the on-damage buff/debuff tricks, because they're based on chance and aren't triggered by Abnegation anyway.
Don't bother with the artifacts' Spell slots. We don't aim to cast a lot of spells and probably won't be provoking a lot. Besides, slotting a spell is very expensive.
All of this is just my personal opinion. Do whatever you want with this build. Experiment.
7.1.1.) (major Mid-game Spoilers) Tackling Late-game Challenges - Part 1
Gate Of The GodsWith such a powerful build, you are probably thinking about battling the gods themselves. A lot of them are easily overcome at rank 10 and beyond, but some of them require a bit of preparation. The following section does not contain an elaborate description of the gods' in-battle effects; I assume you have already unlocked this feature and can easily check for yourself.
The Gods, or: "I always wanted to punch you!"
Aeolian - We're starting with one of the handful of gods completely immune to damage from Abnegation. Just leave Clairvoyant Spirit back at the nest, bring another creature with Mimic's trait instead, wait for an opening and finish him off with a damaging spell gem enchanted with 'Potency based on X% Health'. Cheep wins galore!
Alexandria - Behold, the god of steampunk! He's good at raising his creatures' stats. Not as good as we though. Don't bother trying to grind his gears and countering his strategy directly, just take the first turn in battle and he'll quickly run out of steam.
Anneltha - She is what any young woman should aspire to be - GIANT AND DEADLY!!! D:<
Seriously though, while this goddess likely won't be fast enough to put our crew in danger, she can pose a major threat, if you get unlucky. Should you cherish additional safety measures, adjust the team order of your creatures a bit until you are comfortable. As in every GotG battle to come, go first and the Earth Goddess & her Planeteers should fall before they can summon Captain Planet inflict any harm.
Apocranox - Make sure to bring enough damage mitigation, for it is essential to trigger the healing loop at least once. Should you have trouble doing that, just put Malignant Storm's Wasted Age trait into Clairvoyant Spirit's/Mimic's artifact and Apocranox will be easy prey. You don't have that material? I don't know, maybe go hunt for it?
Ariamaki - The pyjama deity from the Land of Bed & Breakfast! He looks kinda cozy... I wonder if he would mind, if we'd try him on?
He usually puts up a bit of a fight, should you try to rip his fabric with only spells and attacks at your disposal. Lucky for us, indirect damage just straight up ignores his Shelled buff. When you can claim the first turn in battle, Ariamaki's team will come apart at the seams.
Aurum - It's a mutated Swarovski figurine! Since our lowest stat is just too low to pose any serious danger, we can basically treat him like he doesn't have any in-battle effect at all. Just like an overly expensive, but ultimately useless, frail trinket is supposed to be like. Nothing to see here, act first and smash him to pieces.
Azural - Bring one or more traits that let your creatures "always have" a buff and, you guessed it, go first. Oculum Leech's Bloodlust trait works especially well with this build.
...
I refuse to make cold-related puns. Go watch Joel Schumacher's "Batman & Robin".
Erebyss - As long as we get the first turn, she won't see what's coming! ...alright, that was insensitive of me to say. I'm sorry, Erebyss. :c
Friden - Shiver me timbers! Our Clairvoyant Spirit can't do anything against the frightening freebooter, so it is best left below deck. Make sure to act first, then cast Praise the Sun enchanted with 'Potency based on X% Health'. You may need more than one cast, since damage from Blighted is generally terrible, if not properly supported. Stay persistent and send this scurvy dog straight back into the briney depths!
Genaros - I wish this god had a cute, blushing piggybank skin available. Or a fun pot-bellied pig skin! Anyway...
This Okotto-lookalike doesn't pose much of a threat. He and his servants may be able to scale up their Max Health, but we can do that much faster and with awesome damage to boot! Move first and turn him into crispy bacon! Sorry vegans.
Gonfurian - This guy probably requires the most elaborate preparation, but nothing we can't handle. We may be unable to cast spells, but we can still bring traits to inflict enough debuffs on Gonfy and his brothers in arms.
Dryad Vindicator's Absolution, paired with Dolor Sin's Despair will provide us with another powerful loop, but it needs to be triggered in the first place. Woeful Spectre's Guilt, Leper Blightbringer's Pus and Pox or any of the stat-reducing Dragon traits are good candidates for doing so.
Be aware that you can't trigger Absolution + Despair infinitely (you may vaguely remember the stat-reduction cap). If you want to ensure glorious victory, bring either Plague Quack's Black to White or Venedon's Soul Reaver.
This battle can take a bit of time compared to the others, so no blitzkrieg, unless you manage to inflict 5+ debuffs with start-of-battle tactics. Otherwise, Clairvoyant Spirit will probably cause a lot of 0 damage hits, before this god becomes vulnerable.
Lister - Leave Clairvoyant Spirit at home, we can't damage this nuddy bruce anyway. What we need to do is to be flat out like a lizard drinking, spamming the Exhaustion spell as often as possible (enchant it with 'X% chance to cast twice'), while trying to stay alive. No wuckas, it should be quite feasible.
Your hard yakka will pay off as soon as battle fatigue has reached a sufficient value (something around 160-180%-ish?). Lister will simply rack off, probably to go skull a stubby or two.
Meraxis - Our favorite sitting elephant can be a bit tricky to defeat. When receiving damage from Abnegation, he and his allies will retaliate, so better leave Clairvoyant Spirit back at home again. Let Rise Above increase your Maximum Health to a ridiculous amount (lets say 6 turns, just to be safe), cast Covenant on one of your creatures to give it Rebirth (again, to feel blissfully safe) and finally cast a damaging spell enchanted with 'Potency based on X% Health'. Ganesha Meraxis should go down without problems.
Mortem - This is a fun one, because it demonstrates just how often Abnegation is able to hit enemies with this build. Just sit back and enjoy the ceaseless machine-gun fire of indirect damage raining like a crimson shower on Morty and friends. Did I mention you should go first? No? Bloody heck, go first!
Muse - If you had trouble beating her in the past, you're going to love what happens when she faces this build. No diligent practice necessary, but you may bring two copies of the Consecrated Ground trait(!), if you're feeling insecure about your performance. Simply prove that defeating her easily is not a dying art.
7.1.2.) (major Mid-game Spoilers) Tackling Late-game Challenges - Part 2
Perdition - This guy paid a leg for a pair of edgy twin katanas. I guess he must be good at haggling, since he still has both of his arms.
Make sure to be the first taking a turn and let your creatures teach him that antiquated weapons are ineffective against a bombardment of indirect damage!
4080 - Robo 4080 can be troublesome to some builds, but not this one. Again, no modifications necessary. As long as you act first, this fight should be over before this classic RPG character can do anything to prevent his cataclysmic future.
Reclusa - The gambler goddess of "not-being-sure-about-stuff" is no real challenge. She and her allies will likely be dead, before she can trigger her annoying in-battle effect. Just go first and - JACKPOT MOTHER!@#$ER!
Regalis - While we can't be resistant to debuffs, we can still be immune to Blighted. No additional kinks here and no exotic toys necessary. I would have expected something more exciting from such an outgoing deity, but it's the same old: First come, first served, just to be left empty and exhausted. A disappointing petite mort.
Shallan - This is another lengthy one. To avoid delaying her demise longer than necessary, we deposit Clairvoyant Spirit with the Stable. Titania, queen of the fairies Shallan has an interesting damage-reduction mechanic that grows weaker for each time an enemy has attacked or cast a spell during the current battle. Since it works for each enemy creature individually, we're going to focus our efforts on the goddess herself.
Just spam the Infernal Charge spell or similar on her (best done enchanted with 'X% chance to cast twice') until she has performed 21 or more attacks/casts, then strike her with a damaging spell enchanted with 'Potency based on X% Health'.
Once she is down, her allies will soon follow her back into the world of make-believe.
Surathli - Is beating her up considered heresy? Not as long as we do it! Hurray for moral corruption!
We don't need to do anything out of the ordinary to beat the angel with a comically overexposed face. We will defeat her, before we even have the chance to remove her Rebirth buff. Act first and let your creatures take care of her. Twice, most likely.
Tartarith - NO THINKING. GO FIRST. KILL!
Tenebris - Let me do a bit of foreshadowing: His fight can be a tad more lengthy, but not as bad as Lister, Gonfurian or Shallan.
You may either wait through Abnegation's initial 0 damage hits and not bother doing anything, or you can leave Clairvoyant Spirit resting at home, waiting for an opening in Tenebris' defenses and destroy him with a damaging spell enchanted with 'Potency based on X% Health'. Nothing too shady going on, just go slap him in the... void?
T'mere M'rgo - This poor deity has the misfortune of sporting an in-battle effect that is the inferior copy of another's (looking at you, Yseros). Our divine d20 offers not much of a challenge, so don't bother to make special preparations. As long as you act first, this fight should be over before the enemy can roll anything meaningful.
Torun - THIS GIANT !@#$FACE TAKES THE CAKE! HE DOESN'T EVEN BOTHER TO EXPLAIN WHAT HIS !@#$ING TRAIT DOES! HE CAN GO EAT !@#$ FOR ALL I CARE!
Seriously though, this choleric moai statue doesn't joke around. He deals damage based on your creatures' Maximum Health at the start of each(!) creature's turn (something like 400% of your creatures' Max Health)! Bring a lot of damage mitigation and make sure to include Phase Knight's Endurance Aura. If you can survive the first turn, the fight is as good as won.
Venedon - Oh look, someone's ego-ideal rp-character turned into a Siralim deity! No special advice here, go first and suckerpunch him in the Venedong!
Vertraag - I think only a Reaver is in danger of dying to this one. We, however, belong to the clergy, so we strike swiftly, brutally and with arbitrary discrimination! Go first and watch him fade into eternity.
Vulcanar - You don't need anything, bro. Just flex your combo-muscles, as soon as that other bro shows up. You can do it, my man!
Yseros - I see what you did to poor T'mere M'rgo there... Still, this fabulous snake lady probably suffers from serious illusions, if she really thinks to stand even a figment of a chance against us. Act first to win.
Zonte - WIZARD BATTLE!!! Bring Nature Shapeshifter's Nature Transformation trait and you should be fine during the first turn. Sorcery Shapeshifter's Sorcery Transformation can act as an alternative, in case you lack the former trait's material.
The damage turned healing will interfere a bit with our healing loop, but things shouldn't turn out too badly. Just don't be surprised, if it takes more than one turn to take down Zonte.
(WARNING! major late-game spoilers)
Caliban - This past adversary is back to receive some more spanking! And it looks like our naughty boy has lost his Nether Orbs, so he's a lot less beefy than last time we had the pleasure. Just be yourself, Cali-baby! We love you, literally through thick and thin!
He essentially works like a watered-down Zonte, so Nature Shapeshifter's Nature Transformation or Sorcery Shapeshifter's Sorcery Transformation will do the trick. For being one of the last unlocked bosses, he sure doesn't put up much of a fight. Again, go first and show him who's on top!
In case you're wondering, you don't need to defeat this one to ascend your specialization.
7.2.1.) (major Late-game Spoilers) Tackling Late-game Challenges - Part 3
False GodsMany great and imaginative builds are only possible thanks to the wonderful anointment feature! Imagine playing with a choice of Doombringer's perks, only way more focused than Doombringer itself... but that's a story for another guide.
What do you need to get access to anointments? Beat , of course!
How does one get to face them? Place guilds in your castle and take on a bounty. How do you access guilds? Finish a project at Everett's for every single guild, then you can plaster your crummy castle with them through the decoration feature. Yeesh!
Just so you know, I won't get into precise detail concerning the abilities of the , only the most notable ones (you can go check the ingame codex, if you really need to). Most powerful late-game builds don't need to care about them anyway.
Runes of Power
Before moving on to the themselves, lets talk a bit about the runes for empowering/weaking them. You may already be familiar with the fact that you can only encounter these bosses in realms, by slaughtering each and every group of creatures wandering around in those realms. The first five groups will always leave a rune behind*. Interacting with those runes allows us to choose one of three modifiers that will take effect during the upcoming False God fight, two that will strengthen the False God and one that will weaken them.
Naturally, we'll want to choose to power them up, since doing so will reward us with more loot, expand the pool of anointments we may choose from and give more experience points to the guilds.
However, we need to pay a little attention when choosing those modifiers, since our build doesn't handle all equally well.
Try avoiding 'Immune to indirect damage'. Choosing this is not a complete dealbreaker though, as long as we are able to inflict sufficient damage through other damage types and kill off our Clairvoyant Spirit ASAP.
'Can't take more than 10% Health damage' should be easy to deal with, as long as the False God is not immune to indirect damage. Abnegation will trigger enough times to completely decimate the opposition, even if they have powerful auto-heal abilities in place.
'Creatures take 25% Health damage each turn' is usually not a big deal, but can be dangerous during long fights. The damage suffered by our creatures scales with their Maximum Health and can potentially one-shot our creatures at the start of their turn. To counteract this, we can either bring a lot of damage mitigation (preferred option), or implement means to reliably resurrect our creatures.
'False God starts at the top of the timeline' shouldn't give us any problems most of the time, especially if we bring enough damage mitigation and the Katarina's Return trait.
*For completion's sake: As long as you don't interact with a total of five runes, each group of enemies will leave one behind. However, every rune past the fifth one won't do anything when interacted with and simply fade away.
The , or: "YOU again?!?
Caliban - The story's main boss is back and he didn't learn a thing. The fight goes pretty much the same as the first one:
Wack is extremeties to death to make his heart vulnerable. Hit his heart and his bits and bobs will regrow. Rinse and repeat until you can break his heart a third time.
One remarkable thing is that hitting his heart will instantly interrupt all ongoing loops, so pay at least a little attention to see, if it is worth continuing your's for the remainder of the turn. If not, just do whatever you deem necessary. Really, you should've at least learned something by now. You know, other than a certain wannabe holding tight to his Nether balls.
Hydranox - A big scary hydra that likes to cast spells and slowly power itself up. Being one of the easier , this creature is an ideal opponent to test out some experimental builds with. It doesn't really have any notable tricks up its sleeves, so don't be afraid to try anything unusual and wacky. Perhaps you should go for this one first, since those Doombringer anointments are handy components for advanced build construction.
Imp Impington Reborn - A gargantuan cyborg demon. Our fancy little imp friend sure made something of himself. Other than his tiny counterpart, this guy already starts battle in his final form, so no more suprises of that kind. However, his head has an instant-death ability and all his parts are immune to the Blighted debuff. Our build doesn't care much though. He will be dismantled faster than he can say HEE HAY- HOLY !@#%!!!
Jotunn - You likely don't need to read Snorri's Edda to get a rough idea of what a Jotunn is. All you need to know is that this one is a big, unfriendly giant, who is immune to all forms of damage. If you have fought Lister before, you know the drill: Cast Exhaustion over and over again, until this guy goes home to question his life choices.
If you forgot to leave Clairvoyant Spirit at home prior to the fight, just kill it with the Dark Ritual spell or something similar, otherwise the 0 damage hits will prolong the duration of this battle to an unbearable extent. Similarly, 'False God starts at the top of the timeline' will delay victory severly with all those 0 damage Abnegation hits one has to suffer through, before being able to act.
One trick to shorten this fight dramatically is to reroll RI modifiers, until you get the 'Rapid Fatigue' modifier, although you'll likely want to watch the loot multiplier as well.
Since we can't inflict any damage in this fight, we may go crazy with our runes, making this False God immune to all kinds of damage (not that it does him any good) and whatnot. Do be careful with 'Creatures take 25% Health damage each turn' though! Taking it can be very risky and should generally be avoided with high Maximum Health builds.
Loid Prime - Loid returns more pustulant than ever! And boy, is he pissed!
Considered to be the hardest of the , this one works with a very annoying mechanic: Reflected damage. To make things worse, that damage scales with his highest stat, instead of the damage one inflicts on him (in case you're wondering, only his arms and his body have this ability). Lucky for us, Abnegation doesn't seem to trigger his retaliation ability, so as long as we don't make him immune to indirect damage, everything should turn out fine.
On another note, he does like to inflict debuffs and deals more damage to creatures that bear a lot of them. So yeah, look out for that too I guess.
Loid Prime is one of three bosses completely immune to Blighted, so don't even think about bringing a team of Sea Shamblers to face him.
7.2.2.) (major Late-game Spoilers) Tackling Late-game Challenges - Part 4
Lost Construct - Look, a Chaos Dreadnought from Warhammer 40k!
Mr. Roboto here likes to power up and grant himself minions. And that's pretty much it.
You may bring the Contagion spell, if you worry that he'll survive your first turn by some miracle. I don't think you'll make a lot of use of it though, he'll likely turn into a pile of scrap before he can finish his latest iTunes update.
Mindwurm - This very hungry caterpillar specializes in forcing our creatures to attack and casts their spells in its favor. What do we do about that? Bring the Nature Transformation trait, of course! Other than that, Mindwurm doesn't have any notable abilities to speak of. Go squish this oversized bugger!
Nebodar - I could've sworn to have seen part of this guy in a dragon-related online store for eccentric adult toys... Don't judge. <.<'
The self-proclaimed "King of Dragons" may not be the scariest False God around, but he shouldn't be underestimated! When entering battle with him, you may notice that our creatures start with the Burning debuff already applied. Should he happen to go first, he will increase its potency by a noticeable amount and deal additional damage to our creatures based on that potency, so giving him 'False God starts at the top of the timeline' can be quite risky. While removing our creatures' Burning debuff results in it being reapplied instantly, it does reset its potency, so cast Greater Dispel whenever you deem it necessary.
If we move first, there shouldn't be any major problems. Just show this bad dragon who's the true royalty around here!
Saint Althea - ...is that the literal half-sister of DBZ's Piccolo? Just look at her! The resemblance is uncanny.
If you thought about tackling her with this build, just forget about it. We can't do !@#% against her, because she lets our creatures always have the Blighted debuff and we can't be immune to it. Fiddlesticks.
What you can do however, is make another powerful build that isn't afraid of her. Didn't you want to play a frickin' Hell Knight in the first place? With all the loot you received from completing realms on RI5, there's no excuse not to do so. Heck, I expect you to experiment with different specializations and strategies, whenever you have the chance! That's one of the things that make this game more fun! Bonus points, if you beat her with Frieza dog- I mean Eft Elder on your team.
Additional advice: Unless you can unleash a crazy barrage of damage on her, it is better to avoid 'Can't take more than 10% Health damage'. Althea just loves to heal herself and is prone to resurrecting any of her dead bits. Other than that, she shouldn't pose much of a problem to a build that doesn't depend on successful heals (other than a Utopia + Flagellation build). Again, don't bother with a Blighted build, she's completely immune to it.
The Ancestor - Exodia! It's not possible! No one's ever been able to call him!
Well, this False God is not exactly as powerful as Yu-Gi-Oh's original duel winner, but its head does have a potentially devastating instant-death effect, so care should be taken. If you find yourself in a longer fight with him, make sure your creatures defend at the end of their turns, or things may get ugly. He also deals significantly more damage to creatures that are not provoking, but with our insane amounts of Maximum Health this shouldn't be too dramatic. Again, as long as we move first, he shouldn't be able to obliterate our life points.
7.3.) (major Late-game Spoilers) Tackling Late-game Challenges - Part 5
Rare EncountersWhile the following two entries don't make up the entirety of all fights that may be considered "", they can be quite difficult when you're caught off-guard. Since their portals appear at random during realm creation, chances are you will be. Let us take a brief look at them anyway.
Zantai - Looks like Goro came to avenge his master, Shao Kahn.
This creature of the Asura race is pretty pissed at you for beating up Caliban and wants to see you dead. Yeesh, way to overreact! Besides, he attacked us first! Since we don't have a lawyer and we essentially are the authorities, we have no choice but to enforce our right to physical integrity on our own.
He won't make it easy though, since he starts battles with three random boss traits (regular bosses, no Gods or False Gods included)!
No reason to panic, we can still come out on top, if we act smart. We just need to differentiate between three different cases:
He isn't immune to indirect damage
He is immune to all damage, as long as his allies are alive
He is immune to indirect damageThe first one is easy. As long as we ensure to act first, he's likely to die on the first turn.
The second one can be simple as well. Just wait until Abnegation has killed all his friends, then watch him die. If you're unlucky, he may live to see the second turn. If fortune !@#%s you over, he may live longer or outright kill you, but such cases are few and far between.
The third and final case is the least comfortable one, but we can still deal with it. Kill off Clairvoyant Spirit ASAP (use the Dark Ritual spell or whatever) and hit his face with a damaging spell enchanted with the 'Potency based on X% Health' property.
Additionally, all described cases benefit from having high damage mitigation, so make sure to give your creatures some. If all goes well, he should fly right back to Outland.
As a reward, we'll get a trait material that can give one of your creatures the Mega Magic spell + a small powerup for that same spell. Great. Thanks. Totally worth it.
On the bright side, once we beat this guy enough times, we have a chance to randomly encounter our final GotG opponent inside a Nether Portal.
Should you be very shy about meeting this vindictive fella, don't be. His portal can be easily distinguished from regular Nether Portals and Exotic Portals (you'll know it, when you see it), so you can simply clear your current realm and then enter it, if you wish to do so.
In case you didn't know, once you get Zantai's entry in the bestiary, you can summon him with the Divination Candle! He won't be as strong as his randomly encountered boss-counterpart. In fact, he's pretty much a regular creature. Still, it's kinda nice that we're able to theoretically put him on our team.
Treasure Golem 2.0 - The gods have always been scolding you for killing innocent Treasure Golems, but you just wouldn't listen! Now the day of reckoning is upon us!
The berserk brother of Treasure Golem comes with a very nasty surprise: the Torun Jr. minion. What it does is dealing damage to all enemy creatures (in this case ours), based on their Maximum Health, at the start of its master's turn (approprietly enough a nerfed version of Torun's trait). Oh, and all his allies have this minion too.
That leaves us with two possible situations:
We act first, obliterate him & his friends and just forget that all this ever happened
He acts first and unleashes the wrath of Baby Torun upon us. That means we are either dead or we have brought enough damage mitigation to survive and kill him anywayOnce we emerge victorious, we get an unimpressive trait material and (first time only) the Treasure Golem 2.0 skin! Tasty, tasty skins! P:
If you want to summon Torun Jr. for yourself, you can unlock the spell Torun Attunement by leveling up your Nature Guild a bunch.
8.) (major Late-game Spoilers) Late-game Options To Empower The Build
Hang in there, we're almost done!
You may ask yourself what we can do to make this build more powerful with all the new options open to us (I'm mainly talking anointments here). Let's get this over with...
Anointments
Censure (Inquisitor) - Your creatures deal additional damage equal to 40% of the healing they've received in the current battle.
If you're looking to increase your damage with attacks and spells, this is the anointment to go for. Be aware however that using this can make a random enemy cast of Mass Mutilation or Succulent Scotch absolutely fatal. Bring Nature Transformation trait to stop worrying about this.
Source: The Ancestor
Bloodthirst (Bloodmage) - The potency of your creatures' spells is basend on 50% of their Maximum Health instead of their Intelligence.
Not as great as Censure, in my opinion, but it does have its use. Other Maximum Health builds (without healing) probably benefit more from this.
Source: The Ancestor
Bloodrage (Bloodmage) - The damage of your creatures' attacks is basend on 50% of their Maximum Health instead of their Attack.
Same issue as the previous anointment. Besides, we're playing a delusional jerk. Censuring is right up our alley.
Source: The Ancestor
Bleed Out (Bloodmage) - The first time your creatures are killed in battle, they are resurrected with 100% Health, and then they take damage equal to 50% of their Maximum Health.
One of the best auto-resurrection abilities. However take note that, by equipping this anointment, we'd have to kill Clairvoyant Spirit twice when we need to do so!
Source: The Ancestor
Death Rattle (Bloodmage) - Your creatures' stats are no longer reset after they're killed.
It's a great safety net for our creatures' stats. If you're worried about dying and losing your precious stat gains, takes this with you.
Source: The Ancestor
Retention (Windrunner) - Your creatures' stats are no longer reset after they're killed.
This anointment is functionally identical to Death Rattle.
Source: Imp Impington Prime
Never Forgotten (Purgatorian) - Your creatures' stat changes persist through death.
And with this anointment the unholy trinity of "stat-preservation after death" is complete! Don't be fooled by the different phrasing, it's just another Death Rattle in disguise!
Source: The Ancestor
Ascendant (Astrologer) - Your creature with the highest Health starts battles at the top of the timeline.
If you're looking for a replacement for Mimic's Surprise! trait, this is what you're looking for. A very useful anointment.
Source: Hydranox
Momentum (Doombringer) - Your creatures have a 50% chance to double the value of all their actions (damage, healing, stat gains, etc.).
Do you realize how many heals and stat gains we trigger per turn? You simply can't go wrong with this one.
Source: Hydranox
Question Everything (Dreamshade) - When your creatures deal damage to each other, they are healed instead of taking damage.
A stronger replacement for Nature Transformation. Very handy to have indeed.
Source: Mindwurm
Last Stand (Siegemaster) - When your creatures take damage that exceeds 100% of their Maximum Health, they have a 50% chance to be left with 1 Health.
While this anointment is unfortunately based on chance, it can potentially allow us to win against enemies that would normally overpower us at the early stages of battle. I recommend to bring this for Torun fights.
Source: Lost Construct
Late-game creatures
There's not much we may want, really. Meraxis can improve our stat-scaling, but we hardly need that.
Dumplings are another matter though. The thing is that Dumpling (the basic one that takes forever to summon) doesn't quite work as advertised. With a full group of Dumplings, assuming your creatures are level 100, your creatures will start battle with about a million Maximum Health. Now scale that up to your creatures' current level. Absolutely bonkers.
Aside from that, this race of creatures has plenty more benefits to offer, but I won't expand on them. I think you suffered enough.
9.) (potential Spoilers) What The Readers Have To Say
The following section contains opinions, recommendations and other important thoughts from the minds of this guide's readers.
Nothing so far! Good.
10.) Afterword
Thank you for taking the time to read this guide and sitting through all those horrible jokes and silly references! I hope you learned at least something. If not, don't worry. I had a lot of fun writing this, so everything's fine on my end. c:
If you wish to do so, you may insult me in the comment section. See if I care! :P
Oh, and if you happen to have some constructive criticism, just let me know. Please be gentle, I'm a very delicate flower. <3
Special thanks to:
Orc, for encouraging me to write a guide for this build in the first place
lequesai, for providing major inspiration for my own builds and creating the Care to Share? thread on Steam's Siralim Ultimate General Discussion board
Khor, for teaching me about some of the more obscure mechanics of this game and having a nice sense of humor
HeraldOfOpera, for continuously providing me with extremely vital bits of knowledge
( °□°) ︵, for giving complementary information on many different occasions and investigating an impressive amount of bugs
blizzcarsten, for showing me just how awful most Priest creatures are and just being fun to have around
SirFish&ChipsIII, for creating the wonderful Siralim Ultimate Skin Compendium and reminding us to never forget about Imlers/Imlings
I also thank the developer for making this game (duh) and all those people who have squandered their money to make its development possible. Thanks to all those who bought this game after the official release (no refunds!) and all those who still show active interest in it.
...
...
...
Don't look at me like that, dear reader, I've already expressed my thanks to you! Now go do something else! SHOO!
Source: https://steamcommunity.com/sharedfiles/filedetails/?id=2811963801
More Siralim Ultimate guilds
- All Guilds
- My teams for GotG Ascension
- Godforge Upgrades reference
- Community Spell Review Compendium
- Firebrand Bomber [RIP - Firebrand interaction no longer works]
- Dwarf Riddle Answers
- How Do Hurt Gud?
- Starter Specialization Guide
- Hellknight Autowin Story to Lategame
- The Damage-Proof Aeolian [Game v1.03]
- Same Race Realm Spawns