All Joustus Cards & Encounters +tips

All Joustus Cards & Encounters +tips

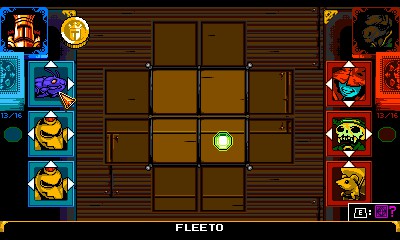
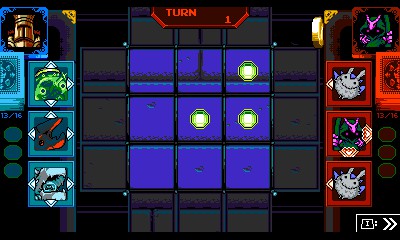
General Strategy: Initial Card Placement


All Joustus Cards & Encounters +tips image 1

All Joustus Cards & Encounters +tips image 2

In general, you want to place your cards next to gems, but not pointing away from them.
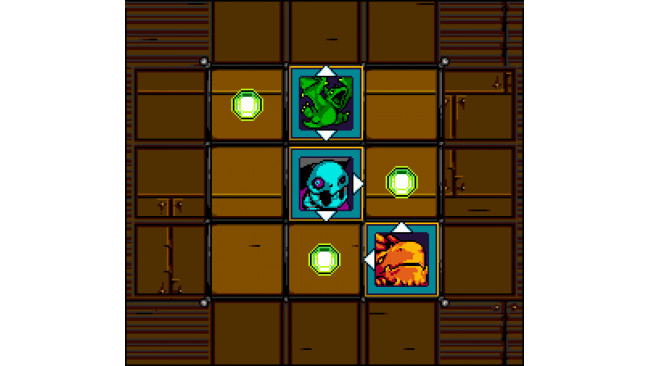
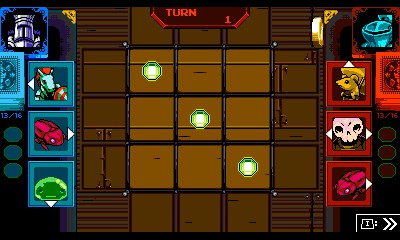
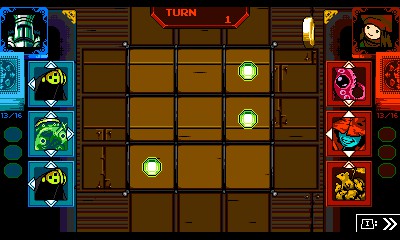
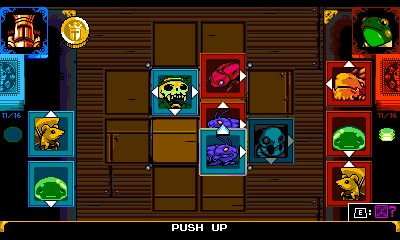
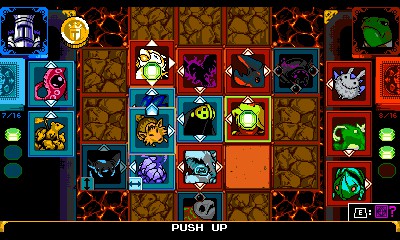
Example 1:

The Divedrake (row 1) is right next to a gem, ready to be pushed onto it. Technically, it can be pushed away from the gem (to the right), but it's not ideal for the opponent to do that because then they would have a card pointing away from a gem.

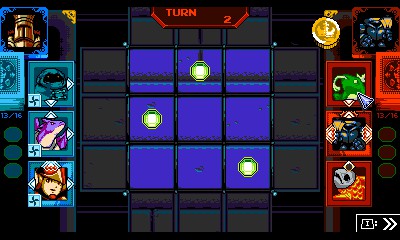
The Zamby (row 2) and Dozedrake (row 3) are both pointing towards gems. These are great spots because there is no other way to push them, except onto gems.Example 2:

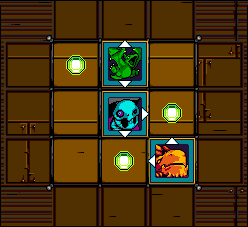
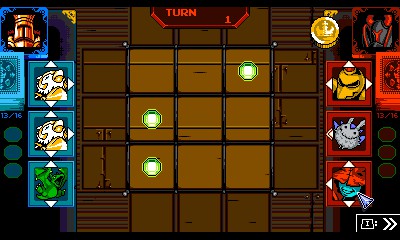
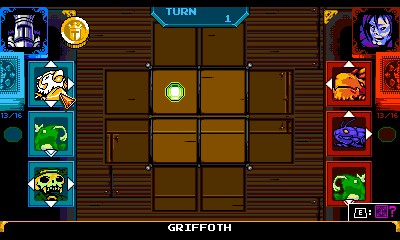
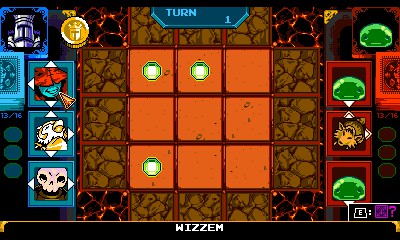
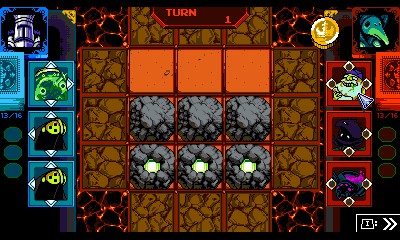
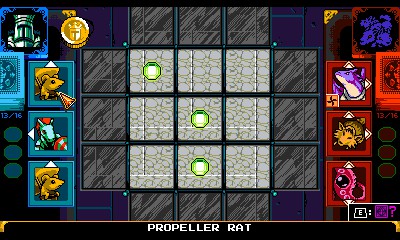
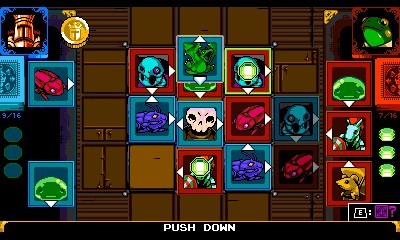
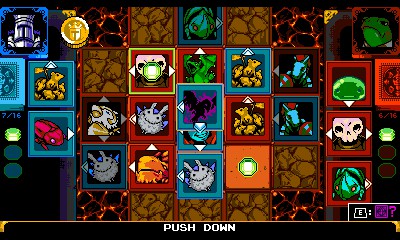
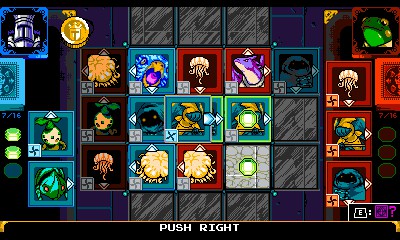
Eventually, you will get cards that point in 3 directions like these.

It is a strong move to point them towards gems like this, because there is no other way to push them, except onto the gem.

The Wizzem (row 3) is technically pointing towards one gem, but away from another. It's not a big deal; still a strong move.

General Strategy: Farming Cards

At first, it might feel like your deck is a random assortment of cards, encouraging you to buy a ton a mystery cards from Chester, but there is another way.

Remember that you can re-challenge opponents as many times as you want; they never run out of cards no matter how many you take from them (with the exception of unique cards). This is particularly useful when trying to get the "Fearless Champ" achievement (Clear all 4 houses of Joustus without buying or reclaiming anything from Chester).

There are some cards exclusive to Chester's mystery card packs, however, and if you're looking for a way to farm a lot of money in order to buy lots of packs, you could do it in new game plus, because NG+ changes the mechanics of the game to make gaining money easier, but you would have to go through the game again to reach Chester at each location.

General Strategy: Power Creep


All Joustus Cards & Encounters +tips image 15
All Joustus Cards & Encounters +tips image 16
All Joustus Cards & Encounters +tips image 17
All Joustus Cards & Encounters +tips image 18

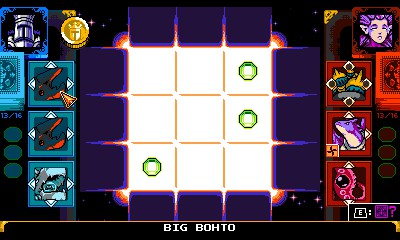
Unfortunately, Joustus is not a balanced game; there are a lot of cards that are strictly better or worse than others. I struggled to find a reason to use bomb cards and cards that only point in 1 direction. I wasn't able to find much of a downside to just making a deck entirely out of 3-directional cards.

Beeto is worse than Torpeeto

Torpeeto is worse than Memmec

Memmec is worse than Big Bohto

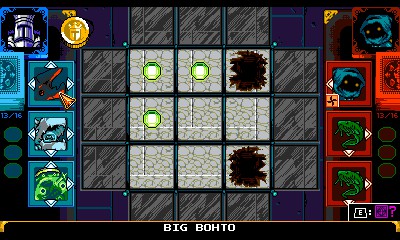
3-directional cards, like Big Bohto, are too good at locking down gems.

Conversely, 1-directional cards are kinda bad at locking down gems.

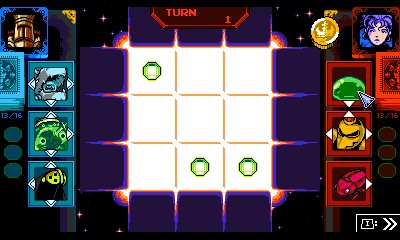
General Strategy: Locking Down Gems


All Joustus Cards & Encounters +tips image 26
All Joustus Cards & Encounters +tips image 27

A gem is "locked down" when there is no way to push the card on top of it off; whoever currently has it, has it for the rest of the game.

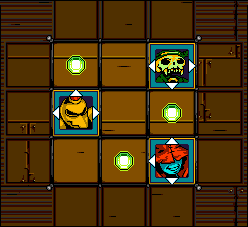
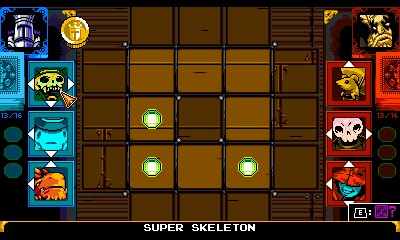
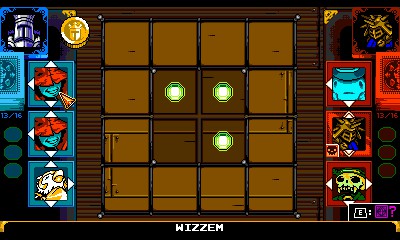
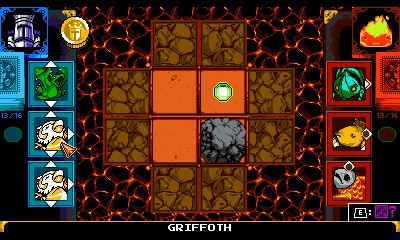
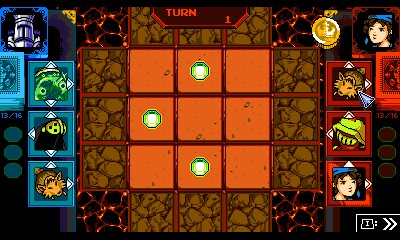
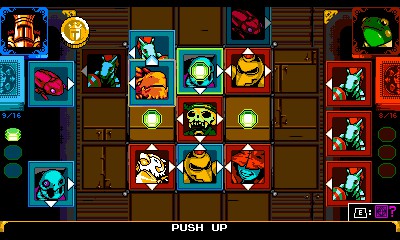
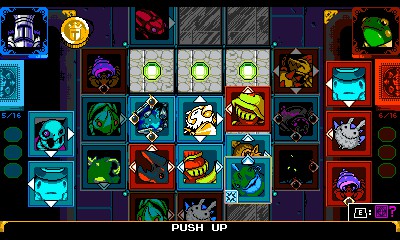
The easiest way to lock down a gem is to use a card that points in 3 directions like this:

The Griffoth (row 2) can normally only be pushed right, but because the Griffoth pushed a Blorb into the graveyard, it can't be pushed anywhere and is effectively locked down.

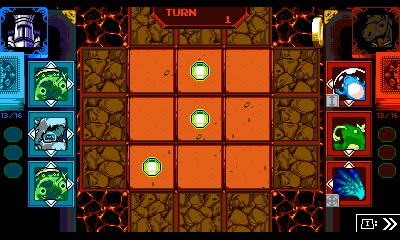
In general, pushing cards that are already on top of gems into graveyards is a good method for locking gems down, because then your card can't be pushed that way.

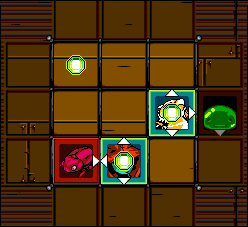
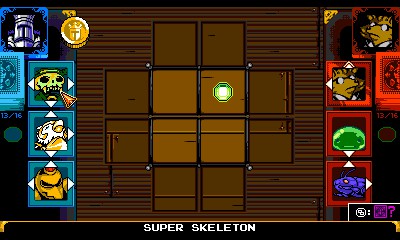
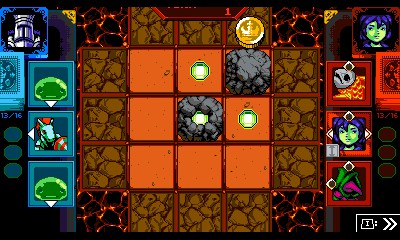
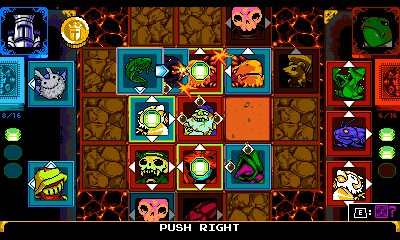
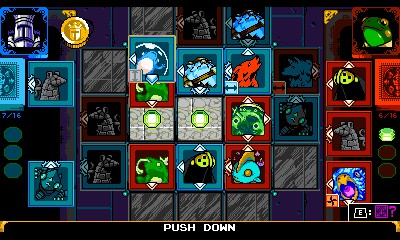
The Wizzem (row 3) can normally only be pushed left, but because there is a Beeto pointing the opposite direction, the Wizzem is locked down. Technically, the Beeto could be moved, un-locking the Wizzem, but that would take 2 turns, giving you a chance to re-lock it.

But of course, you may not have cards that point in 3 directions, or maybe you feel like building a deck without a lot of 3-directional cards. In that case, you must look at your opponents hand before moving onto a gem.

Summary:

Step 1: Push one of your cards onto a gem.

Step 2: Your opponent will steal it.

Step 3: Steal it back.

Before all of this, check your opponent's hand to make sure that step 2 doesn't result in the card being locked down, otherwise you can't do step 3.or

Step 1: You push an opponent's card onto a gem.

Step 2: They will try to lock it down by putting a different card on top of or next to the gem.

Step 3: Steal their gem.

Before all of this, check your opponent's hand to make sure that step 2 doesn't result in the card being locked down, otherwise you can't do step 3.

In-Depth Thought Process:

Before moving onto a gem, look at your opponent's hand.

If you moved onto the gem, does your opponent have the required arrows to steal it?

If they can't steal it, then you're free to take it. Keep an eye on their hand in case they draw a way to steal it later. Optional: You can preemptively stop your opponent from drawing the right card by further investing into the gem and 100% locking it down. This means surrounding it or pushing cards to the edge of the game board. If your opponent can steal it, would it be locked down, or would you be able to steal it back?

If they can steal it and it would result in being locked down, don't move onto the gem.

If they can steal it, but you could just steal it back, then you're probably good to go. Typically, that's as far as you have to think, because at that point, the graveyards are filling up and you start to hit the edge of the board.

Cards that only point in 1 direction are bad at staying on top of gems because they are more easily pushed around.

You can also push your opponent's cards onto gems. The same mindset applies: Check their hand, make sure they can't lock it down on their turn, and that you can steal it from them afterwards.

The Dozedrake (row 2) can normally only be pushed up & left.

It can't be pushed up because the edge of the board has been reached.

It can't be pushed left because there is a Fleeto pointing the opposite direction.

I accomplished this by pushing my opponent's cards onto the gem and then stealing it right after (but making sure that they couldn't stop me from doing that on their turn).

House Of Joustus (World 1)


All Joustus Cards & Encounters +tips image 56
All Joustus Cards & Encounters +tips image 57
All Joustus Cards & Encounters +tips image 58
All Joustus Cards & Encounters +tips image 59
All Joustus Cards & Encounters +tips image 60
All Joustus Cards & Encounters +tips image 61
All Joustus Cards & Encounters +tips image 62
All Joustus Cards & Encounters +tips image 63
All Joustus Cards & Encounters +tips image 64
All Joustus Cards & Encounters +tips image 65
All Joustus Cards & Encounters +tips image 66
All Joustus Cards & Encounters +tips image 67
All Joustus Cards & Encounters +tips image 68
All Joustus Cards & Encounters +tips image 69
All Joustus Cards & Encounters +tips image 70
All Joustus Cards & Encounters +tips image 71
All Joustus Cards & Encounters +tips image 72
All Joustus Cards & Encounters +tips image 73
All Joustus Cards & Encounters +tips image 74
All Joustus Cards & Encounters +tips image 75
All Joustus Cards & Encounters +tips image 76
All Joustus Cards & Encounters +tips image 77
All Joustus Cards & Encounters +tips image 78
All Joustus Cards & Encounters +tips image 79
All Joustus Cards & Encounters +tips image 80
All Joustus Cards & Encounters +tips image 81
All Joustus Cards & Encounters +tips image 82
All Joustus Cards & Encounters +tips image 83
All Joustus Cards & Encounters +tips image 84
All Joustus Cards & Encounters +tips image 85
All Joustus Cards & Encounters +tips image 86
All Joustus Cards & Encounters +tips image 87
All Joustus Cards & Encounters +tips image 88
All Joustus Cards & Encounters +tips image 89
All Joustus Cards & Encounters +tips image 90
All Joustus Cards & Encounters +tips image 91
All Joustus Cards & Encounters +tips image 92
All Joustus Cards & Encounters +tips image 93
All Joustus Cards & Encounters +tips image 94
All Joustus Cards & Encounters +tips image 95
All Joustus Cards & Encounters +tips image 96
All Joustus Cards & Encounters +tips image 97
All Joustus Cards & Encounters +tips image 98

Secret Cards:

Cooper

Climb a semi-hidden ladder above Playing Kid to find Hoop Kid, who gives you Cooper.

Bard

Destroy the wall above Black Knight to reveal a chest that contains Bard.

Puzzle Reward:

Croaker

Awarded for solving all 3 of Croaker's puzzles.
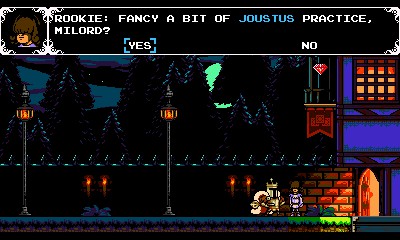
Rookie:

The Rookie gives you an optional tutorial on how to play Joustus. Make sure that you do it anyway because the Rookie counts as an opponent for the purposes of the "King of Cards" achievement.

Playing Kid:

Board State: Fixed

Strategy:

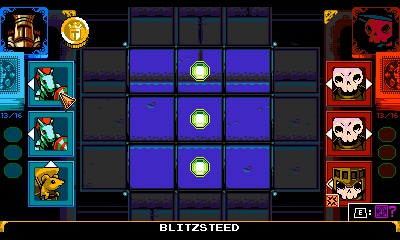
Because Playing Kid can only push right/up, and because the gem is always on the bottom-right, cards that push left are not very useful. Removing blitzsteed and dozedrake from your starter deck will make it better against Playing kId.

Goatician:

Board State: Fixed

Ruffian

x2:

Board State: Random

Black Knight

x1:

x2:

Board State: Random

Strategy:

Black Knight does not place a card on the same turn that he uses his special ability. This gives you an extra turn to try and 'lock down' a gem.

He only has 4 double-arrow cards in his deck.

He will use the double-arrow cards to steal your gems. Before trying to lock down a gem, you can either wait until he does not have any double-arrow cards in his hand, or you can plan to immediately push them off again when he does steal them.

Pushing his double-arrow cards out of the way of his special ability (especially onto the top/bottom graveyard) means that they will not return to his deck for him to use again.

Remember that you can end the game early when you have 2/3 gems rather than going for the sweep.

Airship Challengers (Part 1)


All Joustus Cards & Encounters +tips image 129
All Joustus Cards & Encounters +tips image 130
All Joustus Cards & Encounters +tips image 131
All Joustus Cards & Encounters +tips image 132
All Joustus Cards & Encounters +tips image 133
All Joustus Cards & Encounters +tips image 134
All Joustus Cards & Encounters +tips image 135
All Joustus Cards & Encounters +tips image 136
All Joustus Cards & Encounters +tips image 137
All Joustus Cards & Encounters +tips image 138
All Joustus Cards & Encounters +tips image 139
All Joustus Cards & Encounters +tips image 140
All Joustus Cards & Encounters +tips image 141
All Joustus Cards & Encounters +tips image 142
All Joustus Cards & Encounters +tips image 143
All Joustus Cards & Encounters +tips image 144
All Joustus Cards & Encounters +tips image 145
All Joustus Cards & Encounters +tips image 146
All Joustus Cards & Encounters +tips image 147
All Joustus Cards & Encounters +tips image 148
All Joustus Cards & Encounters +tips image 149
All Joustus Cards & Encounters +tips image 150
All Joustus Cards & Encounters +tips image 151
All Joustus Cards & Encounters +tips image 152
All Joustus Cards & Encounters +tips image 153
All Joustus Cards & Encounters +tips image 154
All Joustus Cards & Encounters +tips image 155
All Joustus Cards & Encounters +tips image 156
All Joustus Cards & Encounters +tips image 157
All Joustus Cards & Encounters +tips image 158
All Joustus Cards & Encounters +tips image 159
All Joustus Cards & Encounters +tips image 160
All Joustus Cards & Encounters +tips image 161
All Joustus Cards & Encounters +tips image 162
All Joustus Cards & Encounters +tips image 163
All Joustus Cards & Encounters +tips image 164
All Joustus Cards & Encounters +tips image 165
All Joustus Cards & Encounters +tips image 166
All Joustus Cards & Encounters +tips image 167
All Joustus Cards & Encounters +tips image 168
All Joustus Cards & Encounters +tips image 169
All Joustus Cards & Encounters +tips image 170
All Joustus Cards & Encounters +tips image 171
All Joustus Cards & Encounters +tips image 172
All Joustus Cards & Encounters +tips image 173
All Joustus Cards & Encounters +tips image 174
All Joustus Cards & Encounters +tips image 175
All Joustus Cards & Encounters +tips image 176
All Joustus Cards & Encounters +tips image 177
All Joustus Cards & Encounters +tips image 178
All Joustus Cards & Encounters +tips image 179
All Joustus Cards & Encounters +tips image 180
All Joustus Cards & Encounters +tips image 181
All Joustus Cards & Encounters +tips image 182
All Joustus Cards & Encounters +tips image 183
All Joustus Cards & Encounters +tips image 184
All Joustus Cards & Encounters +tips image 185
All Joustus Cards & Encounters +tips image 186
All Joustus Cards & Encounters +tips image 187
All Joustus Cards & Encounters +tips image 188
All Joustus Cards & Encounters +tips image 189
All Joustus Cards & Encounters +tips image 190
All Joustus Cards & Encounters +tips image 191

Baz:

1x:

3x:

Board State: Random

Hedge Pupil

Board State: Random

Duelist Di

Board State: Random

Traitorous

Board State: Random

Strategy:

When he has his signature card in hand, careful not to place a card to the left or right of the gem, as that gives him a really good turn; pushing your card down.

Phantom Striker

x1:

x3:

Board State: Random

Strategy:

The AI doesn't know how to utilize its grave and slam cards, or how to play when the gems are in the graveyard. This results in it wasting its turn or even helping you sometimes.

You can prevent the slam card from disrupting you by approaching the gems from the left side, like with Griffoths.

Cavern Of Joustus (World 2)


All Joustus Cards & Encounters +tips image 212
All Joustus Cards & Encounters +tips image 213
All Joustus Cards & Encounters +tips image 214
All Joustus Cards & Encounters +tips image 215
All Joustus Cards & Encounters +tips image 216
All Joustus Cards & Encounters +tips image 217
All Joustus Cards & Encounters +tips image 218
All Joustus Cards & Encounters +tips image 219
All Joustus Cards & Encounters +tips image 220
All Joustus Cards & Encounters +tips image 221
All Joustus Cards & Encounters +tips image 222
All Joustus Cards & Encounters +tips image 223

All Joustus Cards & Encounters +tips image 224
All Joustus Cards & Encounters +tips image 225
All Joustus Cards & Encounters +tips image 226
All Joustus Cards & Encounters +tips image 227
All Joustus Cards & Encounters +tips image 228
All Joustus Cards & Encounters +tips image 229
All Joustus Cards & Encounters +tips image 230
All Joustus Cards & Encounters +tips image 231
All Joustus Cards & Encounters +tips image 232
All Joustus Cards & Encounters +tips image 233
All Joustus Cards & Encounters +tips image 234
All Joustus Cards & Encounters +tips image 235
All Joustus Cards & Encounters +tips image 236
All Joustus Cards & Encounters +tips image 237
All Joustus Cards & Encounters +tips image 238
All Joustus Cards & Encounters +tips image 239
All Joustus Cards & Encounters +tips image 240
All Joustus Cards & Encounters +tips image 241
All Joustus Cards & Encounters +tips image 242
All Joustus Cards & Encounters +tips image 243
All Joustus Cards & Encounters +tips image 244
All Joustus Cards & Encounters +tips image 245
All Joustus Cards & Encounters +tips image 246
All Joustus Cards & Encounters +tips image 247
All Joustus Cards & Encounters +tips image 248
All Joustus Cards & Encounters +tips image 249
All Joustus Cards & Encounters +tips image 250
All Joustus Cards & Encounters +tips image 251
All Joustus Cards & Encounters +tips image 252
All Joustus Cards & Encounters +tips image 253
All Joustus Cards & Encounters +tips image 254
All Joustus Cards & Encounters +tips image 255
All Joustus Cards & Encounters +tips image 256
All Joustus Cards & Encounters +tips image 257
All Joustus Cards & Encounters +tips image 258
All Joustus Cards & Encounters +tips image 259
All Joustus Cards & Encounters +tips image 260
All Joustus Cards & Encounters +tips image 261
All Joustus Cards & Encounters +tips image 262
All Joustus Cards & Encounters +tips image 263

Secret Cards:

Trouple Acolyte

At the very start, go over the wall to your right to find a secret area with this card.

Chester

Inside the chest in the top-right corner of the room with Blazorb.

Puzzle Reward:

Toader

Armorer & Shovel Smith

The Armorer & Shovel Smith do NOT count as separate challengers. They act as one entity that has both of their unique cards.

x1:

x2:

x3:

Board State: Fixed

Strategy:

Because the board state is fixed, Griffoths and Super Skeletons are particularly useful because they can easily lock down the gems on the right and bottom.

Double-arrow cards are also strong.

Blazorb

Blazorb and Blorb count as separate challengers for the purposes of the "King of Cards" achievement.

Board State: Fixed

Strategy:

Stack up on down-arrow cards and remove left-arrow cards.

Griffoth insta-wins.

Insta-win on turn 2 every time because the board is really small.
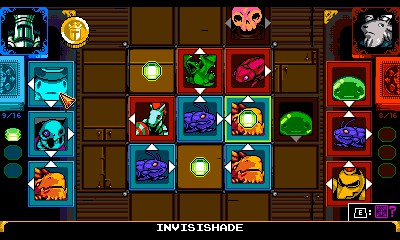
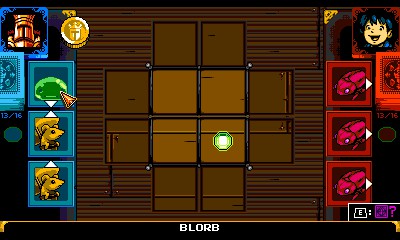
Blorb

Blazorb and Blorb count as separate challengers for the purposes of the "King of Cards" achievement.

x1:

x13:

Board State: Semi-random

There are always 2 gems on the top row and 1 gem on the bottom row.

Strategy:

Blorb always draws its 3 useful cards.

Its deck is so lopsided, that it's almost completely unable to capture any gems by itself.

Have a variety of arrows so that you can reliably push its double-arrow cards off of gems and out of position.

After it plays its 3 double-arrow cards, it is at your mercy.
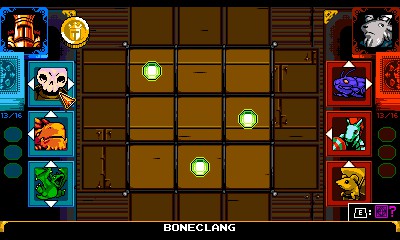
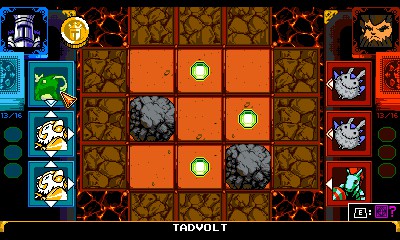
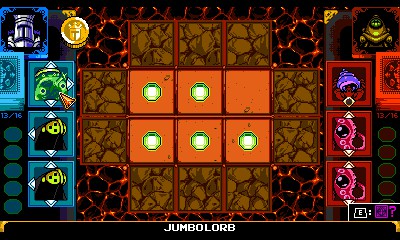
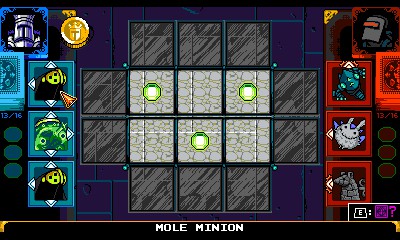
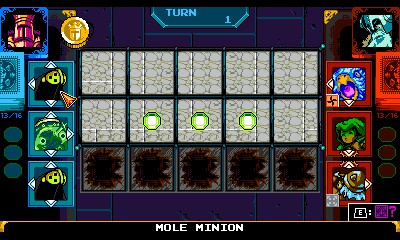
Mole Minion

Board State: Semi-Random

The gem is always in column 4.

Strategy:

Surround the gem while he wastes time destroying the rocks.

Wizzems are strong in this fight.

Don't capture the gem if he can just immediately take it back.

You can end the game early before all the rocks are destroyed.

His AI is really bad.

Mona

Mona has her own card AND Plague Knight's card.

x1:

x4:

Board State: Random

Both gems and rocks are random.

Strategy:

Her special ability is often just a waste of a turn. Even if she puts a red card into your hand, you can still use it to push cards.

Double-arrow cards are strong. You can farm them off of previous challengers.

Airship Challengers (Part 2)


All Joustus Cards & Encounters +tips image 317
All Joustus Cards & Encounters +tips image 318
All Joustus Cards & Encounters +tips image 319
All Joustus Cards & Encounters +tips image 320
All Joustus Cards & Encounters +tips image 321
All Joustus Cards & Encounters +tips image 322
All Joustus Cards & Encounters +tips image 323
All Joustus Cards & Encounters +tips image 324
All Joustus Cards & Encounters +tips image 325
All Joustus Cards & Encounters +tips image 326
All Joustus Cards & Encounters +tips image 327
All Joustus Cards & Encounters +tips image 328
All Joustus Cards & Encounters +tips image 329
All Joustus Cards & Encounters +tips image 330
All Joustus Cards & Encounters +tips image 331
All Joustus Cards & Encounters +tips image 332
All Joustus Cards & Encounters +tips image 333
All Joustus Cards & Encounters +tips image 334

All Joustus Cards & Encounters +tips image 335
All Joustus Cards & Encounters +tips image 336
All Joustus Cards & Encounters +tips image 337
All Joustus Cards & Encounters +tips image 338
All Joustus Cards & Encounters +tips image 339
All Joustus Cards & Encounters +tips image 340
All Joustus Cards & Encounters +tips image 341
All Joustus Cards & Encounters +tips image 342
All Joustus Cards & Encounters +tips image 343
All Joustus Cards & Encounters +tips image 344
All Joustus Cards & Encounters +tips image 345
All Joustus Cards & Encounters +tips image 346
All Joustus Cards & Encounters +tips image 347
All Joustus Cards & Encounters +tips image 348
All Joustus Cards & Encounters +tips image 349
All Joustus Cards & Encounters +tips image 350
All Joustus Cards & Encounters +tips image 351
All Joustus Cards & Encounters +tips image 352
All Joustus Cards & Encounters +tips image 353
All Joustus Cards & Encounters +tips image 354
All Joustus Cards & Encounters +tips image 355
All Joustus Cards & Encounters +tips image 356
All Joustus Cards & Encounters +tips image 357
All Joustus Cards & Encounters +tips image 358
All Joustus Cards & Encounters +tips image 359
All Joustus Cards & Encounters +tips image 360
All Joustus Cards & Encounters +tips image 361
All Joustus Cards & Encounters +tips image 362
All Joustus Cards & Encounters +tips image 363
All Joustus Cards & Encounters +tips image 364
All Joustus Cards & Encounters +tips image 365
All Joustus Cards & Encounters +tips image 366
All Joustus Cards & Encounters +tips image 367
All Joustus Cards & Encounters +tips image 368
All Joustus Cards & Encounters +tips image 369
All Joustus Cards & Encounters +tips image 370
All Joustus Cards & Encounters +tips image 371
All Joustus Cards & Encounters +tips image 372
All Joustus Cards & Encounters +tips image 373
All Joustus Cards & Encounters +tips image 374
All Joustus Cards & Encounters +tips image 375
All Joustus Cards & Encounters +tips image 376
All Joustus Cards & Encounters +tips image 377
All Joustus Cards & Encounters +tips image 378

Troupple Acolyte

On the ship, the character is named Troupple Acolyte, but their card is Troupple Missionary. Might be a minor developer error.

x1:

x2:

Board State: Random

Plague Knight

Plague Knight doesn't have his own card; Mona does.

1x:

3x:

Board State: Fixed

Strategy:

Wait until he digs to the bottom row, then steal the gem from him with double-arrow cards.

Double-arrow cards that point in upwards + any other directions are strong.

You can end the match at pretty much any time, even in a draw, by filling the top row.

Skip

x1:

x3:

Board State: Random

Strategy:

You're going to need a deck of double-arrow cards that face at least 2 directions in order to be on a level playing field. 3 directions is better. You can get these by farming other challengers.

You have to look at his hand before moving (his or your) cards onto gems.

If your card is on a gem, he will attempt to steal it. Before moving your card onto a gem, make sure he doesn't have the required arrows to push your card off in his hand, or make sure that you could just steal it right back if he did.

If his card is on a gem, he will attempt to lock it down by either "blocking" (placing a card next to the gem, facing it), or by placing another card directly on top of his gem (typically the 3-directional cards, Jumbolorb and Toadsdrake). You can prematurely push his cards onto gems as long as you make sure that he doesn't have a way to lock them down on his turn, then you can steal them afterwards.

Barton:

x1:

x2:

Board State: Random

Treasure Knight:

x1:

x3:

Board State: Random

Mole Knight:

Board State: Random

Crag Of Joustus (World 3)


All Joustus Cards & Encounters +tips image 413
All Joustus Cards & Encounters +tips image 414
All Joustus Cards & Encounters +tips image 415
All Joustus Cards & Encounters +tips image 416
All Joustus Cards & Encounters +tips image 417
All Joustus Cards & Encounters +tips image 418
All Joustus Cards & Encounters +tips image 419
All Joustus Cards & Encounters +tips image 420
All Joustus Cards & Encounters +tips image 421
All Joustus Cards & Encounters +tips image 422
All Joustus Cards & Encounters +tips image 423
All Joustus Cards & Encounters +tips image 424
All Joustus Cards & Encounters +tips image 425
All Joustus Cards & Encounters +tips image 426
All Joustus Cards & Encounters +tips image 427
All Joustus Cards & Encounters +tips image 428
All Joustus Cards & Encounters +tips image 429
All Joustus Cards & Encounters +tips image 430
All Joustus Cards & Encounters +tips image 431
All Joustus Cards & Encounters +tips image 432
All Joustus Cards & Encounters +tips image 433
All Joustus Cards & Encounters +tips image 434
All Joustus Cards & Encounters +tips image 435
All Joustus Cards & Encounters +tips image 436
All Joustus Cards & Encounters +tips image 437
All Joustus Cards & Encounters +tips image 438
All Joustus Cards & Encounters +tips image 439
All Joustus Cards & Encounters +tips image 440
All Joustus Cards & Encounters +tips image 441
All Joustus Cards & Encounters +tips image 442
All Joustus Cards & Encounters +tips image 443
All Joustus Cards & Encounters +tips image 444
All Joustus Cards & Encounters +tips image 445

Secret Cards:

Oolong

On the screen with the 3 spinwulves, there is a secret wall on the left. Alternatively, you can just go left of the cogslotter and fall down. Either way, you'll find a plague minion who gives you this card.

Yoppler

Horns are better in a duet! Use the Horns of Heralding relic next to the Yoppler to reveal the location of this card. You can get the relic by buying drinks for everyone at the House of Joustus (World 1).

Puzzle Reward:

Fish Head

Leo:

x1:

x2:

x10:

Board State: Random

Cogslotter

Board State: Fixed

Strategy:

His deck is mostly cards that only point 1-direction, so he has a lot of trouble locking down cards unless he has Cogslotter or Toadsdrake in his hand.

Hover Meanie

x1:

x3:

Board State: Semi-Random

All 3 gems are always in an "L" shape in one of the four corners. The pits are random.

New mechanic: Cascade.

Generally you want to surround gems with your cards, but with cascade, you just got to be careful that they don't immediately push your card (now their card) onto a gem.

So you just have to wait until he doesn't have any cascade cards in hand, or at least not one with an arrow that can push your card, before putting a card next to a gem.

Also, this guy doesn't have any way to push upwards, so Big Bohto will immediately lock down any gem that it's on. You can farm them off of Leo.

Spinwulves

x1:

x2:

x4:

Board State: Random

Airship Challengers (Part 3)


All Joustus Cards & Encounters +tips image 477
All Joustus Cards & Encounters +tips image 478
All Joustus Cards & Encounters +tips image 479
All Joustus Cards & Encounters +tips image 480
All Joustus Cards & Encounters +tips image 481
All Joustus Cards & Encounters +tips image 482
All Joustus Cards & Encounters +tips image 483
All Joustus Cards & Encounters +tips image 484
All Joustus Cards & Encounters +tips image 485
All Joustus Cards & Encounters +tips image 486
All Joustus Cards & Encounters +tips image 487
All Joustus Cards & Encounters +tips image 488
All Joustus Cards & Encounters +tips image 489
All Joustus Cards & Encounters +tips image 490
All Joustus Cards & Encounters +tips image 491
All Joustus Cards & Encounters +tips image 492
All Joustus Cards & Encounters +tips image 493
All Joustus Cards & Encounters +tips image 494
All Joustus Cards & Encounters +tips image 495
All Joustus Cards & Encounters +tips image 496
All Joustus Cards & Encounters +tips image 497
All Joustus Cards & Encounters +tips image 498
All Joustus Cards & Encounters +tips image 499
All Joustus Cards & Encounters +tips image 500
All Joustus Cards & Encounters +tips image 501
All Joustus Cards & Encounters +tips image 502
All Joustus Cards & Encounters +tips image 503
All Joustus Cards & Encounters +tips image 504
All Joustus Cards & Encounters +tips image 505
All Joustus Cards & Encounters +tips image 506
All Joustus Cards & Encounters +tips image 507
All Joustus Cards & Encounters +tips image 508
All Joustus Cards & Encounters +tips image 509
All Joustus Cards & Encounters +tips image 510
All Joustus Cards & Encounters +tips image 511
All Joustus Cards & Encounters +tips image 512
All Joustus Cards & Encounters +tips image 513
All Joustus Cards & Encounters +tips image 514
All Joustus Cards & Encounters +tips image 515
All Joustus Cards & Encounters +tips image 516
All Joustus Cards & Encounters +tips image 517
All Joustus Cards & Encounters +tips image 518
All Joustus Cards & Encounters +tips image 519
All Joustus Cards & Encounters +tips image 520
All Joustus Cards & Encounters +tips image 521
All Joustus Cards & Encounters +tips image 522
All Joustus Cards & Encounters +tips image 523

TMK-500

x2:

x3:

x4:

Board State: Random

Propeller Knight

x1:

x2:

x3:

Board State: Semi-Random

Random except that it's impossible for all 3 gems to be on the same side.

His AI is pretty smart, capable of blocking and locking down cards.

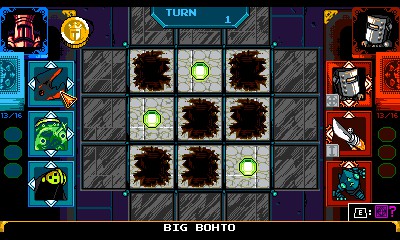
Propeller Knight will attempt to use his cascade cards to push your cards (now his cards) onto gems.

You can intentionally put bad cards in your deck (like in the above picture) and place them next to gems. His AI will still want to convert them to his color while pushing them onto gems. Then, because it's not a double-arrow card, you can immediately steal it back and secure it with double-arrow cards.

Tinker Knight

x1:

x2:

x3:

Board State: Random

Polar Knight

x1:

x2:

x3:

I can't figure out what the 16th card is.

Board State: Fixed

Specter Knight

x1:

x2:

x4:

I can't figure out what the 16th card is.

Board State: Random

Strategy:

Again, the AI doesn't utilize its slam or graveyard cards properly.

It will often use its slam cards to help you.

Just watch out for its lone cascade card.

Tower Of Joustus (World 4)


All Joustus Cards & Encounters +tips image 560
All Joustus Cards & Encounters +tips image 561
All Joustus Cards & Encounters +tips image 562
All Joustus Cards & Encounters +tips image 563
All Joustus Cards & Encounters +tips image 564
All Joustus Cards & Encounters +tips image 565
All Joustus Cards & Encounters +tips image 566
All Joustus Cards & Encounters +tips image 567
All Joustus Cards & Encounters +tips image 568
All Joustus Cards & Encounters +tips image 569
All Joustus Cards & Encounters +tips image 570
All Joustus Cards & Encounters +tips image 571
All Joustus Cards & Encounters +tips image 572
All Joustus Cards & Encounters +tips image 573
All Joustus Cards & Encounters +tips image 574
All Joustus Cards & Encounters +tips image 575
All Joustus Cards & Encounters +tips image 576
All Joustus Cards & Encounters +tips image 577
All Joustus Cards & Encounters +tips image 578
All Joustus Cards & Encounters +tips image 579
All Joustus Cards & Encounters +tips image 580
All Joustus Cards & Encounters +tips image 581
All Joustus Cards & Encounters +tips image 582
All Joustus Cards & Encounters +tips image 583
All Joustus Cards & Encounters +tips image 584
All Joustus Cards & Encounters +tips image 585
All Joustus Cards & Encounters +tips image 586
All Joustus Cards & Encounters +tips image 587
All Joustus Cards & Encounters +tips image 588
All Joustus Cards & Encounters +tips image 589
All Joustus Cards & Encounters +tips image 590
All Joustus Cards & Encounters +tips image 591
All Joustus Cards & Encounters +tips image 592
All Joustus Cards & Encounters +tips image 593
All Joustus Cards & Encounters +tips image 594
All Joustus Cards & Encounters +tips image 595
All Joustus Cards & Encounters +tips image 596
All Joustus Cards & Encounters +tips image 597
All Joustus Cards & Encounters +tips image 598
All Joustus Cards & Encounters +tips image 599
All Joustus Cards & Encounters +tips image 600
All Joustus Cards & Encounters +tips image 601
All Joustus Cards & Encounters +tips image 602
All Joustus Cards & Encounters +tips image 603
All Joustus Cards & Encounters +tips image 604
All Joustus Cards & Encounters +tips image 605
All Joustus Cards & Encounters +tips image 606
All Joustus Cards & Encounters +tips image 607
All Joustus Cards & Encounters +tips image 608
All Joustus Cards & Encounters +tips image 609

Secret Cards

Shield Knight

Shovel Knight

Shield Knight & Shovel Knight are both behind a secret wall on the top-left of the screen with the liquid samurai archer.

Missy:

x1:

x2:

x3:

Red:

Board State: Fixed

Strategy:

After he plays his 3 unique cards, he can barely do anything.

Liquid Samurai:

1x:

x5:

Board State: Random

Horace:

Board State: Random

Strategy:

Horace's special power is to steal your turns, but this isn't a bad thing.

His deck is mostly cards that point in only one direction, making it difficult for him to lock down anything.

You can wait to place your first card until he's filled the entire board up, then steal and lock down a gem when the chance arises, using the edge of the game board. I'd use cascade, triple-arrow, or 3-directional cards for this.

Depending on the system you're playing on, it's also really easy to take a screenshot and pause in order to give yourself more time to think.

Cardia


All Joustus Cards & Encounters +tips image 634
All Joustus Cards & Encounters +tips image 635
All Joustus Cards & Encounters +tips image 636
All Joustus Cards & Encounters +tips image 637
All Joustus Cards & Encounters +tips image 638
All Joustus Cards & Encounters +tips image 639
All Joustus Cards & Encounters +tips image 640
All Joustus Cards & Encounters +tips image 641
All Joustus Cards & Encounters +tips image 642
All Joustus Cards & Encounters +tips image 643
All Joustus Cards & Encounters +tips image 644
All Joustus Cards & Encounters +tips image 645
All Joustus Cards & Encounters +tips image 646
All Joustus Cards & Encounters +tips image 647
All Joustus Cards & Encounters +tips image 648
All Joustus Cards & Encounters +tips image 649
All Joustus Cards & Encounters +tips image 650
All Joustus Cards & Encounters +tips image 651
All Joustus Cards & Encounters +tips image 652
All Joustus Cards & Encounters +tips image 653
All Joustus Cards & Encounters +tips image 654
All Joustus Cards & Encounters +tips image 655
All Joustus Cards & Encounters +tips image 656
All Joustus Cards & Encounters +tips image 657
All Joustus Cards & Encounters +tips image 658
All Joustus Cards & Encounters +tips image 659
All Joustus Cards & Encounters +tips image 660
All Joustus Cards & Encounters +tips image 661
All Joustus Cards & Encounters +tips image 662
All Joustus Cards & Encounters +tips image 663
All Joustus Cards & Encounters +tips image 664
All Joustus Cards & Encounters +tips image 665
All Joustus Cards & Encounters +tips image 666
All Joustus Cards & Encounters +tips image 667

All Joustus Cards & Encounters +tips image 668

Cardia:

Board State: Random

Strategy:

The game allows you to challenge Cardia really early in the game, when you don't have much Joustus experience.

Cardia has a very good AI, meaning that you would need strong fundamentals and/or luck in order to beat her with cards at an equal power level to hers.

If you're new to Joustus, then I'd recommend skipping her until later in the game.

And of course, you can beat her later with strictly better cards.

Giga Cardia:

Board State: Random

Strategy:

After placing 2 cards, she gains the special abilities of all previous Joustus leaders, including Horace's.

You can exploit this just like with Horace. That is, not playing any cards until the board is almost completely full, and then stealing cards using triple-arrow, cascade, or 3-directional cards.

Defeating Giga Cardia Awards:

Cardia

Giga Cardia

Puzzle Solutions


All Joustus Cards & Encounters +tips image 685
All Joustus Cards & Encounters +tips image 686
All Joustus Cards & Encounters +tips image 687
All Joustus Cards & Encounters +tips image 688
All Joustus Cards & Encounters +tips image 689
All Joustus Cards & Encounters +tips image 690
All Joustus Cards & Encounters +tips image 691
All Joustus Cards & Encounters +tips image 692
All Joustus Cards & Encounters +tips image 693

House of Joustus (World 1)

Cavern of Joustus (World 2)

Crag of Joustus (World 3)

Card Chest Levels


All Joustus Cards & Encounters +tips image 698
All Joustus Cards & Encounters +tips image 699
All Joustus Cards & Encounters +tips image 700
All Joustus Cards & Encounters +tips image 701

Card-Chest levels look like this on the overworld map:

King Pridemoor (World 1)

Troupple King (World 2)

King Birder (World 3)

Make sure to talk to npc in the level.

In-level Secret Cards


All Joustus Cards & Encounters +tips image 708
All Joustus Cards & Encounters +tips image 709
All Joustus Cards & Encounters +tips image 710
All Joustus Cards & Encounters +tips image 711

Mom

King Knight

Mom and King Knight are both found behind secret walls in The Homestead (World 1). A way to gain vertical height is required (like the Bubble Frog heirloom).

There is an alternate method (spoilers): You can also get there by returning to where you first found Mr. Hat and talk to the horse guy while a Decree of Rejuvenation is active.

Mr. Hat

Return to the now-called Void Crater (World 3, used to be called Fancy Shop) after defeating Mr. Hat and talk to the NPC who gives you this card.

The Enchantress

In the "Shrouded Spires" level (World 4). Starting at the checkpoint, go left, then down the red ladder (which you can only see briefly before the screen goes black). In this room with liquid samurai, there is a secret wall on the left that contains this card.

Mystery Card Exclusives


All Joustus Cards & Encounters +tips image 721
All Joustus Cards & Encounters +tips image 722
All Joustus Cards & Encounters +tips image 723
All Joustus Cards & Encounters +tips image 724
All Joustus Cards & Encounters +tips image 725
All Joustus Cards & Encounters +tips image 726
All Joustus Cards & Encounters +tips image 727
All Joustus Cards & Encounters +tips image 728
All Joustus Cards & Encounters +tips image 729
All Joustus Cards & Encounters +tips image 730
All Joustus Cards & Encounters +tips image 731
All Joustus Cards & Encounters +tips image 732
All Joustus Cards & Encounters +tips image 733
All Joustus Cards & Encounters +tips image 734
All Joustus Cards & Encounters +tips image 735
All Joustus Cards & Encounters +tips image 736
All Joustus Cards & Encounters +tips image 737
All Joustus Cards & Encounters +tips image 738
All Joustus Cards & Encounters +tips image 739
All Joustus Cards & Encounters +tips image 740
All Joustus Cards & Encounters +tips image 741
All Joustus Cards & Encounters +tips image 742
All Joustus Cards & Encounters +tips image 743
All Joustus Cards & Encounters +tips image 744
All Joustus Cards & Encounters +tips image 745

Cards that you can only get by buying mystery cards from Chester.

Flailarmor, Gobcano, and Slimulacrum are not unique, but I was unable to find a challenger that had them.

Level 1 Mystery Cards

Flailarmor

Rookie

Ruffian

Gastronomer

Goatician

Ledge Farmer

Hedge Farmer

Farrels

Playing Kid

Hoop Kid

Terrorpin

The Big Creep

Leo

Level 2 Mystery Cards

Grandma Swamp

Hengineer

Gouache

Doe

Gobcano

Dancer

Level 3 Mystery Cards

Cloaked Figure

Level 4 Mystery Cards

Slimulacra

Manny

Edge Farmer

Dark Reize

Donovan

Source: https://steamcommunity.com/sharedfiles/filedetails/?id=1948618923					

More Shovel Knight: Treasure Trove guilds