Leveling
Leveling
Leveling is the first step you'll want to take. Keep on playing wizard until it's Level 20, unless there's a class that you know "That's the class I want." And for the record, ninja or rogue will be the class you WANT, but don't bother. They're both extremely difficult to play, although I'll explain them both later. The first times you attempt to level a character to 20, just follow your quests unless the quest bar says one of the following: Cube God, Hermit God, Lord of the Lost Lands, Skull Shrine, Grand Sphinx, Eye of the Dragon, or Ghost Ship. Go for anything and everything else, even Red Demons. Level from 1-20 the first time by following quests and hanging out in the midlands (forested area w/cyclops) however, when you've got some leveling experience you can teleport to the Godlands at level 10-15. NEVER TP THERE @ LVL 1. It's just stupid.
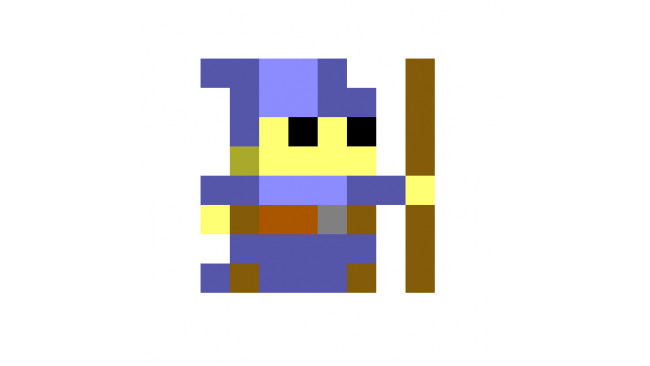
Wizards 1-20: Aim... Aim... BOOM!

Wizards are the class of the beginner, novice, and expert. They use staves and spells to deal damage, and with a high tiered staff and maxed dexterity they can blaze through enemies at a staggering rate. The wizard can use his spell to: Clear fields of enemies, do immense damage to a single enemy, or be a troll and lag his comrades out terribly. Expect soulbound on everything you can spellbomb!
Priest 1-20: Heal Please!

The Priest is a team player. He uses a super long range wand to attack and can heal himself and his allies. He wears robes. By himself he doesn't have enough DPS (Damage Per Second) to solo things easily. HOWEVER, in a team he will prevent any of his teammates from dying or having to take a break from fighting to regenerate. When the priest does solo it can take a little while, but is insanely easy. "In the hands of one who has mastered the spacebar, the priest becomes an unstoppable wrecking ball of scrub domination and good taste in music." Priests rarely die as long as you are careful. They're a solid investment to max. More on the maxing later.
Archer 1-20: Triple The Shots, Triple The Fun
The archer is a class who uses a bow. The bow pierces enemies (the arrows move through them) and has a relatively long range. The archer wears leather armor. Archer is a class to use for range, as well as the fact that the higher tiered (Tier 8 and above) bows fire three shots, allowing for triple the damage if you can get close enough. The archer will roll over enemies in the Midlands, and will be able to achieve soulbound damage on Gods easily thanks to his triple spread. Be warned though, the archer rarely does enough damage without being maxed to make soulbound on enemies with lots of defense like Oryx. Simply because the bow relies on it's three hits to inflict damage, but if only one of them is hitting for 30ish damage, it's just not enough.
Warrior 1-20: I Can Haz DPS?
The warrior is the first melee class available to play in the game. He is capable of insane DPS at max, and even without being maxed has some considerable damage output. The warrior uses his helm to increase the power of himself and his allies, as well as giving the warrior a convenient speed boost that really throws off enemies targeting AIs (even trackers like Ent Gods). He wears heavy armor, and his helmet gives defense as well, meaning that a warrior with decent gear is still pretty dang tanky. Expect soulbound on everything you can get close to.
Rogue 1-20: I'm Here... And Then Less Here.
Rogue is one of the more tricky classes (aside from Trickster of course), wielding a dagger and a cloak. He can make himself invisible, which is very handy for soloing difficult bosses without taking damage. Whilst invisible, enemies will not intentionally shoot at, or torward the rogue. However, take note that any other player near you will still be shot at, and if you're in the line of fire, well... you're invisible not invincible. Rogue has a lot of dexterity, even without maxing, so your damage output at level 20 is considerable. Still however, making soulbound is a matter of being able to stay in to do damage. Use your cloak to avoid being attacked.
P.S: The rogue, being one of my favorite classes, will receive a very detailed explanation, even possibly a VIDEO TUTORIAL MADE BY ME!
Knight 1-20: KA-BAM! (Not Incorporated.)
The Knight is a tank. (Period). At both max and fresh leveled, he has the most defense in the game (excluding warrior with a Helm of the Juggernaut [more on that later]). He wears heavy armor like the warrior, and receives defense from the shield like the Warrior does from his helm. The Knight's shield is one of the most powerful abilities, when an enemy is hit with it, the enemy literally CANNOT ATTACK. To obtain soulbound, take advantage of this temporary ceasefire and UTTERLY BARRAGE THE ENEMY. Note: Some enemies such as Oryx and the Ghost Ship will fire the bullets they would've fired during the stun right as the stun ends. Essentially, it's like buffing them. Learn which enemies do this (I might make a list eventually) and remember them.
Asssassin 1-20: Making These 3 Pointers All Day!
The Assassin is a leather armor wearing class who uses a dagger. His poison can be used to inflict soulbound damage over time on every enemy it hits. The Assassin gets more wisdom than the rogue, but his poison costs more mana to use than the rogue's cloak. Assassins obtaining soulbound is very easy, if you can time your poison right. Just throw your poison so that it hits an enemy when it's vulnerable, resulting in soulbound damage. If your poison is high enough tier, you make soulbound. Note: The Assassin's poison ignores defense, so don't worry about that and toss those milks!
Necromancer 1-20: Your Health... To My Health...
The Necromancer is a staff class, who wears robes like his other stave wielding companions. His ability is the skull, which can be used to both damage the enemies it hits, as well as healing the Necromancer from the damage. Damage healed to damage dealt is a direct 1:1 ratio, so hit as many enemies as possible. The Necromancer gaining soulbound relies completely on his staff, because his skull doesn't do as much damage as wizard's spells.
Huntress 1-20: Sit. Stay. NO, STAY!!!
The Huntress has the same description as the Archer, except for one obvious difference. The Archer uses a quiver, and the Huntress uses a trap. The Huntress' trap slows, but the Archer's quiver paralyzes. The Huntress is essentially a debuffed Archer (I'm sorry to say it, but it's true). Their stats cap out the same, although the Huntress does get 10 extra wis, due to the trap requiring more MP than the quiver. However, the Huntress still functions, and the slow allows for easier dodging. Archer or Huntress is a choice governed by preference, not logic. Soulbound works the same way for Huntress as it does for Archer, close=SB, far away=nothing.
Paladin 1-20: Heal Please! (Again!)
The Paladin is the last melee class (unless you count ninja) but it is definetly the last sword class. The Paladin uses swords, wears heavy armor, and his ability is a seal. The seal heals him as well as increasing his damage output. However, unlike the Warrior's ability he has a lot of range. However, the Paladin's weakpoint comes from his seal not giving him any defense, making him much less tanky than his other armor class counterparts. The healing though makes him powerful enough to still go deep. Soulbound is achieved the same way as warrior, although his squishyness makes him a little more difficult.
Mystic: No No No No... NOT IN MY REALM!
The mystic is the lowest DPS staff class, possibly the lowest DPS class ever (without Conflict, but more on that later.) The mystic uses a staff to attack, her ability is an orb, which can freeze enemies in time and space. Quite nice, but perhaps a little trolly. Mystic is a robe class. The point of the mystic is that it can freeze enemies that it does not want to fight at the moment (freeze a boss and kill the minions) or to free up her allies to kill what's attacking her. The only benefit the mystic has over the other staff classes is that she has an escape ability that's much better compared to Wizard's and maybe compared to Necromancer's. Remember, freeze the tough stuff and come back to it later. Like multiple choice tests.
Trickster 1-20: LOOK, A DISTRACTION!
The Trickster is the T3 dagger class. She attacks with a dagger, and has much more attack and wisdom than her other fellow dagger classes, especially more than the Rogue. However, her ability requires much more skill to use. The prism, the trickster's ability, is used by: Moving toward the way you want the decoy to go for .3 seconds before you teleport. Then, the decoy will move in the same direction you were. Enemies attack the decoy (as long as it is closer to them than you are.) The Trickster's power comes from being able to do massive amounts of damage whilst the enemies are distracted by her clone.
Fun Facts: There are three female classes in Realm, the Trickster, Huntress, and Mystic. The Sorcerer is not female because of the suffix, and the Necromancer is debatable. Huntress is obviously a female because of the suffix, and mystic is assumably female due to the hair.
Sorcerer 1-20: Eat Lightning!
The Sorcerer is the T3 wand class. He uses a scepter to smite all his enemies, spreading his power across the field. He also has more speed and attack power than the priest, however, he possess less wisdom. He is a robe class, and is rather more squishy than the priest because of the lack of a healing ability. However, his vitality stat is much higher than the priest's, as high as a melee class. Sorcerer is good for attacking multiple enemies, like Gods, who spawn in groups. He is great for thinning out the herd, as it were.
Ninja 1-20: ZOOOOOOOOOOOOOOOM
The ninja is fast. That is his class concept. He is fast. He is the only class currently in the game that uses a Katana. The Katana has less DPS than a sword, but slightly more range (.7 to be exact.) The Ninja has more dexterity than the melee classes, but slightly less than dagger classes. He has more attack than Sorcerers, but less than Warriors. This makes him a confusing class, because he has no obvious purpose when unmaxed. He's not adept at rushing higher level dungeons without being maxed, and can't do enough damage quickly either. The only benefit Ninjas do have is their Star. The Ninja ability, or Star, is the only item in the game that is EoT (Effect over Time). It is different from the Paladin's seal because you can control the exact duration of your boost. When spacebar is held, the Ninja receives a speed boost at the cost of 10MP per second. When spacebar is released, if the Ninja has enough MP, he will fire off a high powered, quick moving Star. Stars inflict a lot of damage, and have the same range as a wand. Three star shots alone is enough to kill Gods, achieve soulbound on Oryx, or kill some minions.
Done With The Classes Unmaxed!
Hey, looky there, until Kabam adds some more, I'm done with the classes unmaxed pages! That means it's time to take a look at the UTs (Untiered) items, and the maxed gameplay for each class! Check back to see when I start on that! Meanwhile, Nhero may feel free to add more dungeon guides, although I'd like to call Undead Lair and Tomb of the Ancients.
Nhero's Comment:
Yay, now to procrastoniate even more on writing guides.
Things That New Players Need To Know But No One Ever Tells Them
I can remember that feeling when you're confused about something and so you ask someone who looks like they know what they're doing and they go "LOL WUTTA SCREWB!" and teleport off. I can understand where they're coming from, but I can understand that YOU NEED YOUR QUESTION ANSWERED. So here are some of those questions that no one wants to take the time to answer.
1: What is fame?
Fame: An ingame untradeable currency that can be obtained once a character reaches Level 20. Not before. If you have never reached Level 20 before, it's no wonder you don't know what fame is. However, when you reach Level 20, your lovely green Level Bar is replaced with a shiny new orange Fame Bar. This bar ticks up every so often as you earn fame. Fame is much more difficult to earn than XP, you get 1 Fame every 12 God kills or so. You will notice the Fame Bar approaching it's max pretty fast at first. However, when it reaches 20/150/400/800, it will change and send you on the next Class Quest (like Fame earning achievements.) This is where Stars come from. When you obtain 20 fame, you now must earn 150, then 400, then 800, then 2000. When or if you reach 2000, the fame bar is now completely filled out, though you continue to earn fame. I'll have some pictures of full Fame bars later, as well as the various fame stages.
2: Why can't I trade?
Reason Numero Uno: This is going to be a long one, probably. I'm not going to explain Kabam, I don't usually try to envoke love/hate emotions before 10PM. You can't trade whatever item you've got because it's soulbound (SB). SB-ing is something that's occurred only recently, when it was decided by the aforementioned deity (Kabam) whom I don't concentrate on until after 10. It was decided that Untiered (UT) items could not be traded, and that was that. Items that are 'UT' but can still be traded include: All consumables (excluding tinctures), common eggs (not higher), treasures (Useless feed power item), and Wine Cellar Incantations.
Reason Numero Dos: You haven't created a username yet. Do this by going to the character select screen and clicking 'Name Your Charcter', which is just below your name.
3: What is gold?
An explanation of gold: If you've played any other MMO you know there are two currencies. The same holds true for Realm. There are potions, which can be traded between players. And there is gold, which is purchased for REAL MONEY by PAYING FOR IT. Sorry dude, you get 100 gold to start out with, and that's it. Don't buy equips with it.
Some rules on gold: 1: Never ever ever buy items with it. They can all be obtained in-game for free.
A Note on Gold:
It is believed on the forums and talked about by the devs that there will soon be a fame:gold update, allowing everything that can be bought for gold EXCLUDING CHARACTER SLOTS to be bought for fame. The ratio will most likely be pretty high. Whether or not items will be sold for fame is questionable, as they weren't sold in the nexus when this information was released.
What Do My Stats Do?
Here's an overview of what each stat does. Precise information can be found at http://www.realmeye.com/wiki/character-stats-explained but this is a general overview, in plain English.
Attack: Increases the amount of damage each of your bullets deals. Does not affect Ability damage.
Defense: For every point of defense you possess, you take one less damage from enemies, down to 1/8th of the damage the enemy can deal, rounded up. So if an enemy deals 80 damage, you will take a minimum of 10 damage from that enemy, even if you have 100 defense.
Speed: Affects how quickly you move.
Dexterity: Increases your rate of fire. Dexterity and attack both increase your DPS by the exact same amount per potion.
Vitality: Increases the rate at which you regain health. Slightly trivalized by pets, but still important.
Wisdom: Increases the rate at which you regain mana. In addition, for the Paladin, Priest and Mystic classes it also makes their abilities more effective.
Health/Mana: When you consume a Life or Mana Potion (These are different from the Health and Magic potions that restore 100HP/MP) you gain +5 of the corresponding stat, not +1 like every other potion.
Tips And Tricks Of The Trade: From Boo To You: Section 1 - Godlands
Alright then everyone, I've decided to just move on straight to the enjoyable stuff. So without further ado, here's one of the most important things to explain for Realm.
The Godlands
The Godlands are the place where every noob hesitates to go, and every experienced player heads immediately. Here's an indepth explanation of every enemy in the Godlands and an explanation of the Godlands themselves.
Djinn-He's blue and looks like a genie (because he is). His attack pattern is simple. He runs towards his target then 'activates' and blows white balls in all directions. The white balls do little damage to melees, some to leathers, and they can hurt a robe class.
Drops:SPD
Constructs- There are 3 different types of Constructs. A Steel Construct (Blue), a Rock Construct (Grey) and a Wood Construct (Brown). They rotate in a circle, in the following order. Rock in the center, Steel outside him, and Wood outside of that. With 2000 HP, they are tough to kill. However, they are actually virtually IMPOSSIBLE with unmaxed classes and quite a few of the maxed ones as well. This is because, they HEAL EACH OTHER. As they say "Silly Squishies, we heal our friends in a circle." However, if you have the DPS to kill one before it heals, they go down like the rest of the Gods. The order I do it in: Rock, Wood, Steel. Steel heals Wood, Wood heals Rock, and Rock heals Steel. I think.
Drops:ATT
Ent God-You'll know when you find this one, cause it's a tree. The Ent God is arguably the hardest god to kill, but to me the Slime God still is tougher. Anyway, the reason the Ent is so difficult to kill is that it shoots not at where you ARE, but at where you'll BE. Based on your speed it calculates where you'll be after about .5 seconds and fires there. Now, you can abuse this by strafing side to side (causing it to fire somewhere to the side of where you are) allowing you to kill it with no problem at all.
Drops:DEF
Leviathan-The Leviathan can really screw you over. It kind of looks like a whale crossed with a manatee crossed with a snake. He fires tons of 40ish damage bullets and moves in a triangle, and then he fires sets of 2 60 damage bullets and circles you.
Drops:DEF
Medusa-The Medusa is the easiest God to kill in the Godlands, although it's also 2nd most deadly. The Medusa fires a spread of 5 High Powered green bullets at a 35ish degree angle. Eating these bullets is... not suggested. However, to avoid getting hurt by them, just circle the Medusa. It also throws red grenades that do about 130ish damage, so watch for those too.
Drops:SPD
Dungeon:Abyss of Demons
Sprite God- Sprite Gods are purple looking beings made of fire and pure power. They fire their shots the same way the Medusa does, and they do the same amounts of damage. However, instead of a grenade, a boomerang is fired that quiets you if you touch it. The boomerang is fired in the same way the Ent Gods shots are fired. Remember that the boomerang does no damage. Protip:If you plan on entering one of the sprite worlds that drops from the mini sprites, then you can eat the quiet boomerang because entering a portal while quieted restores all of your base MP. This also works for when the Realm is taken to Oryx's Castle (I tested it, it does work, does not restore +MP from equips at any point though.)
Drops: Potion of Attack
Mini Sprites- With about 5 HP and no offensive capabilities, they're just there for the dungeon. Each one has approximately a 30% chance of dropping a Sprite World. (Although you'd SWEAR it was less.)
Flying Brain-The flying brain does very little damage, just 30 base (with 0 def). While melees and even leather classes will find this guy just tedious to kill, robes can get hurt by him because of how fast he shoots. To avoid his shots, just move steadily in a slow circle.
Drops:Potion of Attack
Dungeon:Mad Lab
Beholder-The Beholder attacks the same way the Flying Brain does, but he shoots slowly with bullets that do MUCH more damage, higher than the Medusa's shots. They hurt. However, they shoot so slowly their bullets are pretty simple to dodge, even on melees.
Drops:DEF
Ghost God-Best for last. The Ghost God fires a spread of 5 SUPER powered bullets (same as Beholder's) at a rather narrow angle. They are difficult to kill on melees, although they are easy enough for robes. Dagger classes may have some trouble, but shouldn't take much damage from these guys. Bow classes excel at killing all Gods.
Drops:SPD
Dungeon:Undead Lair
I plan to make a video explaining each God in depth, and showing me killing them in the ways described above.
Tips And Tricks 2: Oryx 1
Oryx the Mad God is often considered to be the final boss of the game. This isn't precisely true, due to the Wine Cellar, but it is awfully close. Oryx is one of the toughest enemies to learn the patterns for, and he is most definetly the enemy who will drop the best loot the most often for newer players and older ones alike (who doesn't like their def+att off Oryx?) And so, I will not explain to you how to complete:
Oryx the Mad God's Castle
Oryx's Castle, while obviously not being the real challenge, is still difficult for new players, and can be hazardous to overconfident pros. The enemies in the dungeon have a large bullet spread (excluding the pets, who deal melee damage if you stand on top of them) and have high HP. One of them slows you while the other will rush you and stand on top of you, then it will release a lot of heavy damage projectiles from it's center. Standing on top of these projectiles without max def is often a death sentence. The other hazard of the castle (especially for players with max def) is the Brute of Oryx. He's the big guy who fires the scythe-like bullets directly in front of him. He Armor Breaks. This means that when you are hit with a bullet of his, your defense is set to 0 until the Armor Break effect fades. For pros, this means your lovely max def is now NOTHING. Which means that when the enemy with the projectile explosion stands on you, YOU'RE DEAD. You have been warned.
Oryx the Mad God
Oryx the Mad God is a very complicated enemy to explain, for a couple reasons.
1: He has phases, and each phase is completed differently from the next.
2: The phases are random, meaning they come in no particular order.
3: His shots deal a lot of damage, and players will probably die a few times before really figuring out Oryx (I am trying to eliminate a few of these deaths with this section of my guide.)
So without further ado, Phase Number One.
Phase One: Oryx stands in the center of the map until a player activates him (deals ~3K damage to him) and then starts to spawn off his first round of minions. They are red versions of the Brutes of Oryx, however, they do not armor break, instead they can deal decent damage and fire slow stars (like the Slime God.) Oryx also shoots huge waves of red bullets (although most likely melees will tank these and you will not notice them.) This phase is easy, continue shooting until Oryx changes his phase. The red enemies that were spawned also disappear at the end of the phase.(NOTE: This is always Oryx's first phase, the rest from now on shall be relatively random.)
The Rest of the Phases, Ordered by Difficulty In My Opinion:
From hereon, each phase will have two categories. How you know he's in the phase, and how to properly do the phase.
Signs of this Phase: Oryx will yell "BE SILENT!" into the chat, and then create a ring of black balls around him.
How to do it: Do not stand near the black balls, nor Oryx, when this phase starts. You'll soon see why. Oryx and the balls (a possible RotMG band name) now start to fire circle projectiles just about 1.5 tiles away from them, leaving a "safe" area in the middle. This area isn't safe for long however, because Oryx now throws grenades similar to the Medusas' into said ring. However, there is always a couple of safe spots because he can only throw three of these grenades and their AoE isn't extremely large. However, their damage is. An unmaxed character will find 2-3 of these wiping their health down to 0. A maxed one will need 3 at least. (Note: When I say maxed, I mean def at least, unless stated otherwise. E.G. "Def/Dex" or "Def/Dex/Vit") As long as you can avoid the grenades, you're safe. Note also that he fires black and white stars that do no damage but quiet and weaken you, meaning you can't get a lot of damage in here. This phase is one that it's OK to skip.
Signs of this Phase: Oryx will yell "The Universe bends to my will alone!" into chat.
How to do it: Oryx will fire huge tear shaped bullets that do a LOT of damage after firing Quiet bullets. Now, they're huge, but slow, and there's always space in between them for even melees to stand and do damage. (Be careful of the orbiting satellites, which will prevent you from standing to far out.) After a few seconds of this, he switches to firing a ring of bullets around him, which you can run in circles around (or if you are slow you can back up and remove yourself from the phase.) Be careful because the satellites stop orbiting the outside and move inside. After firing the circling bullets, he then goes back to the huge bullets and the satellites move outside again. That concludes this phase.
Signs of this Phase: Oryx will yell "My artifacts will protect me!" into chat.
How to do it: Oryx will first toss out big blue artifacts right next to himself, and then smaller ones will circle around him farther away. Then, he will let loose. During this phase, the large artifacts in the center fire lots of damaging bullets in lines away from Oryx, these can be avoided because they will continue to fire in the same place. The outside artifacts will fire a 3-shot spread at anyone who gets to close to their orbit. Oryx himself fires HUGE 350ish damage bullets which move very slowly, and as previously mentioned, are huge (he fires 3 in a triangle shape targeting the closest player, which means that other players will get in the way of the other two.) These bullets pierce (go through players like archer & ninja shots.) After firing huge bullets, the large artifacts start to spin very rapidly, randomizing their attack location, and Oryx will instead fire 6ish smaller white bullets that deal 80ish damage. These bullets result in less consequences if they are not dodged correctly. After the artifacts slow down Oryx goes back to super huge bullets, and then the phase ends. (Note: There are a couple seconds when the giant artifacts are disappearing where Oryx does not attack nor do Artifacts, but Oryx is still vulnerable. Have at him then!)
Signs of the Phase: Oryx will yell "Time for more Dancing!" into chat.
I know what you're thinking, WAITAMINNIT, THERE ARE MORE PHASES, BUT DANCING IS DEFINETLY THE TOUGHEST! No, it isn't. >:3
How to do it: Oryx will spawn the ring of black balls like he did in the second phase that I've described. However, this time, it's gonna get REAL. Oryx will start to shoot white balls seemingly EVERYWHERE, and even if you dodge these he also shoots the same high damage red grenades from his FIRST dancing phase! It may look like there's nowhere safe, but you've figured out by now that... there is. Dancing is tough to explain, but here is how to do it I suppose.
First: Set a hotkey to return your Camera angle to it's default.
Second: Make your cameras default 45degrees.
Third: Have Oryx start dancing.
Fourth: Get ready, write your will, maybe put up any nice equips you have, just in case.
Fifth: Go time.
To do dancing after preparing yourself in the above manner ^ stand directly below Oryx. Then, when he starts to fire the white bullets, dodge them by moving in zig-zag pattern. Now, when he fires the red grenade, move up and to the RIGHT as far as you can without being hit by another white ball. The grenade will land, not damage you, and you can continue doding. I'll try to make a video about this so that you can see it in action.
-End Phase-
Signs of the Phase: Oryx will yell "Tremble before my Cosmic Might!"
How to do It: Now, when Oryx originally came out, this phase did not exist. However, it does now, which means you should know how to deal with it. This phase will require me a video of me showing you, because it is quite simply impossible to explain in words. Essentially, you must juke Oryx. NO ONE TOLD ME THERE WAS A CHARACTER LIMIT!
Tips And Tricks 2 (Cont): Oryx 1!
So, you've survived just about all of Oryx's stages, you've learned it takes two and a 45 degree screen alignment to tango, and you're ready to face Oryx's last and hardest stages!
Well, here they are, in all their undefeatable glory.
Phase: Universe, Taunt: "The Universe bends to my will alone!"
Oryx shoots out 6 Large Black Spheres (No, not THOSE.) and each Large is accompanied by a Small (Really guys, ssh.) The large black spheres make a shotgun from the center that'll hurt if stood on, and the small ones fire small white bullets that daze. Oryx himself alternates firing rings of bullets that will weaken you. You have to dodge BOTH sets of bullets AND the bullets from the Black Spheres if you want to do any damage worth doing to Oryx while he's doing this.
Snake Pits: By Nhero

The Snake Pit is a dungeon with a 1/5 Grave Difficuilty, and is probably one of the best sources to farm Potions of Speed from. This section of the guide, Written by Nhero Arconix (Arconix IGN) will teach you everything from the enemies to the loot to the layout.
Firstly, the Snake Pit is the third or fourth (mabye fifth) dungeon you would encounter. (Pcave, Forest Maze (If you're new), Spider Den, and mabye Sprite World.)
THE PORTAL:
The duengon has a very random but controlled spawning pattern, it will only drop from:
Lesser Gods
-Minotuar
-Lizard God
-Undead Dwarf God
-Flayer Gods (Or whatever they are, I call them Zoidbergs due to a friend.)
And Ogre Kings.
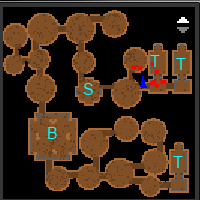
So what about the duengon itself? When you first walk in, this is what you would see.
Pretty bland right? No enemies spawn here. Break the soft blocks to advance foward through the duengon! (The soft blocks are dark brown.)
An example layout of the Snake Pit. (I got lucky this Snake Pit am I right?)
Key:
S= Starting Room.
T= Treasure Room.
B= Boss Room.
Guide will be finished up later, I dont wanna get all the sprites right now.
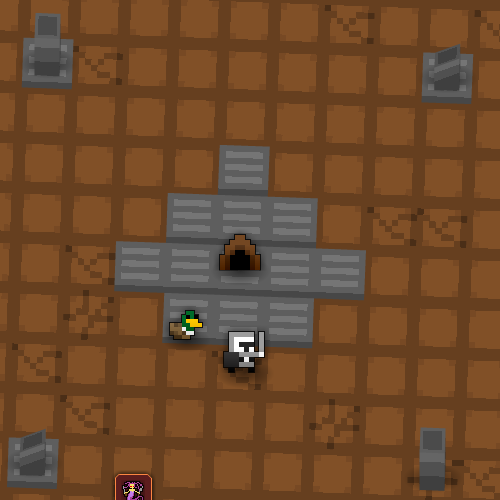
Undead Lairs (UDL) -By Booyah
The Undead Lair is my personal favorite dungeon to run. It's fast, the boss takes a moment or two to kill no matter how large the group is (as opposed to Malphas and most other bosses), and the enemies are fun to kill or run past. The only downside is the traps, I suppose. But more on that later.
Introducing... The UDL!
Questions
I'm not going to be able to finish this very quickly, so here is some shameless advertising. I host a livestream. On it, you may ask me any question, and I will answer you to my best ability.
www.twitch.tv/booyahman (This is rarely up as my internet no longer handles it!)
There it is, just click the message into chat, and I'll answer you! Assuming I'm streaming. Otherwise, messages might be answered if you put them into a comment on my YouTube.
Source: https://steamcommunity.com/sharedfiles/filedetails/?id=129721870
More Realm of the Mad God Exalt guilds
- All Guilds
- Como obtener objetos y fama (SPANISH)
- RotMG
- Character stats explained [outdated]
- How to not die in realm [OUTDATED]
- The Ideal Wizard
- How to not die in Realm Exalt
- How to Max a Character And Everything Else
- how to get good
- A comprehensive guide to almost everything RotMG
- RotMG: A guide for pot farming in the Godlands