Setting Up
Fairly self explanatory step - choose a mission and adjust your loadout depending on it. If you're playing with multiple people make sure you coordinate your kits according to the tactics and playstyle you'll be going with.
It is worth picking roles at this point as well. You'll need a squad lead, and depending on how many people you're playing with 1 or 2 breaching teams or "elements".
The squad lead will coordinate movement and call the shots, while the elements will carry out the breaching procedures. Decide who leads each element to avoid confusion - this way the squad lead won't have to address individual members of the squad, only element 1 or 2, red or blue, cobra or scorpion, whatever you want to call them.
Combat Basics
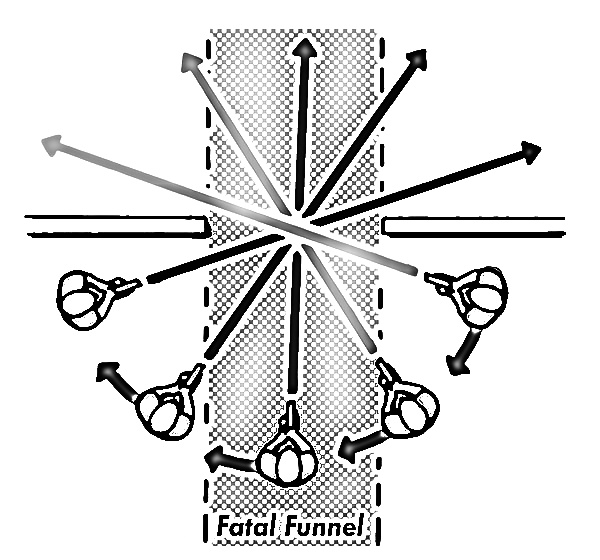
Be aware of your surroundings
Keep your head on a swivel, scan your environment and always be aware of threats and the position of your teammates. When you scan a room, first you're looking for immediate threats - such as people, armed or not. Second, you look for windows, doors, parts of the room obstructed from view, as these can be a source for new threats to pop up. Third, you look for evidence outlined in the mission brief. Make a mental map of the room you entered, remember any doors or openings and keep an eye on them at all times.
Be aware of your movement
Stick to walls when possible, as this not only decreases the angles you have to watch, but it also decreases the chances of walking in your squadmates line of fire. Proper movement maximises your squads ability to cover one another and decreases the chances of getting caught off guard.
Do not cross in front of open doors, hallways, etc. unless they have been cleared by your squadmates.When you reach an opening, stop and wait for your squadmates to catch up so you can breach the room and deal with any possible threats.
Weapon discipline
Keep your weapon semi auto - most suspects go down in two quick shots, this way you keep your accuracy as well. Avoid firing from behind your squadmates unless the situation demands it, avoid shooting through doors they are about to pass or go through.
Angles
This is what it's all down to. The above example shows how you would sweep a room from the outside before entering, or how you would get from one side to the other in case of an open doorway with possible threats on the other side. You have to get used to going around corners, sweeping rooms, etc in this fashion. Always keep your gun pointed to the area that is revealed as you are moving across so you can immediately react.
Tactics Basics
Stacking up
Upon reaching an unsecured door, the team stacks up on it in preparation for the breaching procedure. The order in which squad members stack up varies depending on the situation. In most cases it will be the breaching team on one side, the person handling the doorway on the other, while security will take up a position where it's necessary
Entering and clearing rooms
Above is an example of what entering and clearing should look like. This is the breaching element, there should be security outside the door they came from to cover the back.
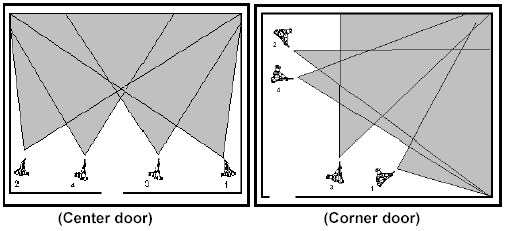
Clearing rooms - whether you're alone or with multiple people changes very little on how you carry out the actual clearing. In the case above we have 4 people breaching a single room which will rarely happen in Ready or Not, however it would look something like this step by step with the center door scenario:
#1 enters the room, clears the right corner, then moves towards it staying close to the wall while facing the center of the room - immediately after the pointman the second in line enters the room and goes the opposite direction, they quickly clear their corner then move to it while facing the middle of the room.
The graphic above shows a center door and a corner door scenario, take note of how squad members stay out of eachothers line of fire by staying aware of their position and movement. In this case #1 didn't move all the way down to the corner to avoid crossfire from #2.
Breaching procedure
We're going to go through a few examples with slightly different situations so you get the idea - afterwards variations should be self explanatory, work with what you find most comfortable. The most important thing is to go through the steps of breaching and make sure everyone knows what their task is and when to perform it.
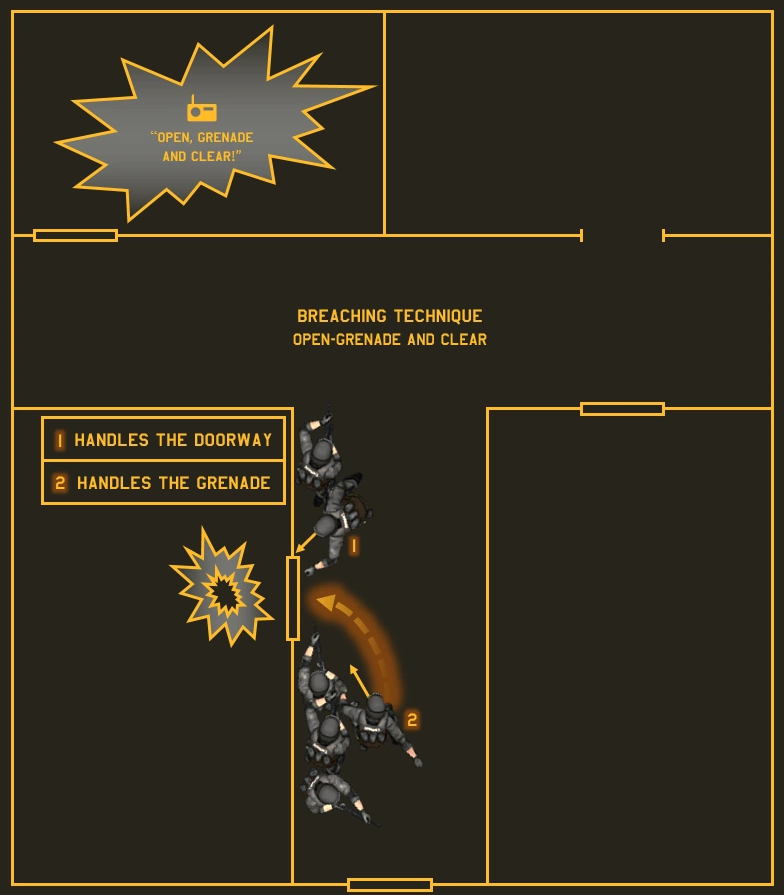
The above example shows a simple breaching procedure with a grenade. From top to bottom the roles are the following:
The person above #1 is providing security for the rest of the squad. He is facing down an unsecured hallway where threats can emerge from. The position or positions from which cover is provided depends on the layout and situation.
The person labeled #1 is going to open the door. Prior to opening the door the squad leader will clarify what is about to happen. For example: open door, throw flash, breach on explosion. Once the squadlead gave the order to go this person counts down from 3 and opens the door on 0.
The person labeled #2 will in this case have a grenade specified by the squadlead in their hand and stand ready for the door to be opened. Afterwards #2 will provide security outside the room.
The person next to #2 closest to the door is the pointman of the breaching team. Following the example above, once the door is opened, the flash went in and it exploded, the pointman goes into the room and starts moving towards one of the corners, hugging the wall next to the door, always facing the center of the room.
The person second from the door behind the pointman is usually the breaching team leader, who enters the room immediately after the pointman and goes the opposite way. He decided prior to breaching whether the pointman goes left or right so there's no confusion during breaching.
The last person in the line in this case is providing security from the rear, watching the door the squad entered through at the bottom of the picture. In this case this person can either turn around and join the breaching team once the procedure commences, in which case the person labeled #2 takes over the role of rear security, or they can simply stay outside and keep watching the rear.
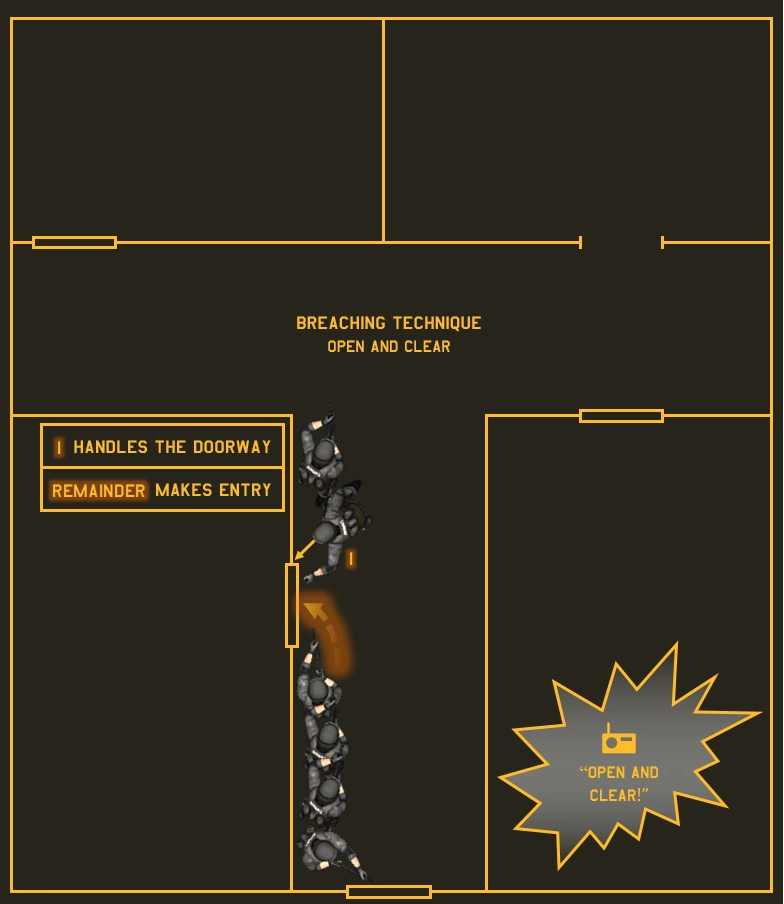
Some variations on this situation:
In the case above the order was to breach without using grenades, therefore the person previously labeled #2 takes up a position at the rear providing security. Everything else remains largely the same.
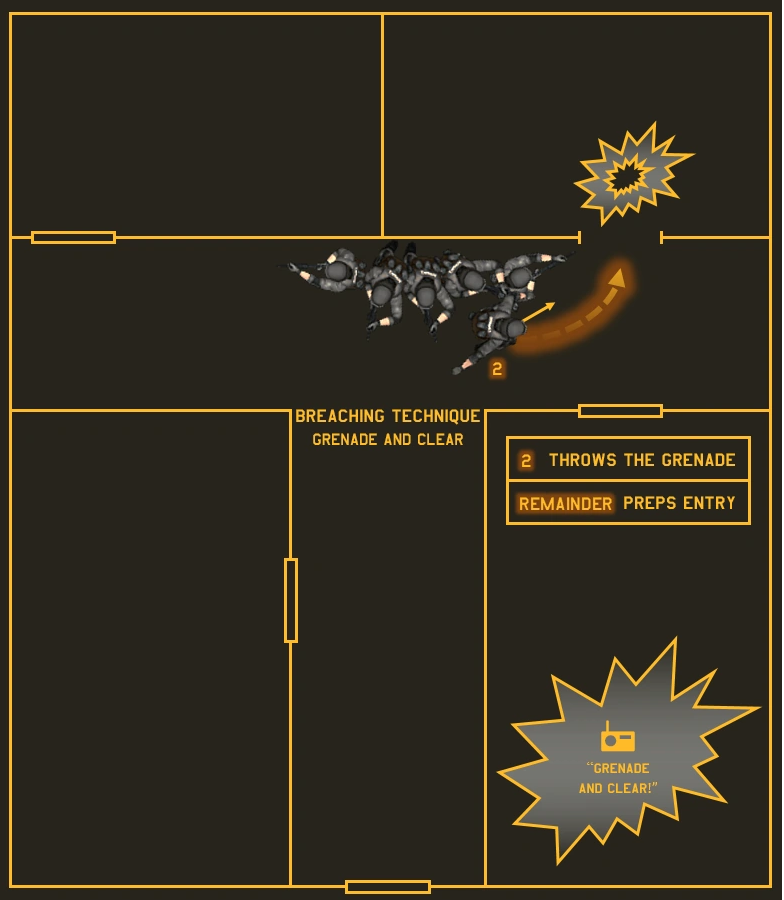
In this case we have an open doorway, note that the squad is all on one side to avoid crossing in front of the unsecured location. We have the breaching team stacked up next to the doorway, the person labeled #2 is in position to throw a grenade, while the rear provides security for the squad.
Source: https://steamcommunity.com/sharedfiles/filedetails/?id=2872852449
More Ready or Not guilds
- All Guilds
- How to check for traps
- How to stop resisting
- Nasl Tekme le Kap Alr
- The Logical Guide to Conquering Ready or Not
- How To Check For Explosive Traps
- JAK ZDOBY WSZYSTKIE OSIGNICIA
- Modding Guide: Ready Or Not
- How To 100% Achievements
- how to not get shot
- how to fire gun.
