Houses And Gangs Of Necromunda
There are technically seven criminal houses of Necromunda:
Currently playable:
House Escher
House Goliath
House Orlock
Not currently playable:
House Delaque
House Van Saar
House Cawdor
House Aranthus (Fallen House)
For more information on each house, check out this video where I provide a bit more around the lore and historical relationships between the houses!
Fighter Classes, Traits, Skills And More!
This section is all about fighters and how to gear and level them up!
Classes/Careers
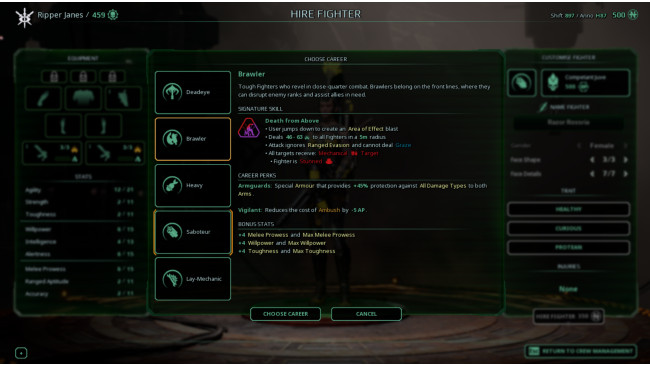
Brawler class is a melee combat focused expert.
Role: Melee-focused combatant
Default weapon: Massive axe
Signature Skill: Death from Above – 30 AP; jumps from an elevated height and crashes down on opponents; causes stun effect; can be a little wonky since the command might no longer be there on your next turn
Career Perk 1: Armguards – 45% protection against all damage to both arms
Career Perk 2: Vigilant – -5 AP cost for ambush (the melee-version of overwatch)
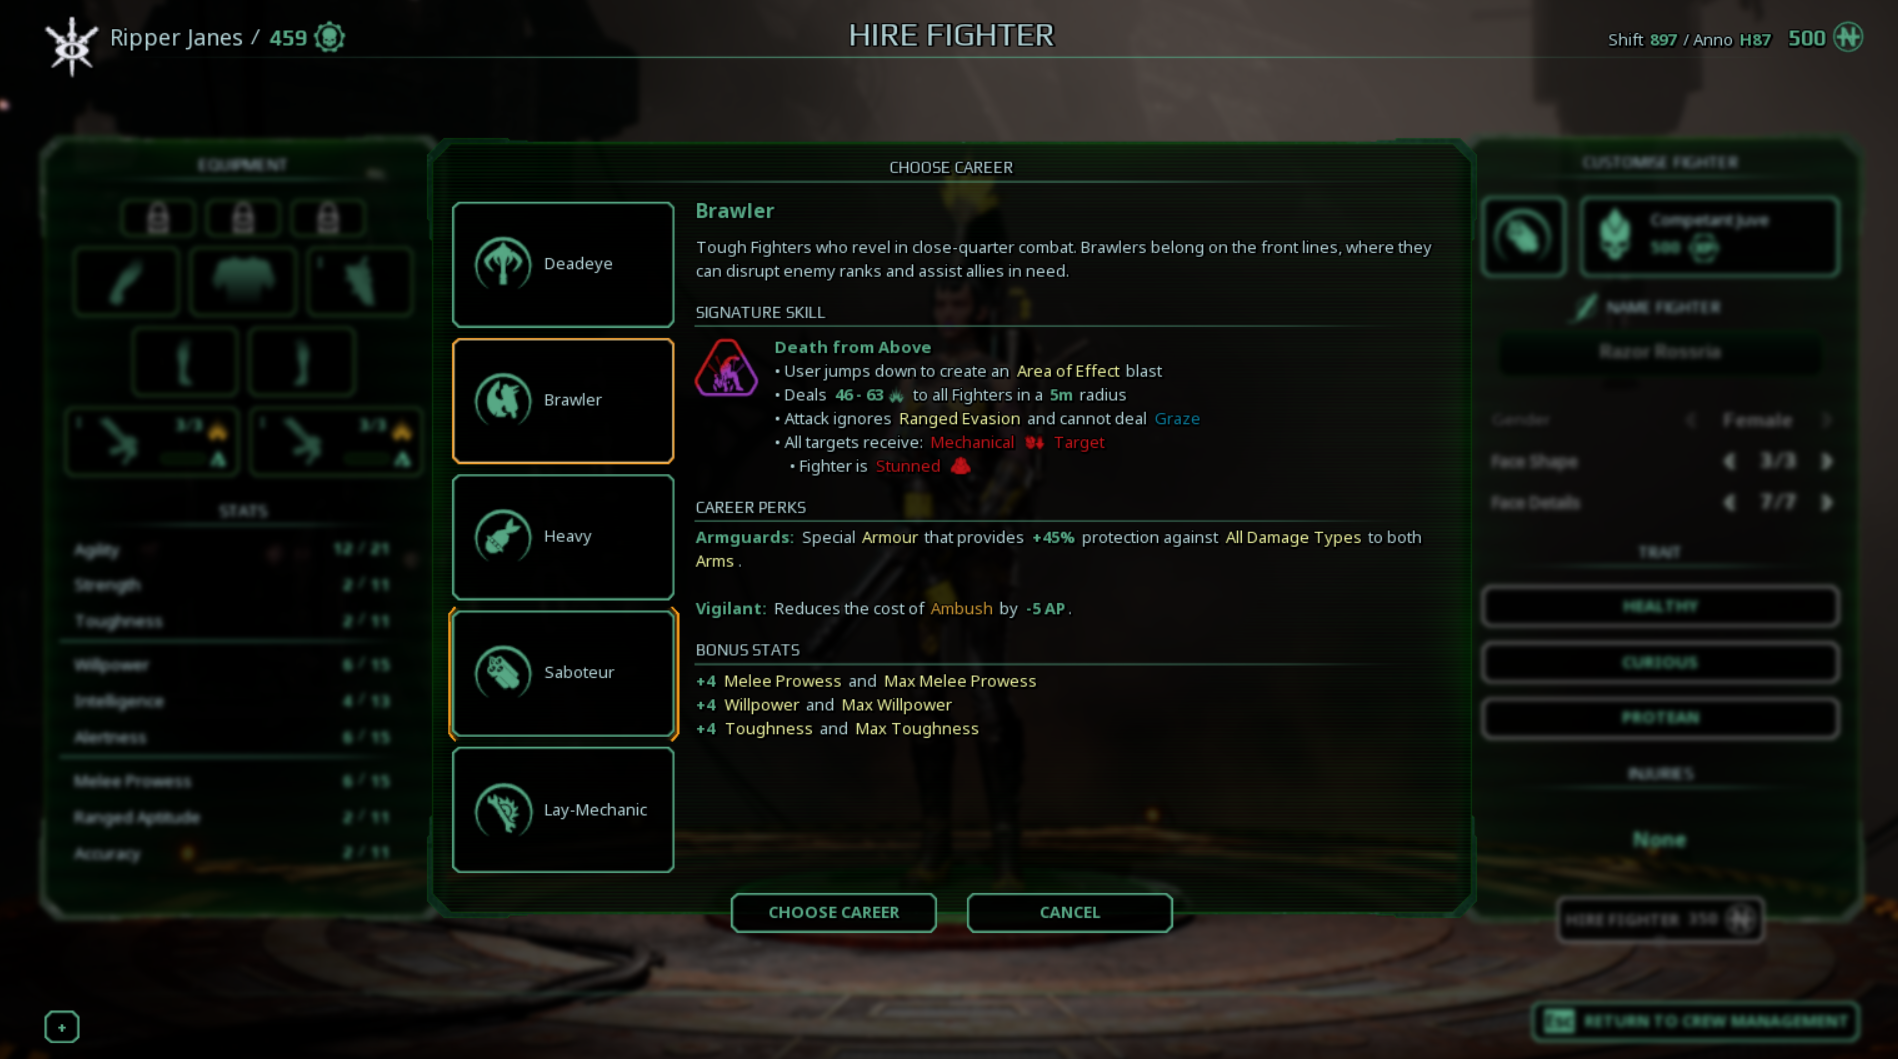
Deadeye class is a ranged focused class and plays the role of a sniper.
Role: Sniper
Default weapon: Lasgun
Signature Skill: Ascension – 15 AP; uses the grapnel to reach higher areas on the battlefield; does not trigger ambush or overwatch.
Career Skill 1: Grapnel Armor – +65% protection against all damage to the left arm.
Career Skill 2: Mono-sight: -5 AP cost for overwatch.
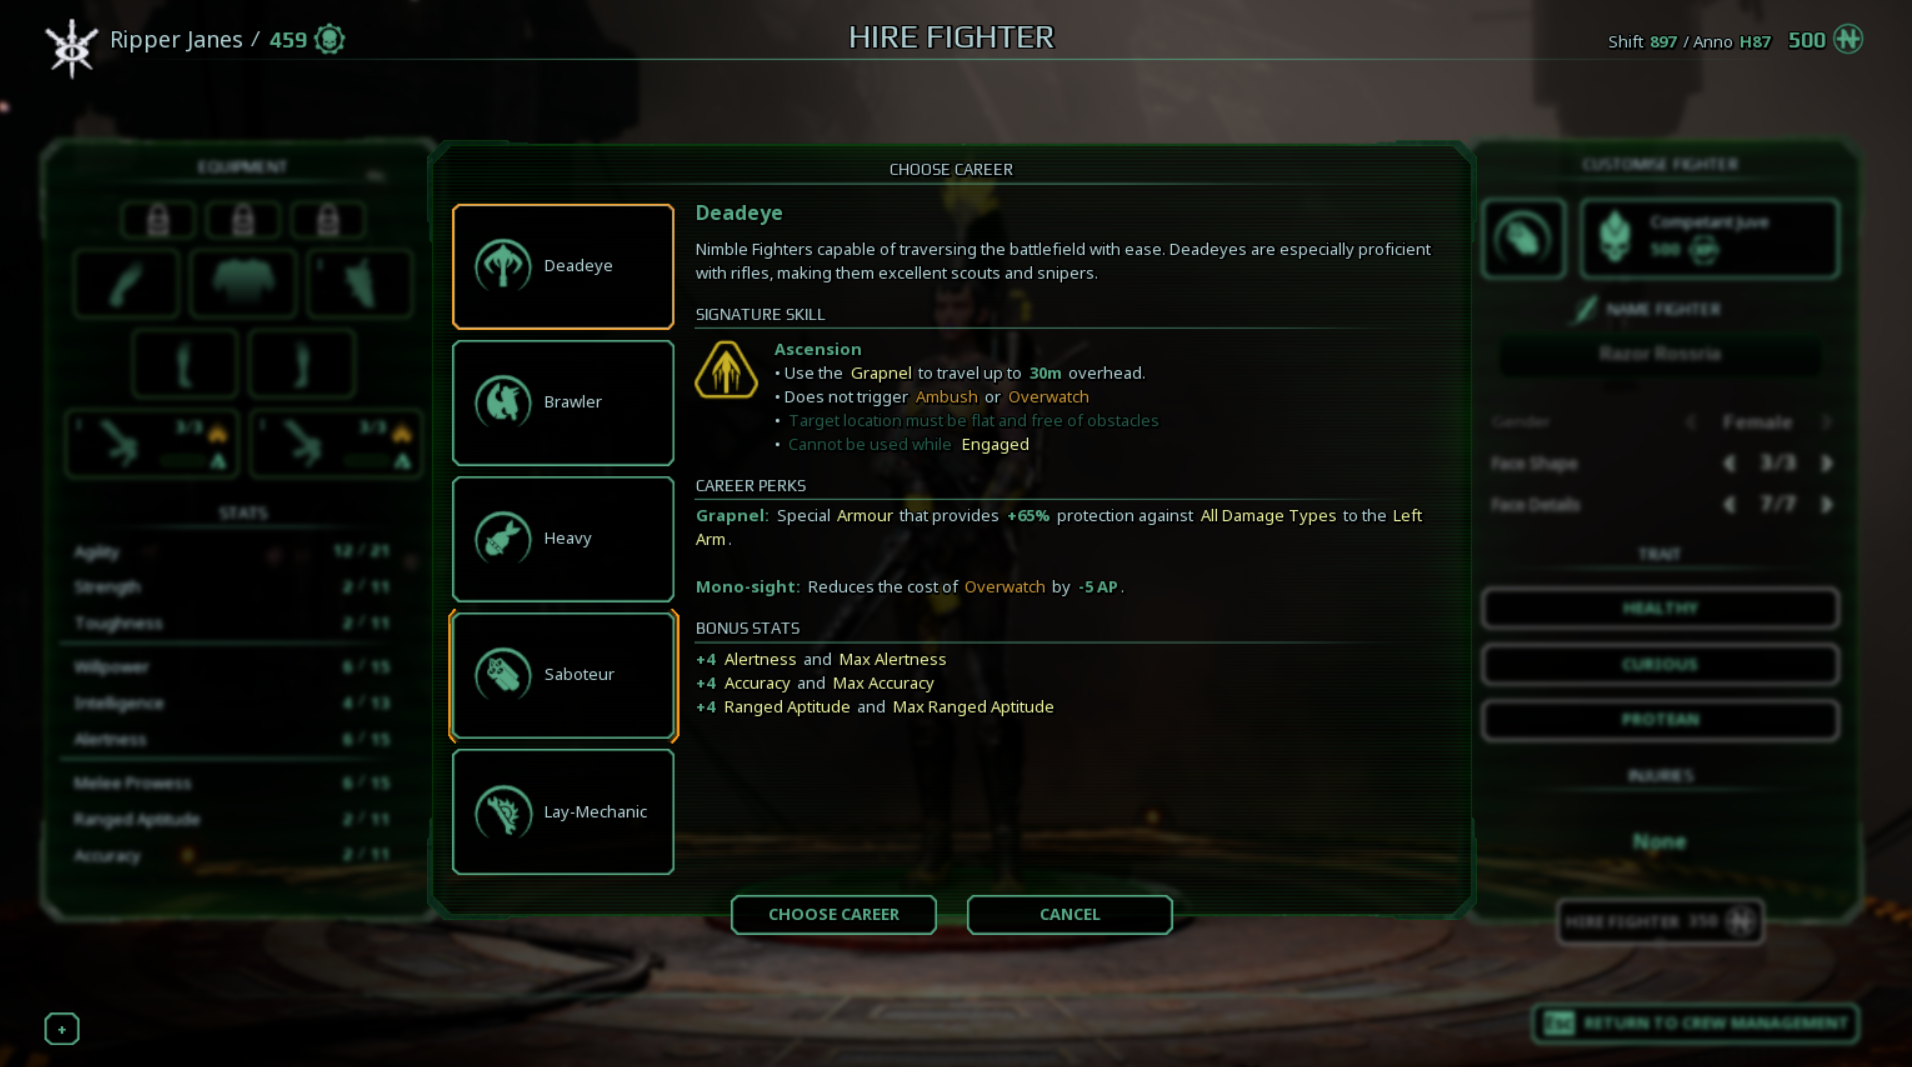
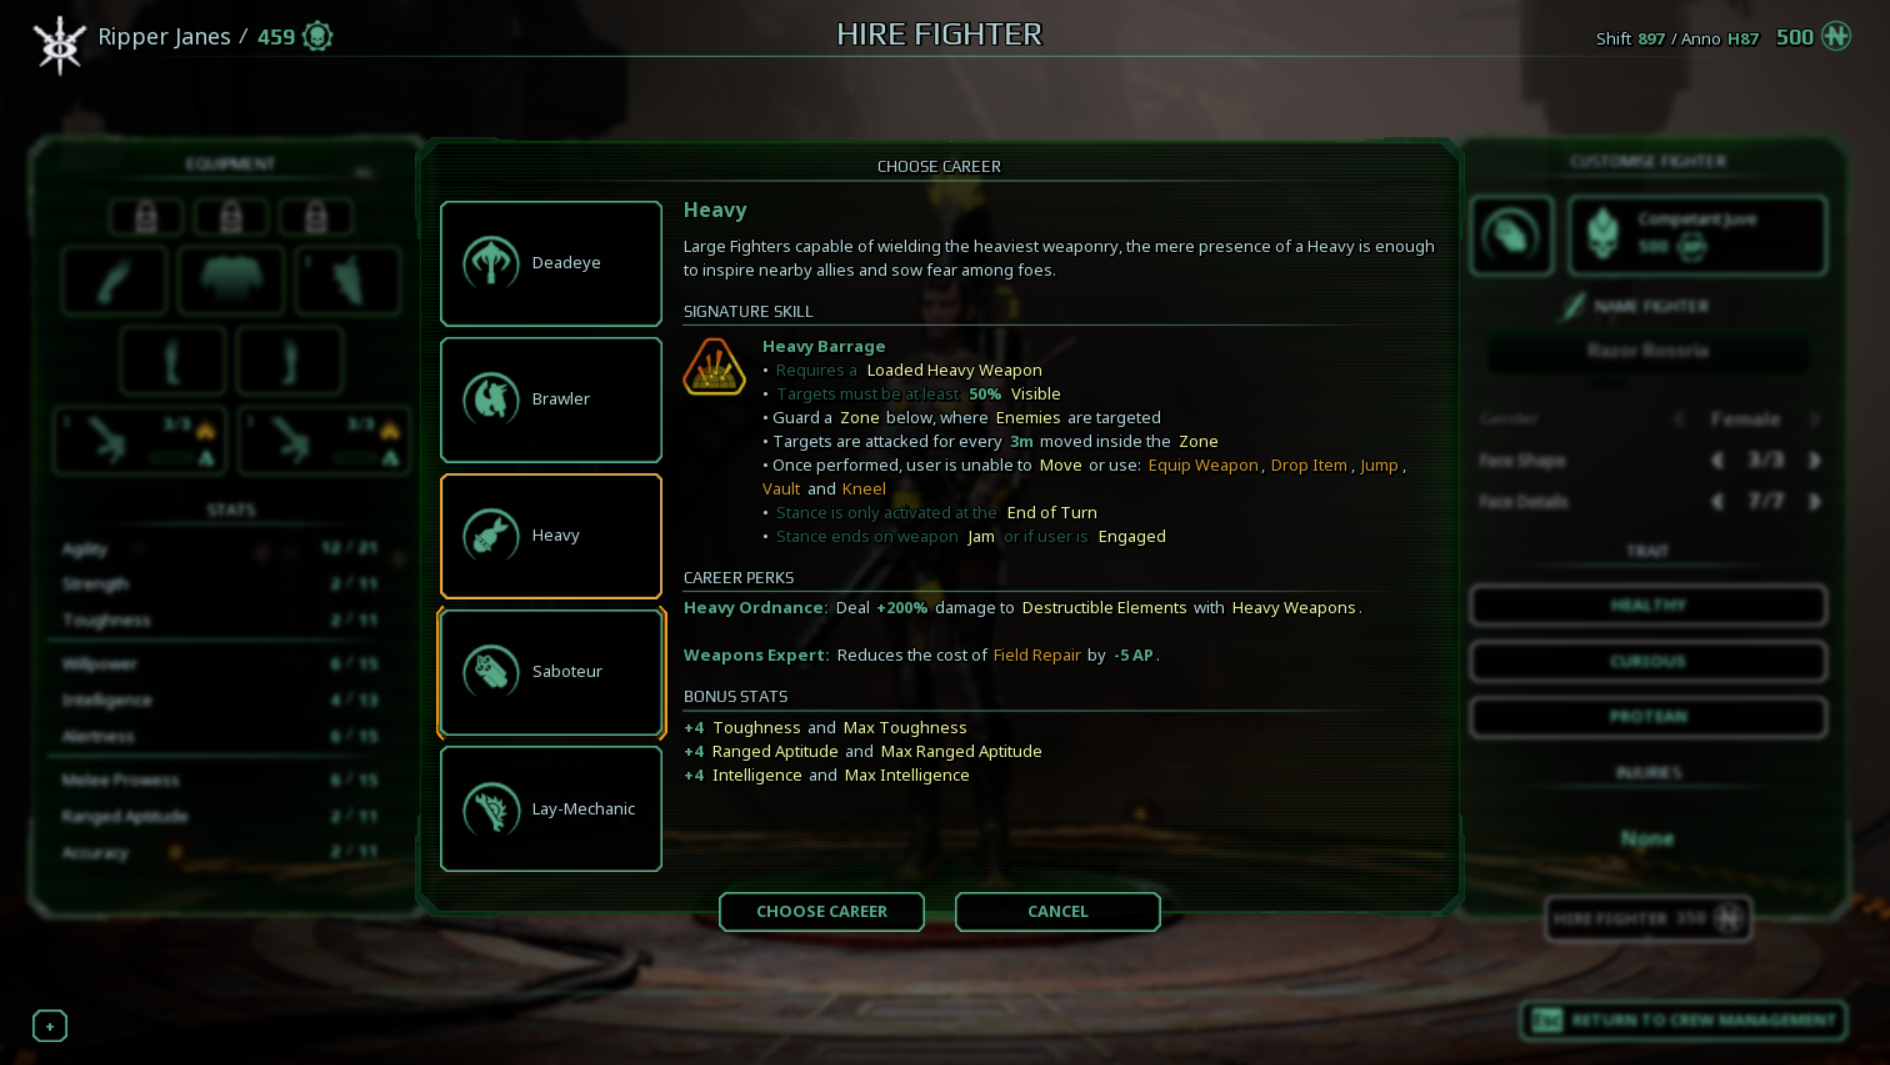
Heavy class is ranged fire support and can blow up barricades.
Role: Fire support and barricade destruction
Default weapon: Autocannon
Signature Skill: Heavy Barrage – 30 AP; an overwatch-type skill where you lay down fire on all enemies that move for three meters within the affected zone
Career Perk 1: Heavy Ordnance – +200% damage vs. destructible elements (i.e., barricades)
Career Perk 2: Weapons Expert – -5 AP cost for Field Repair (fixes jammed weapons)
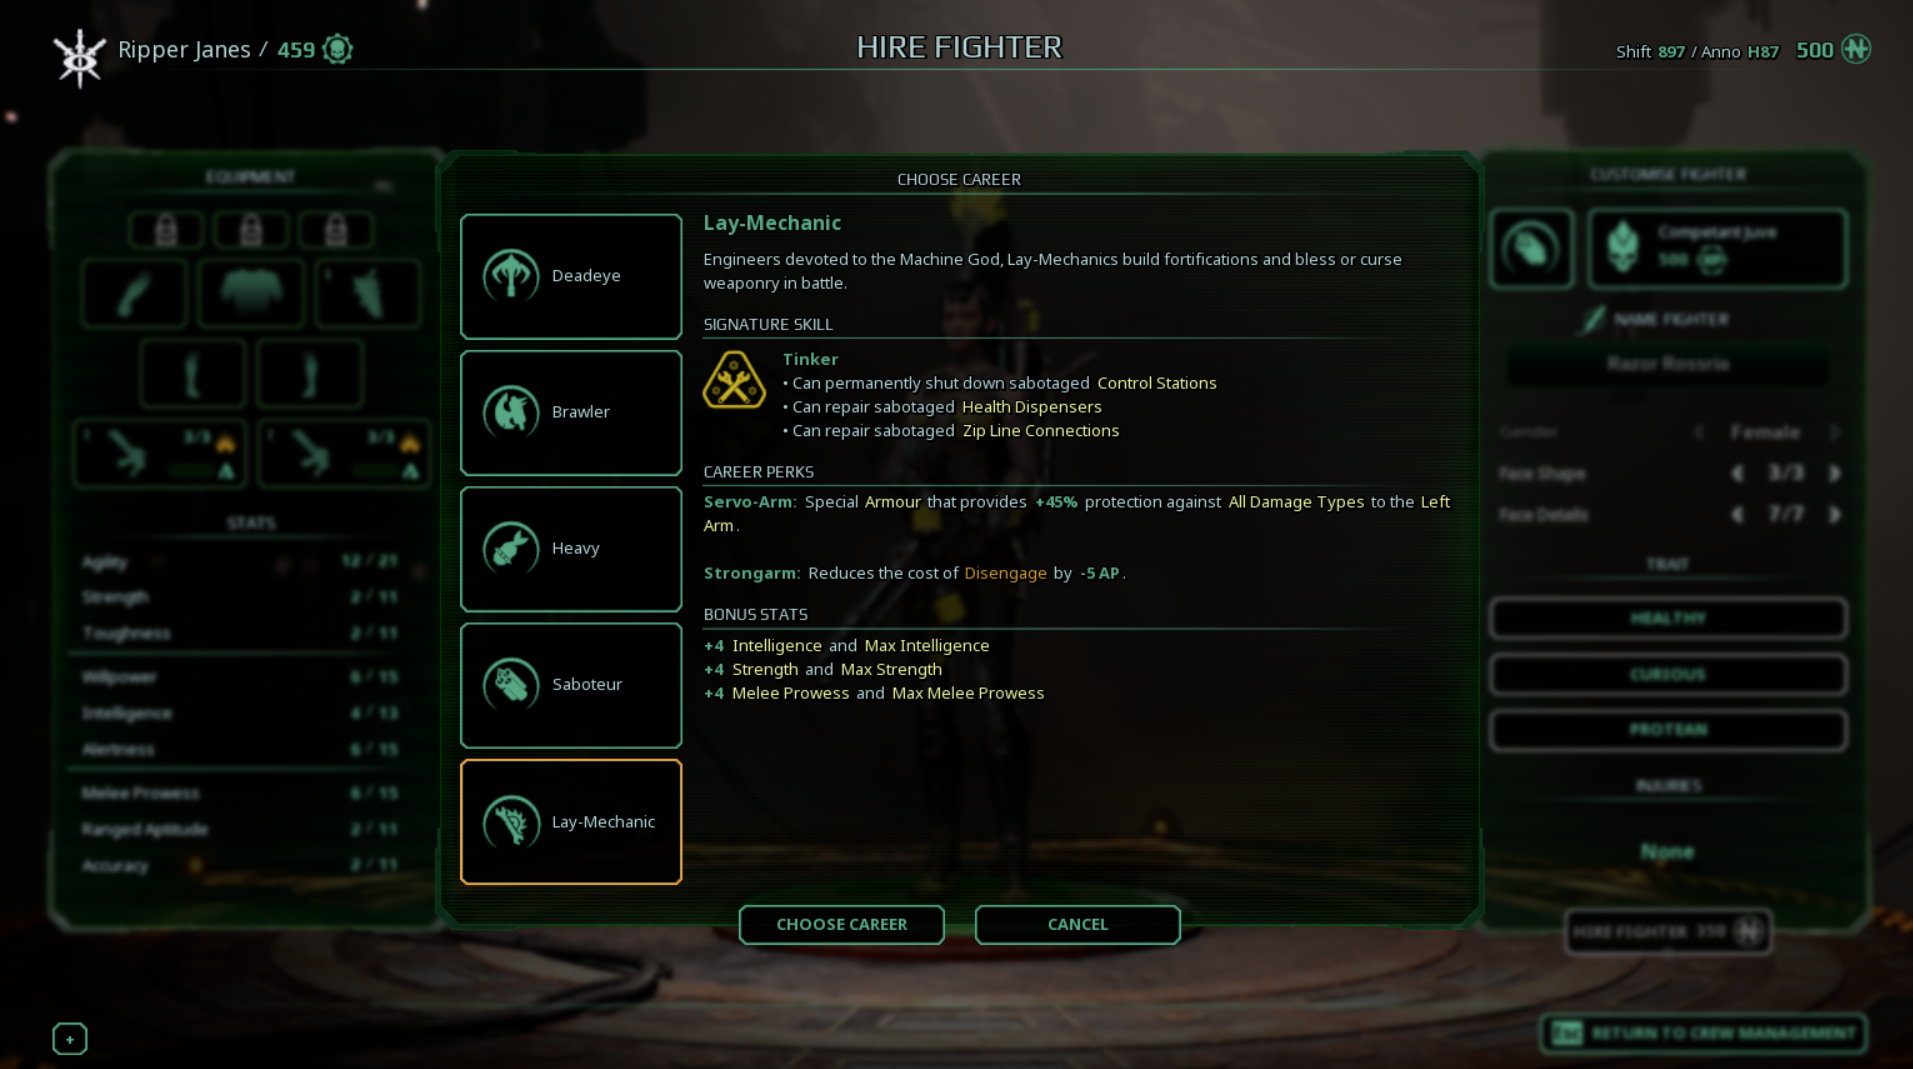
Lay-Mechanic class is a support and can construct barricades and other helpful items.
Role: Utility support and constructor
Default weapon: Rivet Cannon
Signature Skill: Tinker – 10 AP; repair health dispensers and ziplines; permanently shut down sabotaged control stations
Career Perk 1: Servo-Arm – +45% protection against all damage to the left arm
Career Perk 2: Strongarm – -5 AP cost for disengage
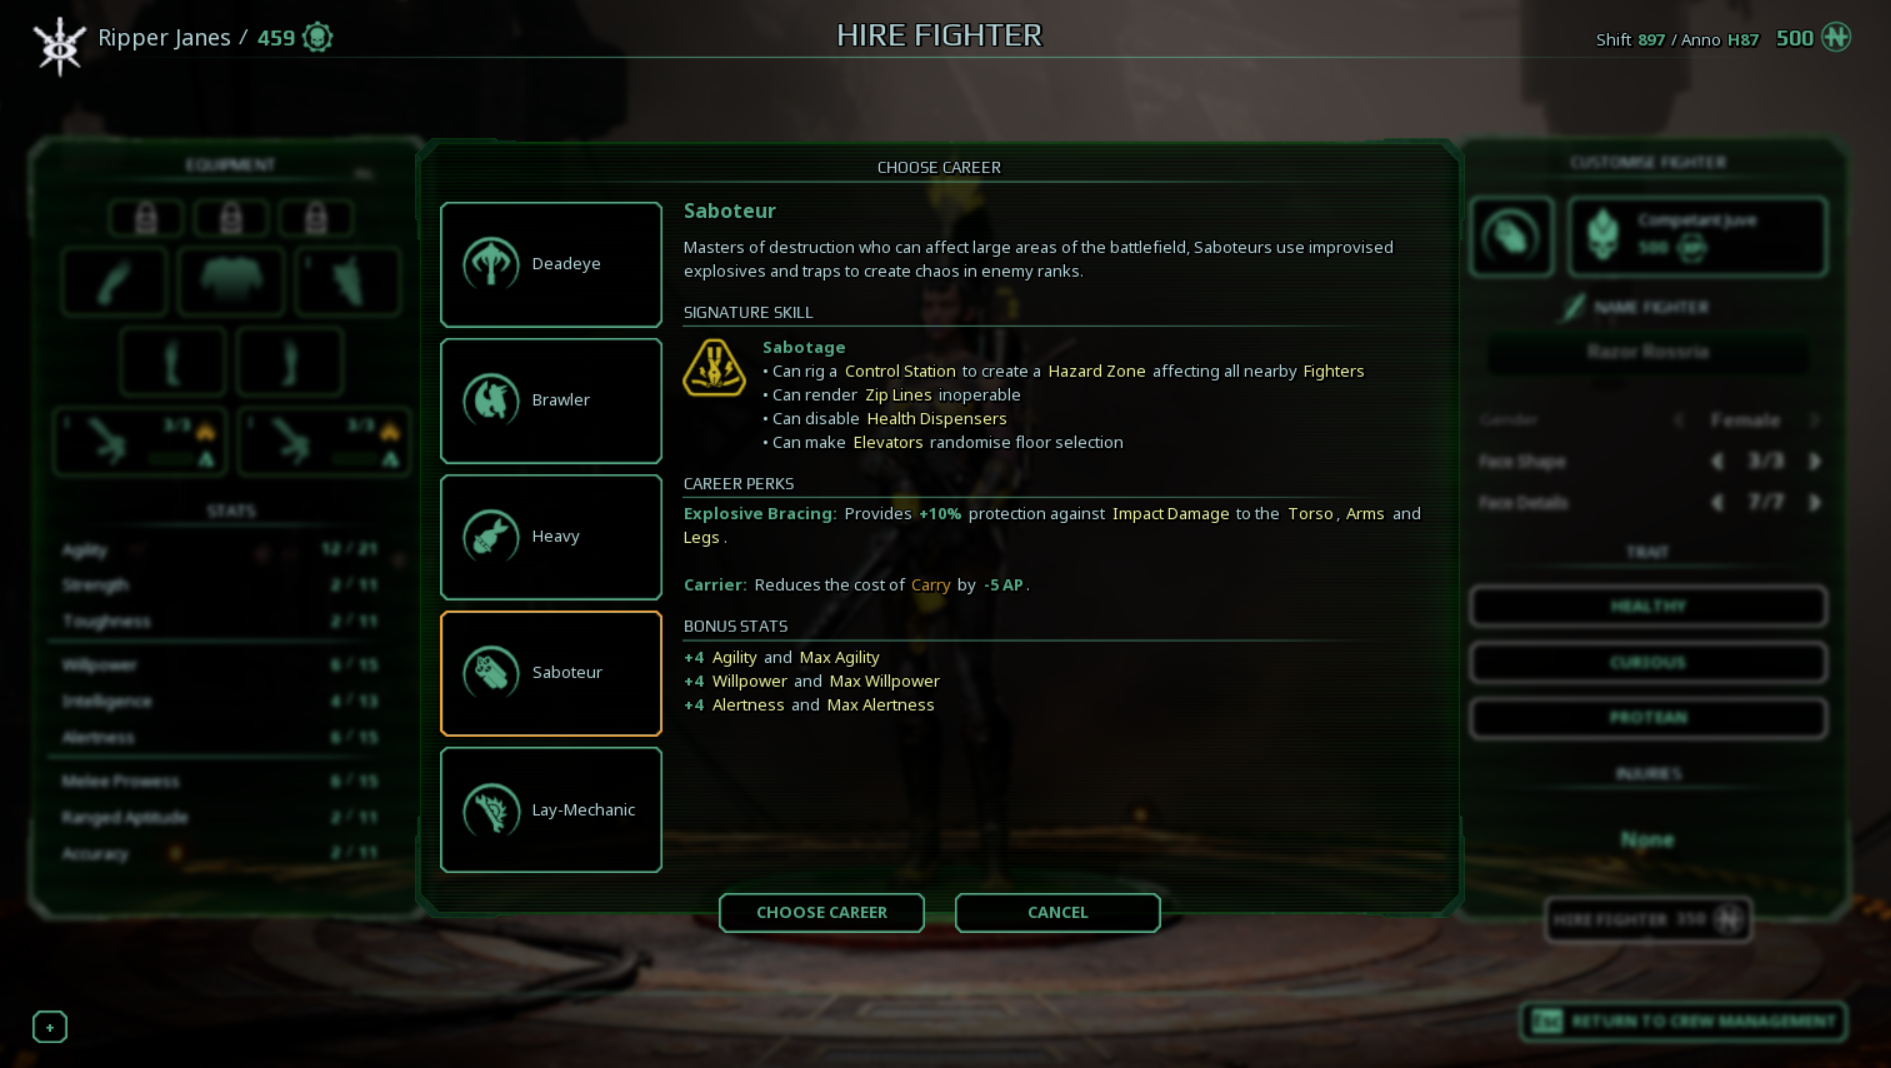
Saboteur class focuses on using flamers, laying traps and sabotaging ziplines and elevators.
Role: Sabotages environment and lays traps
Default weapon: Dual Flamers
Signature Skill: Sabotage – 10 AP; can disable ziplines and health dispensers; can rig a control station to create a hazard zone/trap
Career Perk 1: Explosive Bracing – +10% protection against impact damage to the torso, arms, and legs
Career Perk 2: Carrier – -5 AP cost for carrying objects
Traits
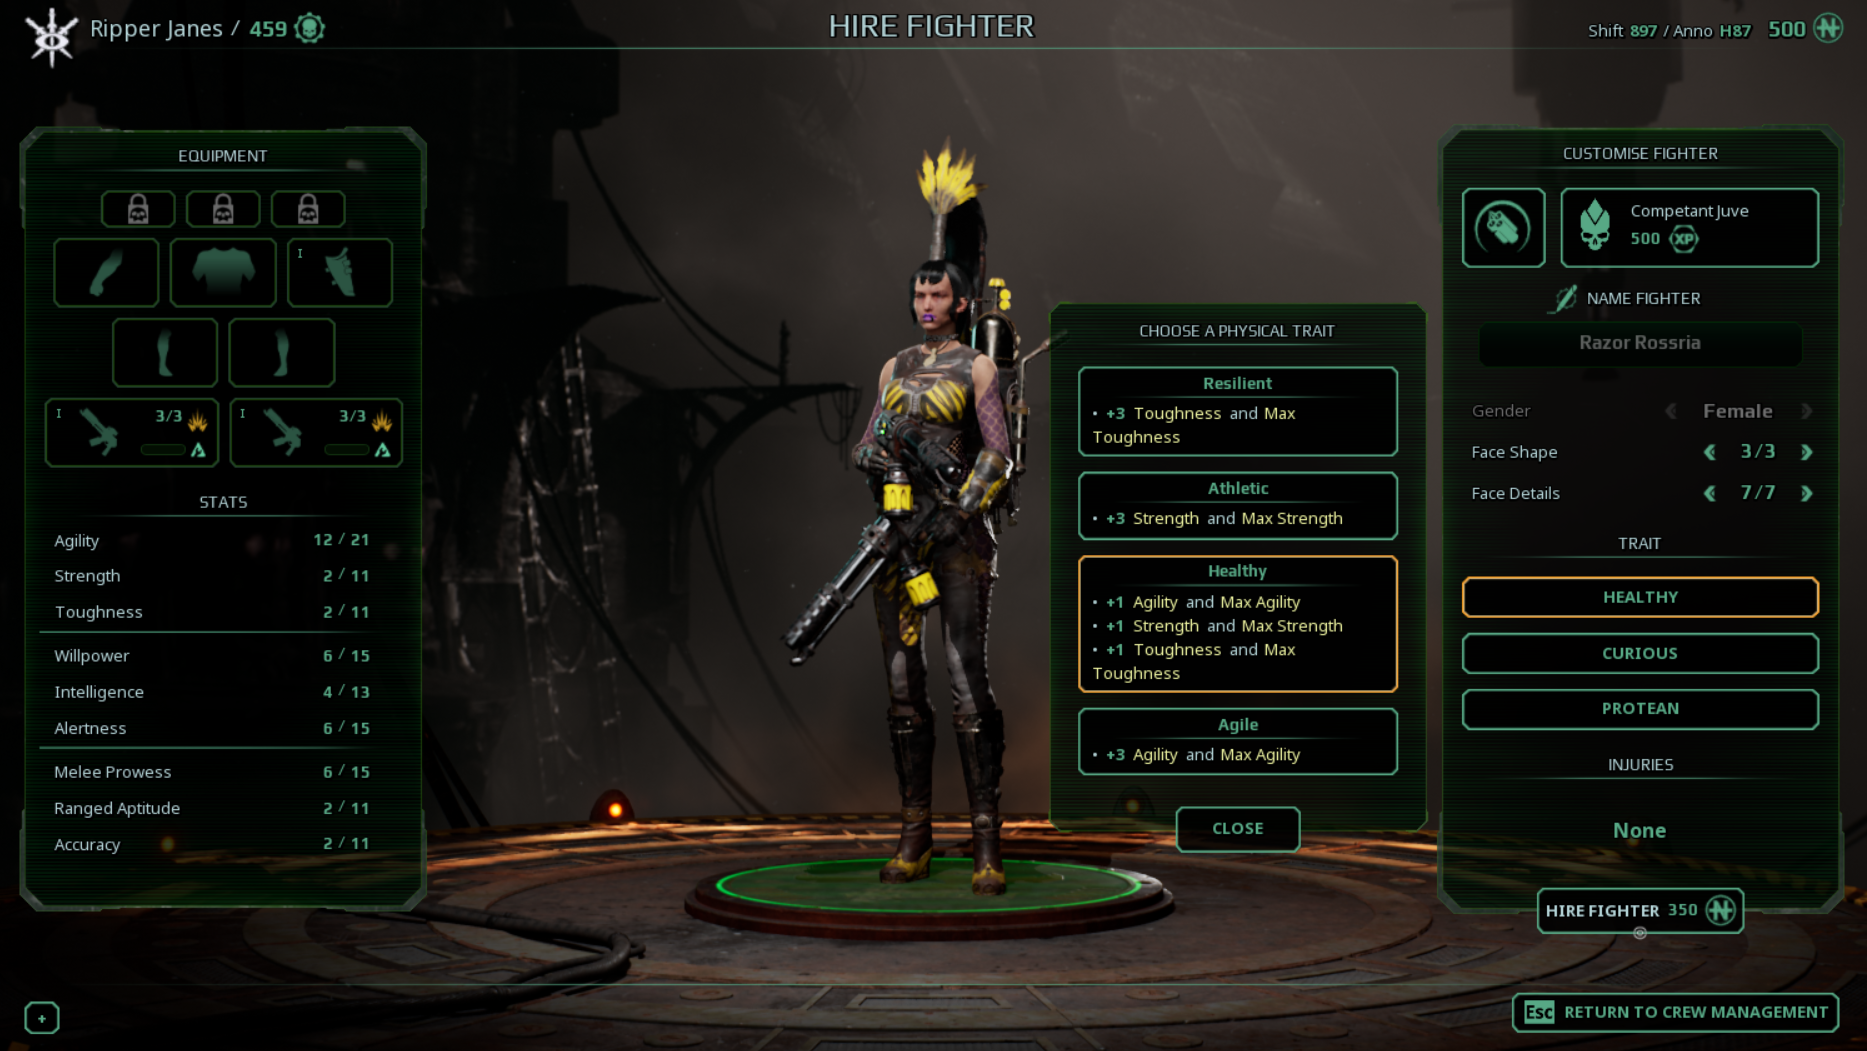
When you create a new fighter you can select traits from each major group.
There are three major groups: Physical, Mental, and Martial each has multiple options within them that will impact your fighter and ultimately your play style with that fighter.
Physical
A) Resilient provides +3 toughness/max toughness
B) Athletic provides +3 strength/max strength
C) Healthy provides +1 agility/max agility, +1 strength/max strength, and +1 toughness/max toughness
D) Agile provides +3 agility/max agility
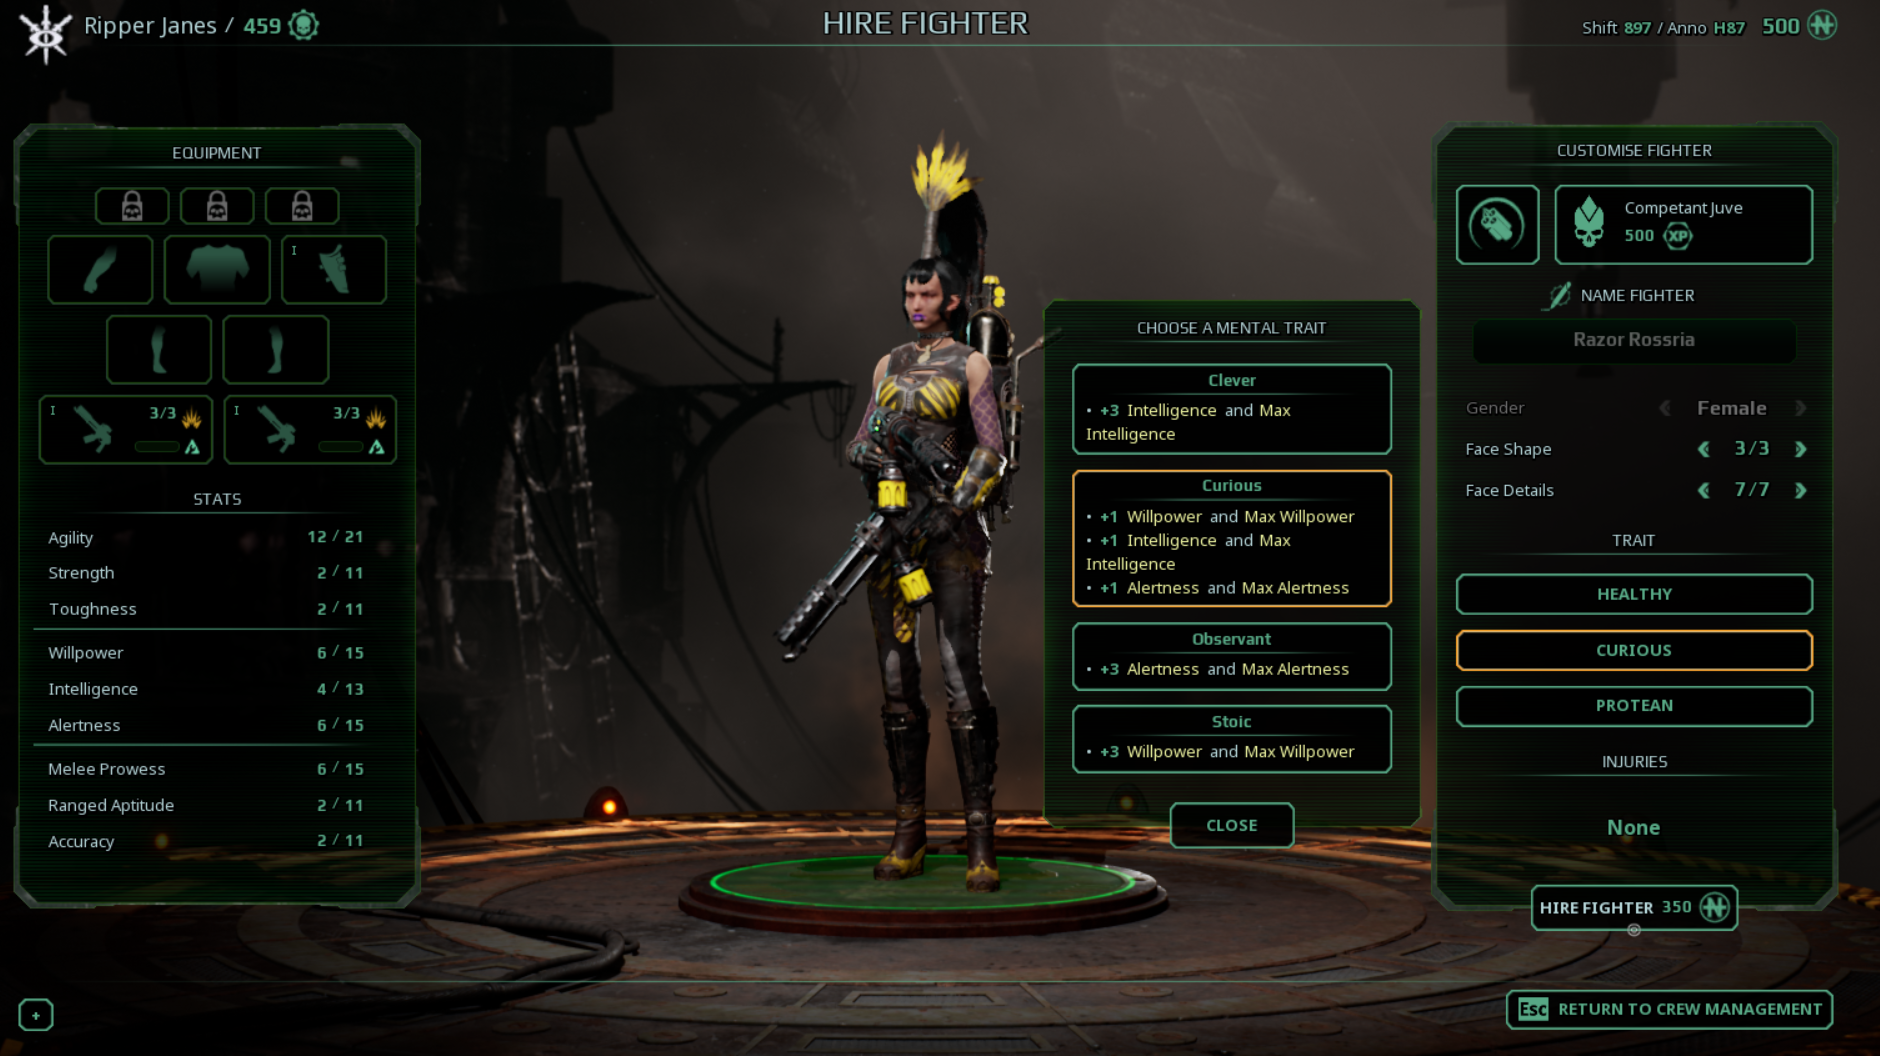
Mental
A) Clever provides +3 intelligence/max intelligence
B) Curious provides +1 willpower/max willpower, +1 intelligence/max intelligence, +1 alertness/max alertness
C) Observant provides +3 alertness/max alertness
D) Stoic provides +3 willpower/max willpower
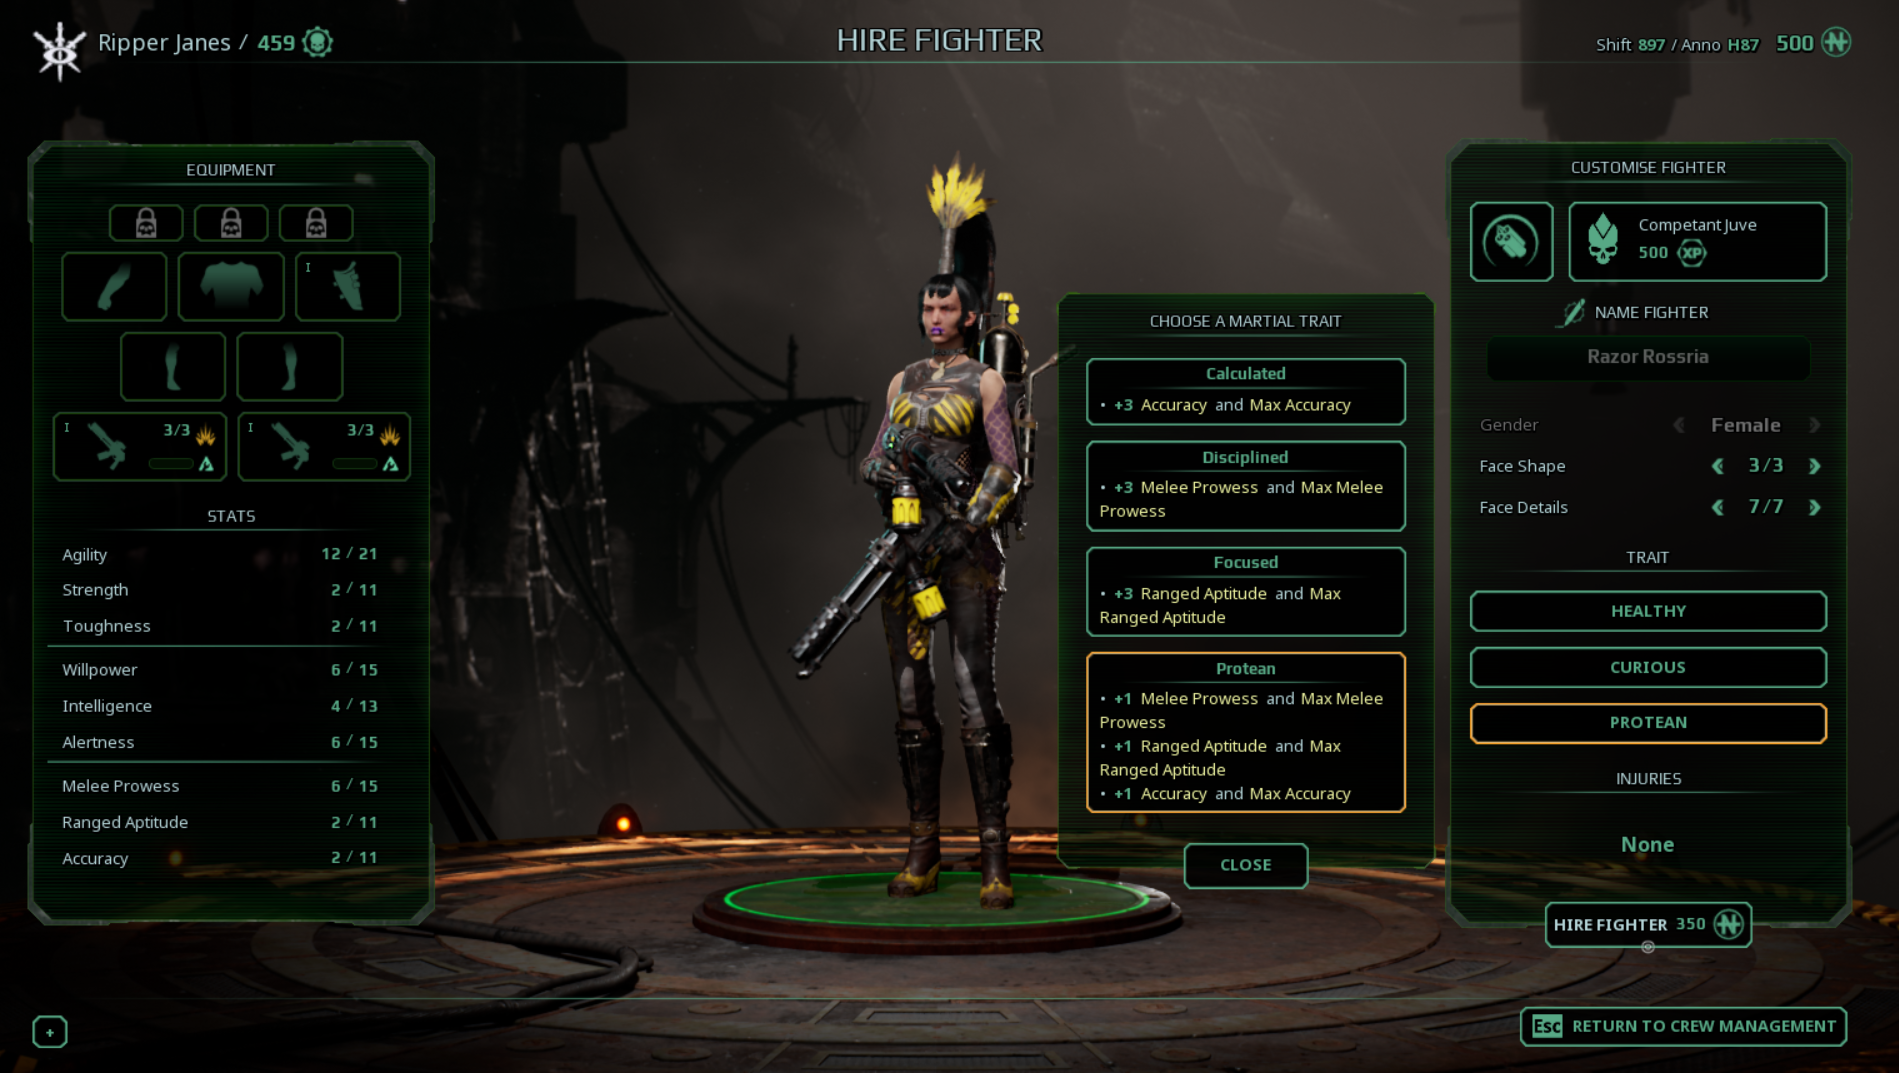
Martial
A) Calculated provides +3 accuracy/max accuracy
B) Disciplined provides +3 melee prowess/max melee prowess
C) Focused provides +3 ranged aptitude/max ranged aptitude
D) Protean provides +1 melee prowess/max melee prowess, +1 ranged aptitude/max ranged aptitude, +1 accuracy/max accuracy
As you can see each trait helps focus the fighter in different directions. For example, if you choose the Brawler class you'll want to focus on melee combat and select athletic or resilient and observant and disciplined. Alternatively, if you select Deadeye you'll want to focus on ranged combat and pick agile or resilient and clever and focused.
Best Deadeye Builds [Sniper Style]
This section is devoted to the Deadeye class and will outline my views on how to optimize your builds focusing on sniping!
Prioritized Stats:
Ranged Aptitude: is one of your priority stats and reduces the chance of inflicting a grazing hit (reduced damaged hit) and reduces the enemies ranged evasion. This is a bread and butter stat you want to maximize early on to ensure your hits land and do damange.
Accuracy : this stat increases your chance to land a critical hit
Altertness : this stat increases your initiative and chance of only receiving a grazing hit
Agility: this stat increases your melee and range evasion
Intelligence: this stat increases penetration of armor and amount of xp you receive each mission
Toughness: this stat determines how much healing you receive
Role: Sniper
Signature Skill: Ascension: 15 AP; uses the grapnel to reach higher areas on the battlefield; does not trigger ambush or overwatch.
Career Skill 1: Grapnel Armor – +65% protection against all damage to the left arm.
Career Skill 2: Mono-sight: -5 AP cost for overwatch.
Best Brawler Build [Melee Beasts]
This section is devoted to Brawlers!
Best Heavy Build [Ranged Style]
This section covers best in class stats, traits and skills for the Heavy career fighters!
Story Line Campaign
I highly recommend you start your Necromunda experience by playing through the story line campaign which will teach you the basics. The story is written by a gaming and Warhammer author, Andy Chambers and follows three gang leaders from each respective house available to play at launch.
WARNING: The following includes SPOILERS to the main story line!
Chapter 1 Hive Quake
In the first mission, we take control of two Escher fighters, Kyra (Saboteur) and Vex (Heavy) who are on their way to meet their gang leader Tessera (Deadeye). This mission shows us the introductory controls and movement and allows us to get our hands dirty by taking on two enemies.
Chapter 2 The Secret
In the second mission, Tessera and her gang are ambushed by Orlocks for some unknown reason. This mission allows us to take on the maximum of 5 gangers with different classes and a few new abilities. Be sure to use your Grapnel skill on Tessera to hook up to the enemies!
Chapter 3 A Dependable Agent
In the third mission we need to fortify our position against incoming Goliath gangers and lay traps and fortifications. Once we clear out the Goliath, we're able to meet with DeVos who can guide us into the Underhive towards ArcheoTech, very valuable technology.
Chapter 4 Rowdy Bois
The fourth mission allows us to take control of a Goliath gang where we attack the Escher taking our revenge. In the attack we find DeVos who tells of of Tess's plan and provides us info on a way to catch up to her.
Chapter 5 All Aboard
The only way to catch up to Tess and her Escher is to take a train straight into the depths of the Underhive. To do so, we have to prove our worth in the Arena!
Chapter 6 Into the Fire
The sixth mission we're back to playing as the Tess and her Escher and take on two rival gangs in order to establish a new Hideout in the Underhive.
Chapter 7 Black Ash
In the seventh chapter we play as the Orlocks with Flynt as their leader. He's hot on Tess's trail and is forced to play DeVos's game to learn where Tess is headed.
Chapter 8 Hot Rod
In the eight mission DeVos refuses to tell us where Tess is headed unless we steal several fuel rods for DeVos. We steal those rods but learn where Tess is heading... and how to get there in the process!
Chapter 9 Settle Down
In the ninth mission we play as Blutvor and need to secure a hideout to centralize our operations! Tough mission but have to leverage the high ground with our Deadeye and eliminate the enemy. Don't forget to use your melta grenades on the barricades!
Chapter 10 Through the Ruins
In the tenth mission we play as Flynt's Orlocks and decide to blow up an enemy base. Tough mission but focus on taking out enemies but wait to kill both leaders as reinforcements start pouring in once both are down!
Chapter 11 Flora
In the eleventh mission we play as the Tessera's Banecats heading to the Arboretum to salvage important resources for medicae and poison bombs!
Chapter 12 The Calvary
In the twelfth episode we combine forces as three gangs to free the Rowdy Bois and gain valuable Intel on Grand Dog and his army.
Chapter 13 The Great Collapse
In the thirteenth chapter we lead a team from a mix of each gang to blow up a key rail station to slow down Grand Dog from bringing reinforcements before we assault the Archeotech!
Chapter 14 Unlikely Alliance
In Unlikely Alliance we team up and lead the three gang leaders on an assault against Grand Dog's fighters protecting the Archeotech. Things get tricky as they sabotaged the area around the Archeotech forcing us to track down the fighter's leaders and obtain codes to shut down the traps!
Chapter 15 The Archeotech
In the final chapter of the main story line we access the Archeotech right as Grand Dog arrives with reinforcements. With little time and no options, we lock ourselves inside the Archeotech vault but not before Grand Dog and his best fighters make it in...
Shadow Knights [Orlock Sniper Elite Gang]
This section is devoted to the Shadow Knights, an Orlock sniper/ranged focus gang that will be taking on the Underhive.
We'll be starting with normal operations and working our way up to Brutal and Deadly operations. After that, we'll take our gang online to compete against other human players!
Rise of the Shadow Knights (Normal Sector)
Shadow Knights Win the Day!
Assaulting the Brass Knuckles Hideout!
Dominating our Sector!
Taking out the Enemy Base!
Taking on Two Superior Gangs in the Arboretum!
Source: https://steamcommunity.com/sharedfiles/filedetails/?id=2222925491
More Necromunda Underhive Wars guilds
- All Guilds
- Get rid of logo screens for quicker startup
- Virtues, Vices, and Talents
- Necromunda Underhive Wars Guide 8
- Dbuter et comprendre Necromunda
- Arming and Equipping Your Gang the Yippeecayyeah Way
- Necromunda: Underhive Wars - How to Restart a Mission (in Operations)
- Necromunda: Underhive Wars - Guide to Goliath Builds
- Necromunda: Underhive Wars - Arming and Equipping Your Gang
- Necromunda: Underhive Wars - Pit Fight Tips (Chapter 5)