Joystick Installation

If you have already used your joystick in other games, then you can probably skip this section, as here I'm assuming you've just bought a joystick or hotas, and have just pulled it out of the box.
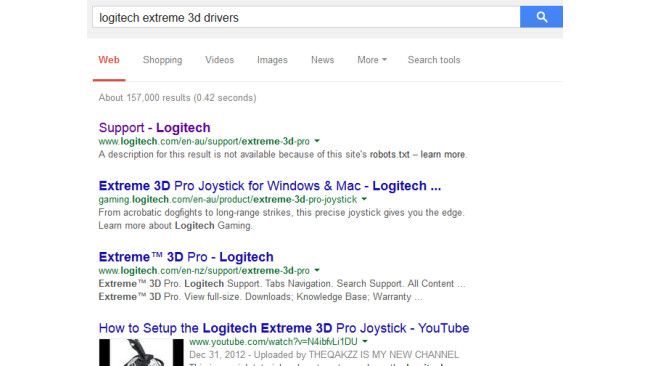
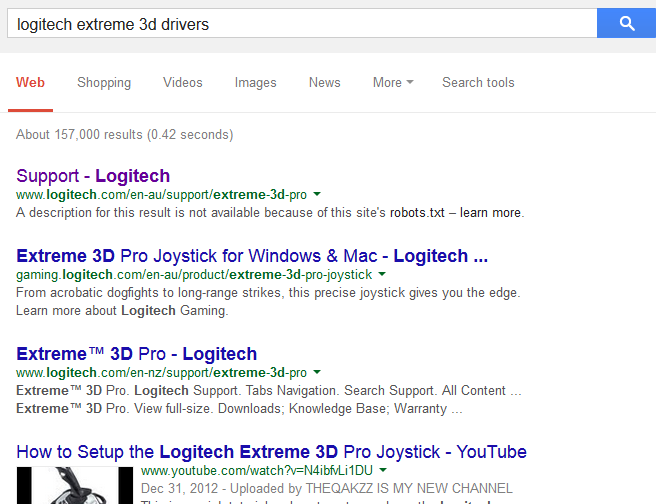
The first thing we need to do is install the software drivers that comes with the joystick. You usually don't need the programming software but it won't hurt to install either. Generally the drivers will suffice.
I like to go online and download the latest versions, however if that's not possible the ones that come on the CD should be fine.
Install the drivers, and any other software that you like (they are sometimes bundled together, so you sometimes have to install both anyway, no biggie). If it wants you to reboot, then reboot.
Once all that is done, you can plug your joystick in into a spare USB port and you should notice a little popup bubble and a positive dingdong sound to tell you it's detected the joystick.
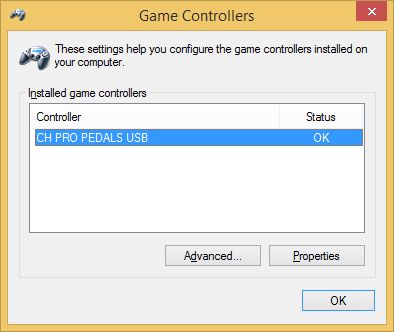
Now, either in the start menu, metro search (Windows key + S) search for "game controllers", and first result should be listed as Set up USB Game Controllers. You can also access this through Devices and Printers.
We want to make sure we can see that our joystick is listed here.
If you cannot see a joystick listed here, then something is wrong, try a different USB port, make sure you installed the software for your version of Windows (e.g. Windows 8.1 64bit drivers) try a different computer, try a different joystick etc Generally I use a process of elimination, is it my computer, is the usb ports, is it windows, is the the joystick, is it the joystick software etc.The troubleshooting is a bit out of scope here, and you are best off looking on the forums of the manufacturer's website or contacting their tech support. But unless something is faulty, installation should be an easy and smooth experience.
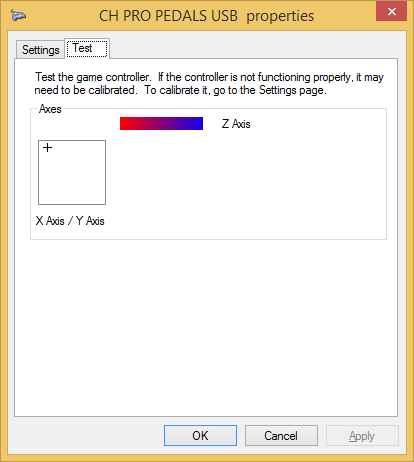
If your joystick is listed in the USB Game Controllers window, then highlight it, and select Properties. Then select the Test tab, and have a play with the buttons, move the joystick around just to see if things are reacting in the test window.
If all looks OK here, then we are ready to go into DCS World.
DCS Options
Now we need to access the controls set up page in DCS, and then select the aircraft we would like to configure.
First of all make sure your joystick is plugged in before you start up DCS World. (otherwise the joystick will not show up in the options menu).
Start DCS World Single Player
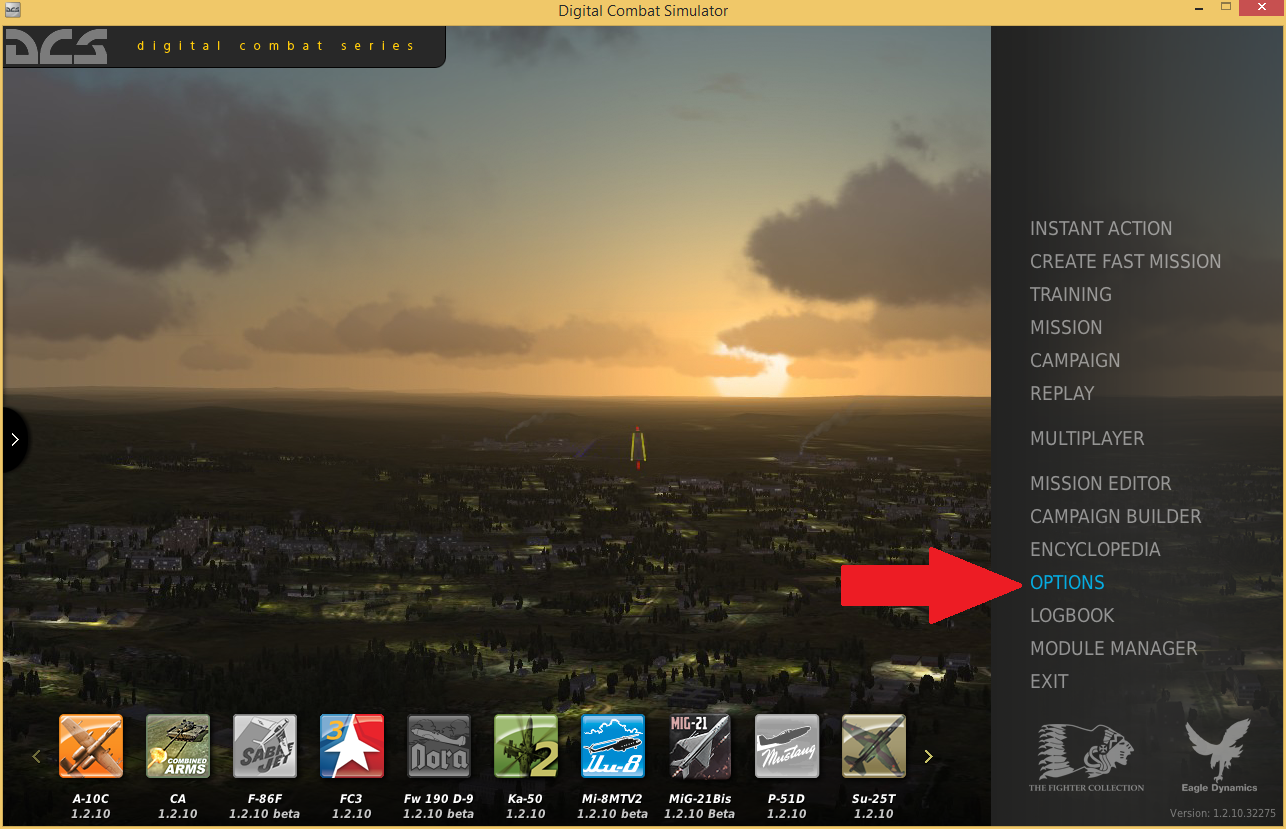
From the Main Menu, click on Options
In the options menu click the Controls tab.
Use the first box of the Layer drop down menu to select the aircraft you want to configure. (I'm using the Su-25T Frogfoot)
Using the second box in the Layer we are able to filter what types of controls we want to see (as there can be hundreds which we have no interest in)
Axis Commands
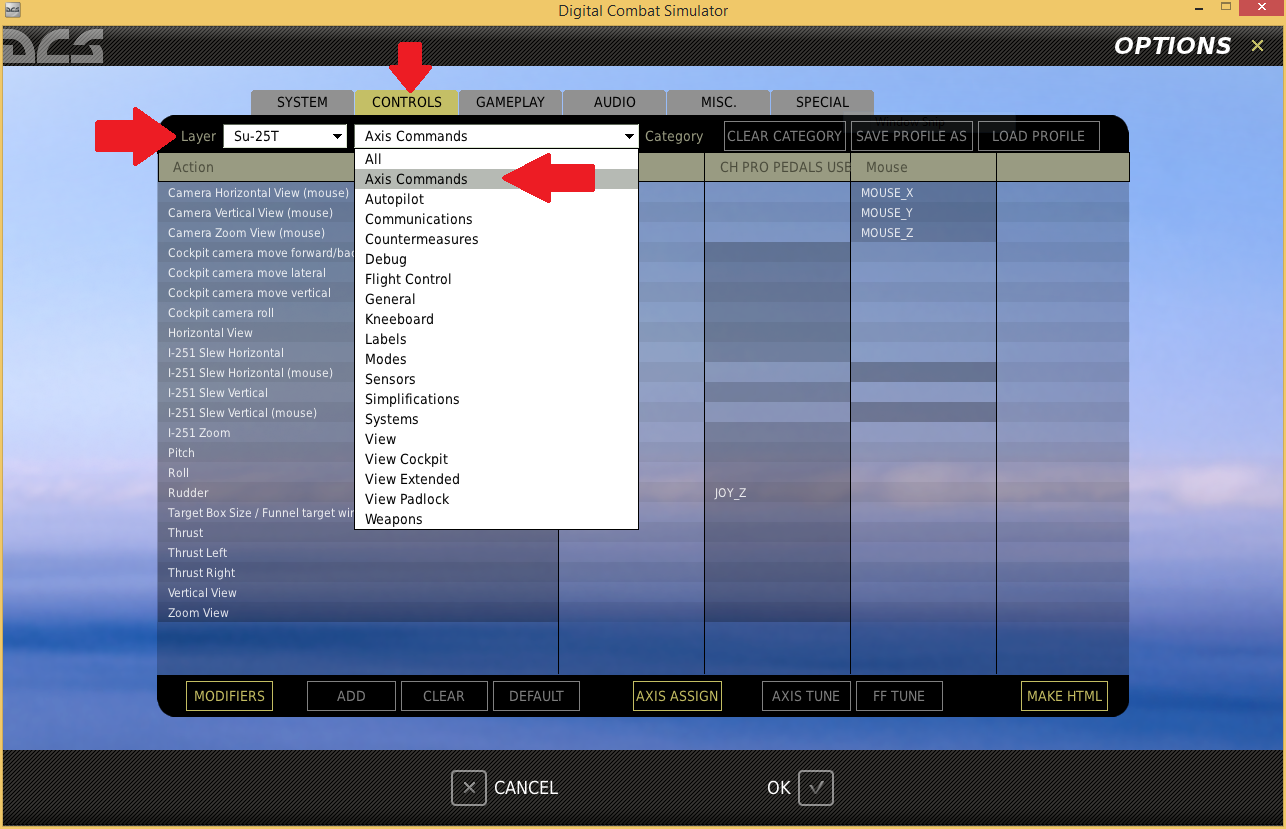
On the second Layer drop down box, select Axis Commands.
This area will allow us to configure the joystick analog axis, such as pitch and roll.
The left most column, is titled Actions, this corresponds to what happens in DCS when we press a a button or move the stick as listed in the other columns, on the same row. Which is very handy, since this allow us to have many joysticks assigned to do the same functions if we want. It also means that we can leave the keyboard and mouse control as they are, which comes in handy as a back up (occasionally it is easier to press a keyboard button with one hand if your flying requires you to keep another hand on a joystick at the same time). And if you have a HOTAS you will probably notice that you have a column for the stick, and separate column for the throttle lever.
You should be able to see at least two other columns here, Keyboard and Mouse, and hopefully also another column for your joystick too. (if your joystick doesn't have a column then make sure the joystick works outside of DCS first, as outlined in the first section).
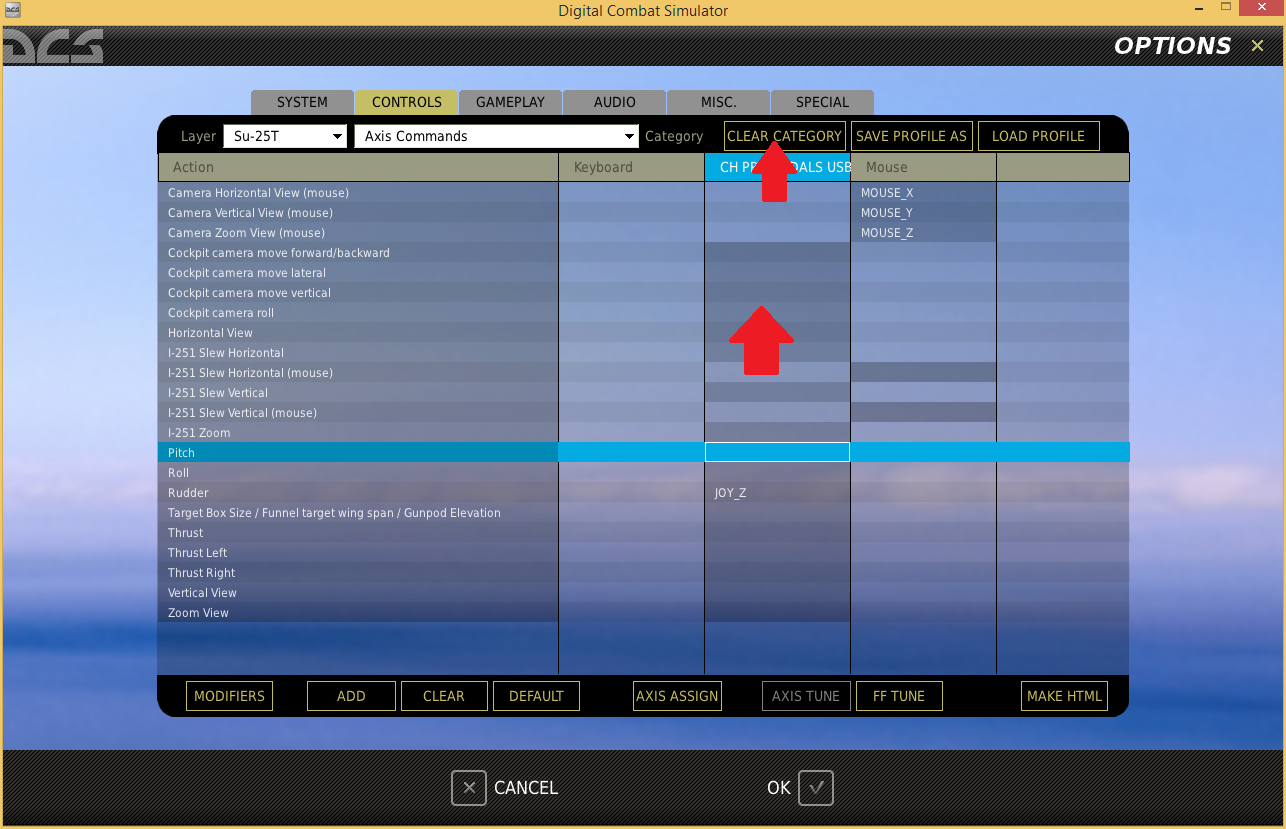
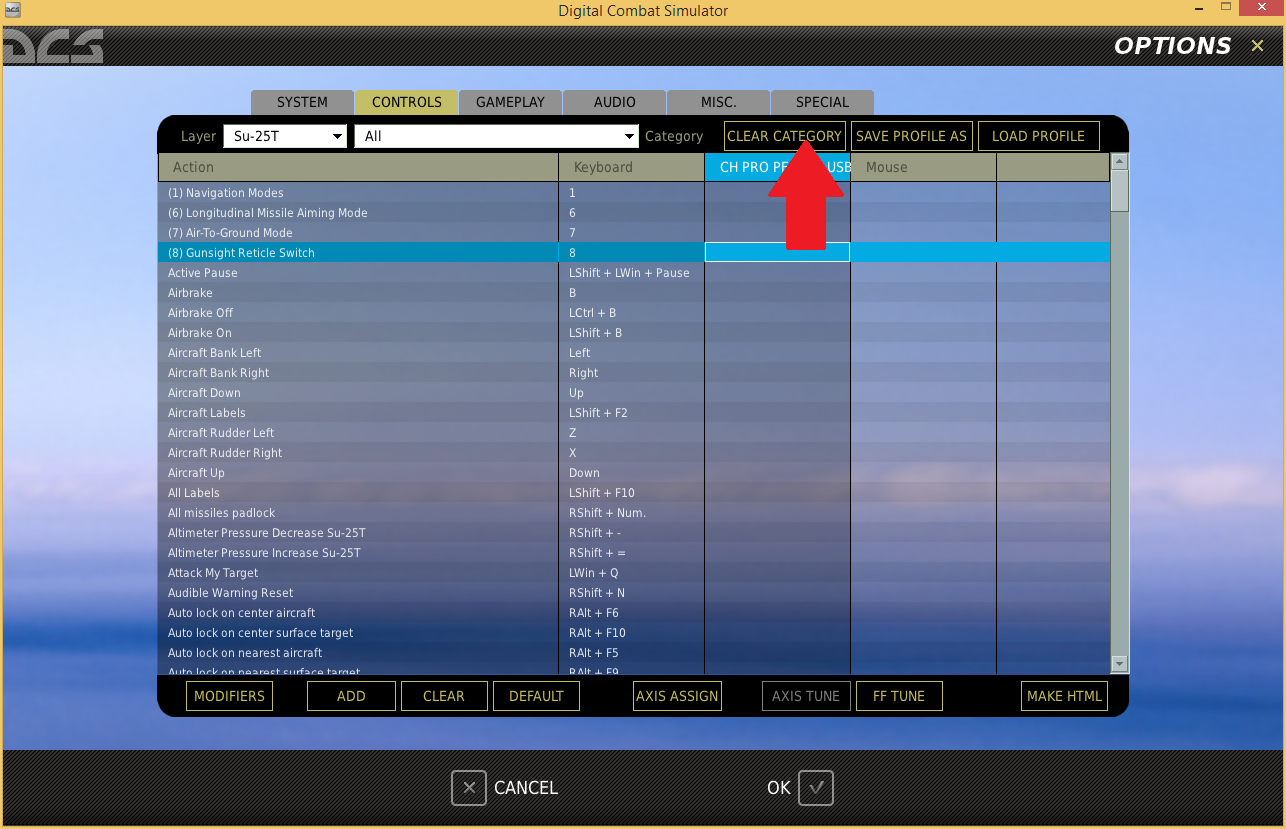
In your joystick column there may already be some default assignments (which are rarely correct) so lets clear them, and make our own.
Click anywhere in the joystick column to highlight it
Click on the Clear Category button to wipe the entire joystick column.
Now that we have a clean slate, we want to bind Pitch, Roll, Rudder, Thrust.
Find the row labeled Pitch, in the Actions column, and follow that row across until you have reached your joystick column.
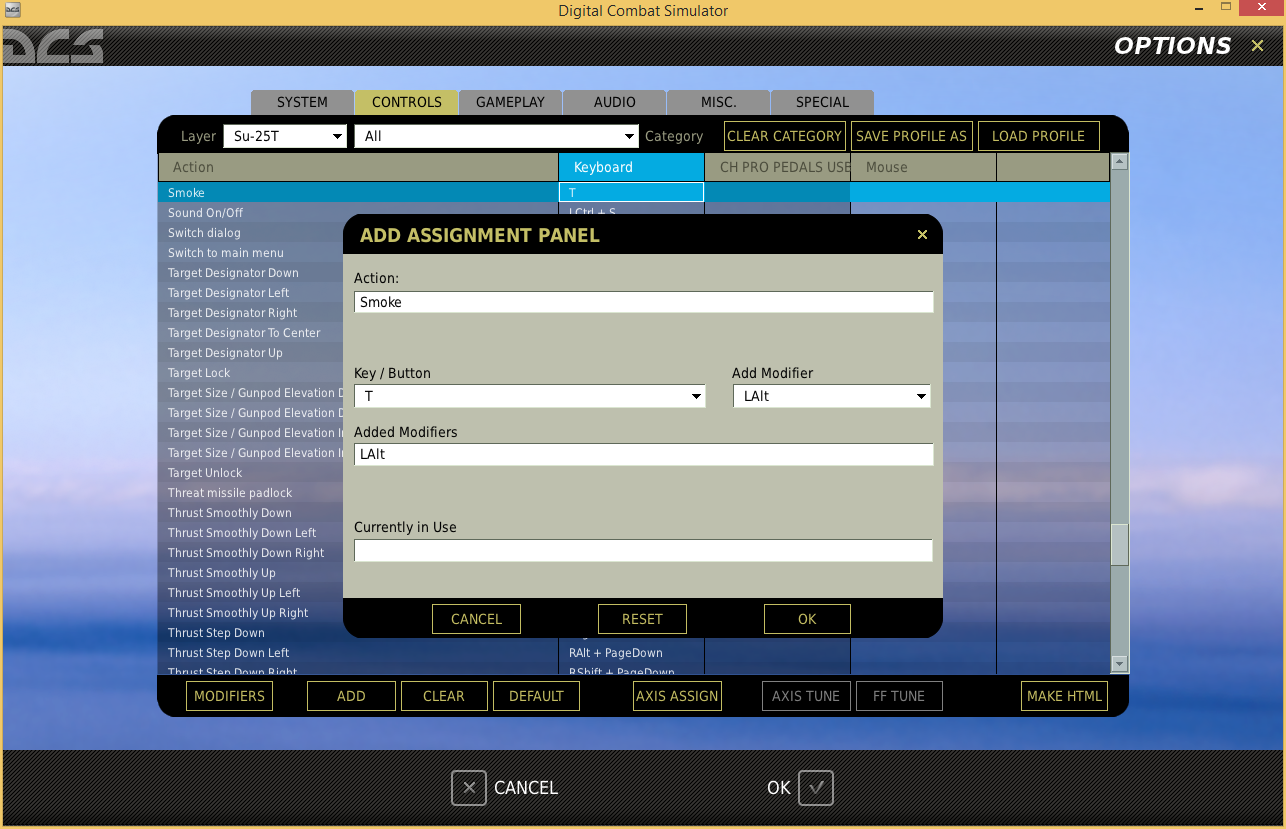
Double click the cell that is in row of Pitch and column of your Joystick.
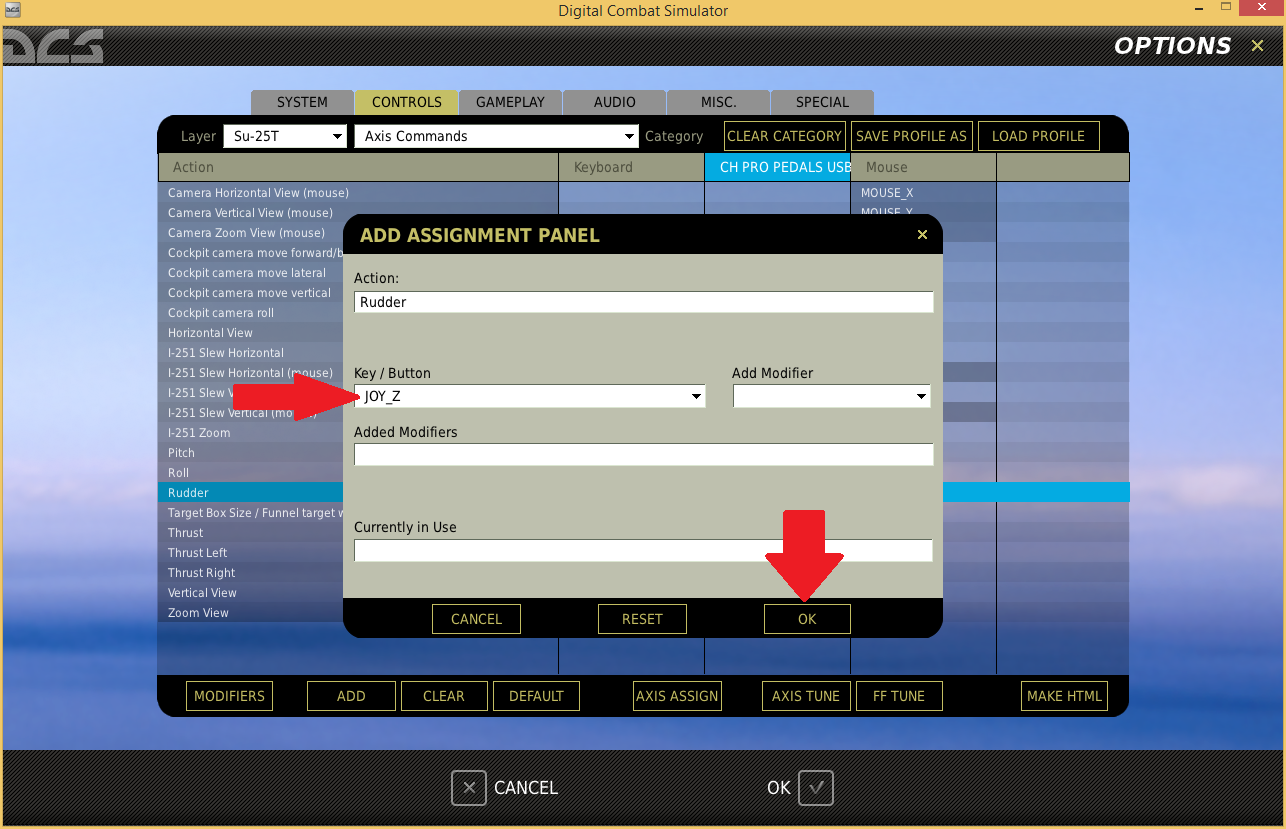
This will bring up a dialog box that wants us to press/move the button/axis on the joystick that we want to perform this action.
Since we have doubled clicked on the Pitch action, we want to move our joystick forward and backward fully one or two times, and you should notice that in the Key/Button drop down box, something like JOY_Y has appeared.This indicates that the Y axis on the joystick was detected as moving, and once you click OK, the Y axis or joystick forward/backward is assigned to the Pitch action.
You can also simply use the Key/Button drop down box to manually select the axis or button you want to use for this action. (that tends too be easier for head-tracking devices instead of moving your head strangely!)
Once you have hit OK, that cell should now list JOY_Y to indicate that you have successfully assigned the joystick's Y axis to the Pitch action.
Repeat this process for the Roll action, by double clicking in the appropriate cell, and then moving your joystick left and right fully a couple of times.
Now do the same thing with the Rudder action by twisting your joystick handle if it has that function. (if not, no problem, you can use the Z and X keys on your keyboard instead, or buy a set of rudder pedals).
Hopefully your joystick also came with a little wheel/lever/paddle. This should be assigned to the Thrust action.
Axis Tuning
Now that we have assigned movements on the joystick to various aircraft actions, we want to tweak things a little to make flying a smoother experience. By default things are a little bit too sensitive or touchy which can make keeping the plane straight and level, or performing smooth turns difficult.
Let's tweak the axis for Pitch, Roll and Rudder.
Click on the cell for the Pitch row in your joystick column, to highlight it.
At the bottom of the screen click the Axis Tune button.
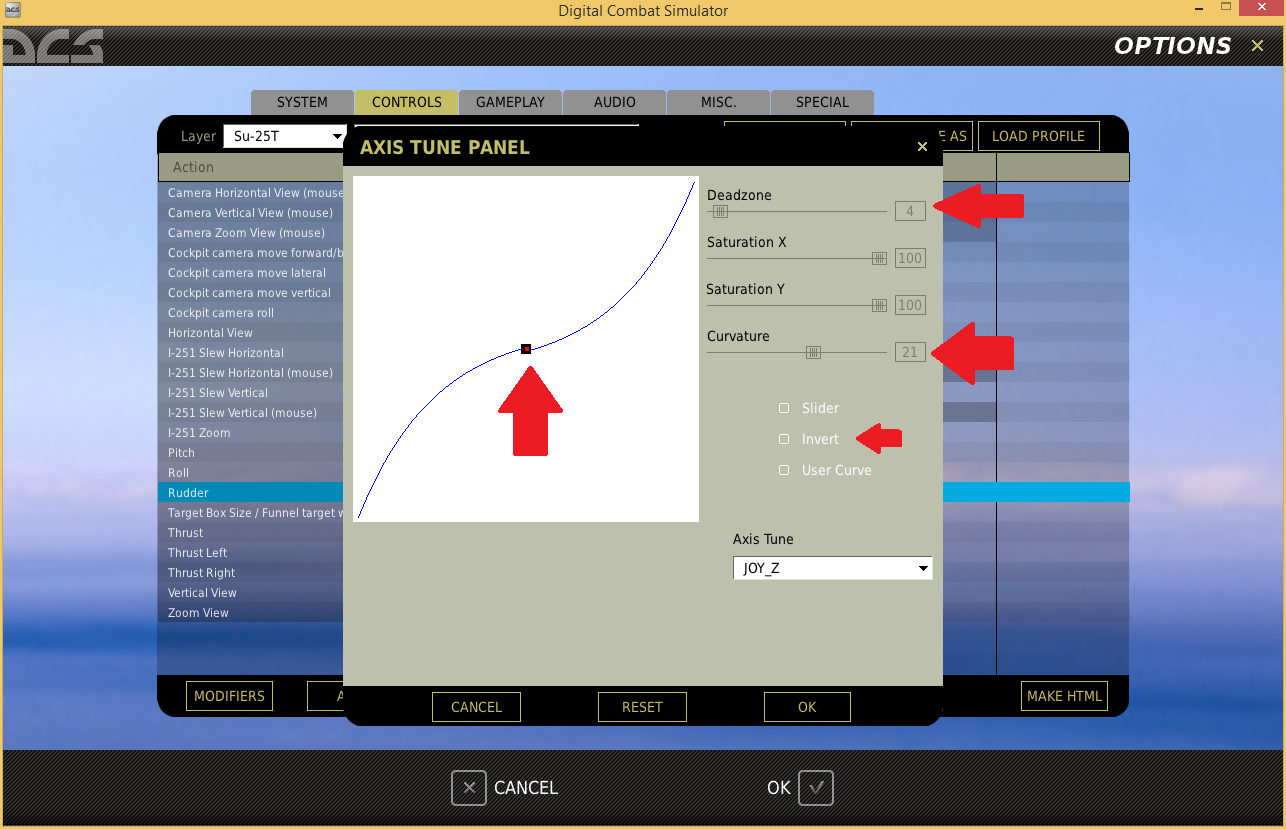
A new window pops up, which contains a diagonal blue line, with a black dot, and a red dot in the center of it.
(if none of the below makes sense, set the curve somewhere between 15-30 usually should be fine, but feel free to experiment with different values to get something that feels right)
This straight blue line indicates that as we push the our real life joystick forward or backward, the virtual joystick inside the game/aircraft will move a equal distance throughout the entire movement. It will have 1:1 ratio movement.
Unless you have an amazingly realistic joystick 1:1 movement, usually results in jumpy or touchy response from the aircraft, so we want put a curve on on the blue straight line, so that when our real life joystick is moved, the virtual joystick in the aircraft is moved somewhat less. And this makes it feel like your joystick has a bigger throw and gives you much finer control. I guess you could say it gives you a kind of dampening effect.
So for the Pitch, and Roll, we want to set a curve of about 20, by moving the Curvature slider to the right.
This screen also gives you an approximation of the effect, by showing you where the real joystick is by the red dots, and where the virtual joystick ends up indicated by the black square.
For the Rudder we want to set the Curvature to about 30 to 40.
And we also want to set a small DeadZone. The deadzone is as the name suggests a zone on the axis, where the virtual joystick will not react until you twist the joystick far enough so that the black square is no longer in the deadzone.
If you set the DeadZone to about 15, you should see that the there is now a very flat line, in the middile of the blue line in the graph. However you only want to set it to about 5 max, or just enough so that when you Pitch and Roll the joystick, you aren't accidentally inputting any Rudder. You can test it out on this screen, and set the deadzone to as little as possible to keep the black square within the deadzone while you pretend to Roll and Pitch by moving your joystick. That way you will only be using your rudder when you actually intend to do it.
In the same window we are also able to tick the invert checkbox, if for some reason things are reacting backwards. (this occasionally is needed to be ticked for rudder pedals and sliders).
Technically this is now enough for you go and fly, but it is also worth while setting up some of the common joystick buttons too. (next section)
Buttons, Switches And Hats

We have mapped our Pitch, Roll, Rudder and Thrust controls, which will allows to fly the aircraft, but DCS World is a combat simulator, so lets set up some buttons that let us fire our weapons, and also a few other buttons which are good to keep close by your hand for easy access.
The first thing we will need to do, is display all of the button controls.
At the top left of the options / controls screen, click on the second Layer drop down box and select ALL
Again here we should first clear the default controls, since they are usually not what we want.
Click on any cell in the joystick column to highlight it.
Click the Clear Category button
Once the entire joystick column is cleared, we are free to assign which ever joystick buttons we want to which ever in game actions we like. The actions are alphabetically ordered so it makes it fairly easy to find what you are looking for.
This is done in the same way as in the Axis Commands area. But I will use the Weapon Fire button as an example.
Scroll all of the way down to the Weapon Fire row in the actions column, and follow the row to the right until you are in your joystick column.
Double-Click the cell, in the joystick column on the same row.
You will be presented with the same window as previously.
Here all you need to do is press a button on the joystick, and you will see in the Key/Button drop down box it will list the button you have just pressed. Something along the lines of Joy_BTN_1, to indicate you have pressed the trigger.
Press the trigger button on your joystick, as this makes a perfect Weapon Fire button.
Click OK on the window to confirm
Now repeat this process for any other actions which you will find handy on your joystick.
Some that I would recommend are
Gear
Flaps
AirBrake
Wheel Brake
Target Lock
Target Unlock
The 4-way hat on the top of your joystick is very good for:
Target Designator Up/Down/Left/Right
Trim Up/Down/Left/Right
If you have only one 4-way hat on your joystick you can use a modifier key, so that you can use the one 4-way hat to perform multiple actions. (explained in the next section)
There are probably plenty of others, but you can assign them as you find the need for them. I find most things work fine from the keyboard apart from things you need to land or use quickly in combat.
Modifier Keys

Modifiers are very useful if you have a limited amount of buttons on your joystick, or if you want to have related functions on the same button. By using a joystick button at the same time a modifier button/key is also pressed, it lets us use a different function on the exact same button.
For example I have assigned button 2 on my joystick to the action : Flaps Down.
But I want the flaps to go back up with the same button.
Well, I can set up the Flaps Up to joystick button 2 + left control (on the keyboard).
So now I can extend and retract my flaps with the same button press on the joystick. Which is really handy since it's one less button to try to remember, as I know that one button is my flaps button, up or down.
You don't have to use the keyboard for modifiers either, you can make any button on any joystick be a modifier for any other button on any other joystick.
So for example you could dedicate say a thumb button the joystick to act as a modifier for every other joystick button. Then you have it all in reach and easy to remember.
But you will first need to add this button to the modifiers list, and you do this by clicking the Modifiers button in the bottom left corner of the options/controls screen.
With modifiers set up well, even one modifier key/button you have effectively double the amount of buttons on your joystick. You can even set up multiple modifiers, and stack multiple modifiers, e.g. Left Control + Left Shift + JOY_Button_1.
It can get quite complicated, which is why I like to keep them as related functions or opposites etc.
I think modifiers especially handy if you only have one 4-way hat. As you can then have the 4-way hat function as a Trim Up/Down/Left/Right adjuster normally, and then with a modifier you can also use the same 4-way hat to move the Targeting Designator around.
SUPER HANDY TIP
While you are in the game, and testing your controls press Right Control + Enter
This will bring up a little graphic specific to each aircraft that will show you where the aircraft's controls currently are, and this makes it very easy to compare your own controls vs what is happening inside the game, if things aren't happening as you expect.
For this to work though, the aircraft usually has to be switched on and in a ready to fly state.
This screen is also handy for seeing if you (or your autopilot) has put some strange trimming effect on your stick. (as well as seeing the trim you apply)
Source: https://steamcommunity.com/sharedfiles/filedetails/?id=324154615
More DCS World Steam Edition guilds
- All Guilds
- F-16C Viper JDAM / JSOW Ripple, Markpoints Tutorial | Digital Combat Simulator
- ACM Slewable Tutorial | DCS: F-16C Viper | Digital Combat Simulator
- F-16C Maverick Ripple, Markpoints | Digital Combat Simulator
- Air to Air REFUELING | Tips and Tricks
- How to get modules/vehicles for free!
- DCS A10C II PS5 Controller
- VF-91
- DCS: Black Shark - Fire Extinguisher Mini-Guide
- AH64D Beginners Guide
- F-16C