
Introduction
Hey All! i hope you find this Helpful. if you're a first timer, i'd reccomend reading this guide. if you'd like to learn more about the aircraft, i'd recommend reading this guide.
i'd like thank u/disgustipated for his valuable feedback, he's why there's engine instruments and trimming covered in the guide.
Instrumentation
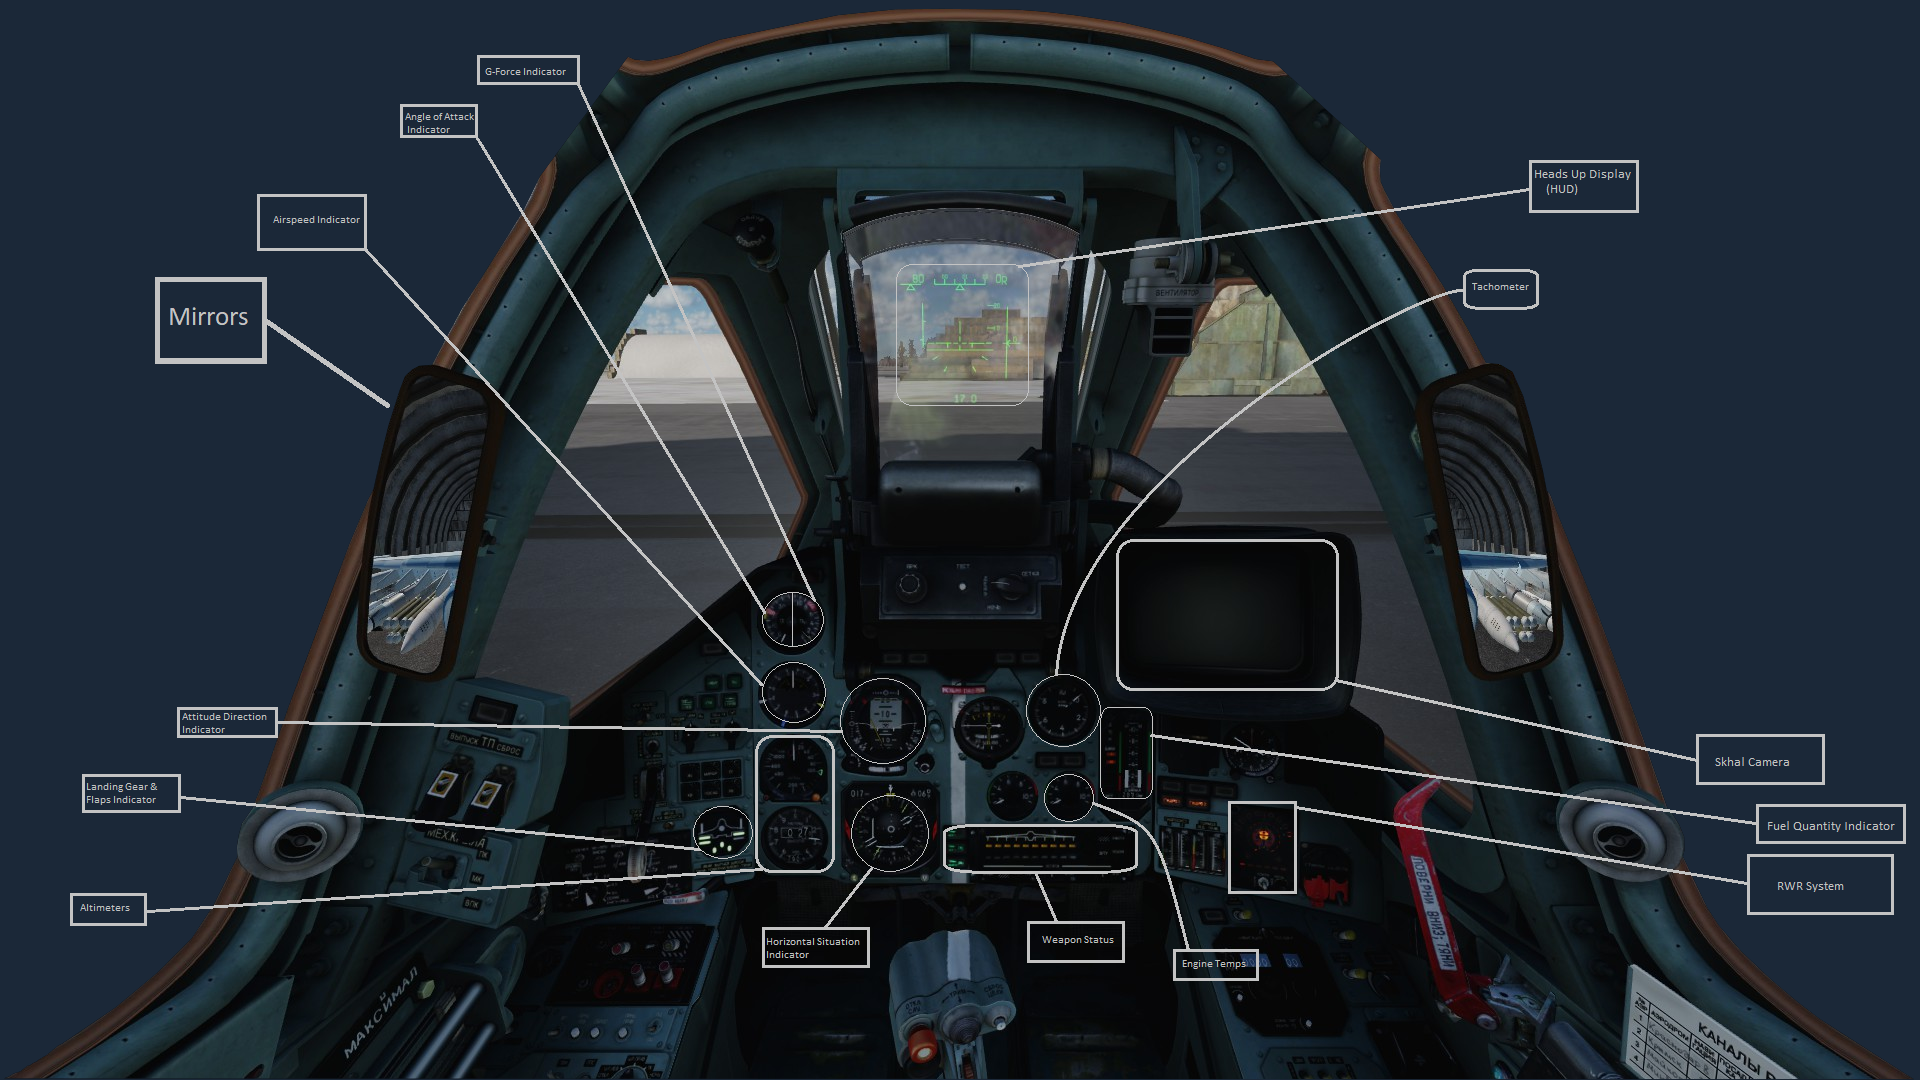
Altimeters
Measures Altitude.
Flaps and Gear Indicator
The Horizontal bars are showing that the flaps are down, the circles are showing if the gear is down. the vertical Bars are showing the Status of the Airbrakes.
Attitude Direction Indicator
Shows what your Heading, Roll and Pitch is.
Airspeed Indicator
Shows how fast you are going
AOA Indicator and G Indicator
The left part of the indicator shows the AoA in degrees, the G-load is shown in the right
part.
HUD
Shows Heading, Roll and Pitch, along with your Selected Weapon.
Skhal Camera
Used for directing air to ground weapons systems
Fuel Quantity Indicator
The Vertical bar on the left shows your fuel status, the vertical bar in the right shows the fuel feeder tank's status.
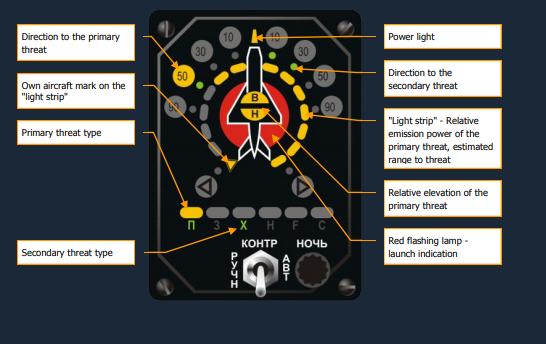
RWR System
Weapon Systems Indicator
Shows the type, quantity and readiness of the currently selected weapon and the remaining gun ammunition are shown. if there's a Yellow bar, that means there is a weapons system on the hardpoint. if there is a green bar, that means the weapon is ready to be fired.
in the upper right corner of the Weapons Systems Indicator, it shows what weapon system is selected.
Б for bombs,
УР for missiles,
НРС for rockets,
ВПУ for the built-in 30 mm cannon
The remaining cannon rounds are shown in the lower right of the panel
К for full,
1/2 for one-half,
1/4 for one-quarter.
Horizontal Situation Indicator
Shows Heading, and Distance to Waypoint and Heading to Waypoint (Waypoints are set before the mission, so don't worry to much).
Tachometer
Measures Engine RPM
Engine Temperature
Measures Engine Temperature
Startup
Hit Right Shift + L to Turn on the Electrical Systems. If your aircraft doesn’t have weapons on the pylons, Hit Backslash (/) and Select Ground Crew, then Rearm & Repair. Select a Loadout Of your choice (Your Cockpit should be open or you should have the radio on, otherwise you won’t be able to communicate with the ground crew). Next, Close the Cockpit with Left Control + C. Request Startup from the ATC via Backlash -> ATC -> 1 -> Request Startup. Then, power up your engines with Right Shift + Home. Using the F2 View or your instrumentation, Wait for the RPM to Go above 33. If you don’t do this, and accelerate before 33% RPM, you could get an Engine Fire. If this happens, shut down your engines using RShift + End, and wait for your engines to cool.
When your Ready, Request Taxi to the Runway and Accelerate using Page Up (If you need to Decelerate, use the Pagedown key). Don’t floor it, look at the throttle lever in the bottom left of the cockpit, get it to about halfway. While you Taxi, use the M Key to set up the Mirrors. Use the F10 Key to view the Map, use it to check for nearby landmarks and players you may see after taking off. Use the X and Z Keys to Steer you while on the ground. Make sure not to turn hard when taxing over 10Km/h. Use the W key to break just before you turn onto the runway.
Takeoff
Request Takeoff from the ATC via Backlash -> ATC -> 1 -> Request Takeoff. Once the ATC has given you Permission to Takeoff, Turn onto the Runway.
Hit F to lower your flaps. Line up with the runway using the Compass bearings at the top of the HUD. Once you’re done lining up, accelerate to the Maximum that your throttle can go. Wait until you are around Three Quarters Of the way Down the Runway. Use the Down Arrow to pull up. Don’t pull up to much, only go for a 25-30 Degree angle. If you don’t take off, raise the angle. Once you’ve gone to an altitude you are happy with, level Out with the up arrow. If you want to, use the left or right arrow to turn. Then, engage the Autopilot
Autopilot
Hit Alt + 1 to keep your current heading and angle.
Alt + 2 = Altitude Hold (Barometer)and Roll hold
Alt + 3 = Transition to level flight, use it if you stall or if you don’t want to fly the aircraft.
Alt + 4 = Altitude Hold (Barometer)
Alt + 5 = Altitude Hold (Radio)
Alt + 6 = Follows Waypoints. It’ll only work on missions with waypoints, so you probably don’t need to worry about it.
Air To Air Weapons Systems
Press 6 to switch to Air to Air mode. the SU-25T can use the R-73 and R-60 Missles for air-to-air combat. you can also use the Cannon.
Air-to-Air Missles
The SU-25T has Two Air to Air missles, the R-60 and R-73. The R-60 is worse than the R-73. The HUD will show what missle you have selected, by either having a “73” or a “60”. To Engage a target, place the Targeting Icon onto the target by manuvering your aircraft. Once you hear the locked sound, hold down space to fire the weapon.
Cannon
While in Air-to-Air Mode, Press C to use the Cannon.
a funnel will appear on the HUD - it represents the shell’s flight trajectory vs. target wingspan. By pressing the RAlt-[], you can change the Wingspan of the target aircraft. Maneuver your aircraft to place the target inside the funnel so that the target’s wingtips touch the
funnel edges. then hold down space to fire.
Air To Ground
There are 4 Types Of Air-to-Ground weapons on the SU-25T, Unguided Bombs, Guided Bombs, Unguided Rockets and Guided Rockets.
Unguided Bombs can be used when you select them via the Weapon Select Key (D). Line up the aiming marker on what you want to bomb, and press Space to release the Bombs.
For Guided Bombs, Use the Sakhal camera by pressing “O” to activate it. Move it around with the [;], [,], [.], [/] keys. Once you have found your target, hit Enter to lock your camera on it. You can Zoom in or out with the - and = keys. Once you have locked in your camera, hit Right Shift + O to designate it. Use D to select the guided bomb, and fly your Aircraft so the Vertical Guiding line is lined up with the Tail on the HUD Aircraft Icon. When you are over the drop zone the bombs will drop automatically. After they drop, disable the laser designator (Right Shift + O) so it doesn’t overheat.
For Unguided Rockets/the Gun, While in Air to Ground mode, select an Unguided Rocket with your weapon select key “D” (Or C for Cannons). Line up your targeting icon with your target and Press Space to Fire.
For Guided Missles, Use the Sakhal camera by pressing “O” to activate it. Move it around with the [;], [,], [.], [/] keys. Once you have found your target, hit Enter to lock your camera on it. You can Zoom in or out with the - and = keys. Once you have locked in your camera, hit Right Shift + O to designate it. The range to the target is shown on the HUD. When at maximum launch range, hold Space to Fire the Missles.
Landing
Line up with the Runway using the Compass Icon on your HUD. When flying under 400 Km/h, you can deploy your Gear. Hit Shift + F to Activate Landing Flaps. As you approach the runway, gradually slow to 270 Km/h Use your Throttle to keep on the glidescope (glidescope being the approach path to the runway). When you are about 5 Meters over the Runway, Flare by pulling up your nose so you have a soft landing. The Flare is Completed when you are traveling at about 240-220 km/h.
Once you actually touch down, Set your Engines to Idle and press P to deploy the Drouge Chute.
Landing is difficult, so don’t worry if you make a mistake.
Surviving A Missle Launch/ Being Shot At
Eventually, you'll get a missle launched at you. if this happens, watch your RWR and Spam Flares and Chaff. if you're at altitude, Dive down to try to break radar contact and to get more speed so you can run away. Don't Fly Directly away from the missle, as this will mean your engine would be directly pointed at the missle, meaning the missle would get a better lock. You should keep the missle off the wings (on the side of the aircraft). Apart from that, just spam flares.
If you're being shot at, you should Dive towards the ground, so you break line of sight with the thing that's shooting at you. if you are damaged, Return to Base. if you aren't, kill the thing that shot at you.
Trimming
Trimming is Tailoring the Aircraft to make it stay level. you can use Rctrl and . to trim the nose up, Rctrl and / to trim the right wing down, Rctrl and ; to trim the nose Down, Rctrl and , to trim the left wing down.
i'd Reccomend Britchot's Method to trimming while flying.
1. Manuver the Aircraft so it's Level
2. Trim 1-3 "clicks" in the opposite to wherever the aircraft's leaning
3. Release the controls and figure out whichever way it's leaning
4. Repeat 1-3 as necessary.
Remeber to Re-Trim the aircraft after you Use Weapons.
How To (Eventually) Fly Competently
i'd reccomend checking out this guide for weapons systems and other useful stuff. try flying around alot, in MP or SP. if you want to buy a module, i'd reccomend getting a Flaming Cliffs aircraft, or the Flaming Cliffs Bundle.
If you're looking for a Wingman, or to be involved with the community more, or you simple need to ask a Question, I'd Reccomend the Developer's Forums[forums.eagle.ru] , or r/Hoggit on Reddit, or the DCS Discord[discordapp.com] , or the Hoggit Discord[discord.gg]
SEAD
SEAD (Supression Of Enemy Air Defences) is all about taking out those Pesky SAMs (Surface to Air Missle)
In the SU-25T, you have two missles that you can use in SEAD. The Kh-25MPU and Kh-58. These Missles Track the Signals Of a SAM, but to detect these Signals you need a L-081 "Fantasmagoria" Pod. You Can’t target Every SAM Though. The Short Range Mobile AAA usually Can’t be targeted, as they use a frequency higher than your Pod Can Detect.
To Find a SAM, Hit 7 to get into Air to Ground mode. Then Hit I to enable Radar Detection. The SAM should be Picked up on your RWR. Turn so Your nose is lined up with the SAM. Switch to the Missle you’d like to Use. The SAM should be marked with a Diamond on your HUD. Use the [,], [.], [/], [;] keys to line the Circle up with the Diamond. Once this is Done, Hit Enter to Lock. On the Left Side Of the HUD, you’ll see a Bar. At the Top of the bar is a Black Box, this indicates your Maximim Range. There is also an Arrow., this indicates how far you are from the Target. If the Arrow is Below the Black Box, you are in Range. When you are in Range, and have the “NP”, Hold space to Fire.
Once you’ve fired, wait until the Missle hits the SAM, then pull away. The reason you want to do this is you will get a Visual Confirmation on whether on not the SAM has launched at you, and you see wether or not you need to re-engage the SAM.
Source: https://steamcommunity.com/sharedfiles/filedetails/?id=1418610189
More DCS World Steam Edition guilds
- All Guilds
- F-16C Viper JDAM / JSOW Ripple, Markpoints Tutorial | Digital Combat Simulator
- ACM Slewable Tutorial | DCS: F-16C Viper | Digital Combat Simulator
- F-16C Maverick Ripple, Markpoints | Digital Combat Simulator
- Air to Air REFUELING | Tips and Tricks
- How to get modules/vehicles for free!
- DCS A10C II PS5 Controller
- VF-91
- DCS: Black Shark - Fire Extinguisher Mini-Guide
- AH64D Beginners Guide
- F-16C