
The In Game Economy And Why You Should(n't) Care.


Take a look around the boat commander! Specifically the port (thats left) side of the bridge. tucked away above the consoles is a display that charts your currency. Currency is important as you need it to bank roll your fledgling empire of disposable drone soldiers. At the start of the game your drones are anything but disposable but with some consideration for your economy you will learn how best to earn and spend your dosh.
Lets briefly discuss your income... where does it come from? Well thankfully just about everything you do produces money, owning islands, capturing islands and killing bad guys all nets you some income. You should always be trying to kill enemies for your income but if for some reason that is impossible or difficult you can cheese the game by just not doing anything for a while. Once the enemy carrier(s) is gone, you can safely AFK forever without worrying about counter attack. Leave your PC on for a few days and slurp up those sweet sweet credits!
What do you spend credits on? Ammunition, fuel, bombs, 13.7 trillion dollar 8th generation stealth drones with active and passive counter measures. Everything your carrier needs for general operation. Not all munitions are created equal and not all enemies pay the same rewards for defeating them.
- Virus bots give 5 credits
- Ground units give 50 credits no matter the chassis
- Aircraft give 100 credits no matter the chassis
- Needlefish payout 200 credits
- Swordfish pay out 300 credits
- Sinking a carrier gives 1,000 credits
P.S: The payout for island capture is between 200 - 600 credits
With this in mind, you can begin calculations in your head to find the most and least economically sensible means by which to destroy your enemy. At a cost per round of 1 credit and roughly 5~ or so rounds killing a light chassis, chainguns are an extremely viable way to pick off small groups of ground targets. At a cost of 50 credits per shot and 5 shots per volley, the 160mm carrier deck gun is a poor choice for dealing with enemy groups smaller than 5 vehicles. This layer of strategy may seem daunting but 90% of it happens in the back of your head and always prioritize fun over all else, dont let the economic repercussions of your actions spoil the fun of bombing virus bots with heavy bombs.
Drive Boat


You wont be going anywhere without touching the helm. While manning the helm is an overwhelmingly boring job and deceptively shrimple there are some aspects of the helm to keep in mind.
First and foremost is be aware of the ocean depth! Those giant waves that blow up your aircraft and cause your carrier to get sick air when you ramp off of them going 110 in a school zone? Those spawn in deep water exclusively. Those calm tranquil areas around islands are all shallow. Those of you who are putting two and two together need to slow down as we're going to talk briefly about water.
So you may have noticed that the map is literally covered in water, its like 99% water or something like that. So you'd be forgiven for assuming that water is water and none of it matters. walk up to the helm click on one of the displays and switch it to ocean depth. Should look like that?
The purple...er, the water the deeper the brighter blue the shallower and if it starts turning green, yellow or red then avoid it like the plague cause thats land!
Okay so now that everyone is on the same page lets doll out some tips. ALWAYS ALWAYS ALWAYS LAUNCH AIRCRAFT FROM SHALLOW WATER! I cannot stress enough how important it is that you launch your aircraft from shallow waters! AND FOR THE LOVE OF JOD RECOVER IN SHALLOW WHENEVER POSSIBLE! If you think your too cool for school then you are literally playing russian roulette with your aircraft every time you launch one. Your just a bad wave away from launching your super expensive suped up manta into the ocean at mach 3.2 Rotor craft are far safer when launching but a sudden change in carrier elevation during landing can SOMETIMES result in an explosion. So please head my warnings, these come from hours of experience... just park the boat at an island.
One thing I've seen people crying out for is an auto pilot. I still dont see the point and let me show you why.
If you hold E while looking at the holo table, we can see some simple map tools and some helpful information. The distance between where we started holding E and where our mouse is now and the angle between the two points. Lets use this information to set sail for Tokamak.
To get there lets first consider if there are any obstacles between us. Luckily there are not but if there are you may need to sail around them, this should take 3 minutes. Next lets angle our ship.
LOOK UP COMMANDER! Thats the compass! that number in the middle is our "Bearing" a bearing is a number assigned to a direction, every possible facing the ship can be at has a corresponding bearing number based on a circle (So from 0 - 360), You may have noticed that this bearing number looks a lot like the number we got from the table, infact if we turn the ship to bearing 125, we're on a direct course to the island!
Yep thats right using the information from the holo map we can chart a course for an island with 100% accuracy. Set your throttle to the desired level of speed and locate this funny looking switch here. When enabled this switch automatically sends corrective commands to the helm, you will literally never go off course! Just remember to switch it off when setting a new course! Now sit back and enjoy minutes of peace and quiet as you do literally anything else!
On the subject of driving, take a look at the throttle.
That red line isn't there to remind you of your favorite sports car! its actually an indicator of the engines (For lack of a better term) "Redline" setting (Inventive I know). When redlined the engine consumes considerably more fuel and outputs considerably more thrust! I recommend (if you can wait that long) to avoid redlining your carrier until you have a stable and substantial supply of fuel. Dont let me fear monger you the engine will not slurp your fuel in minutes or seconds, but increased consumption IS increased consumption. Save your redline for situations you need to nope out of quickly!
Subjective Subjects.
You may have seen the words strategy in the games description and thought to yourself "This is a game where I amass units and give them orders to fulfill operational objectives". Unfortunately I cant call you wrong as that is indeed a feature HOWEVER!!!
I N M Y O P I N I O N
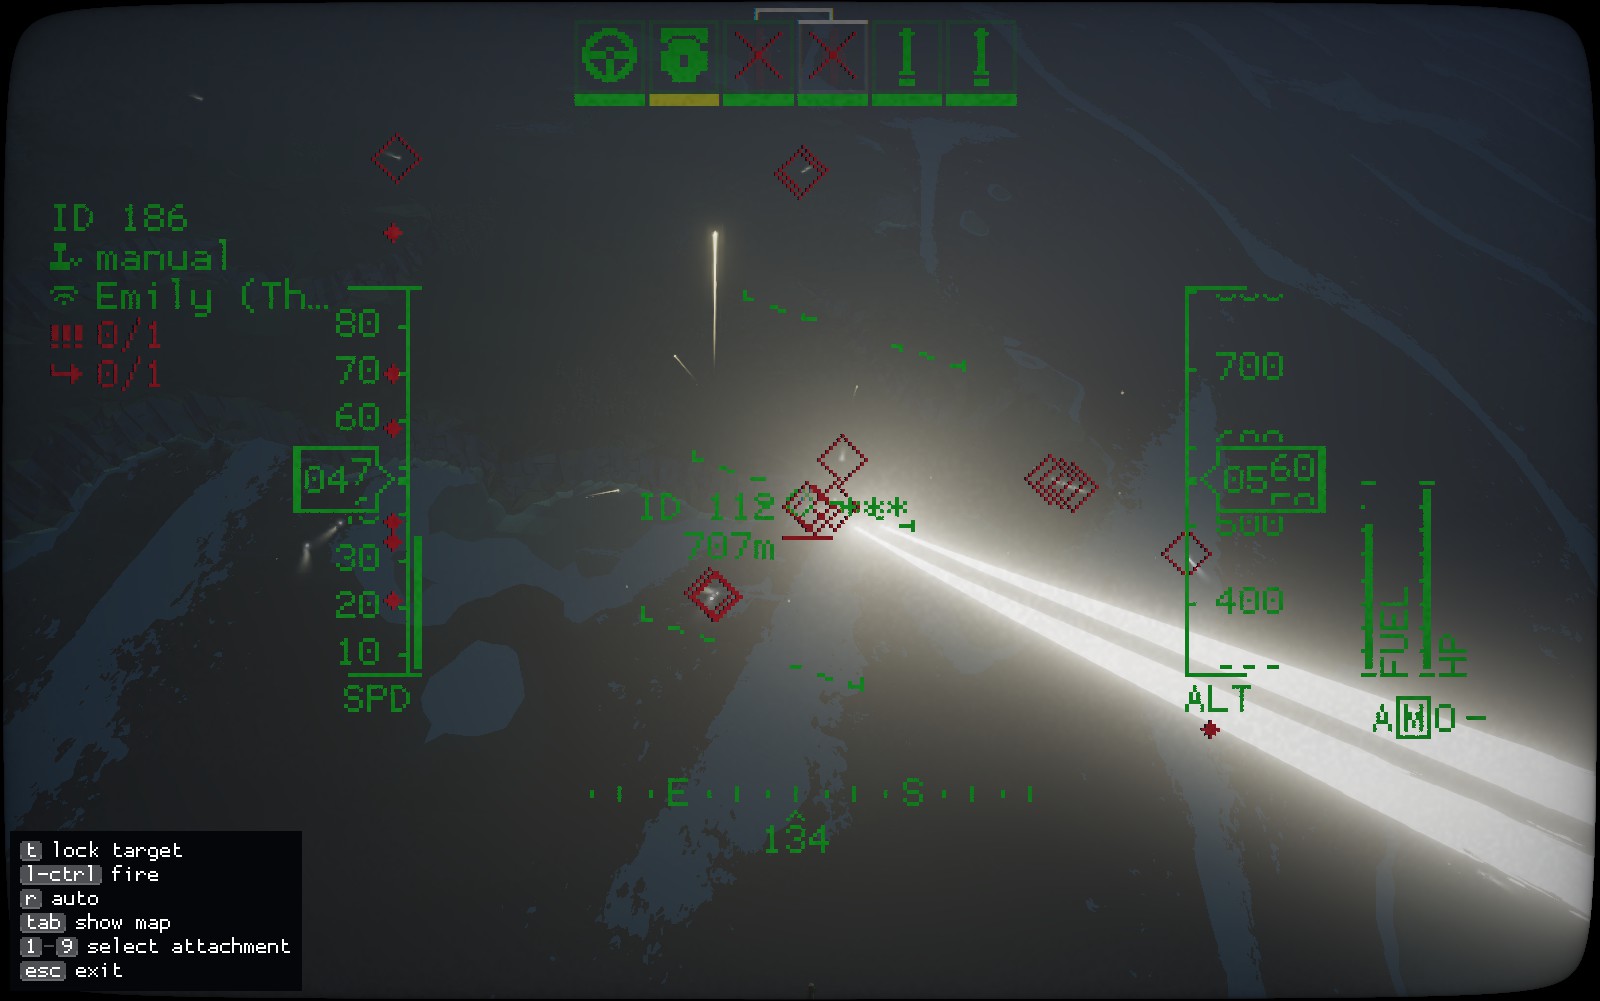
the game is at its most fun when you are in direct control of at least one of your units, or working with your friends as an away team. When the AI biffs a shot its a shame, when YOU biff a shot its a slight against your person. Having an intimate and more direct feel for the games controls puts you in the action and (at least in my opinion) is far more fun than giving orders to the AI who nine times out of ten will absolutely biff whatever simple instructions you gave it.
As a tip I'd at least recommend you become familiar with controlling vehicles manually and get a feel for engaging and destroying targets while in manual control. Not all of us are natural pilots (God rest the souls of the Ti-86's resting on the ocean floor because of my poor judgement.) but luckily the game could not be easier to cheese and as such flying is really as shrimple as that!
Dont expect results right away, take your time and ease into unit control. Go at your own pace and take on challenges that are comfortable to you. Dont see failure as a barrier but as a bump, learn from your mistakes and dont be afraid to ask others for help when you need it.
Y'know what else is better in my opinion? Public servers. For as many players as I met who'd crash an albatross into the ocean through sheer incompetence or who'd order sixty missile launchers I met just as many intelligent and super talented players. To be honest I diddnt mind working with less skilled players at all as everyone starts somewhere and it felt good to pass on what I knew and watch them take that information and personalize it. I STRONGLY recommend you play not only with your close group of friends but with strangers, many strangers will teach you things you diddnt know and many more will need your help.
heres a quick lightning round of some subjective things that are up to you.
How to kill boat?
Spoiler alert: I like missile : )
How to fight island?
Spoiler alert: I use aircraft almost exclusively.
How to be good
Pro tip: Develop a strategy that works for you, dont let anyone tell you how to play.
Naval Combat And Why Torpedoes Suck : (


Ask a veteran of the game and they'll tell you that naval combat was absolutely pointless back in the day. When the game launched enemy boats would just sorta... loiter, around islands and wait for you to show up. You could kill all of them by parking your car and shooting torpedoes in their direction, the arming time be damned. Needless to say the current system (as of 2023) is far more aggressive demanding you know all the tips and tricks to fight a boat.
Let me get this out of the way, torpedoes travel roughly 48 - 50 m/s (So people have told me) so the formula works out like this. Use the navigation table and get the exact distance to the target (Avoid approximations where possible.) The delay on your torpedo should be the distance to your target divided by 48, 49 or 50 and rounded down to the nearest tenth. Thats your arm time in seconds.
As an example a swordfish 2.3KM away needs to meet jesus. To send him there I take his distance in meters (2,300) and divide that by lets use the number I was told originally 48. that gives us 47.916 which we can round down to 40. If our math is correct (and you should always try a ranging shot) the torpedo will sail past their noise makers and slam the swordfish and help him on his journy of redemption :).
You may see a fault here and thats that we're using lame human brains with lame american inner city school math skills and a calculator to resolve a complex and dynamic ranging issue. Plus once the torpedo clears the tube its gone forever! we cant adjust its timing if the enemy boat moves. Can we rectify this in any way?
YES WE CAN INTRODUCING THE WORLD OF BOMBS!
Bombs are drop-dead (heh) simple to use once you get the idea behind aerodynamic resistance, wind, gravity and yeah im just kiddin im too dumb for all that. Fly your manta really high up like 1 or 2KM into the air. Great now dive straight down towards the target, align yourself so that the manta is facing the same direction as the enemy boat and that you are approaching it not only from above but behind. NOW BOMBS AWAY!
with some luck and practice you can peg boats without taking any damage and you'll be bombing em like the pro's from the 1940's. Be mindful of the bomb load and target. Needlefish are fragile so require less bombs than their larger Swordfish cousins. If possible visually or manually ID the target to adjust your payload for the job, no need to waste your dosh. 2 light bombs makes short work of a needlefish, one medium and one heavy will both be more than enough to take down one as well. For the Swordfish you'll need 4 light bombs, 2 mediums or 1 heavy. Take this into acount when anti-shipping for a gay old time!
I hear your calls young one, I hear you pleading: "PLEASE!" you cry, "PLEASE I CANT GET BOMBS UNTIL I KILL BOATS! HELP!"
Well lucky for you, I have the key to success. introducing our MVP, THE I R M I S S I L E!
How does it work!? Black magic dear reader! How do I use it? With tact! Where do I get them? In your warehouse!
To make a long story short get a manta with flares and arm that bad boy with 4 IR missiles, bonus points if you put an AWACS on him. Now fly out to where the mean boats are. Similar to bombing set yourself at a high altitude cant go wrong with 1.5 - 2KM. when the boat launches a missile at you begin your dive and set your nose right onto the target, meanwhile arm all 4 of your IR missiles. This last part is subjective but, close the distance until your confident and fire your missiles. You're generally too close by the time you close to under 1KM but too far if your 1.1KM away so practice until you get a feel for the sweet spot, its not all that hard. With any luck you'll splash the enemy boat.
As a rule its 2 missiles for a needlefish and 3 for a swordfish but I go with four because I dont accept naval targets as real and so choose to exterminate them with extreme prejudice. I hope I dont need to tell you BTW to pull up after deploying bombs or missiles, you dont want to be shot by a CIWS and you dont want to be underwater. once the ordinance is away pull up and evade. Another note is that of course the rocket launcher is the best weapon in the game for blowing up boats but its also the best weapon in the game period, so sortie accordingly.
Congrats! you have now passed the unofficial official naval warfare school. Come back next week to get your cereal box drivers licence!
The Carrier


You may or may not know this but the carrier is in fact one of the most dangerous vehicles you have at your disposal. Improper use can result in death, death, sudden loss of life, death and possibly even death in extreme cases. its crucial that you familiarize yourself with the carriers systems and how to employ them
(NOTE: this is about its weapons. I cant teach you to walk, but I can teach you to run.)
Firstly your weapons ranges. The Cruise Missile has a range of 10KM and the carrier gun has a range of ~5KM. That means if your attacking an island and the carrier is parked 5 kilometers (5,000 meters for those of you unfamiliar with the strange and mysteriously backwards units of measurements used by (nearly) the rest of the world). That you will be able to use both the gun and the missiles. But if the carrier is 7KM away from the target you will only be able to call for missiles.
Surely theres nothing funny you can do with this system that would allow for unlimited death and destruct-WRONG!
First, sortie an aircraft with a camera. Does not matter what kind but you're not getting any bang for your buck if your within 10KM. Next fly away. Before you cross that 10KM range call for a carrier missile strike, remember these are "laser" guided and thus the missile will hone in on where the camera is pointing until the request is canceled or the camera is turned off. Exploit this by continuing to fly away from the carrier and to your desired strike. Point the camera at the target and cancel the strike. You're now free to sit back and relax while you wait upwards of 100 seconds for anything to happen.
On the subject of waiting. Are you aware that all missiles travel at different speeds? I sure wasnt lol. There are mods to adjust speed but as a rule of thumb you can mostly assume each missile travels at 100 m/s, Apparently this varies greatly between missiles but if you look at the bottom left while calling a strike it'll tell you the missiles distance to the target. You can guesstimate the time to impact by counting the hundredths place as a second to impact and each subsequent number as tens of seconds, hundreds of seconds etc, this is true with laser guided missiles as well as cruises.
Looking to hit several targets at once with missiles but waiting for that strike to come in? Good news, you dont have to. Press the fire button again to "Cancel" the strike. This stops the guidance meaning the missile will strike the last location in your cross hair before the strike was canceled. This means you can start calling for a new strike about as fast as you can fire the missiles. If you do guide the strike to the target (hats off to you) but your unhappy with it, dont worry! missiles can and will shoot straight up into the sky to hit wherever you move your camera! change targets just about any time short of 5 seconds to splash, though they are magical they are still stupid so be careful of cliffs and walls.
By the by are you hungry for abject destruction? There are some targets that are too dangerous to hit with aircraft and missiles, notably CIWS turrets. These things can ruin an invasion and send you back to square one! Once you've identified the CIWS or at least its location you should get a spotting craft (AWACS by any other name) in the air at least 1.1KM up and call in for a 160mm strike on the stupid thing. Intercept that you filthy casual.
Another note for the 160 is that its accuracy drops if the carrier is moving. I'm not sure if this is intentional design or if it has to do with the gun trying (and failing) to aim at the same spot from separate angles, either way stop the carrier for accurate strikes and get up to speed to spread the love over a wider area. Its also good to remember that mountains and other changes in elevation can and will block your 160mm shots. So check your line of sight before you confirm a strike.
Have you noticed that the carrier has flares? They do not flare off missiles, though that'd be cool. These flares are for illumination.. y'know like an actual flare? They consume the same ammo as IR flares but brighten things up at night, which if your like me and tag targets based on their headlights kinda sucks. However after accidentally using one I realized that anything in its blinding light spots super fast! Use carrier flares to create exaggerated shadows which can give away enemy positions AND you can spot more quickly while its up. They can even be ordered from the gimbal cam so you dont have to push any red buttons!
TORPEDOES! how could we forget? a simple rundown is as follows! The top number is your activation delay, it moves in intervals of ten and counts seconds before the torpedo becomes "active" in its pre-active phase the torpedo will make adjustments to follow the bearing you give it. Vaguely remember somewhere that it takes a torpedo something like 20 seconds to turn 90 degrees so bear that in mind. The second lower number is your "heading" this is a bearing that the torpedo during its pre-activation phase will attempt to head in. When the torpedo goes active it will scan its horizon for anything boat shaped and begin to track. Torpedoes can track through islands so make sure you wait them out if ones chasing you.
You are not defenseless however and besides offensive torpedoes you also have noise maker torpedoes. These work similarly to offensive torps except the "Activation Delay" determines how long the noise maker will remain active, so a delay of 60 means the noise maker will make noise for 60 seconds. Unlike regular torps noise makers will always move towards their assigned bearing so no worries there. Your last line of defense is the torpedo countermeasure, the little switch above the weapons station by itself on the right there. You flick that and press the button to deploy a countermeasure. These are like static buoys that disrupt the tracking of an incoming torpedo. The torpedo will loose track when approaching a countermeasure but this is not a hard kill system. You will need to take evasive action to ensure the now confused and blind torpedo does not slam into you by accident. 90 degrees port or starboard is a good rule of thumb.
The other weapons I find are mostly fool proof so if your having issues with CIWS or AA missiles I really cant help you, but the good news is that you can reload a save anytime.
POWER MANAGEMENT (Its A Big Part Of The Game!)


Back when the multiplayer was not dead I served on a lot of carriers. In this time I found that a lot of people ignored the games power management system. I'll be the first to admit I never really bothered with it, but it plays a critical role in carrier efficiency and effectiveness!
First familiarize yourself with how this system works. The carrier has a set static amount of energy to distribute to its various systems. For the most part a majority of systems consume little to no power passively. Weapons will consume nothing until powered on, RADAR only consumes a little energy while running and the lift elevator and hangar crane consume nothing when not moving. By far the biggest consumer of your electricity will be the carriers engines. I'm not sure why it runs exclusively on electricity only that it does.
When you put too much load on the carrier, instead of tripping a fuse the system will divide its total energy across all consuming systems as evenly as possible. This often means cutting the total power to one system and giving more to another (PROPULSION AHEM). Its worth noting that each system consumes a set amount of power and will not be boosted by any additional power on the carrier. That is to say cutting power to the RADAR does not give propulsion more power, but allows you to run an equal load worth of other systems such as weapons.
When low on power propulsion can become increasingly slow. Even when you redline the engine you'll find yourself crawling. This is not good if your trying to give chase to an enemy carrier or evade incoming fire. So try and keep propulsion at 100% at all times. Other issues with low power include slower strike times, slower elevator and crane speeds and far greater repair speeds. Yes its true, low power really does drag everything down. But how do we manage this? Simple, with the switch board!
The panel beside the power monitor located on the port side of the bridge has six buttons, but one is the master switch so we'll ignore him and call it 5. These buttons are "Repair, Weapons, Propulsion, Radar, Lift/Crane." When loading the ship we can toggle these on and off to cut power to certain systems until we need them. You can use this to pause the launch or recovery process indefinitely to gain a small boost to speed or to shut down the repairs system while you fend off an attacker.
We can get more creative with this feature. Say for example we're really sad and running away from the enemy carrier after getting our teeth pushed in!
We'll need to stay on the helm to evade our pursuers. but from here it's difficult to toggle on and off our defenses and when they ARE on we're suffering a huge speed cut. we need to manage these systems efficiently AND quickly. Well thanks to the "Weapons" breaker you can! It can be reached while using the helm meaning you dont need to stop driving to toggle it, and the RADAR can be clearly seen from the helm and will beep when incoming missiles are close enough to be countered with the CIWS. In this way the Helmsman can be a major asset during an escape, or you can have some fun having a myocardial trying to micro manage your power systems!
Now that you understand how to manage your power you will probably survive a little longer in a tail between your legs scenario.
Ground Units


I dont really use them ¯\_(ツ)_/¯
You can uhh.. park a ground vehicle on the carrier if your REAL careful with a petrel. its iffy but once its up there it looks cool and you can even use it to shoot at bad guys, now that we have mules we can sorta keep one up there indefinitely.
Real talk I find that the game does not really encourage the use of ground vehicles. If going in with a ground team is fun for you then by all means continue to do so. But I personally find it very boring waiting three minutes for the ground team to clear a hill just to run out of ammo. The thought of adding mules to the mix does nothing but further frustrate matters. As such I play almost exclusively aircraft and only occasionally do a little pounding with a bear or maybe a walrus if im feeling flexible.
I have only two tips applicable to ground forces.
1. The turret of a walrus, seal or turret is a weak point. Hit them to do big damage.
2. Flares can be attached to ground forces and act the exact same on the ground as in the air. No more IR missiles killing you, I have not tested to see if this can be used to give the petrel proverbial flares, but I will now that I'm thinking about it. I'll probably not keep you updated : )
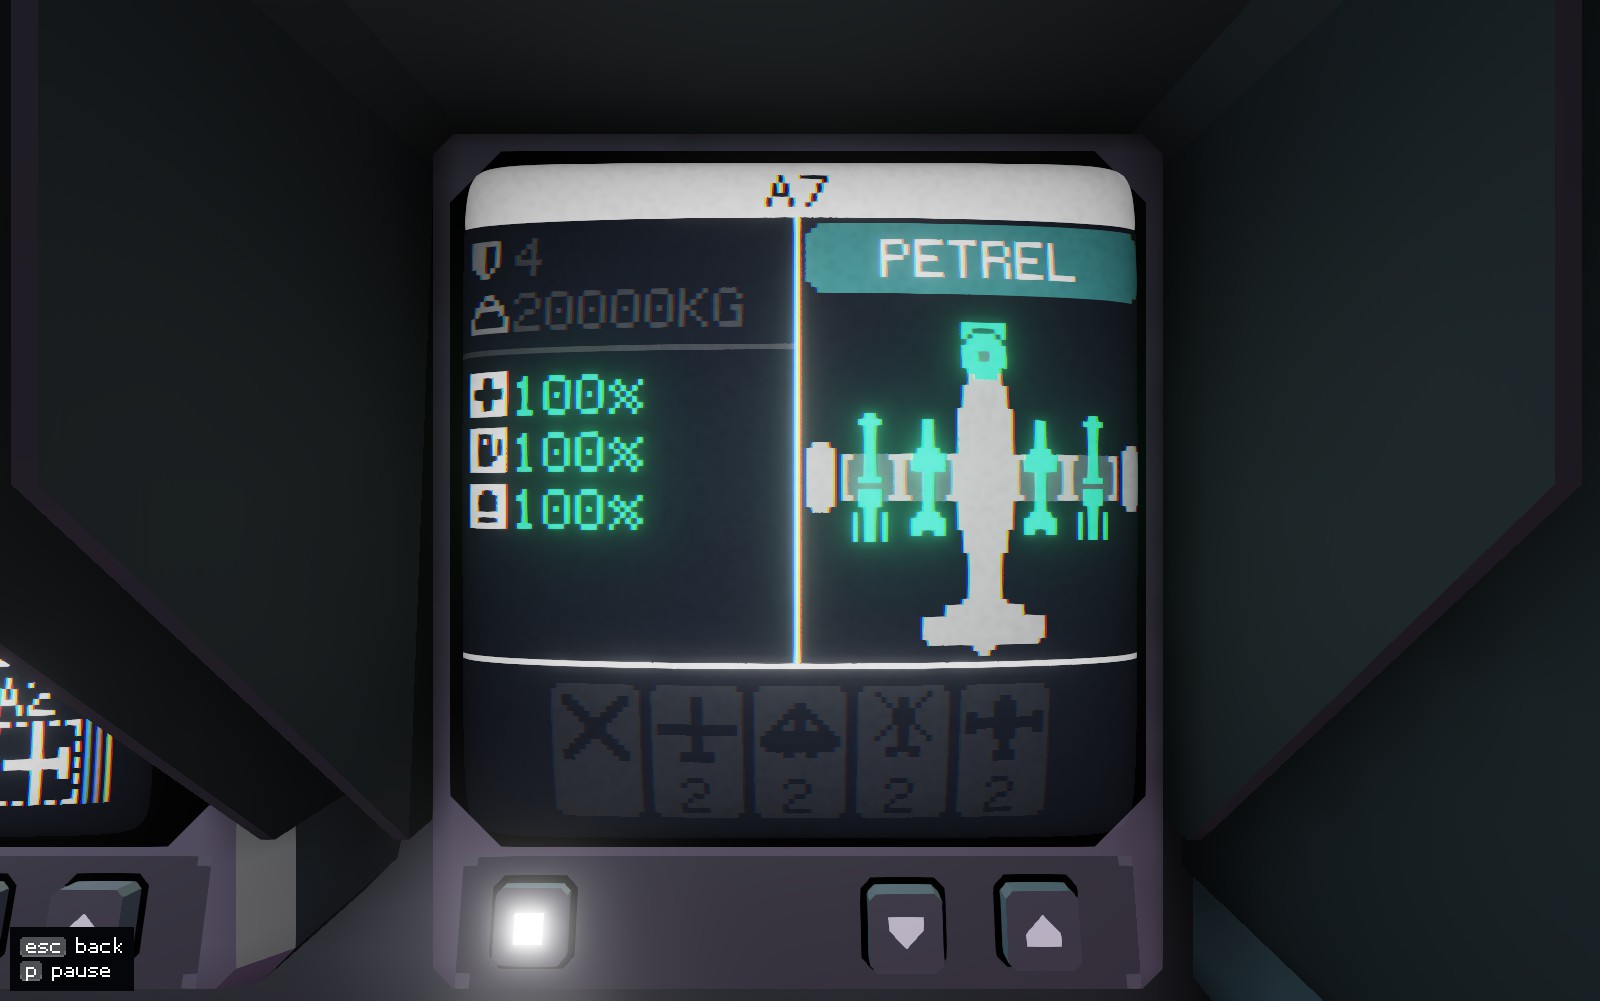
In the interest of filling out this section with anything of note. Chassis have armor ratings : ) These dont seem to follow any set system other than how many times I have to shoot you with a 30mm for you to go away. The stat is visible above the weight in the equipment screen. Also chassis have weight, their weight is (I think) actually part of the simulation as bears are far harder for petrels to lift than seals and behave more weighty when on the ground.
Fun fact: I actually prefer tanks to planes IRL, I'm not sure why I always find myself flying.
THYME! (just A Dash)


(NOTE: I forgot this in the original, dont worry im sure I'll forget and retroactively add more again :) )
Bet you 100 steam points your bridge rarely looks like that. Dont worry me too : ( With that many players almost every aspect of carrier commanding was taken care of at all times. we had crewmen scouting islands fully tagging and IDing targets bombing enemy boats, driving the carrier and replacing munitions as they were spent. It really was the peak of carrier command for me and if your still on the fence about multiplayer it may be dead at the moment but I really do recomend jumping in with some strangers and giving them a chance to show you what they've got.
But this section isn't about your odd avoidance of strangers, this is about time management! See my bridge rarely looks like that too and at best I'm lucky to find a second person to play with, that means a lot of the time I'm on my own fighting to keep the ACC OMEGA afloat. I've had lots of time as you know to develop strategies to work around these long pauses and I'll share them with you.
Firstly I recomend attacking islands from an islands width away. It can be very hard to manage a ground team while also using the carrier gun to swat errant seals that get too close while also firing off AA missiles all while you spot targets from an AWACS. Of course thats really a worst case scenario but still anything can shake up and you want to be in the absolute safest position possible, nowhere is as safe as an island south of the area of operations.
I'd also recomend you break your attack into three distinct "phases" in phase one you need only an aircraft with a camera but maybe some bombs and a radar. Phase one is all about prepwork. Like getting laid your goal is to penetrate the target and drop your payload, but to do that you gotta gotta gotta do some prep. Using your gimbal cam spot the targets on the island and if needed bomb enemy boats and aircraft. I recomend carrier cruise missiles for taking out planes and a jet bomber to deal with enemy boats if possible, where impossible try and gather as much actionable intel as possible that is enemy numbers, boats, turrets and always keep the shield rating in mind as it determines what and how many are on the island.
When your confident in your work you are free to move to phase two! This is the fun part where you'll be sending in your away team. In my case its usually aircraft but you should plan to suit your needs. With few or prefferably no enemy boats left you can sail closer with impunity but keep deep water vs shallow water in mind when doing so. This consists of everyone you need to kill whats on the island. This should NOT contain your virus carrier, that comes later : D.
Finally comes your capture team in phase 3. While they SHOULDN'T need an escort since in phase 2 you killed everyone on the island, if you aren't feeling confident in your work you can send a friend with him to oversee the capture operation. Just remember that the more you send in the capture team the more you'll have to recover which does have a bearing on how quickly the mission can be completed. While the enemy carrier is sluggish at his fastest you ARE against a clock.
Time management in relation to an attack is a big part of your strategy and cognizant of it or not you too have developed a strategy for this, maybe its more elaborate than mine or maybe its less elaborate. By splitting your attacks into phases though and with a good compliment of aircraft you too can enjoy pulling off things like this.
Heres a super secret speedrunning tip that every logistic specialist worth their salt should know. A seal chassis costs 500 dollars A brand new virus pod is 200 dollars. If your carrier is already stocked with supplies you can spend 700 dollars to capture the island make back a meager profit of a hundred or so credits and speed up recovery by not recovering the seal you sent to capture the island. While this is not an economically efficient strategy it can be worth it if your looking to blitz to a certain island. Ground vehicles do not explode on contact with the floor when the fuel gauge is empty so you can always return to recover your seals if supplies thin out.
Heres another tidbit for you! I know you've noticed that a lot of the game is spent going from island to island. Dont let that time be time wasted! you should wait to do your logistics home work until your between islands. This gives you something active to do and allows you to focus your attention on dispatch and recovery as well as scouting. If you do find that your logistics dosn't take the whole 3 hours and 38 minutes it takes to drive the boat seven miles to the east, consider launching scout aircraft before you depart and recovering them on arrival.
Lets quickly go over an example of how to manage our time so we can better put what we've learned here into practice. If theres anything to take away from this its good time management skills, dont do everything at once.
- Firstly we park our carrier at the nearrest friendly island to keep it out of harms way and give us infinite time to work.
- Next we dispatch scouts and anti-ship bombers. Our scouts will tag targets around the island and spot boats. We'll use our bombers to destroy these boats before putting our scouts over the island. We can also bomb the airfield while we're here to get rid of enemy aircraft ahead of time.
- Then (assuming you want to be close) we can begin our approach. We check the holo map for a heading and set course for the island we're attacking. While we're between islands we can go to our logistics terminal and manage our supplies as needed.
- The second to last step is upon arriving to dispatch whatever kill teams we see fit for the situation. Remember if your launching aircraft to bomb the island that they can be sent ahead of the carrier and you'd only need to get close if you intend to deploy ground teams manually.
- Finally once the island is all clear we can begin capture operations. While the seal is transporting the virus bots and our away teams are recovered, we can send another scout bomber to the next island on our list.
Doing things in this order we are always making forward progress in our campaign and we as players always have something to do. Despite being constantly busy you'll notice we never have more than one thing to do at a time. At no point are we rushing to fend off enemy aircraft while giving the away team orders nor are we trying to cram our logistics all at once because we're suddenly out of ground radar. I highly recommend finding a way to compartmentalize your tasks like this as it goes a long way to avoid being overwhelmed. Things CAN and WILL go wrong and throw you off your feet so make sure you give every task your full attention.
(been a while since there was a pretty picture)
DUAL CARRIER PROTOCOL!
OH CRAP THERE WAS AN UPDATE AND I NEEDED TIME TO PLAY IT A BIT OR SOMETHING!
I dont have much to say in this regard so heres some quick tips and no pictures >:^(
- You can move supplies between the carriers by sending an aircraft between the two and taking the things off of it. Keeping an albatross onboard is a good way to quickly move a few things around. (For example if carrier A has rocket pods and carrier B has rockets but no pods, Carrier A can send pods to Carrier B by sending over an aircraft with the right equipment.)
This can be expanded by sending a petrel with a ground chassis in tow if the receiving carrier has the space.
- Its critical to keep the BOYZ(tm) informed about whose talking to who. The best way ive found is to preface your statement with ("Carrier 1") or (Carrier "3") etc. This way everyone on the team knows to listen or ignore your comment. Things will get loud and noisy at times, KEEP YOUR COMMUNICATIONS CLEAR AND CONCISE! Instead of saying "Hey man can you spot that turret on the island?" consider "Hey bob, can you spot the turrets on Vulcan?"
- Carriers can and SHOULD specialize their equipment for certain tasks. This means that carrier A may be stockpiling torpedoes bombs and jets while Carrier B stockpiles petrels, chainguns and IR missiles. This means that when engaging enemy carriers the allies will have the proper supplies to cover one anothers faults. This definitely should not be done to the detriment of any carrier, if A cannot attack islands then they'll be bored and useless. Instead this should happen in the background.
- With two incomes much like two Christmases you have a lot more funds to spend on stupid stuff. Consider tossing the economy out the window and chucking seals with radars into the ocean at regular intervals. these "Boueys" of sorts will act as early warning against enemy carriers and more importantly force them to render and thus give you more time to defend islands or intercept the enemy carrier.
Finally, tell me all about your stupid silly tips and tricks so I can appropriate them and present them as my own without needing to play the game :^D
Things Im Not Sure How To Organize


I'm gonna be perfectly honest with you this guide has been a stream of conscious and im sure it shows. Things are plastered here and there with no regard for readability and so if you've made it here thank you for reading this over! I made sure to include pictures so that its easier to follow, everyone likes pictures!
Before we finish up I'd just like to give a huge shout out to the entire CC2 community and everyone I've personally gotten to play with. Your all great and good fun except the few of you that aren't but in that case I still think your cool cause you like(d) a really cool strategy game. Its thanks to you guys that I have the skills and knowledge that I do and without your help I doubt I'd be half the captain I am.
Theres no real way for me to shift to it so did you know that the top speed of the needlefish is 70 or 80 knots? Not sure which and I dont usually buy them so I couldn't tell you. What I can tell you without a doubt is that they are slower than the carrier. So if your escorting a small fleet you cant redline or else you'll leave them behind.
These little blighters used to religiously and reliably flip themselves upside down on the deck when landing. It was so bad that one of the first updates to the game "Fixed" the issue. After which I booted up the game only to find that my first razorbill immediately flipped itself when landing. 10/10 bug, really miss it.
Are you aware that the CIWS used to be OP? It held 1,000 rounds not 100 and could deal big damage to ground units. Its since been adjusted : ( The CIWS is not worth bringing on a ground attack mission as its woefully under equipped to defend against more than four missiles which could be acomplished by just bringing a flare launcher. It'd also be cheaper since 4 flares defend against a missile. BRING BACK OLD CIWS AMMO! I YEARN TO CREATE NO FLY ZONES AGAIN!
A single carrier missile launched at the middle of the structure will blow up all the air chassis in an islands airbase. You can target them with your AWACS from 2KM up and they'll never sortie after you... most of the time, so long as you aren't spotted.
fully laiden petrels have a maximum range of roughly 25km. This is by no means definitive but anything within 25km of the carrier is complete fair game. A fully laiden Petrel can also catch and keep up with the carrier at redline, that is to say that you dont need to STOP the carrier to recover petrels. They're faster than they feel.
Incase your having trouble aiming the 20mm chaingun, keep track of your current heading. Your velocity is imparted to the bullets, so if your moving forward and up you need to aim below the target to hit them, if your moving down you'll need to aim above them. Practice makes perfect.
If you leap ontop of them when they're on the lift, you can ride an aircraft around. Its kinda iffy but if you wanted to pretend your in the 101st you can totally catch a ride.
On the subject of useful tips, avoid Laser guided and TV guided missiles. They sound useful but in practice they're interchangeable and expensive. While Laser guided missiles arguably help because you can bomb bad guys from the sky to support the ground team, if your not role playing as a helicopter in warthunder these missions could be accomplished by IR missiles or just about any other system.
Heres a super fun fact you might like! Torpedoes travel slower than a carrier at full red line (~100 knots) you CAN in theory and with good conditions outrun a torpedo. Carrier surface speed is determined by the ocean currents and the wind. If both are on your side the carrier can absolutely blitz through the water, but also bear in mind the carrier must compete with waves the torpedo does not.
IR missiles will track the nearrest enemy if not given a target lock before launch. This means IR missiles can be launched in LOBL and LOAL, and you diddnt even need to know those were real terms : D AA missiles do something similar and at launch IIRC were interchangeable with IR missiles in terms of in game application.
A useless bit of trivia, you may have seen otudated guides explaining how to, but it was possible at one point to board the enemy carrier. Once there you could set the self destruct sequence on it causing it to kill itself for no reason. Unfortunately it wasn't really possible or as easy to steal the carrier, but we were happy enough with self destruct. Geometa if your reading this PLEASE FOR THE LOVE OF GOD BRING IT BACK! IT WAS SO FUN PLAYING PIRATES OF THE CARIBBEAN!
You can't take manual control of an aircraft if a friend is using the gimbal camera, but you can use the gimbal camera if a friend is in direct control. Respet the order of operations I guess? Maybe it was just a bug but I vividly remember.
Enemy carriers will pretty much ignore ground vehicles in the water. If the carrier is chasing you, deploy as many bears as you can find. They can and will blow up the enemy carrier in a hand full of shots. This is by far the most fun way to fight a carrier.
Source: https://steamcommunity.com/sharedfiles/filedetails/?id=2944057402
More Carrier Command 2 guilds
- All Guilds
- Delta Fleet Special Operations Manual 2024
- Cheatsheet
- Update 1.2 - Starter Guide (PvE)
- Team Color Science, Part Deux: How to play as ANY team as the host!
- How to create a map with only level-one islands
- CC2 Land and Air Vehicle Information
- Guide 17
- Maybe the carrier is not the real enemy after all...
- Basic Carrier SOP