
What Is A DMZ?
DMZ is a PvPvE mode with elements of Extraction Shooter. A significant part of the local gameplay is related to the search for items in a variety of places, crafting, as well as exfil with a match to receive additional rewards and, accordingly, high penalties for the death of a character.
This mode is actually a part of the free Warzone 2.0 (now called simply Warzone), and technically the game is tied to Call of Duty: Modern Warfare II (2022).
"Technically tied" means that the game has adopted weapons, operatives, and relevant mechanics from this game.
And it will have no connection to Modern Warfare III (2023)
Maps
There are several maps in DMZ, some of which are also available in Battle Royale, Renaissance, and so on, and some are unique to this mode.
Al Mazrah
Map size is extremely largeMaximum number of players — 20 trios (<60)Bot threat level — low to highPlayer threat level — moderateMaximum match duration — 25 minutes + 7-9 minutes of radiation
The largest map of Warzone and, accordingly, the largest map for DMZ. It also has the largest number of relevant elements: the number of bots, contracts and their variety, equipment, closed places, etc.
Ashika Island
Map size — mediumMaximum number of players — 6 trios (<18)Threat level of bots — low to mediumPlayer threat level — Battle Royale "with extra steps"Maximum match duration — 20 minutes + 6-8 minutes of radiation
A small map, but often with an extremely high level of PvP. So high that most players who come here have only one goal - to kill everyone else.
There is a rather dense fog that prevents you from seeing the entire map.
The map has a relatively compact size, a small amount of equipment, and a moderate number of locked rooms with good loot. It also has a certain number of specific items that can be found exclusively on this map (they are required for certain missions and upgrades).
Vondel
Map size — mediumMaximum number of players — 6 trios (<18)Bot threat level — low to very highPlayer threat level — moderate to highMaximum match duration — 20 minutes + 6-8 minutes of radiation
The map is medium-sized and, unlike the previous ones, very rich with architecture. Despite the fact that the bots here are usually unarmored, their weapons are more dangerous than their counterparts in al Mazrah, and there are also significantly more of them. That is why the level of PvE danger can sometimes even exceed the level of PvP danger.
The map provides quite a few opportunities to interact with water.
As on Ashika Island, there is a dense fog that makes it difficult to see over very long distances. It is very rich in a wide variety of loot, which is why many players come here to restore their character after a defeat in the previous match.
The map also has some of the best closed places from which you can get quite specific loot and more.
Building 21
Map size — very smallMaximum number of players — 4 trios (<12)Threat level of bots — deadlyPlayer threat level — Battle Royale "with extra steps"Maximum match duration — 13 minutes + 3 minutes of radiation
A special map of the "close combat" format.
Usually valid from Friday evening to Monday evening (depends on your time zone). In order to be able to enter it, the player must have a special key card "Building 21 Access card" in the key stash. You don't have to add the key card to your backpack or have more than 1 of them.
You don't need it if you are going in a team of 2-3 people - in this case, only the leader of the team should have it.
An extremely tough place both in terms of PvP and PvE. There are almost no unarmored bots, battles are fought mostly at short to medium distances, and many enemies are armed with shotguns and even grenade launchers.
The same applies to players. The most popular are the 6-round RGL grenade launcher and the KV Broadside.
Koshchei Complex
Map size — mediumMaximum number of players — up to 4 teams of up to 4 players (<16)Threat level of bots — very highThreat level of players — others appear there quite rarelyMaximum match duration — 30 minutes + 6-8 minutes of radiation
A unique place for a DMZ, as it cannot be accessed directly from the map selection menu. To do this, you must first get to al Mazrah and then use one of the 4 available entrances. After that, the game will pick up all the players from the same team who will be near the airlock and after a certain time will load them on a new map.
You can read more about this complex and its features in the corresponding manual:
https://steamcommunity.com/sharedfiles/filedetails/?id=2977305493
Choosing An Operator

Before going into battle, you must first create/select a character.
All players have 3 operator slots available from the start. You can add only one unique operator to each of them. For example, you cannot have two captains Price or Ghost in two slots. However, once you have chosen a particular operator, you can change his or her specific appearance to any other available one at any time outside of the match.
You can increase the number of operator slots only by purchasing certain sets with bonuses for DMZ.These sets can contain the following DMZ-related items:A specific operator appearance with a specific bonus
Operator slot
A weapon blueprint that reduces lag for a certain amount of time
You can find out more about what paid bundles with the same bonuses exist, how much they cost, and what they offer in this guide:
https://steamcommunity.com/sharedfiles/filedetails/?id=3024222822
Unfortunately, there is no way to increase the number of slots or get a DMZ bonus skins for free.
The only "free self revive" option with the next skins:
"The Masked Knight" for Alejandro
"The King" for Captain PriceThey could be obtained from the Modern Warfare II Season 5 Battle pass
https://steamcommunity.com/sharedfiles/filedetails/?id=3040994256
Each operator will have 5 special cells:
Backpack
Killstreak
Body armor
Gas mask
Self-reviveThere is also a separate item as a token that is tied to the operator and does not require a special cell.
And they all share a common space in the backpack. That is, the items that were in one operator's backpack are automatically transferred to the other operator's backpack when they are selected.
This issue can be solved by moving a special item to the Cache.
Stash


The following items can be moved to the Stash:
Keys
Key cards
Mission items
Contraband weapons
Cash
Only these items will not be converted into experience after successful evacuation and will remain in the player's backpack. All of them, except cash and weapons, have a special blue background.
Keys
Keys are special items that allow you to open certain locked objects, rooms, or even entire buildings. Each opening consumes a unit of key durability.
You can learn more about the keys, where these secret places are and what loot is hidden in them in this guide:
https://steamcommunity.com/sharedfiles/filedetails/?id=2963718102
Key cards
The principle of their events is similar to the above keys, but they have a card model.
There are 2 key cards that differ in mechanics:
Stronghold keycard — it allows you to open an unlimited number of Stronghold doors
DRC Building 21 Access card — presence in the Stash allows you to get to the map "Building 21" (when it is available to everyone)
Mission items
These can be a wide variety of items with a blue background. They are necessary to complete a particular mission, and in case of a successful evacuation, copies of them are provided to everyone else in the team if they did not have this item.
Contraband weapons
Any other "uninsured weapon" that was successfully evacuated during the exfil becomes a contraband weapon - it can be a weapon from a chest, crate, bot, or another player. In the event of a final death in the match, you permanently lose it, unlike the Insured Weapon.
Insured Weapons

This is a custom weapon that each player can use in the game.
To use it, you need to select it through the corresponding cell. There you can also select any available modules, accessories, camouflage, etc.
In addition to the fact that the player can change the weapon modules outside the match, if the weapon is lost for any reason, the process of restoring access to the cell will begin. The weapon will not be permanently lost and can be replaced with any other available weapon after restoration.
In total, the player will have up to 3 slots of insured weapons and the recovery of each subsequent cell is twice as long as the previous one.
However, this process can be significantly accelerated, namely:
by throwing money, valuables, and other weapons into the dead drop during the match
using special weapon blueprints that provide additional acceleration
upgrading the StashYou can learn more about where the dead drop is located and how it works in the following guide:
https://steamcommunity.com/sharedfiles/filedetails/?id=3026731762
Missions

There are several factions that offer a variety of missions of their own:
White Lotus
Black Mous
Shadow Company
Legion
Crown
In order to unlock access to some factions, you need to complete several separate quests. After completing them, each faction can offer the following:
Daily task
Weekly mission
The mission
Story mission
Each faction has a specific list of missions for a particular tier: 6 regular missions and 1 story mission. In order to move to the next one, you need to complete the story mission, but you need to level up your faction to make it available.
For completing a regular (unchanged) mission, the player can receive a variety of items - from contraband weapons to Double XP tokens, as well as a certain amount of experience of the level of the corresponding faction.
For completing the storyline mission, the player will get access to a new tier, as well as a more significant reward. Each faction has a total of 5 tiers and the rewards for completing the respective story missions are as follows:
Тир місіїShadow CompanyBlack MousWhite LotusPhalanxCrown1Blueprint "No prisoners"Loading screen "High Alert"Loading screen "Eliminating targets"Blueprint "Honor and glory"Loading screen "No time for last words"2Amulet "Brass knuckles"Emblem "Sending signals"Emblem "Aim down sights"Amulet "Spartan glory"Emblem "Barbed Silhouette"3Decal "Of the shadows"Loading screen "Curtain call"Loading screen "Lunar patrol"Vehicle skin "Revolution's wave"Loading screen "Louder than words"4Emblem "Falling chips"Calling card "Neon revolution"Calling card "Trail of bullets"Blueprint "Shield wall"Calling card "Waiting for action"5Blueprint "Rule breaker"Operator skin "Weather proof"Operator skin "Snowplow"Operator skin "Praetorian"Operator skin "Nova Ops"
Upgrades
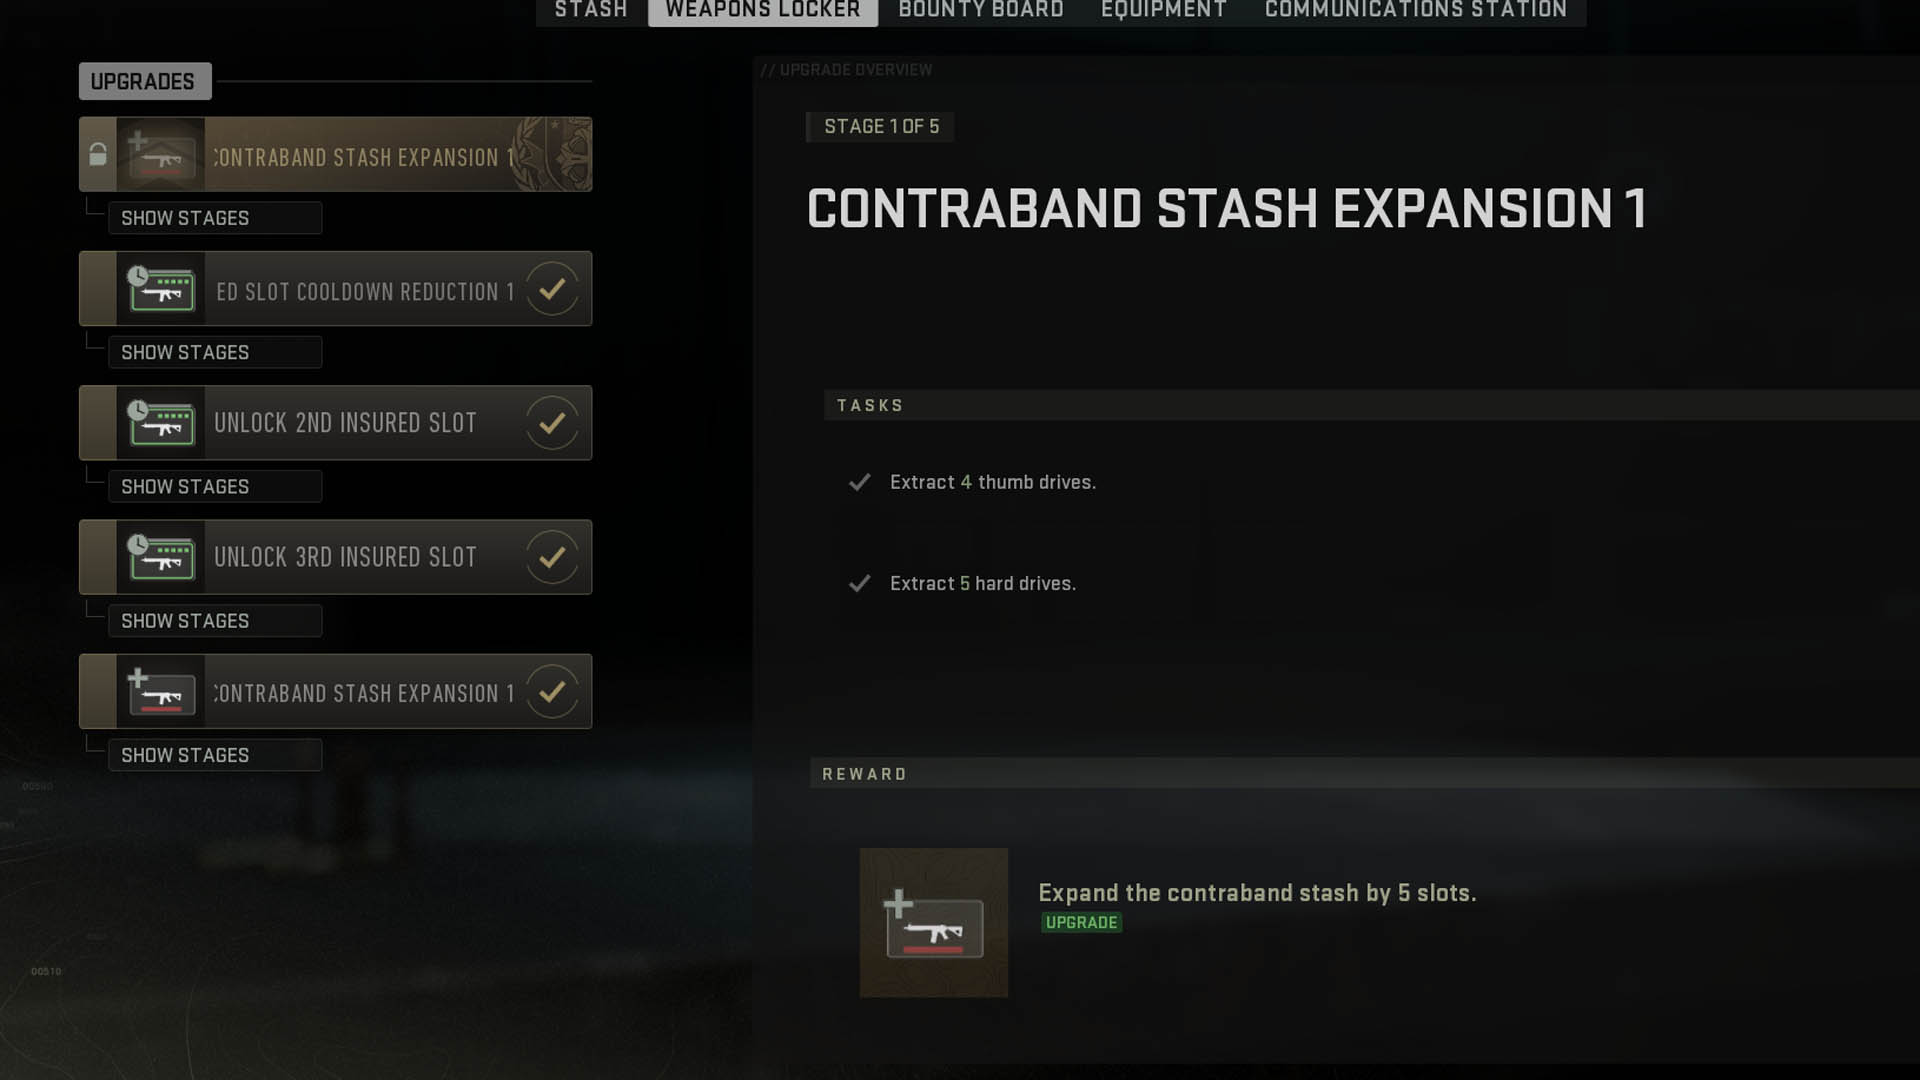
In the "Upgrades" section, the player can perform certain tasks to:
increase the size of the Stash
unlock and expand Wallet
open access to the exchange of certain items
gain access to certain items from the beginning of the match
unlock missions of other factions, as well as improve contracts
You can learn more about each upgrade separately in this guide:
https://steamcommunity.com/sharedfiles/filedetails/?id=2990545248
Bonuses For Modern Warfare II Owners

Players who have purchased a copy of Call of Duty: Modern Warfare II (2022) get the following additional features for DMZ:
additional tasks to improve the Wallet
additional tasks to increase the Stash for keys, items and weapons
a special task that will always reward you with self-revive when playing solo
access to missions of the Crown faction
Contracts
Contracts are similar to those in Warzone, except that there is a much wider variety of them, and the character performs a special "data download" animation.
Although the reward for completing them is not very significant, what they provide upon completion is more important.
Cargo DeliveryUsing the provided LTV, deliver the cargo to a certain point on the map, while simultaneously fighting off the annoying helicopterFree LTV
Cargo ShipmentUsing the provided gunboat, deliver the cargo to a certain point on the map, while simultaneously fighting off the annoying helicopterFree gunboat
Destroy SuppliesDestroy 2 piles of suppliesSeveral nearby safes on the map will be shown
Eliminate HVTSpecial bot must be killedGuaranteed stronghold keycard from it, as well as a random key
Hunt SquadHunt for another teamNo one on the enemy team knows who is being huntedThe hunted team knows the approximate distance to the huntersIf the target survives for a certain time, he will receive a free UAV
Raid Weapon StashYou need to install a drill on the large safe in the StrongholdAbility to open a specific Stronghold without a keycard, and there are many good items in the safe for the whole team
Rescue HostageYou need to free a hostage in a certain building and prevent his vest from explodingAbility to successfully evacuate with the hostage
Secure IntelYou need to find a laptop with a disk in a certain place, climb the nearest tower and wait for the signal to be transmittedThe nearest living Commanders will be shown
Secure Nuclear MaterialsYou need to take a Geiger counter and use it to find radioactive cachesIn the caches there are radiation blockers, gas masks, and the radioactive rods themselves can be sold
Secure SuppliesThere are 3 special boxes to openIdeal contract for quick recovery from 0More specific items can be found, such as special vests (2 plates)
Signal IntelligenceMust interact with other contractsPerforms very quickly and it is easy money provided over time
Bosses
Bosses are special enemies in the DMZ that can be killed with various rewards.
In addition to direct drops from them, there are also certain improvements for killing them, such as opening a particular exchange, unlocking certain mechanics, and discounts.
You can find out more about these improvements in the guide below, namely in the section "Bounty Board":
https://steamcommunity.com/sharedfiles/filedetails/?id=2990545248
Boss imageHis name and where he can beWhat he has of valueBoss Helicopteral MazrahAshika islandVondelParcel with various rewardsJuggernautal MazrahAshika Island (as a miniboss)AUAVGolden Skull2 or 3 plate armor(if he has it) Weapon caseChemistal Mazrah - radioactive zoneAUAVM13BGolden SkullMedic Vest 3Chemist's Acid ♻️Wheelson turretAshika IslandBuilding 21 (as a miniboss)Nothing, on the island gives you the ability to enter the castle without a key through the main doorEncrypted disks (Building)Black keycard of the BuildingBombmakerAshika IslandWeapon CaseComms Vest 3Bombermaker Screwdriver ♻️CrossbowVelikanBuilding 21RGL-80Stealth Vest 3Pyroal MazrahVondelTempered VestKV BroadsideGolden Skull(if he has one) Weapon CaseScavengeral MazrahAshika IslandVondelAppears only if you drop someone's custom weapon near the backpacks of fallen playersAUAVScavenger backpackTokens of fallen playersWeapon stolen by ScavengerGolden skullRhinoKoschei Complex.50 GSAbility to go to the 2nd floor to the SniperSniperKoschei ComplexVictus XMRLachmann SUBSecure room key (worn)BullfrogVondelSelf-revivesVest 3Bullfrogs blowtorch ♻️Weapon casePossibly a killstreak
Weapons Cases
The weapon case is a special item on each DMZ map that gives certain rewards for successful evacuation.
Depending on the map, there are different ways to get this case, as well as different rewards.
If the player has already collected all possible rewards from a particular map, then he or she will receive an additional 10,000 xp for an additional successful exfil with case.
Be careful, as the owner of the case is shown on the general map of all players in real time.
You can learn more about the rewards you can receive for successfully exfiling a weapons case in this guide:
https://steamcommunity.com/sharedfiles/filedetails/?id=2955775039
Notes
Notes is a specific item in DMZ that has no practical game value and can only be useful for those players who want to dive deeper into the local lore.
https://steamcommunity.com/sharedfiles/filedetails/?id=2993620221 https://steamcommunity.com/sharedfiles/filedetails/?id=2995926791
Dog Tag
Dog Tags are specific DMZ-related items that are tied to a specific operator (and the corresponding slot).
The level of the dog tag indicates how successful the last matches of this character were, and also indicates the approximate number of perks. There are 4 levels of tokens:
Bronze
Silver
Gold
Damascus
In order to improve the tokens, it is necessary to fulfill any contract in the match and then successfully exfil. In this way, +1 will be added to the operator's progress, and he will also receive one of the certain perks. Accordingly, the level of the token symbolizes the successful number of evacuations in a row and a certain number of perks:
Bronze token - 0-1 successful evacuation
Silver token - 2-4 successful evacuations
Gold token - 5-9 successful evacuations
Damascus token - 10+ successful evacuations
Please note:
Fulfillment of more contracts will not accelerate the progress of the token, except for +1
The player cannot have more than 10 perks, and therefore, when reaching the Damascus level, there will be no further increase
In the vast majority of cases, the token is more of an indication of the operator's status than a useful item. There are a few cases where it can be really useful:
Gold and Damascus enemy tokens can be sold for $10,000 and $50,000 respectively
For certain missions and upgrades, you need to exfil with a specific level enemy dog tag, including the Damascus token
You can use your tag to exchange certain items, for example, at the Scavenger's shop or at a special shopping station in Zaya (al Mazrah)
Despite the fact that you exchange this token for a benefit, you do not erase your progress if you successfully evacuate
You can read more about what you can exchange your token for (and more) in the following guide:
https://steamcommunity.com/sharedfiles/filedetails/?id=2961669349
In-game Activities


Bots
There are several factions of enemy bots, namely:
Al Qatala
Shadow Company
KonniAll 3 of them are at odds with each other if they meet, which can be seen only in Building 21.
Also, all bots can be divided into the following categories:
Tier 1 (T1) - armed with the simplest weapons, unarmored
Tier 2 (T2) - armed with more serious weapons, have armor
Tier 3 (T3) - armed with even more serious weapons, heavily armored
HVT - slightly more armored than T3, but exist exclusively for the sake of the contract
Special - this can include helicopters and other bosses
Please note that the armor of bots works separately from each other - a helmet separately and a vest separately. Therefore, alternating between hitting the head and the body will only lead to even more ammo consumption per enemy.
Also, T3 cannot be killed with a single shot to the head from a sniper rifle, thanks to the helmet. However, they can be oneshoted if shot in the neck and upper chest area.
Enemy reinforcements often arrive in the form of both helicopters (light and heavy) or ground vehicles. Bots do not use watercraft, ATVs, or motorcycles.
Camouflage
Sometimes you can find a special item "Disguise" on the map
Activating it from the backpack, the character will have the appearance of a T2 bot, which will give him the following advantage:
Bot aggro is significantly reduced, especially if you drive a car
The duration of bots' suspicion is extended before they realize the deception
Ability to interact with the Scavenger's store (the main thing is not to kill him, otherwise the store will self-destruct)
However, cloaking will not allow you to destroy bots completely freely, as they will quickly realize the deception. It will not help to speed up the reduction of their aggro.
Cloaking will not give 100% imitation of a bot, as the player's backpack will still be on his or her back.
It has a certain level of durability that wears out from taking damage.
Also, the cloak does not protect you from being shown on the UAV tower as a player, not as a bot.
UAV towers
On the same three spacious maps, you can also find UAV towers, which, after a short capture, will show all enemies within a radius of about 125 meters, separately distinguishing both bots (a diamond with a hole) and players (a solid red diamond).
However, the UAV tower will not show a player who is wearing a stealth vest and is not firing a weapon without a silencer.
A tower under enemy control cannot be intercepted until it stops working.
In the first seconds after UAV activation, the tower will emit a Morse code signal ".. -.-. ..-" (I C U, which sounds like "i see you")
Air defense installations
On three spacious maps (al Mazrah, Ashika, Vondel) you can find air defense installations, which are usually guarded by several bots. The process of capturing them takes some time, and you will also receive enemy reinforcements. To take control of an air defense system, you need to be constantly near it.
Once the unit is captured, it will automatically target any air targets, both enemy (troops, boss helicopters) and neutral (cargo planes), for a certain period of time.
A downed cargo plane will drop a large parcel that can be opened by any player.
Radiation
All maps contain radiation in one form or another. The three spacious maps have a separate radiation zone that you can enter. Before it starts to spread, it does a lot of damage to any gas masks.
But as soon as the radiation zone begins to expand, the damage to gas masks will be much less. Also, the evacuation helicopter called during this expansion will have several gas masks on the seats. All other bots that were outside of its zone will start to quickly flee away from the epicenter, up to the edges of the map. The situation on Vondel can be especially dangerous.
Only on Al Mazrah is there any bot activity in the radiation zone itself, with both regular bots and the special boss Chemist.
Almost all of these bots drop gas masks, but to fight a boss on its territory, you may need a special item - a radiation blocker.
After using it, the player will be immune to radiation for 2 minutes, but will still wear a gas mask. You can impose the effect of immunity for up to 4 minutes, but no more.
The blocker can often be found in first aid kits, medical bags, and hospitals.
Buy station and Workbench
There are many buy stations on the map, and each of them (except for the special ones on Zaya and in the Koschei Complex) has a Workbench nearby.
Almost every shop can offer the following assortment:
Unlimited quantityArmor plate
Ammo box
Gas mask
Medium backpack
Medium vest
Personal exfil (if unlocked)
Stronghold keycard OR Self-reviveLimited quantity per storeLarge backpack
Large vest
Killstreak
Keycard for access to Building 21
Other items (depends on the map)
Using the Workbench next to the buy station, the player can add or remove a certain weapon modules for a certain amount of money. A great tool for changing ammo for hunting down mechanical bosses or installing better modules than a missing buttstock on the Vaznev-9K or a 20-round magazine for the Kastov-74u.
At the same buy station, you can also buy contraband weapons (but for what purpose), as well as exchange a certain set of items for more useful ones. For example, for a special vests, backpacks, keys, etc.
You can learn more about what items can be exchanged and for what, in the guide below:
https://steamcommunity.com/sharedfiles/filedetails/?id=2961669349
PvP

The peculiarity of DMZ is that there are several other players on the map and most often they will be hostile to all others.
You will never know for sure what their main goal is - to complete missions, collect certain items, or destroy everything that moves. And if it doesn't move, they can stir it up and destroy it anyway.
No one is obliged to be friendly or "neutral" to the other team, except for two specific points:
You can request to join an enemy team nearby, or vice versa - request to join your team.
A downed player can request to be picked up and an SOS signal will be sent to all players within a certain radius (depends on the map).
However, even at this point, enemies can refuse the offer, or even worse, go to the fallen enemy and take everything from his backpack.
An enemy who has taken critical damage can be interrogated to find out where his team is. The signals of his accomplices (if any) will be visible for a certain time, or until the interrogated person is finally killed.
However, you cannot send a request to the interrogated person to join your team, and vice versa. However, being already dead, he can make a request to be raised, and there it is up to the decision of the player nearby.
Please note - the stealth vest PROTECTS against showing enemy players on the map when interrogating an ally
The mechanic of assimilation does NOT work in Building 21 and the Koshchei Complex.
Also, please note that from now on there can be no more than 4 players per team. Mostly due to this relatively recent change, a significant number of players are not able to raise anyone at all, including a true solo player.
Anyway, if you want to survive:
Turn on subtitles and always watch out for the message that you are in range of an enemy UAV
Always keep a plan B in mind in case of a sudden fight that can potentially happen at any time
Enable access to the general voice chat, but keep the information silence yourself. A very large number of players make noise into the microphone, which allows you to respond to potential danger in advance
Don't be a cheapskate and be prepared to use UAVs or AUAVs in response to threats to you or your team. It is better to use and regret than NOT to use and regret
Remember the "fight or flight" rule. It is often easier to just run away and force the enemy to play on the edge of the blade (for example, to be at the very edge of the map) or retreat to a building/place from which it is better to defend
Never underestimate the enemy until the enemy operators are completely gone (and only their backpacks will remain). There may always be an enemy with a stealth vest nearby, which is not visible even with AUAV
📝 Other MWII / DMZ Guides


Modern Warfare IISeason 1
Season 2
Season 3
Season 4
Season 5
Season 6
https://steamcommunity.com/sharedfiles/filedetails/?id=2890174117
🔄 Barter system in DMZ
🧰 All awards for weapon cases in DMZ
💀 All about the Koschei Complex in DMZ
⚙️ All about passive upgrades in DMZ
💰 All paid bundles with bonuses for DMZ
♻️ Location of all dead drops in DMZ
🔑 Ultimate guide about KEYS in DMZ
✍️ All about LORE NOTES in DMZ
📝 Texts of lore notes in DMZ
🐍 How to unlock the secret Serpentine camo in DMZ
https://steamcommunity.com/sharedfiles/filedetails/?id=2892218858
KO-FI (USD)[ko-fi.com]
Donatello (UAH)[donatello.to]
Source: https://steamcommunity.com/sharedfiles/filedetails/?id=2892218858
More Call of Duty: Modern Warfare II guilds
- All Guilds
- The Tomb
- Story Quest The Tomb
- BSOD crash FIX
- HOW TO FIX BO6 STUTTERING
- Black Ops 6 Tomb Easter Egg Ultimate Guide
- [Black Ops 6] The Tomb
- The Tomb - Easter Egg
- THE TOMB
- HOW TO DO "THE TOMB" BLACK OPS 6 ZOMBIES EE (and other easter eggs)
- THE TOMB - EASTER EGG GUIDE Zombies