
Why Play Imrik And The Knights Of Caledor Faction?
Imrik is by far my favorite High Elf legendary lord.
He's got a huge, powerful pet dragon mount, and he can obtain 5 other legendary dragons for his regiments of renown.
His starting position is precarious and challenging and therefore a lot of fun.
He can be turned into one of the tankiest lords in the game, single-handedly wrecking whole armies.
Imrik's Starting Situation
Starting Position
Imrik begins far from the Ulthuan High Elf doughnut.
He's surrounded by unfriendly and outright hostile factions, including two very active Skaven clans:
To the North is Clan Rictus led by Tretch Craventail.
To the West is Clan Mors, led by Queek Headtaker.
To the East are some Ogre clans, Vampire Counts, and Nurgle.
Starting units and starting traits
You begin with a Sun Dragon and a unit of Dragon Princes, which are very good startng units.
Imrik starts out the game with a horse mount and a purple unique weapon.
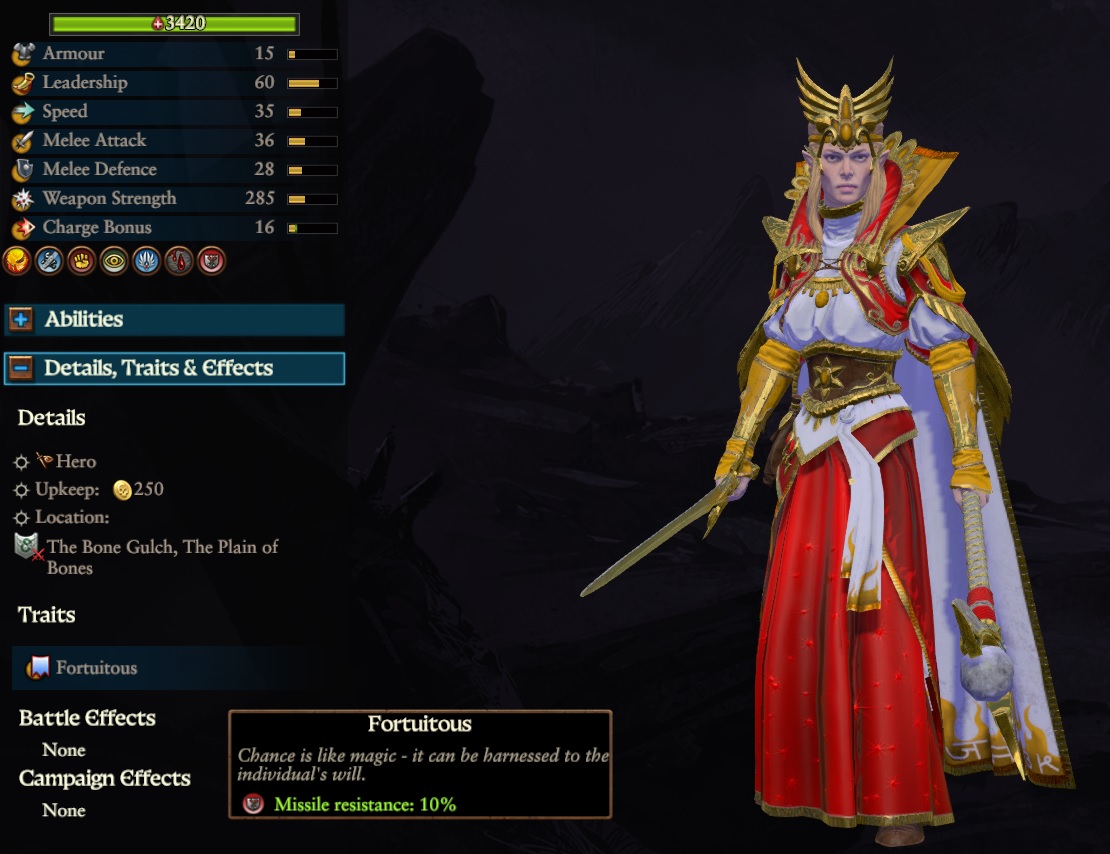
Even more importantly, you start with a Fire Mage, Mikaela. Her starting trait is random, and none of them are particularly great.
Probably the best of her starting traits is either "Primed" (Miscast base chance -10%; Spell Targeting Range +10%); "Fortuitous" (Missile Resistance +10%); or Resistant (Melee defense +3, Spell resistance 5%, and Missile resistance 5%. All of these resistances apply to the hero's army.)
The higher tier traits (i.e. "Incendiary" and "Protected") are not available to start.
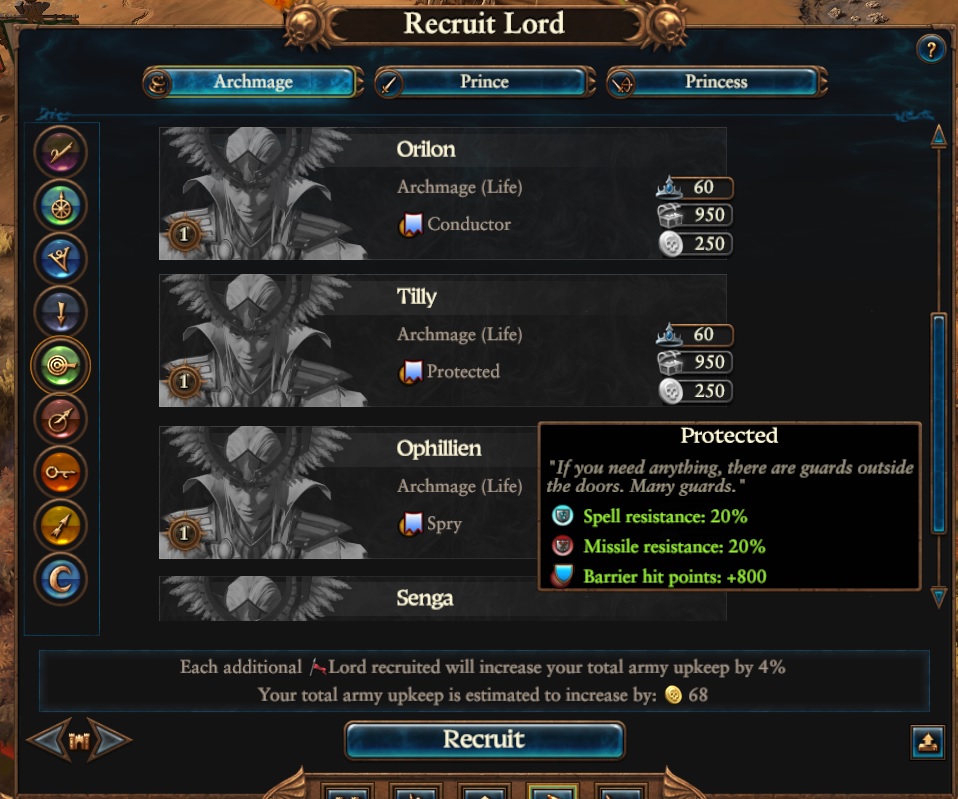
More important than your starting trait for your Fire Mage is the starting trait for a Life Magic Archmage Lord. When I start the game, I like to check out the available Life Magic Archmages and see if there is one that has either the Protected or Incendiary traits. (You can't recruit them immediately because you don't have enough influence.)
Being the sort of obsessive compulsive person I am, I tend to restart the game until I get the traits I want at the start. You certainly don't need to do this, however.
The best traits:
Diplomacy Is Essential
Imrik is in a somewhat precarious position. While Imrik is quite strong, he can't be everywhere at once. If you expand rapidly, you will end up with enemies in all directions, and you won't be able to defend your territory. With aggressive Greenskins in the North, Ogres, Vampire Counts and Nurgle to the East, and Clan Mors to the West, you can easily get overwhelmed by hostile armies.
It is important to expand slowly and deliberately. I generally try to hold only two full provinces to start; The Plain of Bones where you begin the game, and the Desolation of Azgorh just to the North.
Anything I capture that is not in these two provinces, I give away in exchange for money and/or treaties. I try to build buffers of land held by friendly factions around my core holdings.
For example, when fighting Tretch Craventail, you will probably capture Mount Silverspear. It's best not to keep it. Give it to the Karaz a Karak Dwarves in exchange for a non-aggression pact. If I can't trade it to the Dwarves, I will sometimes just sell it to Skarsnik for several thousand in gold. You can always use that gold to build an army to attack Skarsnik and take back the territory he just bought from you.
Greesus Goldtooth on the East makes a good buffer. Give him the Black Fortress and The Sentinals in exchange for a defensive treaty. Try to get the Karaz a Karak Dwarves to create a Northern buffer by giving them the Tower of Gorgoth and Mount Silverspear.
With your Northern and Eastern borders secured, you can focus on the West and Clan Mors, which is probably your greatest long-term threat.
Keep a close eye on your allies and help them out if they start to get in trouble. The stronger they are, the more secure your borders will be. When playing as Imrik, I spend at least half of my time fighting for territory that I plan to trade away to allies.
The strategy is to build tall, not wide. Focus on improving your two main provinces, boosting growth as much as possible.
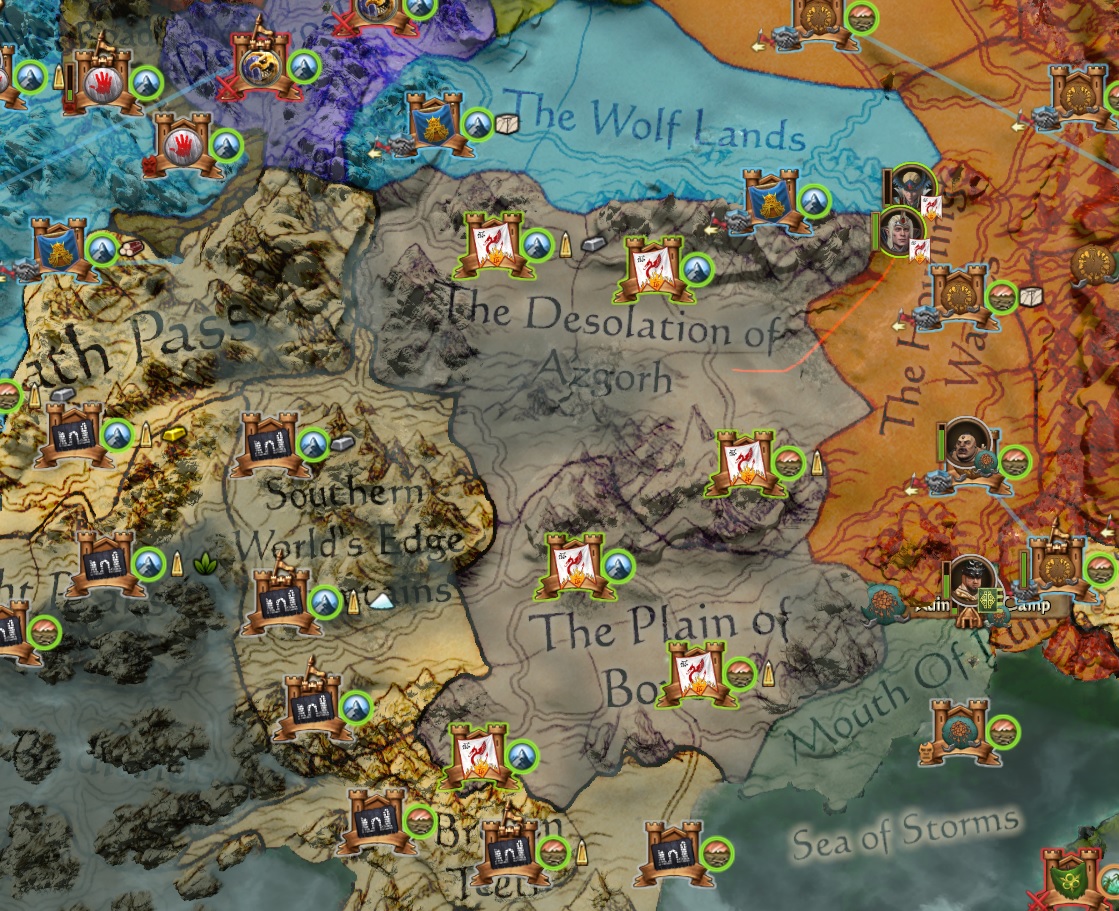
Here's an example of building a "buffer" through diplomacy. Note the Karaz a Karak Dwarves sealing off the North, and Goldtooth Ogres to the East. These buffers allow me to focus on fighting Clan Mors to the West.
What To Do In The First Few Turns

Eliminate the Helhein Dwarves
Imrik's starting enemy is the Clan Helhein Dwarves.
They're pretty easy to crush.
Take The Bone Gulch and Ash Ridge Mountains, and you've got full control of your home province.
Eliminate Tretch Craventail
Clan Rictus, the Skaven clan headed up by Tretch Craventail, is headquartered at Crookback Mountain, to the North of your starting province. They are at war with the Greenskin Moon Howlerz faction. It's best to head North and fight Tretch while he's still distracted by these Greenskins. If you wait very long, the Skaven will destroy the Moon Howlerz, and you will have to face the Skaven threat alone.
Approach cautiously, using the "encamp" stance to avoid getting ambushed. When you decide to strike, use diplomacy and have the Greenskins pay you to join the war against Clan Rictus.
If you can isolate Tretch's army and attack it on its own, this will be the easiest path to success. Besieging Tretch inside of Crookback Mountain is a difficult battle. If you can eliminate Tretch outside of the city, the Crookback Mountain garrison is much easier to deal with.
Usually, Clan Rictus will hold both Crookback Mountain and Mount Silverspear. Once you've rooted them out of these holdings, you can focus on eliminating the Greenskin Moon Howlerz.
Here's a typical army on Turn 6, after the Dwarves have been defeated and right before setting off to attack Clan Rictus.
Use the Invocation of Eldrazor
The Invocation of Eldrazor provides significant experience buffs for Imrik. You want to level him up as soon as you can, so an experience buff is a good thing. The negative for this invocation is that it gives you bad relations with other High Elves. So, you should do it in the early game, as you have not yet encountered any other High Elf factions, so the negative relations with High Elves won't affect you.
What Buildings To Construct? What Units To Recruit?
In the Fortress of Vorag, I build a Rally Field so I can get access to Lothern Sea Guard as soon as possible.
I upgrade it to the War Hall when I can, to allow for recruiting Lothern Sea Guard with Shields and Shadow Warriors. The stalk ability of the Shadow Warriors makes them very useful for capturing victory points in sieges and sneaking up on the enemy's exposed flanks.
It's also useful to build the smith building that gives access to the Reaper Bolt Thrower artillery unit.
Other than that, I prioritize growth buildings.
The Tower of the Bloody Tooth is a unique building in the Fortress of Vorag. I don't bother building it. It provides very little benefit.
The unique landmark building in Darkhold, the Graves of the Dragons, is worth building. It provides access to Dragon Princes at tier 3, and provides dragons and Dragon Princes to the Darkhold garrison.
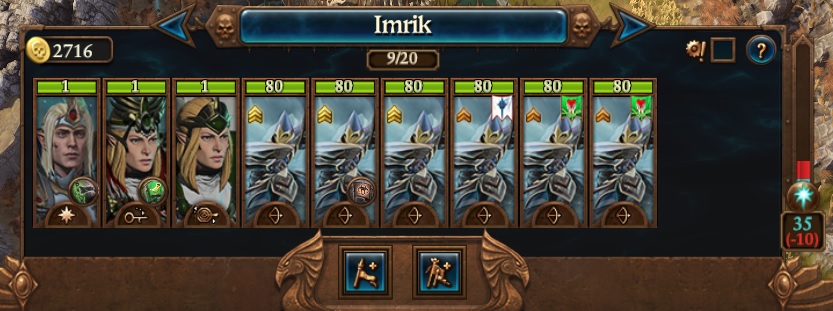
Typical army composition that will take you all the way to the late game is:
3 or 4 Shadow Warriors, 5 or 6 Lothern Sea Guard, 1 Sun Dragon, 1 Dragon Princes cavalry, your Fire Mage, 2 Reaper Bolt Throwers, and the rest regular Archers.
This is a very flexible army that will be able to take down most everything that the game throws at you.
Your First Dragon Encounter
The first dragon encounter occurs on turn 10. (Watch the dragon encounter count-down timer at the top of your campaign UI to keep track of the timing of these encounters.)
When the dragon encounter occurs, a dragon marker will appear on the campaign map near Imrik's location. The dragon encounter can be triggered by moving any lord to this dragon marker.
For pretty much every dragon encounter after the first one, you should pick the "ritual of war" option.
However, for this first one, it's often a good choice to select the "Bargain with the Dragon" option to gain influence. Having this extra influence will allow you to recruit an additional Lord with a good trait. I generally will recruit a Life Magic Archmage with either the Incendiary or Protected traits. Having this Archmage gives you access to the healing spells of the Life Magic lore, which is extremely useful for healing Imrik, your Fire Dragon, and other single entities.
Very Important! You will need 2000 gold to be able to select the Bargain option and obtain the influence.
The Protected and Incendiary traits are seriously powerful, and make your Archmage a lot more dangerous. If one of these traits is not available on a Life Magic Archmage, I will generally just choose the "ritual of war" option and get the option to fight the dragon quest battle.
Your first dragon encounter happens at turn 10. Thereafter, every 15 turns you will have another encounter.
There are 5 legendary dragons in total.
For each encounter (other than the first) you want to pick the Ritual of War.
The Ritual of War creates a quest battle where you have to fight the dragon and its accompanying army. You can fight this battle at any time you choose. (You don't have to fight the dragon immediately on picking the Ritual of War. You can also accumulate these quests, such that you can have all of these quests available at the same time.
Winning a dragon quest battle gives you access to the legendary dragon in your Regiments of Renown pool, It also gives you a permanent character trait and a unique magical item. There is also a temporary army buff that affects all armies in your faction.
Some of these dragon quest rewards are very powerful, providing things like perfect vigor, regeneration, extra damage, speed, etc.
These legendary dragon quest battles can all be won with a standard mid-game army made up of Lothern Sea Guard and Archers. If you have hit level 14 and obtained Imrik's dragon mount, it's generally a good idea to dedicate Imrik to fighting the legendary dragon right away, as the legendary dragons tend to buff their allies as long as they are alive.
After you have exhausted all five of your legendary dragon encounters, every 20 turns you will have encounters with ordinary dragons. Unlike the legendary dragon encounters, choosing to fight the regular dragon will instantly transport you to the battle, rather than creating a quest battle that you can fight when you want to.
The ordinary dragon encounters can drop some very good loot, including an arcane item called, "the Amplifier" which provides +20 Winds of Magic and -30% cooldown to all spells.
The Armor Of Caledor Quest Battle
This armor is extremely powerful, providing both healing and reset of ability cool-downs.
The quest battle for this armor requires fighting several armies at once, including an artillery heavy Vampire Coast army. While the quest is available quite early, you should wait until you have reached level 14 with Imrik and can mount him on his star dragon mount.
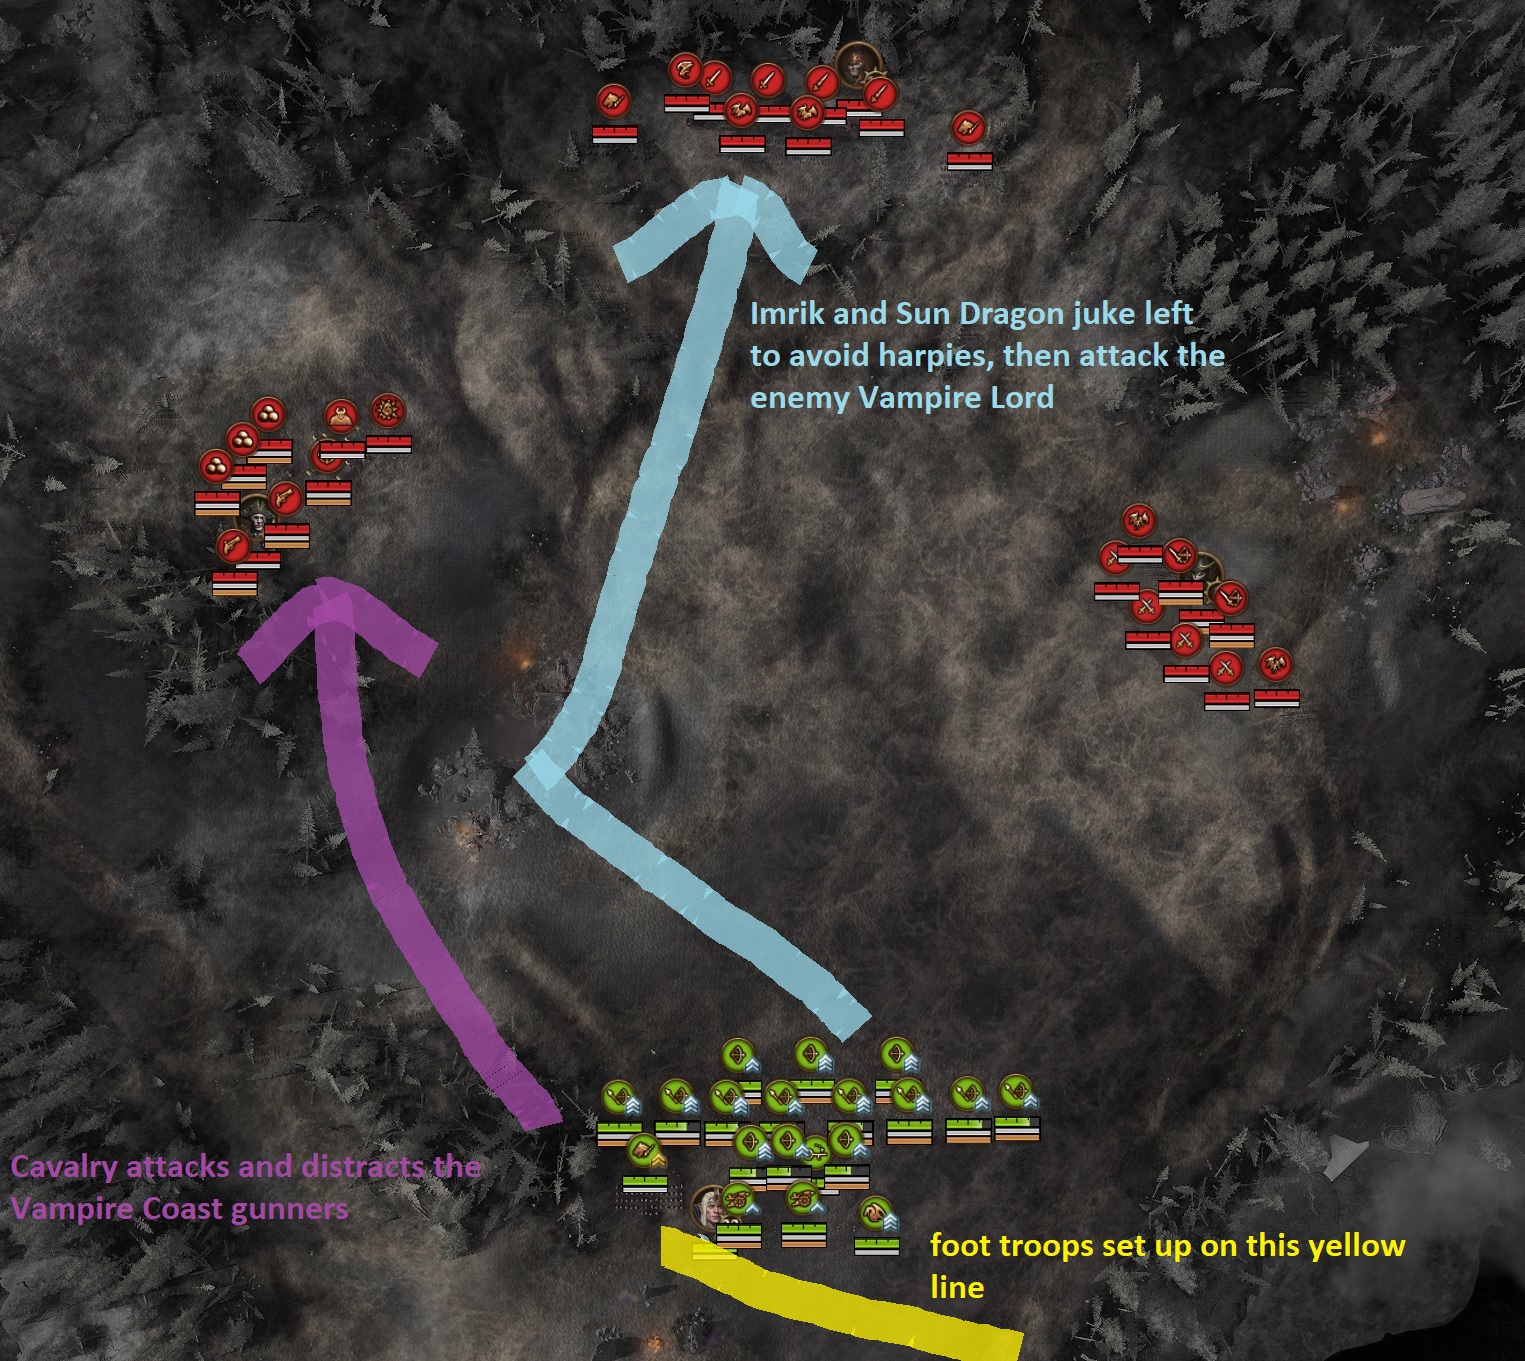
The key to winning this battle is killing the Vampire Lord who is mounted on a flying dragon. As soon as you kill him, all of your enemies disintegrate.
You don't get a chance to pre-deploy your army for this battle, so as soon as it starts, take all of your foot troops and pull them back and to the right. Set them up in a defensive posture to take out the Dark Elves that attack in the first wave.
Take your Dragon Princes and advance them to the left to attack and distract the Vampire Coast army artillery and long-range missile troops. (Watch out for the Bloated Corpse)
Use Imrik (on his Dragon) and your Sun Dragon to attack the enemy Lord. He sits still at the far edge of the battlefield until the first wave of Dark Elves is engaged. Don't bee-line directly towards him or you will get stuck fighting the flying Harpies in the first wave. Dodge left a bit to avoid the first wave flying troops, then head directly for the Vampire lord on his dragon. He will be protected by some Fell Bats, which you can mostly ignore. It's best to attack him from both the front and behind, so try to sandwich him between Imrik and your Sun Dragon.
Keep harassing the Vampire Coast artillery and missile units with your Dragon Princes to keep them from firing on Imrik and your Sun Dragon.
Eventually, you will kill the enemy lord, and his entire army will crumble.
Nagashizzar Cheese
Nagashizzar is a city nestled in the mountains just to the Southwest of The Bone Gulch.
It is home to the Skaven Clan Carrion. These Skaven are passive. They never leave their area, and just sit and guard the city of Nagashizzar.
Nagashizzar is unique in that it starts the game at Tier 5. Because it is Tier 5, the Clan Carrion troops that guard it are very numerous and very high level.
However, if you are not averse to using a bit of "cheese" tactics, you can capture Nagashizzar quite early in the game and quickly procure a Tier 4 city. (It starts at Tier 5, but loses a level when you take it.)
The key to taking Nagashizzar is the Shadow Warrior unit. These High Elven missile infantry have the Stalk ability, which makes them invisible until the enemy gets very close to them.
Shadow Warriors are available from the Tier 3 War Hall buildingt, which you can build at the Fortress of Vorag relatively early in the game.
Once you can recruit Shadow Warriors, you can take Nagashizzar at any time.
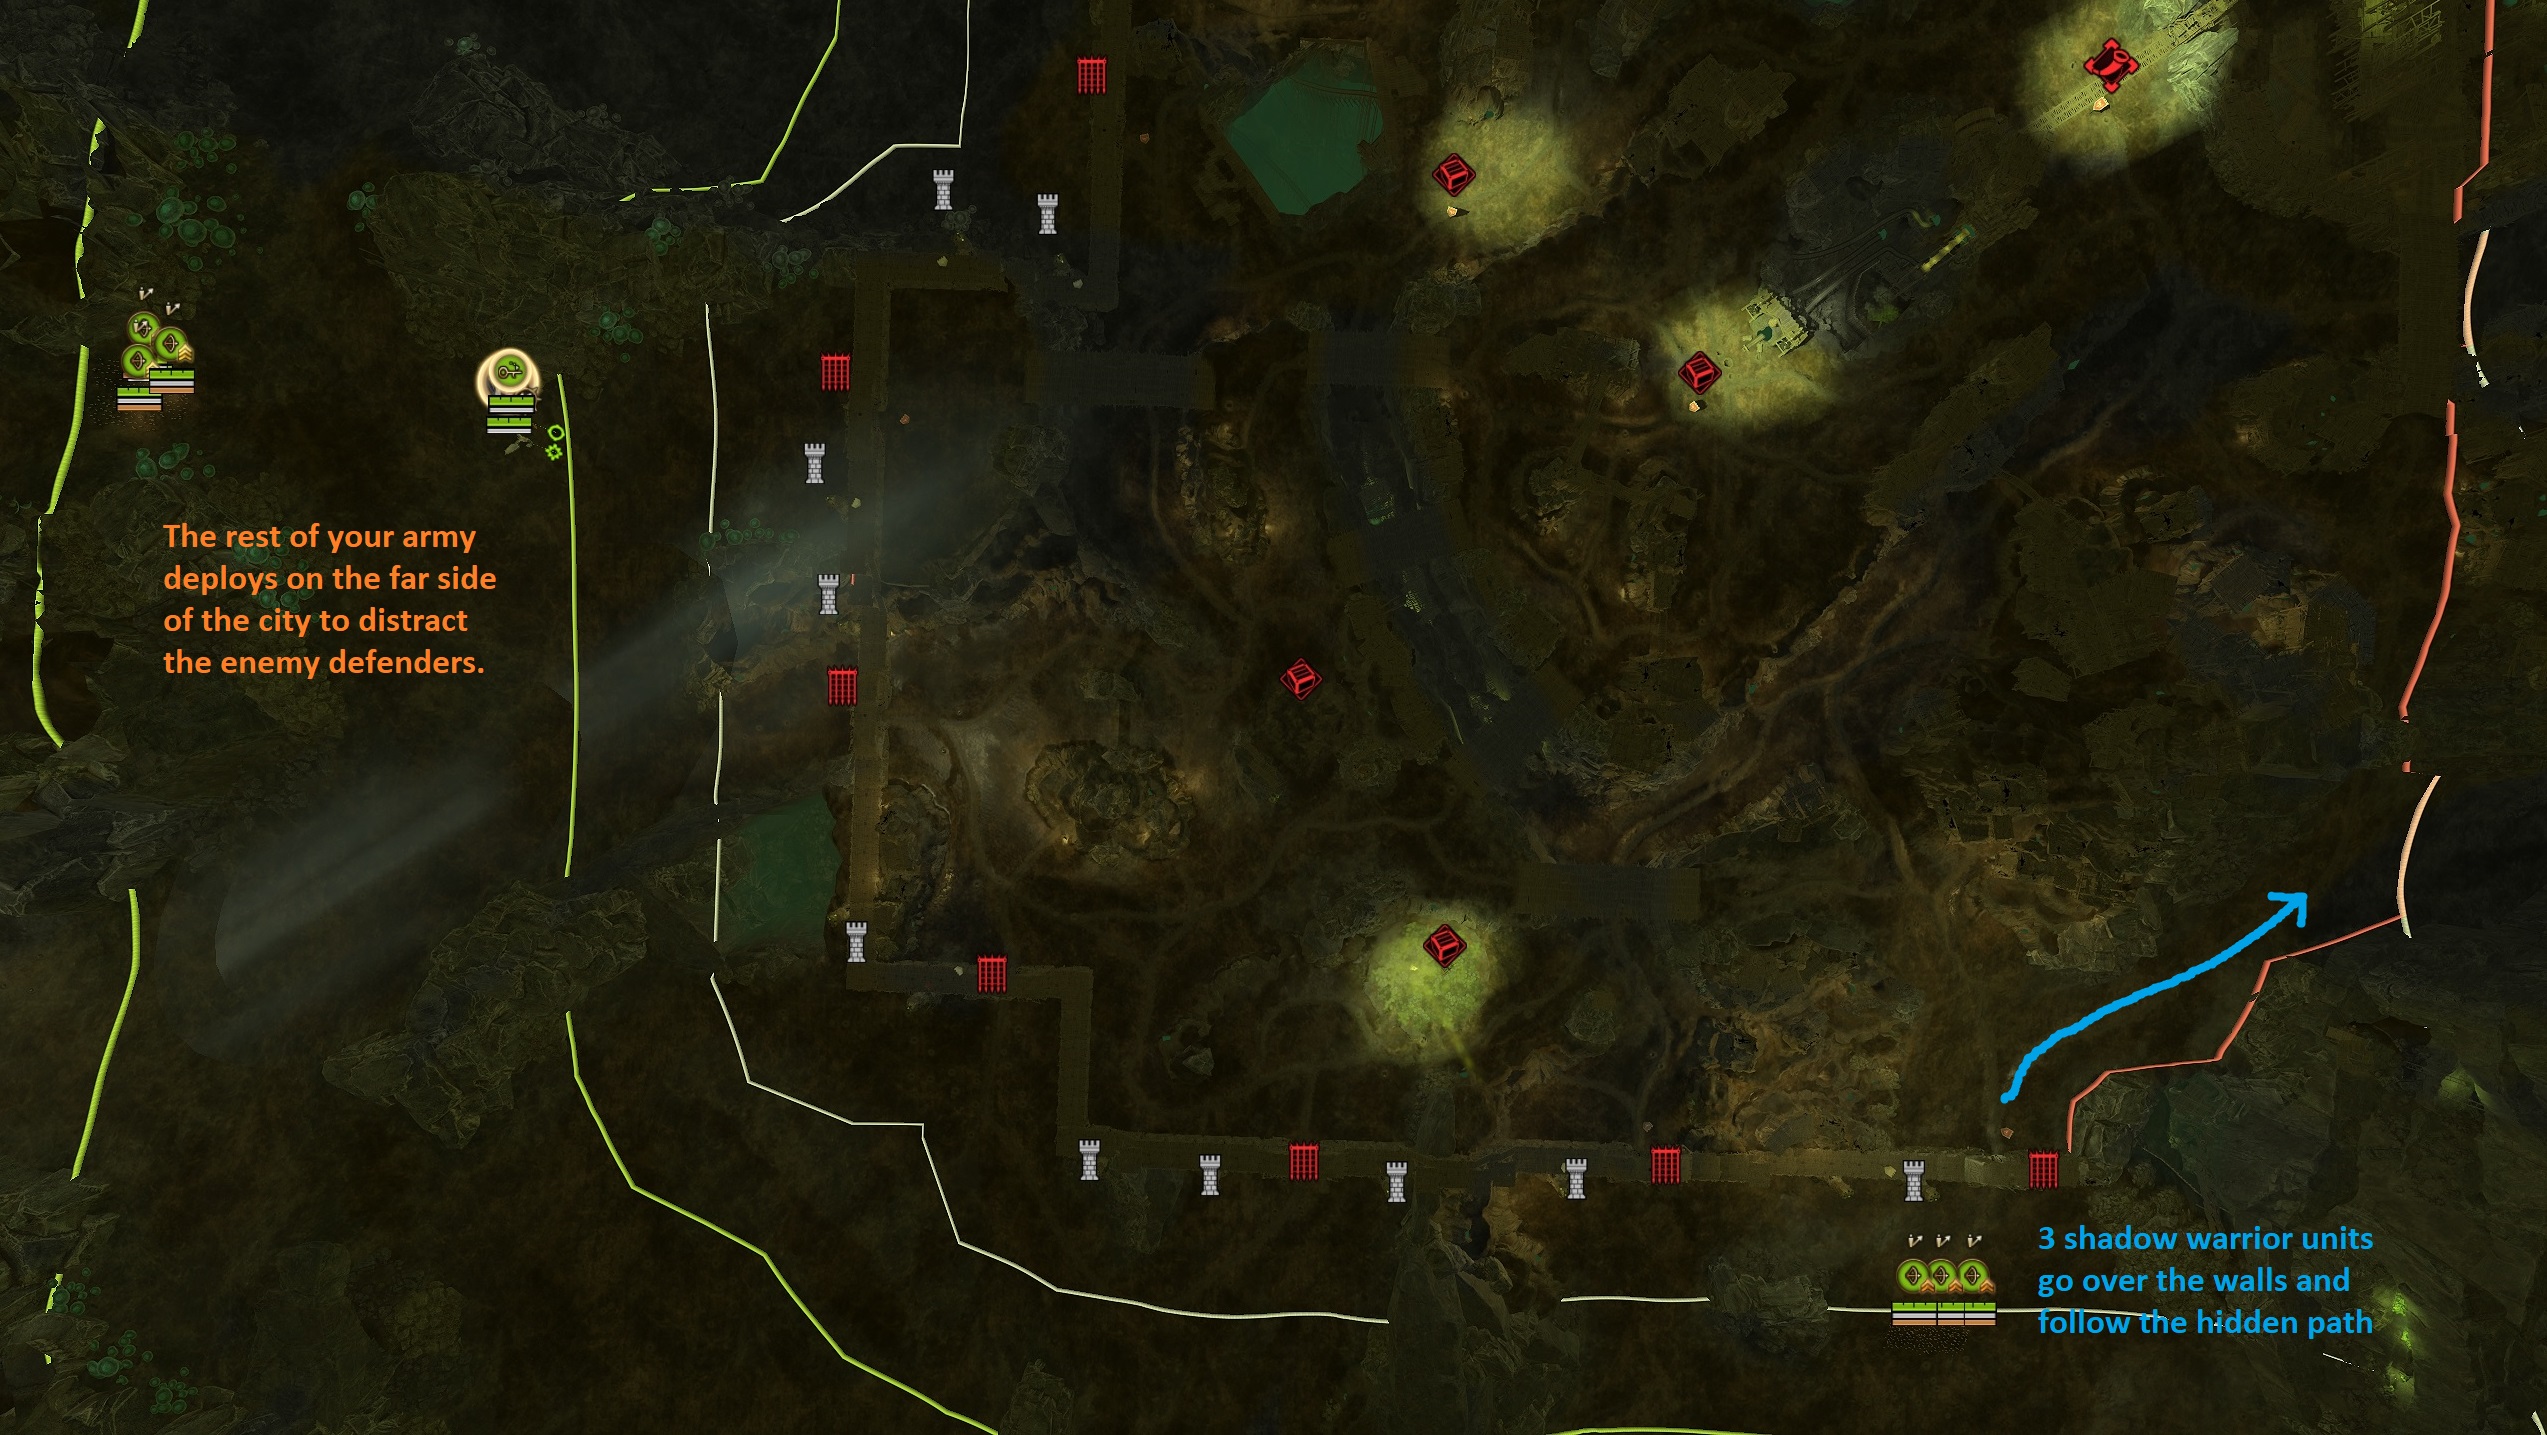
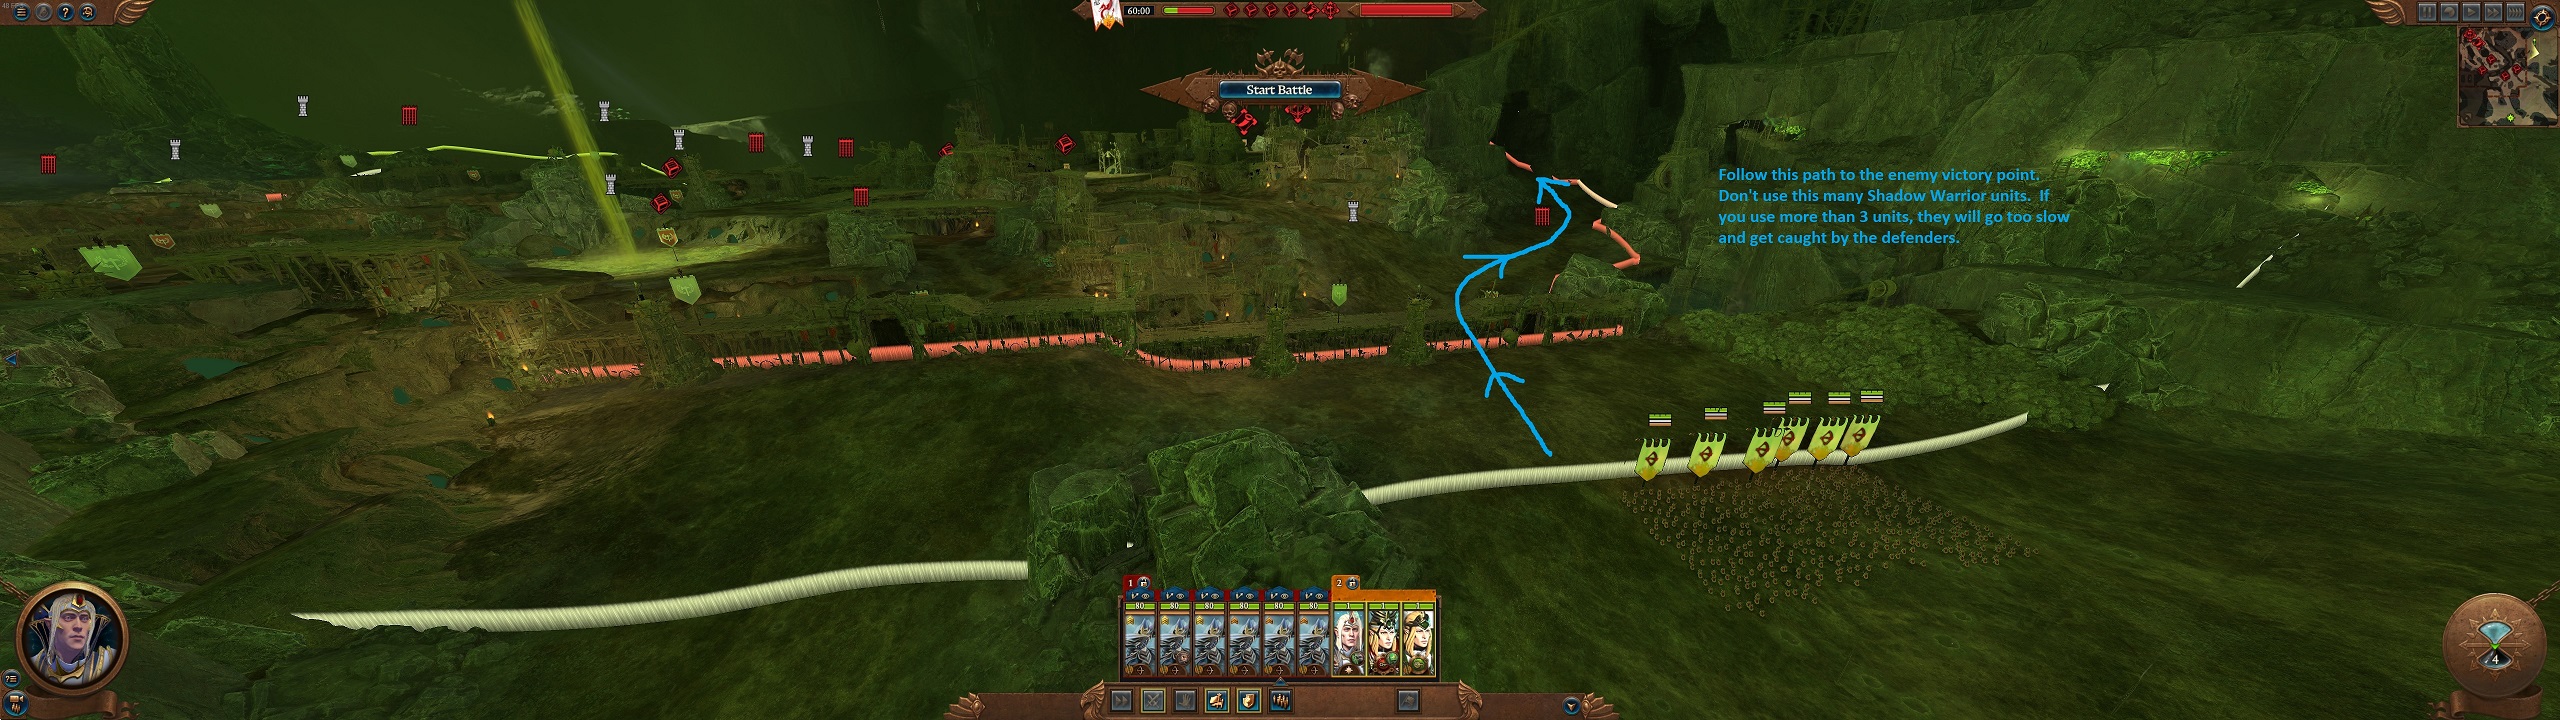
Like all Skaven walled cities, Nagashizzar has a hidden pathway that leads from the walls directly to the main victory point for the city. It's this hidden path and the stalk ability of the Shadow Warriors that makes this cheese tactic work. Your goal is to send a small "commando" force over the wall, along the hidden path, and then capture the victory point.
Station two or three Shadow Warriors next to the walls nearest the hidden path. Station the rest of your army on the opposite side of the city, as close as possible to the walls, so the enemy will feel threatened and position its troops in that location.
It is important to not use more than three Shadow Warriors for this "commando" run. As soon as they get on top of the walls, it will alert the enemy to their incursion, and they need to move quickly to get off of the walls and onto the hidden path. More than three units, and they will move too slowly and will get caught by the troops sent to investigate the breach. Turn off the "fire at will" toggle on your Shadow Warriors until they reach the victory point. Otherwise, they will fire on nearby enemies and give away their position.
Sometimes the enemy will station a few troops to guard the hidden path. If this happens, then have your hidden Shadow Warriors wait outside the walls, and send your other troops in to attack on the opposite side of the city. This will generally draw away the enemy guards, and then you can go over the walls in safety.
When your Shadow Warriors reach the victory point, the enemy will react and send troops to re-capture it. At this stage, once the victory point has been captured, the Shadow Warriors just need to defend the point against the enemies that will try to take it back. It is sometimes useful to send your Sun Dragon (and Imrik if he is on his dragon,) to help defend the Shadow Warriors and the victory point.
If all goes well, you will have a newly captured Tier 4 city, that you can use to recruit awesome Tier 4 units like Sisters of Avalorn, Loremasters of Hoeth, etc.
Confederation With Caledor
Taking six settlements will trigger the option to confederate with Caledor.
This will give you a presence in the Elven Doughnut of Ulthuan.
Even if you have no desire to maintain a presence in Ulthuan, it's worth confederating to gain access to the trade opportunities with the other High Elf factions.
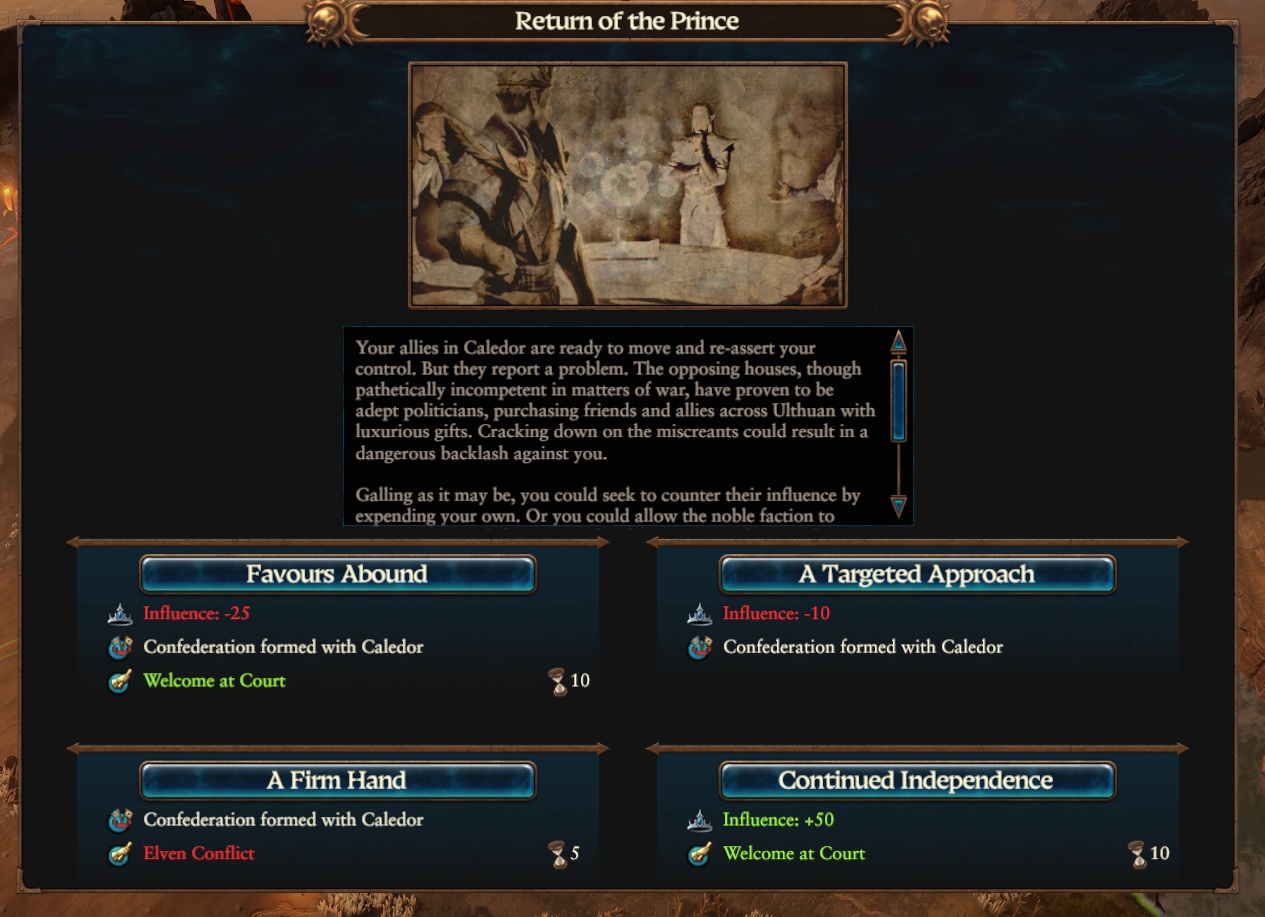
When the confederation trigger happens, you will be given a number of options.
Choosing the "Favors Abound" option is generally the best, as it will allow you to easily establish non-aggression pacts and trade with the other High Elves.
Mostly I have found that I am better off not expanding too much in Ulthuan. I tend to hang on to Vaul's Anvil and Tor Sethai, and don't hold any other territory. The reason why is that I can hold these territories without having to maintain an army to defend it. The other High Elves will generally be active enough in their defenses that an army is not necessary.
Often, Count Noctilus and his Vampire Coast will have taken some of the lands on the outside of the Western border of Ulthuan, North of Vaul's Anvil. I will generally fight them, take their territory, and then trade all the territory North of Tor Sethai to Tyrion or Allarielle in exchange for money and/or defensive alliances. Trying to hold more territory outside of the Vaul's Anvil province requires constant defense and the expense of maintaining an army.
Leveling Up Imrik

In order to properly level up Imrik, you have to look ahead to what sort of role he will play.
Ultimately, Imrik will turn into an absolute beast, capable of taking on large numbers of enemies, tanking whole armies, and destroying enemy lords and heroes.
By turn 40, this is what Irmik's army looks like. It's Imrik (for tanking damage dealing, and lord and hero killing,) a fire mage (for doing AOE damage,) a Life Magic Mage (for healing,) and a few Shadow Warriors (for stalking and damage dealing.)
You can obviously build any kind of army you wish. Imrik can also perform well with stacks of dragons, Dragon Princes, or Sisters of Avalorn. However, I've found that buffing Imrik's own fighting skills is the most efficient. At high levels, Imrik is so tanky and so deadly, that he doesn't need much in the way of support to wreck multiple enemy stacks.
With that in mind, I tend to invest in skills that will improve Imrik's ability to fight and survive, along with some general campaign skills.
Here's what my ideal Imrik skill tree looks like at level 41. After adding Speed of Assuryan and War of Hoeth, then all of the essential skills would be covered, and there's still space for more skills as he moves to the level 50 skill cap.
Choosing To Leave. A Very Different Imrik Campaign Experience
Let's face facts.
Imrik's starting position pretty much sucks. You're surrounded by nasty factions. Your provinces are not particularly rich and easily attacked. It's a grim, ugly situation.
If only there were a place where you could build a home that was free of conflict and war.
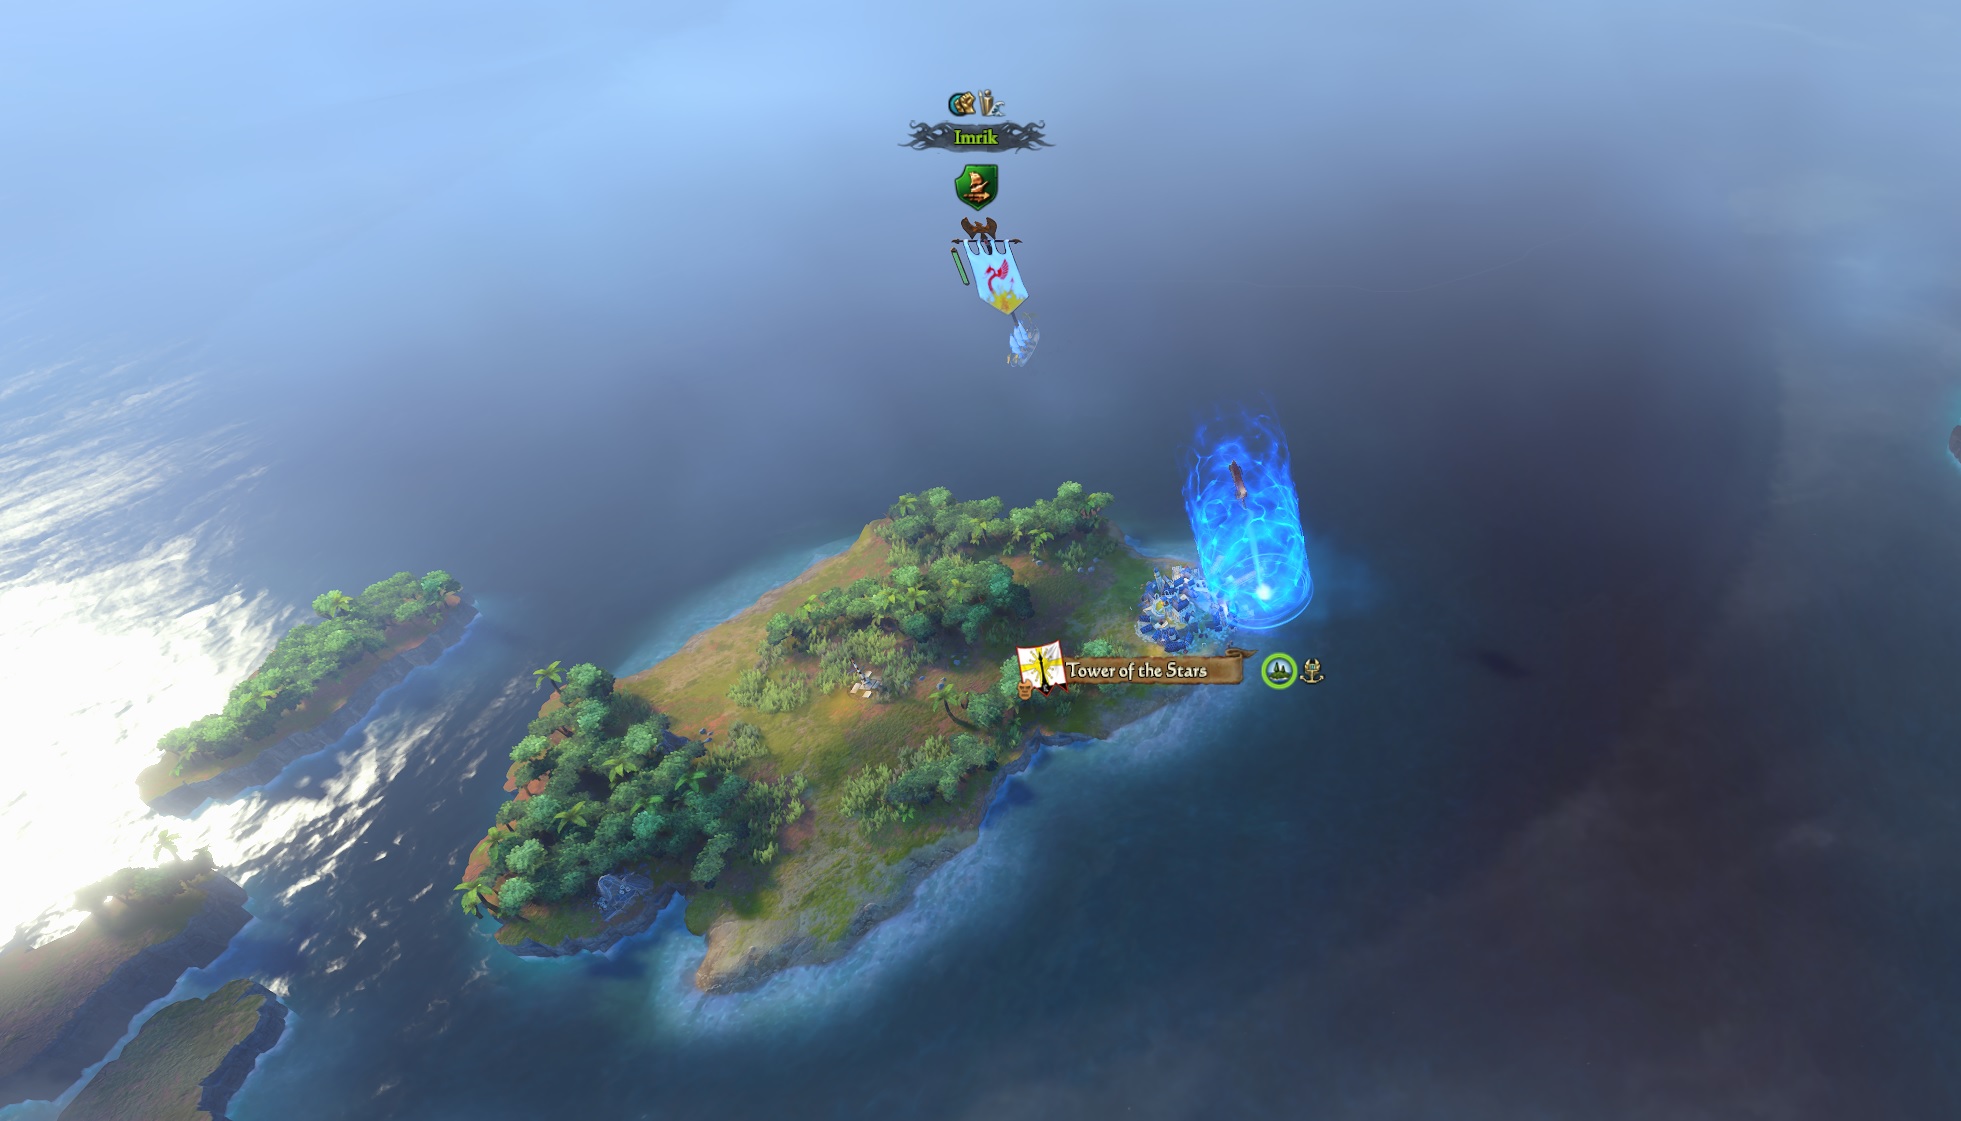
It turns out that there is such a place. South of your starting location, across the Sea of Dread, are the islands of the Eastern Elven Colonies. This is a chain of three islands inhabited by High Elves.
If you're tired of Imrik's starting position, you can just pick up and leave. Play the first three turns so you can capture the entire Plain of Bones. Recruit some Lothern Sea Guard. Then, head south across the ocean to the Elven Colonies. Use the Invocation of Isha to avoid attrition while at sea.
Capture the Tower of the Stars first. It's poorly defended. Then recruit a few archers to top up your army, and take the rest of the province. This province is very rich, with unique Elven Colony ports and valuable trade goods.
When you have established yourself in this new location, you can abandon your possessions in the Plain of Bones and you can start your adventure anew. Raid and pillage the southern chaos wastes. Go find Teclis and confederate him. Have fun. It's a completely different campaign experience.
Source: https://steamcommunity.com/sharedfiles/filedetails/?id=2863893315
More Total War: WARHAMMER III guilds
- All Guilds
- Skulltaker - Khorne overview Total War: Warhammer 3 Immortal Empires
- TOTAL WAR
- 20253MOD
- Immortal Empires Maps: Resources 6.0.3
- Free FPS (7$ tops I promise), or how to make Warhammer III fast
- Total War: WARHAMMER III Guide 1654
- how to prevent an update killing your modded campaign
- Total War: WARHAMMER III Network Ports
- How to stop playing Total War: WARHAMMER III [lite version]
- Epidemius - Nurgle overview Total War: Warhammer 3 Immortal Empires