
Intro
There are 2 primary aspects models being combined for this guide. They are the OODA Loop and Geometric Strategy. They can be used independently, but they also synthesize quite well together which is why I have sort of merged them into one framework. Inspiration for this framework and the formal one I created are inspired by American and Byzantine military history.
OODA Loop

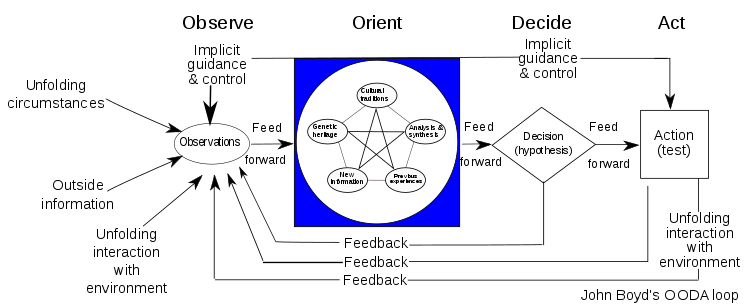
Created by American pilot John Boyd, and has been consistently used by many American pilots and military personnel. The link to an article about the history and development is is below. The acronym stands for Observe, Orient, Decide, and Act.
Just using this OODA Loop alone would most likely make the game more approachable and easier to play. However, I think there are certain elements that are missing/underdeveloped that are important for an RTS like WH3, which the next section will address.
Link: https://www.businessinsider.com/ooda-loop-decision-making-2017-8
Geometric Strategy
Geometry, geography, and warfare have long coexisted with each other for all of recorded history. All the ancient empires knew or experimented with different formation shapes, castle wall shapes, and so on to make defending/attacking easier. Whether its straight lines, square formations, multiple rectangular formations, triangular cavalry formations, and so on, these have all been developed because the shapes accentuate the use of each unit type. Put simply, there are 3 primary geographic and geometric aspects of military affairs that geometric strategy apply to for these campaigns.
1. Territorial Expansion and Defense: Terrain plays an important role in deciding what settlements/regions you should target first in your campaign. Take Carcassone's starting position as an example. You are located on the coast with rugged mountains running along the south, southeast, east, and Northeast. In addition, the east is covered in heavy woods and your western flank is all coastline with only a small land access point to the southern peninsula in the SW. Your only other unhindered geographic access points go North-Northeast. You have 1 port to access as well (although in WH TW any army can sail the high seas so ports/navies mean less). IRL military strategy would then suggest that optimal expansion routes are North to Northwest due to how easy it is to traverse the terrain. If you were to send your armies to conquer the southern peninsula, Your empire's shape would go from a slanted I shape to a weirdly shaped reverse "b" making the travel time longer and due to rugged terrain would dictate that it is more time efficient to sail, rather than march. However, when using the OODA Loop to analyze political surroundings, we see that there are fullstacked pirate navies patrolling the nearby oceans which makes it dangerous. Thus, it becomes clear the most optimal expansion route for attacking and defending is going north towards Bordeux, Paravon, and Grom The Punch. So remember, geography and geometric shape of your empire can play important roles in how hard or easy it is to attack/defend. Be sure to position armies (as possible) in geographic choke points or most ideal transit points to ensure adequate responsiveness to invasions from any direction.
2. Tactical Formations: For Example, if you have 10,000 spearmen/hoplites and youre fighting 50,000 sword infantry, you do not want to use compact square formations to fight them unless your troops/commanders are capable enough. Rather, what most would do is spread out the formation to a thin long line using any rugged terrain to protect your flanks so you cannot be flanked or encircled. Smaller armies almost always rely on choke points or mobility to overcome numerical inferiority. However, if the enemy has cavalry and heavy infantry or any offensive infantry that can penetrate those thin lines they could easily place them on the flanks or centre to break through your formation and encircle the other parts of your army. So, before you start the battle OBSERVE the enemy army's unit types, then OBSERVE the Geography after you enter the battle before playing with formations. Make sure to use the geography to your advantage when positioning your units and the formations you use. If your army lacks cavalry and the enemy has cav, try to find geographic positions that prevent their cavalry from flanking you. If you only have melee cav and melee infantry and the enemy has melee and missile infantry....fight on a wide plain that easily allows your cavalry to swoop around and flank the archers before flanking the melee infantry. If you fight them at a narrow chokepoint, cavalry effectiveness is minimal if they are forced to go head on into infantry (especially spearmen). Also, if you bunch up your infantry, then you boost the effectiveness of their archers as it makes it easier for them to hit your infantry, so make sure to spread out.
3. Logistics: It is common knowledge in military history/strategy that logistics is essential to empire and army maintenance. The current Russian-Ukrainian conflict is perfect example of that. It is also essential to understand how geography and geometry affect your logistics. Thankfully, most WH3 factions do not require food supplies so it is much easier. As an example, let us use Carcassone again. If you expanded your empire all the way to the Northern coasts and NE mountains where Mousillon, Marienburg, and Heinrich Kimmler are located and you only developed the military buildings in your capitol, then you would have to march across somewhat rugged terrain taking anywhere from 6-10 turns to send reinforcements to your northern borders. A lot can happen in that time frame. You could easily lose 2-3 settlements if your main army loses or has to retreat. Thus, as you expand your empire, make sure you create additional core regions to build military buildings in that can be used to build new armies to support your frontiers. You also should make sure that your armies are within reasonable range of your settlements when attacking, otherwise, if another faction invades it could take you too long to respond.
Combining OODA + Geometric Strategy
Step 1 "Observe": First Observe your faction and battle effects of the legendary lord you want to play in the campaign menu. Then observe your location on the map. Then start the campaign and observe the geography, political relations of nearby factions, observe enemy army locations, enemy army composition, personal unit recruitment capabilities, and your economic capacity. As an example, the faction Carcassone will be used below.
Step 2 "Orient": Analyze what all the information indicates and means. For political scenario, we OBSERVE that we started at war with Red Cloud Greenskins, very unfavorable/almost at war with other greenskins, on the verge of war with Clan Skryre, and on neutral terms with the other human factions. Estalia the faction to the South is at war with Clan Skryre who is our greatest southern threat and we are at neutral, but increasingly positive relations with them so its not worthwhile to expand south against them or Clan Skryre because of other immediate threats and geographic restraints. What the current observations dictate is that we attack Red Cloud and capture city of Brionne. We also Observed that our starting army has 11+1 hero against their 8, so we have a relatively safe advantage against them. There are no other immediate threats, so you can march immediately against them.
For economy, you have 1 settlement that has 1 infantry building completed and 1 open building slot. After going through the available buildings through the available buildings select 1 that makes the most sense. I would argue between choosing the "stables" or the "farms" to either give your army more cavalry or boost your economy so you can recruit more units.
Step 3 "Decide": Formulate all this information into a general plan. So for now, it seems the most reasonable starting plan to "decide" on is (1) attack the enemy army in immediate vicinity and expand northwards to consolidate control over captiol region. (2)Build up the barracks to tier 2. (3) Build up T1 Farm building. (4) Sign non-aggression pacts with Estalia and other increasingly friendly factions.
Step 4 "Act": Now, actually accomplish your plan and then end turn. Repeat this process as new information is introduced at the beginning of each turn before doing anything. AS you get used to the OODA Loop and Geometric Strategy, it becomes natural and faster. However, there are no timers for each turn so take your time as a beginner to carefully map these details out using OODA Loop and integrating the Geometric Strategy into it.
Battle Applications
Make sure to use OODA Loop + Geometric Strategy in both campaign and battle strategy.
For Battles, there is less factors involved but still requires just as much strategizing. For Carcassones first battle we OBSERVE:
Your Army: 2 spearmen, 3 swordmen, 3 archers, 1 heavy cav, 1 trebuchet, 1 LL, and 1 hero.
Enemy: 4 swordmen, 2 archers, 1 LL, and 1 catapult.
Terrain is a grasslands with no major geographic barriers and only small patches of trees.
Orient: we know that we have more melee and missile infantry. Our archers have slightly better range advantage and they have no cavalry to ride them down. We have a lord an hero that can 2v1 their lord. We have 1 extra infantry unit an cav to flank. Their infantry are on average stronger though....
Decision: Lock up their higher quality infantry with our cheap defensive infantry and use the Battle Pilgrims to flank on one side while the cavalry flank on the other to pincer their archers. Position our archers upfront and let them fire at max range for a couple shots and move them up after infantry clash to increase their accuracy. Have archers first pepper their infantry before targeting the enemy archers. Since 1 of our flanks is slow infantry, when the infantry lines clash change your archers focus to the enemy archer unit on the side where your melee infantry is flanking since it will take them longer to get there than it will for your cavalry and we want to avoid friendly fire. That way, your archers can get in multiple shots into the infantry and missile units before the melee. Once all units are locked in melee you can bring your archers in much closer or put them on the flanks to get clear shots into the backs of enemy infantry.
Act: everything went according to plan. They couldnt prevent flanking maneuvers and it resulted in a decisive victory. 150 losses out of 1k for my army and 570 loses out of 700ish on their side.
For post-battle, its situational when you should take gold or bonus XP. In this case, 400g is not as valuable as bonus XP so I chose XP.
Conclusion
Hopefully this rough framework can serve as a useful systematic approach to Warhammer 3 Total War and help new or intermediate players develop good practices by giving them a clear way of approaching the game. You do not need to do all these steps at the beginning of every turn, but rather when you see there are new information and developments. If there are none, you can speed through the process and focus on continuing the Decision-Act phases. As a habit, be sure to constantly check your surroundings for new information and constantly observe your diplomatic statuses with neighbors to prevent being caught off guard by declarations of war and invasions.
I've been meaning to do a more in-depth YT guide on this but have not gotten around to it so feel free to use my combined Geometric Strategy for YT content and put your own spin to it if you think there are more important factors or improvements to it. I just figured I'd put at least the basics of the strategy that I used for research and for this game out here to help out beginners since I've seen a lot of comments about how hard the game is.
Source: https://steamcommunity.com/sharedfiles/filedetails/?id=2922299918
More Total War: WARHAMMER III guilds
- All Guilds
- Skulltaker - Khorne overview Total War: Warhammer 3 Immortal Empires
- TOTAL WAR
- 20253MOD
- Immortal Empires Maps: Resources 6.0.3
- Free FPS (7$ tops I promise), or how to make Warhammer III fast
- Total War: WARHAMMER III Guide 1654
- how to prevent an update killing your modded campaign
- Total War: WARHAMMER III Network Ports
- How to stop playing Total War: WARHAMMER III [lite version]
- Epidemius - Nurgle overview Total War: Warhammer 3 Immortal Empires