Introduction
This is a quick'n'dirty guide to set up a solid ground team for story missions that isn't too expensive and can carry you through most, if not all, of the singleplayer ground content of the game on any difficulty.
When assembling this build I made sure to keep the build cheap. All items are mission rewards and the skills and specializations together come in at 500-750k ec. depending on the current price on the Exchange and which skills you actually need to buy.
Basics
Let's get started with the basics.
Bridge Officers, usually referred to as BOffs, are unbelievably stupid. They barely use their weapon's primary fire, nor do they flank enemies, avoid getting flanked or even just crouch to reduce incoming damage.
Lastly, due to how the AI is coded, all BOffs constantly evaluate whether the conditions for using their abilities are met. Once they are they don't hesitate or coordinate and simply use any ability that has been evaluated as usable right now - which tends to mean that you get 4 heals on an allied NPC with a minor scratch then have to wait for the cooldowns of those very same heals as the enemy tears your entire away team to pieces -.-'
All hope is not lost though!
While you can't teach your BOffs tactical positioning except by ordering them around manually, you can do something about the other three issues:
proper weapon use
crouching
overkill
CrouchingThis one is the easiest to fix.
BOffs won't crouch unless some effect grants them a bonus for doing so - and no, the standard +50% dodge from crouching doesn't count.
Thus, you can make them crouch by simply bringing the Take Cover skill from the Command Specialization - Take Cover I easily suffices since it only needs to be present, not provide a major boost.
You can get the manual to teach one of your BOffs that specialization for about 100k ec on the exchange and the skill itself from the BOff trainer for 500 ec.
Weapon UseOk, you can’t teach your BOffs to use the primary fire of their weapon worth a damn.
They use secondary fire just fine though.
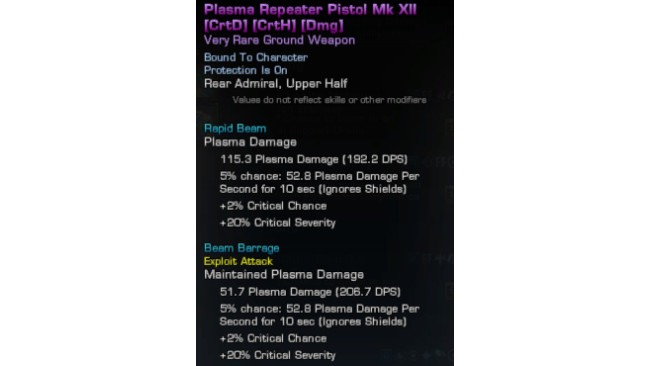
Thus you can give them a weapon with a secondary fire mode that acts as though it was a primary one – e.g. a fuel-based weapon like the Plasma Repeater Pistol[sto.gamepedia.com] (mission reward: Iconian War -> Uneasy Allies or buying it at New Romulus Command, Dyson Joint Command or Delta Quadrant Command) or any of the Flamer weapons.
I love that pistol.
Just by having your BOffs equipped with it, you’ve already more or less turned them into actual help during the battle, even without them having a single skill.
OverkillWell, this one is tricky.
You can't fix it as such. You can, however, work around it to a certain degree.
You can avoid bringing multiple copies of the same ability and instead look for alternatives that have an identical, or similar enough, effect but a different duration and/or cooldown.
WIth them not becoming ready for use simultaneously you only get overkill on the first instance they can be used in, then, after that one time, you are significantly less likely to see any more excessive use of the same ability on the same target.
And lastly, you can prioritize abilities with shorter cooldowns, thus reducing the impact of 'wasting' a use of said ability.
While this is not a perfect solution it does help mitigate the issue quite a bit.
Theory - BOff Abilities
Before I get into the nitty-gritty of the build I intend to introduce you guys to with this guide, let's talk about the theory and concepts behind picking BOff abilities and assembling a full away team.
Ability CategoriesWhenever I start planning an away team setup I always mentally go through a checklist to ensure I got everything I need:
Heal
Disable (including knockdown)
DPS
Control (including Buffs, Debuffs and anything that moves or slows enemies)
Let's talk a bit about each of these in more detail before I explain why I want some of each in any away team I put together.
Theory - Heals
These come in both Shield and Health healing types as well as in instant and over-time variants.
Instant-Heals are what you want to avoid death right now, e.g. right after a major enemy attack or ability has hit one of the team so they get back to full before anything else can finish them off. The big risk with these is that not only has the dumb BOff AI a tendency to over-heal, thus wasting a lot of potentials, but they also all cast the same ability at the same time at the same target, thus having more than one of these tends to be ... situational at best.
Heals-Over-Time (short 'HoT's), on the other hand, are best if you are facing many smaller attacks for some time. The slow heal will counter the incoming damage and thus give you more time to handle the situation however it requires - and time is indeed quite the valuable commodity in combat...
When it comes to Shield and Health heals things are significantly easier - shield heals are almost completely a waste of space. Having a single one can help in particularly tough situations or against certain enemies, but any more is not worth it - too many effects can either nuke the shields or just bypass them directly to make them viable. Thus when looking at healing on ground you'll want to focus on health.
With that being said, the most potent heals your BOffs will have access to are Nanite Health Monitor, Medical Tricorder, and Vascular Regenerator. Via the optional specializations, you also get access to Throw Regenerative Nanite Cannister, an AOE HoT grenade. Though while the Heal Grenade is quite potent I found the rest of the specialization too lacking to make it worth taking, thus ended up not taking it after some testing.
Of these abilities the Nanite Health Monitor is by far the best for 3 reasons:
Automation (automatically heals hurt allies near the target of the ability when they fall below a certain threshold - thus the healing can't be prevented by disabling the healer)
Charges (you get 3 heals out of 1 use of an ability)
Duration (the buff lasts several minutes - or until out of charges - thus even with your BOff AIs being trigger happy the ability is rarely, if ever, wasted)
Besides these three major advantages, there is a fourth, more minor one as well - it is a buff and can't be applied to a target that already has that buff (? verification needed). This (should) prevent multiple BOffs from 'wasting' the ability by all putting it on the same target, thus make it a viable choice for picking more than once.
Finally, you'll want a certain amount of redundancy when it comes to heals. A single BOff is too easily disabled or outright killed, thus having heals on two (or more) different entities ensures that the healing continues until the fight is truly lost (or won) and more healing would no longer matter anyways :-P
Theory - Disables
This category covers any ability or effect that prevents the enemy from acting.
The top disables are obviously Paralyze, Stun and to a lesser degree Stasis effects (the last one less so since it is usually 'fragile' and ends if the victim takes too much damage, making it very situational and incompatible with AoE damage).
Unfortunately, these three tend to be single target, are often either fragile or have a very short duration and most of them have fairly long cooldowns as well - together that makes these very potent while they last but then you're left without anything to hinder the enemy for way too long before they become available again.
Fortunately, there are alternatives.
Charm effects have similar duration and cooldown issues but tend to last slightly longer with a significantly longer cooldown - hence they help more in a single engagement but won't be available for the majority of the mission afterward.
In my experience and testing, I have found that the two most effective means at hindering the enemy, partly because it messes with how the AI is coded, partly because it directly prevents them from acting, are staggers and knockdowns.
Any effect that staggers the enemy briefly interrupts everything they do and I got the distinct impression that he AI also gets 'reset' each time, thus re-evaluating its actions when the stagger ends which in turn tends to make it switch targets and thus spread its damage over your entire away team, making it significantly less effective. Staggers also interrupt abilities with a 'charge' time, thus having at least one of these helps a lot when used on bosses to lock their nukes down - assuming you can control the ability usage precisely enough for that.
The last and probably most readily available option is that of knockdowns. Knockdowns are essentially 'major staggers' and not only interrupt anything the victim was doing but also add a 'get up' animation which essentially is the same as the enemy being stunned for that duration. Yet, unlike stuns, knockdowns are readily available from loads of sources, tend to have very little cooldown, and are sometimes even part of basic attacks of certain weapons - e.g. Mortars.
There is however a downside to knockdowns. While they are by far the most readily available means of disabling your enemies, it is unfortunately also the most easily resisted one and particularly tough enemies may even be completely immune to them.
All in all, I found having several AoE knockdowns, e.g. from 2-3 Mortars, helps a lot against hordes of enemies like Borg or Hur'q but all types of disables work significantly less against bosses and elite enemies if they have any effect at all.
Theory - DPS Abilities
DPS or Damage Per Second, is technically a measure of someone's ability to deal sustained damage. In this case, I actually mean damage-dealing abilities though.
DPS abilities usually came in either instant ('nuke') or dot (damage over time) variants and are either single target or hit an AoE (area of effect). Some rare abilities can affect multiple targets but don't hit an area, e.g. by chaining from target to target. I count those as AoE abilities anyways :-P
Single target 'nukes' tend to have long cooldowns and, as already said, only target a single enemy. With how much STO focuses on waves of entire hordes & armies of enemies single target abilities tend to do fairly badly except during the last 30 seconds of some specific missions when you get to face the occasional boss.
As a result, I tend to completely ignore single target damage-dealing abilities - at least for BOffs.
AoE abilities, on the other hand, especially ones with a secondary effect, are basically made-to-order for the typical hordes of enemies one faces in most missions. The trick here is to find the ones that have a good balance between damage dealt, time over which said damage is dealt, number of enemies affected, and of cause time between uses.
With those considerations in mind, there are surprisingly few BOff abilities that are worth considering - and most work best when paired with some way to slow or immobilize the enemy so they stay in the AoE for as long as possible.
For me, the two abilities that stood head, shoulder and heck, even hip and knee, above all others were the Mortar, particularly the 23c Photonic Mortar, followed by the Paradox Bomb from the optional temporal specialization.
The Paradox Bomb is, at least in my eyes, primarily a crowd control method that pulls all enemies into one cluster and mostly keeps them there for a time before ending with a bang - I consider it a control ability first and an AoE DPS one second simply because how effective the control is compared to the OK damage the AoE deals.
Mortars, on the other hand, are basically insanely good - if they can hit the target. While their range (40m from the mortar itself) and AoE (5-10m radius iirc), as well as damage, are incredible and even the fire rate is quite good, the delay between firing and the mortar's shell impacting on the targeted location, unfortunately, means that quite often the target has already left the AoE.
Hence while Mortars are by far the best DPS ability that a BOff can have in STO they do require a bit of a setup to work truly well - e.g. pairing them with a Paradox Bomb works so incredibly well one could honestly call that combination somewhat 'broken'. ;-P
Note: The 23c Photonic Mortar was re-balanced to be more in line with the Quantum Mortar for Captains. This balance patch was skipped for BOffs though. Hence atm 23c Photonic Mortar outperforms Quantum Mortars for BOffs (but NOT Captains) by a very significant margin (just under 40% thanks due to the way faster fire-rate - that is for the Lt Cmd. Photon Mortar vs the Cmd. Quantum Mortar).
Theory - Control
Lastly, control abilities or more precisely battlefield control abilities give you that invisible edge in combat that goes beyond mere 'on paper' numbers - though they boost those as well - and are what differentiates an OK setup from an incredible one.
For me, they fall into three categories:
Weaken
Enhancements
Maneuverability
Each of these has their role and a good setup has some of each of these to maximize the overall performance of the away team in all regards - instead of focusing everything onto a single aspect. The more well-rounded a setup is, the more readily it can adapt to the ever-changing conditions of the various battlefields, thus making it significantly more reliable.
WeakenAny ability that reduces the enemy's statistics, e.g. damage or damage resistance, falls under this category.
There are quite a few abilities that lower the (energy) damage output of enemies within quite significant AoEs by 20-60%, depending on the ability in question. It should be obvious that such an effect would make any battle significantly easier.
As an engineer captain, my favorite such ability is the Neutronic Mortar[sto.gamepedia.com] . Not only does it deal the incredible damage to a large area, but it also debuffs both the enemy's damage output and their movement speed. This is by far my favorite engineering kit module in the game :-P
Unfortunately, BOffs don't get access to anything quite so versatile and potent.
IMO the exact ability you choose matters little, so long as you have one in your setup. I recommend browsing the STO Wiki for BOff abilities that are available based on the careers and specializations you decided on and simply pick from the available choices as suits your build.
EnhancementsEnhancements are the bread-and-butter of control abilities and even of many DPS focused builds - both Captain and BOff ones alike.
There are too many to list them all. However, for completions sake I'd like to list the ones I like best:
Overwatch (tactical; team-wide %DRR buff with chance to expoes those that hit the team)
Battle Strategies (tactical; team-wide %bonus damage buff with chance to expose those that hit the team)
Strategic Analysis (command specialization, grants a team-wide buff that grows over time, enhances DRR and bonus damage for the entire team for about half a minute - imo the best team-buff in the game; unfortunately due to a bug (?) one can't sprint while providing this buff to the rest of the team when using this ability as a captain - they can spring fine though -.-')
Take Cover (command specialization, allows the AI to crouch, DRR buff, HoT while crouched, all team-wide - very good defensive buff)
I highly recommend taking a BOff with the command specialization along and giving them both Take Cover I and the highest level of Strategic Analysis you can fit into your particular setup - the effect of those two simply can't be overstated, even if your BOffs don't have weapons they can properly use the benefits to your captain alone are easily worth it.
ManeuverabilityAny ability that either improves your ally's ability to maneuver on the battlefield, e.g. by being faster, or decreases your enemies, e.g. by slowing them, knocking them back, or pulling them to a certain location, falls into this category.
They don't directly affect the damage calculations nor can their exact effect be reliably predicted with how random enemy positioning is, as such the actual impact of these abilities is almost impossible to properly determine while working purely 'on paper'.
I found that being able to slow enemies is nice, but not a major benefit in most situations. A significant slow applied to a wide area/many enemies can be fairly noticeable as it makes it easier to avoid or flank them, but it is rarely decisive.
Pulling enemies into tight clusters, on the other hand, is a game-changer. Not only does this make it significantly easier to move around them, either to flank them or for completing objectives, it also sets them up perfectly for AoE DPS abilities and AoE Weaken abilities to nerf then vaporize the entire lot of them.
There are many abilities that can do so for captains. For BOffs though, the choices are significantly more limited. The most effective by far is the Paradox Bomb from the optional temporal specialization.
I always pack at least two of those with my BOff teams, sometimes - as with this build - even more.
Team Composition


There are many ways to make an effective ground team. In this guide though, I'll only showcase two variations of the same build.
The first one is meant for people that play through the story for the first time and want to enjoy it and its dialogue. Due to how some of the missions are scripted one needs at least one BOff of each career type for all the dialogues to show the correct person.
The second one is the actual composition for when you grind story missions for their rewards, e.g. when hunting for one of the many awesome mission sets.
Basic CompositionThe basic team composition is always the same:
two engineers for area denial and AOE damage
one scientist to heal the team and debuff the enemies
and either another scientist or a tactician to buff the team and help out with crowd control
Note: Some of the abilities I am recommending below are not part of the 3 base classes (engineer, scientist, tactician), but instead from one of the Specializations. In order to teach your BOff one of those abilities you'll need to get the appropriate Specialization Qualification Manual from the exchange first (or craft it yourself). They currently cost about 150-300k ec each.
ENGINEERS
The engineers have the same abilities in slot 3 & 4 (Lt. Cmd. and Cmd. respectively), namely a Mortar in the 3rd slot (ideally the 23rd century Photonic Grenade Launcher III since this one is insanely strong compared to the Quantum Mortar I) and the Paradox Bomb II (or III if you can craft that one) from the Temporal specialization.
One of them will have Uncertainty Burst I and Spread Decay II for the 1st and 2nd slots (cadet and lieutenant respectively).
The other will have Shield Recharge I and Chronomatric Diffusion I for their first two slots.
Note: If you don't have an engineering captain or one that isn't using the Sabotage kit module, then I very strongly recommend getting Sabotage I instead of Shield Recharge. Sure, it costs a pretty penny on the exchange with it being a lockbox item, but it is quite definitely worth it!
The mortars are likely the highest damage ability a BOff can have. Combined with the Explosive Expert Duty Officer (usually referred to as DOff) that grants a chance to spawn two extra Quantum Mortars whenever your captain or one of your BOffs uses a mortar ability they can wreak utter havoc among your enemies.
The other reason for the mortars is to have them in case an enemy gets stuck in or behind terrain or walls. Mortars no care, most of the time at least. Thus the chances of getting stuck on a glitched enemy are almost completely eliminated simply by having at least one mortar along.
The Paradox Bombs further enhance the impact of your mortars by clumping up enemies and making it significantly harder for them to dodge the massed mortar barrages heading their way.
The rest of the temporal abilities harm, slow, and weaken your enemies while building up that entropy to make the paradox bombs hit even harder.
Lastly, in the few cases where they actually get around to shooting you, the Shield Recharge should see you (and your BOffs) through a good portion of that without too much of an issue.
SCIENTIST
The scientist will have Medical Tricorder I, Tricorder Scan I, Paradox Bomb I, and Nanite Health Monitor I (or Nanite Health Monitor II if you can craft it or buy it off the exchange).
The Nanite Health Monitor is a good fully automatic emergency heal with multiple charges - and where it's on cooldown the Medical Tricorder will fill the gaps. The Medical Tricorder will also allow your Scientist to heal the entire away team back to full without having to trigger the longer cooldown of the Nanite Health Monitor.
Tricorder Scan, on the other hand, is an amazing debuff that can hit large groups of enemies, softening them up for the inevitable mortar impacts, while the Paradox Bomb helps to keep enemies nicely clustered up and pinned down.
FOURTH MAN
The fourth BOff depends on whether you want a tactician for experiencing the story missions as they were intended, or whether you want a more reliable option by bringing along another scientist for more healing.
Regardless of which you pick, they will have the Command specialization and use it to bring Take Cover and Strategic Analysis - both very potent buffs on their own, but with Take Cover actually allowing your BOffs to crouch the true impact of these two is even larger than one might think at first glance.
Take Cover allows your team's AI to crouch, increases their damage resistance and, while crouched, grants them a heal over time.
Strategic Analysis increases in strength the longer the battle lasts and increases the entire team's damage resistance while also granting growing bonus damage.
Story CompositionThe fourth BOff in the story composition is a tactician.
They will bring Take Cover I, Battle Strategies II, Strategic Analysis II, and Overwatch II (or Overwatch III if you can craft or buy it).
All of these provide very potent buffs for the entire team, including the captain, thus significantly increasing the away team's performance even with the ... limited ... AI that runs the majority of the team.
Battle Strategies increases the team's damage output by quite a significant amount while Overwatch not only grants a major boost to damage resistance for the team but also grants the team a chance to expose and weaken the armor of any enemy that hits them.
Grinding CompositionIn this composition, the fourth BOff is a scientist.
They will bring Take Cover I, Medical Tricorder II, Strategic Analysis II, and Nanite Health Monitor I (or, if you can craft or buy it, Nanite Health Monitor II) with them.
Since I already described all of these above, I'll skip doing so here, except to say that that extra healing is quite noticeable in certain ground combats during elite story missions. Having a backup in case one healer gets stunned or downed is a major help!
It can be a good idea to also teach both your scientists the Vascular Regenerator ability so that, if you expect hordes of weaker enemies like Borg or Hur'q, you can switch over to that one instead of their respective Medical Tricorders.
Equipment


When it comes to the gear for your ground team I have to admit that the impact of whatever you equip them with will be fairly minor - unless you equip them with things that have special effects besides their stats.
For that reason, there are a few items that I recommend for your BOff team to get if at all possible.
ArmorFor armor I recommend getting the Jem'Hadar Armor[sto.gamepedia.com] (a mission reward) since this one not only has rather nice stats but also grants health regeneration and a rather significant amount at that.
Simply having a source of +% health regeneration on ground is a noticeable though not exceptional boost. Having +100% or more is almost equivalent to a small permanent HoT effect.
But when you combine this with ways to shed threat/agro and forcing enemies to spread their attacks over your entire away team? Then things become significantly more potent.
Hence, if you can do so adding health regeneration to your BOffs is a rather significant boost, but if you can't reliably shed agro on your BOffs? Then it might be a better idea to go for armor that provides better defensive stats or outright hitpoints instead of passive recovery. You'd have more benefit from that.
Though I have to warn you - this armor lacks any kind of melee defense and thus missions against lots of melee enemies, especially fast ones, will be a bit tougher than they might be with another armor. HOWEVER: you got so many paradox bombs and slows & knockbacks already that this is rarely a problem, even against Hur'q swarms like one faces in the Home mission.
ShieldFor your BOff's shield, I recommend the Romulan Operative Personal Shield[sto.gamepedia.com] , another mission reward.
The shield is decent, but not exceptional as far as shields go.
It does, however, provide one benefit that no other shield provides: it automatically cloaks the wearer whenever they take damage, and with a fairly short 30s cooldown at that.
Technically the Nakuhl shield would be better since it provides outright immunity for a time, not just stealth. Unfortunately, the Nakuhl shield applies its buff to the captain, even when triggered on a BOff and thus does nothing to help said BOff -.-'
Which makes it useless for your BOffs, no matter how great it is on your captain.
Hence I picked the Romulan Operative Personal Shield instead.
The automatic cloak upon taking damage combined with the short cooldown basically ensures that your BOffs loose aggro almost constantly, thus forcing your enemies to switch targets over and over, spreading the damage over the entire away team and its pets, minions or fabrications.
THAT is why I pick this shield for the BOffs.
WeaponAs I said earlier, BOffs rarely use the primary fire mode of any weapon given to them. They use it occasionally, but so unreliably that they might as well not bother at all.
For that reason, as I stated earlier, giving them a weapon that relies on its secondary fire mode, for the most part, is the way to go. The Romulan Plasma Repeater Pistol[sto.gamepedia.com] I mentioned earlier is - so far at least - my absolute favorite for my entire BOff team - the fact you can get it for free from a mission only makes it better :-P
In fact, that weapon is so good, that I used it on my captain until midway into my Reputations where I tried out various alternatives in vain before finally finding one that performed better for me with my build.
DevicesThere are two consumables that every BOff should have in my opinion and one type of consumable that should also be standard if it is available.
Pahvan Healing Crystal
The Pahvan Healing Crystal[sto.gamepedia.com] from the Illusion of Communication is a team-wide heal over time. That on its own is nice, but the amount it heals is not especially noteworthy.
If combined with one of the DOffs that grant a chance to summon a Medic, Nurse or EMH Mk I when using a Hypo it becomes somewhat ridiculous though - the chance to summon said healer isn't rolled once, but for every single target the crystal affects ... that means a single use of this crystal can result in a small army of healers getting beamed down in one go ...
The combination is so good - or at least so much fun - that I keep an EMH Mk I DOff AND a Nurse DOff in my roster at all times while also bringing that crystal to any mission or TFO I run. Having multiple healer NPCs accompany each captain on the team is just to good to ignore :-P
Frequency Remodulator
This item can be replicated for free and is a must-have on any Borg mission - at least if you don't use a weapon the Borgs can't adapt to (e.g. a kinetic or physical damage one).
While I could swap BOff gear to account for that whenever I face Borgs I'm too lazy and thus keep one of these equipped on all my BOffs at all times - which also ensures I can never forget to give them one either ^.^
Combat Pets
If you give one of your BOffs a Combat Pet (e.g. the Horta[sto.gamepedia.com] craftable mission reward) they will deploy the pet whenever they enter combat. Thus, by giving each of your BOffs their own pet, you can easily bring a lot of extra meatshields and a few more DPS onto the battlefield.
While combat pets don't bring amazing DPS they do work rather nicely as disposable meatshields, thus making any combat just that much easier.
Lastly, I'd like to mention the Rebreather[sto.gamepedia.com] which not only helps against certain environmental effects but also against the occasional gas-based ability.
Summary
All in all, by bringing a good mix of AOE damage, crowd control, and ways to both reduce damage as well as recover from it the game becomes significantly easier.
Your team will keep the enemy piled up in one cluster almost permanently, rain down debuffs and mortar shells on that juicy target while significantly improving the performance of the entire team. They will also passively retreat from battle due to their shield's special ability and have sufficient healing to recover from any damage they take past all the above.
I have used this away team setup during several tests including multiple runs of the Hive story mission on elite. In all of those runs, I basically didn't use my captain at all, leaving it to the BOffs to handle all the ground combat entirely on their own. I also restricted myself to use the gear 'raw' aka as one gets it from the various missions. None of it was upgraded or re-engineered for better performance.
Yet even with that premise I only had a single BOff go down once during the entirety of that mission - and that was my own fault. I got overconfident and ran too far ahead of the team, thus forcing the BOffs to overextend into the middle of the enemy and thus ended up with them being surrounded and one of them killed. Though even then, when I pulled them back out to the edge of the combat again they managed to win the fight just fine.
I have yet to see a more effective team that is as much fun to see in action ^.^
Source: https://steamcommunity.com/sharedfiles/filedetails/?id=2154565908
More Star Trek Online guilds
- All Guilds
- 100% Critical Chance in Space
- Do What You Love and the Dilithium Will Follow: A Very Basic Guide for Newbie Players
- Path to 2409 daily trivia lore questions.
- Beginners Guide to STO
- Accolade Guide - Colonized New Romulus
- A Beginner's Guide to Playing as the Federation
- Accolade Guide - Nimbus Survivor
- Star Trek Online - Basic Engineer Guide
- Star Trek Online - Starship Guide for Beginners and Stuff