Introduction
Rift Wizard is a game about wizards. Wizards blow things up. Ergo, Rift Wizard is a game about blowing things up. If you're not blowing things up, you're doing it wrong!
Well, maybe not. Rift Wizard gives you a lot of freedom to play however you like. This guide simply describes one of many build archetypes you can use. But Arch Sorcerer makes a great starting point, and even if you plan on pivoting into a specific build later on an Arch Sorcerer start can help you power through the early game to save up SP for your grand design. If you're struggling with the game and find yourself running out of potions before you can really get your build up and running, this guide may help you jump start your game and give you enough time to accumulate the skills you really want to build around.
The Build
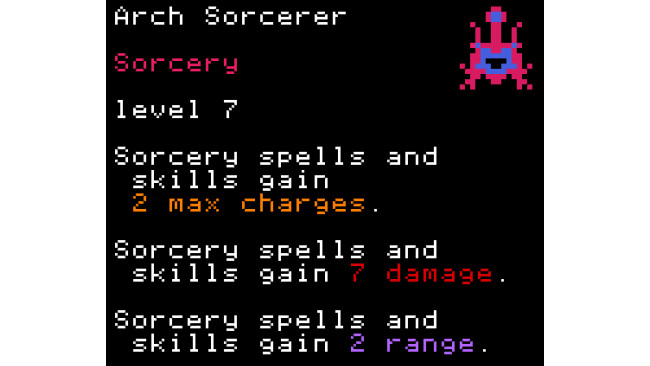
Rift Wizard has a wide range of passive skills you can buy, including many overlapping and complementary skills. It's easy to look at the huge skill list and picture stacking up a bunch of skills that all apply to a single spell to pump it up to dizzying heights--but conversely, you can take a single skill and apply it to a wide range of spells. And no skill is as broadly applicable as Arch Sorcerer.
On its own it may not sound like much for any given spell, but when you've got 10 different sorcery spells at your fingertips that's 20 extra charges from every mana potion. Big spells with few charges get a proportionately bigger impact from the extra charges, while weaker spells benefit from the flat damage boost that can increase their damage output by double or more.
So Arch Sorcerer is the lynchpin of your build, and you really want to pick it up somewhere around rift 3-6. Ideally you want to pick it up sooner rather than later, but sometimes a juicy magic circle or shrine may tempt you to deviate for a couple floors. Unless there's something particularly exciting, though, you should strongly consider aiming for Ruby Hearts early on while you save up for Arch Sorcerer.
Your gameplan typically looks something like this:
Rift 1: Buy a cantrip as normal to clear the level, then buy 1-3 more cantrips.
Rifts 2-4: Save up SP for Arch Sorcerer and immediately purchase it. Maybe spend 1-2 SP on additional spells before Arch Sorcerer, if you get a discount or good shrine.
Rifts ~5-7: Use Arch Sorcerer to steamroll a couple levels while looking for good discount circles to stock up on more cheap spells. If no relevant circles appear, just buy something big for now to tide you over for a few more circles.
Rifts ~8-11: Try to find another circle to plug a bunch of upgrades into a couple bread and butter spells, preferably ones that you've found shrines for. If you can't find any circles for cheap upgrades, then aim for big ticket upgrades or expensive skills instead.
Rifts ~12-17: If you have any gaping holes left in your build, try to plug them now even if it means coughing up full price without a circle. Round out your build with utility spells.
Rifts ~18-21: Grab any further skills and upgrades to pump up your key spells to power through the late game gauntlet.
Rifts ~22-24: If you don't have a suite of spells to handle Mordred yet, you need to buy them now. At a minimum look for a teleport, a shield stripping attack, and a massive single target damage spell. If you can squeeze in some CC and defensive/healing spells, all the better.
Beyond your starting spread of cantrips there really aren't any absolute must-have spells to build around. Quantity is its own form of quality: buying a lot of different spells (preferably at discount circles when possible) gives you a ton of ammo, and having different damage types and quantities and AOE options lets you stretch your spell charges even further by being able to hit enemies where they're weakest. When in doubt, buy more spells! Buying upgrades and skills usually just makes your existing spells better at doing what they already do... which means you may run into a dead end in situations where they don't. Buying another sorcery spell that does something completely different is usually more efficient than trying to force a single spell to handle situations it's not naturally good at.
Try to pad out your spell list with to cover as many different bases as you can:
Do you have a source of a wide range of damage types? Holy damage is ideal as few enemies resist it and many are vulnerable, but by the time you reach lategame even holy damage will run into plenty of resistances, so diversification is key.
Do you have efficient AOE? Spells like Fireball, Lightning Bolt, Fan of Flames, Toxin Burst, Icicle, and Heavenly Blast are good cheap cleanup spells that will save charges on your better spells.
Do you have chaining attacks? Chain Lightning, Arc Lightning, Death Shock, Death Cleave, and Prince of Ruin are all ways to wipe out ever-multiplying chaff quickly.
Do you have big single target damage? Touch of Death, Chaos Barrage (situationally), Annihilate / Mega Annihilate, and Shrapnel Blast (with upgrades) are all excellent boss killers.
Do you have ways to hit through walls? Blazerip, Toxin Burst, Shrapnel Blast, Chill Wind, Wheel of Death, Heaven's Wrath, and Meteor Shower all let you snipe troublesome enemies and gates from a position of safety. With upgrades Thunderstrike, Volcanic Eruption, and Pillar of Fire all do the same.
Do you have ways to deal with wide open spaces? Heavenly Blast, Arc Lightning, Chill Wind, Pain Mirror, Siphon Shields, Searing Orb, Searing Seal, and Searing Heat are all very useful here.
Do you have ways to get around? Blink and Teleport are the gold standard here, but with the right setup Underworld Passage, Lightning Form, Aether Swap, and Soul Swap all do the same.
Do you have ways to deal with shields? Siphon Shields, Magic Missile (with upgrades), Chaos Barrage, Shrapnel Blast, Cantrip Cascade, Toxin Burst, Searing Orb, and Nightmare Aura are all good at racking up lots of hits to take down shields quickly.
Other Skills
There are a lot of nice skills beyond Arch Sorcerer but they should not be regarded as priorities--you really want to flesh out your spell list first. Aim for having at least 6 or so spells before you start branching out into skills, or even more. It's not unreasonable to buy 10-12 spells or even more just to give yourself a good spread. You can aim for a more focused build that stacks up a bunch of skills to pump up a smaller number of spells, but that's not the primary goal here.
In particular, some skills to look out for later in the game:
The various elemental "Lord" skills are good for pumping up a couple of staple spells further, although you should still focus on Arch Sorcerer first.
Prince of Ruin turns any physical/fire/lightning spell into a knockoff Chain Lightning, turning monsters that split or summon into nonissues and squeezing out a fair bit of extra damage in general.
Shatter Shards is a great way to turn freezing spells into extra damage. Crystal Power, Frostbite, Ice Tap, and Radiant Chill all let you extend support for your freezing spells even further, but Shatter Shards is probably the best bang for your buck to start with.
Melting Armor, Searing Heat, and White Flame all let you juice the damage from fire spells considerably, if you go that route.
Collected Agony lets you funnel the excellent AOE damage from Toxin Burst (or other poison spells, but let's be serious here) into incredible single target damage, although it can be tough to aim. Collected Agony's dark damage can kill things that Toxin Burst couldn't on its own, although unfortunately Poison+Dark immunity isn't that uncommon. Paralyzing Venom also turns Toxin Burst into CC, although really most things don't live very long anyhow once you start slinging upgraded Toxin Bursts around.
Be wary of the various skills that redeal damage in different elements: they sound nice, but you have to do damage with the initial element in the first place so they won't really let you get around resistances. Cracklevoid is head and shoulders above most skills here since the damage goes to other enemies, so you can conceivably hit one enemy with arcane damage to deal lightning damage to other arcane-immune enemies. Pyrostatics works somewhat similarly, but has more steps involved.
Horror and Shock Value both let you turn kills into extremely powerful CC. They're expensive and specific to certain damage types, but very strong, especially with mass kills.
Soul Harvest and Arcane Accounting can be used to facilitate unlimited-charge engines, although they are quite expensive and focused; you may often be better off just buying more spells. Glittering Dance is much more limited but stretches your teleport charges a lot further and gives you some free fodder to boot. Chaos Casting... exists, and will give you a couple extra charges of Mega Annihilate if you use the cheaper chaos sorceries a lot, but is pretty expensive for what you get.
Level 1 Sorceries (Cantrips)

Death Bolt : Death Bolt is extremely powerful, but on its own it's really more about raising skeletons than it is about blowing things up. The expensive Soul Battery upgrade lets you ramp up the damage to potentially blow the game wide open, but it pushes you into a more one-dimensional Death Bolt build. It will clear the first few rifts very efficiently by itself but you might as well just go hog wild with multiple cantrips anyhow.
Fireball : A classic wizard staple, Fireball is excellent for clearing chaff but doesn't have the greatest scaling and can be a friendly fire hazard in tight spaces. If you splurge on Fire Lord it starts to get truly terrifying but that's a lot of SP just to pump up Fireball, and if you have bigger fire spells you probably have limited use for Fireball.
Icicle : A very well-rounded spell. Icicle brings two different damage types to the table, some light splash damage, and can be upgraded to add freeze and free charge refills. Virtually nothing is completely immune to both damage types, although 100%/50% resistance is quite common--watch out for metal enemies.
Lightning Bolt : The gold standard for cantrips. It's got excellent range, damage, and line-based area coverage and a great suite of upgrades. Channeling allows you to continually cast over the same target area without expending extra charges, and Judgment/Energy Bolt will give you triple damage spread across three different damage types. It's easy to get your money's worth whether you invest a lot or a little into ugprading it.
Magic Missile : Magic Missile lacks the AOE potential of other cantrips and is relegated to more of a utility role, although it does its job well. It has best-in-class range and a damage type that gets around a lot of common resistances, and the Shield Burn upgrade lets you burst down enemy shields quickly--although note that a lot of shielded enemies have high arcane resistances. Theoretically you can get around that with some of the Bolt upgrades but they are awfully expensive for what you get.
Poison Sting : Even more of a niche utility than Magic Missile. Physical damage has a lot more resistances than weaknesses and there is a lot of overlap between physical and poison resistance. It theoretically does a lot of damage to enemies that are susceptible but only over a very long time. It exists to combo with Combust Poison and that's it.
Level 2 Sorceries (Pseudo-cantrips)
Annihilate : For 2 SP it's tough to beat Annihilate for single target damage. While the damage type spread isn't the best (without upgrades it will do all of 16 damage total to metal enemies due to their resistances) it's very cheap to add extra damage types and more damage. You can upgrade it to have limited cascade potential but it's an awfully expensive upgrade for very limited chaining; you'd be way better off just buying Death Cleave instead.
Blazerip : The area is a bit awkward and it's short on charges and range, but this is a fantastic utility spell and practically always worth picking up at a circle. Use it to snipe gates and problem enemies through walls or simply blast a path to walk through. The damage won't knock your socks off but it will do a decent amount of work for a spell with so much utility.
Chain Lightning : One of the best crowd clearing spells in the game, and a steal at 2 SP. Note that you can cast it at floors to shoot around corners, too. Damage is not great but that's easily fixed. It's not something that you should rely on to carry a run but as a splash pickup it's terrific insurance against slimes and other summoners.
Chaos Barrage : If you can focus the barrage on a single enemy it gets even better single-target damage than Annihilate while still being able to fan out effectively over a couple targets (without a pricy cascade upgrade), although its upgrades are expensive and don't bypass resistances the way Annihilate does. Still, it's a lot of damage for 2 SP and a fun alternative.
Disperse : The first pure utility spell on the list. You can use it as a panic button to try to get troublesome enemies off your back, but it's not terribly reliable. Generally, this is more for conjurers who want to spread their minions around.
Fan of Flames : Despite what the description says, this doesn't truly ignore LOS and will get stopped by solid walls--but it still will splash around corners as long as a path exists, letting you hit targets from a position of safety. It's fun as hell and since it comes out of the box as a channeled AOE it's extremely efficient although the lowish single type damage holds it back. If you didn't pick up Fireball this makes a very compelling alternative for clearing chaff.
Healing Light : This does literally nothing if you don't have minions and minions are for degenerate conjurers, not cool sorcerers like you.
Heavenly Blast : This is a bit more like it! It still leans towards conjurations but it's a deceptively good blasting spell, with a unique and effective AOE and an extremely useful damage type. You will probably want to splash in some kind of conjuration to get the maximum benefit out of it but it doesn't take much investment to make minions worthwhile backed up by this kind of juice. In a pinch you can go for the Spirit Bind upgrade to let Heavenly Blast make its own minions, but you need to commit to a lot of investment to make that build work.
Invoke Savagery : Another conjuration support spell. I will begrudgingly give this one an extra star because it's a decent way to turn minion spam into real damage, but it's still not what we're here for.
Melt : Kind of a niche utility spell. It does get you a lot of charges of decent-ish single target damage, but having twice as many charges and half as much damage as Annihilate doesn't really work out in your favor. The resistance debuff is basically window dressing; it does have an upgrade that will let you freeze ice immune enemies, but a single target debuff just doesn't have the action economy to be worthwhile.
Soul Swap : At first glance this looks like another conjuration support, but there's a cheap upgrade available that lets it target enemies. If you get a circle that means you can get an infinite-range teleport for 2SP total, although the targeting restriction does limit it quite a bit.
Thunder Strike : A lot of people swear by Thunder Strike and it's a decent utility but in the end I just find the upgrades a bit pricy for what it is. If you stack upgrades on it you can get a ton of single target non-LOS damage but it's an awful lot of SP and I find it doesn't really have the range or charges to have real legs. Still, the AOE stun can put in some work, and if you get a circle discount it makes for a very cheap panic button.
Toxin Burst : It's easy to write this off, because who has the time to sit around and wait for poison damage to tick? But it does do an entire 1 point of direct damage, which means it benefits from damage boosts: slap Arch Sorcerer on this and it does 8 damage to an immense area, through walls, which ain't too shabby. It also has a built-in damage upgrade that's absolutely huge for the cost, turning it into absolutely premium AOE damage at a very affordable price.
Level 3 Sorceries
Aether Swap : It's fun and being able to teleport+attack at the same time is very action-efficient, but the range and targeting is too constrained to be a good escape tool so it winds up being a cantrip-level attack that also puts you closer to danger.
Blinding Light : Absolutely do not sleep on this. Being able to blind everything on the map makes wide open levels vastly less dangerous, and the damage is nothing to shrug at either. Like Toxin Burst it doesn't sound like much to start with, but it potentially hits the entire level, the damage can easily be boosted to very appreciable levels, and many of the enemies that it hits are vulnerable to its damage.
Blink : It's less efficient than Aether Swap, but what a difference being able to target empty spaces makes! Having some form of teleport is heavily recommended and Blink is the basic low level staple option, although cool Arch Sorcerers should strongly consider saving up for Teleport instead. Still, if there's a nice translocation shrine it can be worth picking up an early Blink.
Combust Poison : A little bit niche, but potentially terrifying. Toxin Burst is already an extremely effective offensive spell and this is a hell of a force multiplier on it. It also makes Poison Sting somewhat usable as the Acidity upgrade on Sting lets you poison some poison-immune enemies. It's not necessary, but if you already have Toxin Burst it will get a lot of extra mileage out of it.
Devour Mind : A very unique and interesting spell, quite strong but a bit limited. You can do very decent chunks of damage through walls and with the cheap Gluttony upgrade you can mow down infinite numbers of a lot of enemies. It's a neat utility pickup, although its limitations make it tough to build an engine around.
Earthquake : Another utility spell, and not one of my favorites. It covers an absolutely huge area with decent damage but it's very unreliable since it misses 50% of the tiles in the area. The more interesting part is that it will clear walls (which other spells do better) and even fill in chasms (which other spells don't!), but if you need to get around on a chasm level you'd likely be better off picking up a teleport instead.
Flame Burst : Now we're talking! Flame Burst doesn't have the utility of Earthquake but on the offensive side it delivers everything Earthquake promises and more. It's got some very cost-effective upgrades that let it rack up some very terrifying damage, although the more expensive utility upgrades are quite pricy. Spreading Flame can be a literal win button in the right circumstances, though.
Ghostball : Like Death Bolt, this is really more about churning out minions. Dark damage is an interesting type but this is cantrip-level damage with very little ability to improve unless you start investing in minion skills, which is a road no self-respecting sorcerer would go down.
Holy Fire : Not too shabby, but not great. It's solid single target damage with a little bit of spread in a unique pattern, and there are plenty of nasty undead/demon enemies that get stopped cold by the stun. Interestingly the AOE portion of the attack goes through walls too, but ultimately the splash damage just isn't that impressive. It's a fine spell but not quite good enough to be your bread and butter.
Iceball : Another solid utility-grade spell. The damage isn't amazing but it scales nicely, the CC is useful and there is plenty of skill support for freeze if you want to go that route.
Shrapnel Blast : An interesting and fun power. At base it's just an odd utility spell--its damage is pretty unreliable but in a tight space you can focus the shrapnel into a small area and rack up some decent damage for a spell that doesn't require LOS, and in a pinch you can use it to get through walls. But if you shell out for the expensive Magnetized Shards upgrade it becomes absolutely murderous, one of the quickest ways to cut down high HP enemies.
Touch of Death : One of the highest damage spells in the game, for only 3SP. The range is an obvious problem and dark damage runs into a lot of immunities, but it does have affordable upgrades to staple on more damage in other damage types. It's a very decent panic button for tough melee enemies and has excellent synergies with a few choice enchantments. You can turn it into a minion generator too, although this gets quite expensive and feels like a bit of a distraction.
Underworld Passage : A very situational but very powerful teleport. It won't help much in labyrinth levels but it's invaluable for wide open chasm levels if you start to get bogged down; zipping over to the other end of the map to snipe monster gates will save you a ton of resources.
Level 4 Sorceries
Arc Lightning : Tricky to use, but potentially powerful. The damage isn't great and the area is unpredictable, but the range is potentially infinite. The upgrades are both very powerful and very expensive, so it's more of a spell that you build around, but when it's firing on full cylinders you can clear out open maps pretty quickly.
Bone Barrage : Like Invoke Savagery, this exists to get spike damage out of your summoned minions. It does have some advantages for a sorcery build--any minions that you do incidentally end up generating can be considered disposable, so liquidating them for damage is no big loss. It's awfully expensive for what it does, though.
Death Gaze : Even more crossover conjuration utility. Death Gaze rewards minion quantity more than quality, so if you're determined to use Ghostball this will help translate it into extra damage. Still, you're a sorcerer--you should be able to get more than enough damage out on your own.
Death Shock : Back to the good stuff. Death Shock gives you a decent number of charges of meaty damage that can spread across multiple targets, with a good combo of damage types that is not often walled and a reasonably priced upgrade that can turn it into a potential level wipe. It is the sort of thing you want to center a build around but it can occasionally be worth splashing into also.
Ice Vortex : Very much a combo piece. Without a source of freeze it does basically nothing. Combine with Chill Wind or Word of Ice to spread damage and freeze around. Throw in Ice Tap and Crystal Power and you're looking at a potential level wipe. Two stars is misleading because it's absolutely a game-winning spell but you really have to plan around it specifically.
Orb Control : Orbs are technically summons and therefore not for you. Even then, the best orb is Searing Orb which doesn't need the extra help and the other orbs aren't worth investing turns and SP to try to make them better.
Pyrostatic Pulse : If it looks unimpressive, that's because it isn't. It's not exactly useless: the AOE is absolutely fantastic, and if you can plug in a few cheap upgrades at a circle it can wind up being a pretty respectable spell. Still, there's never really a compelling reason to take it except for sheer novelty.
Storm Burst : Flame Burst's little brother, that's more expensive for some reason. It does have some very decent CC potential, so it's potentially an even better panic button than Flame Burst, but it runs into an awful lot of immunities. Having dual damage types helps but like Earthquake you can't guarantee that any given enemy will get hit by the "right" damage type, and many construct enemies have double immunity anyhow.
Void Beam : The range on the void laser can't be beat; coupled with the ability to blast through walls, it's an excellent way to snipe problematic enemies or gates that you can't reach otherwise. Still, the mediocre base damage means you will burn through your limited charges very quickly trying to get things done; you can fix that with upgrades, but it's quite costly.
Volcanic Eruption : Oh man. This thing is basically a long-range Flame Burst, which is incredible. It does have targeting issues, but on chasm levels it can't be beat--and with upgrades, you can largely fix the targeting problem (although arena levels do exist.) It can be pretty expensive to upgrade it fully but it's worth the cost, and also functions fine as an occasional utility without them.
Wheel of Death : Kind of an all or nothing spell. On its own, it's moderately useful as a way of sniping gates or bosses after clearing out the rest of the enemies on a level, although you will still probably have to burn a couple extra charges on newly spawned monsters wandering out of gates. With the expensive Death Roulette upgrade you can quickly clear anything that's not immune to dark damage; couple it with Soul Harvest and you can trivialize most levels for free. That's almost 20 SP worth of investment, though, and while it's worth every SP it's not something you pick up casually.
Level 5+ Sorceries
Cantrip Cascade : It's awfully expensive, and requires additional investment in cantrips to really sing, but it's a potential gamewinner. If you have a heavily upgraded Death Bolt or Lightning Bolt it will let you hit a much bigger AOE with that big damage potential. If you have Icicle+Fireball you can nail a crowd with a bunch of overlapping AOEs to rack up a ton of damage, although you need to be very mindful of friendly fire if you go that route. All in all it's a great force multiplier and very fun, but it's quite expensive for the range and number of charges you get.
Chill Wind : An absolutely stellar and wildly underrated spell, it's easy to underestimate this before you see it in action. When the description says "Ignore LOS" it means ALL. OF. IT. Chill Wind cuts a swath all the way through the map, no ifs and or buts. Cast it close to you to freeze nearby enemies and get some breathing room. Cast it on a cluster of gates across the map a couple times to snipe them dead and end the level more quickly. The only thing holding it back (and rightly so) is the anemic number of charges--if you can hook it up with a way to recharge, though, you can very quickly and safely kill everything on the map that's not ice immune.
Mega Annihilate : Does exactly what Annihilate does, only moreso. Fantastic for getting rid of tough enemies quickly, and with upgrades it's a boss killer par excellence. It's on the expensive side, but it's a great addition to absolutely any build if you can afford it.
Pillar of Fire : Pretty cool, but kind of crap on its own--it's not terrible as a "delete this gate now" button but it's very expensive for how few charges you get. The channeling upgrade is an absolute make-or-break for it: it's not clear from the tooltip, but it gives you unlimited channeling. On many maps you can hole up in a dead end, set up Pillar of Fire, and mash spacebar until all the starting enemies are dead and then mop up the gates; even when you can't wipe the whole map that way, if you hook it up with some radius upgrades and spend a few turns channeling you can do heinous amounts of damage.
Soul Tax : A really fascinating utility spell--it quickly whittles down the HP of anything that doesn't resist dark+holy, while also being one of the few sources of healing in the game. It's something of a luxury, but one that you should be happy to shell out for if you can afford it. Do note that the 1/3 damage happens sequentially, so instead of knocking off 2/3 of the enemy's HP it will knock off 1/3 (assuming no resistance) and then knock off 1/3 of the new lower HP; this also means that the Arcane Tax upgrade that shaves off an additional 1/3 has serious diminishing returns, but it does make it easier to get around resistances.
Teleport : The king of translocation spells. In a vacuum, a 1-charge teleportation spell is a tough sell. But if you're already planning on grabbing Arch Sorcerer, then Teleport becomes a lot more appealing with 2 extra charges for free. You could just grab Blink earlier and upgrade it into a mini-Teleport with more charges, but those upgrades add up quickly and you will still have to burn more of those charges to compete with Teleport's range.
Heaven's Wrath : A very interesting utility spell that you can potentially build an engine around. Nailing the toughest enemies on the map for decent damage + stun is pretty great; the actual damage output isn't very impressive for how expensive each charge is, but being able to hit anywhere on the map helps a lot. Sadly it won't hit gates, but it makes a great complement to Wheel of Death: Wheel away the gates and anything vulnerable to dark damage, then slam Heaven's Wrath until those are dead.
Meteor Shower : The biggest ♥♥♥♥♥♥♥ nuke in the game, Meteor Shower delivers some really impressive firepower at a very steep price tag. As expensive as it is it really wants even further investment to shine--Fire Lord is incredible here, so it's probably best to pick up Meteor Shower later on after already have Fire Lord (with a few cheapo fire spells to justify the initial investment.) It's fun, it can pull its own weight, but there are easier ways to trivialize the game. Still, while starting a level with Meteor Shower may not be the single most effective tactic in the game it's still fun as hell and good enough to be worth a try.
Enchantment Spells
There are an awful lot of enchantment spells, and many of them are not going to be especially relevant to a sorcerer build, but there are still some handy utility spells so this guide will cover a few highlights. You don't need them, and I would recommend using them sparingly in order to maximize the benefits of Arch Sorcerer, but picking up one or two for utility purposes is probably a good idea. Stopping to cast enchantments in the middle of a fight can be rough, but remember that you can cast enchantments right before you enter a rift (use "I" or ">" keys to open a rift you're standing on top of without having to take an extra step losing a turn of duration.)
At the top of the list is Death Cleave, which gives almost any spell in your arsenal a chain-on-kill effect. This lets you turn single target spells like Touch of Death or Mega Annihilate into potential level wipes. It does rely on being able to kill enemies in one shot, so shields, immunities, and even just very large HP totals can stop the chain cold. But even if you're not able to wipe a level, letting you hit more enemies with your best spells is extremely powerful. Do note that it only works on spells you target directly--no Wheel of Death or Heaven's Wrath shenanigans here, sadly. Even so, it's a phenomenally powerful win button for most levels and picking it up by the mid-game will make the game much easier, perhaps even too easy.
Nightmare Aura is another popular pick. If you hole up in a dead end of a twisty maze you can rack up quite a bit of damage on enemies as they make their way towards you (great for gates that are close by but on the other side of walls you can't easily walk around), and if nothing else it will strip shields on anything close to you.
Siphon Shields is the other standout here. Wide open levels with lots of floating eyes, troublers, or aelfs can be extremely punishing. If you're not packing Blinding Flash or Searing Orb then it can be very painful trying to deal with all those shields while getting sniped by long-range attacks; Siphon Shields will take out all of them while also buffing you with a tremendous stack of shields. The upgrades are very affordable and can boost the action economy even further, turning it into one of the few sources of mass multi-shield removal and also letting it weaken or outright kill some high shield/low HP enemies (although unfortunately many of them are arcane resistant.)
Pain Mirror is another good utility for open levels. At first glance it seems like a bad idea since Plan A is to avoid damage, but sometimes that's not practical, and if there are a lot of enemies in view then Pain Mirror will multiply back anything you take many times over. On a rough level it can quickly wipe out anything that's not immune to dark damage; while many later levels may not have many enemies vulnerable to dark, it will reliably delete gates if nothing else.
Twilight Gaze is an excellent way to get around those pesky dark resistances, and it works on line of sight just like Pain Mirror. You can also use Conductance for a similar effect on lightning resistances, but it's a single target spell so it's not terribly efficient.
Purity is extremely handy insurance against enemies with petrification/freezing/stunning attacks. It only buys you a few turns of safety but hopefully that's enough to get control of a safe perimeter. It can also save you from debuff totems, but since those keep hitting you for the duration of the level it's only really useful for corner cases.
Freeze, Petrify, Basilisk Armor, Sight of Blood, and Petrification Field are all great CC spells and having at least one is a big help, although you do need to be mindful of the resistance bonuses on petrification--if you've got great holy/arcane/dark damage, go nuts.
Lightning Form is a fun alternative to proper translocation spells, although the fact that all the translocations benefit from Arch Sorcerer and Lightning Form doesn't makes it somewhat less appealing; it's really for lightning-centric builds first and foremost.
Dominate is extremely powerful as it effectively deletes an enemy and turns them into your minion. It's not the world's greatest splash and really encourages you to build around it, but if you picked up Heavenly Blast at a holy circle then Dominate is a good complement.
Mystic Power, Mystic Vision, and Multicast all seem very tempting as they directly improve your sorcery spells. Honestly they're fairly niche, though, and you'd often be better served just throwing more sorceries. Mystic Vision can be useful to increase the AOE on cone spells or to extend your reach for sniping gates, and Multicast is an effective alternative to Death Cleave for non-targeted spells like Heaven's Wrath, but by and large you can probably pass. Searing Seal also exists in a similar space, although its limitations are much more obvious and it's a big enough force multiplier to be worth it.
There are several "pseudo-sorceries" that act as attack spells with a duration: Death Chill, Lightning Halo, Blizzard, Lightning Storm, Seal Fate. Again, not being able to benefit from Arch Sorcerer is a real drag; Seal Fate is probably the cream of the crop here, as it has enough charges and damage that you don't miss the Arch Sorcerer buffs too badly.
The various Eye enchantments such as Eye of Fire/Lightning/Ice/Rage similarly are more or less attacks. They're really oriented towards their own specific Eye-centric build, but they're good enough in a vacuum that plugging a few SP in at an enchantment circle is not a total waste. The damage types aren't terribly exciting, though.
Conjuration Spells
You may be asking yourself, "What is this even doing here?" But even a sorcerer build may have a reason to dip their toes into the conjuration pool, if it strikes your fancy or a juicy shrine appears early on. Again, this guide will not cover everything but will touch on the most relevant spells.
Searing Orb is the main standout--it's almost pure direct damage, practically a sorcery in all but name, and obscenely powerful. It can easily trivialize open levels to the point that it feels a bit cheap to take it, but if you need the firepower then go for it.
No discussion of conjurations would be complete without mentioning the Blue Lion, a beefy summon with plenty of charges that also gives you shields. It's expensive, but not a bad hedge for your bets. Call Archon is another tank that can hand out shields and has a solid ranged attack on top of that, although it has a rather short duration.
Earthen Sentinel and Giant Bear are both good, affordable meatshields that can dish out some decent damage--stick them in a chokepoint or drop them next to an enemy gate and forget about them. In a pinch even the lowly Wolf can do, especially with a good shrine.
Chimera Familiar is a fun damage multiplier for a lot of your classic blasty sorceries. It runs into some of the same problems as Multicast, although it has a much longer duration as long as you can keep it alive. Works great with long range spells, although it doesn't work with blindcasting. Just don't get caught in a crossfire!
Choir of Angels is a nifty utility spell. It may not look like much, but many undead and demons take double damage from holy so out of the box the 3 angels add up to something like 18 damage per turn over a large area. That will simply melt a lot of enemies--and minion damage bonuses can boost that even further. While you probably don't want to invest in a lot of conjuration boosts, if you stumble across an Angelic Attunement Shrine then Choir of Angels will just delete undead and demonic enemies across a wide area. Note that the angels will heal living enemies, but hopefully you should be killing them quickly enough not to matter.
Heavenly Idol can be used to similar effect on open maps, but its aura effect cannot be boosted so it's limited to chipping them down slowly. Still, on demon-filled lategame maps that damage can add up.
Prison of Thorns can be a decent panic button to slow down a cluster of enemies, although it works best as a way to get a lot of minions out on the field at once and relies more on synergizing around that (particularly with death triggers, since they don't tend to live long.)
Fire/Ice/Storm/Void/Gold Drake summons are all very decent artillery, although somewhat redundant with your own sorcery blasting, and probably best left to dedicated dragon summoners.
Conclusion
I hope this guide was useful. Please don't take my opinions as gospel--if I've rated a spell low I may have overlooked something crucial or just haven't been using it properly. Even if I'm not, it doesn't really hurt to splash a couple "weak" spells into a build as long as your bases are covered, especially if you're hitting relevant circles or shrines. The whole point of this sort of build is that you get to build a big grab bag of spells, so it's OK if some of them aren't as useful as others--you can always use them for mop up to save charges on your "good" spells, or to hit very specific enemy types where they shine.
Source: https://steamcommunity.com/sharedfiles/filedetails/?id=2526286046
More Rift Wizard guilds
- All Guilds
- Bestiary List (Names only)
- Frostfire build
- how to activate Cheatmode
- The Path to Ice Wizardry
- Archmage Trial: Wolfer
- The Thorn Garden Build!
- 3 easy to play builds to get your first win !
- Skill list
- Shrine list
- How to backup your save file!