
Requirements / Info
requirements:
-Base Game.
-DLC.
-Medals. (earned ingame for taking on a challange)
Info:
-All Builds can work without DLC / Medals but have diminishing returns if requirements are not fully met and need tweeking.
-All Builds are proven on Max Difficulty & Hardest rnd wave Profile you can think of in the game, on Campaign & Skirmish 1-8 Player games.
-All Builds Works on its owen! but show his real power in a good team Composition.
-All Builds harmonize well together up to a full team Composition.
Example for some Team/Map Critt Chance Buffs thats make you a Power house:
-Harvest (Medic) +5% (100% uptime)
-Targeting Systems (Heavy) +5% (100% up time)
-Combat Exhaust 5/5 (Terminator) +10% (100% up time near good Terminator)
-Strol Samples 10/10 +10% (100% uptime aslong players collect them regulary)
-Manual Aiming +15% (after some seconds of Aiming)
Total: +45%
Guide is WIP adding Builds frome time to time!
Assault: Basic

ROLE:
-Frontliner
-Aoe Dmg
-Biomass clear
PLAYSTYLE INFO:
-Overwatch user keep in mind you want a heavy with lvl 5 HSLF near you or stay near a Window / Door / Barrikadeto to get quick targeting.
-Manual aim user keep in mind near a Window / Door / Barrikade you get your 15% critt chance bonus from manual aiming instant & with a Heavy with level 5 HSLF near you almos instant.
-use Specialist (Blueskill to get 3 Rockets if you have less than 1-3 already. use it to clear biomass or fire 3 rockets at the enemys all 74 seconds. you allways have some rockets to shot and clear the way without reling on secondary ammo drops :)
-Activate Cohision (Blue Skill) to get unlimited ammo (kinetic) in your Magazine for 6 seconds +1 second for each team mate near you on aktivation. keep in mind forcing reload (R) aslong the buff is aktive dont give you energy bullets from ammonite! dont use it if you want to dmg a fluffy
/ thanatos / speciment / Strol marine / Mrityunjaya
-Ammonite: each 2. Reaload (thanks to cadet medal), you load Energy rounds in your magazine thats give you 1 free magazine all 2 reloads. this gives you a high ammo efficency. combinet with cohision (blue skill) you are one of the team mates with the highest ammo effiency!
- if you see a "Mrityunjaya" and its down to under 2k HP you can last hit it with Energy Blade (green skill) to prevent it from respawning ;)
-IMPORTANT: force reload to gain energy bullets + manual aiming is your way to make a lot of critt dmg to targets weak to energy dmg! after you use your 55 energy bullets and the target weak to energy is still a life, just force another reload to skip your 1 mag of kinetic bullets!
-IMPORTANT: you are tankieer in comparison to any one else becide hellfire class! extra tanky near Window / Door / Barrikade. go between the enemy and the team! or hold doors for the team and only rotate to the team if you run to low on HP!
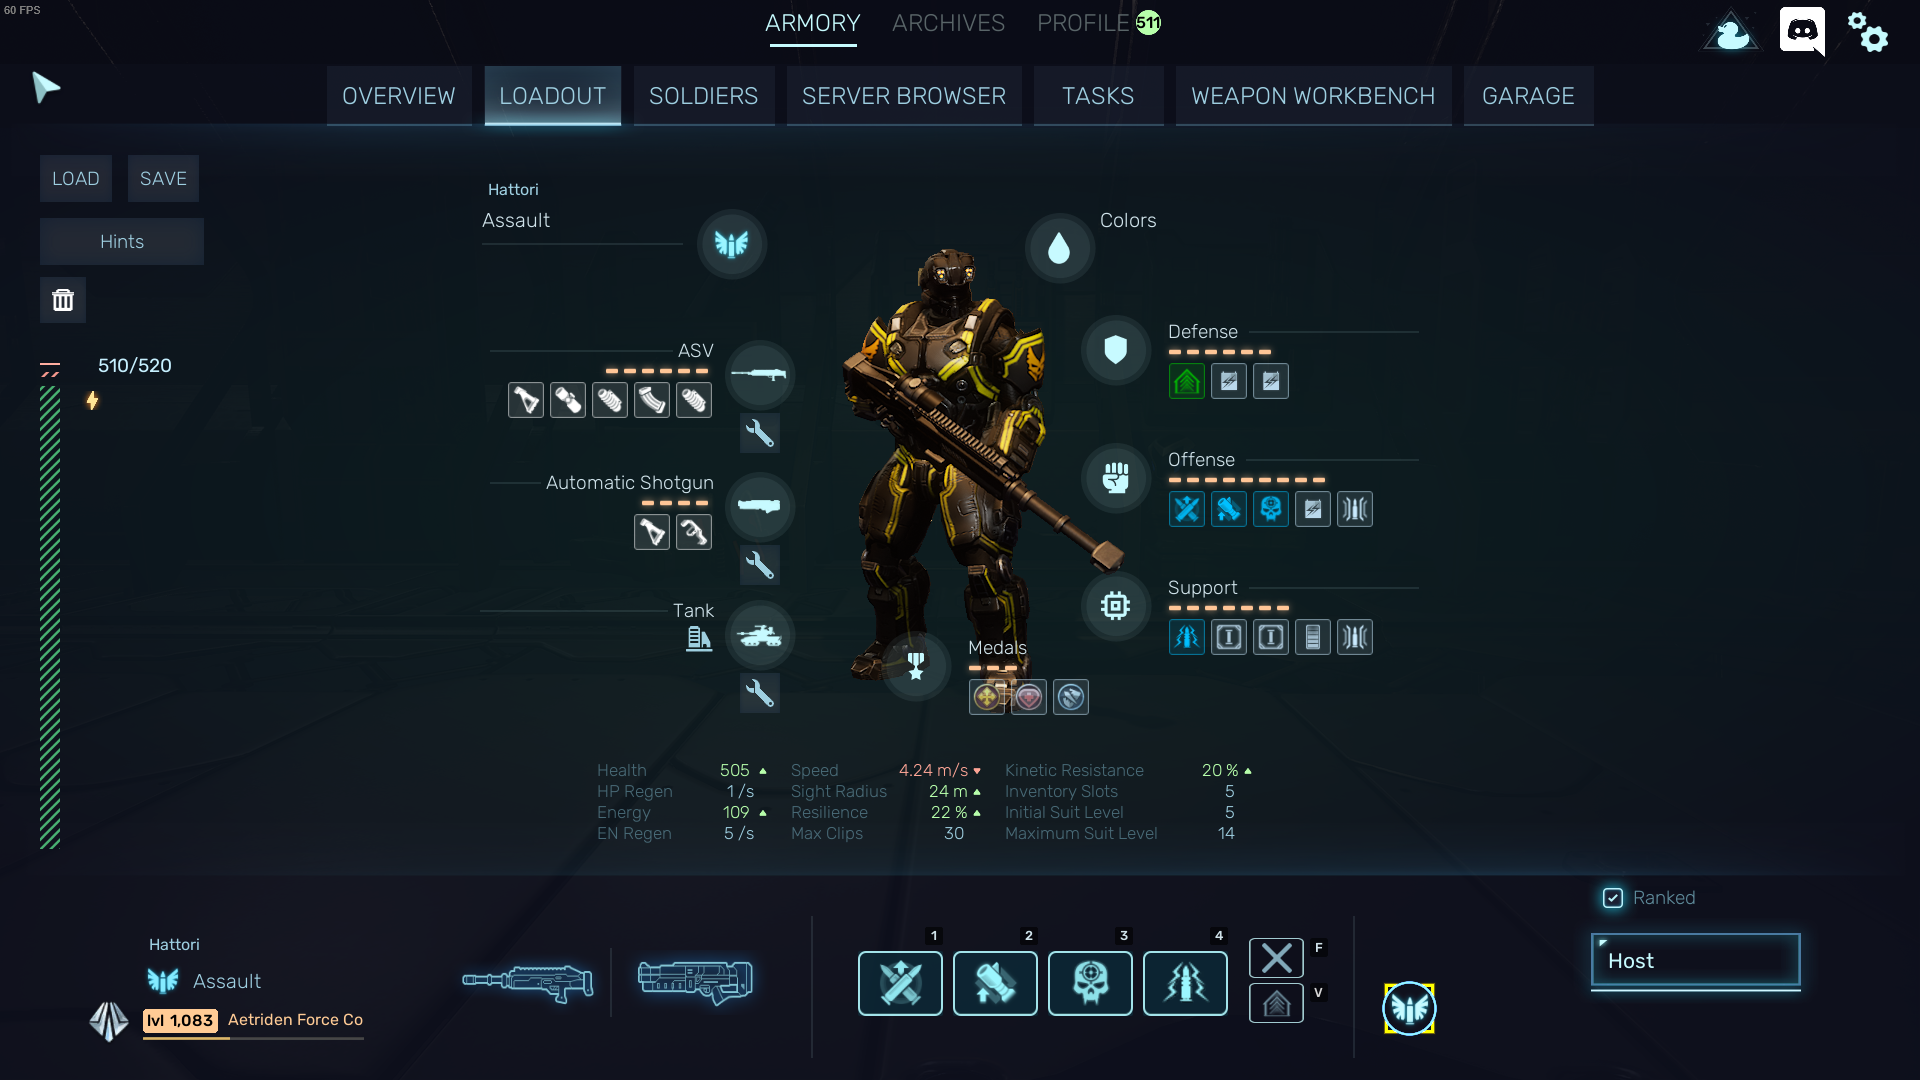
BUILD:
GAR:
-Forward Grip
Rocket Launcher:
-Forward Capacitator
-Extended Mag
Medals:
-Distinguished Servise Cross
-Cadet Graduation Medal
-Medal of Survival
Defance:
-NanoPlate
-2 Slot Power Core
-1 Slot Power Core
Offence:
-Energy Blade (Green skill)
-Adaptive System (Green skill)
-Cohesion (Blue Skill)
-Critical Strike (Blue Skill)
-1 Slot Power Core
Support:
-Ammonite (Blue Skill)
-Specialist (Blue skill)
-Overcharge
Assault: Burst DPS ASV (Meta)
ROLE:
-Main Dmg Dealer. (Kinetic / Energy dmg) + Armour Shreed via dmg output.
PLAYSTYLE INFO:
-Overwatch user have to aktivate/deactivate (E) Overwatch for each target, to switch to next target fast!
if you stay near a Window / Door / Barrikade or a Heavy with level 5 HSLF skill, you can keep it on and only turn it off if your just running.
-Manual aim user keep in mind only near a Window / Door / Barrikade you get your 15% critt chance bonus from manual aiming almost instant. and with just a Heavy with level 5 HSLF near you in 3 Seconds. (both togeter = instant)
-Secondary Firemode (C) do dubble dmg to armour! (ASV singel shot)
-Time Frame for highes dmg output is after Realoading as long Cohision buff for reloading (blue skill) is Active! longer duration as more team mates are around you at the time you reload! (8 player team and you have 100% uptime on it as long you use your 20 shot in 14 seconds)
-Ammonite: each 2. Reaload, you load Energy rounds in your magazine thats give you 1 free magazine all 2 reloads. this gives you a high ammo efficency & energy ammo enable you to reduce more than 1 armor block per shot (critt) in your max dps phase, with secondary fire mode!
-IMPORTANT: your high dmg is comming from critt dmg! your team can buff your critt chance a lot. hope they are not terrible selfish team mates and pick builds thats support the team with buffs.
(in the end screen you can see, its can make a difference of over 1-2 million extra effective dmg done for you)
-the first think you will experience is that your secoondary fire mode often dont hit the target on medium / long range. Adaptive system buff lower this problem but only after you get the Combat Exaust buff from a Terminator player you stop missing at that range on open field!
BUILD:
ASV:
-ASV Singel
-Forward Capacitator
-Long Side
-Light Stock
-Dual Mag
Automatic Shotgun:
-Light Frame
-Suppress Frame
Medals:
-Distinguished Servise Cross
-Medal of Survival
-Distinguished Anti-Armour Service Cross
Defance:
-Adaptive System (green skill)
-2 Slot Power Core
-2 Slot Power Core
Offence:
-Cohesion (Blue Skill)
-Light Weapons (Blue Skill)
-Critical Strike (Blue Skill)
-2 Slot Power Core
-Stabilizer System
Support:
-Ammonite (Blue Skill)
-Primary Extender
-Primary Extender
-Overcharge
-Stabilizer System
Assault: Burst DPS SGAR

ROLE:
-2. Dmg Dealer
-Energy Dmg Provider
-Fluffy Killer
PLAYSTYLE INFO:
-IMPORTANT: This build show its real power if you Manual Aim!
(i like to play this build in WASD Mode)
-Critical Strike is your level 4 Skill
-your ammo effiency is High but you have to fokus on only Big targets or you use to many Magazines into Overkill DMG! you will be one of the team using a lot of Magazines.
-Activate Cohision (Blue Skill) on CD to get unlimited ammo (kinetic) in your Magazine for 6 seconds +1 second for each team mate near you on aktivation. keep in mind forcing reload (R) aslong the buff is aktive dont give you energy bullets from ammonite! dont use it if you want to dmg a fluffy / thanatos / speciment / Strol marine / Mrityunjaya
-Ammonite: each 2. Reaload, you load Energy rounds in your magazine thats give you 1 free magazine all 2 reloads. this gives you a high ammo efficency. combinet with cohision (blue skill) you are one of the team mates with the highest ammo effiency! But thanks to your low Magazine capacity and RPM you burm Magazines quick.
BUILD:
SGAR:
-Forward Grip
-Shreeder Ammo
-Laiser Pointer
-Light Stock
-Enhanced Frame
Automatic Shotgun:
-Light Frame
-Suppress Frame
Medals:
-Howell-Barrex Commendation
-Heavy Combat Award
-Hawk Eyed Ribbon of Combat
Defance:
-Adaptive System (Green Skill)
-2 Slot Power Core
-2 Slot Power Core
Offence:
-Cohesion (Blue Skill)
-Light Weapons (Blue Skill)
-Critical Strike (Blue Skill)
-2 Slot Power Core
-1 Slot Power Core
Support:
-Primary Extender
-Primary Extender
-Primary Extender
-Overcharge
-Ammonite (Blue Skill)
Assault: Substain DPS GAR

ROLE:
-2. Dmg Dealer
-Energy Dmg Provider
PLAYSTYLE INFO:
-IMPORTANT: This build show its real power if you Manual Aim!
(i like to play this build in WASD Mode)
-IMPROTANT: Cohesion (Blue Skill) is your lvl 3 skill. if you reload a 2. time, aslong the buff for reloading is still active, you not just refresh the buff but stack him up aswell. so you end up with a lvl 5 chohesion reload buff after the 2. reload. Timing is needed.
or Example: you reload and get kinetic rounds, you reload again. skip 1 mag of ammo and you have the full buff active together with energy Bullets in your magazine. then just manual aim and remove Fluffys / thannatos / Speciments
-your ammo effiency is High but you have so mutch RPM you use Magazines quick! you will be one of the team using a lot of Magazines.
-Activate Cohision (Blue Skill) to get unlimited ammo (kinetic) in your Magazine for 6 seconds +1 second for each team mate near you on aktivation. keep in mind forcing reload (R) aslong the buff is aktive dont give you energy bullets from ammonite! dont use it if you want to dmg a fluffy
/ thanatos / speciment / Strol marine / Mrityunjaya
-Ammonite: each 2. Reaload (thanks to cadet medal), you load Energy rounds in your magazine thats give you 1 free magazine all 2 reloads. this gives you a high ammo efficency. combinet with cohision (blue skill) you are one of the team mates with the highest ammo effiency!
- if you see a "Mrityunjaya" and its down to under 2k HP you can last hit it with Energy Blade (green skill) to prevent it from respawning ;)
BUILD:
GAR:
-Forward Grip
-Shreeder Ammo
-Laiser Pointer
-Light Stock
-Enhanced Frame
Automatic Shotgun:
-Light Frame
-Suppress Frame
Medals:
-Howell-Barrex Commendation
-Cadet Graduation Medal
-Heavy Combat Award
Defance:
-Adaptive System (Green Skill)
-2 Slot Power Core
-2 Slot Power Core
Offence:
-Cohesion (Blue Skill)
-Critical Strike (Blue Skill)
-Light Weapons (Blue Skill)
-1 Slot Power Core
-Energy Blade (Green Skill)
Support:
-Ammonite (Blue Skill)
-Primary Extender
-Primary Extender
-Overcharge
-1 Slot Power Core
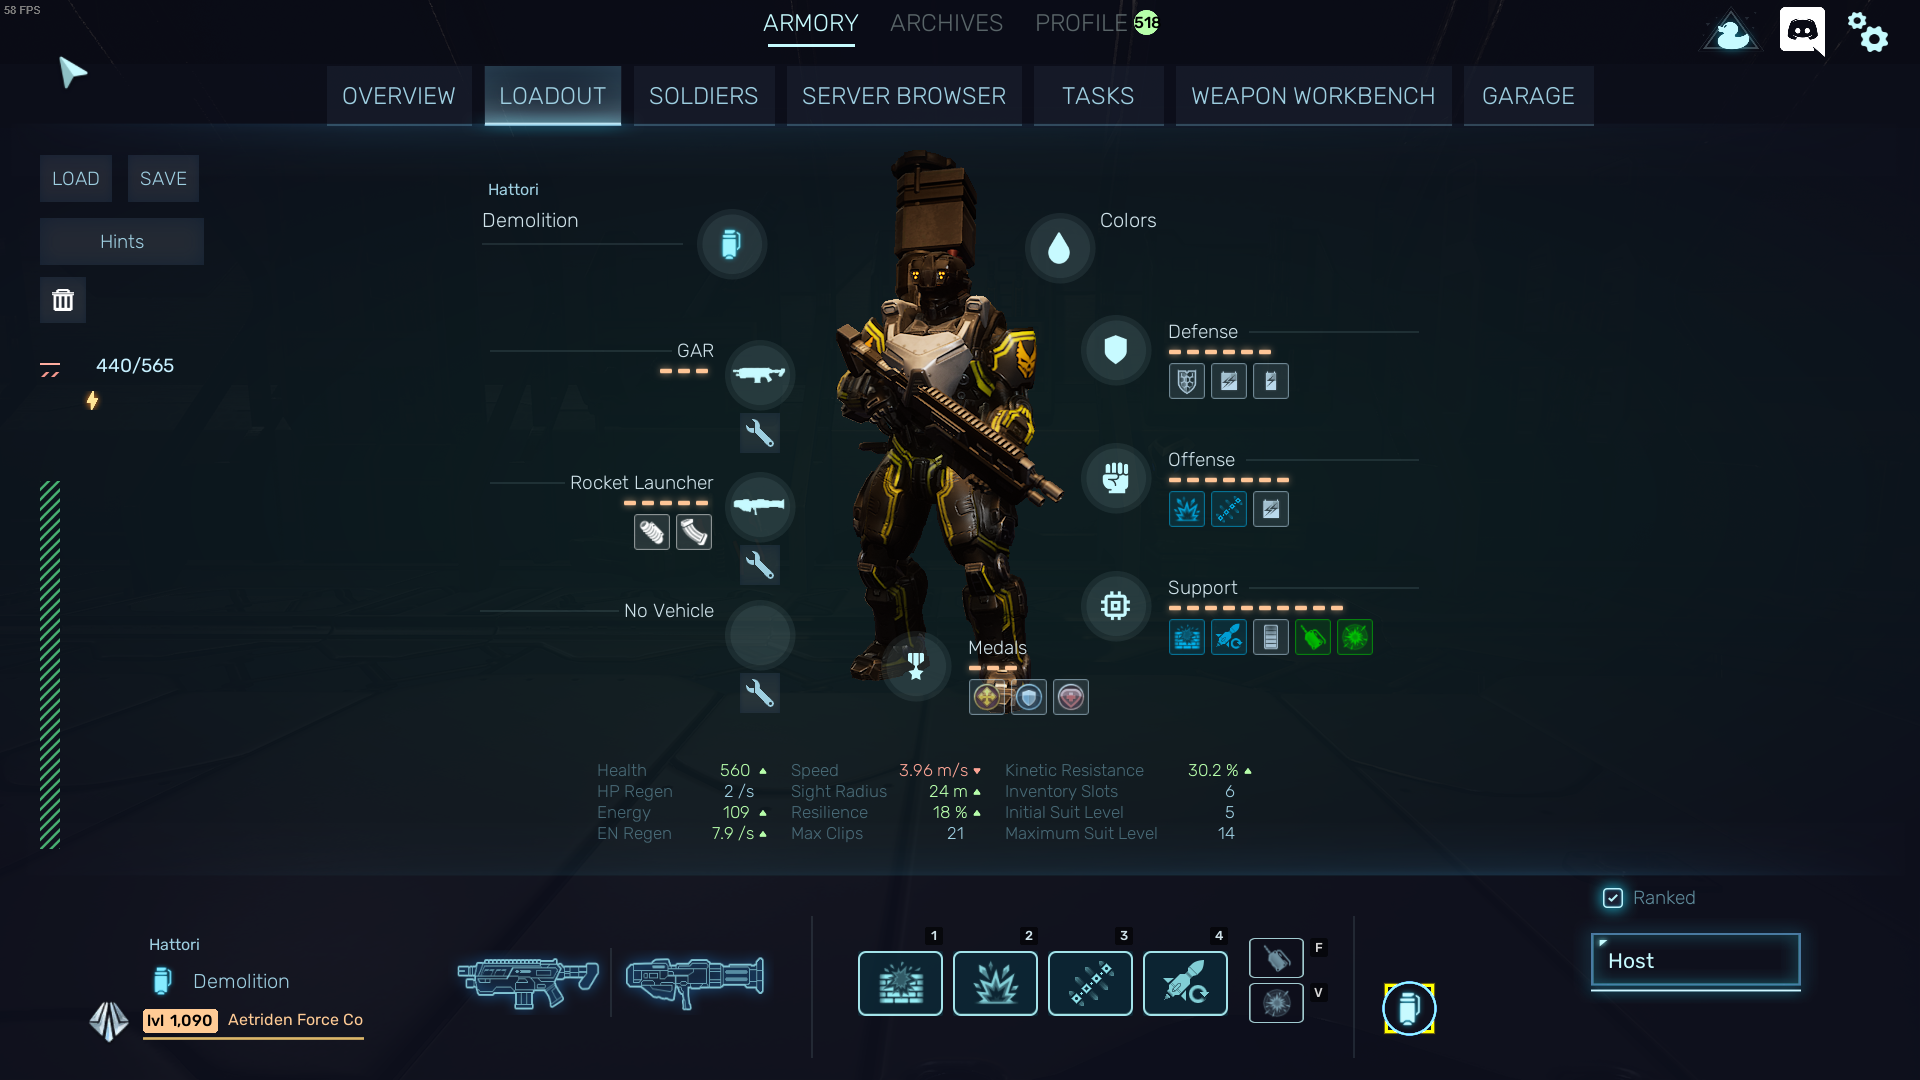
Assault: Warhead

ROLE:
-Armour Shredd
-Heal Support
-mop up enemies (NUKE)
-Granade Spam
TEAM COMBO:
-Medic use neutralizer to stack up Enemys & you Nuke them.
PLAYSTLYE INFO:
-Field Treatment has a little circle were you can pick were to use it. keep in mind no matter how many players staying that close together in the Circle ALL can get the 30 second 8 HP/sec buff !
-Buckshot & Granade are your tools to armour shredd & Trash Clear
-IMPORTANT: How to use Granade Lauchner GAR MOD:
1. Reaload to have a full magazine.
2. stay near as many Team mates as possible & Activate Cohesion (Blue Skill)
3. Switch to secondary Fire mode (C) and spam Granades for up to 14 seconds (14 Granades)
-IMPORTANT: How To use Warhead:
1. switch to Rocket Launcher and press (C) you get a hit radius indecator like with Missile Swarm just way Bigger. if you shoot (cost 2 secondary ammo per Nuke), you shoot the rocket like Missile Swarm. Carfull about Frendly fire! your teammates dont get any indecator with what range the nuke lands on the ground! (dont use it indoors xD)
BUILD:
GAR:
-Granade Launcher
-Stock Capacitator
Rocket Launcher:
-Forward Capacitator
-Warhead
-Stock Capacitator
-Extended Mag
Medals:
-Distinguished Service Cross
-Elysium Commendation
-Medal of Survival
Defance:
-2 Slot Power Core
-2 Slot Power Core
-1 Slot Power Core
-Field Treatment (Green Skill)
Offence:
-Adaptive Systems (Green Skill)
-Granade (Blue Skill)
-BucksShot (Blue Skill)
-Cohesion (Blue Skill)
-1 Slot Power Core
Support:
-Specialist (Blue Skill)
-Secondary Extender
-Secondary Extender
-Overcharge
Assault: Support Skills User

ROLE:
-Armour shreed
-Burning debuff
-Trash Clear
-Locking Boss in Place
-Team Buff
SIDE NOTE:
-This is a Support Build with fokus on Skill useing and allways underperform to a Gun build!
but its work pretty well.
PLAYSTLYE INFO:
-Field Treatment has a little circle were you can pick were to use it. keep in mind no matter how many players staying that close together in the Circle ALL can get the 30 second 8 HP/sec buff !
-Buckshot & Kinetic Spear are your tools to armour shredd
-Flame Burst ignites the ground adding fire debuff to Enemys & Frends on it. its Remove Biomass Ground to. its good to hold shoke points or just spam it on the following Enemys.
-Assault Banner is Situational! if your team gets in trubble its provide critt chance & energy regen to the team. and let you spawm YOUR skills!
-IMPORTANT: you use Ballator Harpoon MK II to Ensnäre bosses in one lockation and preventing then to attack if no one gets to close! to give the team time to kill it with no Danger, Keep in mind as soon YOU leave the Harpoon Circle thats show up after you shoot the boss, the Boss is FREE and you have to Ensnäre him again.
BUILD:
GAR:
-Shredder Ammo
-Laiser Pointer
Ballator Harpoon MK II:
-you canot mod it.
Medals:
-Distinguished Service Cross
-Assault Coombat Award
-Hawk Eyed Ribbon of Combat
Defance:
-Assault Banner (Blue Skill)
-Field Treatment (Green Skill)
-Adaptive Systems (Green Skill)
Offence:
-BucksShot (Blue Skill)
-Kinetic Spear Module (Blue Skill)
-Flame Burst Module (Blue Skill)
-1 Slot Power Core
Support:
-Overcharge
-2 Slot Power Core
-2 Slot Power Core
-1 Slot Power Core
Demolition: Basic
ROLE
-Armour Shreed
-Door opener
-Biomass Clear
-Boss Killer
-Mop up Enemys
TEAM COMP EXAMPLE:
1. Demo + Psychic
-Demo place FIRST "Shrapnell Bomb" & "AFTER Stationary Explosives" in one Place, then Activate "Explosive Amplifier" near the Explosives To Buff DMG by 50% (let it tick 2x on the explosives!) and back up. (this takes 3 Seconds to set up)
-Psychic run on top of the explosives and Activate "Reality Mixer" to Pull Enemys.
-Demo Press 2x (G) to quick Detonate "Shrapnell Bomb" to remove Armour, and then use Detonator System (F) on the "Stationary Explosives" befor "Reality Mixer run out to not kill the Psychic!!! (done in 1 Second)
BOOM Field Cleared! Even if the Psychic pull A Legalesh, Thanatos, Speciment, or a KER pops out of the ground over the Explosives xD.
SIDE NOTE:
-This is the good old Basic Demo back in the old days thats allways do the job a Demo is for!
PLAYSTYLE INFO:
-BOSS Insta Kill:
Place FIRST "Shrapnell Bomb" & "AFTER Stationary Explosives" in one Place, then Activate "Explosive Amplifier" near the Explosives To Buff DMG by 50% (let it tick 2x on the explosives!) and back up. press 2x (G) to quick Detonate "SB" first to Remove Armour, then Detonate "SE" with (F) Detonator System for extra 25% DMG.
(this takes 3 Seconds to set up) and can one shot a KER, Sandworm, Thanatos, Speciment, or any other enemy lower than them.
-Use Rocket Ammo on CD Clear every Biomass you encounter! if Biomas just have 3k HP left after rocketing, use "Level 5 Breaching Charge" on it and detonate it With "Detonator System" if 5k HP is left you can rocket it or just use "Explosive Amilifier on the "Breaching Charge" to.
-Breaching Charge can Shredd Armour 2+1 from dmg, at higher level and insta kill any Blast Door! this is your spam Skill vs targets with Armour and weak to kenetic if armour got removed.
-Shrapnell Bomb at level 5 Removes 100 Armour BLOCKS for 10 Seconds from the enemy, giving your team a 10 second time Windo to kill it without Dealing with his armour at all. AND ist apply -HP regeneration on the Enemy. (example: level 5 = 1250 -HP/sec for 7 Seconds, 11250 DMG total - enemy HP regeneration. overall insta kill Holer, Zombie Marines, Devouer, almost Slashers.)
BUILD:
GAR:
-NO MODS
Rocket Launcher:
-Forward Capacitator
-Extended Mag
Medals:
-Destinguished Service Cross
-Iron Defance
-Medal Of Survival
Defance:
-NanoPlate
-2 Slot power Core
-1 Slot power Core
Offense:
-Shrapnell Bomb (Blue Skill)
-Stationary Explosives (Blue Skill)
-2 Slot Power Core
Support:
-Breaching Charge (Blue Skill)
-Rocket Ammo (Blue Skill)
-Overcharge
-Detonator System (Green Skill)
-Explosive Ampilfier (Green Skill)
Demolition: Mine Spam Boss Killer (Meta)

ROLE:
-Armour Shreed
-Boss Killer
-Hold The Line
-Biomass Clear
PLAYSTYLE INFO:
-Use Minefild (Blue SKill) and then use Disarm System (Green Skill) on each mine on the ground to get Mines as Items. every time you can until you have over 200 mine items :)
-use Shrappnell Bomb level 5 to Clear Medium Targets with under 6k HP (Big Trash Clear)
or to remove Armour for 10 seconds on big targets
-Boss Kill Magnetic Puls Mine combo from save distance:
1. place a lot of ITEM mines on the ground. CTRL+ "hotkey" then left click, repeat quick.
2. use Explosive Extender on them to add armor Schredd to each mine.
3. OPTIONAL but not needed if you allways collect your Minefield skill as items. fire Cluster mines with rocket launcher in range to pull them to.
4. Place Magnetic Puls mine on the Boss, have the mines in Pull Range and Detonate the Magnetic Pulse Mine. this pull ALL explosives in one place and Detonate them.
BOOM Boss Dead.
-use Rocket Ammo on CD this is your lvl 4 skill. if your team hold a Position or is running to some were, you can spam Cluster Mines with your rocket launcher (C) secondary fire mode, to cover Trash Clear and armor schreed in diffeerent Directions. just dont place them in moving direction of your team!
BUILD:
GAR:
-Forward Capacitator
-Optimal Frame
Rocket Launcher:
-Forward Capacitator
-Cluster Mines
-Stock Capacitator
Medals
-Destinguished Service Cross
-Medal OF Survival
-Medal of legendary Combat
Defanse:
-Minefield (Blue Skill)
-NanoPlate
-1 Slot Power Core
Offense:
-Shrapnell Bomb (Blue Skill)
-Disarm System (Green SKill)
-Explosive Extender (Green Skill)
-2 Slot power Core
-1 Slot power Core
Support:
-Rocket Ammo (Blue SKill)
-Magnetic Pusle Mine (Blue Skill)
-Overcharge
-Agility
-1 Slot Power Core
Heavy: Support Autocannon

ROLE:
-Trash Clear
-Armor Shredd
-Stun
-Team Buffer
PLAYTYLE INFO:
-Overwatch 24/
-IMPORTANT: allways & only use your secondary fire mode on the AC thats add energy dmg to your shots. thats your way of team support in form of stun locking enemys by hitting suppressed Targets. this keeps a lot of deadly dmg away from the team if not to many big enemys are present. or prevent a Speciment from jumping away,
-Critical Strike is your lvl 4 skill ;)
-keep distance from Fluffy / Thanatos / Speciment. you dont want to be effectet by the ROAR abillity.
-your ammo efffiency is Medium, you will need a lot of ammo if you keep overwatch on 24/7 but in the mean time you kill almost all little trash alone and your team can save ammo.
-IMPORTANT: you are the Trash clear and buffer for the team! your buffs have a range. stay allways in the middle of the team. if some one get fractured (brocken Bone symbole in the team overlay) in the backline keep HSLF buff in his range so he dont loose all his movement speed!
BUILD:
Autocannon:
-Autocannon Auto
-Energy Ammo
-Laiser Pointer
-Stock Capacitator
-Enhanced Frame
Automatic Shotgun:
-Light Stock
-Suppress Frame
Medals:
-Heavy Combat Award
-Howell-Barrex Commendation
-Distinguished Servise Cross
Defance:
-1 Slot Life Support
-1 Slot Life Support
-1 Slot Power Core
Offence:
-Targeting System (Blue Skill)
-Critical Strike (Blue Skill)
-Stabilizer System
-Stabilizer System
-Stabilizer System
-Stabilizer System
-Stabilizer System
-1 Slot Power Core
Support:
-Ammunition Link (Blue Skill)
-HSLF (Blue Skill)
-Overcharge
-Adaptive System (Green Skill)
Heavy: Support LMG (Meta)

ROLE:
-Team Buffer
-Trash Clear
-Suppress & Stun lock Enemys
-Dmg Dealer vs targets weak to explosion dmg
PLAYSTYLE INFO:
-Overwatch user you can keep it on 24/7. Manual aim user keep in mind you gain nothing for using manual ainimg in this build! if you have to fokus a target left click on it!
-use rocket ammo on CD keep in mind you need rocket ammo level 5! and collect some Energy batterys on the field (Blue Bubbels) to use both buffs and rocket ammo!
-IMPORTANT: allways & only use your secondary fire mode on the LMG thats add energy dmg to your shots. thats your way of team support in form of stun locking enemys with suppression + energy dmg into stun! this keeps alot of deadly dmg away from the team if not to many big enemys are present. or prevent a Speciment from jumping away, if to many big enemys present blame your main dmg dealer for not doing his job. but i must say you can easy end up with 1 million effective dmg in the endscreen.
-HSLF is your lvl 4 skill ;)
-keep distance from Fluffy / Thanatos / Speciment. you dont want to be effectet by the ROAR abillity.
-your ammo efffiency is Medium, you will need a lot of ammo if you keep overwatch on 24/7 but in the mean time you kill almost all little trash alone and your team can save ammo. win win. you read this Team?! SPARE AMMO!!
-IMPORTANT: you are the Trash clear and buffer for the team! your buffs have a range. stay allways in the middle of the team. if some one get fractured (brocken Bone symbole in the team overlay) in the backline keep HSLF buff in his range so he dont loose all his movement speed!
BUILD:
LMG:
-Forward Capacitator
-Energy Ammo
-Short Sight
-Heavy Stock
-Suppress Frame
MS-AJAX:
-Forward Capacitator
Medals:
-Medal of Survival
-Distinguished Servise Cross
-Distinguished Anti-Armour Service Cross
Defance:
-HSLF (Blue Skill)
-1 Slot Life Support
Offence:
-Targeting System (Blue Skill)
-Damage
-Damage
-Adaptive System (Green Skill)
-2 Slot Power Core
-1 Slot Power Core
Support:
-Ammunition Link (Blue Skill)
-Rocket Ammo (Blue Skill)
-Overcharge
-Capacitator
Heavy: Support GAR Burst

ROLE:
-Team Buffer
-Suppress & Stun lock Enemys
-Lock Bosses in Place
PLAYSTYLE INFO:
-Overwatch only, works fine but keep in mind you gain 15% critt chance bonus for Manual Aiming.
-Fokus Fire Big Enemys to quick supress and stun lock them with your Gar Burst fire mode. ONLY use Burst fire mode.
-use the Harpoon gun to lock Bosses in place and prevent them with it from attacking the Team. keep in mind as soon you leave the Circle thats pop up after firering on the enemy, the Harpoon break and the boss is free again.
-your buffs are auras. stay in the middle of the team!
BUILD:
GAR:
-GAR Burst
-Energy Ammo
-Long Sight
-Light Stock
-Suppress Frame
Bellator Harpoon MK II:
-you cant mod it.
Medals:
-Distinguished Servise Cross
-Medal of Survival
-Hawk Eyed Ribbon of Combat
Defance:
-Adaptive System (Green Skill)
-1 Slot Life Support
Offence:
-Targeting System (Blue Skill)
-Critical Strike (Blue Skill)
-Damage
-Damage
-2 Slot Power Core
-Overwatch Upgrade
Support:
-HSLF (Blue Skill)
-Primary Extender
-Overcharge
-1 Slot Power Core
-Ammunition Link (Blue Skill)
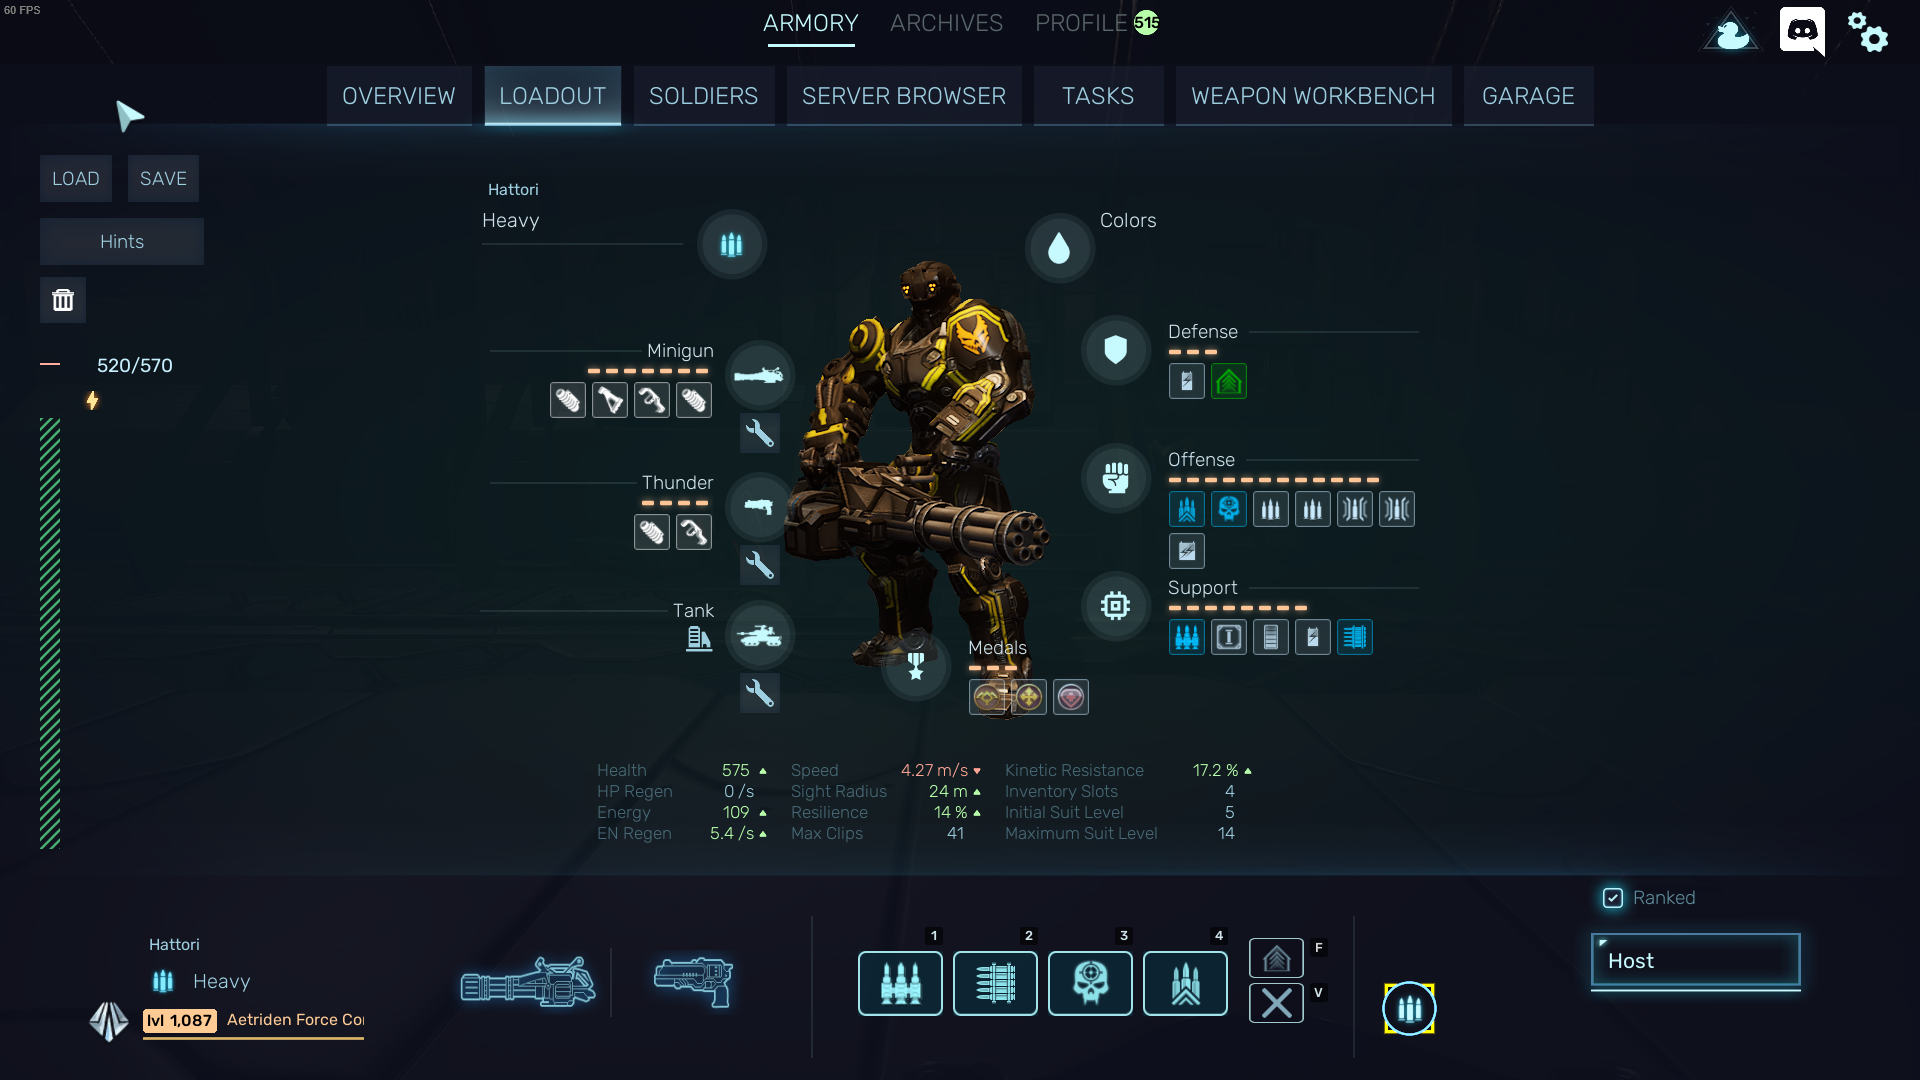
Heavy: Substain DPS Minigun (Meta)
ROLE:
-Trash Clear
-Suppression
-Never need ammo!
-Boss Killer (need "Designate" from team mates!)
PLAYSTYLE INFO:
-IMPORTANT: level 5 Wired Ammunition (Blue Skill) FIRST! ONLY and really ONLY shoot if Wired Ammounition is Active! & make sure with Manual Aiming thats you have max Energy as soon its CD ends. this way you provide a lot of damage without ever needing to Reaload once! Level Critical Strike after to level 5.
-use WASD Movement to have it easyer.
-IMPORTANT: if you have a Terminator in the team all ways be with him. combat exhaust lets you shoot way longer befor you have to wait for Wired Ammunition to go off CD. if you get the Item Tokugawa Overload, Perfect thats will make you a Power House!
-Spreed: dont Worry its reduce as long you keep shooting. just keep shooting until your minigun reach PinPoint Acc.
BUILD:
Minigun:
-Forward Capasitator
-Critical Enhancer
-Light Stock
-Enhanced Frame
Thunder:
-Forward Capacitator
-Light Frame
Medals:
-Howell-Barex Commendation
-Disinguished Service Cross
-Medal of Survival
Defance:
-1 Slot Power Core
-Adaptive Systems (Green Skill)
Offence:
-Heavy Weapons (Blue Skill)
-Critical Strike (Blue Skill)
-Damage
-Damage
-Stabilizer System
-Stabilizer System
-2 Slot Power Core
Support:
-Wired Ammunition (Blue Skill)
-Primary Extender
-Overcharge
-1 Slot Power Core
-Ammunition Link (Blue Skill)
Heavy: Ultra Boss Killer
ROLE:
-Ultra Boss Killer
(up to 3 second kill on any Ultra Boss, becide Overlord, if supportet via team combo)
-Bio Clear Support
TEAM COMBO:
-Medic apply 20 stacks of "Tissue Decomposer" on the Boss.
-Engeenier "Team Thruster" you near the Boss.
-YOU aktivate "Stonewall" + "Supressive Fire" and left click on the Boss and see its Vaporating
( reload befor you do that! )
PLAYSTYLE INFO:
-HSLF level 1 until all other skills are level 5
-keep distance from Fluffy / Thanatos / Speciment. you dont want to be effectet by the ROAR abillity wile or befor using Stonewall (Blue Skill).
-your ammo efffiency is Low-Medium.
-IMPORTANT: you are good at armor shredding and boss killing, or clear 15 boss Atrocitys at once thats rushing your team. your weekness is trash mobs! let someone else handle them if possible.
BUILD:
Autocannon:
-Autocannon Auto
-Light Stock
-Enhanced Frame
Automatic Shotgun:
-Light Stock
-Suppress Frame
Medals:
-Medal of Survival
-Howell-Barrex Commendation
-Distinguished Servise Cross
Defance:
-Adaptive Systems (Green Skill)
-1 Slot Power Core
Offence:
-Stonewall (Blue Skill)
-Suppressive Fire (Blue Skill)
-Heavy Weapon (Blue Skill)
-Stabilizer System
-Stabilizer System
-Stabilizer System
-Stabilizer System
-Stabilizer System
Support:
-Ammunition Link (Blue Skill)
-Primary Extender
-Overcharge
-2 Slot Power Core
-1 Slot Power Core
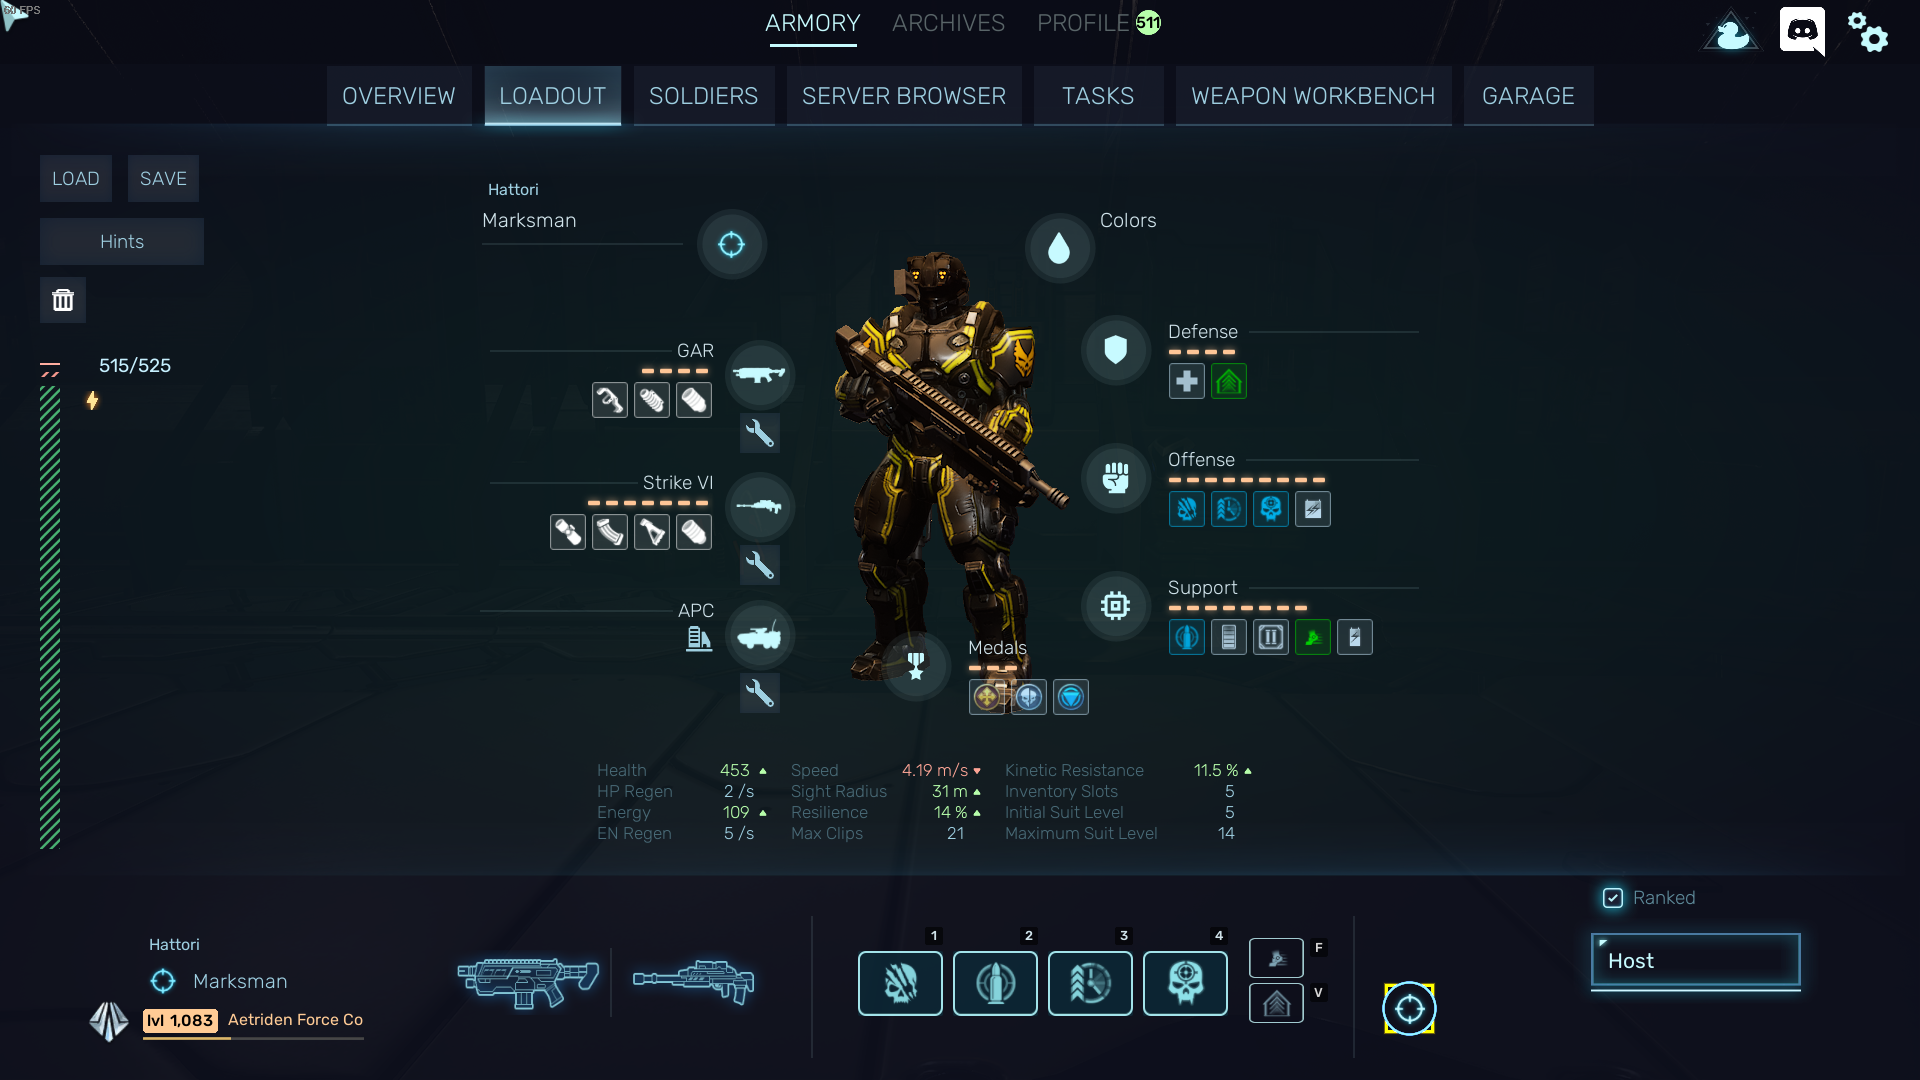
Marksman: Basic (Meta)

ROLE:
-Energy Dmg Provider
-Boss Killer
-Cover Fire
-Solo Runner
-Biomass clear
PLAYSTYLE INFO:
-IMPORTANT: Activating "Vital Spot Targeting" gives you 6 Bullets Secondary ammo as long you are under 6 Bullets in Reserve! if you Critt on Biomass without hitting any enemy befor the Biomass with VST buff the 5 stacks of the buffs stay at 5 stacks! you can quick 1 tap one Biomass after another aslong they are under 10k HP (early game insta kill 6 Biomass is possible)
-IMPORTANT: with CTRL + 1-4 you can delevel your skills. if you have to move delevel skills to get lvl 5 Silent hunter! kill 1 trash mob with one shot of your stinger all 8 seconds to keep invis up to travel save! never stay out of invis wile moving at all! and if you stay still allways have 1 point in stalker to stay invis wile you have the Stinger in hand!
-IMPORTANT: Primary Weapon hits remove invis. just never ever use your Primary Weapon at all.
-IMPORTANT: Positioning is all! allways set up near a Door / Window /Barrikade to get Adaptive Systems buff. this increese your Stinger Range by 50%. example you can snipe targets 2 Prefabs away from you with this! chose your Position wise! never every set up in moving path of enemys! if you set up near the team make sure you keep distance from your teammates but not behind the team! or a direktion enemys come from!
-Marksman is one of the Classes thats hardest to master but provide "if Mastered" a godlike power house to the team.
-Vision Range: dont care about it. if the team need Cover fire you can see HP bar in the dark or the team fire a personal Flare to give your Vision on the Situation.
BUILD:
Rhino Pistol:
-Light Frame
Stinger:
-Forward Capacitator
-Stinger Single
-Long Side
-Dual Mag
Medals:
-Distinguished Service Cross
-Distinguished Anti-Armour Service Cross
-Marksmen Combat Award
Defance:
-Stalker(Blue Skill)
-2 Slot Power Core
Offence:
-Vital Spot Targeting (Blue Skill)
-Silent Hunter (Blue Skill)
-Adaptive Systems (Green Skill)
-2 Slot Power Core
Support:
-Sniper Rounds (Blue Skill)
-Secondary Extender
-Overcharge
-Overcharge
-1 Slot Power Core
Marksman: Hit & Run
ROLE:
-Energy Dmg Provider
-Boss Killer
-Trash Clear
-Suppression+Stun
PLAYSTYLE INFO:
-IMPORTANT: as long "Reaper is Active (4,4 seconds) you gain 1 bullets Secondary ammo all 3 Seconds. the Buff refresh every time you kill a Target with the Final hit with your Secondary Weapon! you can keep this buff up forever aslong you have targets to one shot.
(pray that your teammates are bad at trash killing or leave you some trash, or you never will keep the buff up forever)
-IMPORTANT: Silent Hunter not just give you dmg bonus wile you killing with active Reaper buff the enemys with your Secondary is also give you enough Movmentspeed to keep moving at same speed like your team do with your secondary Weapon in hand!
-IMPORTANT: use Sniper ammo on CD to get some Bullets up in your reserve. that way you can fire more Bullets than just 1 all 3 seconds as soon Reaper is active again. in the mean time only use your GAR secondary fire mode (Burst Gar) for suppression+stun support!
-this build shows its real power if you play a inside map like Facility / Underground! if you Master this you can solo carry a full team with it.
-if you time it right you can have 5/5 Dash (Green Skill) allways up wile Reaper is Active. this req. alot of managing to what you allready have to manage.
-keep in mind, playing this Build Perfect is Very Hard.
BUILD:
GAR:
-GAR Burst
-Energy Ammo
-Stock Capacitator
Strike VI:
-Shredder Ammo
-Long Side
-Light Stock
-Extendet mag
Medals:
-Distinguished Servise Cross
-Elysium Commendation
-Terminator Combat Award
Defance:
-2 Slot Life Support
-Adaptive Systems (Green Skill)
Offence:
-Reaper (Blue Skill)
-Silent Hunter (Blue Skill)
-Critical Strike (Blue Skill)
-2 Slot Power Core
Support:
-Sniper Rounds (Blue Skill)
-Overcharge
-Secondary Extender
-Dash (green Skill)
-1 Slot Power Core
Medic: Basic (Meta)
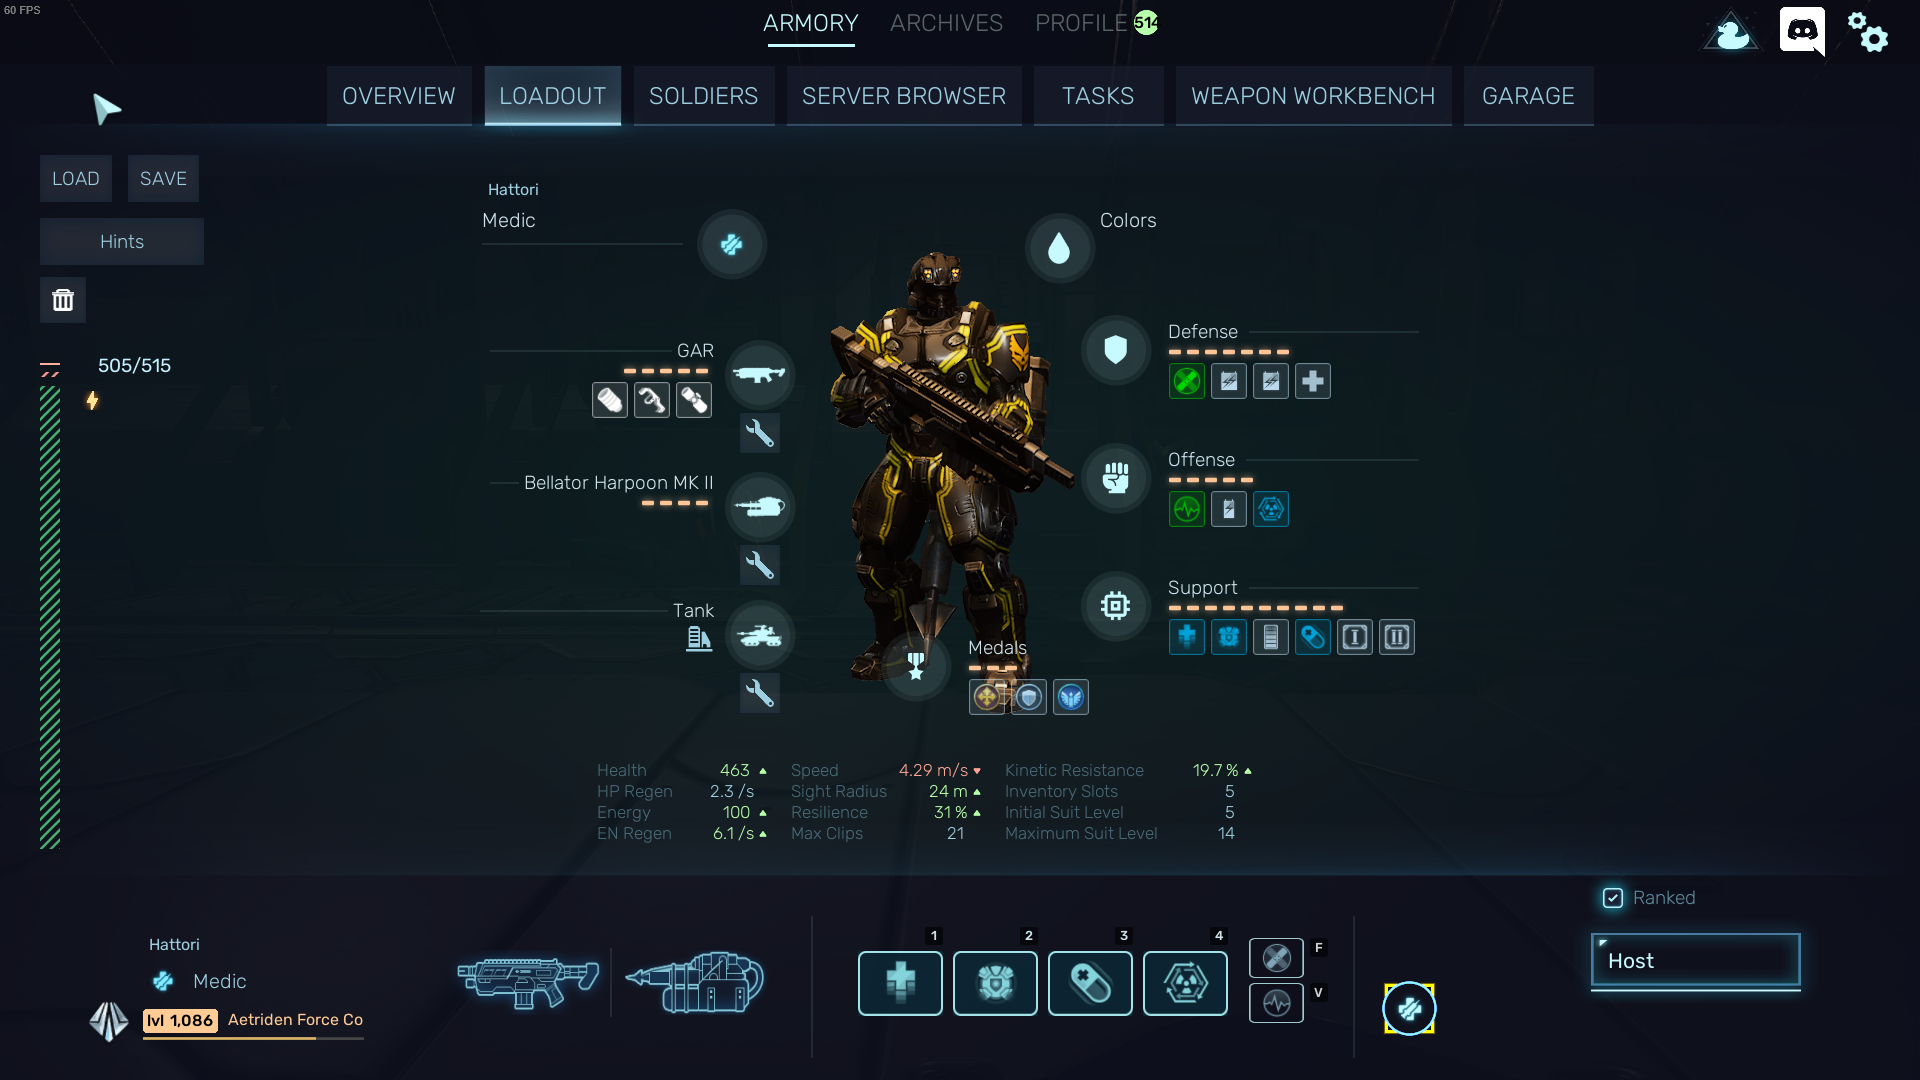
ROLE:
-Direct Heal
-Heal Circle & Biomass Ground Remover
-Passive Heal
-Kinetic Resi Debuffer
-Cleanser
-Team Buffer
-Ensnäre Bosse
PLAYSTYLE INFO:
-Guardian Drone is your lvl 4 Skill. use it to pass Whale Terettori, hold a position, or if your team go strait and have to fight alot. keep in mind the Circle dont move if you stay on the ege of it. you can still benefit from the heal.
-Broken Bone debuff on your team mate? go to him and use Cleanse! keep in myd to rally your team to you for mass Cleanse even if no debuff is on them to give them the passive HP regen buff.
( 2/2 stacks, hold 2 min, total 4 HP/sec for free)
-IMPORTANT: Tissue Decomposer gets a Stack for each dead enemy Decomposed. at level 5 stacks up to 20 (-60% Kinetic resi on enemys in a wide Circle) only use it on bosses or a big group of Fluffys! keep in mind the debuff holds forever on the enemy, and even if you just apply 14 stacks you can apply the missing 6 stacks on the enemy by using it on the enemy again. aslong you collected stacks again.
-Only use Gar Burst. be ammo efficient!
-Only use Harpoon to lock bosse in place and prevent them from attacking the team.
-shoot Enemys to get 15 stack from your Weapon mod to heal 30% more with your heal Gun (Blue Skill)
BUILD:
GAR:
-Enhanced Suit Amplifier
-Laiser Pointer
-Optimal Frame
Bellaton Harpoon MK II:
-you cant mod it.
Medals:
-Destinguished Service Cross
-Iron Defance
-Assault Combat Award
Defance:
-Cleanse Alliment (Green Skill)
-2 Slot Power Core
-2 Slot Power Core
-1 Slot Life Support
Offence:
-Revive Module (Green Skill)
-1 Slot Power Core
Tissue Decomposer (Blue Skill)
Support:
-Heal Gun (Blue Skill)
-Guardian drone (Blue Skill)
-Overcharge
-Harvest (Blue Skill)
-Primary Extender
-Secondary Extender
Medic: Support (Meta)

ROLE:
-Strong Direct Heal
-Cleanser
-Team Buffer
-Stack up Enemys
PLAYSTYLE INFO:
-just use Medical Steroids on CD, or save it for situations were your team need to disengage or needs the extra HP / Energy Reg. all works.
-Broken Bone debuff on your team mate? go to him and use Cleanse! keep in mind to rally your team to you for mass Cleanse even if no debuff is on them to give them the passive HP regen buff.
( 2/2 stacks, hold 2 min, total 4 HP/sec for free)
-IMPORTANT: Neutralizer. ONLY use it if alot of enemys Rush the team to let your team Disengane and then AOE dmg the group of enemys. NEVER EVER use it on a lonly singel big target. keep in mind its dont work on bosses.
-shoot enemys to get 15 stacks from your Weapon mod for 30% stronger heals!
BUILD:
GAR:
-Enhanced Suit Amplifier
-Laiser Pointer
-Optimal Frame
Thunger:
-Forward Capacitator
-Stock Capacitator
-Optimal Frame
Medals:
-Distinguished Service Cross
-Assault Combat Award
-Iron Defense
Defance:
Medical Steoroids (Blue Skill)
-Cleanse Alliment (Green Skill)
-2 Life Support
-1 Slot Life Support
Offence:
-Neutralizer (Blue Skill)
-1 Slot Power Core
-Revive Module (Green Skill)
Support:
-Overcharge
-Heal Gun (Blue Skill)
-Heal (Blue Skill)
-Primary Extender
-2 Slot power Core
-1 Slot Power Core
Recon: Support (Meta)

ROLE:
-Debuff kinetic Resist
-Armour shreed
-Team Buffer
-Boss kill Support
PLAYSTYLE INFO:
-spam level 5 tracker Pulsar (its designate targets -30% Kinetic Resistance) and if a Designated target comes in range use lvl 5 Seeker Mine to shreed his armor and reduce its resisence by another -10% Kinetic / Energy for 10 seconds. Seeker mine Prioritise Designated targets if near by! keep in mide Seeker min debuff apply to teammates to! dont use it without a Designated target near by. dont kill your teams Armour Value!
(total you reduce enemy resistence bei -40% Kinetic / -10% energy)
-you want to make Boss dmg? Use level 5 Rapid Fire, activate your secondary fire mode on the ASV and shot a full mag in the target. (reload first befor using Rapidfire for full effect)
-you buff the team to move faster with Speed Mechanism. its a Aura like the Heavy buffs. stay in the Middle of the team and if Players fall behind go near them to give them the buff to catch up.
(if player fall behind and the Player in Front just keep running ahed, you can compansate a bit that your team mates are no team players and dont know how to "Run & Gun" to play together in a team based game)
-IMPORTANT: you are Week! low HP, low Armour% but with Team / Map Buffs even YOU can hold a Door for some Seconds if no other Options are Avalible anymore!
BUILD:
ASV:
-ASV Singel
-Forward Capacitator
-Light Stock
-Dual Mag
Automatic Shotgun:
-Light Frame
-Suppress Frame
Medals:
-Distinguished Servise Cross
-Hawk Eyed Ribbon of Combat
-Medal of Survival
Defance:
-Seeker Mine (Blue Skill)
-2 Slot Power Core
Offence:
-2 Slot Power Core
-Adaptive Systems (Green Skill)
-Rapid Fire (Blue Skill)
Support:
-Tracker Pulsar (Blue Skill)
-Primary Extender
-Overcharge
-Speed Mechanism (Blue Skill)
-2 Slot Power Core
-Primary Extender
Terminator: Vindicator
ROLE:
-Energy AOE DMG
-Supress + Stun
-Team Buffer
-Team Protector
PLAYSTYLE INFO:
-Overwatch 24/7 to keep yout stack high
-only use GAR Burst. Secondary Firemode (C) "Kinetic + Supression + Energy DMG"
-use Energy Capacitatos (Blue Skill) to get Secondary ammo.
-a big ball of Enemys in your Team? Aktivate Energy Shield (Blue Skill) wile Having 10 Stacks then load your Vindicator and fire like Crazy until the Shield run out. keep in mind you do more dmg with it as more staks you have! and you insta kill your teammates with it!
-Level "Dio Striker" to level 5 first, its a Passive you have to Aktivate once and only Auto turn off if you have 0 Energy left. (keep in mind energy spend from shooting and running out of energy dont turn it of, but skill use do if you end with 0 energy) its give you stacks for your skills 1x a seconds if you hit a target with your Primary Weapon.
-IMPORTANT: at 21 stacks you self destruckt in a NUKE blast! to prevent that if not wanted (thats mean you die if you dont Aktivate Energy Schild (Blue Skill) AND Deactivate Dio Striker (Blue Skill)
- Dont Spam (F) for Combat Exaust. only keep 5/5 stack of Exhaust up. and try to stay between 15-20 stacks. you do more Primary & Secondary DMG as more stacks you have depends on what level Energy Capacitors (Blue Skill is)
-Energy Capacitors (Blue Skill) is your level 4 skill!
-IMPROTANT: Combat Exhaust use 5 stacks and give a buff up to 5 stacks to all around you and yourself! keep 5/5 stacks up no matter what!
BUILD:
GAR:
-GAR Burst
-Energy Ammo
-Light Stock
-Suppress Frame
Vindicator:
-NO MODS!
Medals:
-Medal of Survival
-Distinguished Servise Cross
-Elysium Commendation
Defance:
-Energy Shield (Blue Skill)
-2 Slot Power Core
-1 Slot Life Support
Offence:
-Dio Striker (Blue Skill)
-Combat Exhaust (Green Skill)
-Light Weapon (Blue Skill)
-Overwatch Upgrade
-Overwatch Upgrade
-1 Slot Power Core
Support:
-Overcharge
-Energy Capacitors (Blue Skill)
-Adaptive Systems (Green Skill)
-2 Slot Power Core
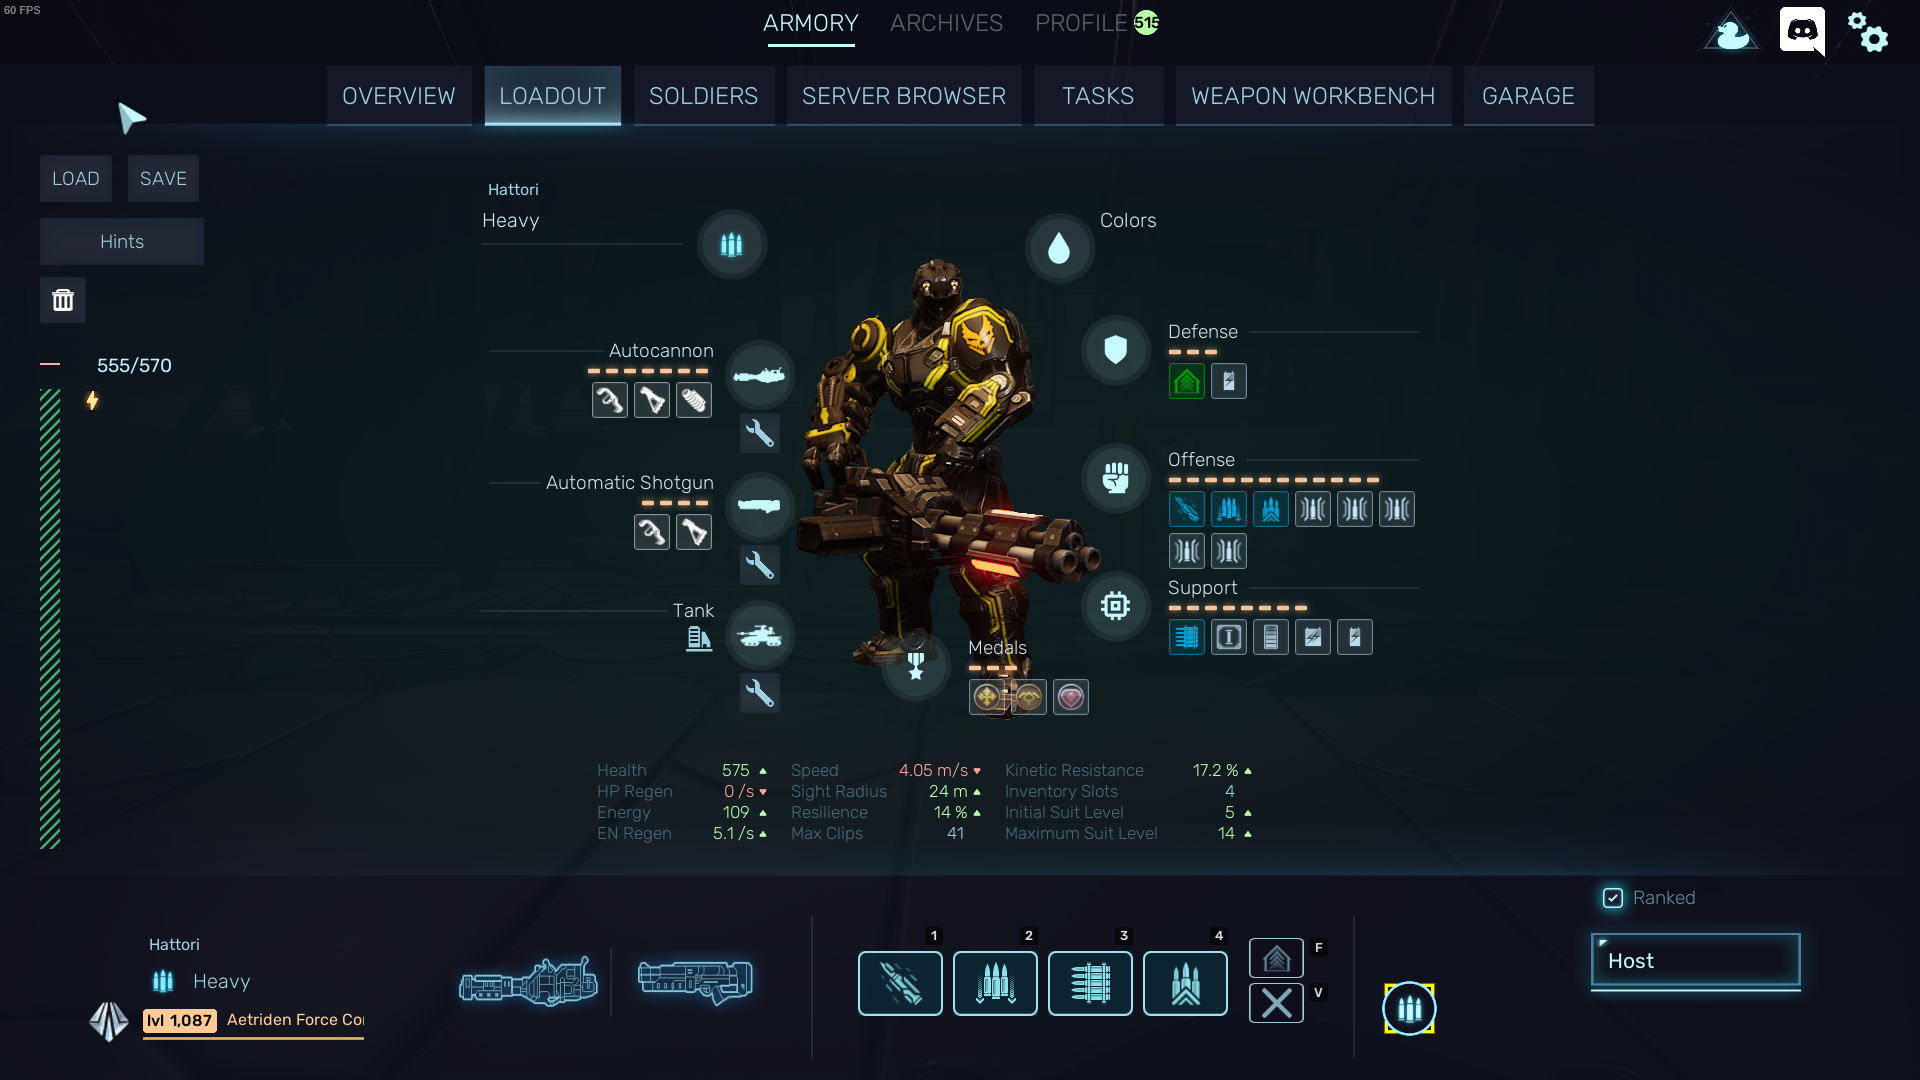
Terminator: Autocannon (Meta)

ROLE:
-Main Dmg Dealer.
-Armour Shredding
-Team Buffer
-Team Energy Battery
-Terminating everything
SIDE NOTE:
you can change "Surge" to "Energy Shield" if you cant Manage to Press (F) to not Overload and Selfdestruct!
PLAYSTYLE INFO:
-Overwatch and Terminate Everything! left click or Manual aim at Big targets.
Manual aim user keep in mind only near a Window / Door / Barrikade you get your 15% critt chance bonus from manual aiming instant. with HSLF lvl 5 in 2 seconds.
-Secondary Firemode (C) "your Kinetic mode" is on by Defult, and do dubble dmg to armour!
-you primary Mode is aoe Explosion dmg. (FF, dont kill yourself with it or your team mates, just dont shoot with it at targets on close range to a Player)
-Time Frame for high dmg output allways! and Highest dmg output (21 Seconds) is after Aktivation of Weapon Overload (Blue Skill) with 10 stacks. as long the skill is aktive shoots cost no energy!
-Level "Dio Striker" to level 5 first, its a Passive you have to Aktivate once and only Auto turn off if you have 0 Energy left. (keep in mind energy spend from shooting and running out of energy dont turn it of, but skill use do if you end with 0 energy) its give you stacks for your skills 1x a seconds if you hit a target with your Primary Weapon.
-IMPORTANT: at 21 stacks you self destruckt in a NUKE blast! to prevent that if not wanted (thats mean you die) Spam (F) for Combat Exaust.
-if you you see your Team (or your Wired Ammunition Minigun heavy) is Low on Energy, use Surge (Blue Skill) to restore teams Energy!
-you see a Boss use Weapon overload and give him hell. if kinetic resist is lower then Explosion resist on the enemy use Kinetic and the other way around. example: Hellspawn, no kinetic debuff on it just explo dmg him to death in 20 seconds.
-IMPROTANT: Combat Exhaust use 5 stacks and give a buff up to 5 stacks to all around you and yourself! just spam it every time you have 5 stacks no matter what! only exaption tosave up to 10 stacks if you encounter the situation were you need to aktivate your Blue skills to kill a boss / skill many armoured targets in a row / schild the team. never wait to the situation to happen. just stack to 10 in the situation. you want to have 5 stacks of Exhause up befor you do anythig with your skills. they are the base line for your power. without 5 stack expect deminishing returns!
BUILD:
Autocannon:
-Autocannon Auto
-Pirecing Ammo
-Laser Pointer
-Stock Capasitator
-Enhanced Frame
Thunder:
-Forward Capacitator
-Light Frame
Medals:
-Distinguished Servise Cross
-Medal of Survival
-Howell-Barrex Commendation
Defance:
-2 Slot Power Core
-Adaptive Systems (Green Slikk)
-1 Slot Life Support
Offence:
-Weapon Overload (Blue Skill)
-Heavy Weapons (Blue Skill)
-Dio Striker (Blue Skill)
-2 Slot Power Core
Support:
-Combat Exhaust (Green Skill)
-Primary Extender
-Overcharge
-Reload Upgrade
-Surge (Blue Skill)
Terminator: ASV

ROLE:
-Main Dmg Dealer.
-Armour Shredding
-Team Buffer
-Terminating everything
SIDE NOTE:
-if you get lucky and the game spam Enemys at your team 24/7 this build shows it real power with ENDLESS ASV Singel Shot MADNESS!
PLAYSTYLE INFO:
-Light Weapon is your Level 4 skill
-Overwatch and Terminate Everything! left click at Big targets and go back into Overwatch. you cant affort to loose a singel second were you dont get your stacks!
-Secondary Firemode (C) "your Kinetic mode" do dubble dmg to armour!
keep in mind if you use it and run out of energy Dio Striker Go on CD and you never want that to happen!
-IMPORTANT: Time Frame for highest dmg output in the entire game:
Almost Endless ASV Singel Overwatch. how to set it up:
1. get all 19 Skill points. (5,4,5,5) have Dio Striker and XICS active.
2. get 5/5 Stacks of both exhaust and keep them the entire time on 5/5!
2. Activate Weapon Overload after reaching 15-20 Stack for max CD reduction!
(carefull at 21 you self destruct!)
3. turn on Overwatch (E) and ASV Singel (C) for the 21 seconds of Weapon Overload.
(you have to manage your Energy wile shoting with 8 energy cost per shot and keeping both Exhaust on 5/5 to substain the Energy use if you need to switch firemode from time to times so be it. "27,5 Energy reg is your final value without team buffs if you do all right" )
4. use both firemodes to manage energy until Weapon Overload is off CD. Repeat 2-4 for ever.
(only works if at all time enemys are present. some time i encountered that i needed to ask my team to not shoot at all and leave all enemys to me to have no down time in stack generation)
-Level "Dio Striker" to level 5 first, its a Passive you have to Aktivate once and only Auto turn off if you have 0 Energy left. its give you stacks for your skills 1x a seconds if you hit a target with your Primary Weapon.
-IMPORTANT: at 21 stacks you self destruckt in a NUKE blast! manage your stacks wit hyour Green Skills "Exhaust" if you self detonate in the late game and dont have a power Cell to repair your Broken skills you are usless for 5 min!
-IMPROTANT: Combat Exhaust (20) cost less energy to use than Exhaust Energysed Charge (40) start stacking echaust with Combat Exhaust.
BUILD:
ASV:
-ASV Singel
-Forward Cpacitator
-Long Sight
-Light Stock
-Dual Mag
Automatic Shotgun:
-Light Stock
-Suppress Frame
Medals:
-Distinguished Anti-Armour Service Cross
-Distinguished Service Cross
-Medal of Survival
Defance:
-2 Slot Power Core
-2 Slot Power Core
-1 Slot Power Core
-1 Slot Life Support
Offence:
-Weapon Overload (Blue Skill)
-Light Weapons (Blue Skill)
-Dio Striker (Blue Skill)
-Overwatch Upgrade
-Overwatch Upgrade
Support:
-Combat Exhaust (Green Skill)
-Overcharge
Exhaust Energized Charge (Green Skill)
-XICS(Blue Skill)
-1 Slot Power Core
Psychic: Crowd Control (Meta)

ROLE:
-Kinetic Burst Damage
-Crowd Controll
-Cleanse Aliments
SIDE NOTE:
-This Build is used Situationel. you need to get a feeling for it to shine. combo option, situation arwarness, Positioning.
PLAYSTYLE INFO:
-you go ahed of the team if you want to push, use Mind Blast to open a path into the building or out for example. or use it to push back enemys thats comming to close to week teammates like supporter or Medics! or push back a Boss close to a team mate and combine it with gravity to keep him in place for some seconds to open a time window for your team to use stuff thats other wise have killed the teammate near the enemy.
-IMPORTANT: if to many Enemys show up and overload the DPS of the team go on distance to the side of the team and use Reality Mixer to Pull all Enemys to your position!. as long its active you cant take DMG so dont give up if you see 3 rockets flying in your face :) as soon the skill ends you have to use gravity instant on the group of enemys you pulled to lift (stun) them to hve a to escape.
-use gravity frequently to lift big enemys thats charge into the team :)
-IMPORTANT: Psy Blast fire in the direction you are AIMING! turn overwatch off or you never hit the traget you try to hit with this skill. and more important NEVER use it on targets with Armour, wait until they got shreddded by your team.
-IMPORTANT: Pulse (2,1 sec CD !) is a long range on point Bubble creater! you can place it directy on team mates or in front of them! its Ceanse Aliments! ON RANGE! Broken bone in the back? NP Pulse on the mate he is cleansed and get a speed buff to run back to the team.
(and the medic dont have to go into danger zone and can use his Clease Aliments (30 sec CD) for mass Clease to apply HP reg buff to the team, Pules dont apply HP reg buff insted Speed buff for short duration.)
speed buff per collectet bubble up to 5/5 25% movement speed.
BUILD:
GAR:
-Optimal Frame
Thunder:
-Forward Capacitator
-Optimal Frame
Medals:
-Distinguished Servise Cross
-Medal Of Survival
-Hellfire Combat Award
Defance:
-2 Slot Life Support
-Pulse (Green Skill)
-1 Slot Power Core
Offence:
-Psy Blast (Blue Skill)
-Critical Strike Skill)
-2 Slot Power Core
-1 Slot Power Core
-Mind Blast (Green Skill)
Support:
-Gravity (Blue Skill)
-Reality Mixer (Blue Skill)
-2 Slot Power Core
-1 Slot Power Core
Hellfire: Basic (Meta)

ROLE:
-Removing Hp regenaration with fire/Poisen debuff on Enemys
-Trash Clear
-Fire immunity Buff
-Frontliner
PLAYSTYLE INFO:
-IMPPORTANT Use Equalizer (Blue Skill) on any Barrels you can find on CD. this gives you free Poisen Ammo equvivalent to 10 magazines worth of ammo! this disable your fire debuff but you get poisen debuff insted on hit. and you can still apply fire debuff with Shockwave & Phase Reaper (Blue Skill)
-thanks to base 55% Armour you are the main frontline for the team to any dangerus enemy. tank the hits for them to soften the load on the Medic. (pray the Medic have Heal Drone in his kit to support you well, or tell your team to use the Medic bot. if you allways tank the hits he will allways put the Heal Drone on you if you keep behing near him)
-Positioning wile tanking: you between the enemy & the team in a line. that way each time the team trigger harvest you almost insta collect the heal bubbles from harvest, this will ensure your survival in the long fight. remember better you take the hit then any one else in the team. you are the reson for heal efficency!
-IMPROTANT: Shockwave DESTROY ITEMS 8m Around you. be carfull! and its give everyone 15m around you (basically everyone inside the ring of Fire you do with it) the fire immunity Buff thats alow you to spred fire every were without realy hard damaging and slowing your team mates if no poisen ammo from a barrel is loaded. the buff holds longer than your CD so dont worry. aslong you us Shockwave on CD +10 seconds your team is save from you!
-IMPORTANT: Phase Reaper gives you 50% movment speed buff for 5 seconds. best "Sprint skill in the game if you hit a target with it. thats your way of quick positioning and escaping!
-Napalm System is your level 4 skill
BUILD:
Arclite:
-Stock Capasitator
-Extended Mag
Thunder:
-Forward Capacitator
-Light Frame
Medals:
-Medal Of Survival
-Distinguished Servise Cross
-Iron Defance
Defance:
-Shockwave (Blue Skill)
-Plating
-Plating
-Plating
-1 Slot Life Support
Offence:
-Phase Reaper (Blue Skill)
-Adaptive Systems (Green Skill)
-1 Slot Power Core
-2 Slot Power Core
Support:
-Equalizer (Blue Skill)
-Napalm System (Blue Skill)
-Overcharge
Hellfire: Autocannon DPS

ROLE:
-Frontline
-Enemy HP regenaration Reducing via Fire Debuff
-Explosion Dmg Provider
-Biomass Clear
-Trash Clear
-Armour Shredding
-Solo Runner
PLAYSTYLE INFO:
-Simple use kinetic mode on Targets Weak to Kinetic Damage & Explosion mode vs Targets Weak to Explosion Damage
-Use Shockwave to kill Biomass together with Explosion Damage Fire mode. and Use Shockwave behind the team wile moving, to clear trash with fire debuff thats follow the team.
-Be one of the fronltiner for the team you are Tankier then others in the team. Help your Medic by Absorbing big hits from Enemys!
-use Equalizer on Barrels to get 1 free Magazine Explosion Bullets.
BUILD:
Autocannon:
-Autocannon Auto
-Shredder Ammo
-Damage Booster
-Stock Capacitator
Enhanched Frame
Thunder:
-Forward Capacitator
-Light Frame
Defance:
-Adaptive System (green Skill)
-Shockwave (Blue Skill)
-2 Slot Life Support
-2 Slot Life Support
-1 Slot power Core
Offence:
-Stabilizer System
-Stabilizer System
-Stabilizer System
-Stabilizer System
-Critical Strike (Blue Skill)
-2 Slot Power Core
Support:
-Equalizer (Blue Skill)
-Overcharge
-Napalm System
Combat Engineer: UBAS

ROLE:
-Frontline
-Biomass Clear
-Crowd Control
-Solo Runner
-Explosion DMG Provider
SIDE NOTE:
Over Suit Power Limit with low Energy Regenaration:
-YOU are a UBAS Pilot. the only time you use YOUR energy Pool is by going out of the UBAS to place a Advanced Charger, Press Ammo Generator & Rocket Ammo. your Regenarate you energy full befor you leave the UBAS again anyways :)
PLAYSTYLE INFO:
-Here will stay a Link to a Ultra Detailed UBAS Guide Soon.
BUILD:
GAR:
-Light Stock
-Suppress Frame
Missile Swarm:
-NO MODS
Medals:
-Distinguished Service Cross
-Elysium Commendation
-Medal of Survival
Defance:
-Combat UBAS (Blue Skill)
-1 Slot Power Core
Offence:
-1 Slot Power Core
-Ammo Generator (Blue Skill)
-2 Slot Power Core
Support:
-Advanced Charger (Blue Skill)
-Overcharge
-Rocket Ammo (Blue Skill)
-Repair (Green Skill)
-Revive Module (Green Skill)
Combat Engineer: Tower Defance

ROLE:
-Primary Ammo Supplyer
-Fortifying
-Trash Clear
-Suppress + Freeze Enemys
PLAYSTYLE INFO:
-Ammo Generator is your Level 4 skill! Keep in mind with GAR burst and lvl 4 Ammo generator you load Cryo ammo and can 1 tap all supressed targets in to Freeze state. hit the target again and you can Freeze them forever until you magazin is empty. Freezed Targets take bonus dmg!
-each time you use Tactical Sentry Gun on a Exsisting Build turret you upgrade it to the other variant. Keep in mind, so far 4 explo 2 Minigun worked really good together.
(upgrading a Flamer turrets do nothing than letting you rebuild the flamer turret)
1. explo turret, short range, high dps (frontline)
2. Kinetic turret, long range, low dps, high Suppression, (Backline)
3. Flamer Turret, short range, low dps, Burning debuff, (USELESS!!!)
-IMPORTANT: you need time to Build enough Tactical Sentry Guns to be efficient, and Turrets BLOCKING BULLETS! if you fortify a position (mostly near a building or door) build the turrets outside, as close on the walls of the building with Charger between them. that way your turrets are not in the way for your team mate and can cover the trash clear highly more efficient. keep in mind you want to build your "Defense Guardian" inside behind the wall but still on the frontline, they sending a drone out to fight but still have a engage range.
-IMPORTANT: wile the team is running, run a head of the team and build 2 explosive Sentry & 1 Charger. if the team pass you stop building and run a head again. wile moving, basic Tactical Sentry Gun do it! dont waist time upgrading them.
(Keep in Mind you can run a head and place the turrets and the team passing by Building them for you just by walking over it without stopping ;) that way you can have a line of turrets thats cover the backline wile running. BUT they dont hold long becurse your Charger have longer CD and most of the turrets will stay without a charger near by. never use Defanse Guardian for that!
BUILD:
GAR:
-Gar Burst
-Light Stock
-Suppress Frame
Automatic Shotgun:
-Light Stock
-Suppress Frame
Medals:
-Distinguished Service Cross
-Medal of Survival
-Elysium Commendation
Defance:
-Tactical Sentry Gun (Blue Skill)
-Defense Guardian (Blue Skill)
Offence:
-Revive Module (Green Skill)
-Ammo Generator (Blue Skill)
-1 Slot Power Core
Support:
-Advanced Charger (Blue Skill)
-Adaaptive Systems (Green Skill)
-Overcharge
-2 Slot Power Core
-Primary Extender
-2 Slot Power Core
Combat Engineer: Support

ROLE:
-Primary Ammo Supplyer
-Biomass Clear Support
-Team buffer
-Team Relocator
-Suppress + Freeze Enemys
-Fortyfier
PLAYSTYLE INFO:
-Ammo Generator is your Level 4 skill! Keep in mind with GAR burst and lvl 4 Ammo generator you load Cryo ammo and can 1 tap all supressed targets in to Freeze state. hit the target again and you can Freeze them forever until you magazin is empty. Freezed Targets take bonus dmg!
-you can have a total of 3 Harpoon traps on the field. allways place 3 together (just 5 sec CD) they pull enemys and your team have a save area to use AOE or whatever to kill the Targets without behing in danger. example: oh 3 Fluffy rush the team. BÄM all 3 get pulled from harppon traps, trapt in one place. give them hell :)
-IMPORTANT: use Team Thrusters to go up / down Hill with your team or engage / disengage. pull range is short the team needs to stay close to you! as soon the jump starts, all jumping gain a buff for 9 Seconds! 100% critt chance, overwatch retarget time -50%, 30% DMG, and not showen on the skill: OVERWATCH RANGE gets dubbled!
(CRY on your teammates if they ALL dont activate Overwatch for 9 Seconds as soon the Jump starts! to Terminate EVERYTHING around)
-IMPORTANT: use Rapid Respose lvl 5 on ultra Bosses. on max difficulty ou will almost never see them getting supressed + stun / freeze locked becourse they have realy high supression regen. Rapid Respone reduce the Supresion regen by 90% and let your theam stun / freeze lock the boss foor up to 8 Seconds! (ever seen a instant freezed hellspawn, KER, Leviatan, Leagalesh, Sandworm, hunter queen, Ripjaw, Overloard, Saffron, Hatchling, Speciment, Thanathos or whatever enemy in the game, not able to do anything for 8+ seconds?)
BUILD:
GAR:
-Gar Burst
-Light Stock
-Suppress Frame
Automatic Shotgun:
-Light Stock
-Suppress Frame
Medals:
-Distinguished Service Cross
-Elysium Commendation
-Assault Combat Award
Defance:
-Harpoon Trap (Blue Skill)
-2 Slot Life Support
Offence:
-Team Thrusters (Blue Skill)
-1 Slot Power Core
-Rapid Response
Support:
-Adaaptive Systems (Green Skill)
-Revive Module
-Primary Extender
-Ammo Generator (Blue Skill)
-Overcharge
-2 Slot Power Core
-1 Slot Power Core
Combat Engineer: Damage Dealer

ROLE:
-Damage Dealer
-Primary Ammo Supplyer
-Biomass Clear Support
-Armour Shredd
-Team buffer
-Team Relocator
-Suppress + Freeze Enemys
PLAYSTYLE INFO:
-Ammo Generator is your Level 4 skill! Keep in mind with GAR burst and lvl 4 Ammo generator you load Cryo ammo and can 1 tap all supressed targets in to Freeze state. hit the target again and you can Freeze them forever until you magazin is empty. Freezed Targets take bonus dmg!
-IMPORTANT: use Team Thrusters to go up / down Hill with your team or engage / disengage. pull range is short the team needs to stay close to you! as soon the jump starts, all jumping gain a buff for 9 Seconds! 100% critt chance, overwatch retarget time -50%, 30% DMG, and not showen on the skill: OVERWATCH RANGE gets dubbled!
(CRY on your teammates if they ALL dont activate Overwatch for 9 Seconds as soon the Jump starts! to Terminate EVERYTHING around)
-IMPORTANT: allways use Gar Burst, only exeption is, if you want to freeze enemys then use the automatic mode (C)
-use Rocket Ammo on CD!
BUILD:
GAR:
-Gar Burst
-Energy Ammo
-Long Sight
-Light Stock
-Suppress Frame
Missile Swarm:
-NO MODS
Medals:
-Medal of Survival
-Distinguished Service Cross
-Elysium Commendation
Defance:
-Adaptive Systems (Green Skill)
-2 Slot power Core
-1 Slot Power Core
Offence:
-Critical Strike (Blue Skill)
-Team Thrusters (Blue Skill)
-1 Slot Power Core
Support:
-Ammo Generator (Blue Skill)
-Rocket Ammo (Blue Skill)
-Overcharge
-Primary Extender
-Primare Extender
-Primare Extender
-2 Slot Power Core
-Security Bypass
Combat Engineer: Trampoline

ROLE:
-Primary Ammo Supplyer
-Biomass Clear Support
-Team buffer
-Team Relocator
-Suppress + Freeze Enemys
-Fortifier
SIDE NOTE:
-Keep in mind this build fokus on Team Jump to support a GUN TEAM COMPOSITION only!
-Energy regeneration will be a problem if the Terminator dont Provide Combat Exhaust buff!
PLAYSTYLE INFO:
-Ammo Generator is your Level 4 skill! Keep in mind with GAR burst and lvl 4 Ammo generator you load Cryo ammo and can 1 tap all supressed targets in to Freeze state. hit the target again and you can Freeze them forever until you magazin is empty. Freezed Targets take bonus dmg!
-IMPORTANT: use Team Thrusters to go up / down Hill with your team or engage / disengage. pull range is short the team needs to stay close to you! as soon the jump starts, all jumping gain a buff for 9 Seconds! 100% critt chance, overwatch retarget time -50%, 30% DMG, and not showen on the skill: OVERWATCH RANGE gets dubbled!
EXAMPLE: Team Jump, 9,9 Seconds highest DPS you gan get in the game, 8,5 Seconds later another Jump again and again. you make your team even with a Basic GAR to a Power house!
(CRY on your teammates if they ALL dont activate Overwatch for 9 Seconds as soon the Jump starts! to Terminate EVERYTHING around)
-IMPORTANT: Reaper Turrets Spam them WAY ahead in the direction your team is moving. they power up, the team passes then and they provide cover fire. if you hold a position make sure you place then on the side of the team and NEVER place then in positions thats block the line of fire for your team! they Stopp bullets and can get killed by Frendly guunfire!
-use Ammo Generator on CD! Keep in mind if your Magazine Reserve is full. drop 3 mags with (X) befor you use the skill to not waist 3 mags per use. pick the dropped ammo up after and carry it with you. make sure you have a team mate near you so he gets 3 mags to!
-IMPORTANT: you are the weakest player in the team. stay in the middle of the team. not just to stay save, to team jump also :)
-IMPORTANT keep in mide indoors you are uslees for the team, if your team hold a door they have to stay outside so you can jump them to buff them! Example: all sit outside in front of the door. you make a short team jump, all have overwatch ON, and go back to the Door, hold at door for 18 seconds and team jump again. nothing ever will arrive your team to threaten them xD
BUILD:
GAR:
-Optimal Frame
Auto Shotgun:
-Optimal Frame
Medals:
-Distinguished Service Cross
-Recon Combat Award
-Terminator Combat Award
Defance:
-2 Slot power Core
-2 Slot power Core
-1 Slot Power Core
Offence:
-Team Thrusters (Blue Skill)
-Ammo Generator (Blue Skill)
-1 Slot Power Core
Support:
-Reaper Turret (Blue Skill)
-Rocket Ammo (Blue Skill)
-Optimizer
-Optimizer
-Optimizer
Source: https://steamcommunity.com/sharedfiles/filedetails/?id=2854424571
More Red Solstice 2: Survivors guilds
- All Guilds
- (Ver. 2.99) Weapon Stats
- Medals in game (all 25 - total) [3.0.4]
- Combat Engineer Course
- Condatis Outline
- Red Solstice2 Nightmare build2.99
- DPS Calculator
- Red Solstice 2: Survivors Guide 221
- Psychic Handler Guide
- Red Solstice 2: Survivors Guide 202
- Capture Trap Bonuses