
1. Introduction
Last updated 08/06/2022 for the Fast Friends Update - Build 509629I never intended to write a guide on dreckos. After my guides for ranching hatches and divergents, I was ready to take a break and actually play the game for a while :)
I've seen some really well done drecko ranches, but for reasons that make a lot of sense I've never seen a single one use a 'critter dropper' to automate repopulation. For that reason I decided to challenge myself to see if a drecko ranch was even possible with a critter dropper design. I figured it would require several compromises in space usage and efficiency, assuming I got it to work at all, but I wanted to try nonetheless.
If you're not following why this might be challenging, there are a handful of unique requirements for ranching dreckos that don't match well with the critter dropper technique:
Since dreckos can climb on walls and ceilings, you can't simply leave open doors in the floor for dropped critters to fall through. Otherwise the other dreckos in the stable would crawl through the open doors into the stables above and below.
In order to shear dreckos for plastic and reed fiber, they must spend time in a hydrogen atmosphere.
Whatever mechanism is used to allow critters to fall between floors would also allow hydrogen to rise and mix with other gasses. Managing gas pressure between floors could be a challenge unless the entire ranch is full of hydrogen.
I ended up building 4-5 designs with working critter droppers, and some of the more exotic ones even included thermo regulators, aquatuners and steam turbines for cooling. But while those results scratched the "challenge" itch, none of them were interesting enough or efficient enough to write a guide about. Then, I stumbled into a drecko ranch design I found truly inspiring:
thegroundbelowme & Beardo09 - Optimized Drecko Ranch Design v3https://www.reddit.com/r/Oxygennotincluded/comments/qarpve/optimized_drecko_ranch_design_v3/
Within this guide I will refer to the above design as the TGBM/B09 design. My own designs had a lot of empty, wasted space, and though it doesn't look like it on the surface, the TGBM/B09 design does as well. Looking at the two side by side it became clear that I could combine elements from both to remove much of the empty space. And by building the TGBM/B09 design 'upside down' it would allow the integration of a critter dropper from the shearing area into the breeding stable. Ultimately, that is how I came up with my new design, and then decided to write this guide.
2. Objectives
As stated above, this all started as a fun personal challenge, not an exercise in optimizing drecko ranching. Even so, I'll document below what I set out to achieve.
Requirements Must be a “horizontal” stable
This is just personal preference; Drecko ranches especially come in all shapes and sizes, but I wanted to emulate my previous ranch designs Must integrate a "critter dropper" to deliver new dreckos to lower levels of the ranch
This was the whole point of the challenge, after all :) Must automate all required resource delivery
Dreckos don't eat delivered materials, but consume plants directly
As such, the resources required to maintain plant growth (dirt) must be automatically delivered Must automate all required resource extraction
Plastic
Reed Fiber
Eggshells
Meat
Phosphorite
Optionally: extra meal lice and mealwood seeds Must automate population maintenance to keep eight dreckos in the breeder stable
Removal of eggs
Addition of new breeding dreckos when required (e.g. after natural death)
Goals / "Nice to Haves" (In approximate order of importance) Should minimize time between breeder death and replacement
i.e. should not wait 33 cycles for a new egg to hatch and grow to adulthood Should confine dreckos to a small area to expedite grooming and shearing
Should be relatively easy to build, no tricky order of operations or dupe pathing
I'd argue that I failed this objective due to the vertical water locks required, but I'll provide a tip on how to build those in the construction section Should try to keep automation requirements reasonable (subjective, I know)
Should not use incubators (powered or unpowered) to manage eggs
Normally I don't like incubators. They take up a lot of room, a lot of power, and require dupes to interact with them. That said, with dreckos in particular my designs without incubators were significantly handicapped. The final design, like the TGBM/B09 design, does use incubators.
3. Mark II - What's New?
There were three major factors that drove me to rewriting this guide. The first was the recent Fast Friends update, which patched a longstanding bug about how dreckos eat. Previously it was possible to sustain large populations of dreckos off a very small number of plants, for example a full stable might require only 2-3 mealwood plants. My original guide did not exploit this bug, however until the bug was patched it was impossible to know how many plants should be put in a stable to "future proof" the design. My original design used 10 mealwood to feed 8 dreckos, but now that the patch is released it is possible to determine the "correct" number of plants per stable.
So far the research I've seen is that every 4 regular dreckos require 3 plants (6 plants for a full stable) while glossy dreckos require a 1:1 ratio, thus 8 plants for a full stable. Those numbers do not appear to change depending on the plant type, e.g. mealwood vs. balm lily. With this information in hand I decided it would be worth reducing the number of plants in my stable from 10 to 6 to free up some additional space.
The second driver was that after multiple runs of building this ranch, especially post Spaced Out!, I realized that it takes a lot of rushing mechatronics skills and research to get to a half-functional state. The big impediment was the solid filter for sorting eggs, which in the first design was the very first upgrade from the fully-manual ranch. In Spaced Out! this tech requires 40 Applied Science research (400 radbolts) plus 30 Data Science research. This requires either launching a rocket to collect databanks, or analyzing 2-3 geysers (~10ea) and collecting a few more databanks from POIs around the map. Not to mention researching and building a virtual planetarium to use the databanks... it's really a whole lot of effort for one simple conveyor filter.
This improved build allows you to delay solid filter research until much later in the game, or at your discretion not use solid filters at all! You'll still need to skill up a Mechatronics Engineer fairly early, but I feel like almost everyone does that anyway. You'll also have to crank out 200 radbolts (probably from a manual generator) to research the conveyor receptacle. But this design can get up and running in a productive way much earlier in the game.
The third major change was that I've been playing on very hard difficulties lately and noticed that my ranchers were frequently getting radiation poisoning. My old design used two wheezewort in the breeder stable to cool the mealwood, and I usually installed a third wheezewort outside the shearing room to help with temperature control. On low difficulties this was no problem, but as you scale up the radiation given off was no joke. In addition, the majority of the starting asteroids do not provide wheezewort, so it always felt like a race to get to another planet and bring some back before the ranch overheated and stifled the mealwood. I decided to remove wheezewort from this design and rely instead on a cooling loop.
Comparison of Old and New Design Features Mechatronics
OLD: Requires a solid filter almost immediately, which is locked behind lots of technology research and science buildings.
NEW: Does not require a solid filter at all. Adding a filter as a final upgrade only allows for better segregation of outputs. Incubators
OLD: Supports up to 2 incubators, both can only incubate breeder dreckos (e.g. if you've chosen to breed glossy dreckos, it is not possible to incubate regular drecko eggs, and vice versa)
NEW: Supports up to 4 incubators, two for glossy dreckos and two for regular dreckos, regardless of which type you've chosen as breeders. Also uses automation to reduce incubator power consumption by 90% Cooling
OLD: Uses 2-3 wheezewort to provide local cooling
NEW: Can still optionally use wheezewort, but the preferred design does not provide any cooling and must be plumbed into a cooling loop. Utility Area
OLD: Stable contains an 8x4 open area to build whatever you like
NEW: Stable contains a 14x4 open area to build whatever you like (75% more space!)
4. Bottom Line Up Front - The Design
My design consists of a control room paired with a single breeding stable. Both rooms fit within a "standard" 24x4 layout. The control room contains the infrastructure to support the stable and export all resources. An example ranch (with an optional gymnasium in the bottom left corner) would look something like this:
Unlike my previous ranch designs, this is not intended to be stacked, as there is little reason to have more than one stable of breeding dreckos. The rest should be in hydrogen full time to maximize shearing output. It is actually possible to stack drecko stables with a critter dropper, and while I don't necessarily recommend it, I'll include a section on how to do this as a bonus at the end of the guide.
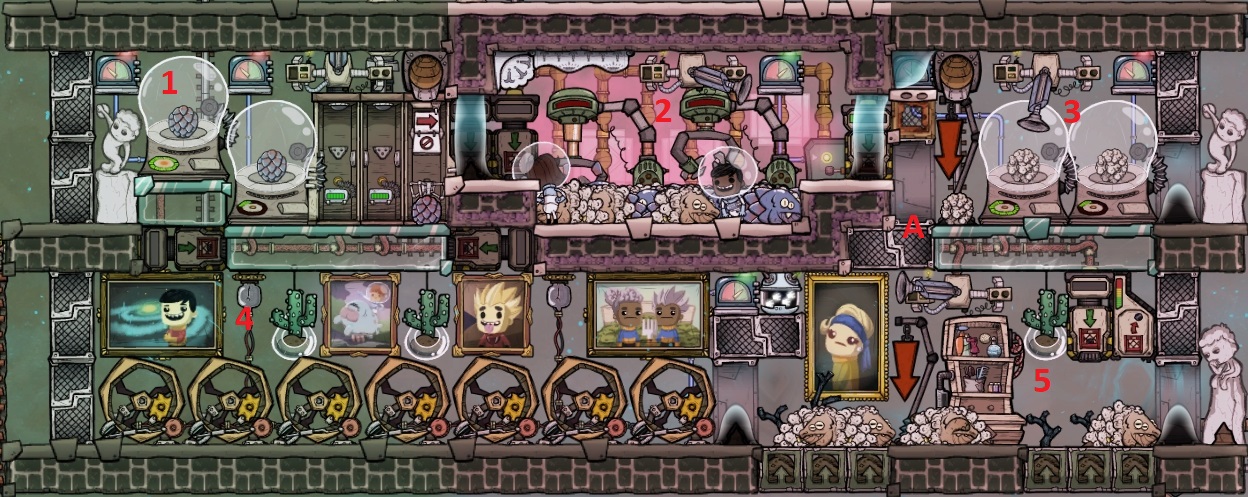
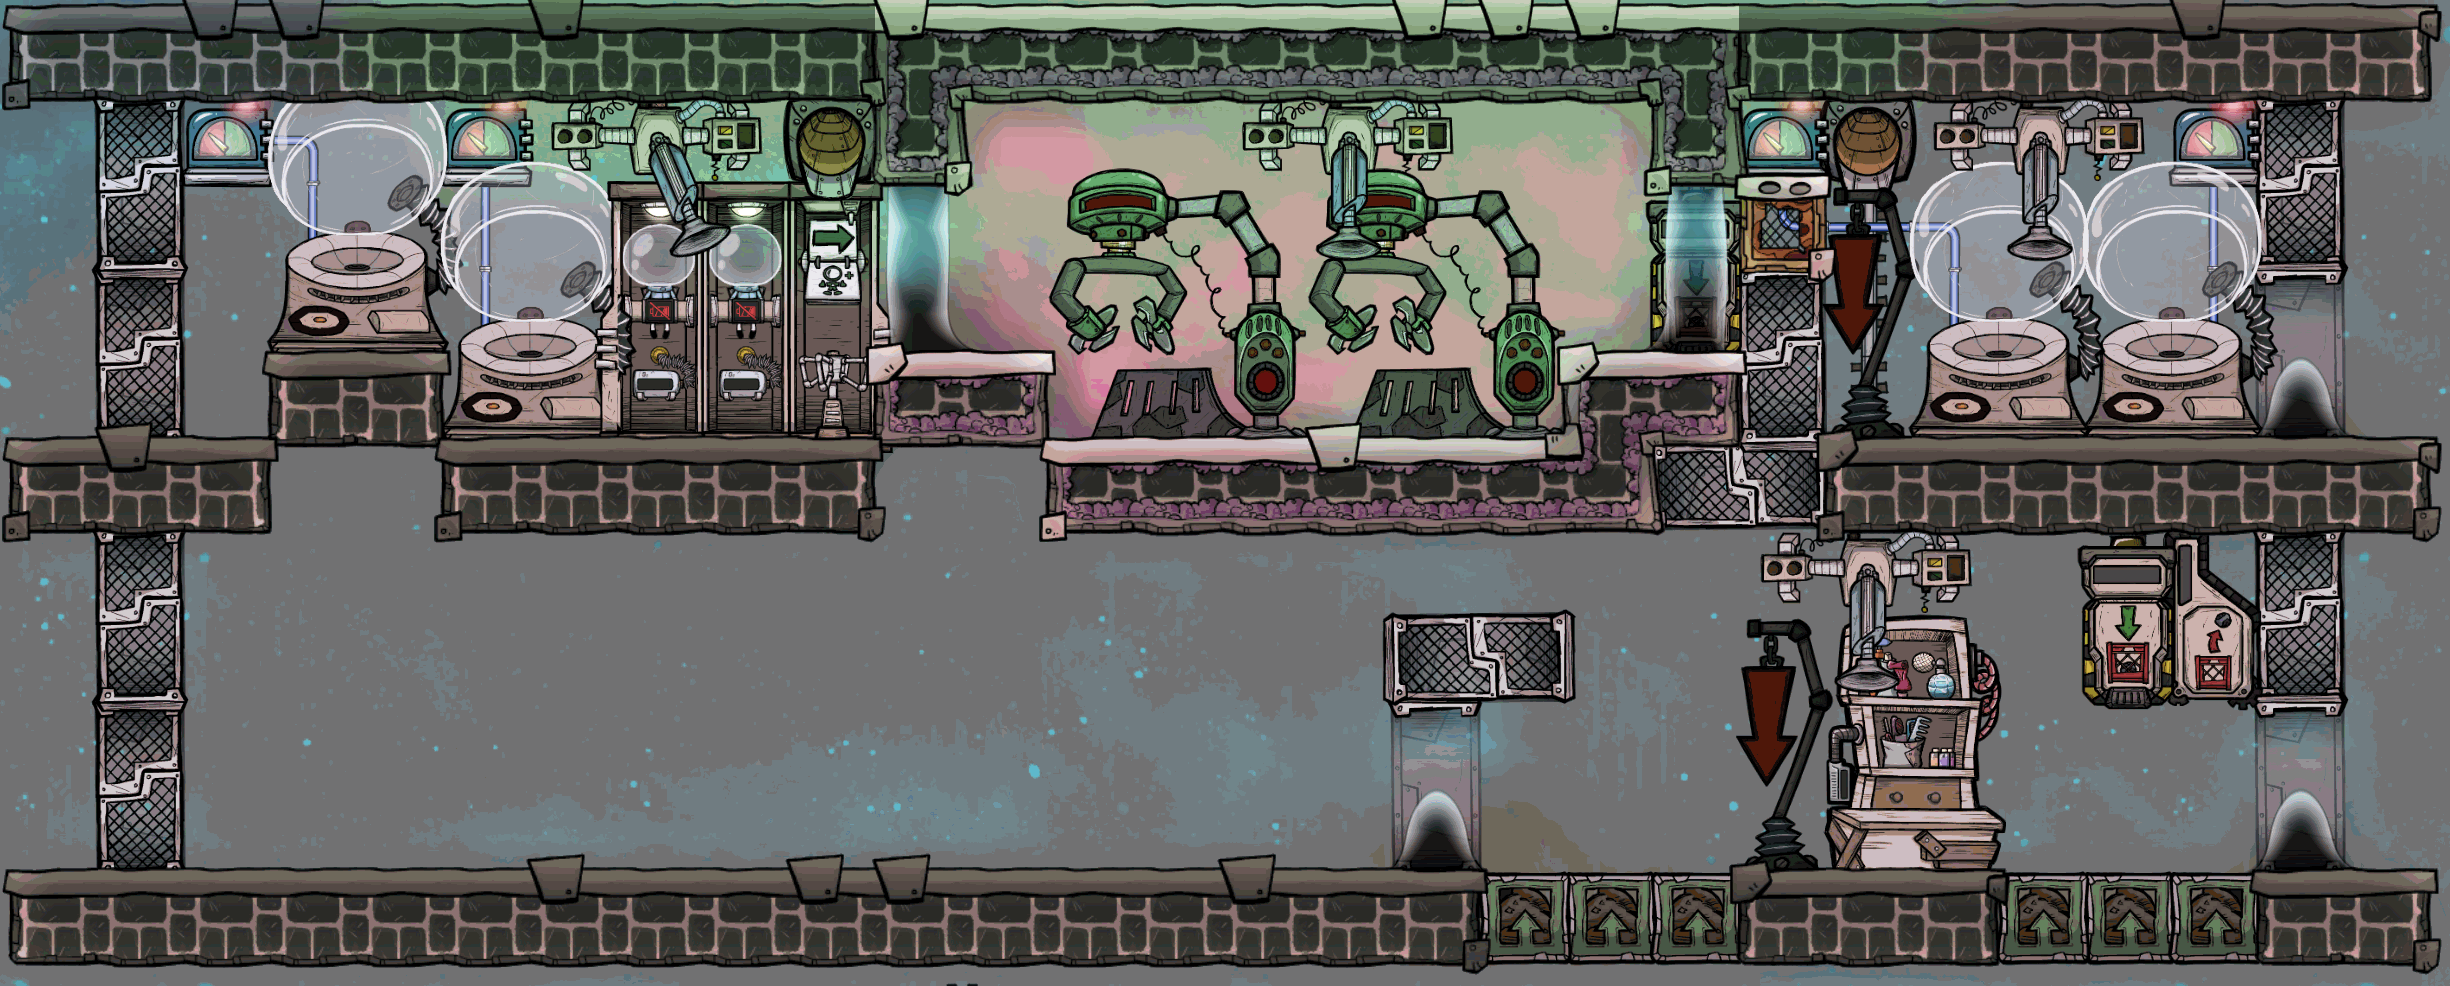
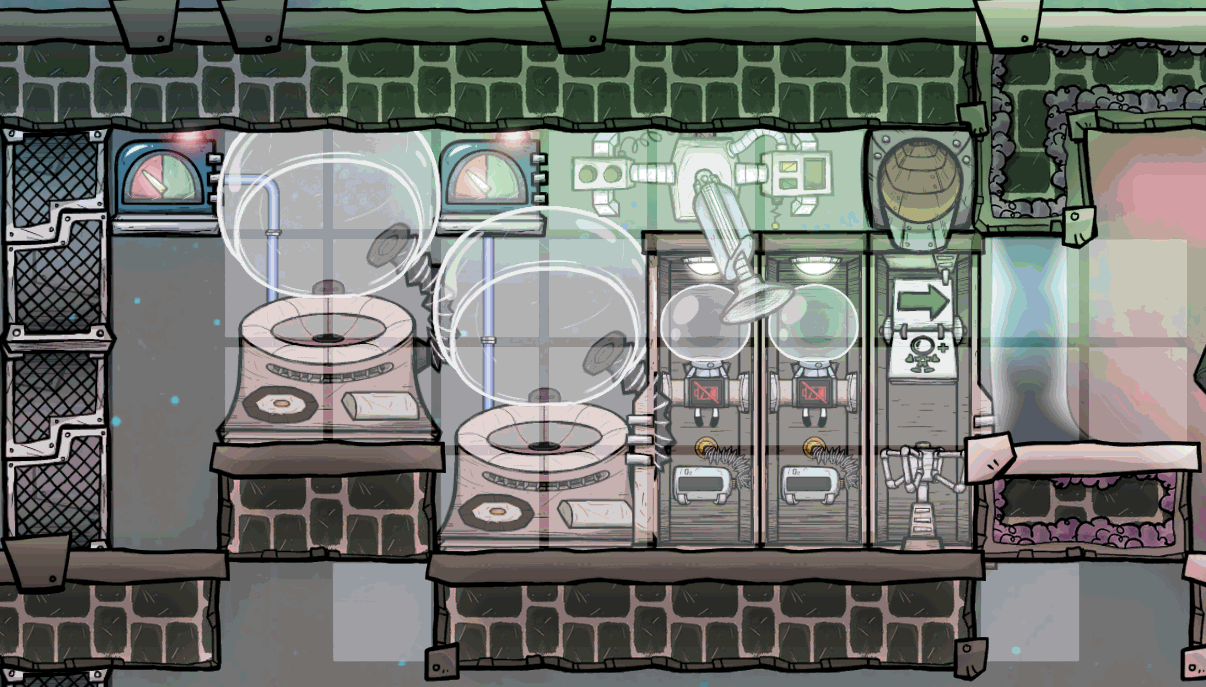
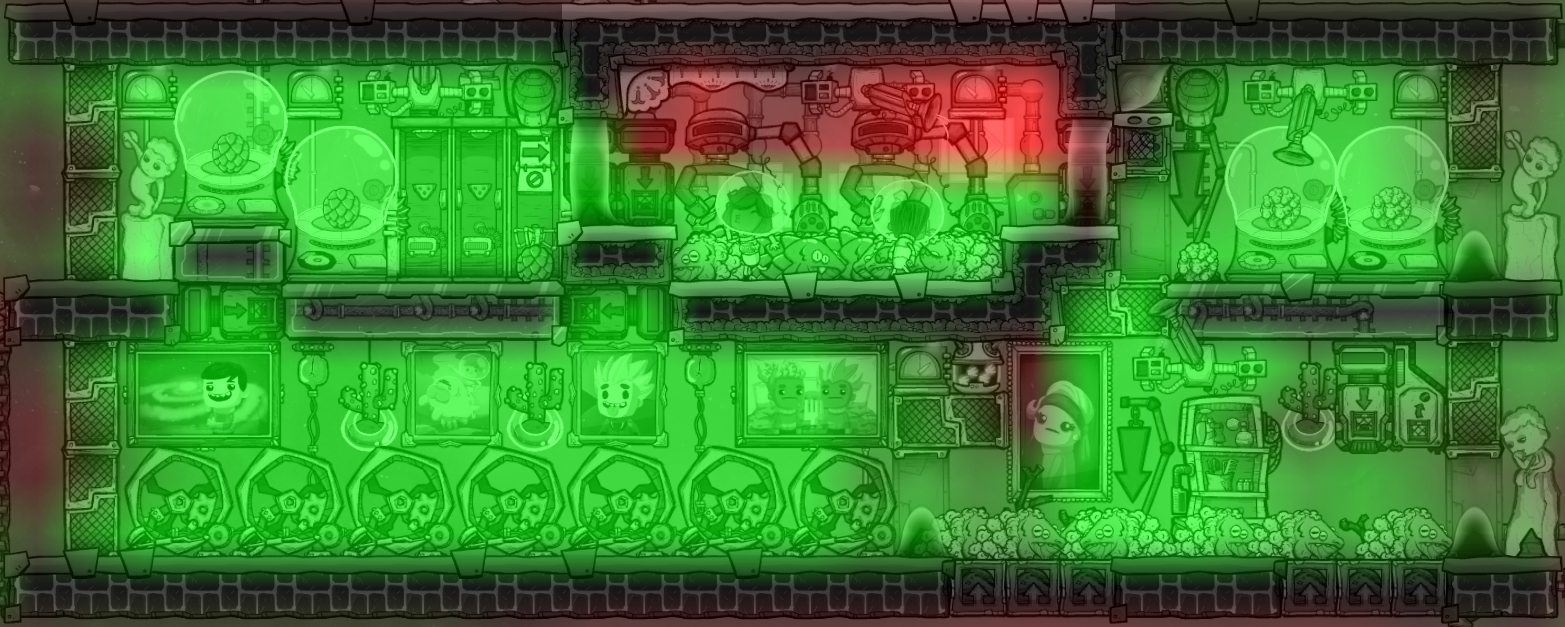
The Control RoomThe control room consists of three chambers which I’ve labeled 1 through 3 in the screenshot above.
Chamber 1 - Entrance and Resource SortingThis area handles all of the export activity for the ranch and controls access to the shearing room via the atmosuit docks. There are four total conveyor receptacles reachable from the single sweeper, two in the floor below are reachable diagonally, and two on the far left of chamber 2. Note that there is no door between chamber 1 and 2, so from ONI's perspective this is all a single 64-tile room.
Up to two incubators can be installed, as shown, to incubate the egg type which was not chosen for breeding (glossy, in this screenshot). In place of one incubator, a storage bin full of dirt and an additional conveyor loader can be installed to warehouse dirt for the mealwood. As there are six mealwood plants in the design, each consuming 10kg of dirt per cycle, a single storage bin holding 20 tons can provide a buffer of around 330 cycles worth of dirt.
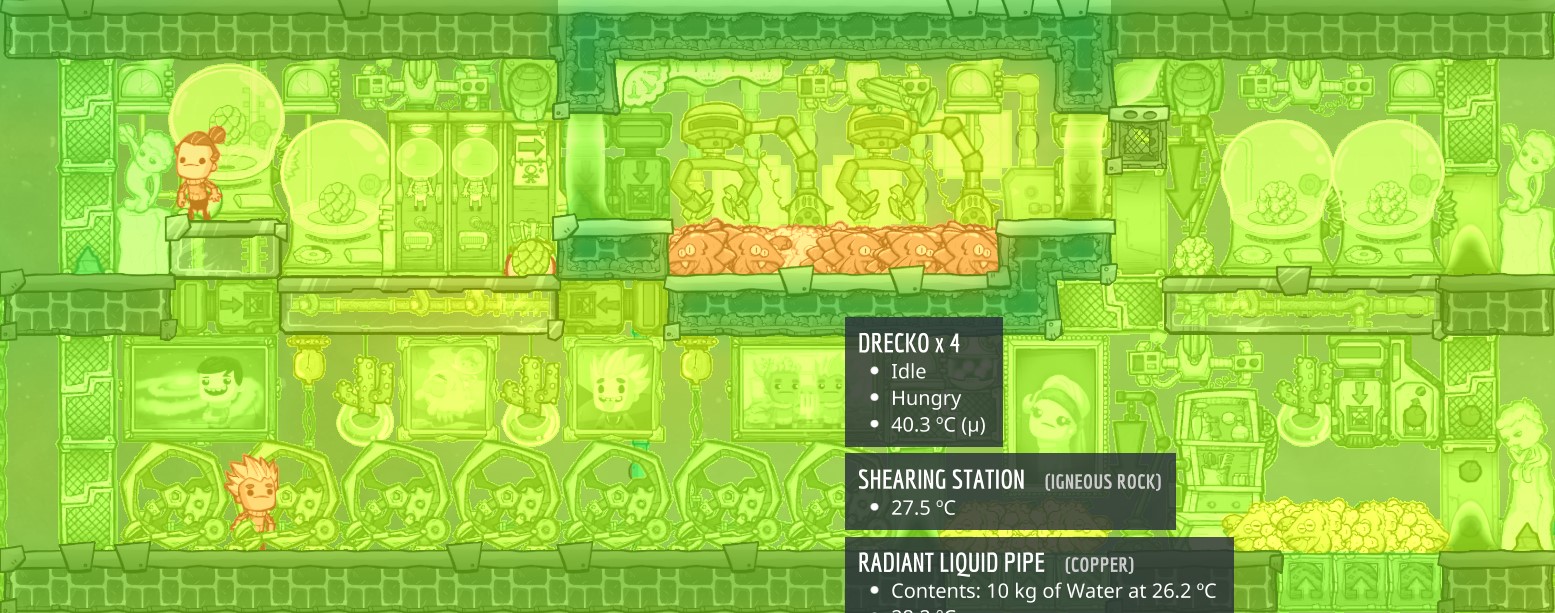
Chamber 2 - ShearingDreckos in this room, like the hatchery, are unable to crawl up the walls or into the rooms on either side due to the liquid locks. They will remain in this room until they eventually starve and become meat. Before that happens, the 100% hydrogen environment will promote rapid scale growth and allow shearing them multiple times for plastic and reed fibers.
Chamber 3 - HatcheryOne type of egg (glossy or regular) is chosen to be routed to this room and used to repopulate the breeder stables when necessary. Up to two incubators provide a steady supply of drecklets which are unable to climb up the step to the left into chamber 2. They are also unable to climb the doors on the right due to the liquid locks. They will remain in this room for up to five cycles until they either reach adulthood and can climb into chamber 2 or the stable below requires a new breeder. Note that the bottom right door, with the liquid lock, must be set to 'open' and to disallow dupe traffic in both directions. Dupes will climb over this door through the door above it to avoid the 'soggy feet' and 'sopping wet' debuffs
On the left hand side, the doors marked 'A' create a critter dropper mechanism. When the stable below requires a new breeder, the top door will alternate between open and closed, and any critters trapped in the closed door will fall through to the stable below. Once the stable is full, the door will remain open, allowing adult dreckos to crawl into chamber 2. Note that the door on top should be set to disallow dupes passing through from either direction, so that the only way in and out of chamber 2 is through the atmosuit checkpoint in chamber 1.
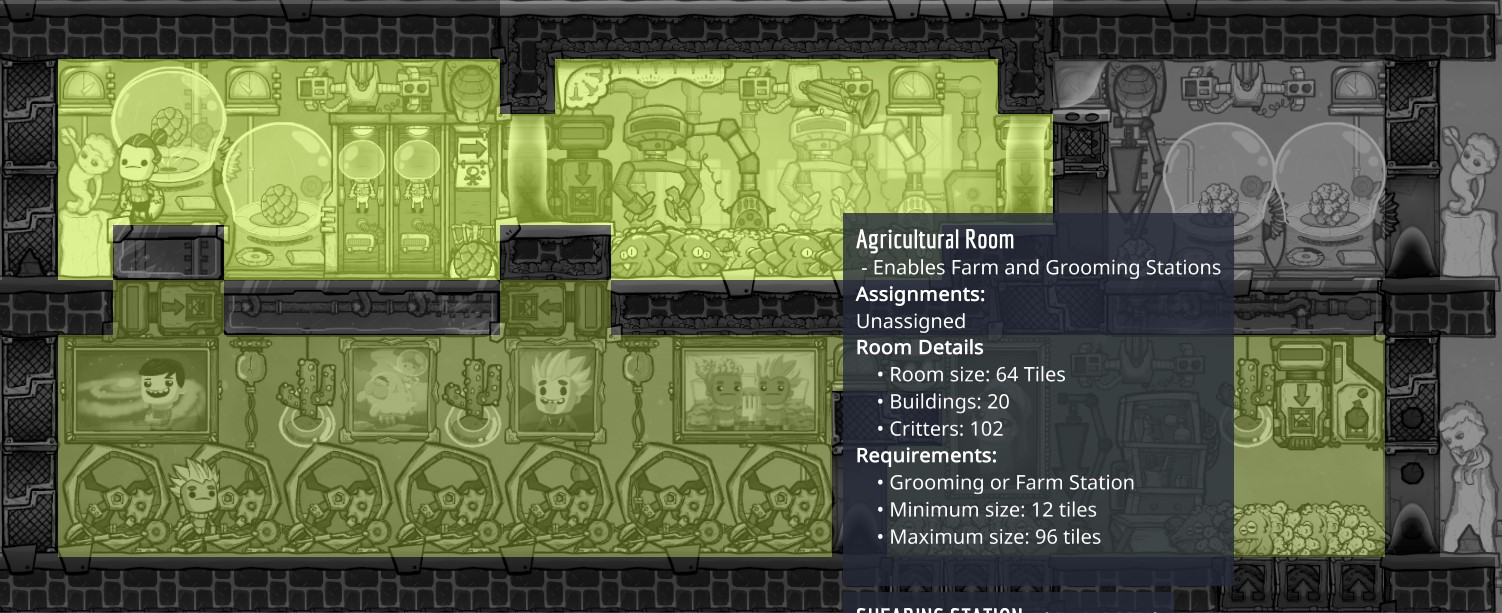
The Breeding StableThe breeding stable is fairly straightforward. The areas marked 4 and 5 combine to form a 96-tile stable able to hold 8 dreckos.
Chamber 4 - Utility SpaceThis area (minus the conveyor loaders in the ceiling) is simply a 14x4 empty space that can be used however you wish. As shown in the screenshot I installed a gymnasium to train athletics and boost decor. I could see benefits to installing a power generator and transformer(s), more plants to feed your duplicants instead of the dreckos, or even some one-off base staples like the rock crusher in this area. Or just leave it empty if you're pining for the classic empty hatch ranch look :)
Note that the bottom of the two doors between chambers 4 and 5, with the liquid lock, must be set to 'open' and to disallow dupes passing through from either direction. This will force them to climb through the upper door and prevent them from getting the 'soggy feet' or 'sopping wet' debuffs.
Chamber 5 - Breeding StableThe breeding dreckos are confined to this area and cannot climb the walls due to the liquid locks. Six mealwood plants provide just enough food for eight dreckos after the Fast Friends bug fix.
If you have access to wheezewort, you may choose to add an additional farm tile on either side of the grooming station and plant two wort seeds to provide cooling. Otherwise, the plants will need to be cooled with a cooling loop. The wheezewort are nice here as they consume only phosphorite, which is what the dreckos excrete, however they produce significant radiation which can poison your ranchers. Two wheezewort will consume a total of 8 kg per cycle of phosphorous which is 10% of the 80 kg per cycle (10 kg per drecko) produced by the ranch. You'll have plenty leftover for other uses.
Note that the door in the bottom right , with the liquid lock, must be set to 'open' and to disallow dupes passing through from either direction. This will force them to climb through the upper door and prevent them from getting the 'soggy feet' or 'sopping wet' debuffs.
5. Construction
The following sections describe how to build both the control room and the breeding stable in a progressive fashion. The expectation is that you would begin the early game with a fully manual ranch and an empty control room, then gradually build up to the final design.
- Early Ranching - Zero Automation
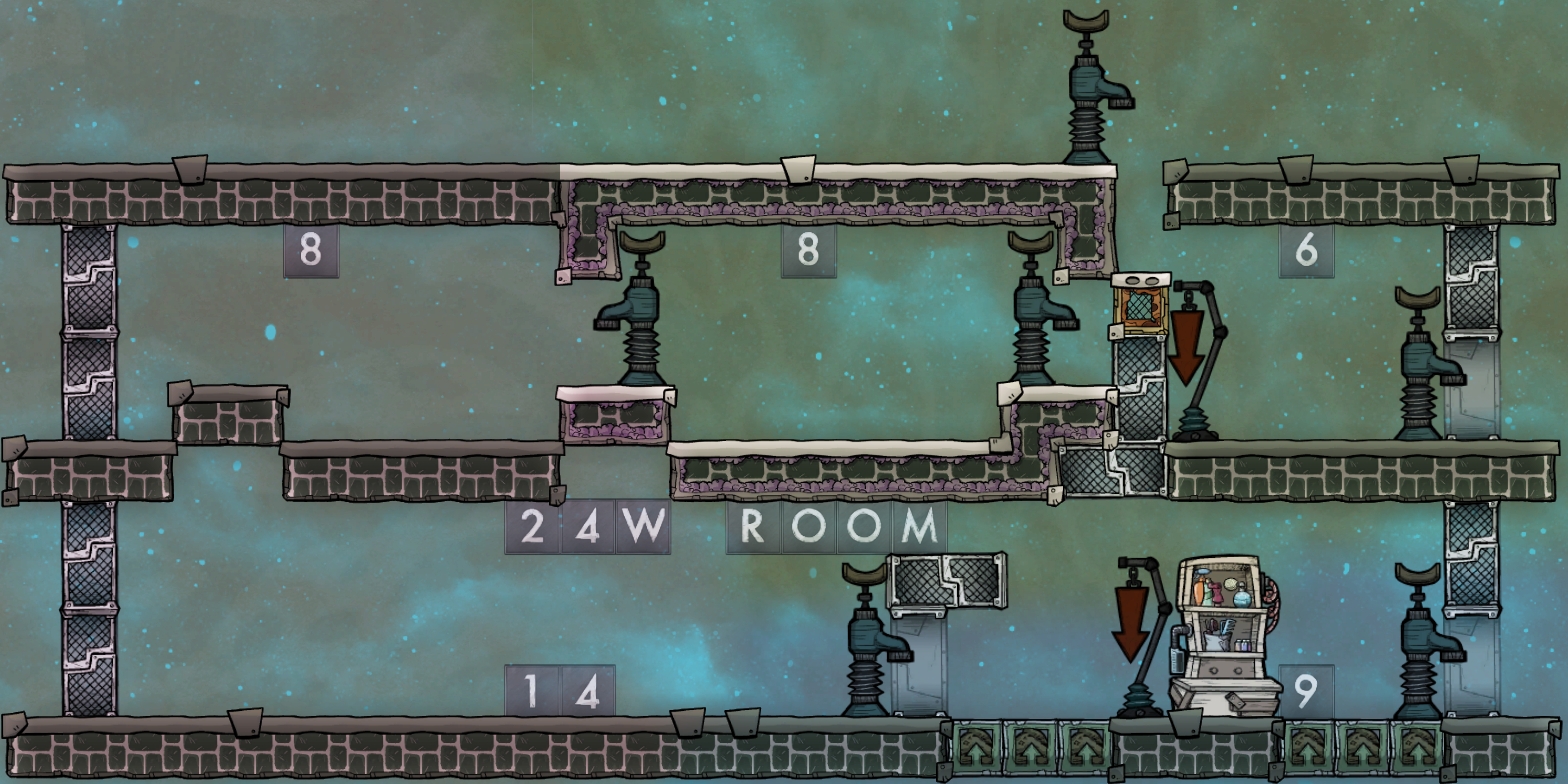
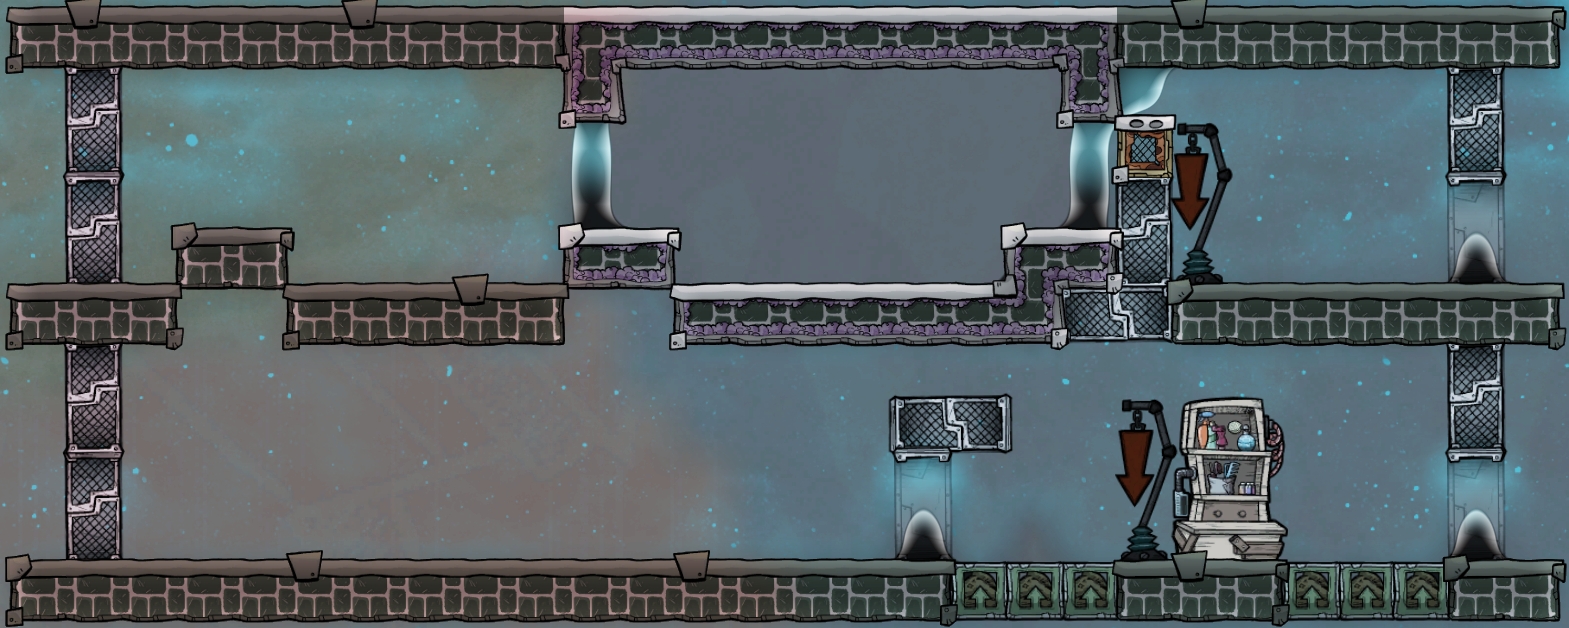

By far the most difficult part of this build is at the very beginning, with the vertical liquid locks. You won't be using the control room right away, so it's possible to create just the two locks on bottom for now, start your ranching, and gradually fill in the rest as you upgrade. Note that in the screenshots below I recommend changing the three tiles under the grooming station and critter drop off to airflow tiles as soon as you can. Otherwise CO2 will build up between the liquid locks and be unable to escape.
Here's the initial layout:
And with the locks established:
To get started you'll want to dig out space for two 24x4 rooms. For the bottom room you have to choose how you will eventually keep the plants cool. In the standard design (pictured) there are six farm tiles for feeding dreckos, and cooling is supplied via a cooling loop circulating water from elsewhere in the base. If you prefer a fully standalone ranch you can install two additional farm tiles (one on either side of the grooming station) to plant wheezewort and keep the plants cool.
Do not forget to set the three doors shown open in the screenshot to always open (not auto), or you'll be chasing escaped dreckos off the ceiling later on. I also recommend setting all three to disallow dupe travel in both directions, to prevent debuffs.
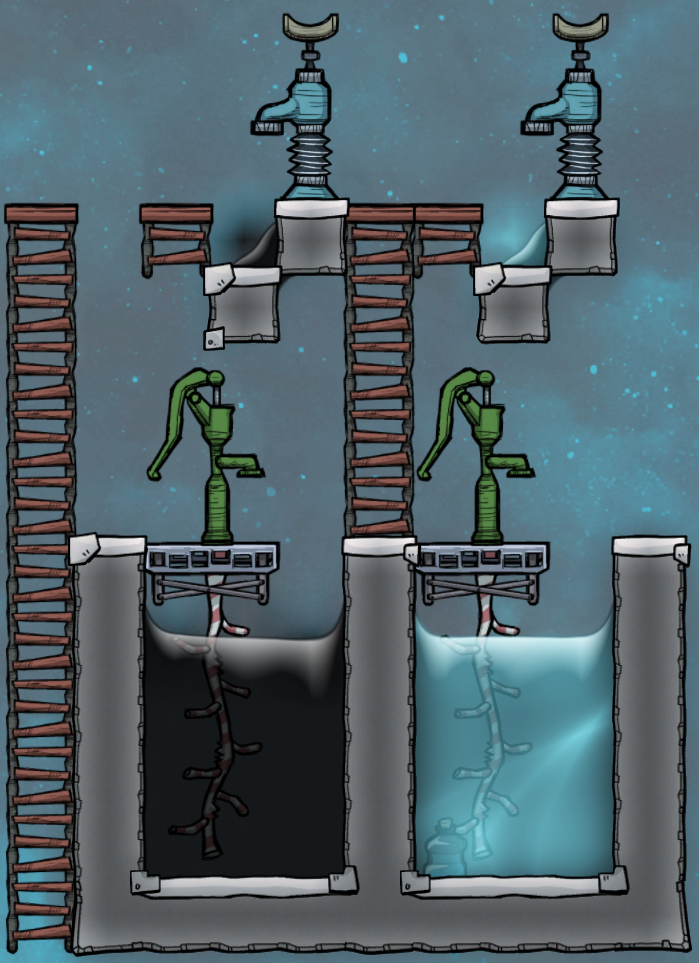
Building the Liquid LocksAll of my locks are using water on top of crude oil, with the exception of the single tile lock in the top right (above the airflow tile) which is just water. You can't see the top liquid if the lock is below a door instead of a tile, but trust me it's there. You can build your locks out of any 2 liquids, water over brine or polluted water works fine for the most part, but given the small quantities required I believe oil + water is a reasonable early-game approach. Much better would be petroleum with oil, however petroleum is a very mid-game liquid that I don't expect to have when just starting dreckos to obtain plastic. Once you do have some plastic, you can melt a small quantity to obtain naphtha, which is a great liquid for locks as well.
If you're having trouble locating crude oil there might be enough near your teleporter if you mop and bottle it carefully, or you may have to send a dupe to the other world and send a bottle back. Note that polluted water will not off-gas once the lock is established, however if anyone ever makes a mess inside your stable the lock will be instantly broken, so I strongly recommend avoiding polluted water as one of your lock liquids.
The toughest part of construction is obtaining the tiny amounts of liquid required for the locks. The oil on bottom can be any amount 350g or less (I've tested down to 30g), and the top water will end up in the 30-35g range. Trying to overfill and then mop the area can be a real pain and likely won't work, especially when applying the top liquid, as too large a quantity will push the bottom liquid aside and not form a lock. Before starting, I recommend setting all emptiers in the ranch to sweep only and deselecting all liquids in their settings.
I take no credit for this idea, but the best way I've found to get the small droplets of liquid are using a stair-step design, like this:
The small blob of liquid trapped on the step after the rest flows away is exactly 350g of oil and 35g of water. It's no coincidence that this is exactly the amount needed to form a lock. You can build an even larger staircase and create all the blobs you need from a single pour. This works for all other liquids as well, but if using polluted water be prepared to mop the steps quickly to prevent offgassing.
Once the small blobs are bottled, I recommend setting one emptier at a time in the ranch to sweep only and the liquid desired. Then have a dupe sweep a single bottle from the staircase. Once each lock is established, delete the emptier and move on to the next following the same process. With patience, it should all come together on the first try with no additional mopping required in the ranch. Rarely, a blob can be deleted and never actually come out of the emptier. In this case simply try again with another blob.
Early RanchingUnless you're in a hot starting biome, you won't need cooling for the mealwood right away. The dreckos have a body temperature of 63C / 145F and mealwood stifles at 30C / 86F, but it will take time to spread that heat into the surrounding tiles of the stable and stifle the plants. Once you have drecklets warming up the incubator rooms and a full shearing room slowly leaking heat, it will become impossible to keep plants growing without cooling.
If using wheezewort for cooling (8 farm tiles instead of 6) I recommend wheezewort in the second tiles in from the left and right, so they are just a bit closer to the outermost plants while still adequately cooling the center. Critters like to spend a lot of time standing at the far edge of their enclosure, so the outer plants will heat up faster in the early game, before the heat from above starts bleeding into the center later on. This also keeps the wheezewort a little farther from the grooming station to reduce radiation exposure. I ran this design for over 300 cycles and the plants stayed right around the middle of their growth range on the terra biome.
The critter drop off in the stable should be set to accept glossy and regular drecko and drecklet types, a maximum of 8, and auto-wrangle surplus. AFTER the stable is full with 8 dreckos, the top critter drop off should be set to all four types again, a maximum of 20, and disable auto-wrangle. The priority on the top drop off should then be set to a higher number than the one in the stable. This combination protects against too many critters being dropped into the stable once the critter dropper goes operational. If you only need one critter but the dropper drops two, a rancher will come and wrangle the extra critter back to the dropper room, and since the stable no longer needs critters the door will be open for it to crawl through to the shearing room.
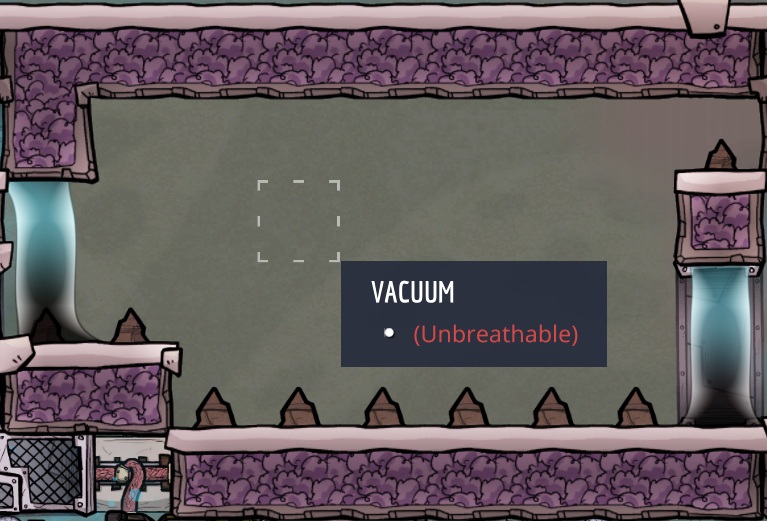
Note on the Shearing RoomEventually you will need to create a vacuum in this room. This can easily be done later with a gas pump, but before any equipment is installed in the room there is another option you might consider. If you build a tile in every cell inside the room, all the gas will be forced out. You can then deconstruct all the tiles to leave a vacuum.
IMPORTANT!If you use this approach, you cannot build a tile to the side of the upper liquid in a liquid lock until after building a tile to the side of the lower liquid. Conversely when deconstructing the tiles you must go in the opposite order, removing the top tile first, then the bottom tile. Doing this in the wrong order will destroy the lock. In the images below I highlighted the problem tiles that must be built AFTER and deconstructed BEFORE the tile immediately below them.
- 1st Upgrade - Egg Removal
As soon as you acquire the Mechanical engineering skill and the appropriate research, the first thing you’ll want to automate is extraction of eggs from the stables. This is primarily because if eggs are left in a stable you will suffer from the ‘cramped’ debuff, preventing more eggs (and thus meat, plastic, reed fiber, etc.) from being produced.
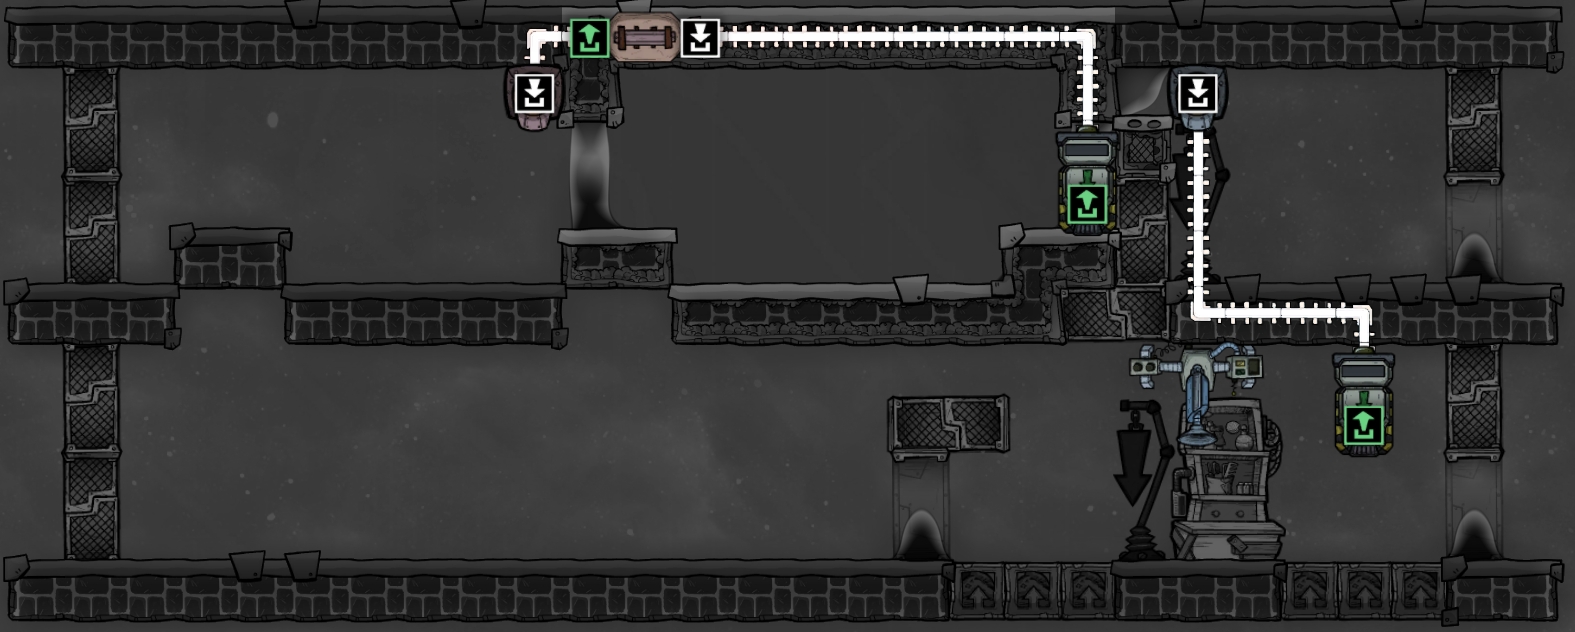
This upgrade requires 600 refined metal to build one auto-sweeper and two conveyor loaders, as shown in the shipping overlay.
I won't show any power overlays, since the layout is so simple. I tend to run horizontal power busses through the floors, then everything connects up or down to the nearest power bus. You can run power however you want, there is nothing tricky about the layout.
The loader in the bottom right serves only one purpose which is to remove the type of egg you've chosen for breeding. Unlike the advice in my previous guide, I now recommend breeding regular dreckos for the stable. I'm not sure if something was patched or if I was simply unaware, but I used to believe that glossy dreckos' egg chances were not affected by eating mealwood. That is not true, mealwood increases the chance of glossy eggs from both drecko types. Because of this, and because regular dreckos start at a 2% chance of glossy egg while glossy starts at 65%, a stable of all glossy dreckos will lay far less regular drecko eggs, and could potentially cause that variant to go extinct. In addition, glossy dreckos require slightly more food, 1 plant each rather than 0.75, so breeding regular dreckos let me maximize the utility area to the left and consume less dirt.
For convenience, the loader in the shearing room can be set to ALL and then unselect dirt and the egg type you've selected for breeding. Alternatively, each of the stable's products can be individually selected, including meat, phosphorite, meal lice, mealwood seeds and the egg type not chosen for breeding. Products that will be produced later in the shearing room and hatchery would also be individually selected in this case, including plastic, reed fiber and eggshells.
A note on Conveyor BridgesBridges in general, especially conveyor bridges, are EXCELLENT at transferring heat. There are even exploity builds for steam turbines that make use of this property, but we want to be absolutely sure we don't accidentally make use of this.
What this means is we need to be very careful when running conveyor rails out of the shearing room to deliver resources. Any bridges required should ideally start and end inside an insulated tile, as shown. Starting in an insulated tile and ending outside the ranch (in your base) is also acceptable. What should never be done would be starting a bridge inside the shearing room and ending inside an insulated tile (which will quickly heat the tile, causing heat to leak into the base) or even worse, jumping a bridge over the insulated tiles and connecting the hot shearing room directly to the air in your base.
- 2nd Upgrade - Dirt Supply
Here you have a choice between warehousing dirt locally in the control room, or shipping in dirt from another storage location in your base. The latter option requires only a conveyor receptacle in the stable to receive incoming dirt. This dirt will be automatically fed to the plants by the existing auto-sweeper.
The warehouse option requires 400 refined metal to install an auto-sweeper and conveyor loader, and takes the place of a future incubator. Dupes will fill the storage bin with dirt, which will be loaded onto the conveyor, shipped to the receptacle and auto-fed to the plants. The more incubators you run the faster you'll produce plastic, reed fiber and meat, but you can easily change your mind later when you have more centralized warehousing established in your base, and have excess power for incubation.
- 3rd Upgrade - Incubation
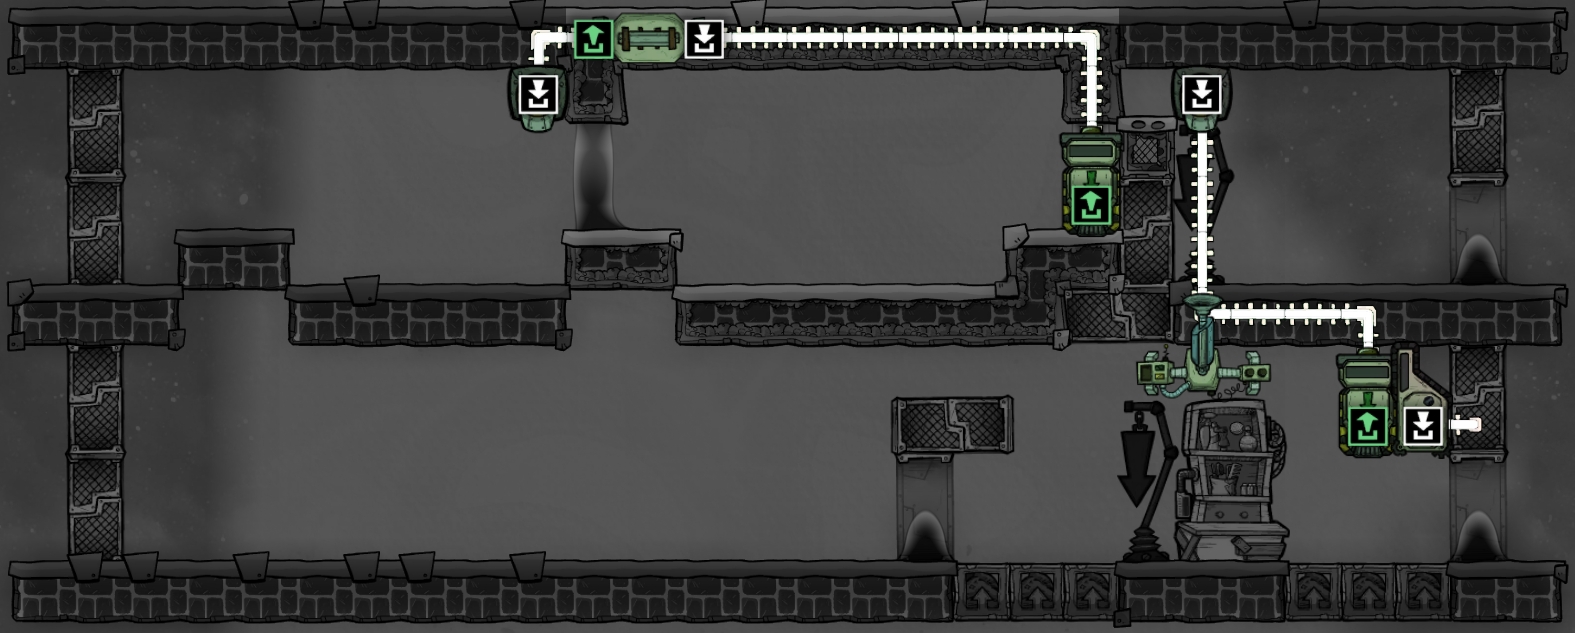
You now have the option to install up to four incubators, or three if you decided to warehouse dirt in the previous step. Each incubator should be set to continuously hatch eggs of the respective type, breeder dreckos on the right and non-breeders on the left.
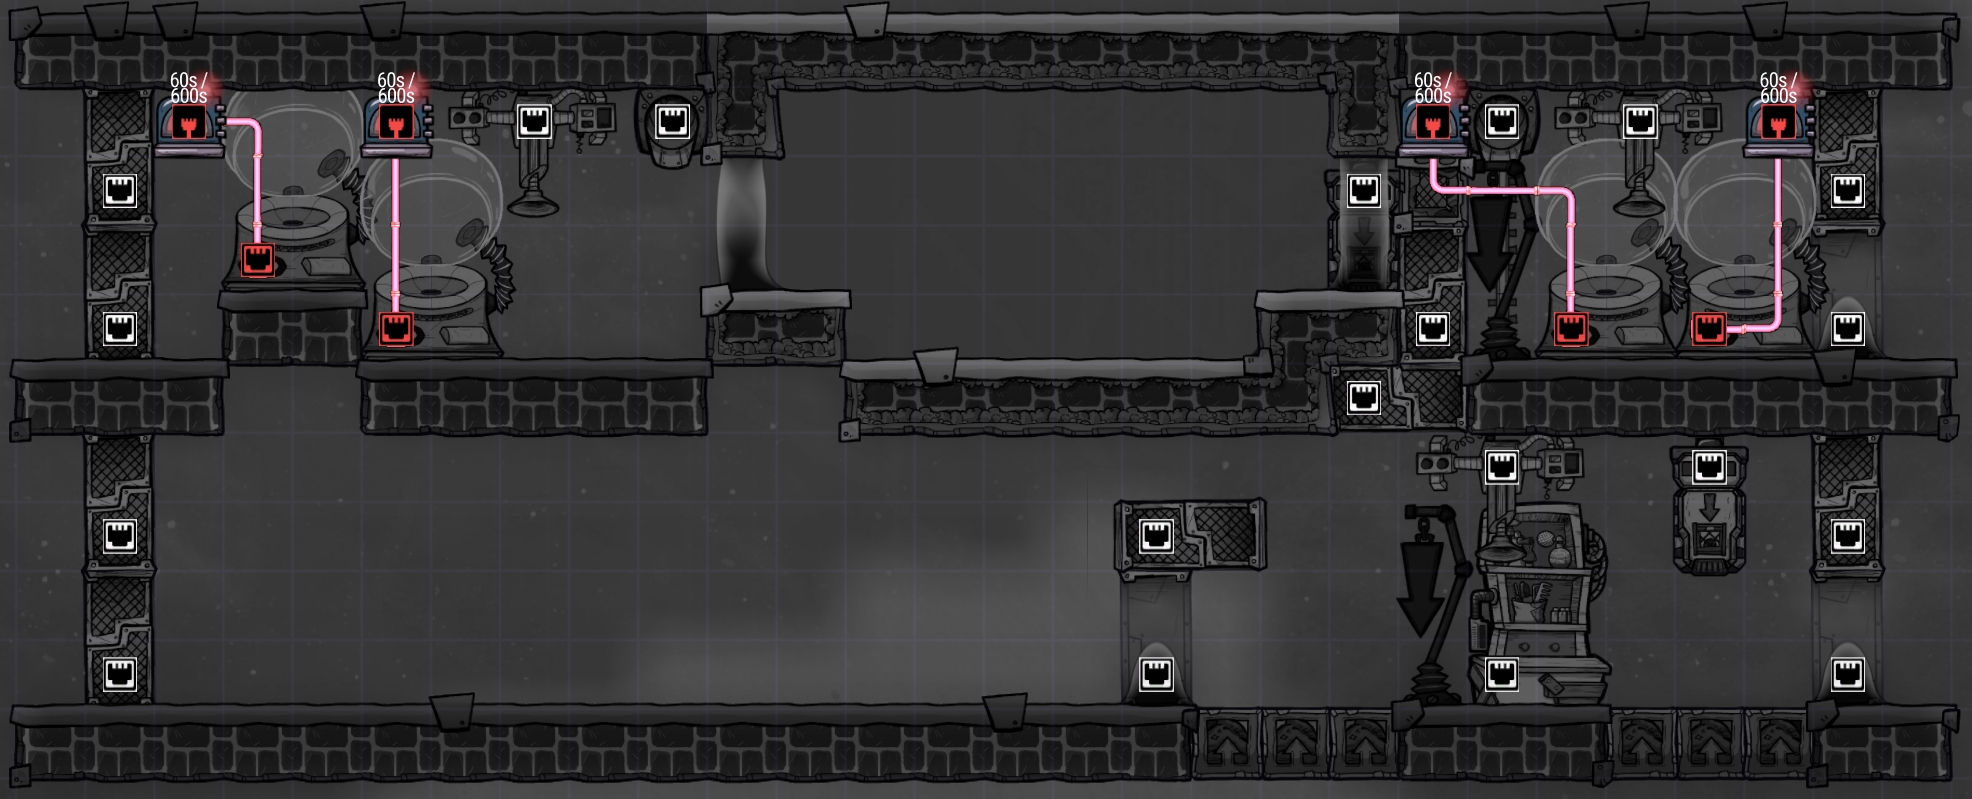
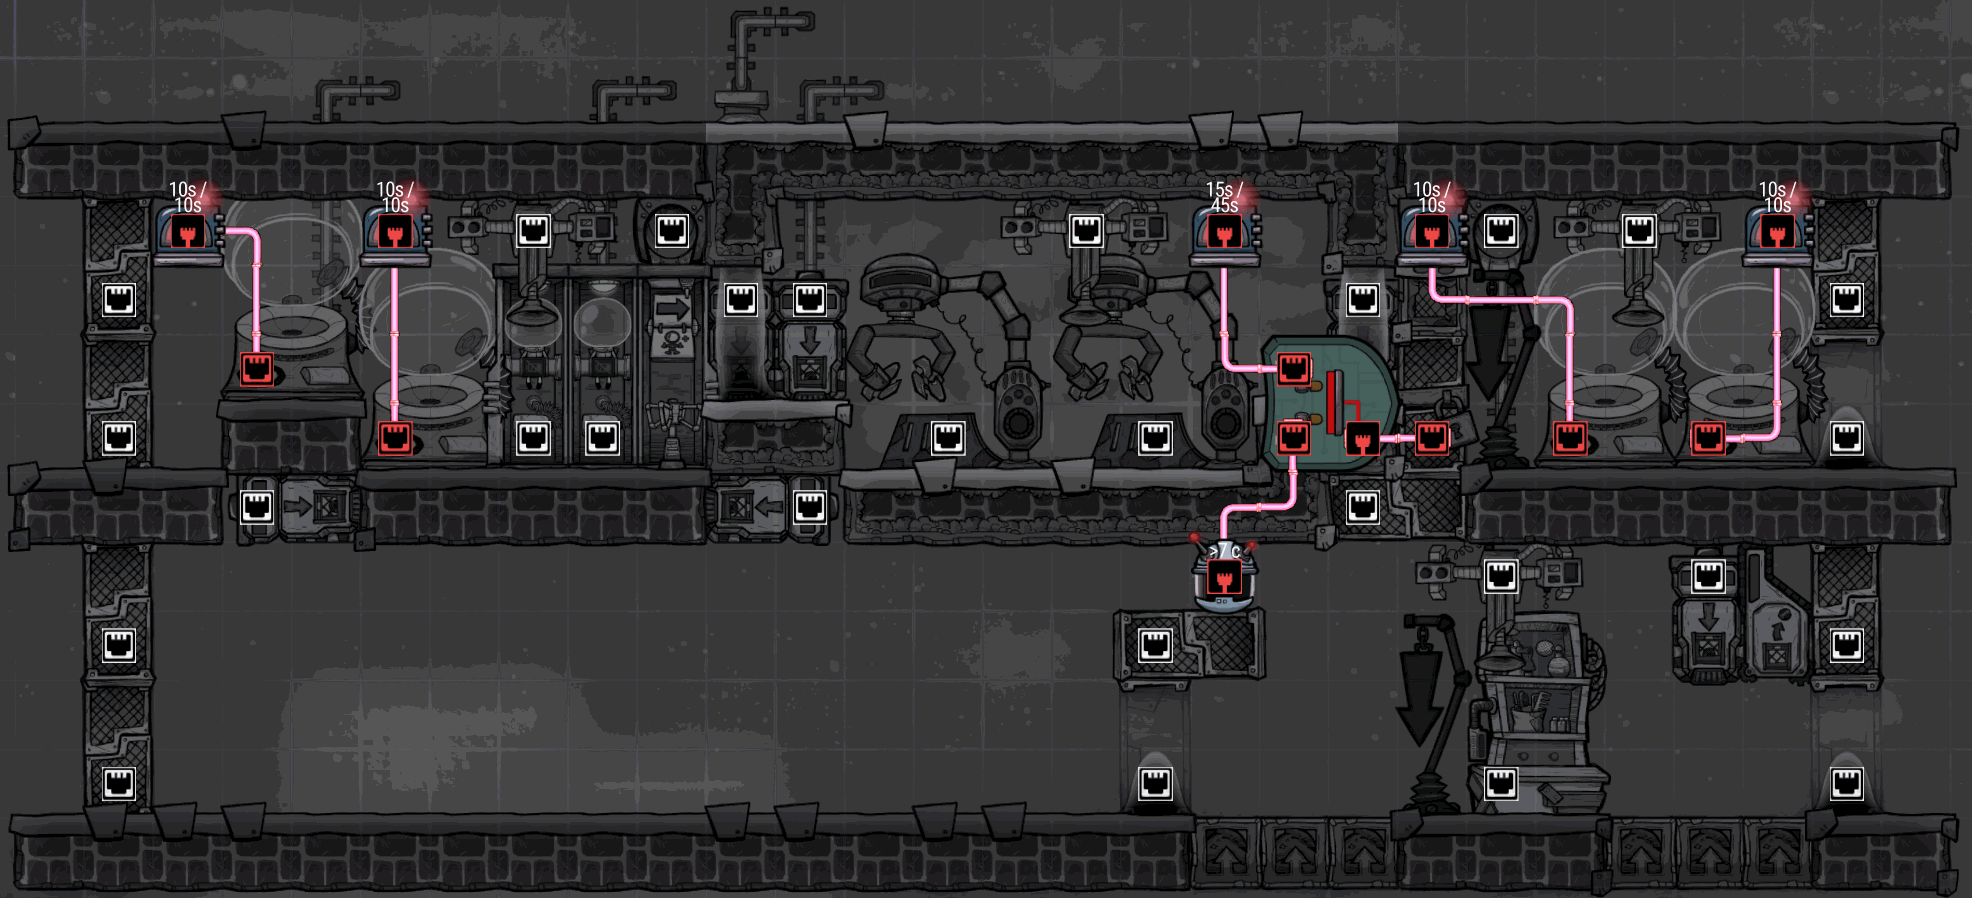
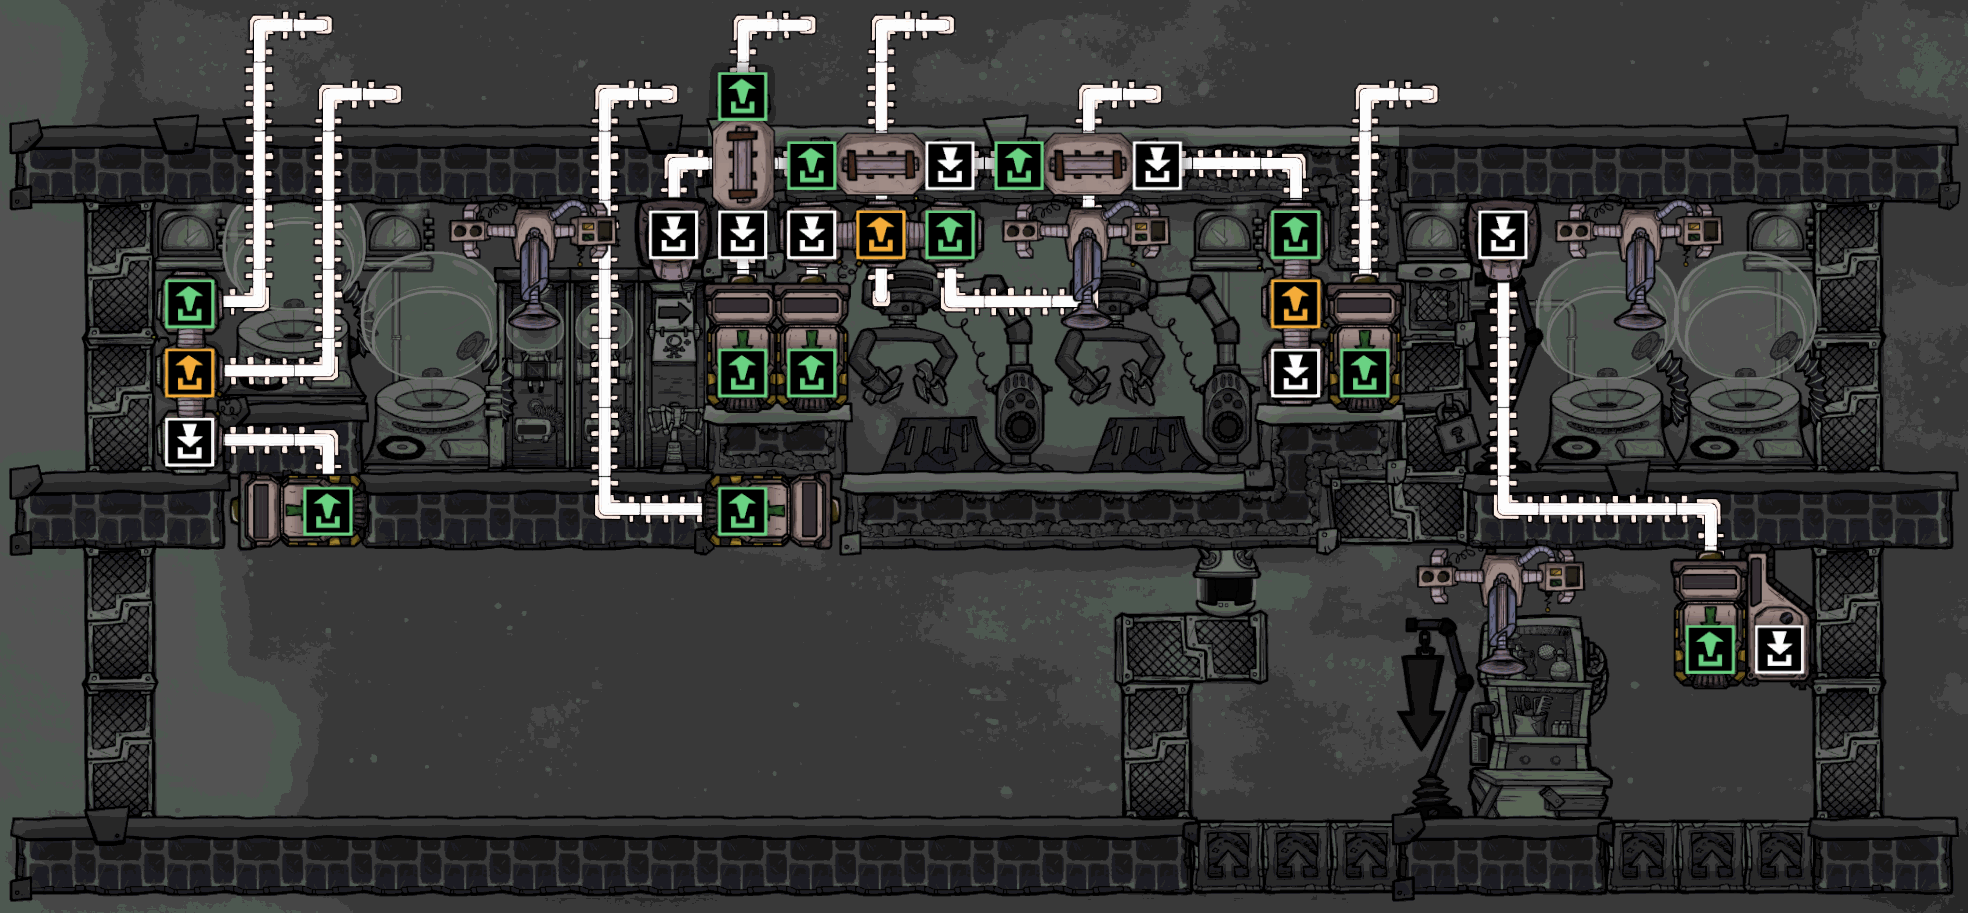
This requires 400 refined metal to install two autosweepers (200 if you installed a sweeper for dirt already) plus approximately 250 per incubator to account for some automation and wiring. The automation overlay is pictured:
The sweeper on the right can reach the previously installed conveyor loader which was set to ALL, thus it will send any eggshells produced there. Both sweepers will also load eggs into the incubators, saving your ranchers the trouble.
What we've done with the automation could be considered an exploit by some, but it's been in the game for so long it feels intended, and there are several other ways to get the same effect (e.g. disabling buildings via mechanized airlock floors). If you consider this an exploit feel free not to use it and power your incubators continuously. I'll describe how it works and what the benefit is below.
What the timer circuits do is enable the incubators only once per cycle for a period of 60 seconds. The period for each incubator should be staggered such that when one incubator is about to be disabled the next incubator gets enabled. This is accomplished using the "reset timer" button on the timer sensors when you first set them up. Once they are all set up, there will never be more than 1 (or 2 for a few seconds of overlap) incubator powered on at the same time, reducing load on your power wires. When any incubator powers on, a rancher will rush over and hug the egg (I recommend raising the priority of the incubators), and soon after the incubator will power back off. The 'lullabied' buff will remain for one full cycle even though no power is being used, and then the process will repeat. This allows us to cut the power load of the four incubators from a constant 960W to only 240W for 240s (4/10 of a cycle) and then 0W for the rest of the cycle. That's a total reduction of 90% from 576 KJ/cycle to 57.6 KJ/cycle!
- 4th Upgrade - Shearing
This is where we really become a drecko ranch. Note that your first eggs should be laid around 10 cycles after starting to groom dreckos, the first drecklet born around 33 cycles after that (or 7 if you're running the incubator!), and after 5 more cycles they'll grow to adults and enter the shearing chamber. So without incubation you'll want to get this ready within 48 cycles of building the initial stable, and you'll have only about 22 cycles if you installed incubators for the breeders.
If you haven't already, the first thing you'll need to do is create a vacuum in the shearing room. There are two ways to do this very easily:
Install a gas pump and vent the oxygen through the liquid locks on either side, back into your base
Building and deconstructing tiles in every cell of the room.
This was discussed in the Early Ranching section, and if you've reached this point without doing it it's likely too late. [Frankly I think the pump is easier anyway] This upgrade costs a total of 500 refined metal. 200 is used to add an auto-sweeper to the shearing room. The other 300 is for the atmosuit docks and checkpoint to the left. Two shearing stations give us plenty of throughput once the drecko numbers start to grow.
This sweeper can reach the previously installed conveyor loader to the right which was set to ALL, thus it will send any meat, plastic and reed fiber that direction. That single loader is working triple duty for us now!
Once all of the equipment is built inside the shearing room, it should be flooded with hydrogen using a temporary gas vent. The quantity of hydrogen is unimportant as the dreckos do not consume the gas, they simply need to soak in it to grow scales. I still recommend creating a relatively high pressure, at least 1.2-1.3 kg per tile. Note that there is no chlorine in the shearing room in the screenshot, that's a green biome background showing through the pink hydrogen.
A few notes on this stepI assume by this time that you've built your first electrolyzer to provide oxygen to your base. If so, it's easy to both fill the shearing room with hydrogen by tapping off your hydrogen line, and supply the atmo suit docks from one of your oxygen lines. If you're running a SPOM you may want to use a gas valve to siphon off small packets of hydrogren while allowing most of it to stay behind and be burned for power. You don't need much hydrogen to fill the room after it's a vacuum, and you can just leave the pipe hooked up to slowly reach max pressure if you like. Once the shearing room has reached your desired pressure I recommend deleting the gas vent, as hydrogen is not consumed and will never need to be replaced.
If you don't have atmosuit technology yet you could get by for a while without, but the primary concern is dupes exhaling CO2 in the room which sinks to the floor and prevents scale growth. For the short term, perhaps until your first couple reed fiber shearings if you have no other source, this is manageable. You could later delete a tile from the floor if necessary to allow the CO2 to fall out, assuming the hydrogen pressure is high enough to prevent oxygen from flooding in. Worst case scenario you may have to delete a shearing station later and re-vacuum the room. Long story short, you'll want to rush atmosuits if possible. If you plan to go this route, I'd recommend no less than 1.6 kg of hydrogen per tile in the shearing room and ideally fill it all the way to over pressurize the vent before you open up the floor.
- 5th Upgrade - Output Distribution
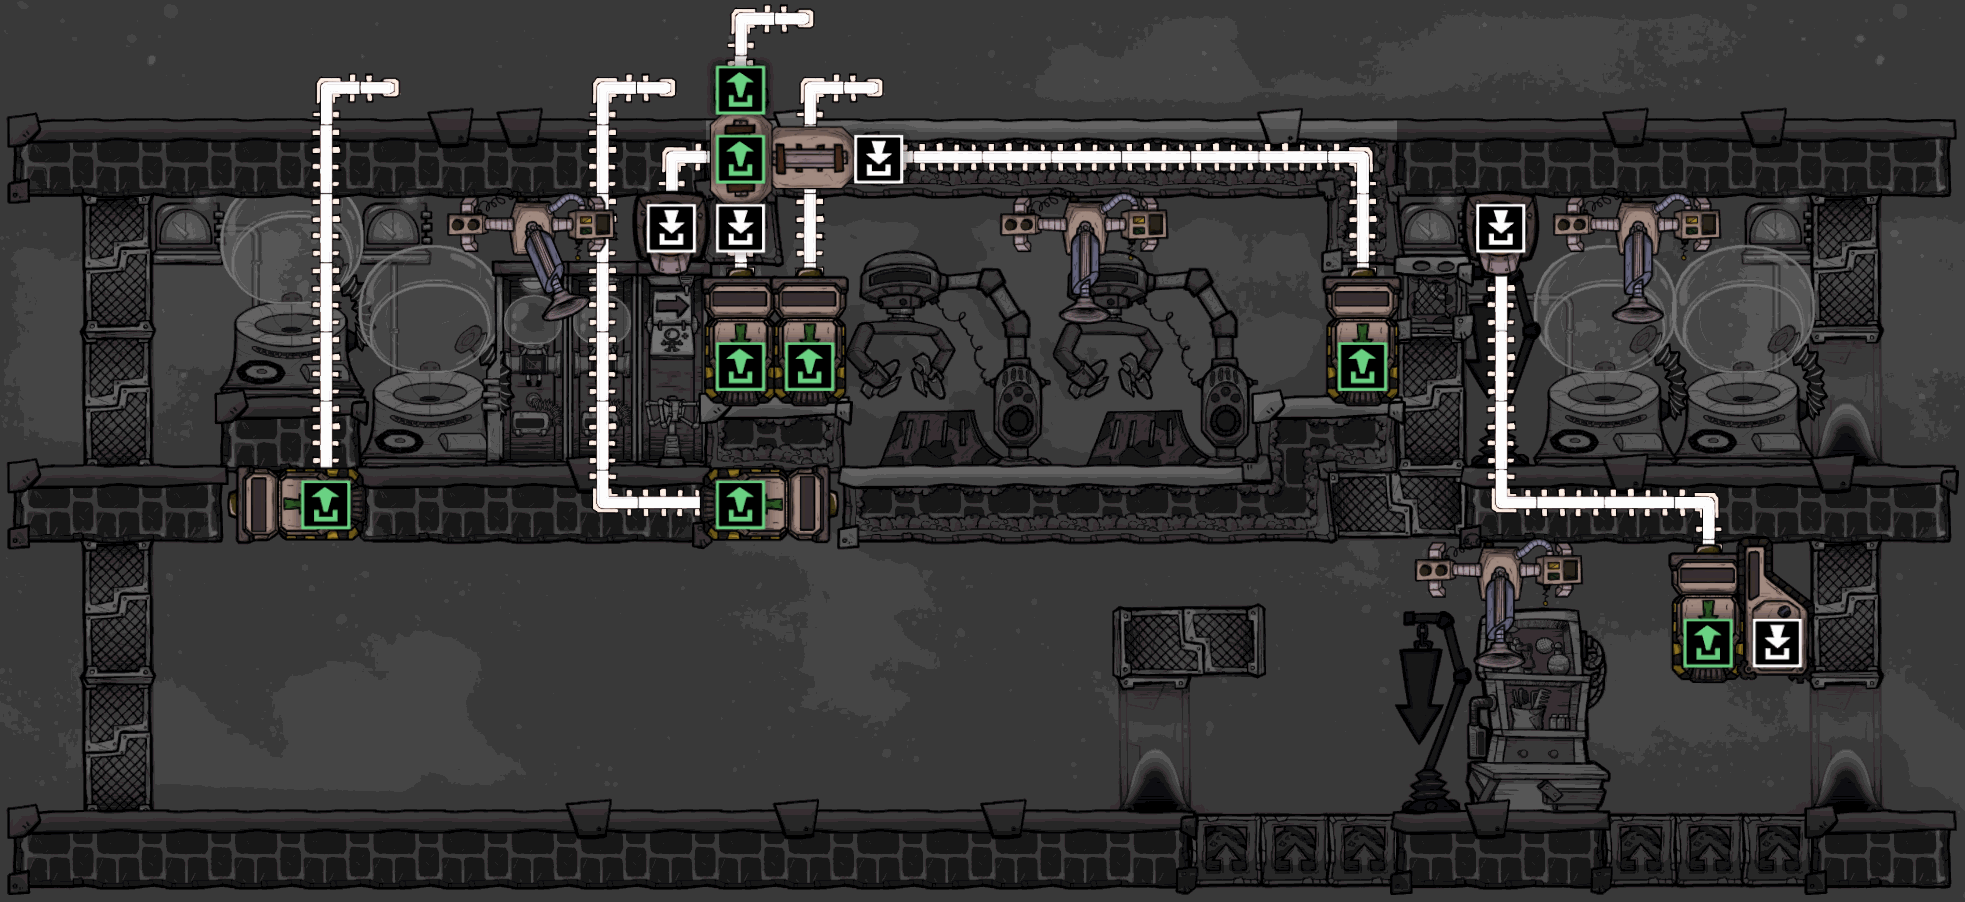
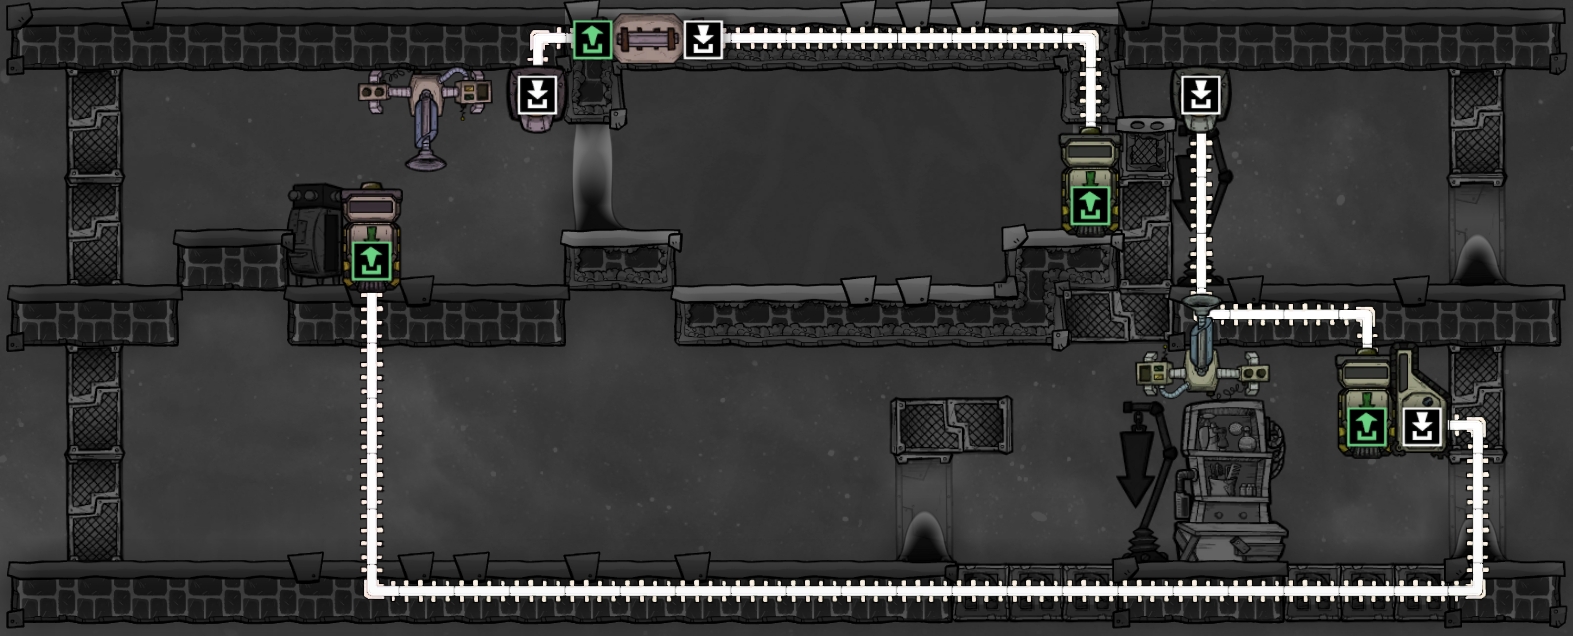
This upgrade requires 800 refined metal to install four conveyor loaders around the left side incubators. The sweeper can reach two tiles diagonally in the floor, as well as the four left-most tiles in the shearing room.
Automation overlay showing all four loaders installed:
Unfortunately we can only fit four conveyor loaders while there are seven different materials produced in this ranch. In order to help you plan your sorting and distribution requirements, these are the seven resources produced:
Phosphorite
Meat
Plastic
Reed Fiber
Eggshells
Meal lice (negligible amount)
Mealwood seeds (negligible amount)
For now you'll have to decide which products are most important to export, and whether any of them can share a conveyor. Meat and meal lice, for example, might both share a conveyor to your kitchen. If you don't have an immediate use for a resource, such as phosphorite or mealwood seeds, those could be left in this room until later. Later when you've researched solid filters we will upgrade the distribution to handle all seven resources independently.
A reminder on conveyor bridges that we discussed in the section on egg removal: you do not want them to cross from the shearing room, over the insulated tile, to your base outside. All bridges should have one or both terminals inside an insulated tile, and the other terminal can be outside the ranch, but not inside the shearing room.
- 6th Upgrade - Repopulation
Since dreckos live for 150 cycles you should have plenty of time before you need to activate the critter dropper to repopulate your breeders. That said, compared to my previous ranch designs, this is by far the simplest automation so you might as well install it early. The upgrade requires only about 125 refined metal, 25 each for a critter sensor, timer sensor and OR gate plus about 50 for automation wires.
The critter sensor is set to "above 7" which causes the dropper door to be held open whenever the stable is full. If the stable needs a new breeder this input goes red, and the state of the door is controlled completely by the timer.
The timer should be set according to the game speed you spend the most time in. 2-5 seconds of open time followed by 10-15 seconds of closed time should be a good cycle for the base slowest speed. You then need to multiply the values by the game speed you most often play at. I'm almost always on high speed and the values 15 on and 45 off work well.
Dreckos will climb into the open door and tend to hang out there since it's an edge of their enclosure. Once the door closes they're entombed and forced out the bottom. It was stated earlier in the guide, but in the event too many dreckos are dropped into the stable, the dual critter drop offs ensure extra dreckos are automatically wrangled and carried back to the nursery, where they'll eventually crawl into the shearing room.
- 7th Upgrade - Cooling
If you decided to install two extra farm tiles of wheezewort in the stable you can skip this section. Your shearing room will get very hot over time, but not hot enough to break the equipment. Your ranchers might also need to take an occasional rad pill, but the mealwood will stay at a perfect temperature.
My new preferred approach is to connect the drecko ranch to one of your base cooling loops, using either water or polluted water. In the example below I have a large reservoir of water at 24.5C / 76F that I'm pumping through the ranch and then straight back into the reservoir without any cooling. As a temporary solution that is fine, but eventually you'll want an aquatuner on the loop to regulate temperature. It's also possible to use a thermo regulator with a heat exchanger, if you're like me and use thermo regulators for kitchen freezers instead of aquatuners.
Note that you don't need nearly that many radiant pipes or insulated pipes, a far simpler loop will do just fine. At a minimum you need to run either radiant pipes or granite pipes through your six farm tiles, and circulate cold water through them. Which type of pipe to use depends on how cold the water is, as you also don't want to stifle the mealwood below 10C. My rule of thumb is if I'm using anything around "room temperature" water, I use radiant pipes, if I'm using "cold" water I use granite pipes. 12C / 54F is probably a good tipping point for that decision.
While not required, I like to remove some heat from the shearing room as well, by running radiant pipes through that area. Even more not required, you can add tempshift plates in the shearing room to assist with heat transfer, but the hydrogen atmosphere does pretty well even without the help. A single row of radiant pipe across the bottom is fine, especially in combination with the tempshift plates which will spread the cold upwards. If you do use tempshift plates you don't need anything too conductive for them (e.g. metals); granite is a great choice. Finally, make sure you don't install tempshift plates where they would exchange heat with the insulated tiles, always have one empty space between them and the insulation.
The screenshots below show testing I did of the above loop with over 100 dreckos in the shearing room, which should be far more than starvation ranching can produce. The 24.5C input water was able to maintain the shearing room at around 28C / 83F while the mealwood in the stable stays pegged to temperature of the input water. It's clear that the ranch doesn't require "much" cooling, as evidenced by the original wheezewort design, so any cooling loop you're already running should be able to handle this extra load with ease.
[/previewicon]
- Optional - More Output Distribution
When we installed the original conveyor loaders we had to choose which four of the seven products to export, or else combine multiple products onto a single rail. Once you've researched the solid filter technology this can be improved to give each product a dedicated conveyor rail. By attaching solid filters to three of the four loaders, we can obtain seven total outputs carrying one product each.
This is a purely optional step if you want finer control over your resource outputs, however it doesn't cost any refined metal so in my opinion it's worth doing if you have spare dupe labor to run more rails. In addition, the rail layouts are just examples, anywhere I say a rail runs up and out it could just as easily run down through the stable or anywhere else you need it to come out.
The first filter on the far left is the easiest to understand. Simply assign two products to that loader (e.g. meat and meal lice) and then choose one of those products to come out the orange port of the filter. The other will come out the green port.
The second filter at the top of the shearing room is connected straight down to the loader below it. Similarly assign two products to that loader and choose one of them on the filter. The orange port goes straight up and out of the ranch (ignore the small piece of rail below it, that should have been deleted) and the green port goes to the right a bit before running straight up and out as well. Notice that this layout keeps the conveyor bridges inside insulated tiles rather than allowing them to cross into the shearing room and pick up heat.
For the third filter on the right you can't really see the wiring. The white port connects directly to the loader on its right, while the orange port also runs directly right and then straight up and out. This loader remains set to ALL to gather resources from all three of the connected rooms. As such, the filter can be set to any resource except for eggshells, since those will be produced in the far left room and have no way to get to this loader. Phosphorite, plastic and reed fiber are all great options for this filter.
- Optional - Decor
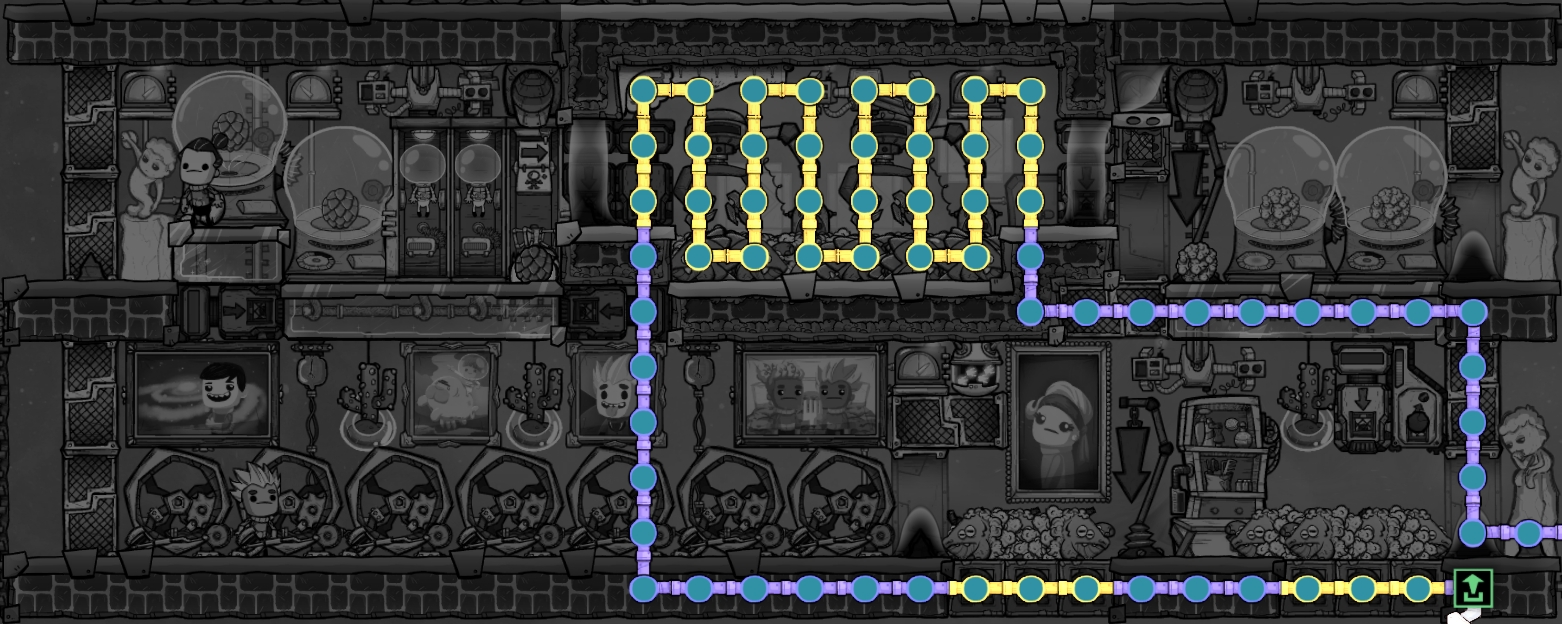
Later in the game it's nice to add decor to the places your dupes spend most of their cycles working. There is room near the grooming station for a couple decor items, and plenty of room in the utility area to blast decor. In addition, you can replace some of the ceiling tiles above the stable with windows to spread the decor upwards.
There's not much room in the shearing room to add decor, however each drecko innately provides a decor bonus, so the floor tiles where the ranchers work should have a pretty good decor score regardless. With these changes it was quite easy to provide great decor across the entire ranch:
6. Summary And Statistics
During my experimentation I came up with several other designs. I had a split stable design that supported 5 of one drecko type and 3 of the other in separate rooms. I had multiple critter dropper variants that could repopulate stacked stables like a traditional hatch ranch. I even had a way to allow each stable in a stack to choose which drecko variant to restock with. Ultimately, I found that those designs were quite complicated and not worth the additional trouble (but check out the Bonus section for more!).
This relatively simple design ended up being my favorite layout for dreckos. The critter dropper works well, the hydrogen gas is fully contained, and other than the liquid locks it's quite easy to construct. It borrows heavily from the TGBM/B09 design, but I believe the modifications made give it a unique twist. I could go into my opinions on comparing the pros and cons of the two designs, but I don't want to be perceived as knocking the TGBM/B09 design which in my opinion is fantastic on its own.
StatisticsNOTE: All statistics below were collected from the earlier version of the ranch, and before the Fast Friends patch. Nothing significant changed in the ranch design, however the increased food consumption of the dreckos might mean a little more phosphorite output?I've run this ranch design for around 300 cycles and calculated the average output of each resource. Note that due to the longer lifetime of dreckos it takes longer to start obtaining eggs and meat than other ranches. This style ranch is not intended to be a primary food supply. You would build this for the sustainable plastic and reed fiber, and as a bonus you'll eventually get a little meat to feed just under three dupes.
PhosphoriteWow do these dreckos like to excrete phosphorite! With each of the breeders producing 10 kg per cycle you should have more of it than you can handle. If using two wheezeworts for cooling they will consume 4 kg per cycle each, so the expected net output is about 72 kg. In my test I only measured 65 kg per cycle, so I assume some of the dreckos aren't eating every single cycle.
Regardless, this is enough to feed ~65 Pincha Pepper plants, over 300 shine bugs, or just synthesize a ton of fertilizer for the farm station bonus.
Plastic and Reed FiberYour first plastic and fibers should come out around cycle 48, or as early as cycle 22 if you're using the incubator(s). The first round of eggs might not have any glossy dreckos, so it could be another 10 or 20 cycles beyond that point before you have enough glossies for reliable output. Over the long term, I measured over 700 kg of plastic and ~1.3 reed fibers per cycle.
Meat and EggshellsEven with the incubators running, it takes over 50 cycles for the first drecko to starve and produce any meat. Without incubators running that number is closer to 80 cycles. You'll definitely need to have food figured out for your colony long before you see any meat production from a drecko ranch, but eventually it will add a bit to your stockpile. I measured around 2800 KCal output per cycle, assuming you're cooking the meat into barbecue, and a little over 0.75 kg of eggshells per cycle. Converting the eggshells to lime and then steel, you'd be able to produce 100 kg of steel every 13.5 cycles. As with meat, you'll probably want to ranch another critter with a shorter lifecycle if you're looking to mass produce eggshells.
Meal Lice and Mealwood SeedsFor all practical purposes I would assume that you will not see any of these resources from the ranch. We provide the breeding dreckos just barely enough mealwood plants to survive on, so none of the plants should ever reach full maturity and produce a harvest or seed. That said you might have multiple breeders die of old age around the same time, or might not be able to find 8 wild dreckos from the get-go when setting up the ranch. For those short periods of time with less than 8 dreckos in the stable you may see small amounts of meal lice produced, and depending on the skill of your farmers they might also produce some seeds. I wouldn't even bother mentioning these outputs except that meal lice left on the ground will eventually turn to rot and produce polluted oxygen in your base. So at the very least you should be prepared to clean it up.
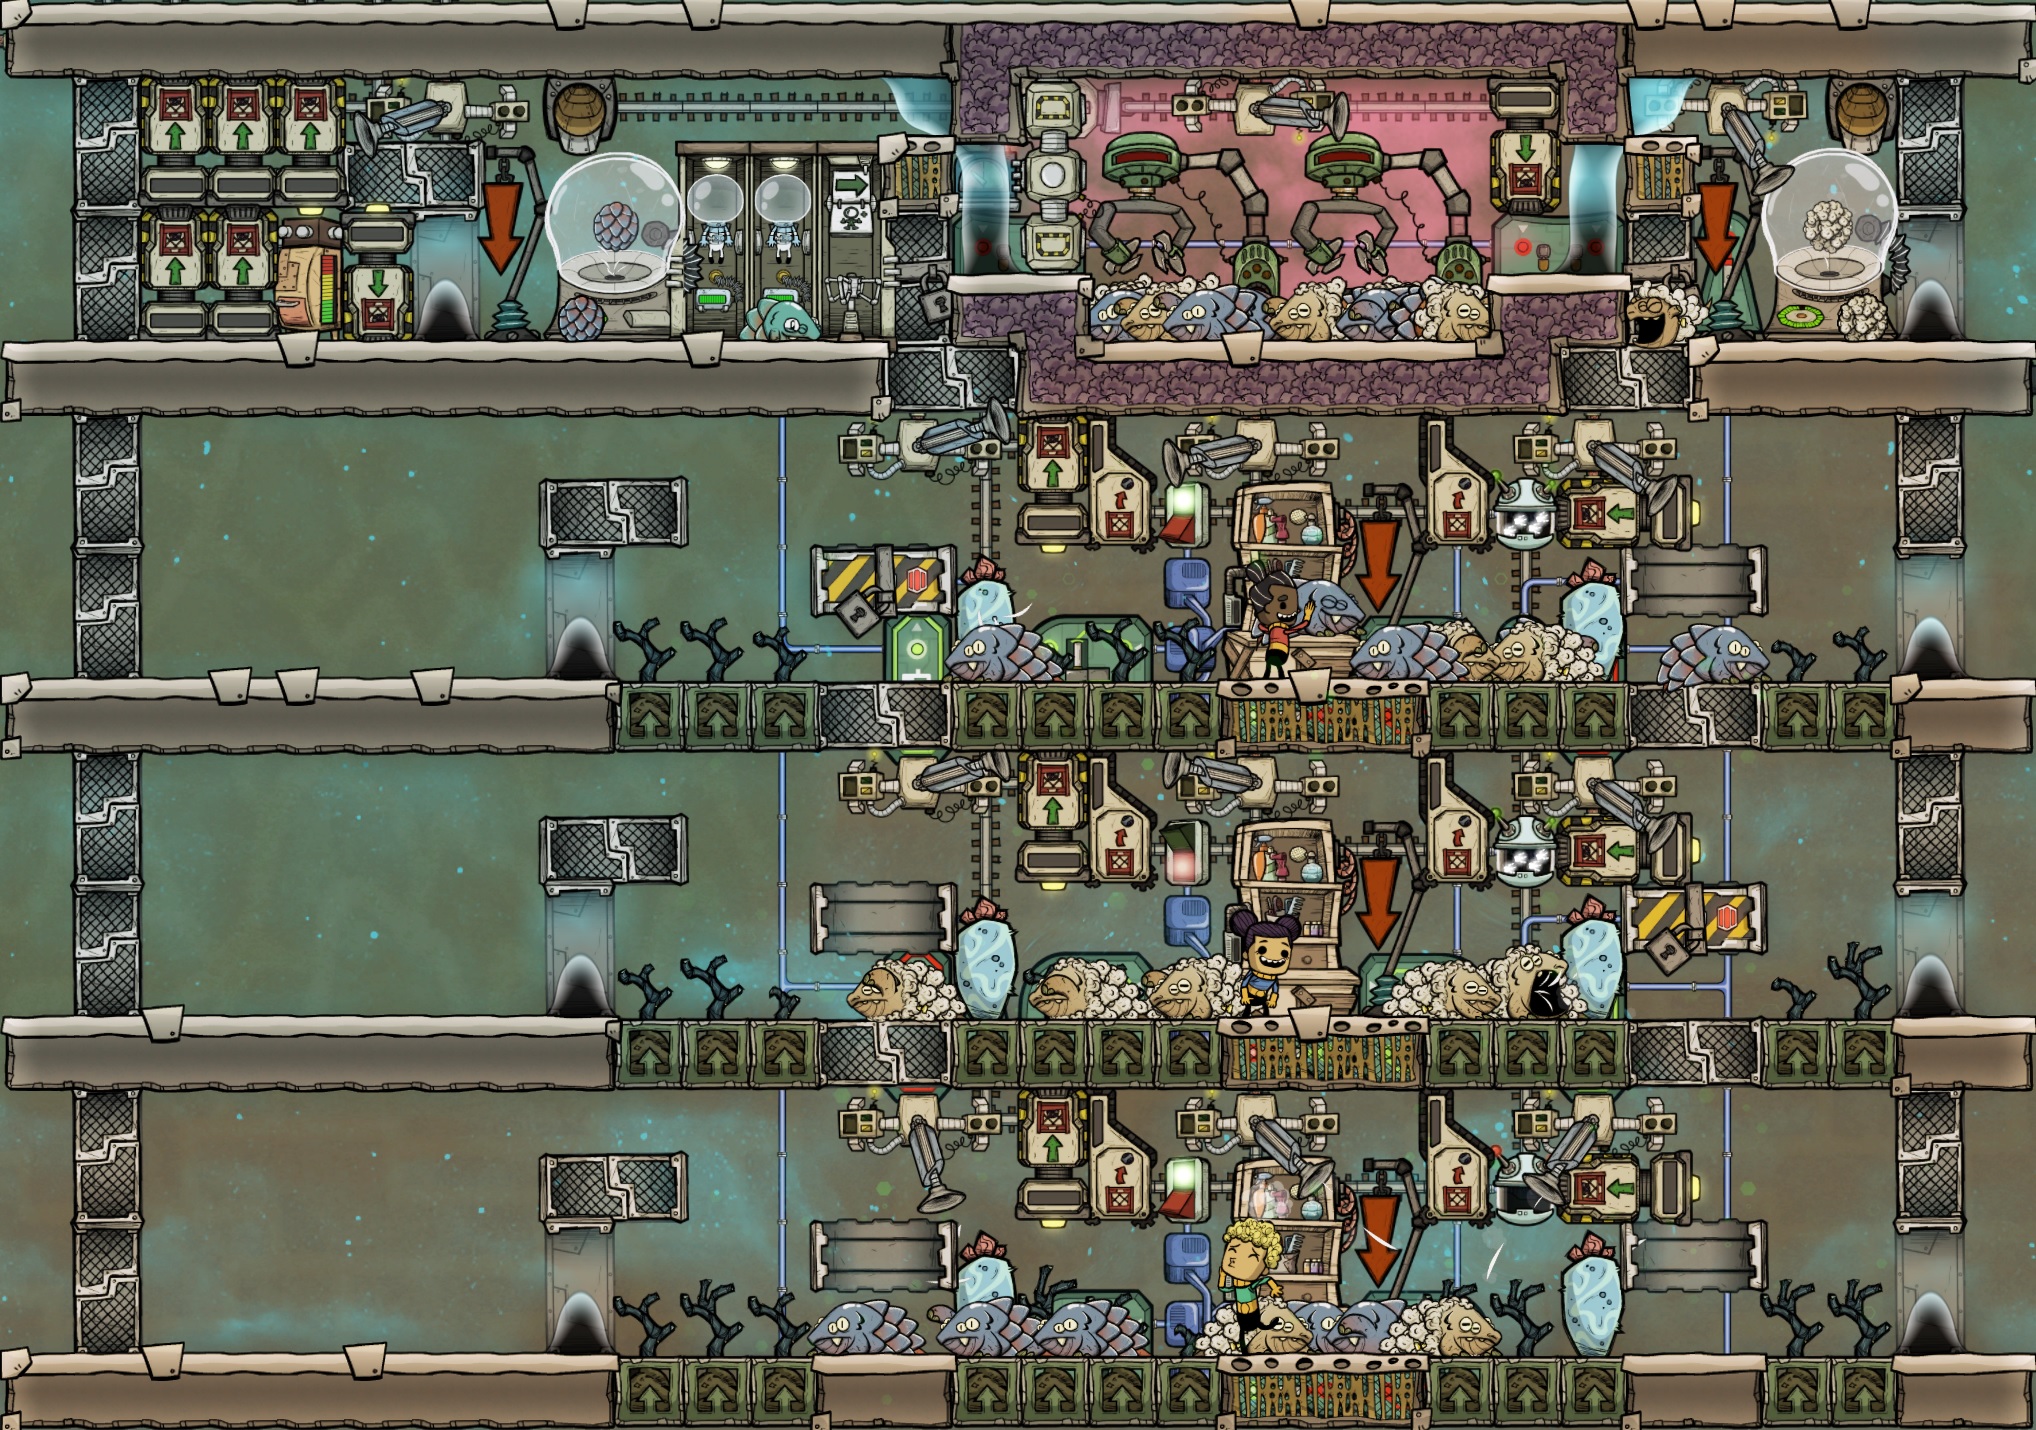
6. BONUS - The Overkill Drecko Ranch

You probably shouldn't build the ranch I'm about to describe in this section. When I finished the original guide I was looking at the final design's simplicity, and looking at some of the complicated prototypes I'd gone through, and got to thinking... "What if I took some of the neat features from the throwaway designs and integrated them into this design?"
Specifically what if I:
Modified the stable to allow stacking like a traditional hatch ranch
Added a second critter dropper to the control room
Added a bunch of automation to allow each stable in a stack to independently request breeder dreckos of a specific typeTo get all this I decided to grow the design by 2 tiles in width, so each level is now 26x4. It's also possible (and in retrospect, better?) to keep it at the standard 24x4 size by going to 7 dreckos per stable, and getting creative with the warehouse/distribution space. But enough build up already.
Construction OverviewNOTE: This section and screenshots have not been updated to reflect possible improvements since the Fast Friends patch. I never intended anyone to actually build this style ranch, but if you wanted to you could apply most of the improvements from the MkII design above here as well. Specifically, far fewer plants are required, more incubators can be used with smarter automation, and the wheezewort can be replaced with a cooling loop. It's a fun design, it's just unnecessary for normal gameplay.I'm not going to do a complete construction guide, but it should be obvious that most of the same step-by-step instructions from the main guide apply. Here's what the finished product would look like:
This screenshot shows off the new features of the overkill ranch well. The big change in each stable is the addition of a mechanized airlock and a pneumatic door. This combination allows critters to either fall through stacked stables or be captured mid-fall, without allowing dreckos to climb through an open door on the floor.
It's also important to note that all three stables in this shot started with only regular dreckos. Just to the left of each grooming station is a manual switch. When this switch is on/green it indicates that you'd like to repopulate breeders from the left critter dropper, which in this case is glossy dreckos. Conversely, when the switch is off/red new breeders will come from the right dropper, or regular dreckos here. In the screenshot the top and bottom stables have been almost entirely replaced with glossy dreckos, while the middle stable still contains only regular dreckos, as requested by its switch. You can also see how two of the airlocks are currently closed, the upper left and middle right. These two stables are short one drecko each, and are requesting a replacement from the critter droppers indicated by their switch positions.
There are a few minor construction notes I should convey before getting too far in:
The two mechanized airlocks in the bottom stable should be set to always open. In all other stables the airlocks will be controlled by automation.
All 8 of the doors with an oil blob in them (4 far right, 4 mid-left) should be set to disallow dupes through them from both directions to prevent debuffs.
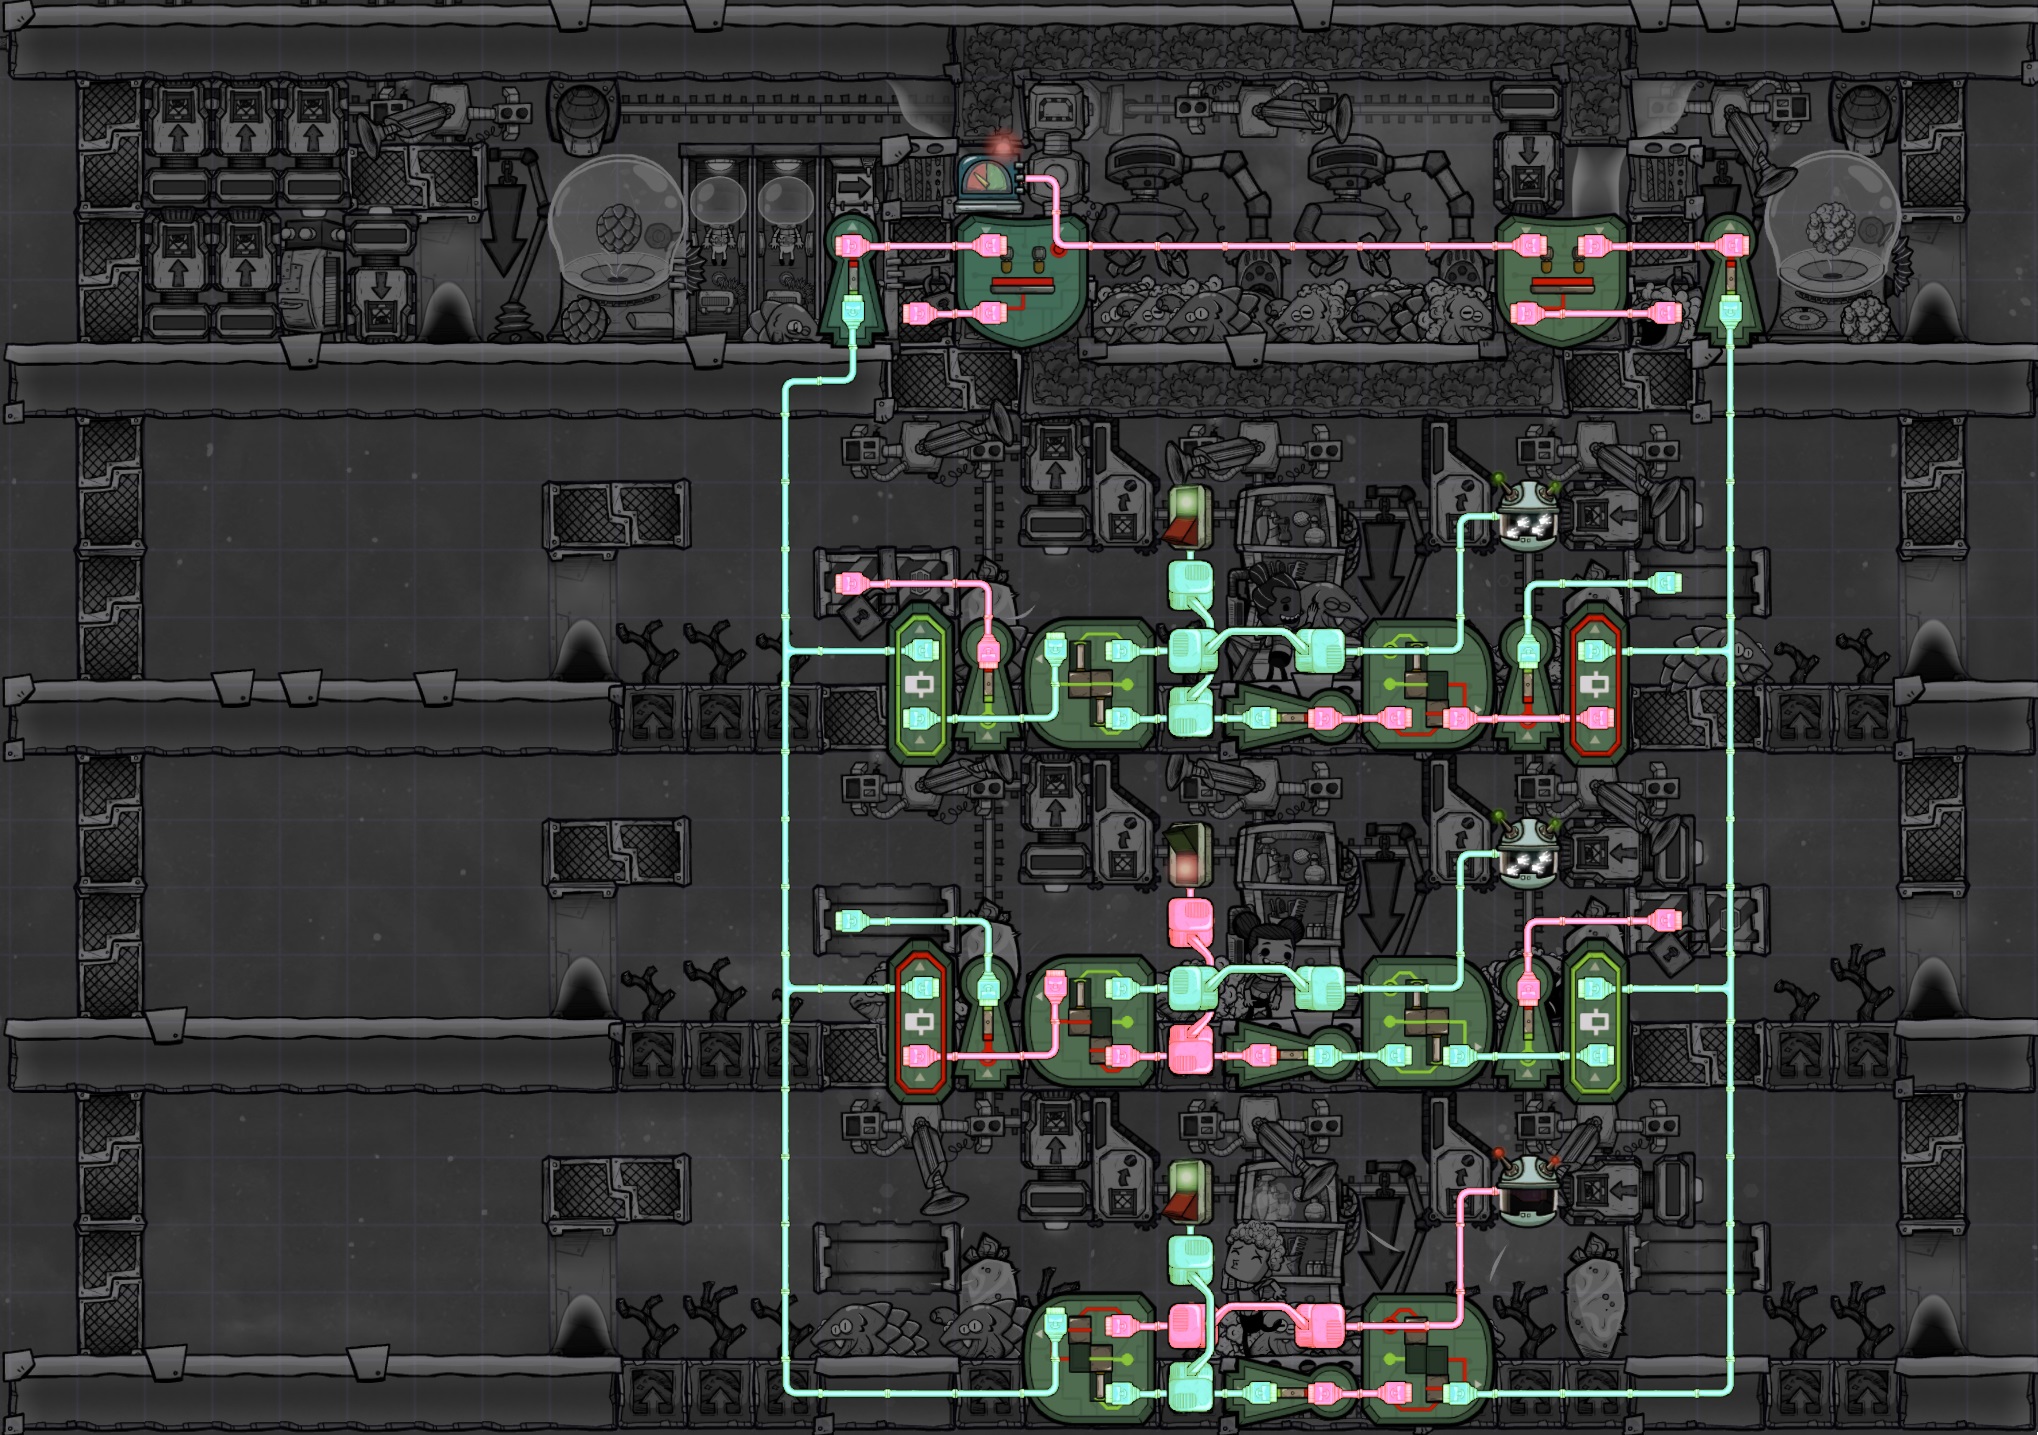
The door to the left of the right-side incubator, entering the shearing room, must be set to disallow dupes in both directions. This prevents lost atmo suits and possible scalding damage to dupes.With that out of the way, below are the shipping and automation overlays:
The shipping isn't too complicated, dirt is sent down the center of each stable then T's out to the dual receptacles. The loaders in each stable send resources up and then left into the same solid filter as the original design. It looks a bit complicated, but it's really no different from the original.
The automation looks even more complicated, but it's actually quite simple. The control room logic is almost identical to the original design, using a timer to alternate the dropper doors, but only when one or more of the stables needs a drecko.
It's easiest to start the explanation in the bottom most stable which has 4 fewer parts:
There are two AND gates, both connected to the critter sensor, which is set to Below 8. Therefore unless the stable needs a new breeder, everything will turn red. This gets inverted in the control room and holds the dropper door open, so dreckos will crawl into the shearing room rather than being dropped. Very similar to the original design.
The second AND gate input is from the manual switch, one direct on the left and one through an inverter on the right. Thus only one critter dropper, either the left or the right, can ever be triggered at the same time by a single stable. This is how you select which type of breeders to fill a stable with.That's literally all of it for the bottom stable. If it needs a critter, ask for one from the dropper you indicated with the switch, otherwise don't ask for one :) For the stables above it, there's only a little bit more to add.
The signal coming off each AND gate (both left and right) is sent to both an inverter and a buffer gate.
The buffer gate simply connects the AND gate's output to the same output from all other stables, such that if any stable is in need of a breeder, the whole line goes green to activate the critter dropper. Normally this can be done with no gates, as any green signal will overwrite other reds on a shared wire, however in this case the buffer is explicitly protecting us from that behavior. Looking at the upper right or middle left circuits, it's clear that without the buffer, the red signal to the inverters would be overwritten with the green signal coming from another stable.
The inverters connect to the mechanized airlocks to control whether dreckos should be allowed to fall through this stable or be caught. If a breeder is needed the AND gate output is green, so the inverter turns it red to close the door. Conversely, when the stable is full the door is left open to allow critters to fall to lower stables.Well that's the highlights, in case anyone wants to go full overkill mode. I think the standard 2-level design is great but if you really need a couple tons of plastic and a handful of reed fibers per cycle, and the flexibility to change breeder types on a whim, then this just might be the way to get you there.
7. Thank You!
Thank you for reading this guide and I hope you found something worthwhile to take away from it!
I also want to re-thank both thegroundbelow me and Beardo09 for their collaborative ranch design. I've seen a lot of other decent drecko ranches but none of them were close to what I had in my head. Their design helped me greatly optimize my own and I hope they'd appreciate my variation.
thegroundbelowme & Beardo09 - Optimized Drecko Ranch Design v3https://www.reddit.com/r/Oxygennotincluded/comments/qarpve/optimized_drecko_ranch_design_v3/
Source: https://steamcommunity.com/sharedfiles/filedetails/?id=2685094605
More Oxygen Not Included guilds
- All Guilds
- Colony 101: blueprints collection
- Easy Kitchen and "Core Base" Guide
- Oxygen Not Included - Useful Construction Patterns
- Oxygen Not Included - Ultimate Gas Weight Guide
- Oxygen Not Included - Liquid / Gas Valve Guide
- Oxygen Not Included - Gameplay Tips
- Oxygen Not Included - Stress (How to Handle It)
- Oxygen Not Included - Surviving the Late-Game
- Oxygen Not Included - Asteroid Spawn Seeds