
Introduction

After getting tired of searching for a great build I saw several months ago, I decided to have a central place where I could present all of them, with all the key details and trade-offs.
This guide is a collection of great designs that can be used as blueprints in your own survival colonies. They are all builds on which their authors spent a lot of time testing, refining and improving every possible detail, and as such have very little potential for improvement without consequent trade-offs.
I've tried my best to attribute builds authors, let me know if I made a mistake. I also re-used existing screenshots rather than redo everything from scratch, so please excuse the lack of visual coherence.
Most of those builds assume a good handle on the game mechanics, including things not covered in my main guide, most of them being explained in the Unusual uses of Gameplay Mechanics wiki page[oxygennotincluded.fandom.com] .
I also assume you'll be able to figure out how to build them yourself. As such I won't explain all the construction details, which should be obvious from the screenshots. If you have a doubt, try it in Sandbox first! Most of the builds include their source, which can contain more guidance on how they work and how to build them.
Builds that are specific to the Spaced Out! DLC will be marked by this icon.
They either use some Spaced Out! geysers, points of interest, or are made to solve issues that do not exist in Vanilla (mainly the lack of Regolith falling from the sky, making filtration medium not as ubiquitous).
Disclaimer: while I consider all those builds great, I haven't actually built all of them. If you encounter an issue with a build, please head out to the Unofficial ONI Discord[discord.gg] to get some help (and hopefully the author themselves will be the one answering).
I'll try my best to note anything that might have changed since they were designed (old bugs being fixed, new bugs appearing).
Summary
Quick links to all the builds (mostly to be able to share direct links to builds, because Steam summary doesn't use anchors):
Electrolyzer: Rodriguez
Electrolyzer: Hydra
Deodorizer
Cool Steam Vent: Clown's Hat
Salt Water Geyser: Infinite Saltuner
Polluted Water Geysers: Evapotuner
Polluted Oxygen Vents: Chilter
Hydrogen Vent
Metal Volcanoes
Leaky Oil Fissure
Sulfur Geyser: Brimstoner
Auto-drowning Pez Dispenser
Drecko
Pacu: Pacubox 3.0
Incubator automation: SSAI
8 Dupes self-sufficient base: Spicy Tofu Bunkhouse
24 Dupes core base
LOX/LH: Integrated Rocket Refueler
Sour Gas Boiler
Experiment 52B: Exspilement
Naphtha production
Construction Methods
While I do assume a good familiarity with game mechanics, I'll start with some very useful construction methods that are required to build some of the designs.
> About Construction Materials
When showcasing builds, a frequently asked question is "what are the materials?".
It would be infeasible to detail all the materials used for each build in this collection.
For builds that have a main article, those will generally be detailed by the author there.
For the others, sensible materials choice will work ok:
Anything insulated should be built out of Igneous Rock (Mafic Rock works just as well).
Exception 1: if it's dealing with Magma or temperatures above 1400°C, use Obsidian.
Exception 2: it's highly recommended to use Ceramic for Steam Turbines foundation, because STs exchange heat with their foundation.
Radiant liquid pipes should be built out of Copper, Iron or Gold (they have mostly the same characteristics). As Aluminum is not available on all maps and is far better, it's considered a space material.
Radiant gas pipes should be built out of Copper Ore or Iron Ore. Cobalt Ore works as well for Spaced Out!
Aquatuners coolant is Polluted Water. Super Coolant is better but it's a space material, and most builds aim to be pre-space. Nuclear Waste is better than Polluted Water as well for Spaced Out!
Buildings that have an overheat temperature (such as Pumps) in a 75°C to 125°C atmosphere should be built out of Gold Amalgam (if using Metal Ore) or Copper, Iron or Gold (if using Refined Metal). In a 125°C+ atmosphere, use Steel instead.
In general, there will be 3 categories of builds:
Can be made very early because they don't use Steel or Plastic.
Can be made somewhat early because they use Steel or Plastic.
Can only be made late game because they require Space Materials: Aluminum, Super Coolant, Thermium or Visco-Gel.Most builds try to be at least in the second category, because using Space Materials heavily restrict builds usage, and it's obvious when a build uses Plastic (there is a Steam Turbine) or Steel (there is a building with an overheat temperature in 125°C+ atmosphere).
Therefore, I will only specify when some builds require Space Materials.
> Pedestal For Single Cell Liquid
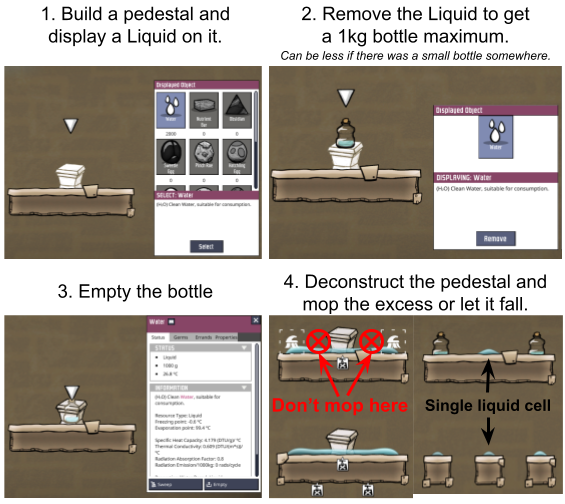
Multiple designs use a single cell of low-mass liquid at a specific place.
To do that, you could use a Pitcher Pump and Bottle Emptier combo, to bring bottles of 200kg. That will leave you with a lot of extraneous liquid to mop up afterwards.
Instead, when you need a low mass of liquid at a specific cell (for example for a liquid airlock), you can construct a Pedestal there, specify a liquid (a Pitcher Pump or bottle of that type must be available), and Dupes will bring a bottle of at most 1kg.
Note that if you need to create a lot of those single cell liquids (for example for an Arbor Acorn farm) there are 2 additional methods that can be better suited:
Use a Valve that leads to pipes that you deconstruct at specific places. That way each section will only have a small amount of liquid in it that will drop there, avoiding any mess.
Make the liquid flow in a staircase, then mop up each step. On each step, there will be a bottle that, when emptied, will not spill to other cells, avoiding any mess.
> Liquid Stacking
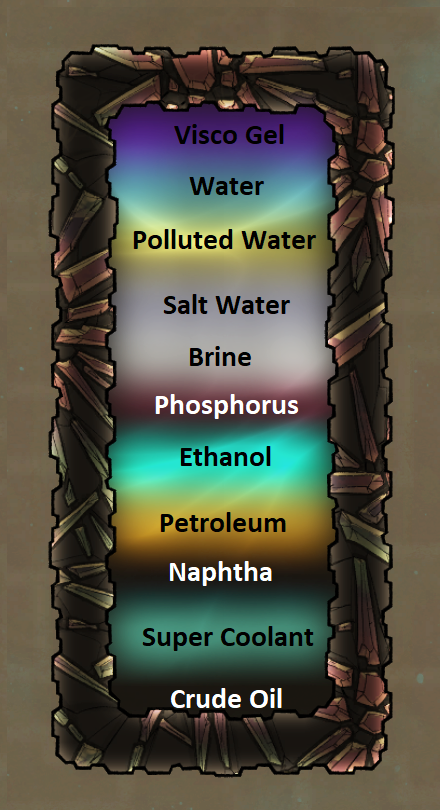
As liquids don't mix, you can stack them in layers, by using a Bottle Emptier to create layers one by one, from the heaviest to the lightest liquid.
I've included a chart of the most common liquids on the right.
This is useful for a whole range of applications, for example:
Creating a Steam room without vacuuming it first.
Using low masses of liquids for heat exchange on a self-cooled Steam Turbine.
Auto-drowning critters in an Incubator.
Creating advanced liquid airlocks.
Covering all the cells of an Electrolyzer (Hydra design).
And more....
> Vacuuming A Room
Your first reflex when trying to vacuum a room will be to add Gas Pumps. While Gas Pumps are very efficient at pumping when they can get full packets, they are actually not that good for vacuuming a room.
In a thin atmosphere, Mini Gas Pumps will use a fourth of the power to pump the same amount of gas. More importantly, Mini Gas Pumps can reach all the cells they cover, while Gas Pumps cannot reach the upper right cell they cover. This means covering a room with Mini Gas Pumps will vacuum it much faster than with Gas Pumps.
But there is an even better method, that uses Dupe labor rather than power: plastering the place with Tiles, until it's entirely covered and there is no more gas. After adding a liquid airlock at the entrance, you can deconstruct those tiles and be left with vacuum.
An alternate version, for example to make a Steam Room, is to stack liquids to chase gases out, using the method explained in the previous section. From heaviest to lightest type of water: Brine, Salt Water, Polluted Water, Water.
Oxygen Production
Starting off with Oxygen production, the main one is Electrolyzers, with 2 very well-known builds, and a less-known one that has an additional goal.
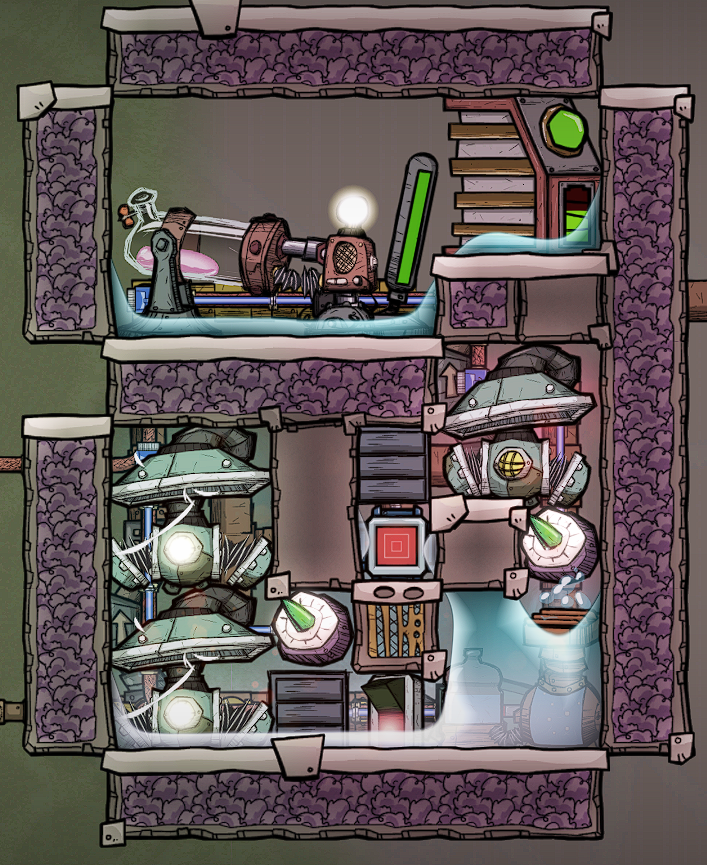
> Electrolyzer: Rodriguez
Goal: Convert Water into Oxygen while self-powering
Author: some guy named Rodriguez (hence the name), popularized by Francis John, improved by Saturnus
Input: about 850g/s Water per Electrolyzer (with an uptime of 85%)
Output: about 750g/s Oxygen and 250W per Electrolyzer
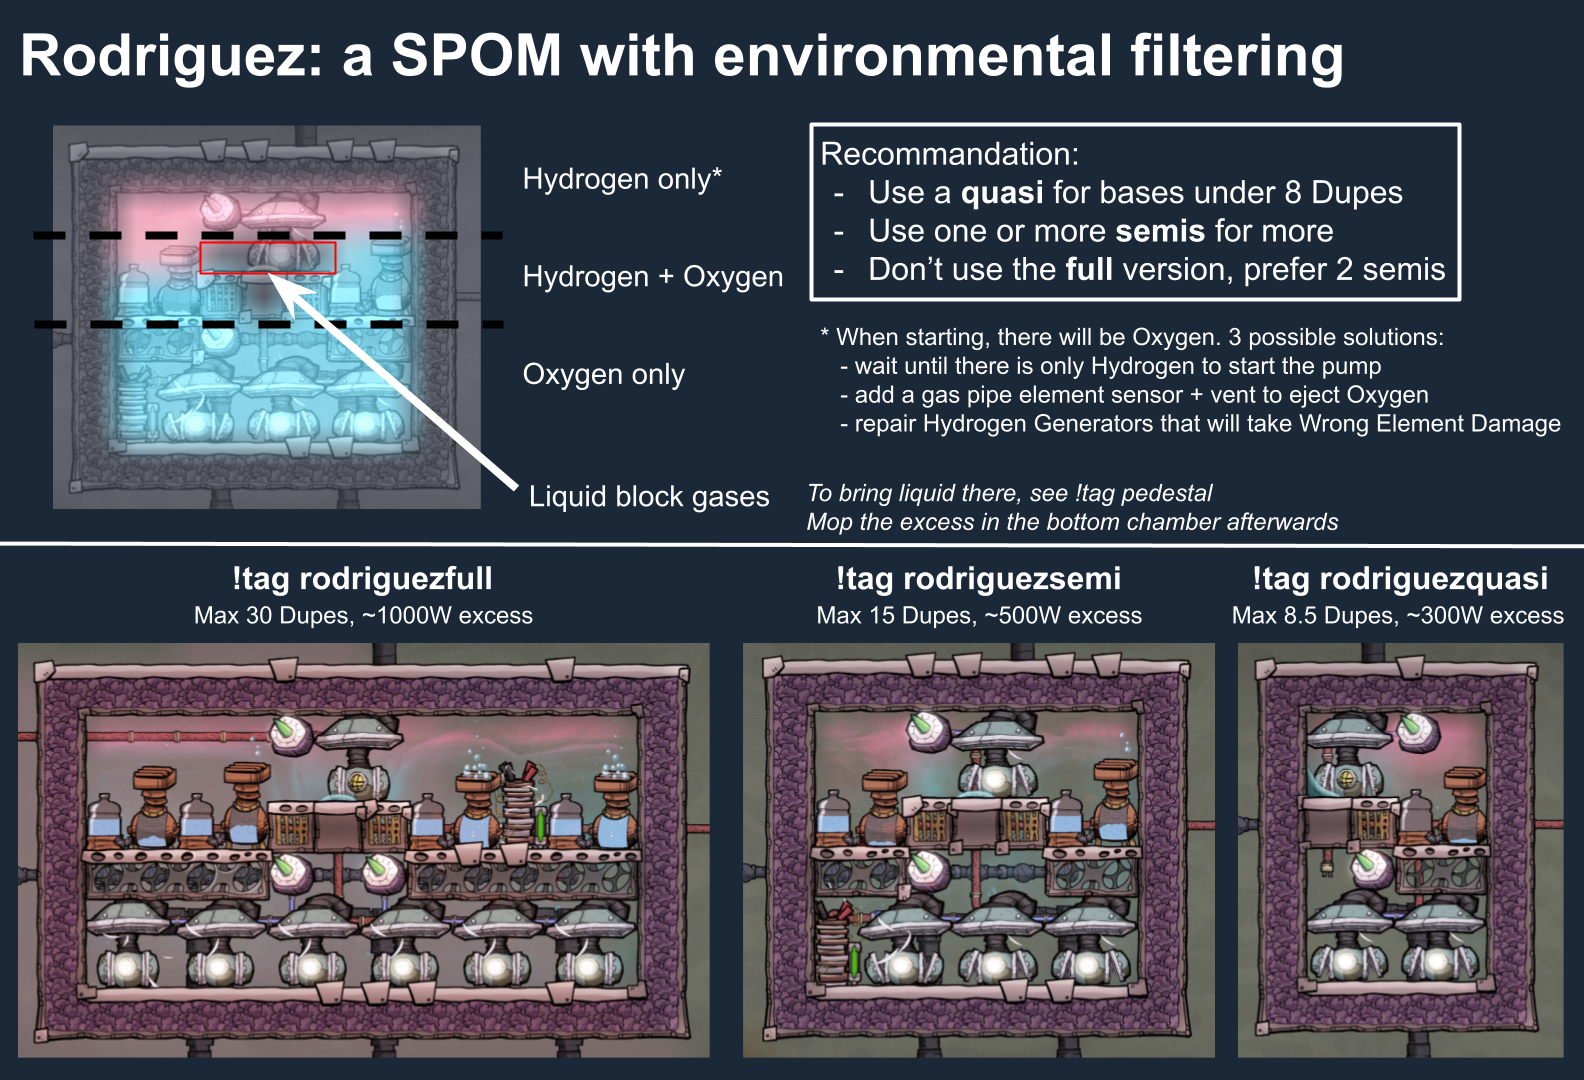
The basic premise of the Rodriguez build is to separate gases in the atmosphere using their weight and the fact that a lighter gas cannot sink to a row consisting of only heavier gas and vice versa. This eliminates the need for a Gas Filter and, with proper atmo sensors configuration, gas pumps never pull in partial packets. This leaves you with a surplus of power.
This means to prime the build, the cells gas pumps can draw from must be only the gas they should pump: Hydrogen for the top row, Oxygen for the bottom 2 row.
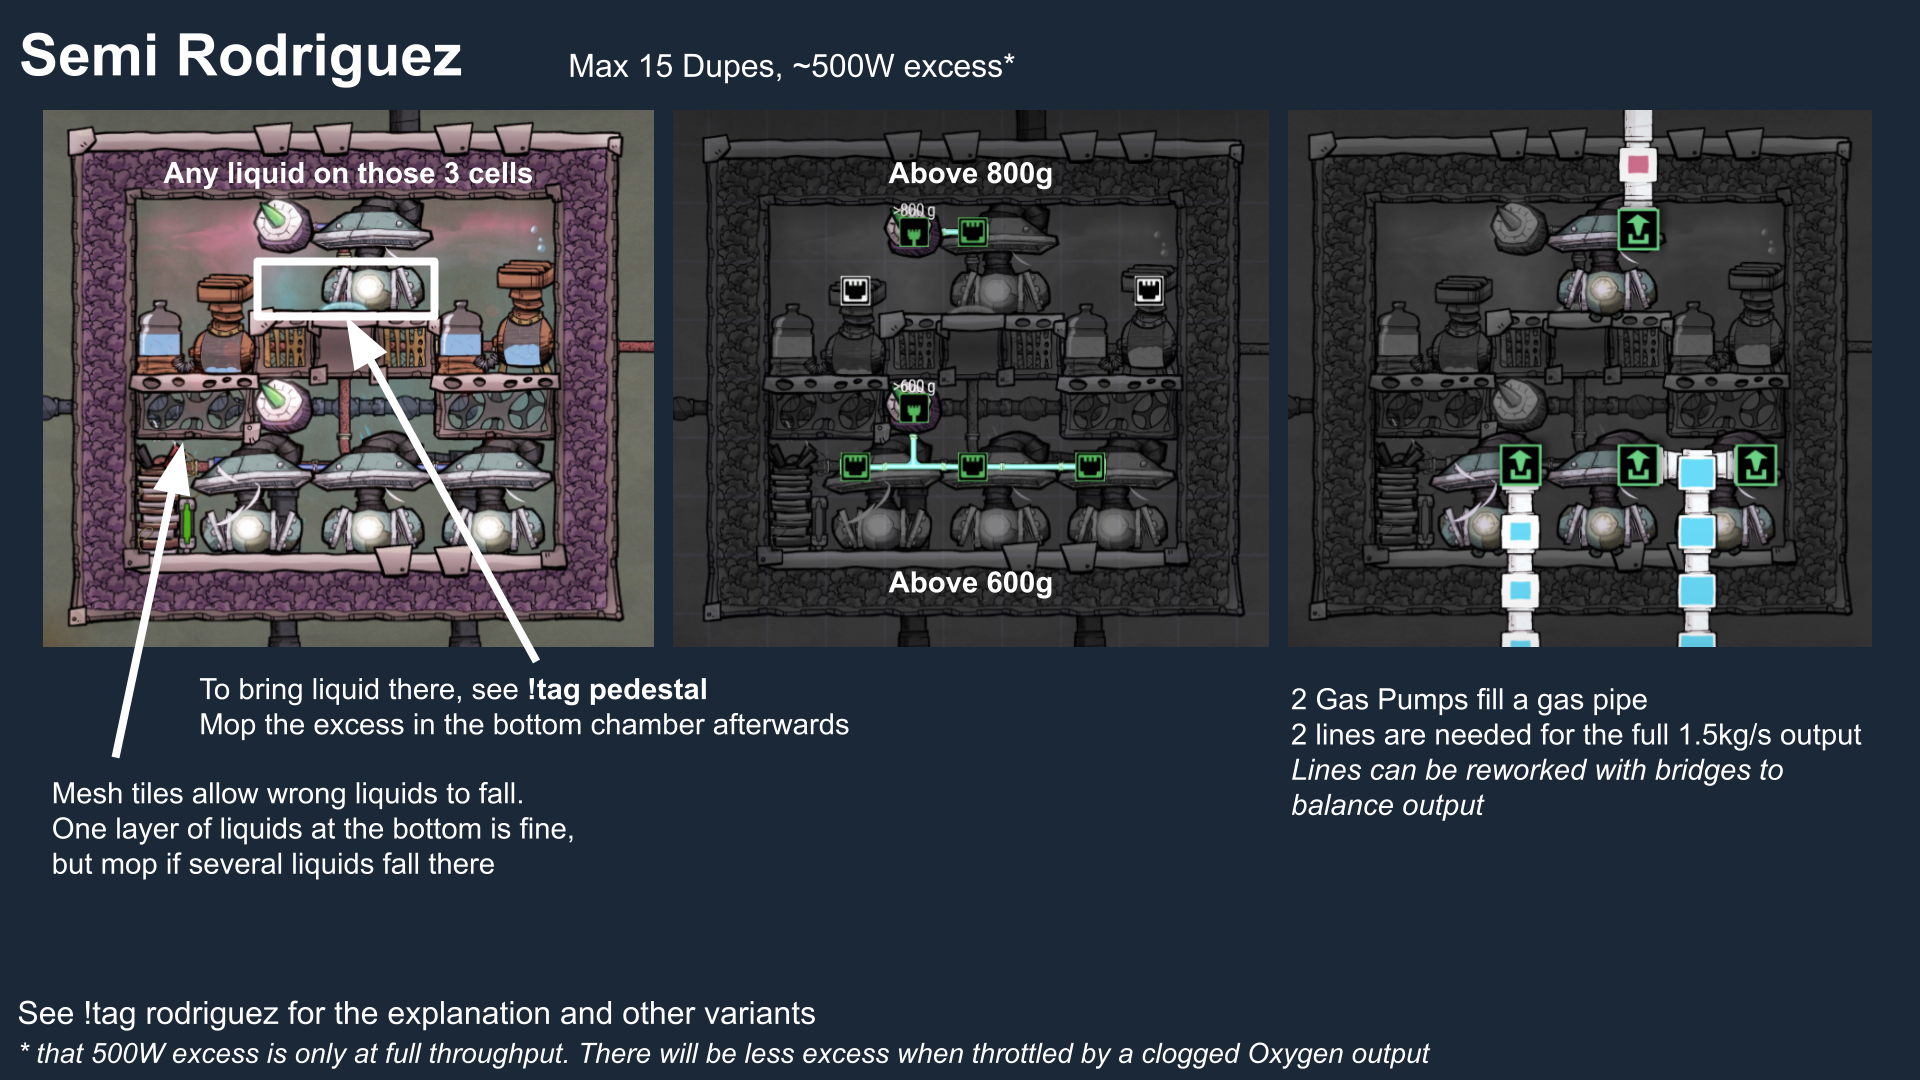
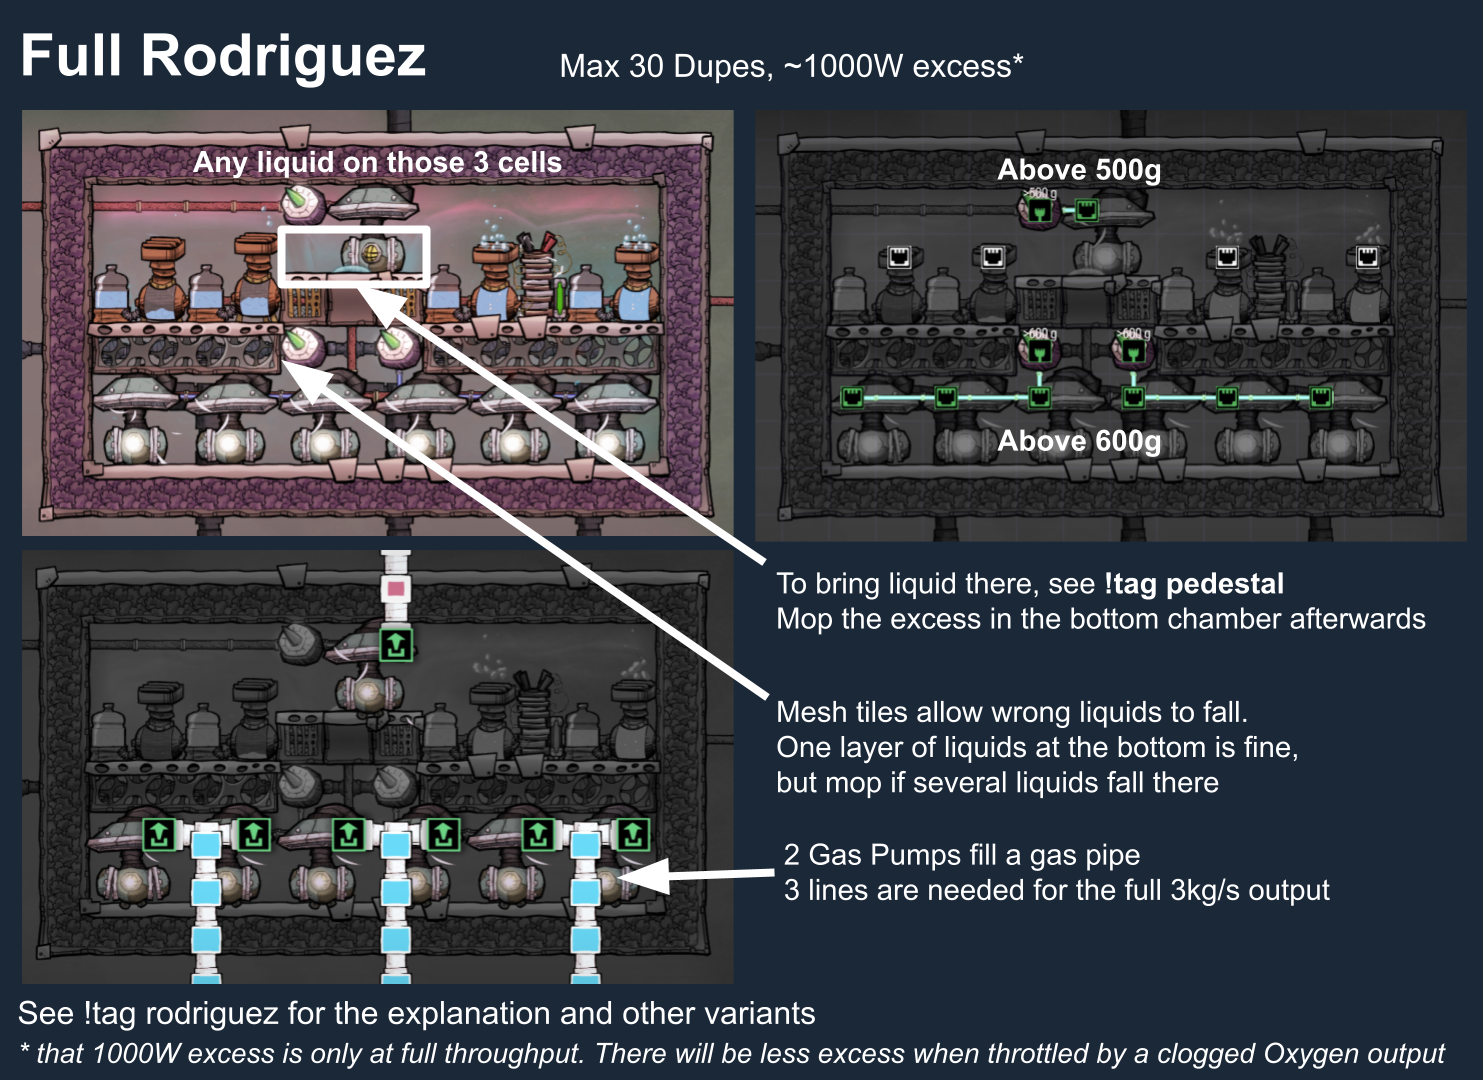
Here is a preview explaining it with the 3 versions: Quasi, Semi, Full:
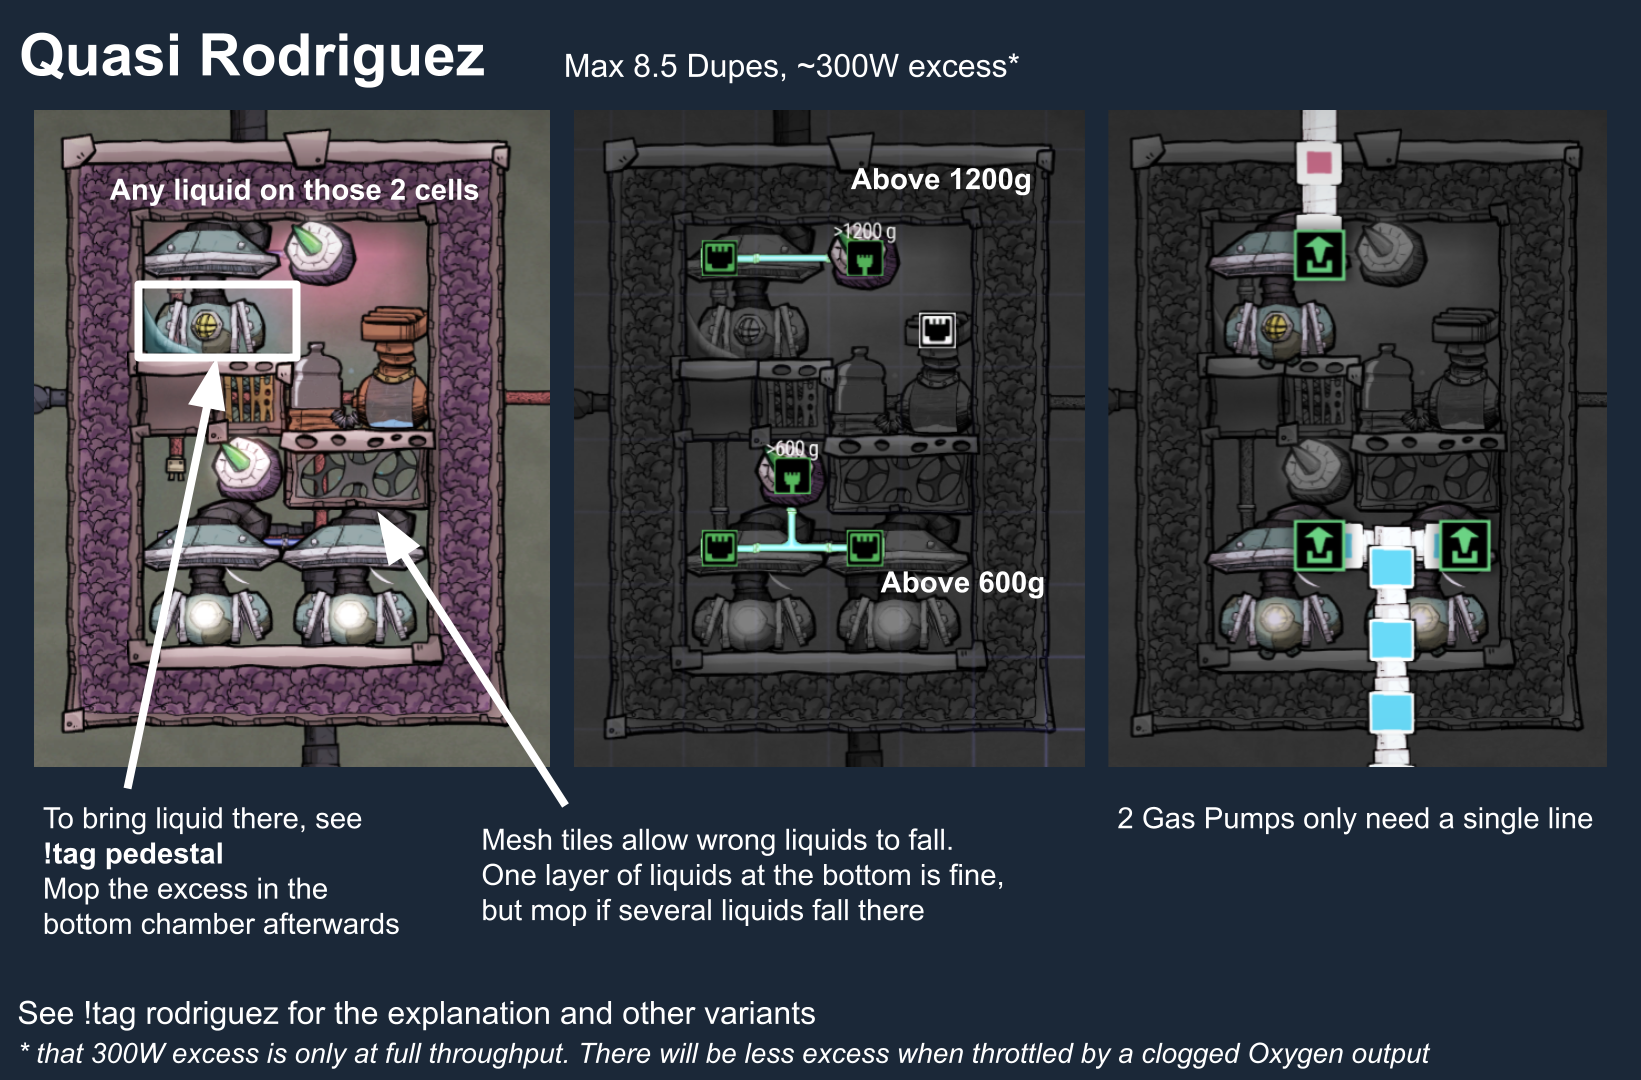
Compared to the classic Rodriguez version, this build uses a liquid to prevent the Hydrogen gas pump from drawing from the 3 middle cells in range, and a solid tile for the bottom cell in range. See this post for gas pumps range.[forums.kleientertainment.com] It also means a slightly smaller build, and opens the possibility for a single electrolyzer setup.
By keeping this build small and properly sizing pumps, Electrolyzers can operate to about 95% (despite reporting a lower uptime), as long as the outputs are not clogged.
For safe operation, it is advised to ensure the Hydrogen output is never clogged (by always burning it if there is too much).
The build will safely stop when the Oxygen is clogged (meaning you supply enough Oxygen for your Dupes).
Here are the details of all 3 builds, pick the one that will provide enough according to how many Dupes you have (though it's recommended to build 2 Semis rather than 1 Full if you have more than 14/15 Dupes):
> Electrolyzer: Hydra
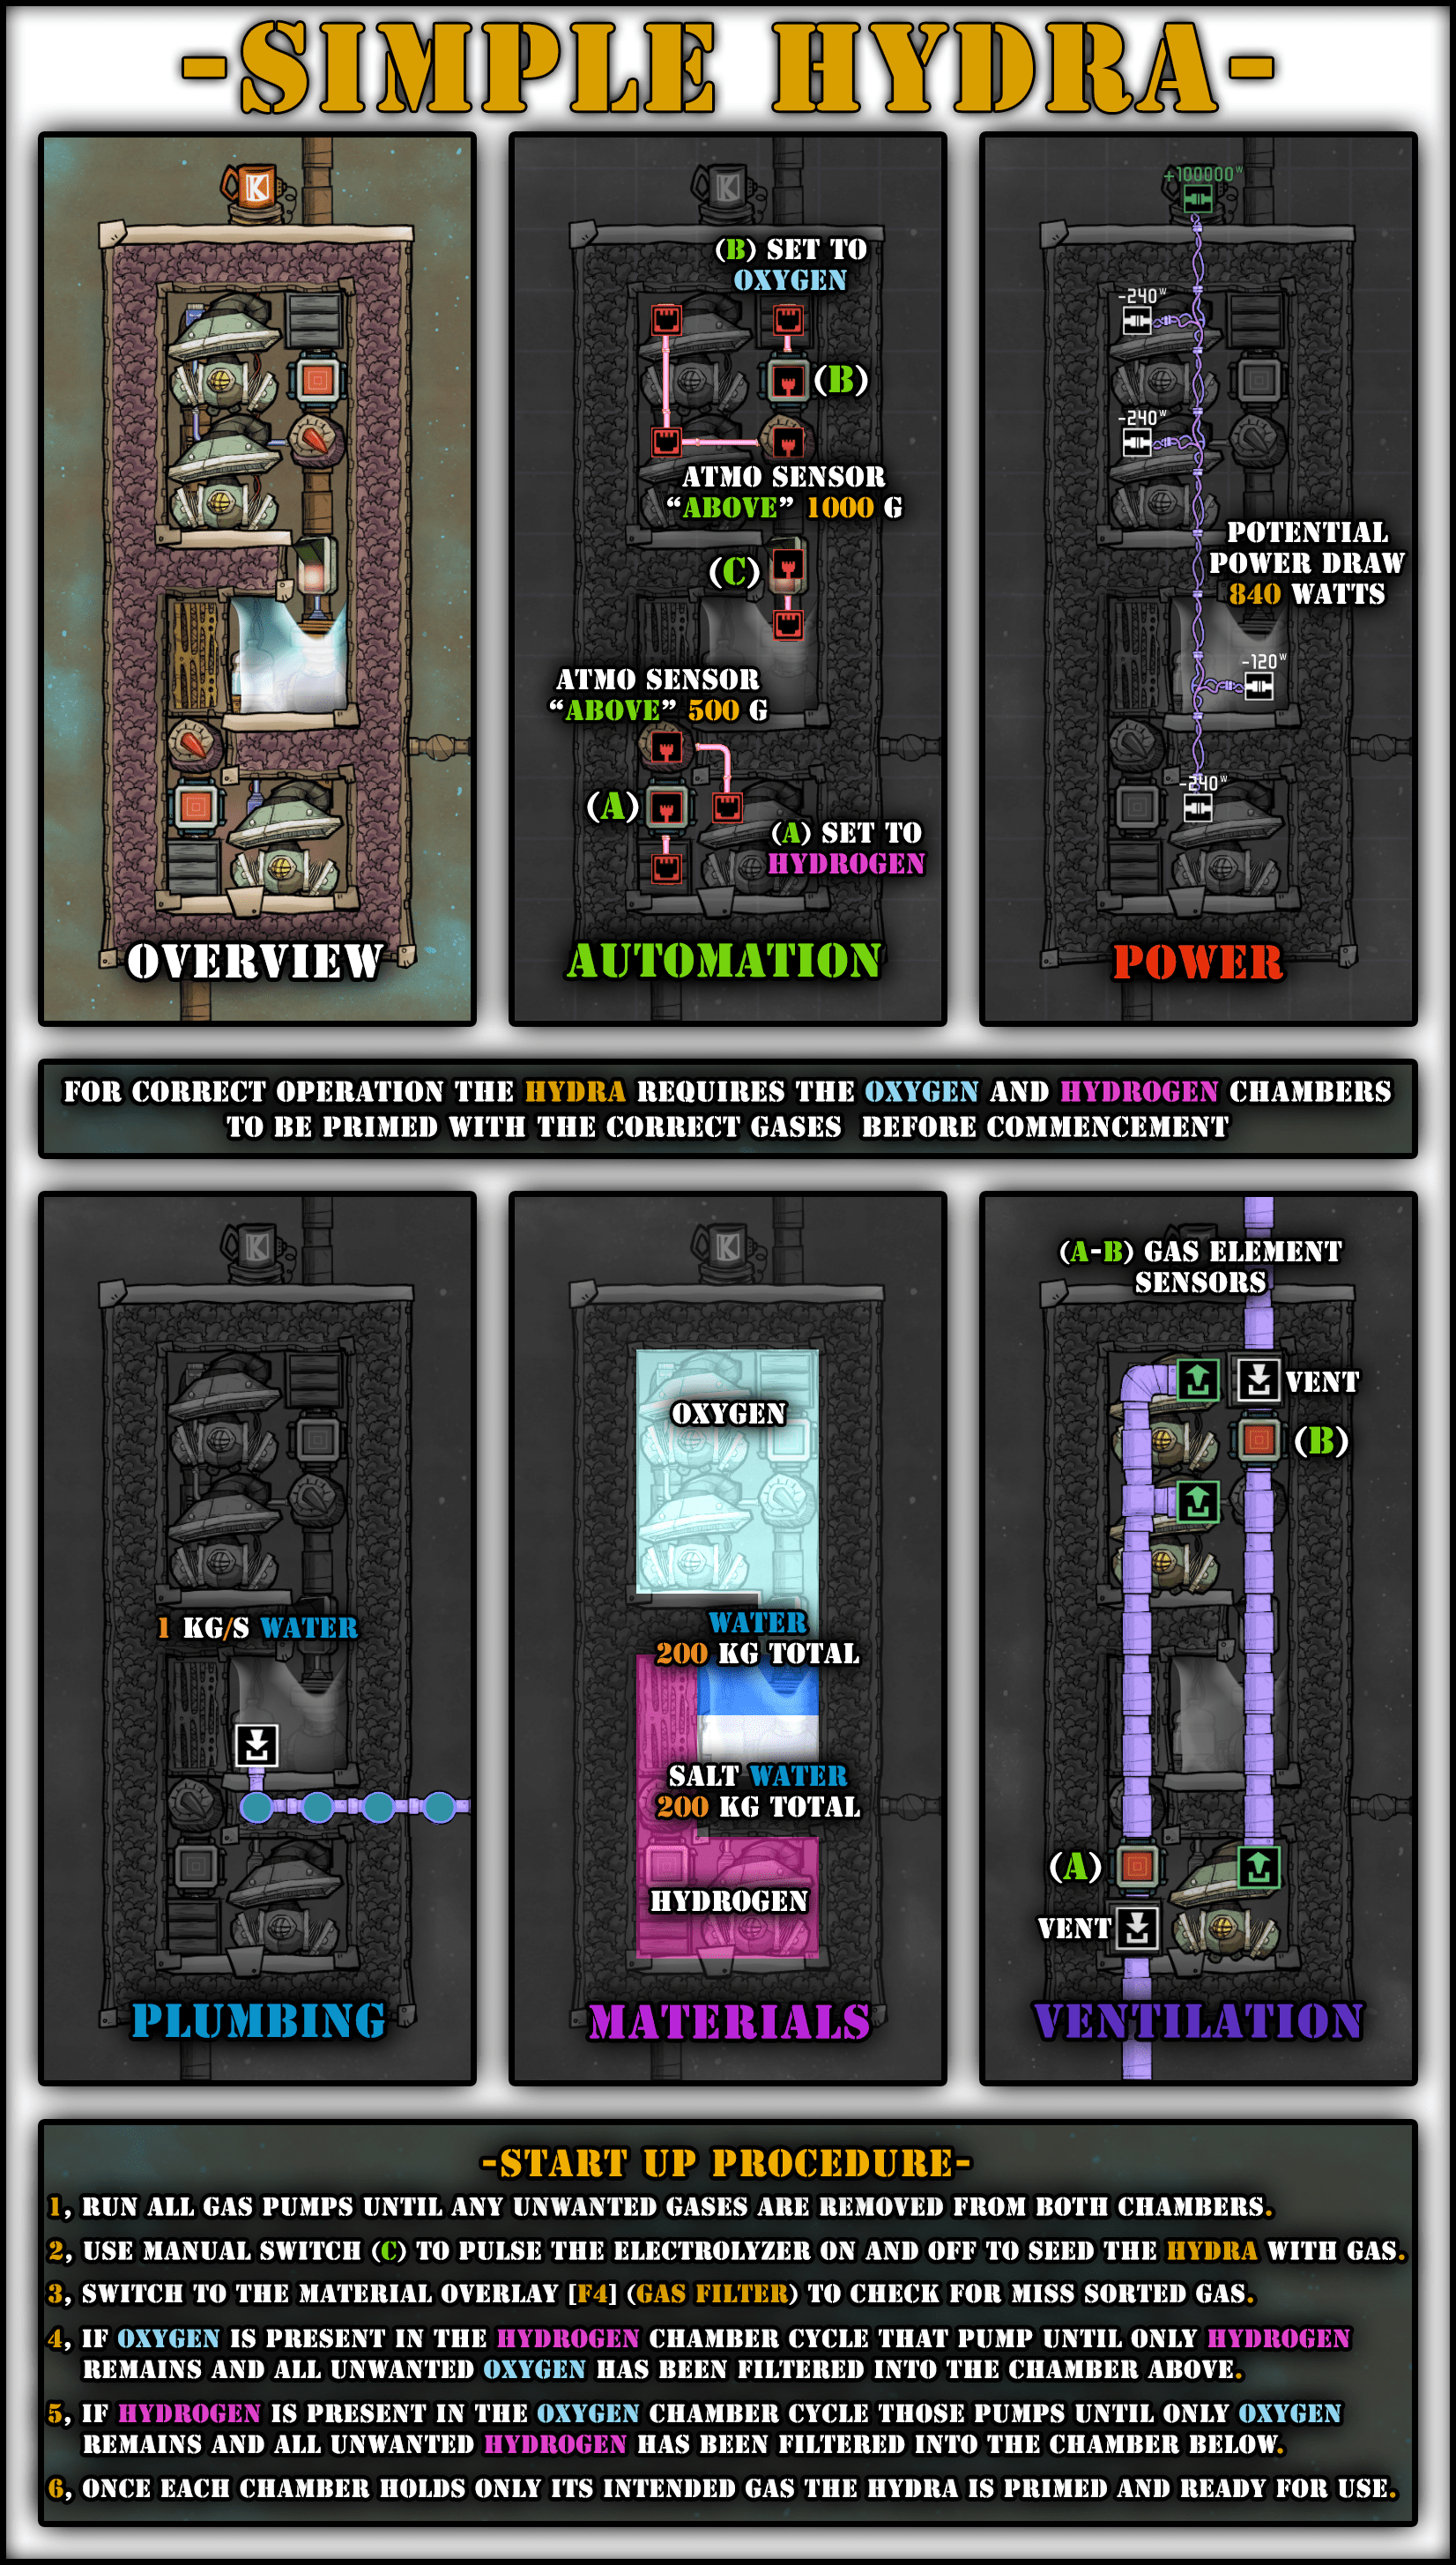
Goal: Convert Water into Oxygen and Hydrogen stored in infinite storages
Author: earliest known design by PVD[forums.kleientertainment.com] , improved by Hotep Thunderbolt
Input: 1kg/s Water per Electrolyzer
Output: 888g/s Oxygen and 112g/s Hydrogen (self-powering if burning most of the Hydrogen)
That build uses the fact that Electrolyzers can be tricked by liquids (about 100kg per cell, or one bottle with a Bottle Emptier per row) to never overpressure, and gases will try to merge with existing gases first rather than displace others.
This results in Electrolyzers outputting gases directly into infinite storages, meaning 100% Electrolyzers uptime and you do not need to care about clogging either side. On the other hand, if you do not limit it, it will happily burn all your water.
Compared to the original design, this design has been reworked to use less Airflow Tiles, and this version has integrated priming for easier building. If you prime it yourself, you can get rid of Gas Pipes Element Sensors and Vents.
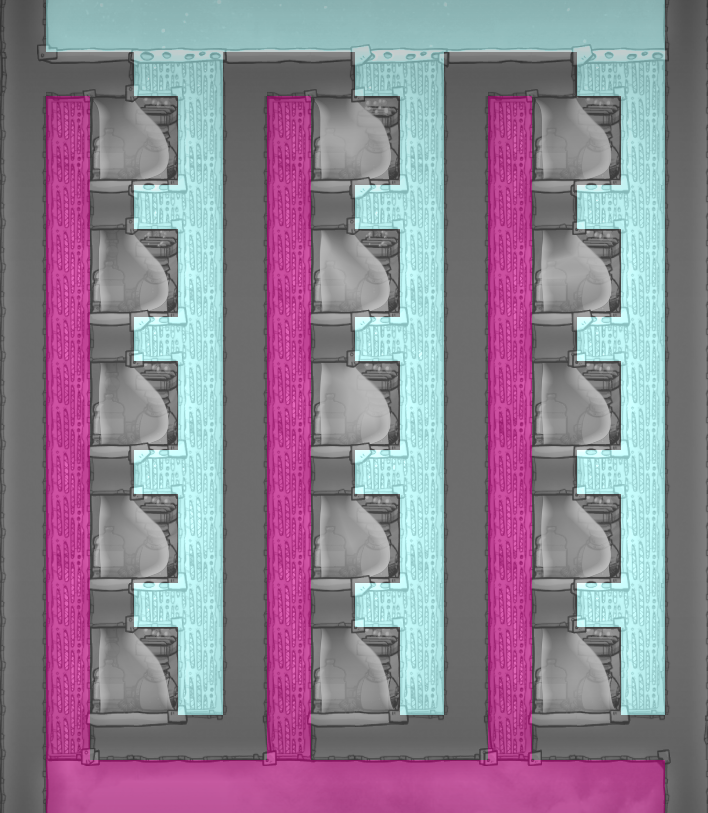
More Electrolyzers can be stacked by directing The build can be compressed as well,
gases with airflow tiles: here is Saturnus version:
> Deodorizer

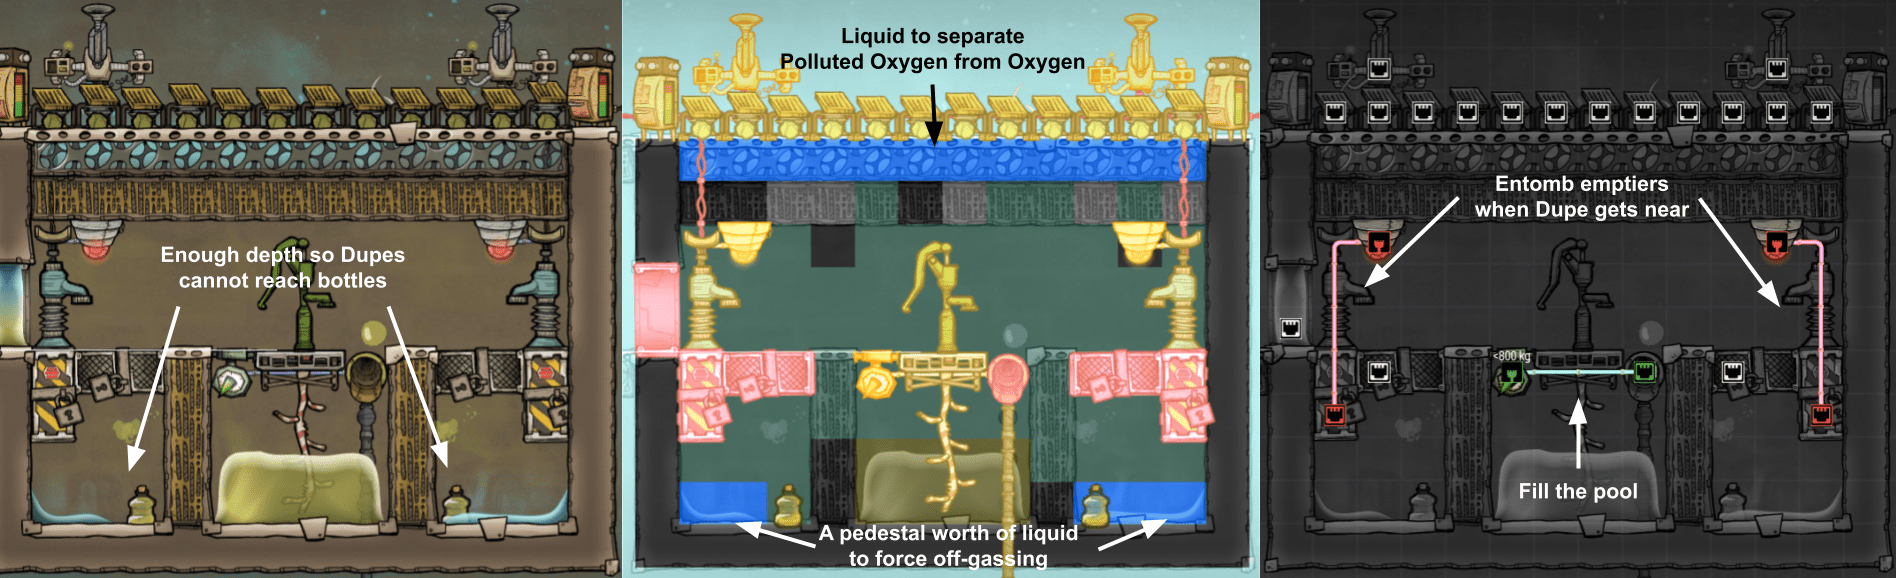
Goal: Convert Polluted Water into Oxygen and Clay
Author: Hotep Thunderbolt
Input: 1.2kg/s Polluted Water, 1.6kg/s Filtration Medium, 60W, 120s of Dupe Labor every 7 cycles
Output: 1.08kg/s Oxygen, 1.72kg/s Clay
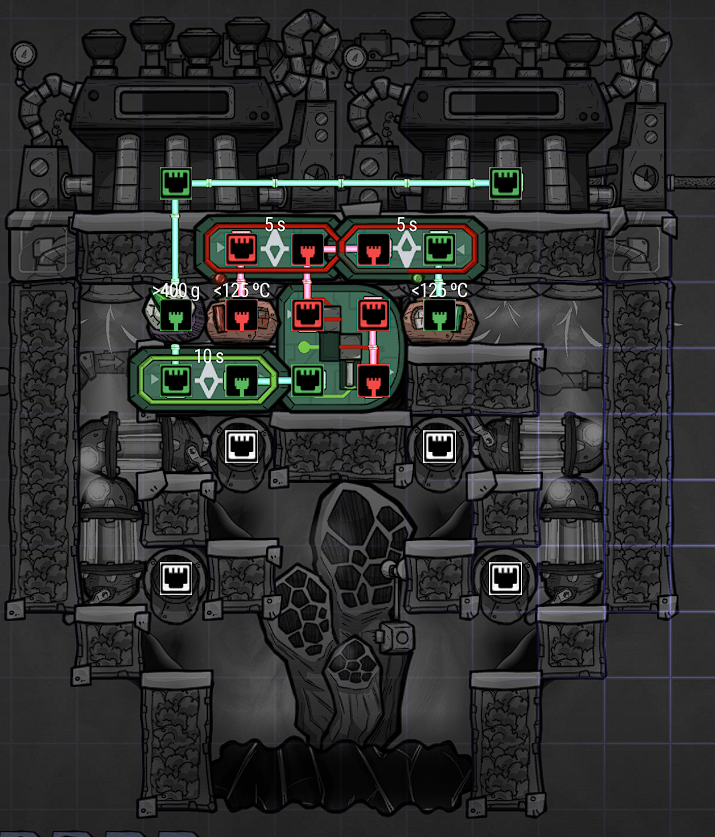
The main idea of the build is to have a Dupe pump Polluted Water to supply a Bottle Emptier, but entomb that emptier before the Dupe can reach it, so that the Polluted Water falls in a very shallow pool of liquid (under 1kg/cell) which forces off-gassing to be on regardless of the actual gas pressure above.
The main point of the build is to produce Clay rather than Oxygen, but it still produces enough for 10 dupes at a fourth the power cost of 2 Oxygen Diffusers.
Note that Polluted Water tiles off-gassing was massively crippled by The Big Merge update, which means converting it to bottles allows to speed up the off-gassing rate in very few tiles.
See also: Claymator V3 from nakomaru[forums.kleientertainment.com] , which uses Polluted Water tiles.
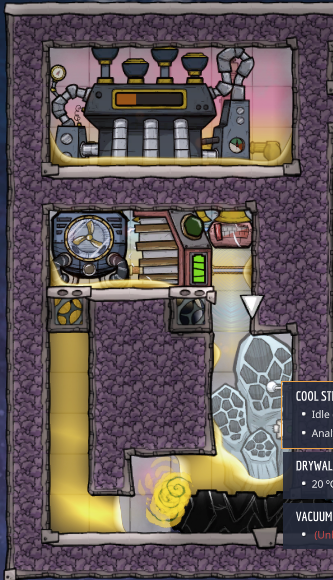
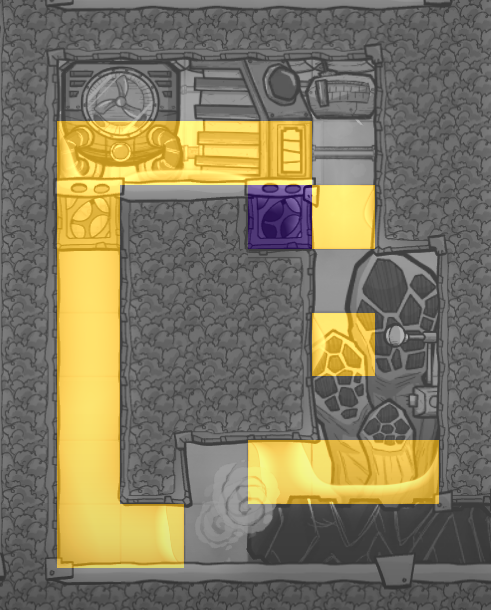
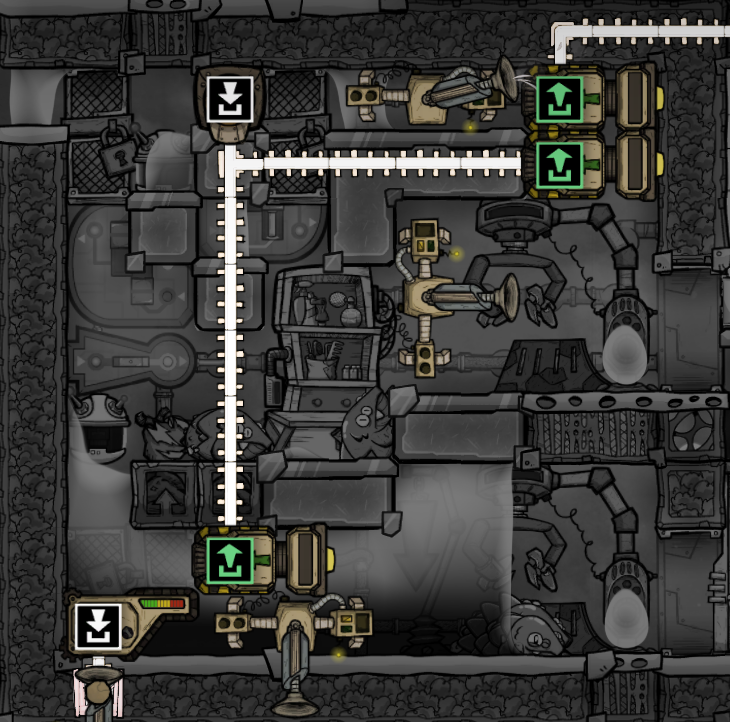
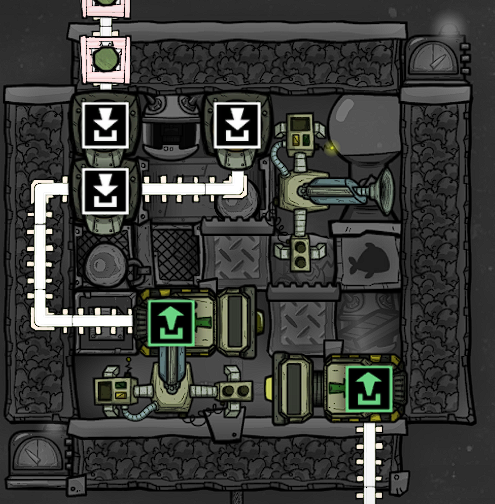
Here is a simplified version of the build:
It doesn't automate doors, which means it's your responsibility to let a Dupe in and out of the room. Most of the automation complexity in the real build stems from that detail.
You will also need to add a Carbon Skimmer on each side if you let unsuited Dupes inside.
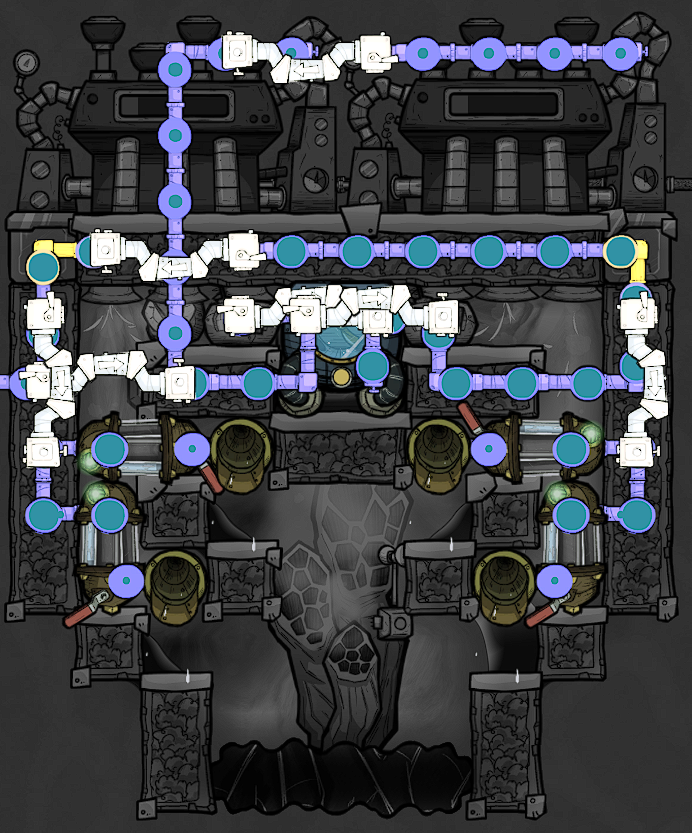
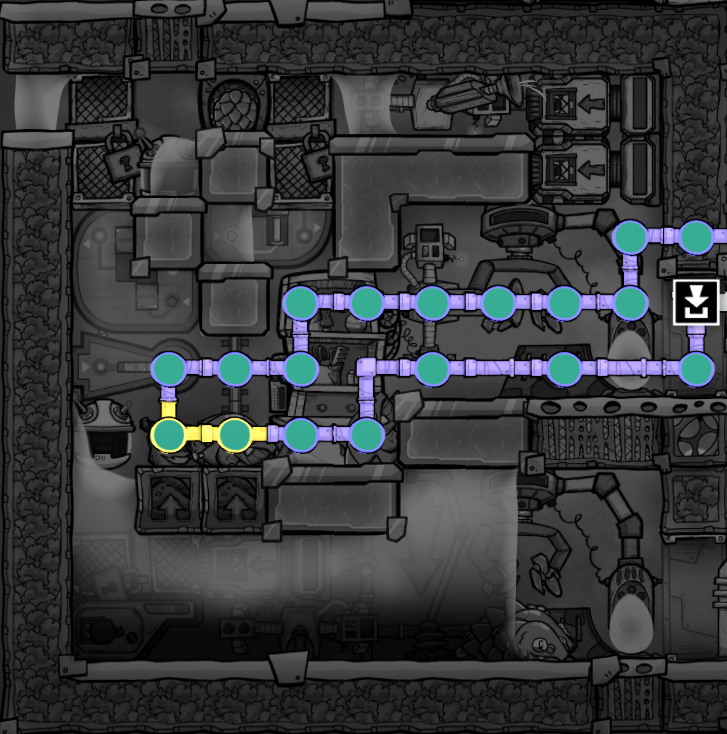
Here is the full optimized build:
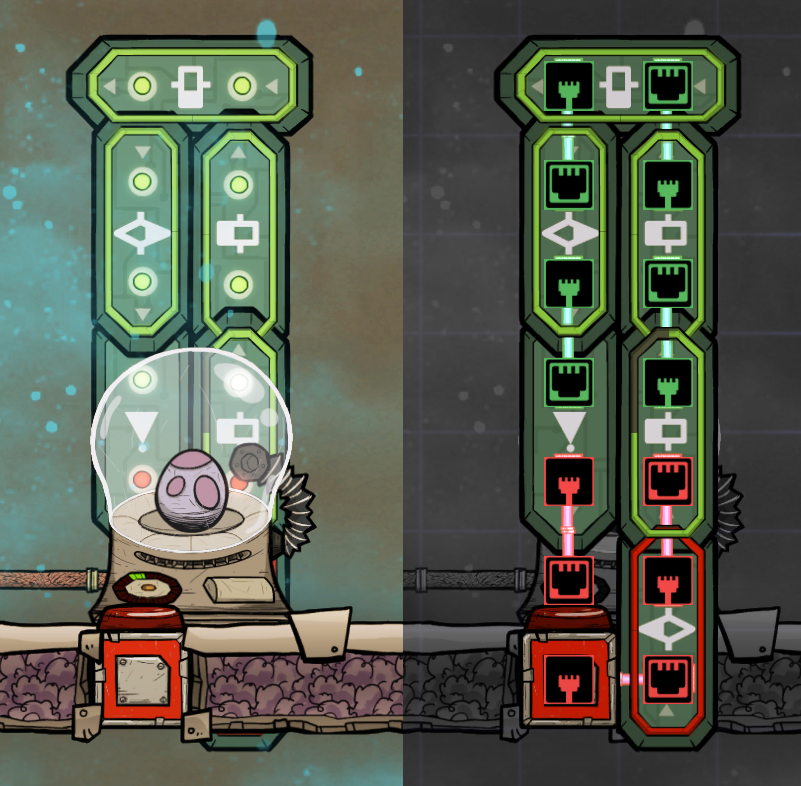
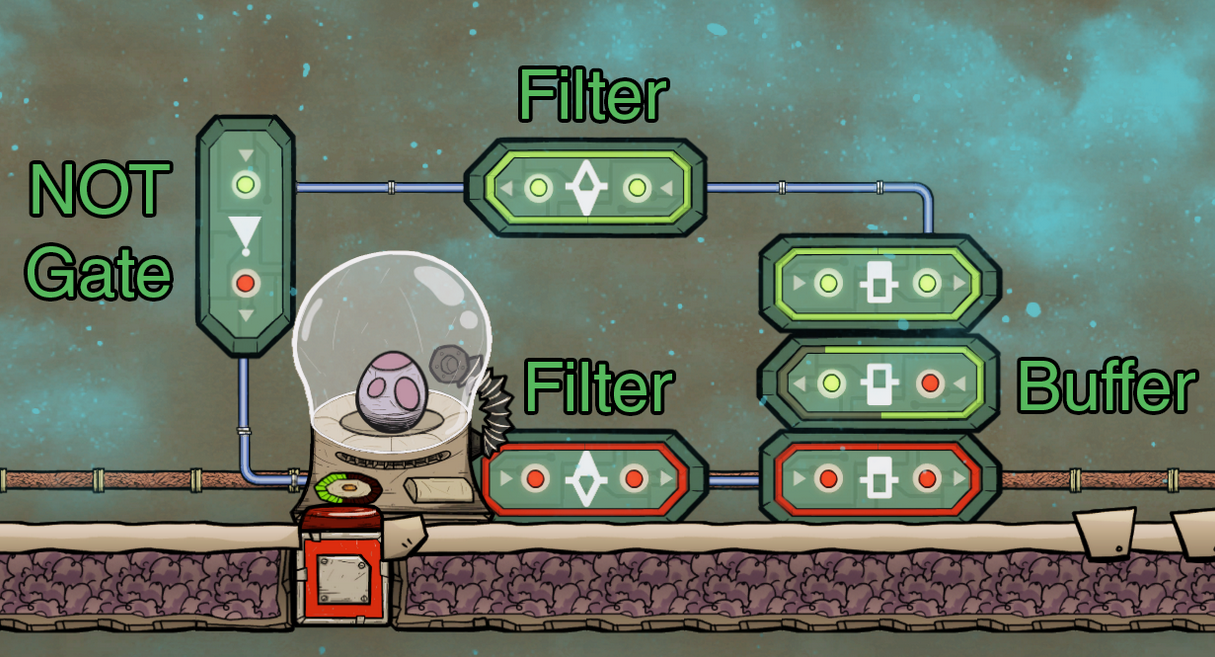
At the top, buffer gates are used as diodes, to prevent signals from going backwards (they are not required for the 2 middle Dupe sensors).
The hop between the Pitcher Pump and adjacent tile has been removed to have faster traveling. As a result, the pool is narrow, and special tricks are required to fill it to the brim.
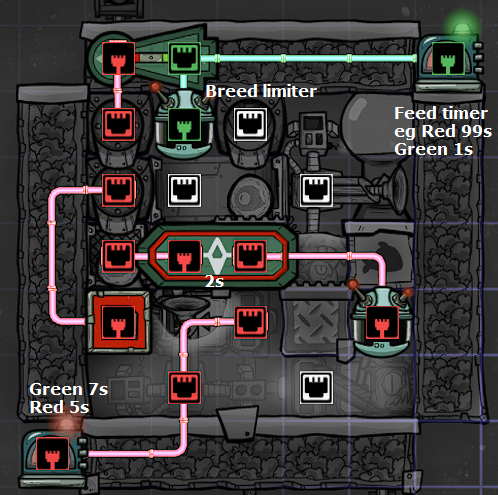
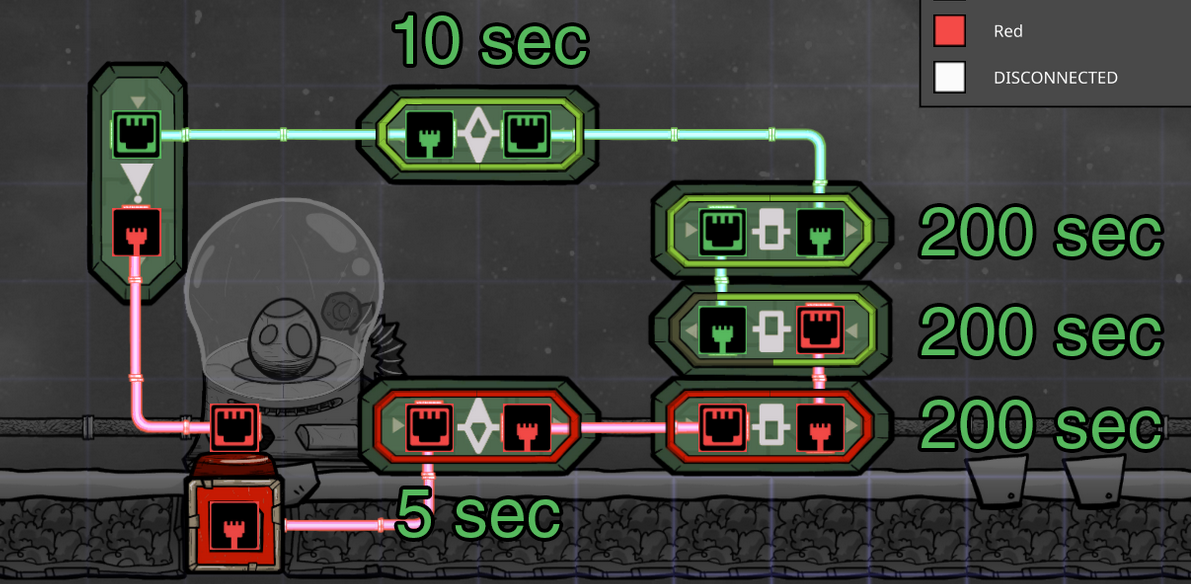
Then, 4 different signals are required to automate the left entry gate:
There hasn't been a Dupe inside for a while.
The cycle sensor, synchronized with the Dupe schedule, indicates it's a good time.
The atmosphere is too low since Deodorizers now work faster than the bottles off-gas, it's time for a refill.
The pool is refilled, to prevent partial pumping at the pitcher pump.
Geysers Taming
For geysers, the following blueprints goals are to extract the resource of the geyser and turn it into something useful, with a power efficient or self-powered build, that's significantly better than just throwing things together.
Output numbers are based on lifetime average geyser output, and can significantly vary based on your geyser. In general, the following builds should be able to handle any geyser, even outliers, without issue.
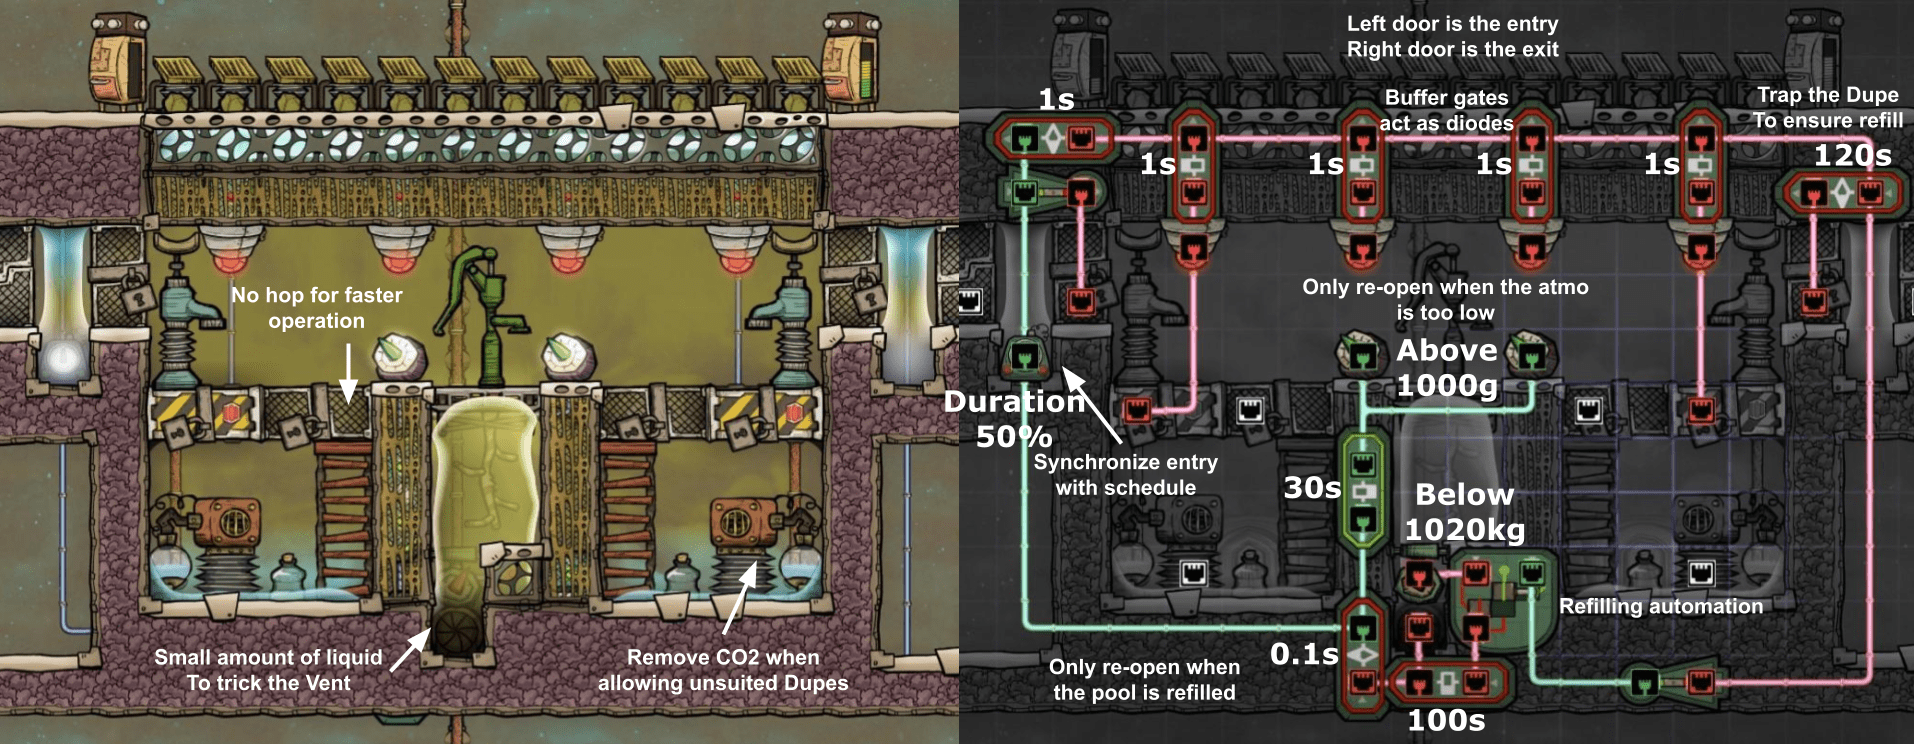
> Cool Steam Vent: Clown's Hat
Main article[forums.kleientertainment.com] - Link to Saturnus version in Discord[discordapp.com]
Goal: self-powered Cool Steam Vent taming to extract water
Author: mathmanican, with various variations from Saturnus (whose version is shown here) and others
Input: a Cool Steam Vent
Output: about 1.5kg/s water average
The goal of this design is to tame a CSV in the most efficient way possible. When using all possible game mechanics (temperature clamping, split turbine), as displayed in the main article, it's possible to have a power-neutral (even slightly positive) build.
The version displayed here doesn't use those, so it's not completely self-powered but it's very close.
The output water averages 84.2C.
The main feature is 4 Liquid-Gas Bypass pumps[forums.kleientertainment.com] , which together are able to pump up to 12kg/s of Steam (3kg/s each) to avoid overpressuring the Vent.
An alternate way to pump Steam is to use a Liquid Bead Gas Pump[forums.kleientertainment.com] for the Steam and an Escher Waterfall[forums.kleientertainment.com] to replenish that liquid, as shown by this build for Ishamoridin:
Disclaimer: this last build is known to delete part of the Steam, from about 10% for low output vents to 35% for high output vents. There is currently no known workaround.
> Salt Water Geyser: Infinite Saltuner

Main article[forums.kleientertainment.com]
Goal: efficient Salt Water Geyser tamer to extract water
Author: Fradow, improved by Saturnus
Input: a Salt Water Geyser, about 150W for an average geyser
Output: about 1.5kg/s water average, in an infinite storage
Since a Salt Water Geyser outputs 95°C Salt Water, it's surprisingly power-efficient to vaporize it and immediately re-condense it to Water. More power-efficient than trying to use a Steam Turbine, or using the dedicated building, the Desalinator, while also removing the Dupe labor.
Salt Water flows from your Salt Water Geyser into the boiling chamber.
When there is over 50kg/cell Salt Water in the chamber, the Aquatuner turns on to boil it.
Even with additional flow coming in, it will quickly boil and form Steam on the tiles above.
The Steam is very quickly condensed by being in contact with the Manual Airlock.
When condensed, since the water has nowhere to go, it will try to find any cell upwards it can condense in: that’s in the Infinite Storage. I call that water teleportation, and despite being weird, so far I believe that’s not a bug but rather the normal tile-swapping rules and won’t get changed.
The outgoing Salt and Water exchange a bit of heat with the incoming Salt Water before being shipped/piped out.
This is the most practical "Infinite Saltuner" variant of the Saltuners series. See the main article for the "Stoppable Saltuner" and the "Hybrid Saltuner" variants, which use a big heat exchanger for efficiency and being able to stop, but are way less practical as a result.
Disclaimer: there has been a single report of this build failing because Steam forms at a place it shouldn't when the geyser eruption stops. If you are worried about it, use my slightly bigger design shown in small in the main article, which should not exhibit that failure case.
> Polluted Water Geysers: Evapotuner

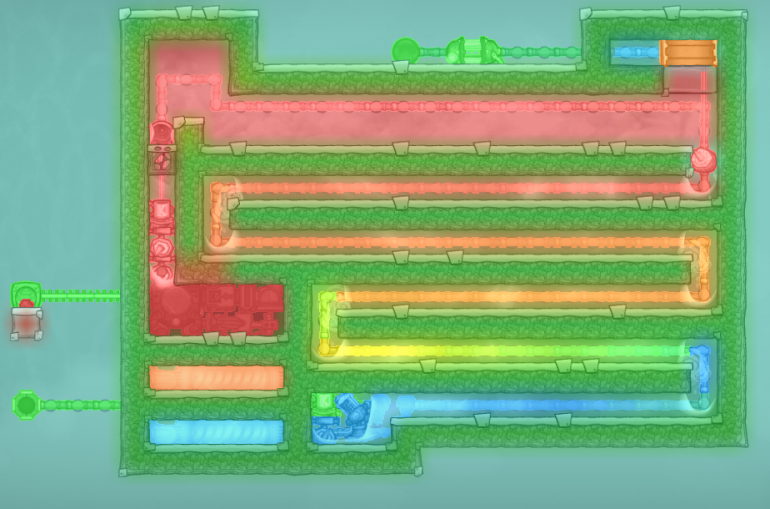
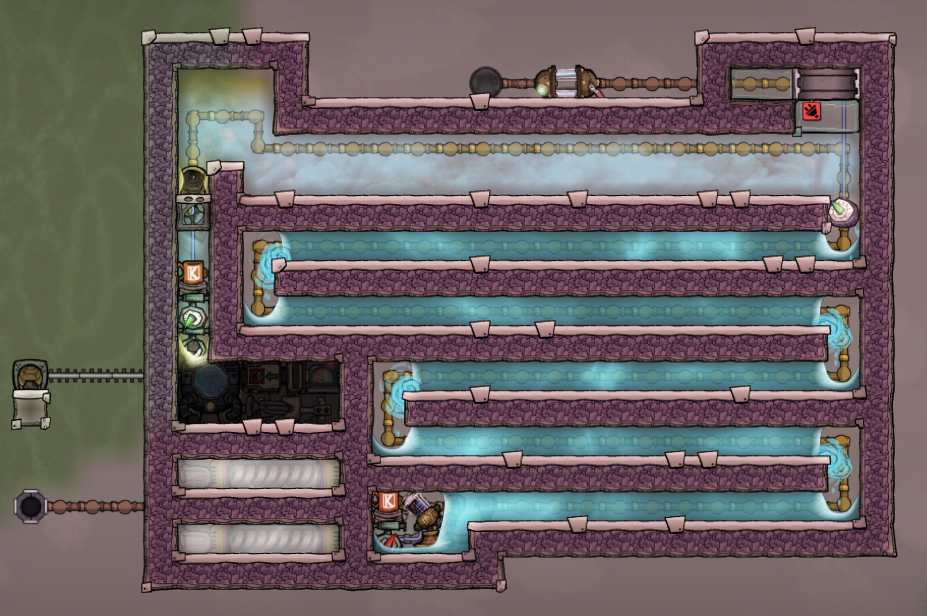
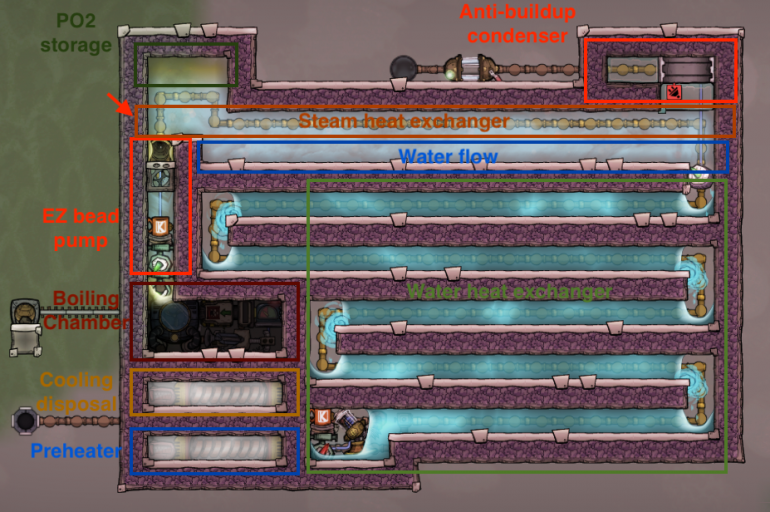
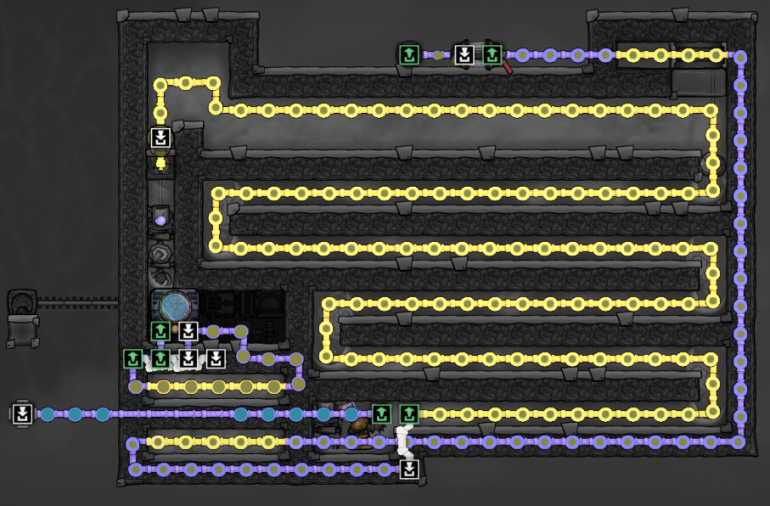
Main article[forums.kleientertainment.com]
Goal: transform Polluted Water to Water without filtration medium
Author: Fradow
Input: Polluted Water Vent, Cool Slush Geyser, or some Polluted Water, 600W to 700W for 5kg/s
Output: same mass of Water as input Polluted Water
This build is marked as Spaced Out!, because in Vanilla it's always easier to use renewable Regolith in a Water Sieve.
Polluted Water geysers are either 30°C (Polluted Water Vent) or -10°C (Cool Slush Geyser), which means a lot of heat to vaporize. To greatly reduce the heat requirement, you have to use a counterflow heat exchanger, which is explained in greater length in my late-game guide.
Efficiently boiling water has a few more caveats for which you need a few more gizmos:
A pre-heater in case the input water is under 0°C, to avoid output water freezing.
A counterflow heat exchanger that handles both Steam and Water.
A heat bridge to force Steam condensation if it goes up to the end of the Steam section.
A Bead Pump to move Steam away from the boiling chamber.
A Polluted Oxygen chamber for initialization.
Overall, it performs very close to the Water Sieve + Rock Crusher option while removing Dupe labor, but at a huge construction cost.
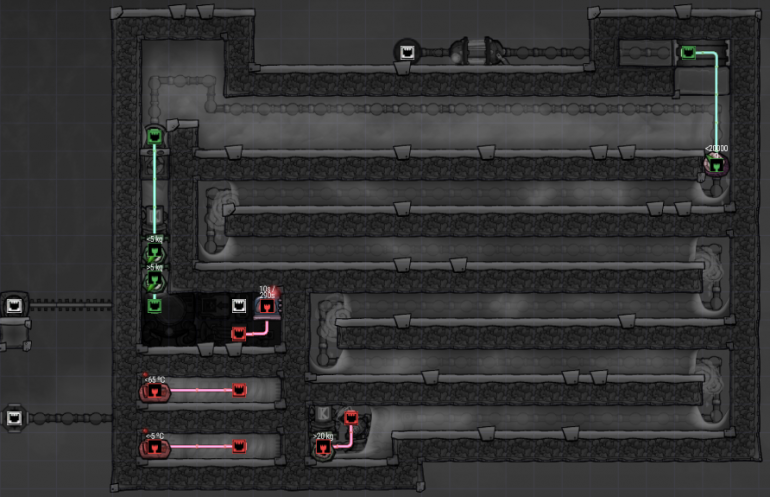
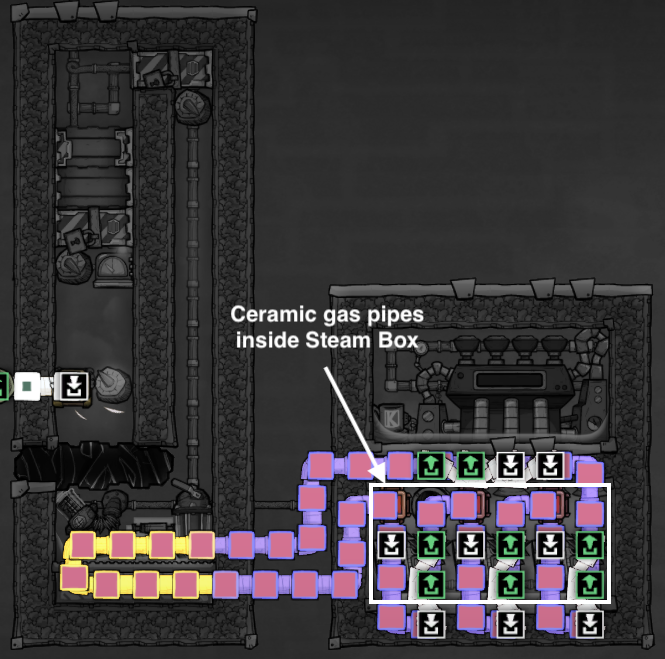
> Polluted Oxygen Vents: Chilter
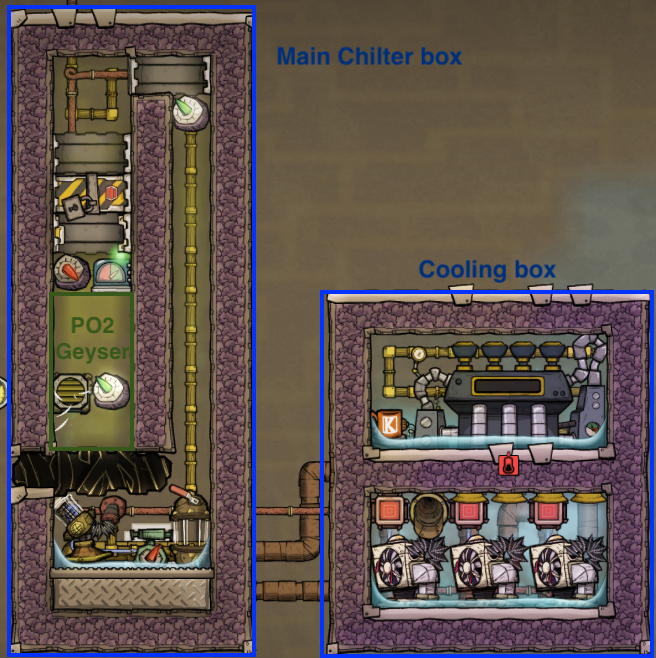
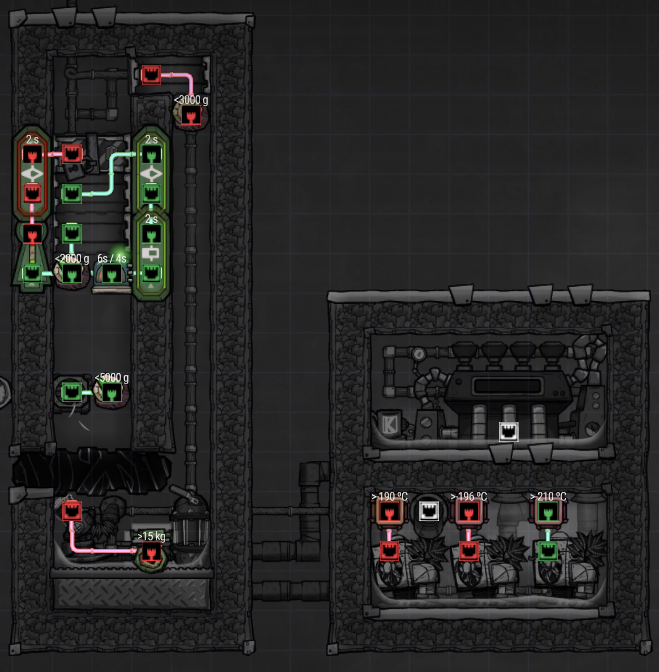
Main article[forums.kleientertainment.com]
Goal: transform Polluted Oxygen into Oxygen without filtration medium
Author: Fradow
Input: a Polluted Oxygen Vent or some Polluted Oxygen, 100W for 100g/s
Output: same mass of Oxygen as input Polluted Oxygen
This build is marked as Spaced Out!, because in Vanilla it's always easier to use renewable Regolith in Deodorizers.
Just like with the Evapotuner, we can replace the need for sand with a state transition. Except this time it's a liquefier instead of a vaporizer.
Considering the low output of Polluted Oxygen Vents and the low SHC of Oxygen, the power needed is minimal, even when using the less efficient Thermo-Regulators.
This also means the counterflow heat exchanger doesn't need to be big. On the other hand, because Polluted Oxygen and Oxygen have the same weight, that heat exchanger MUST be vertical. And since Liquid Oxygen will fall, the hottest part needs to be on top.
Since Thermo-Regulators are not powerful, you must pay special care about the materials selection in the liquefaction chamber, otherwise it will take ages to ramp up due to flaking.
This build works best with an Infectious Polluted Oxygen Vent and will output Oxygen slightly colder than the Vent output. For a Hot Polluted Oxygen Vent, you might want to modify the build a bit to passively cool the Polluted Oxygen with a Steam Turbine beforehand.
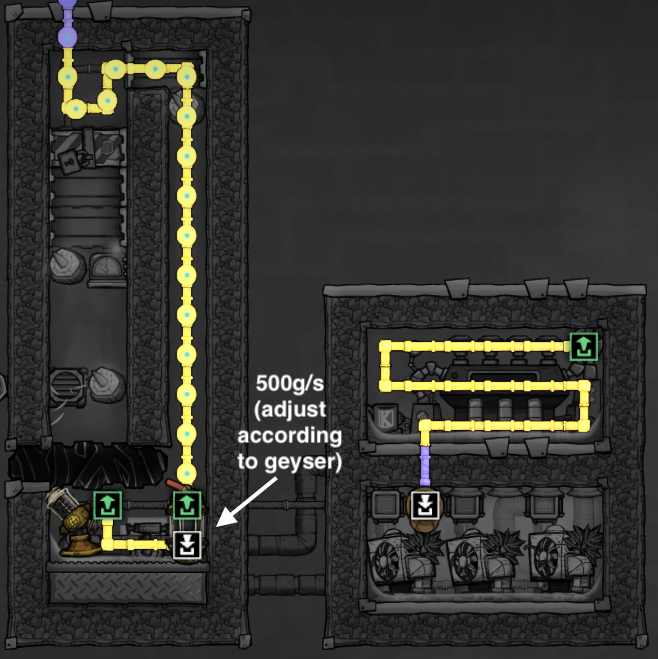
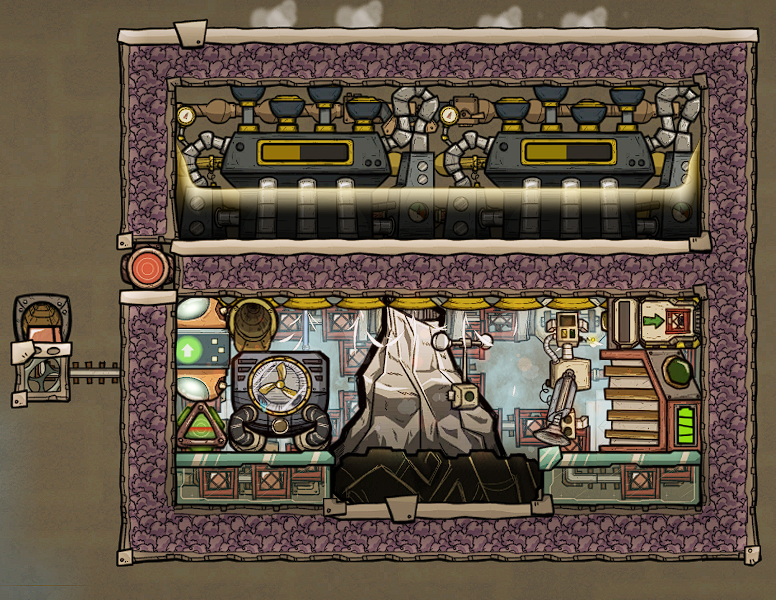
> Hydrogen Vent
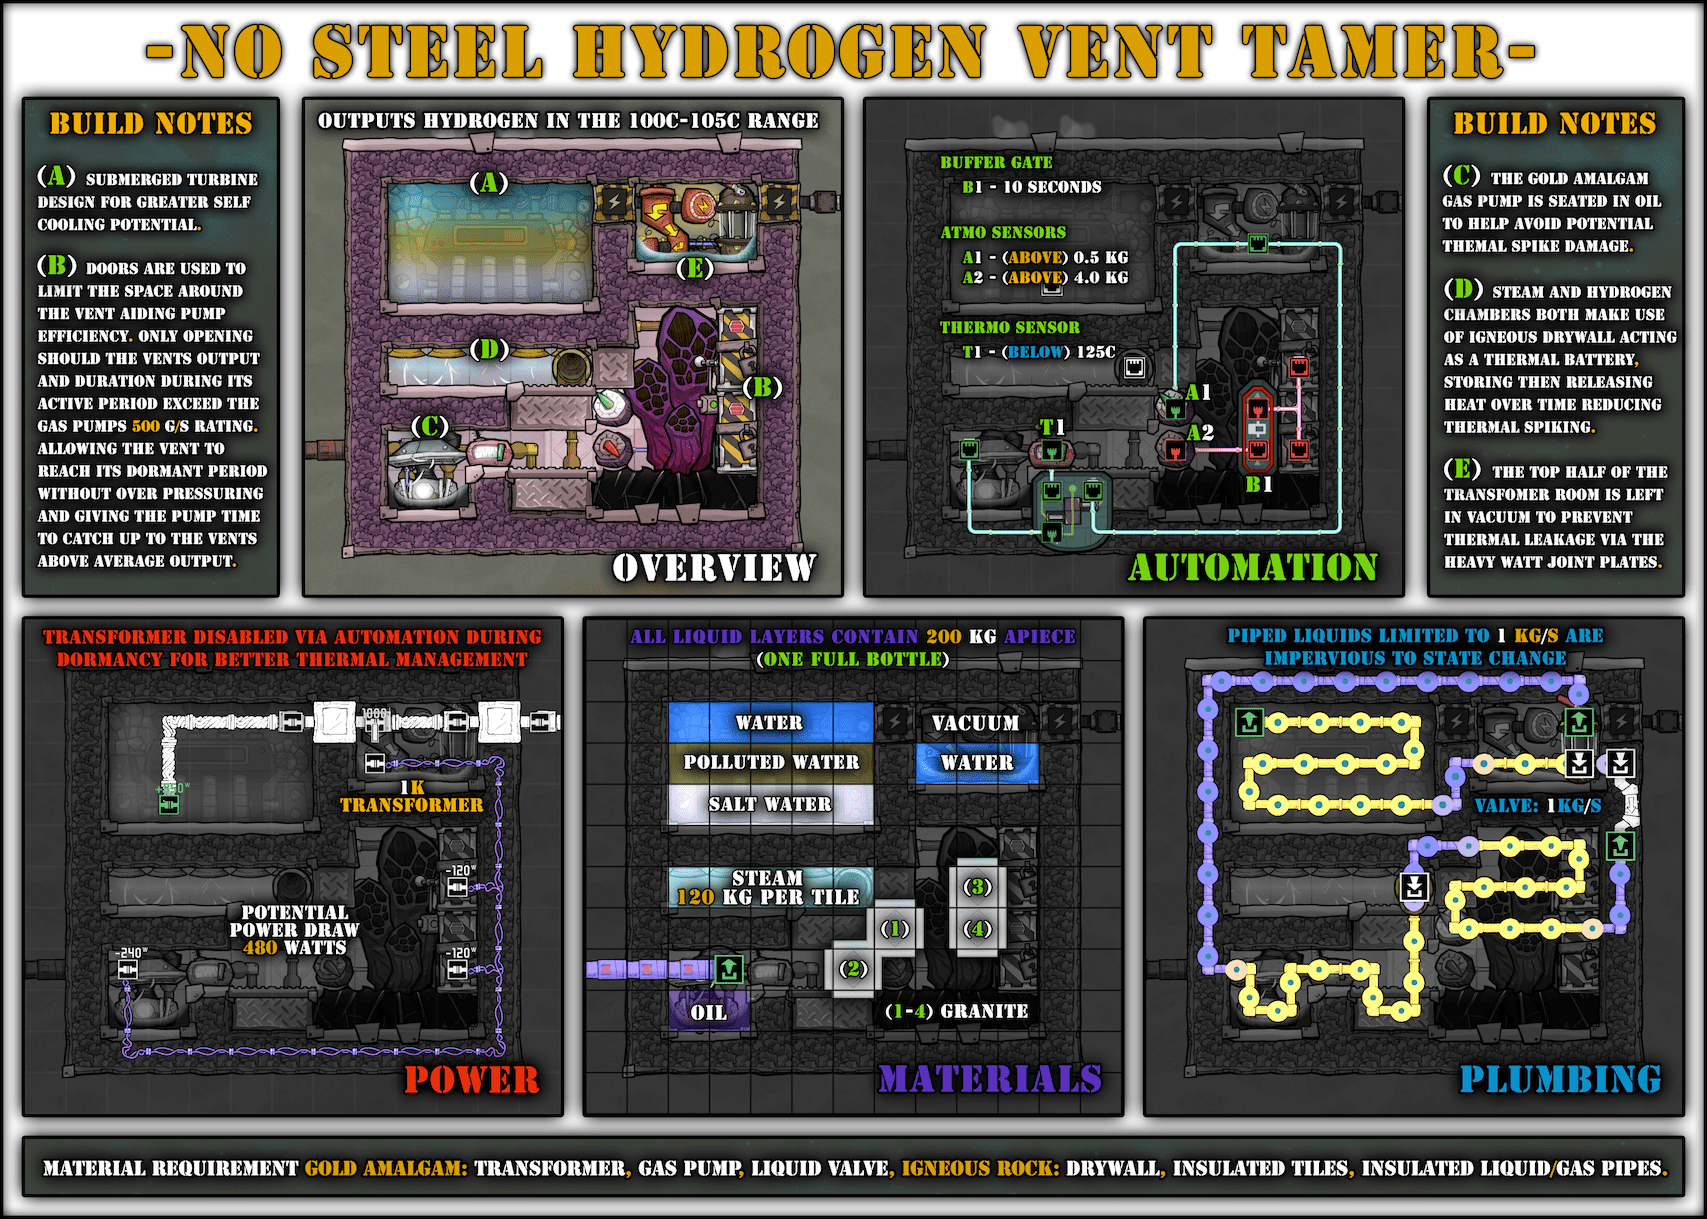
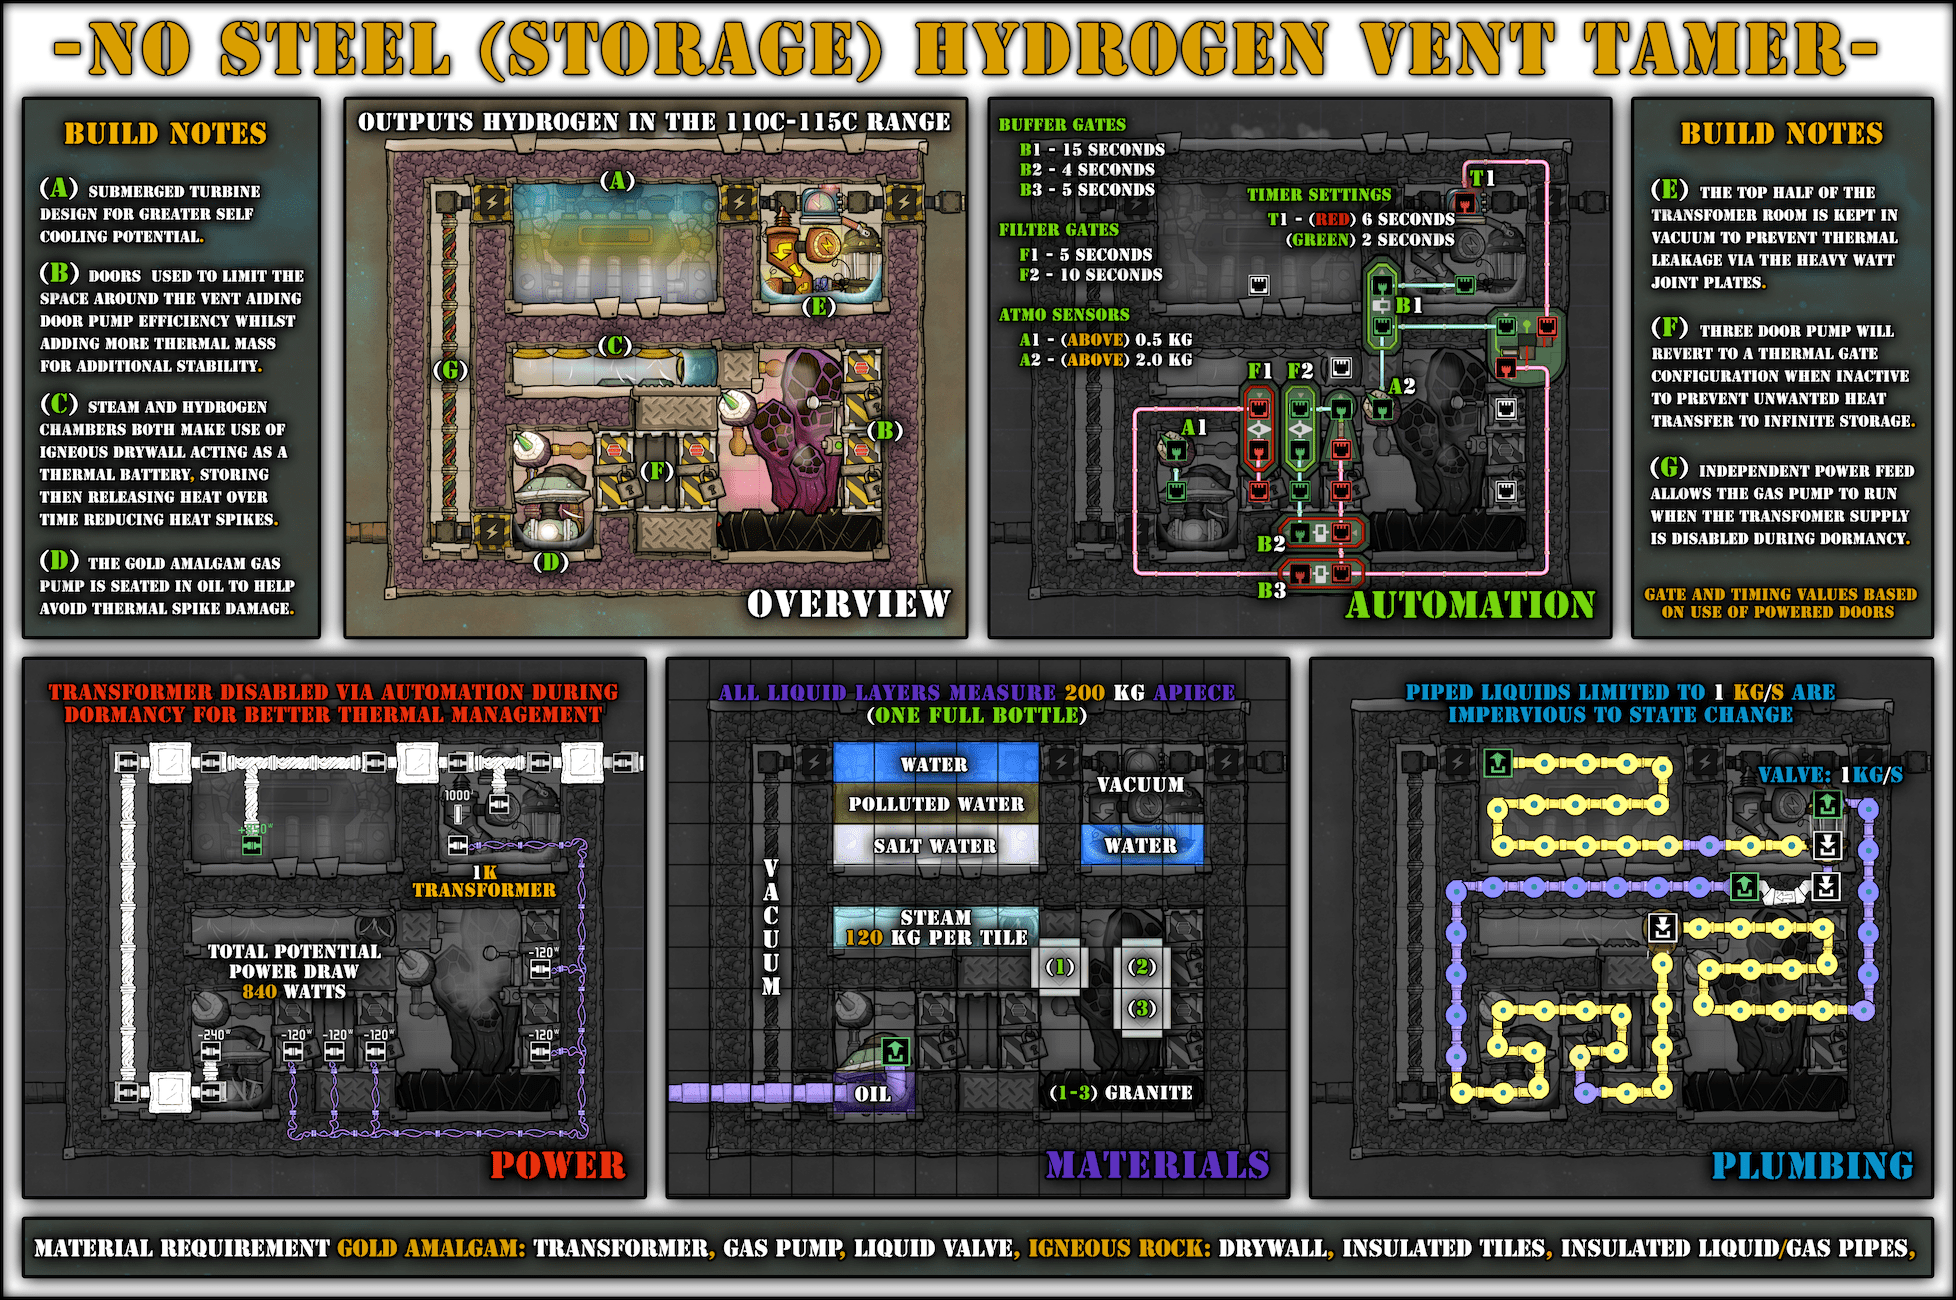
Goal: Steel-less Hydrogen Geyser tamer to pump Hydrogen
Author: Hotep Thunderbolt
Input: a Hydrogen Geyser
Output: about 105g/s average, under 125°C, piped Hydrogen
Since Hydrogen Geysers produce Hydrogen too hot to pump anyway, you will need to cool Hydrogen before pumping it.
While you can go simple and just passively exchange heat with a Steam room sitting below a Steam Turbine to get it to around 130°C, requiring Steel, you can get clever with Steam Turbine exhaust to get it under 125°C, extracting more power and removing the need for Steel.
With all bells and whistles, including 10% packets, here is a Steel-less build:
Here is also a variant that has an infinite storage using door pumps:
> Metal Volcanoes
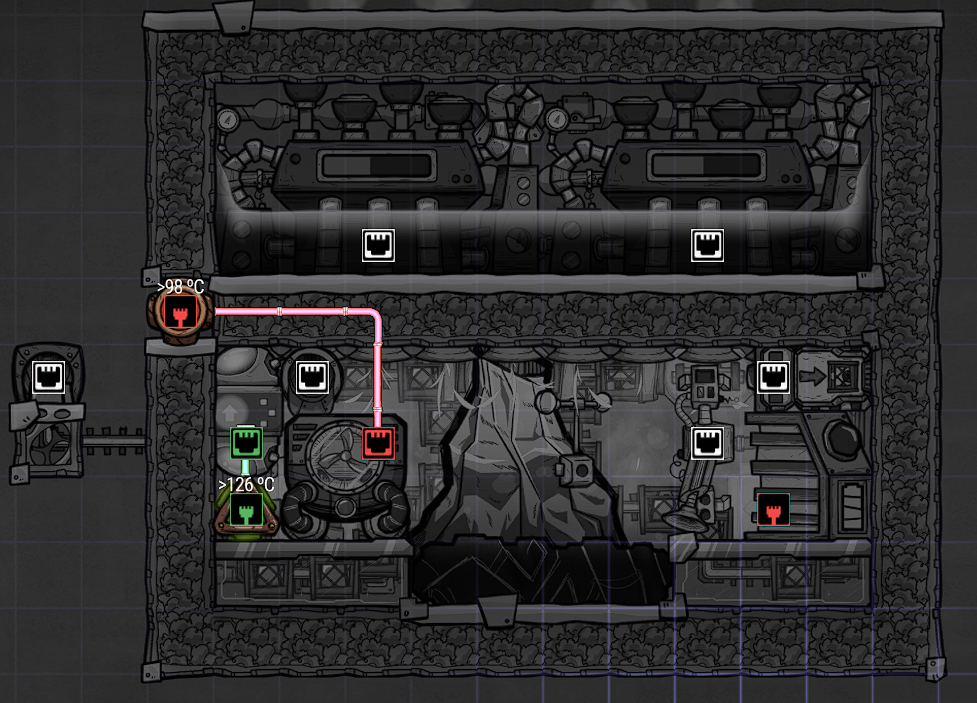
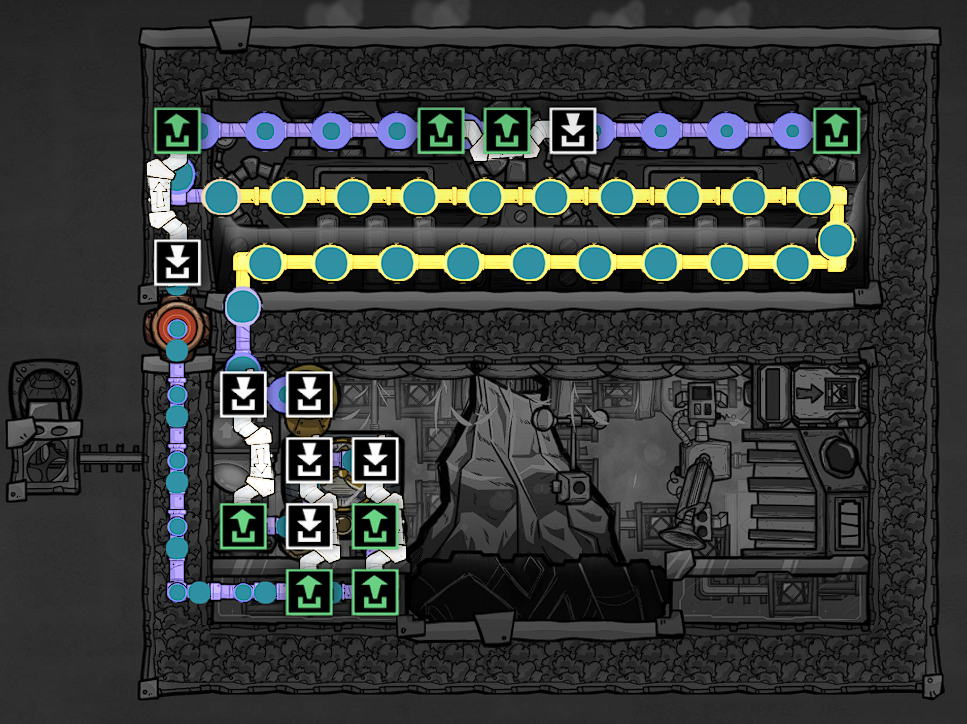
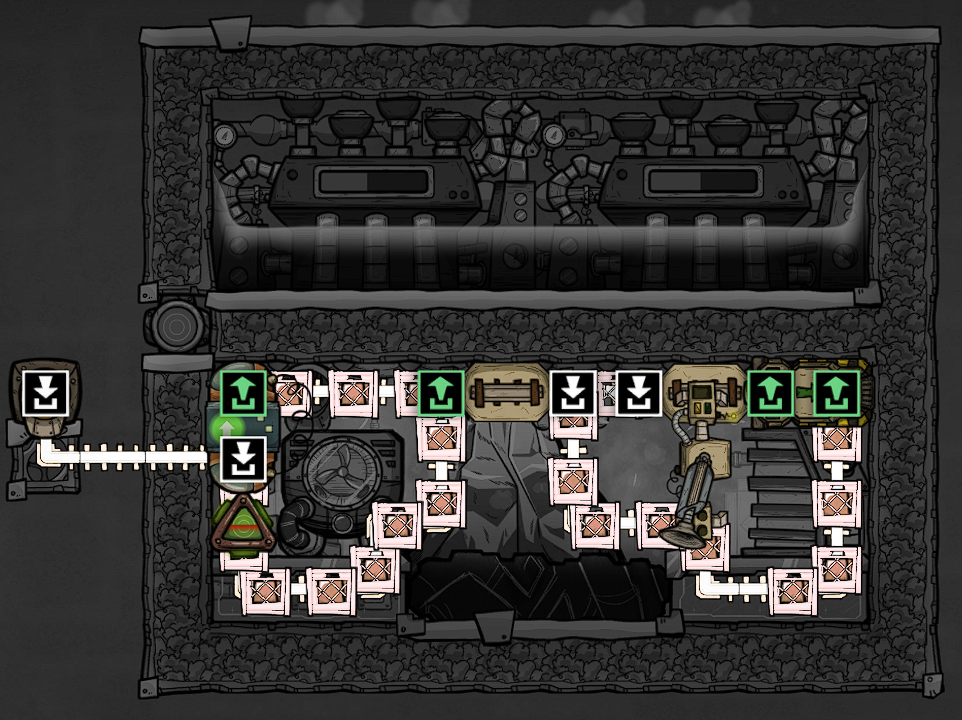

Goal: self-powered Metal Volcano tamer outputting Refined Metal on conveyor rails
Author: Saturnus
Input: a Metal volcano (all except Niobium)
Output: debris of 126°C Refined Metal
There are many ways to tame Metal Volcanoes: in a vacuum to remove the Steel requirement, by cooling the output down below 100°C, by using them to power a boiler ...
That approach aims to be a dead simple self-powered build that does not cool its output below 126°C to 130°C (depending on your preference), since temperature is clamped when using the metal to build something.
There is also an hybrid ST cooling system: it uses self-cooling under 98°C and is assisted by an AT over that threshold. Note that the Pipe Thermo Sensor placement is deliberate: it's a clever way to only cool 7 packets before resuming self-cooling.
The battery can be any battery type: Small or Jumbo batteries work as well.
While it's not shown in the screenshots, since it's a self-powered build that doesn't require external power, it's trivial to modify the build to get excess power out of it, by wiring the turbines with Heavy-Watt Wire and stepping down to Conductive Wire with a Large Power Transformer (or 2 normal ones). It's up to you to keep the build self-contained or link it to your main grid, both have merits.
> Leaky Oil Fissure

Goal: self-powered Leaky Oil Fissure tamer to extract Crude Oil at a useful temperature
Author: Hotep Thunderbolt
Input: a Leaky Oil Fissure
Output: 125g/s of 95°C to 100°C Crude Oil
Since Leaky Oil Fissures have a weird output temperature, that's too hot to directly use but too cold to turn to Petroleum easily, this build cools it down to about 95°C to 100°C with a SCST and its exhaust (just like the Hydrogen Vent tamer), which matches Oil Wells temperature.
That output is perfect to supplement a 3 Oil Wells setup: since 3 Oil Wells cannot output 10kg/s (due to depressurization eating into their uptime), a Leaky Oil Fissure can help fill the gap.
> Sulfur Geyser: Brimstoner
Main article[forums.kleientertainment.com]
Goal: self-powered Sulfur Geyser tamer to output hot Sulfur debris
Author: Fradow
Input: a Sulfur Geyser
Output: 1.5kg/s hot Sulfur debris
Since Sulfur Geysers output 165.2°C Liquid Sulfur, there is a small amount of heat that can be used to produce power through Steam Turbines, while solidifying Sulfur at the same time to be used for crops/critters.
When using ONI mechanisms to their full potential (10% of pipe packets, split turbine), that heat is enough to self-power the build, meaning it can be left in a corner without getting linked to your main grid.
The left Steambox is above 125°C during eruptions to enable the Turbine. The right Steambox is colder than that to extract more energy. The automation is there to ensure the left Steambox stays hot and Liquid Sulfur never overflows too much in the right-most part, and might need some fiddling depending on the exact Geyser properties.
If a tile forms there, you will need to dig it out, either with a Dupe or with a Robo-Miner (like on the automation screenshot, which shows a revised version of the automation with an additional buffer gate).
See also, OCD Simpelr Sulfur Geyser Tamer from MooChiChi[forums.kleientertainment.com] , which aims to output 25°C Sulfur, but requires some electricity to do so.
Critters Taming
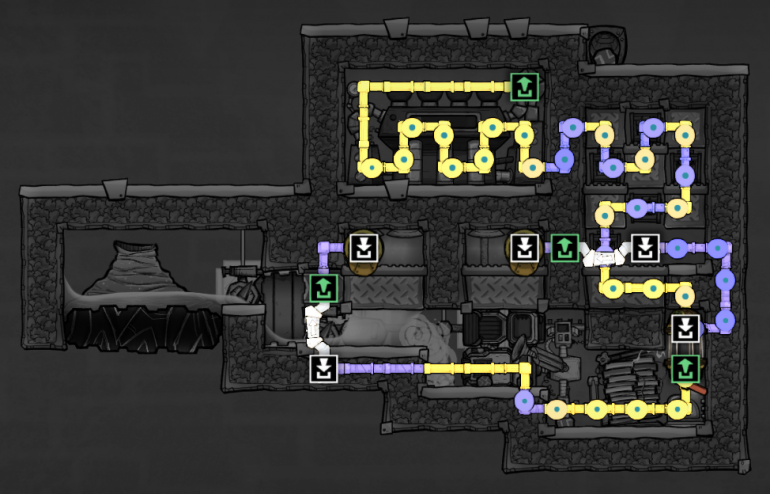
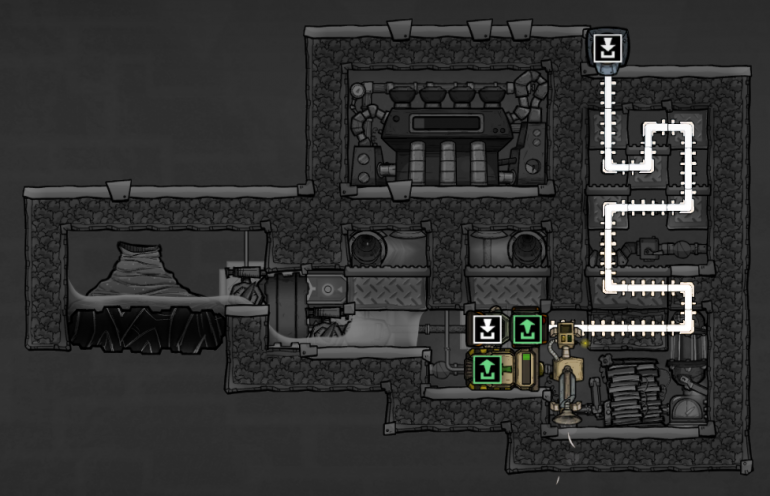
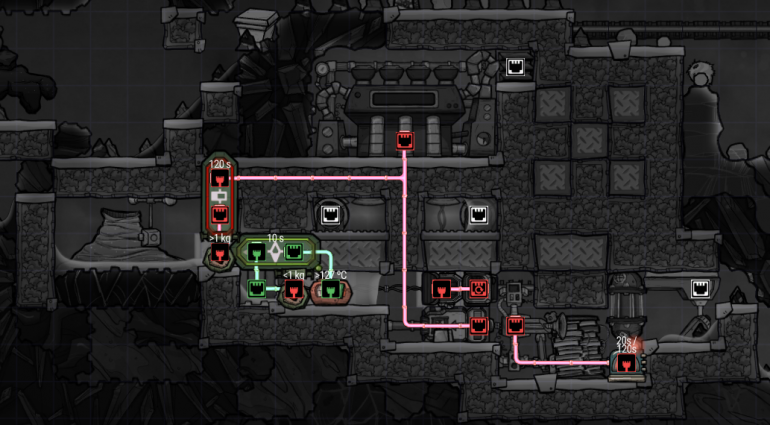
> Auto-drowning Pez Dispenser
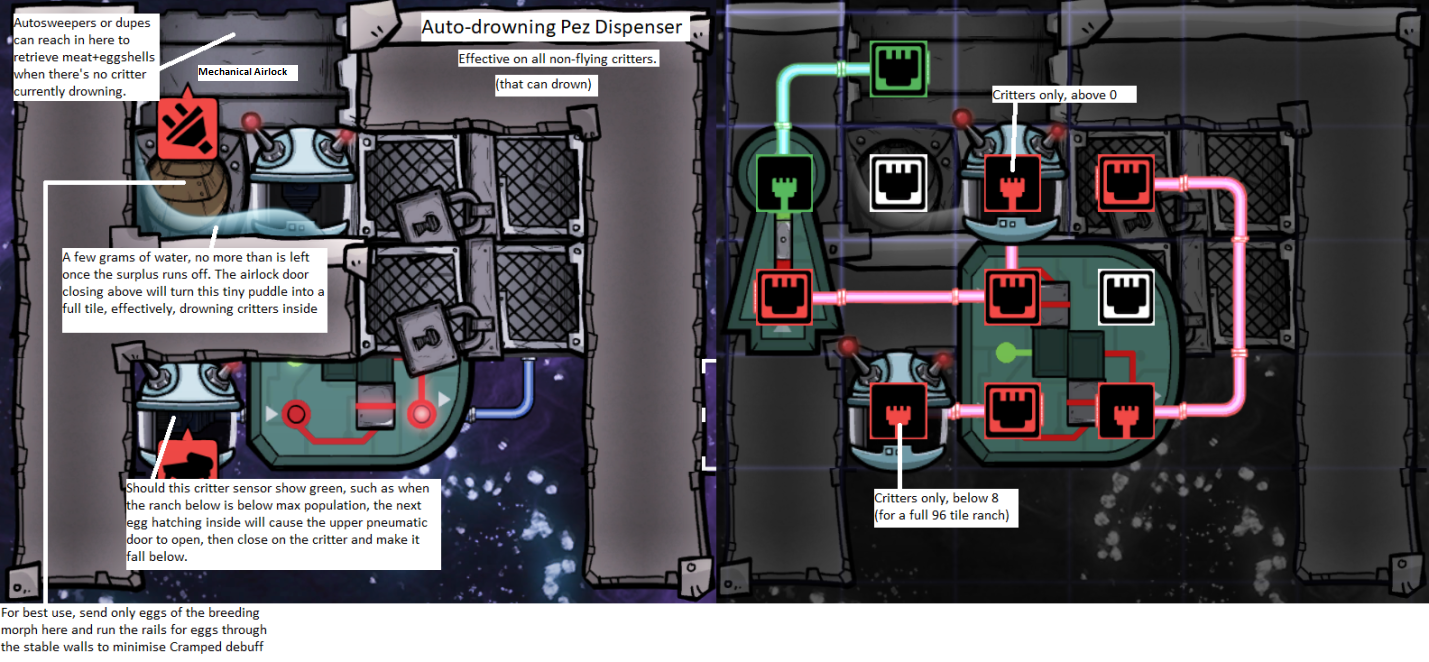
Goal: Dispense critters to a ranch and automatically drown the excess
Author: Ishamoridin
Input: Critter Eggs
Output: Critters dispensed to the ranch, Meat from the excess
To optimize ranches, you want to take eggs out, let them hatch, and re-introduce just enough critters to fill the ranches and drown the rest.
That compact design takes care of both the re-introduction and the drowning with no Dupe labor, and fits perfectly on a tall 4 width ranch that optimizes Dupe walking time.
It works with:
Hatches
Slicksters
Pips, though you will need a wider ranch to plant trees
Dreckos, though the excess is best starvation-ranched in hydrogen to shear them
Divergents (Spaced Out), though you will probably use a wider ranch to house them with plants
Shove Voles do not need taking eggs out since they cannot be cramped.
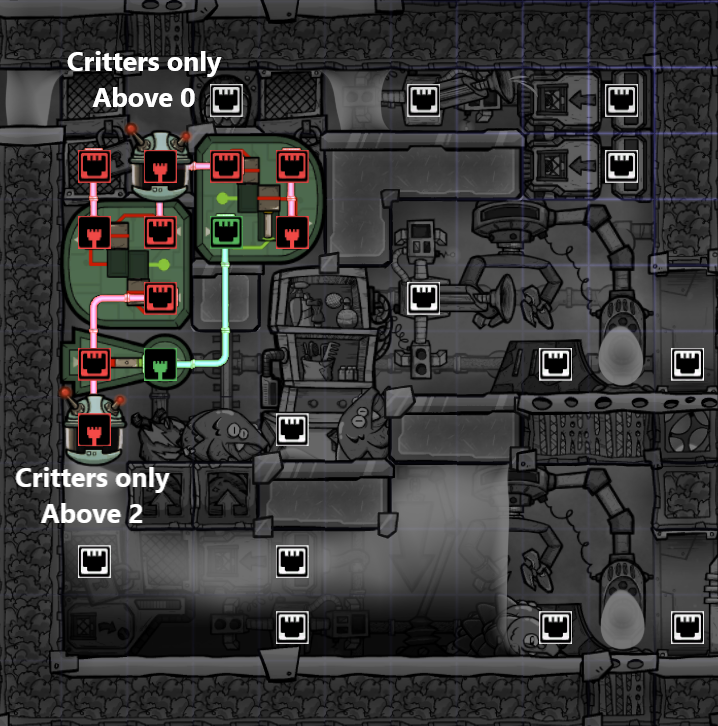
> Drecko: Dreckobox
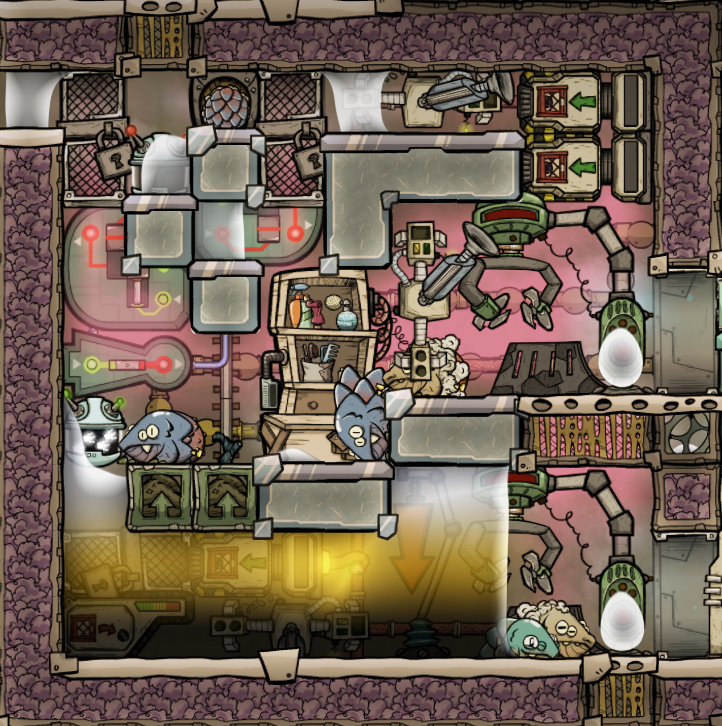
Goal: low-labor drecko stable to produce Reed Fibers and Plastic
Author: Ishamoridin
Input: Dirt for the Mealwood, dupe labor, power for the Shearing Station
Output: Reed Fiber, Plastic, a trickle of Phosphorite, Meat, Eggshells
If you optimize it to the maximum, a Drecko stable only needs breeders grooming and shearing of all dreckos. And since Dupes need to await Drecko at stations before starting operation, you also want to minimize Dreckos pathing.
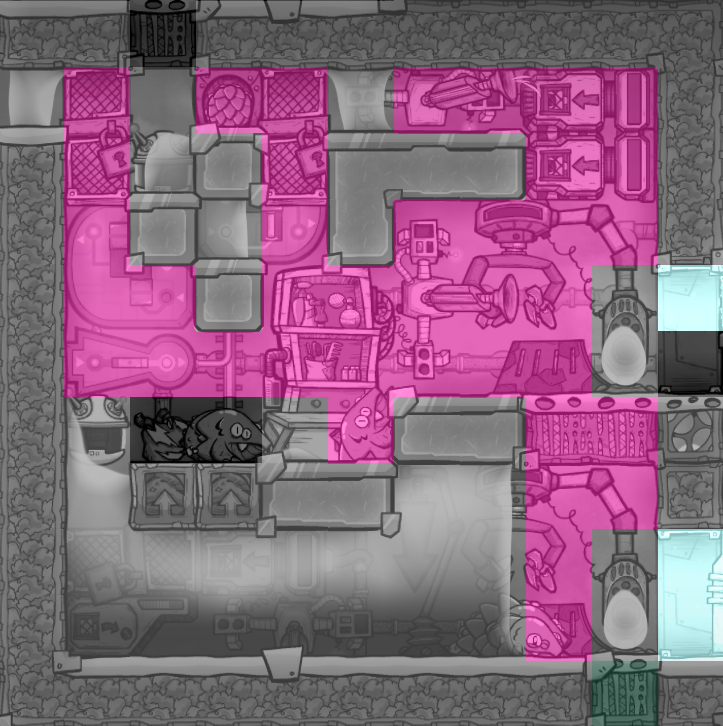
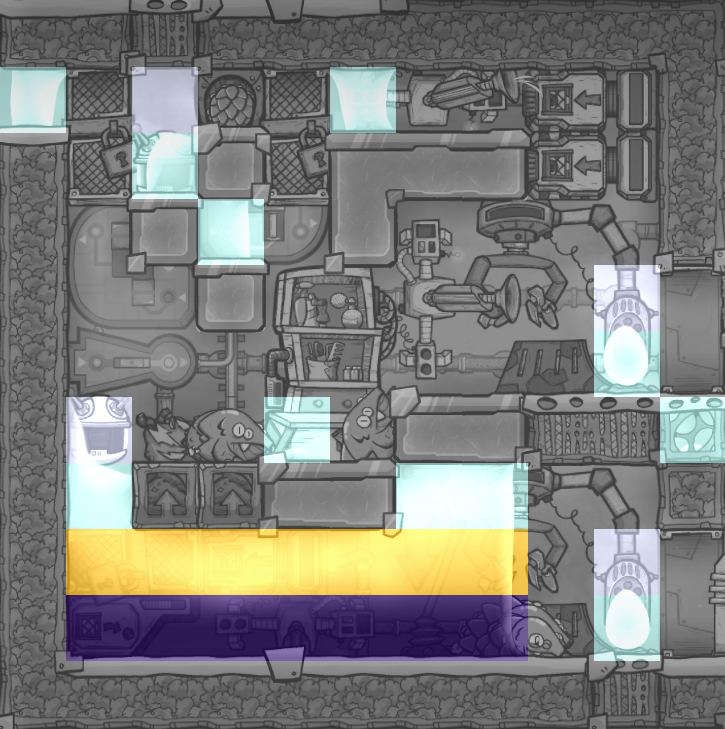
To achieve that, first you build a pez dispenser that lets Dreckos fall either in the breeding chamber or the starvation chamber (for shearing only). Then you restrict their pathing with clever liquids positioning.
The final result is this dreckobox, the pinnacle of Drecko optimization, complete with some eggs for visual flair (the peculiar shape 2 stacked liquids take above airflow tiles):
The liquid loop is there to cool Mealwood, as the box will eat up above 30°C otherwise due to drecko spawning temperature.
> Pacu: Pacubox 3.0

Discord link[discord.com]
Goal: Breed and starvation-ranch Pacus in a small box
Author: both Saturnus and Ishamoridin have worked extensively on improving Pacuboxes, the one displayed is from Saturnus.
Input: Algae/seeds for population growth, then only a bit of power
Output: Eggshells, Seafood
Pacus have the property of always laying an egg before dying as long as they are not cramped or confined, even when tame and not fed.
Pacuboxes use that property by having a single fed breeder to grow the population, and the rest starvation-ranched to provide an infinite source of Eggshells (for Lime) and Seafood (for Cooked Seafood then Surf'n'Turf). Once you reach your population goal, you can stop feeding the breeder.
This is the pinnacle of Pacuboxes, after numerous improvements, in a 5x5 box with no unused cell.
See also, the Aquamaton from Saturnus[forums.kleientertainment.com] , a massively complex build that have double breeders (contrary to Pacuboxes which are single breeder)
> Incubator Automation: SSAI
Main article
Goal: minimize a powered incubator power consumption
Author: Linkitch
Input: ~10/20W average per Incubator rather than 240W, Dupe labor
Output: Lullabied eggs (4x faster incubation rate), Husbandry training
Incubators use power all the time, not only when being operated, but it's only useful to provide them power when they need to be used (to generate the errand) and when in operation, as the buff is applied on the egg and continues to work even when the incubator is disabled / doesn't have power.
Since the lullabied buff is for a fixed 600 seconds (a full cycle), some simple automation can be used to disable it for 600 seconds after a Dupe has spent more than 5 seconds on the pressure plate to operate the incubator.
Right of the text is the compressed version which allows putting several incubators side-by-side. Below are the automation details.
Warning: because of this bug[forums.kleientertainment.com] , the automation won't count exactly 600 seconds. It's mostly close enough not to matter, but if you want more precise control, use a water clock[forums.kleientertainment.com] .
Bases Design
> 8 Dupes Self-sufficient Base: Spicy Tofu Bunkhouse
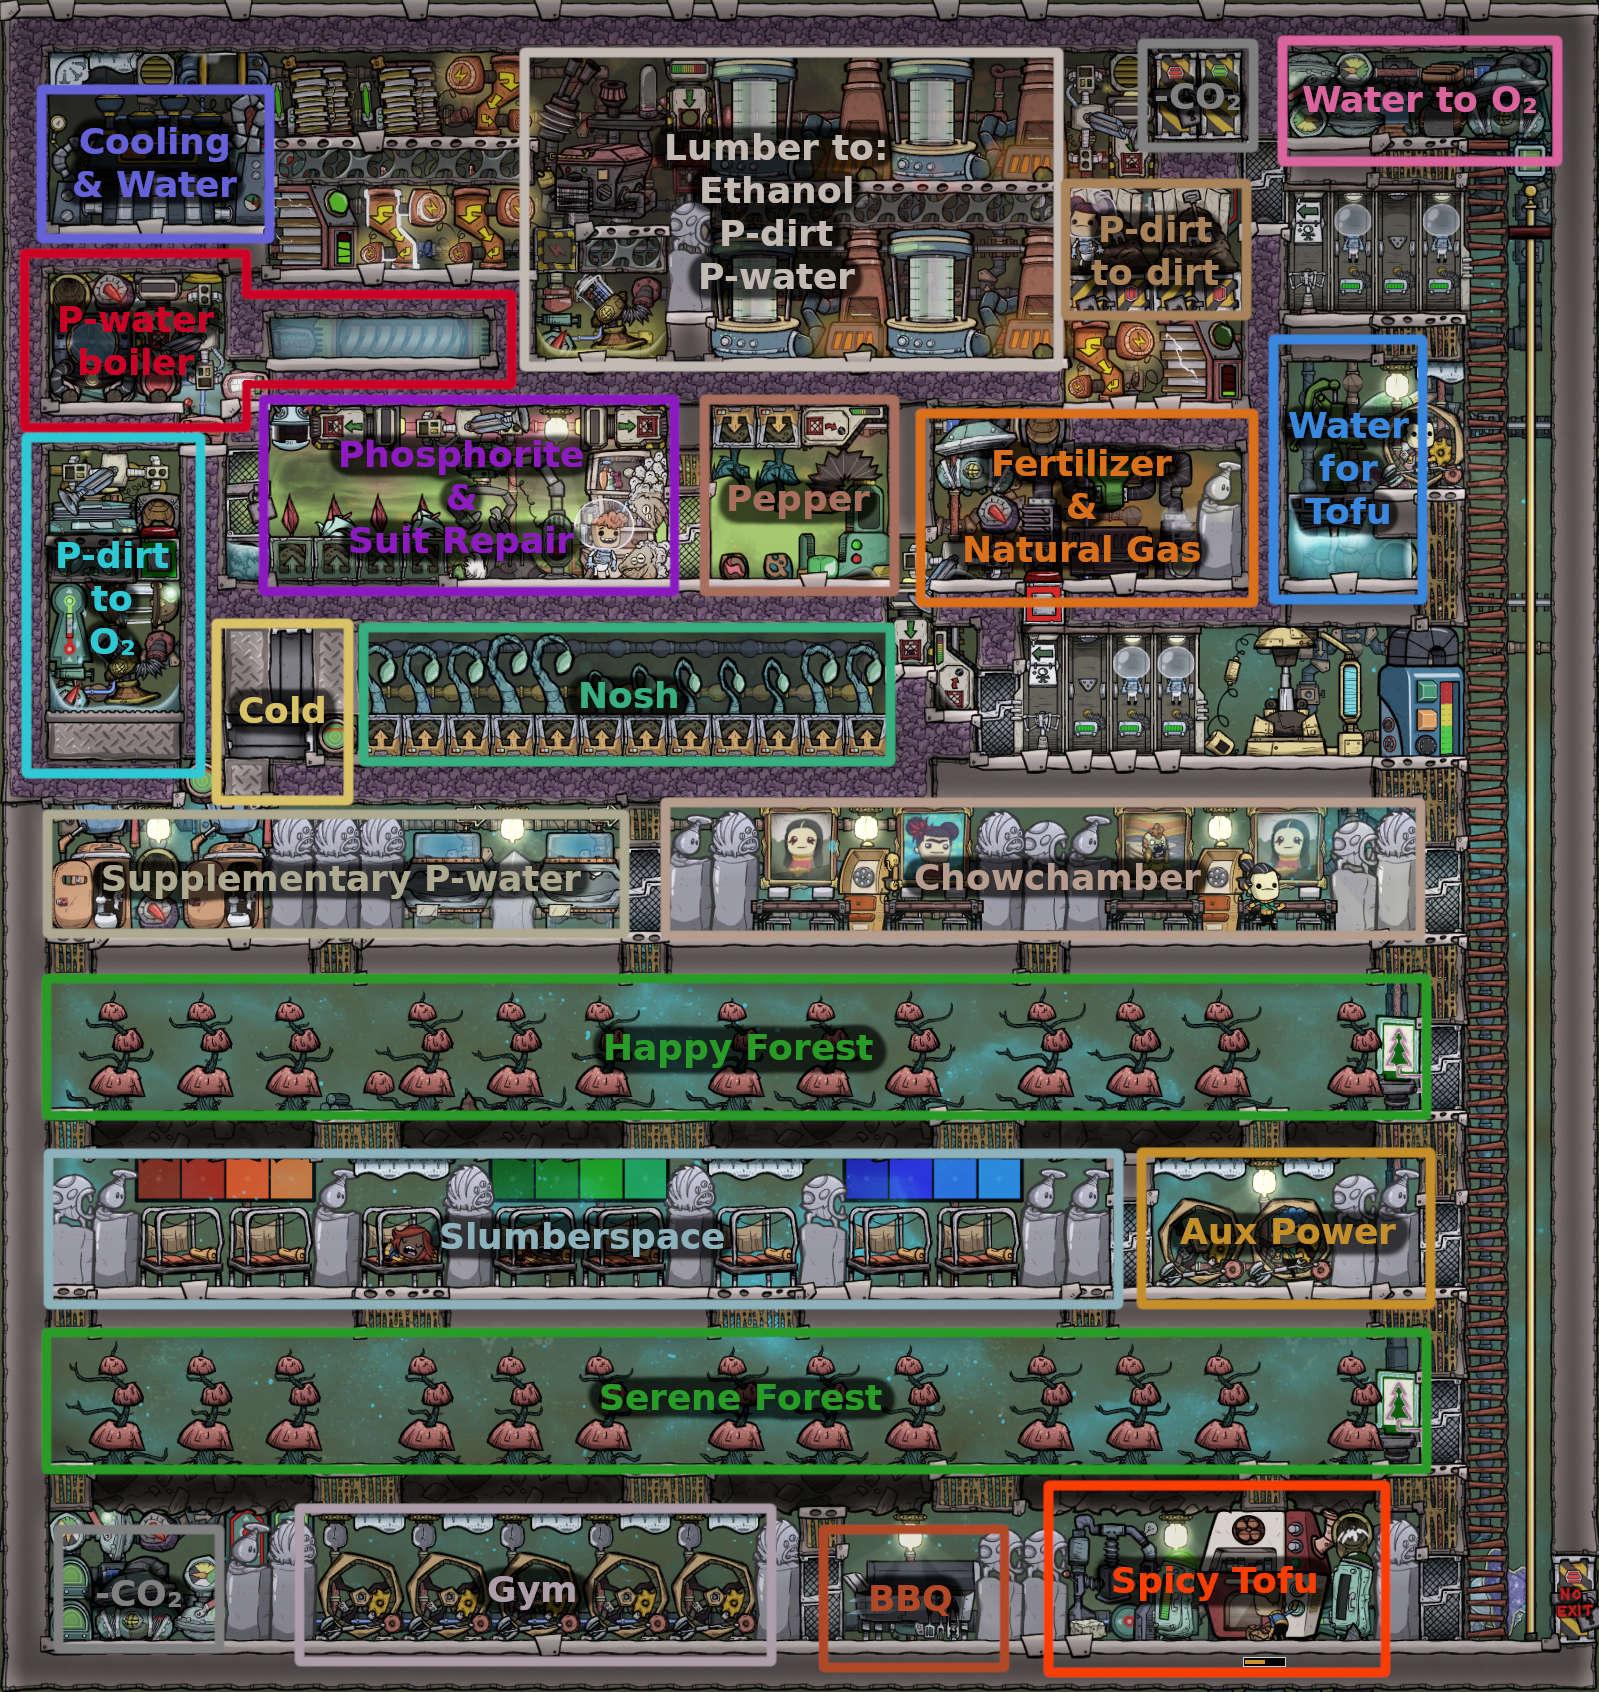
Main article[forums.kleientertainment.com]
Goal: house 8 Dupes in a fully self-sufficient base
Author: Yobbo
Input: None
Output: small amounts of Water, Hydrogen, Phosphorite, Fertilizer, Natural Gas, trace amounts of Reed fiber, Balm lily, Pepper seeds, Nosh beans, BBQ, Egg shell.
Using an ethanol loop with 24 wild-planted Arbor Trees as its base (here there are 26, the 2 extra are for safety), you can get 750g/s Polluted Water and 1.33kg/s Polluted Dirt, by using Lumber in Ethanol Distillers to get Polluted Dirt and Ethanol, and burning Ethanol in a Petroleum Generator to get Power and Polluted Water.
This base uses that resource creation cycle to power the base, oxygenate Dupes using a Sublimation Station with the Polluted Dirt and feed them using a varied diet.
It measures 36x38 cells, walls included.
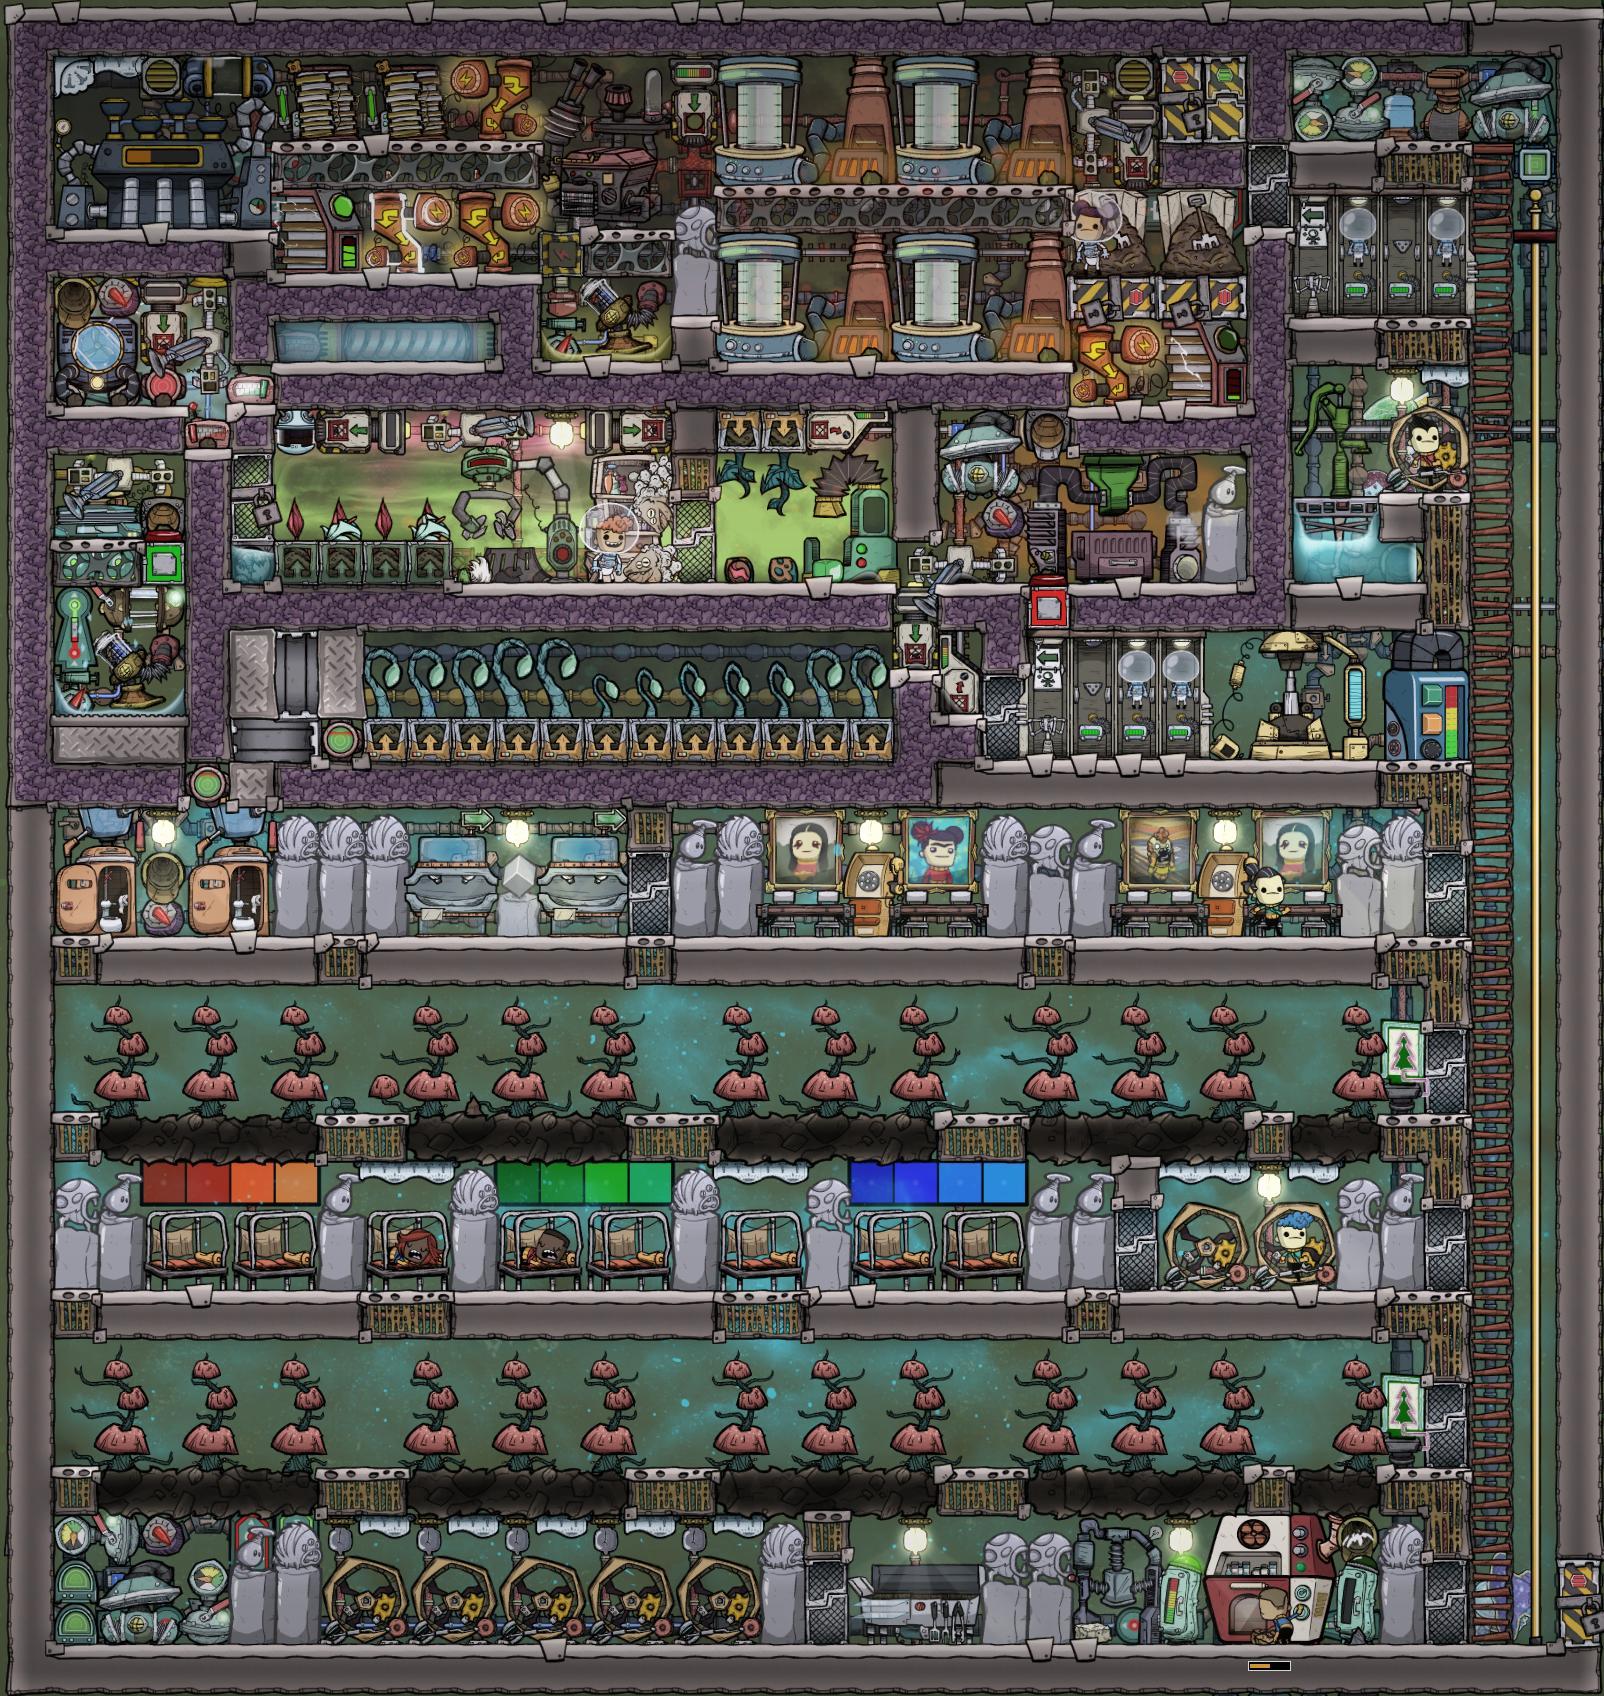
> 24 Dupes Core Base
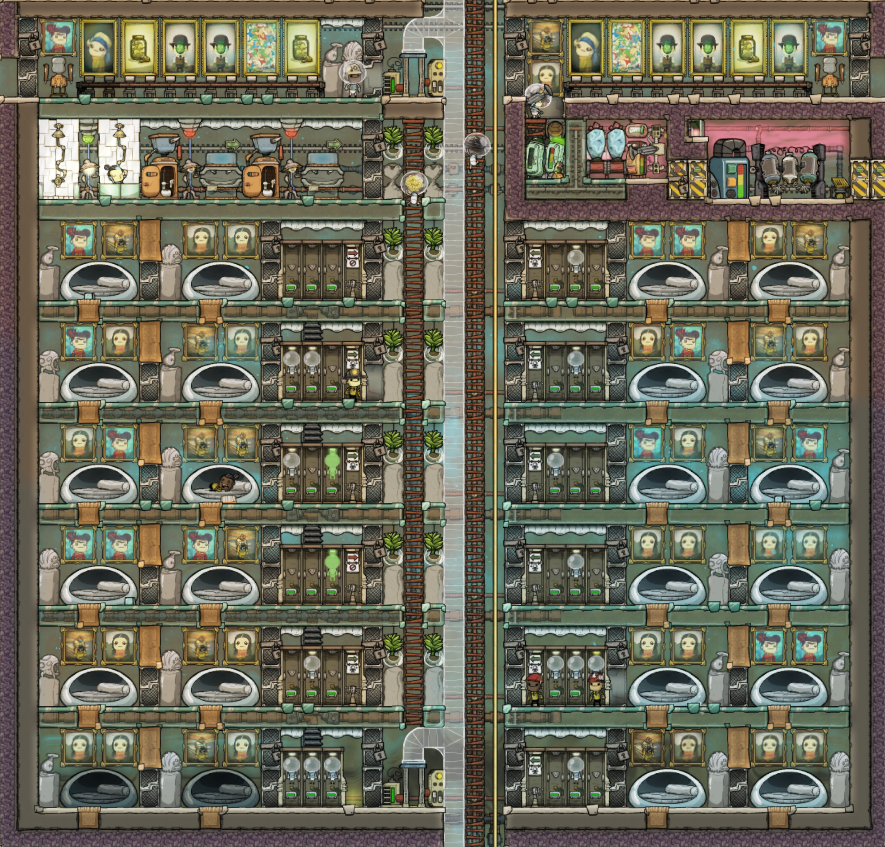
Goal: House 24 Dupes with all the basics (food, toilets, perma-suits)
Author: Fradow
Input: Food, Oxygen, Filtration medium
Output: 24 Happy dupes
This is a base that focuses on keeping Duplicants happy with decor-spamming and almost all the time in atmo suits, except when they sleep. There are 3 Atmo Suits per 2 Dupes to avoid trapped alert when a Dupe just hanged a suit to go to sleep.
The deep-freeze setup is a bit clunky because it had to be retro-fitted after Mergedown and wasn't originally planned.
There are a few details that could be improved here and there, but overall it does a nice job of minimizing travel time by keeping every room for core needs together.
Miscellaneous
> LOX/LH: Integrated Rocket Refueler

Goal: transform water into usable Hydrogen rocket fuel
Author: Hotep Thunderbolt
Input: Water, Power
Output: Liquid Oxygen, Liquid Hydrogen
This advanced build ties together a 4-headed Hydra with LOX/LH making.
By inputting gases in the liquefaction chambers via door pumps rather than gas pumps, it eliminates one of the main power consumers of such builds. Indeed, as Supercoolant ATSTs are nearly power neutral, the main power consumption in LOX/LH builds come from pumps.
> Sour Gas Boiler
Main article[forums.kleientertainment.com]
Goal: Sour Gas boiling: Crude Oil => Sour Gas => Natural Gas => Power + Water
Author: Yobbo
Input: 3.33kg/s Crude Oil (one Oil Well worth)
Output: 1.65kg/s Water (0.65kg/s excess after feeding the Oil Well), 1.11kg/s Sulfur and 0.55kg/s CO2
Sour Gas boiling is often considered a vanity project, as Petroleum boiling is easier and more than enough for most reasonable purposes. If for some reason you want more Power and/or excess Water, you need to engage into Sour Gas boiling, which is a loop consisting of:
Extracting Crude Oil from an Oil Well: 1kg/s Water => 3.3333kg/s Crude Oil
Boiling this Crude Oil to Sour Gas by heating it up to ~540°C: you get 3.33kg/s Sour Gas
Condensing this Sour Gas to Methane by cooling it down to ~165°C: you get 2.22kg/s Methane and 1.11kg/s waste Sulfur
Slightly heating up this Methane again to Natural Gas (above -160°C): you get 2.22kg/s Natural Gas
After dumping some heat in it, burning the Natural Gas in generators: you get 18KW and 1.66kg/s of Polluted Water
Boiling the Polluted Water to Steam: you get 1.65kg/s Steam and trace amounts of Dirt
Condensing this Steam with Steam Turbines: you get 1.65kg/s Water
Feeding 1kg/s of that Water to the Oil Well to complete the loop: you still have 0.65kg/s excess Water.This build does step 2 to 8, only leaving you the Oil Well extraction to perform.
All overlays are important, but to keep that part readable I only included the most important. Please see the main article for the rest and more detailed explanations.
Do you want a no-compromise 10kg/s Sour Gas boiler? See NurdRage OHSA's Revenge[forums.kleientertainment.com] .
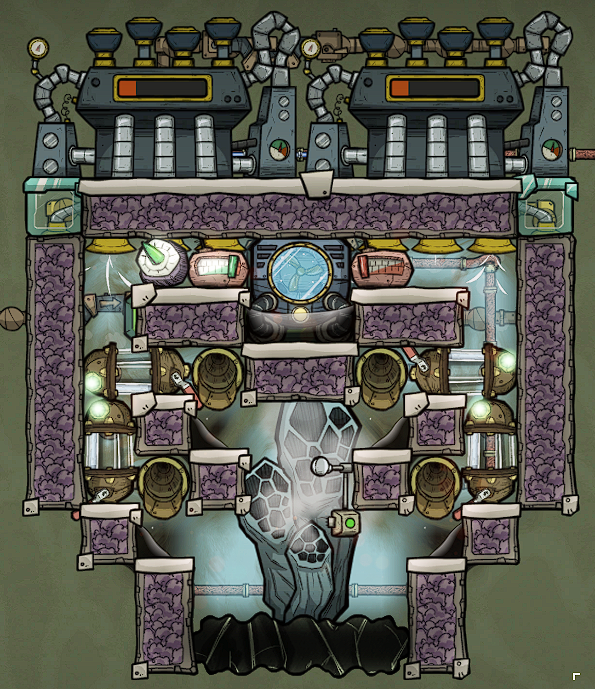
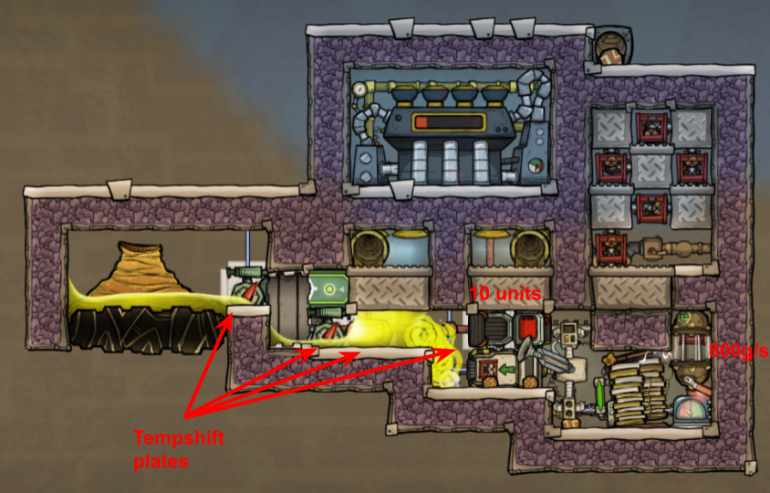
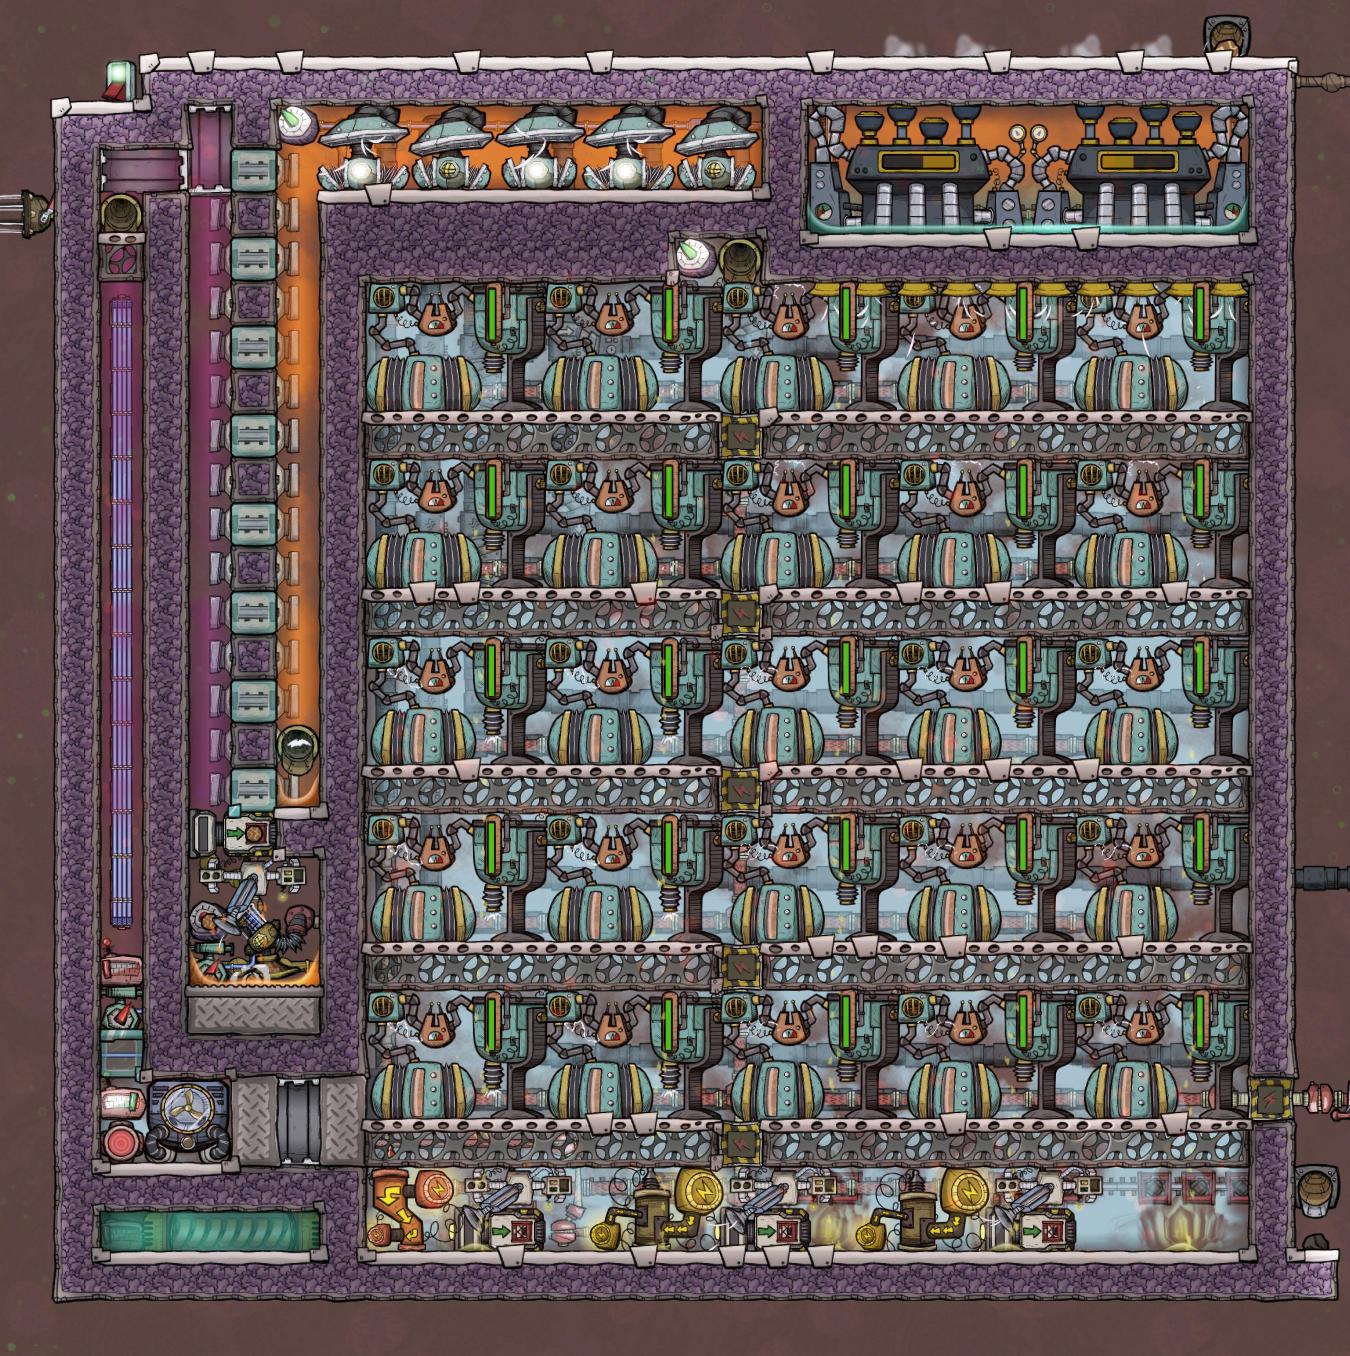
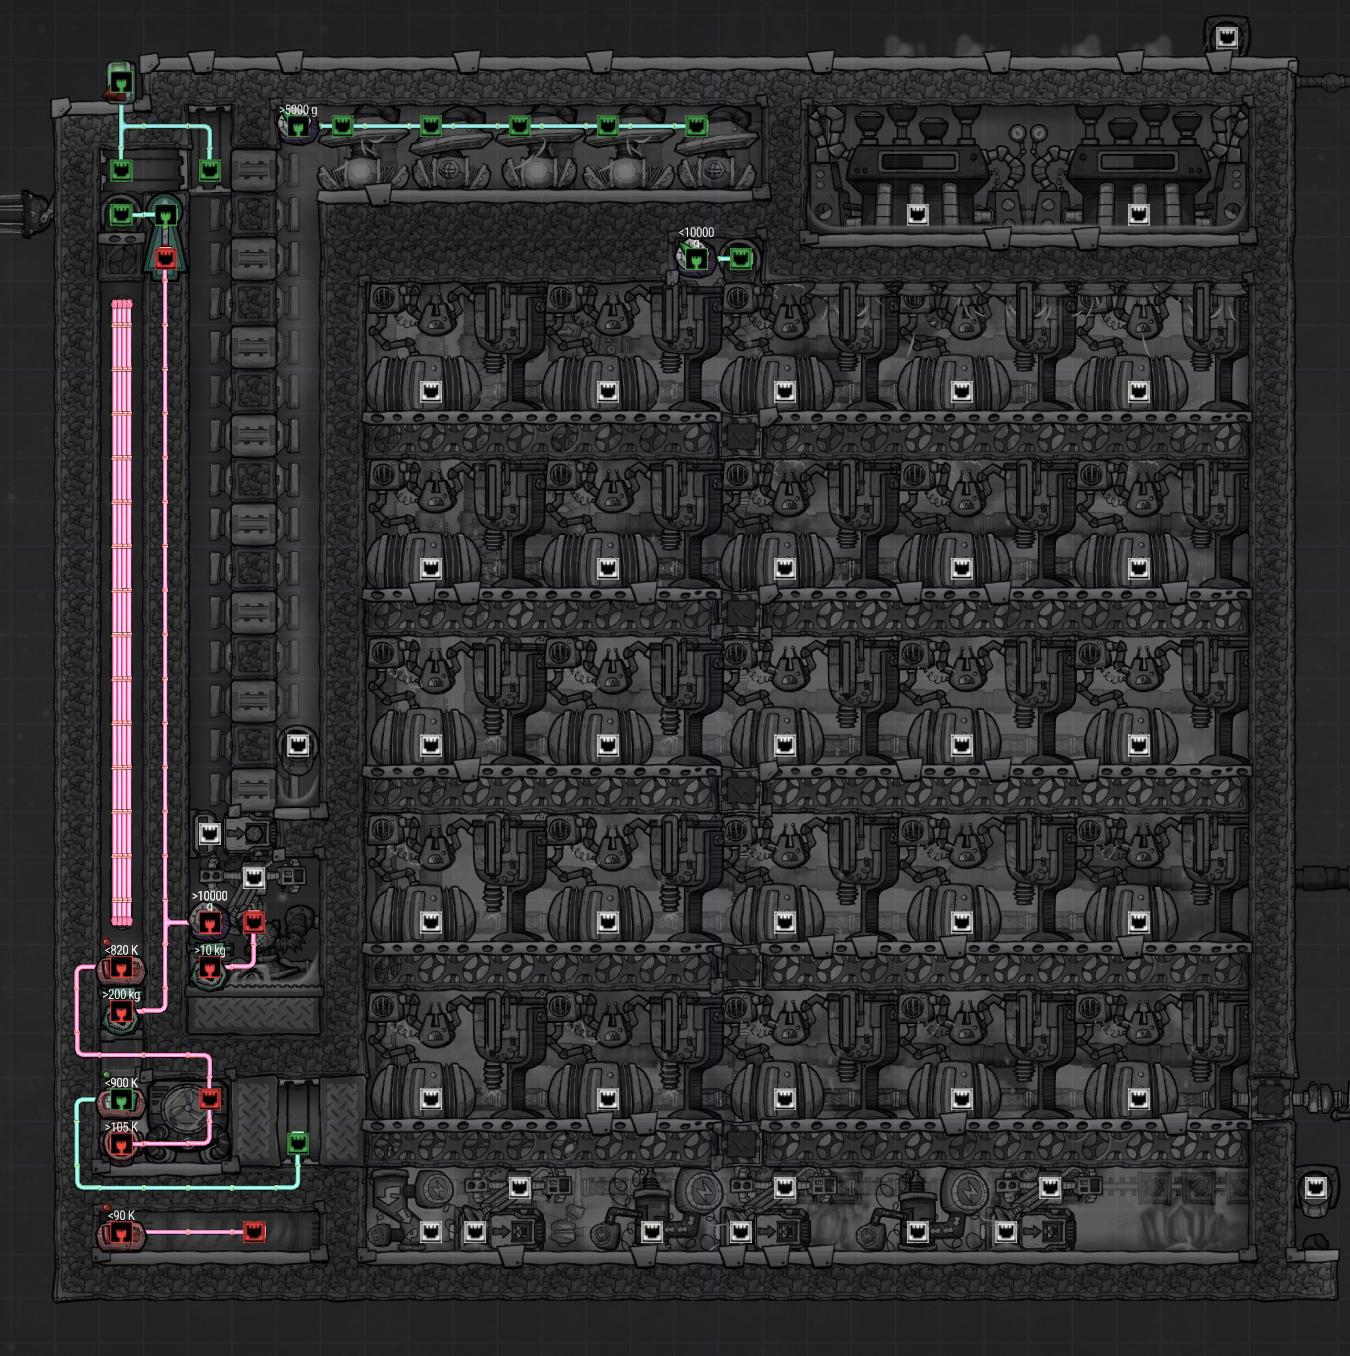
> Experiment 52B: Exspilement
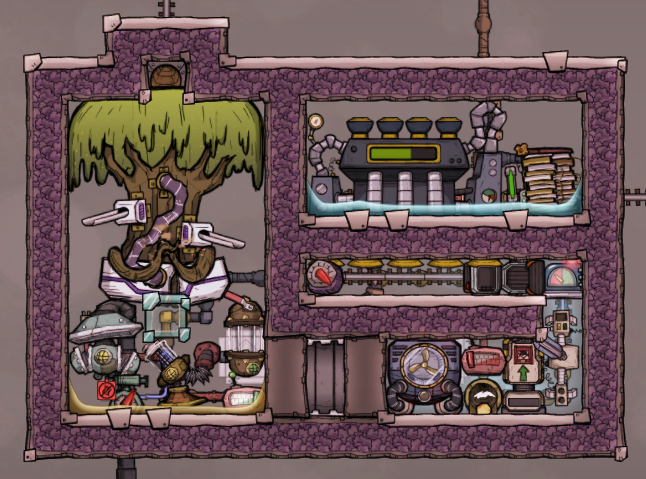
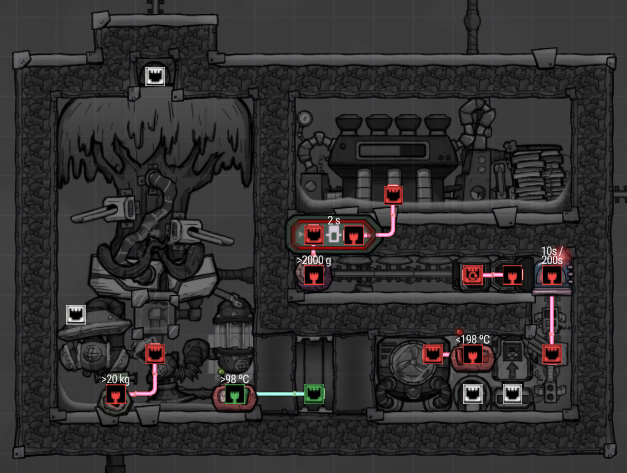
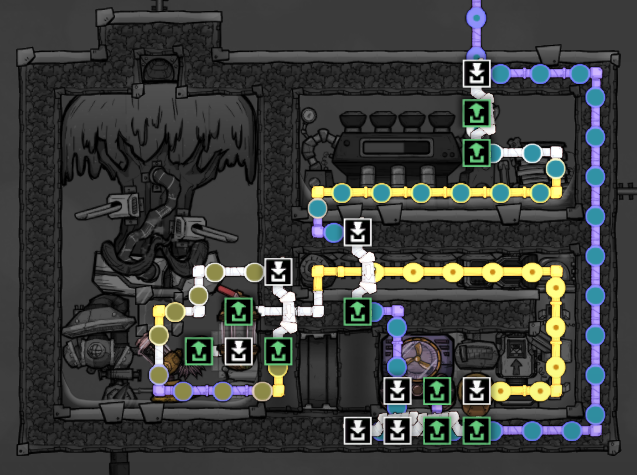

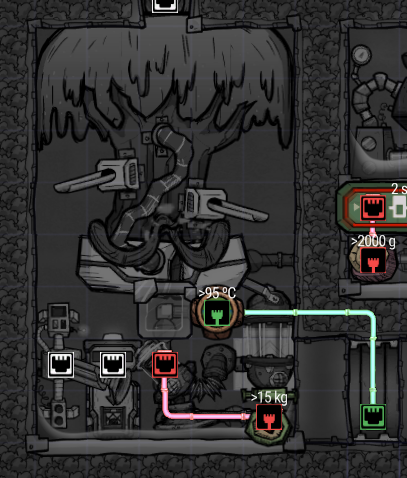
Main article[forums.kleientertainment.com]
Goal: Self-powered Experiment 52B tamer that transforms Food into Water + Isoresin
Author: Fradow
Input: Food, up to Experiment 52B limit
Output: Water + Isoresin, scaling with food input calories
The goal of this setup is to tame the Experiment 52B that spawns on the Marshy Asteroid, and use the heat creation that happens when Resin is boiled to recoup that boiling cost.
This involves using the 10% of pipe capacity mechanic, and having a very small counterflow in the Steam chamber, as well as pining the tree to 95°C to 100°C to reduce the boiling cost.
After initializing the setup, it's better to ship Rot Pile out rather than wait for it to transform to Polluted Dirt and off-gas, that's why I revised the left part to use an Auto-sweeper and Conveyor Loader.
A tweak to the automation had to be made to allow both those buildings, by measuring Pipes temperature rather than Resin temperature.
> Naphtha Production
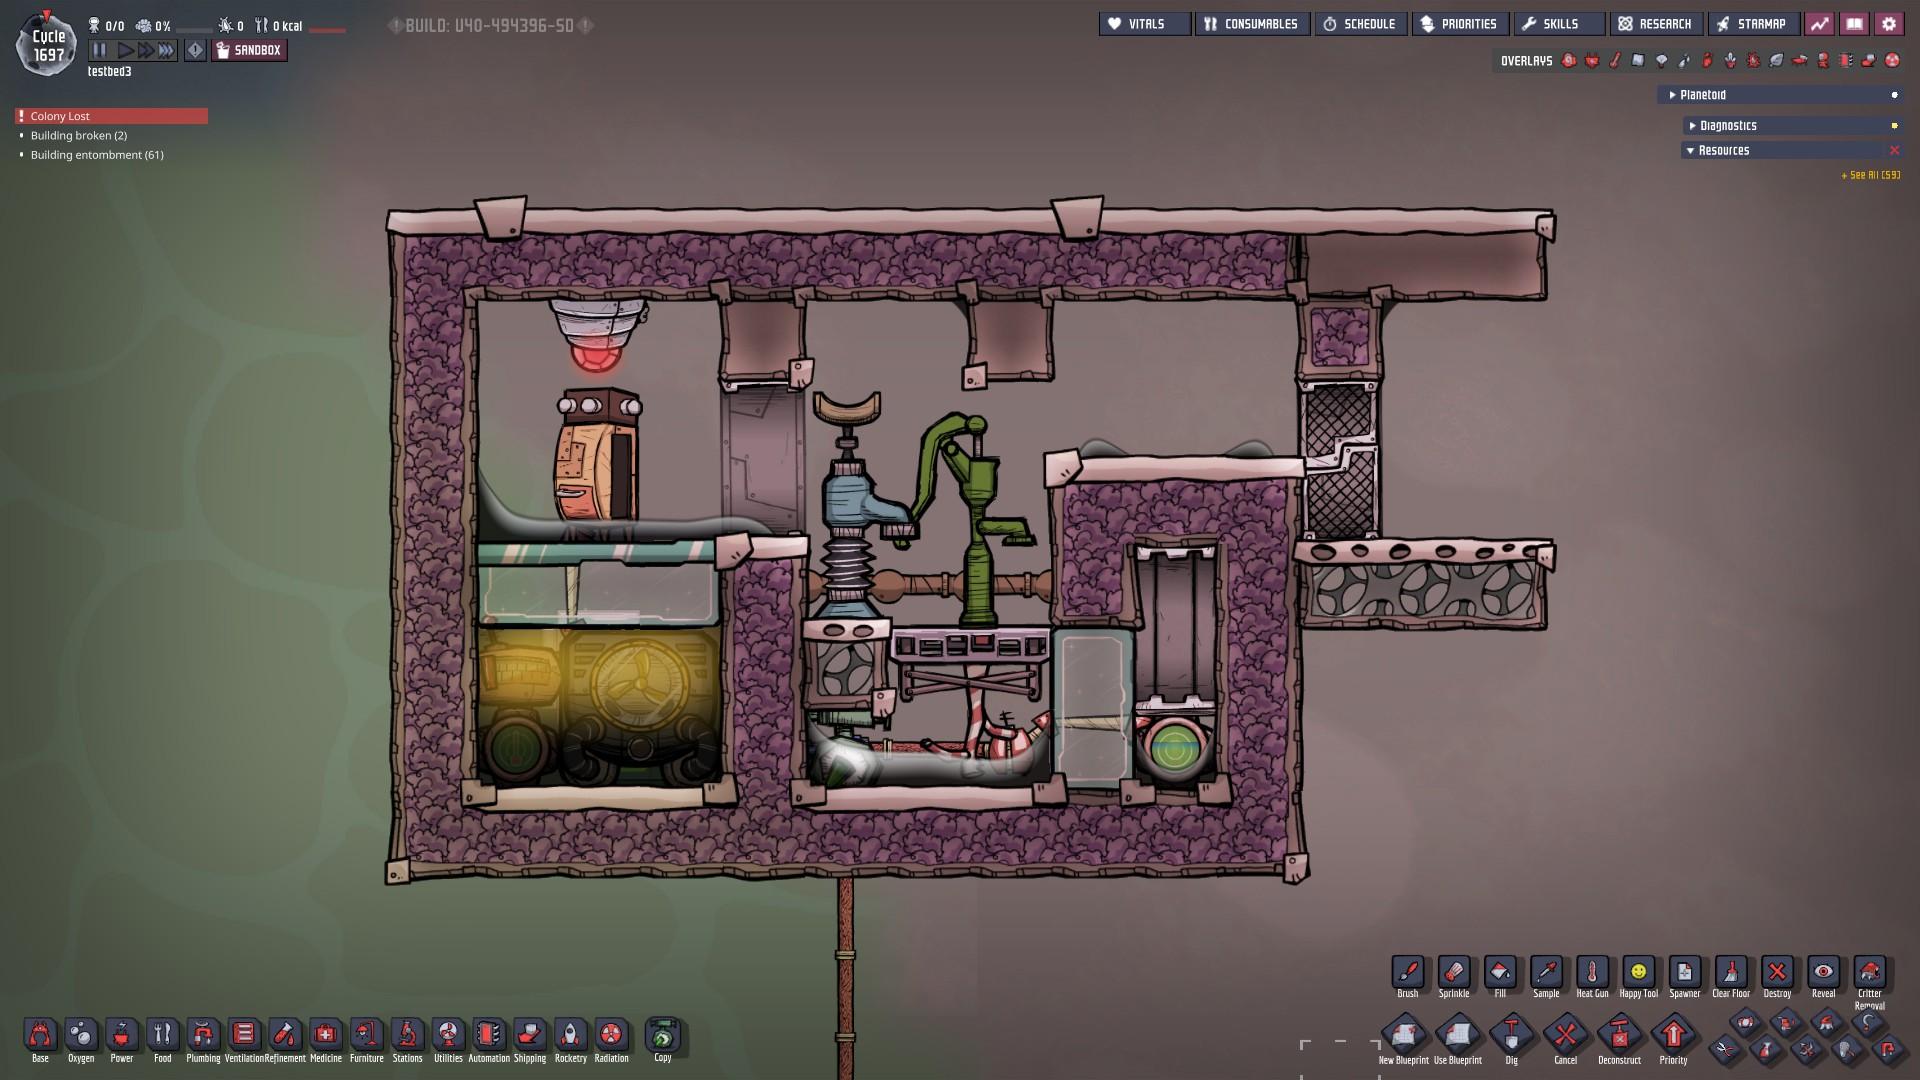
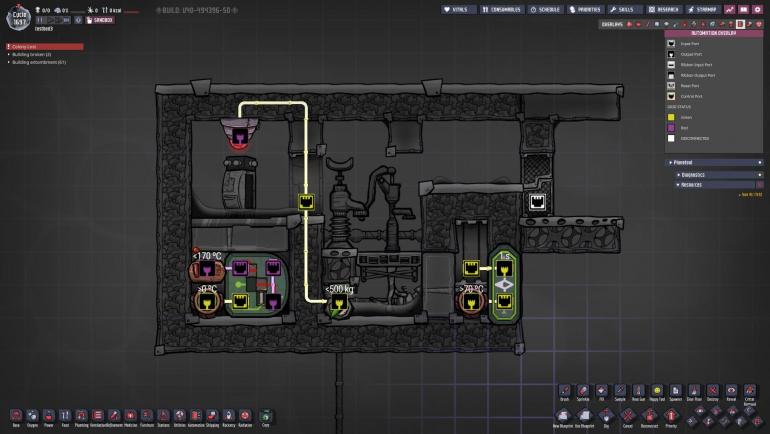
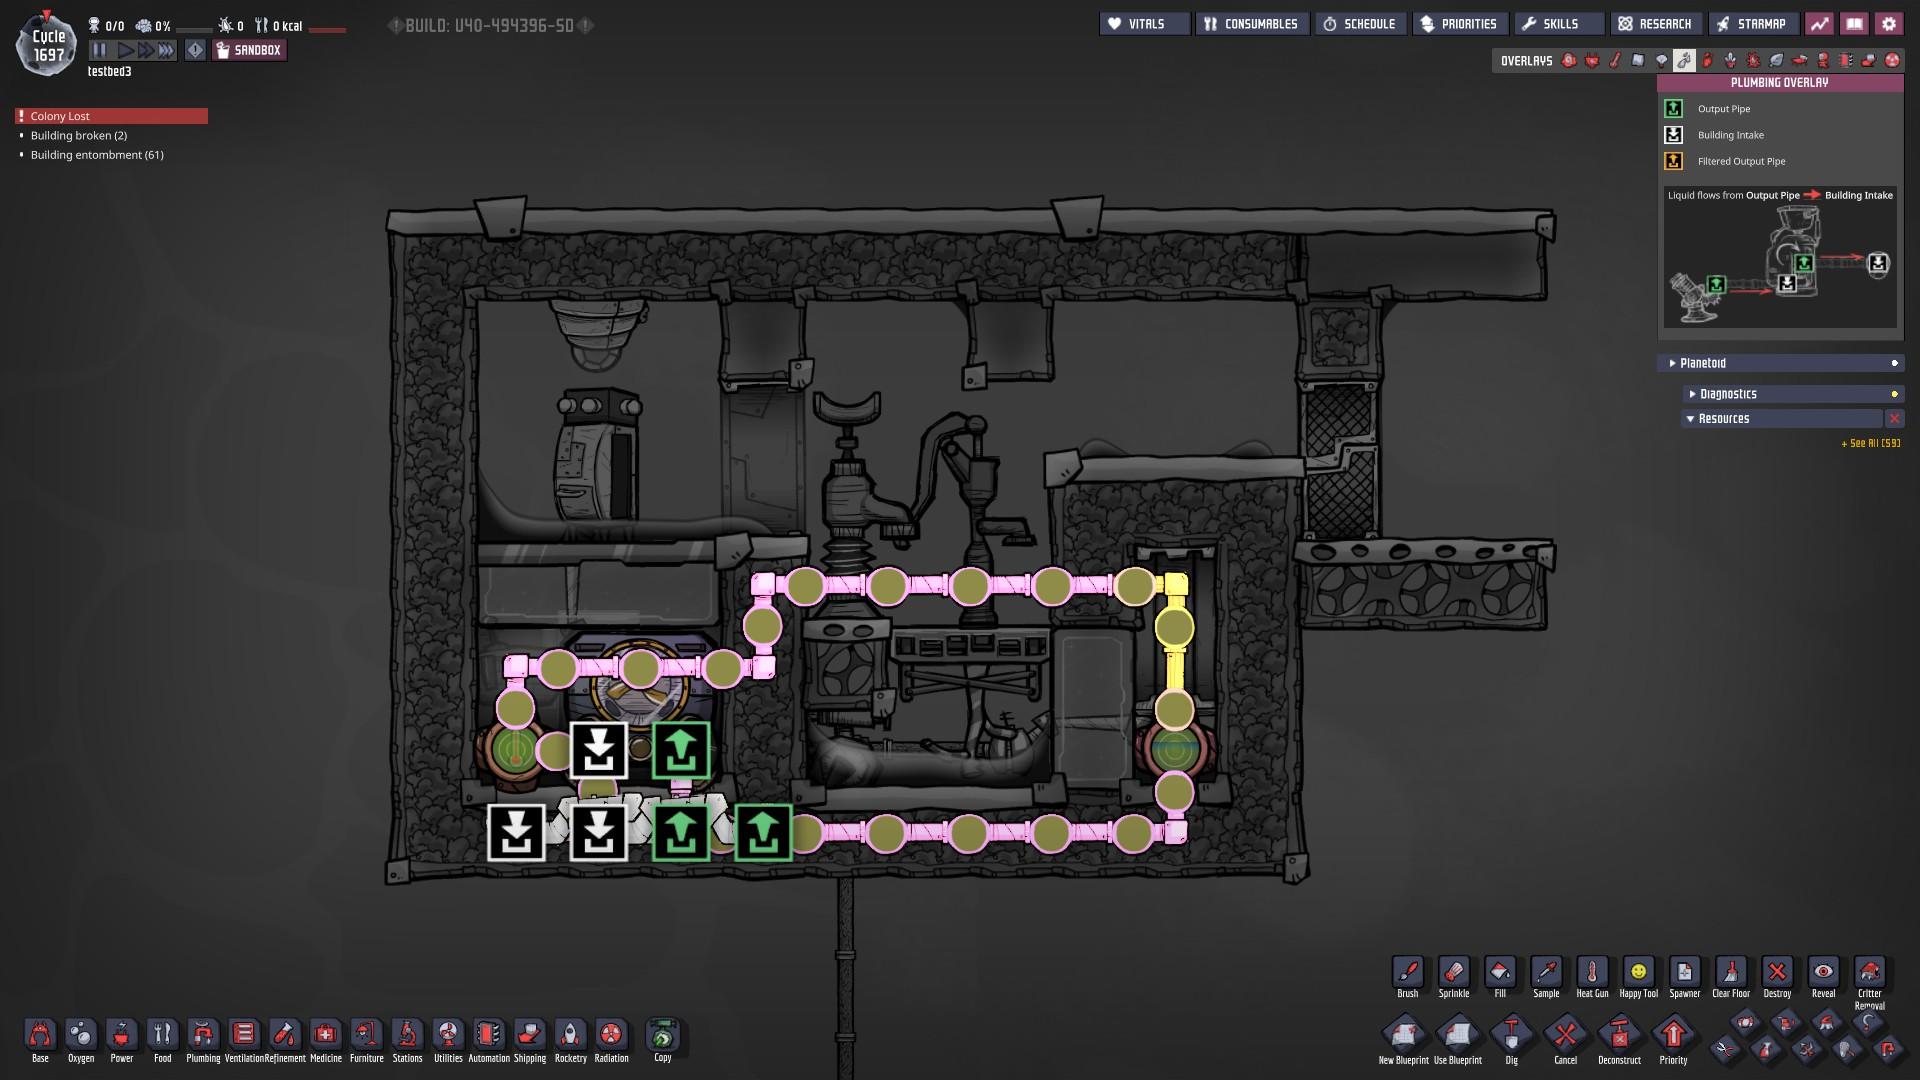
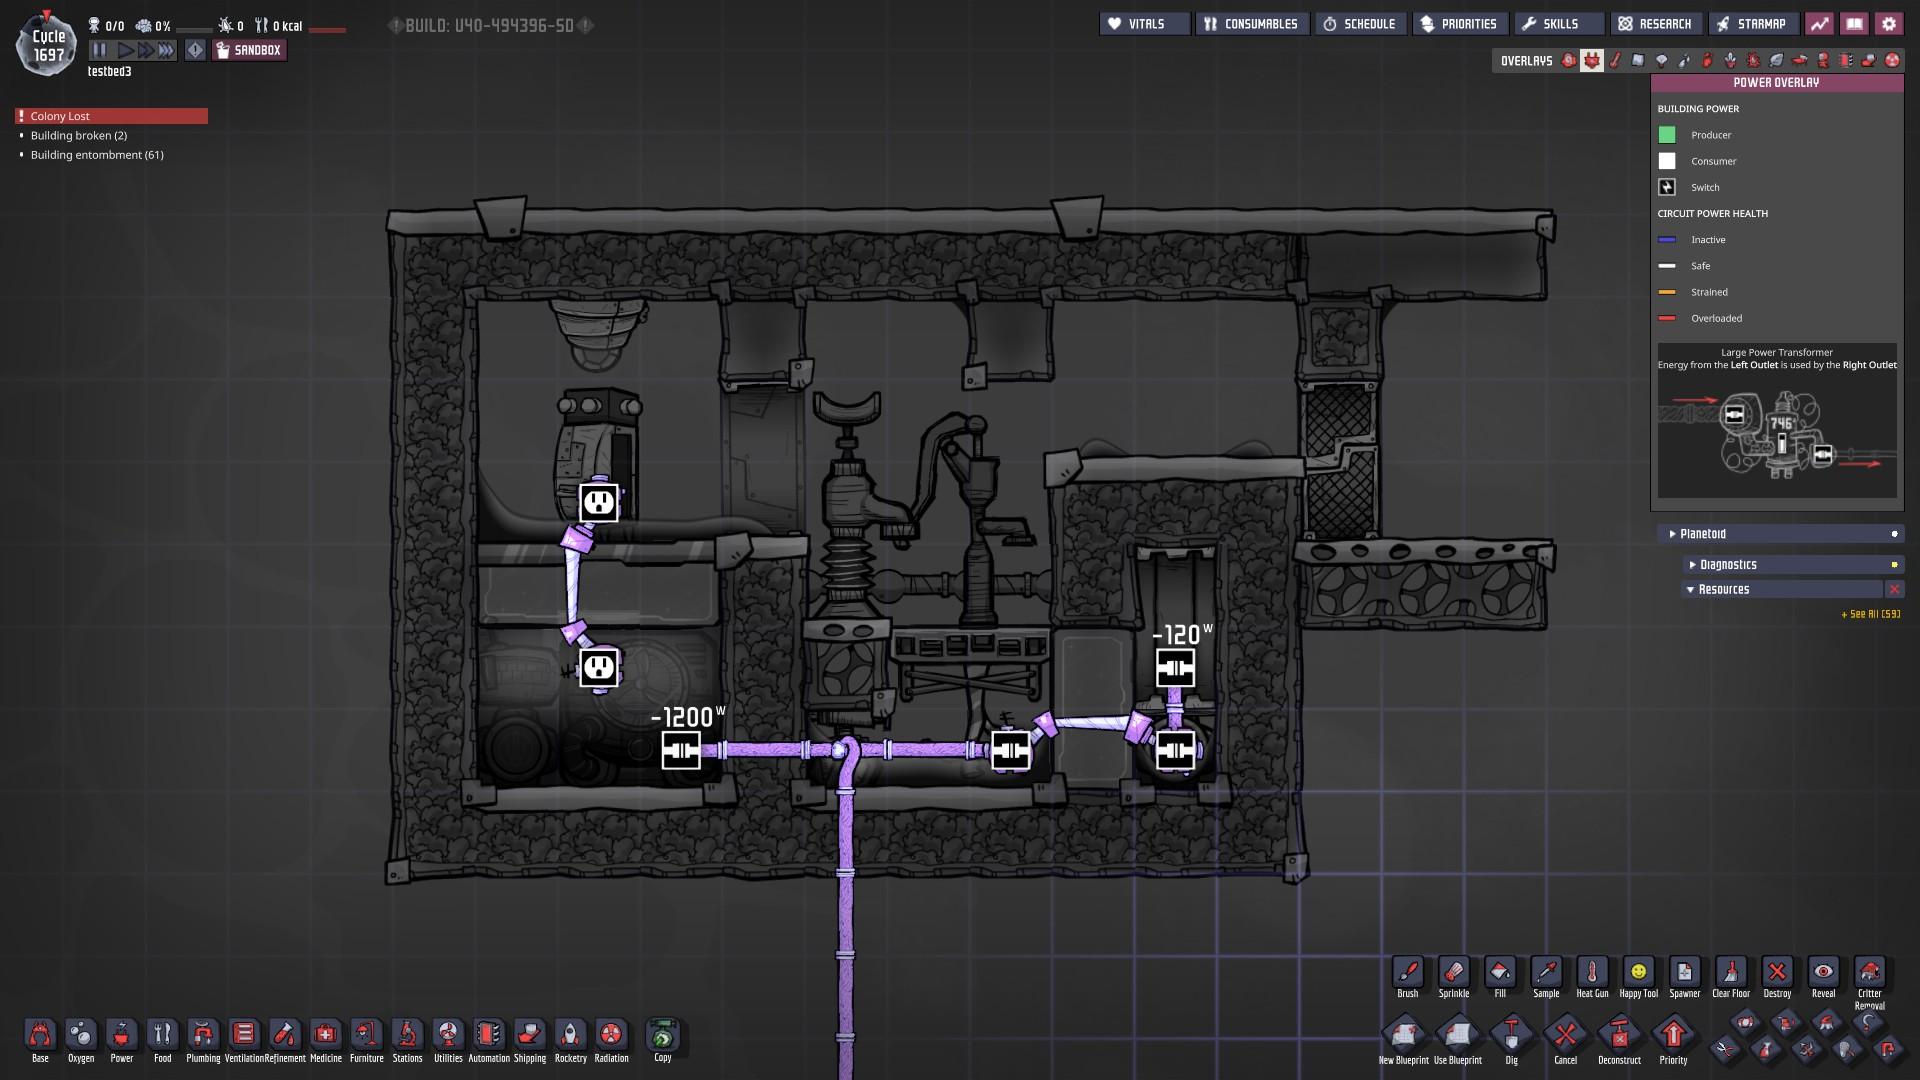
Main article[forums.kleientertainment.com]
Goal: melt some Plastic into Naphtha
Author: Occam Blazer
Input: Plastic, Dupe Labor, power
Output: Naphtha bottles
Naphtha is a useful but a bit underrated resource, because melting Plastic in a controlled manner is not intuitive.
This build takes care of the controlled manner, making Naphtha easy to produce, so it can be used in various endeavors: as an additional layer for any liquid stacking, as a replacement for petroleum when you need a liquid with a large temperature range, as an insulator thanks to its low TC...
The storage bin should be set to a low amount to melt it fast enough, like 50kg, and sweep-only to avoid using too much plastic.
Note that the build uses some power bridges for heat transfer: those bridges are required at those specific places.
Conclusion
That's it for now, feel free to leave a comment if I made a mistake, or to suggest a new build to be added to this guide.
Stay tuned for more builds, I'll definitely be adding more interesting builds as I discover them.
Special thanks to all the super-friendly guys in the Unofficial ONI Discord[discord.gg] ] who contributed to those builds, in one way or another.
Happy building!
Source: https://steamcommunity.com/sharedfiles/filedetails/?id=2736463085
More Oxygen Not Included guilds
- All Guilds
- Fully Automated Drecko Ranching
- Easy Kitchen and "Core Base" Guide
- Oxygen Not Included - Useful Construction Patterns
- Oxygen Not Included - Ultimate Gas Weight Guide
- Oxygen Not Included - Liquid / Gas Valve Guide
- Oxygen Not Included - Gameplay Tips
- Oxygen Not Included - Stress (How to Handle It)
- Oxygen Not Included - Surviving the Late-Game
- Oxygen Not Included - Asteroid Spawn Seeds