
Introduction
In Nebulous: Fleet Command, the ANS faction’s Mk600 Beam Cannon and Mk610 Beam Turret are the two most powerful weapons that can be mounted on a ship. Boasting a base armor penetration value of 180 centimeters per second and a base damage value of 300 damage per second they are unmatched in terms of sheer destructive potential. Make no mistake, these are weapons of terror. Their raw power is counterbalanced by an exceptionally short maximum range compared to any other weapon. This short range makes the beam weapons tricky to use effectively, but when wielded by a skilled commander they can single-handedly change the tide of a game. This guide will provide information about the fundamental mechanics, tactics and strategy to master beams. It is up to you to put it into practice.
Notes For The Impatient
Buffing Energy Regulators (Ereg) make you shoot faster, and have diminishing returns beyond 3 or 4
Focused Particle Accelerators (FPA) make you shoot harder (more penetration and damage) but shorter duration, same diminishing returns, recommend min 1 FPA to be viable to kill anything above tug, 2 is ideal
Beam Turret (Axford, Solomon) 5k range, effective below 4k
Turns slow, consider 1x mount gyro but not necessary with pre-aim
Battleshort causes damage and debuffs fast, but tap firing makes you discharge partial loads which is good for killing small stuff
Can battleshort harder on Axford due to increased max dc repair
Beam Spinal (Keystone) 6k range, effective below 5k
Raider drive for main fleets, dragonfly for goalie (raider has a higher first shot hit probability, dragonfly is better at reacting to opportunities/ambush)
Can hold battleshort for much longer, consider battleshort as ammunition - remember to click DC priority on the beam when shorting
Manage traversal, cut speed and avoid being on tangent with enemy where possible, slow to 1/3 if beam isn't keeping up
Tapping battleshort can improve alignment due to small inherent gimbal (use if gunner spazzing)
General Notes Winning with beam is positioning based, play either to directly go all in or to zone
When going all in, consider stealth and always hard commit to targets (do or die)
When zoning, simply exist and allow the enemy to know they will get beamed if they fight you, force them to go around you (typically in middle of map is best)
Fundamental Beam Mechanics
The raw game mechanics behind the beam are deceptive. On paper they have the highest DPS in the game but as will be explained shortly there are several hidden mechanics that can take their phenomenal power and quench it to mediocrity. In addition, they have the most powerful battleshort ability in the game, and when mounted on a Keystone can fire for very long periods of time.
Damage Frequency, Falloff, Damage Thresholds and Buffing ModulesThere are three major mechanics that interact to temper the damage output of a beam. These are: the frequency at which it applies damage, a hidden power falloff that reduces the damage the further away the target is, and the damage threshold property of the hit component. The damage reduction of a targeted hull is also an important consideration but it is not one of the fundamental mechanics.
Building an intuition for how much damage a beam does against a given target at a given range is critical to maximizing the effect on a battle. This is the most complicated section of the guide, but it is the fundamental building block to effective beam use. I have created a tool to assist with this intuition https://rocketpuppy.github.io/Nebulous-Fleet-Command-Minmax-Tool/damage.html#beam. Feel free to explore with that tool and come back to this section later for all of the details.
Damage ThresholdsEach component in the game has a listed “Damage Threshold” value. This value is a measure of how much damage that component can take in a single hit without being destroyed. Even if the component has zero hit points, if the hit is not over the damage threshold value the component will not be destroyed. For example, a Basic CIC has a damage threshold of 25. If the Basic CIC had 10 hit points and was hit for 25 damage it would have 0 hit points, but it would not be destroyed. If it was then hit for another 25 damage while it was at 0 hit points it would still not be destroyed. The damage must exceed the damage threshold to destroy the component. Any excess damage after the component hits 0 hit points is lost. Therefore, in those two hits a total of 40 damage would have been rendered ineffective and lost.
When it comes to beams this damage threshold effect can be particularly devious. A beam will attempt to damage the first undestroyed component that it hits. It will not hit anything else. This means that a single component with a large damage threshold, such as a reinforced drive, can act as a shield preventing the rest of the ship from being injured. While beams have a large damage per second value, the next sections will explain how that large value can be turned into something that can’t even exceed the damage threshold of a Basic CIC.
Damage FrequencyBeams are listed as having 300 damage per second but do not actually do damage every second. Instead beams do damage every two tenths of a second, in other words five times per second. That 300 damage per second is best thought about in terms of the actual damage per hit, which can be found by simply dividing by five. So a base beam weapon actually deals 60 damage per hit. This effect, on its own, renders a base beam incapable of destroying an FM500 capital ship drive, which has a damage threshold of 70. On large hulls, the damage is further reduced by the damage reduction of a hull, which takes a flat percentage of damage off of each hit. On a Solomon class battleship with 40% damage reduction, the base 60 damage per hit is reduced to 36 damage, which renders it incapable of destroying a Reinforced Magazine component with a damage threshold of 40.
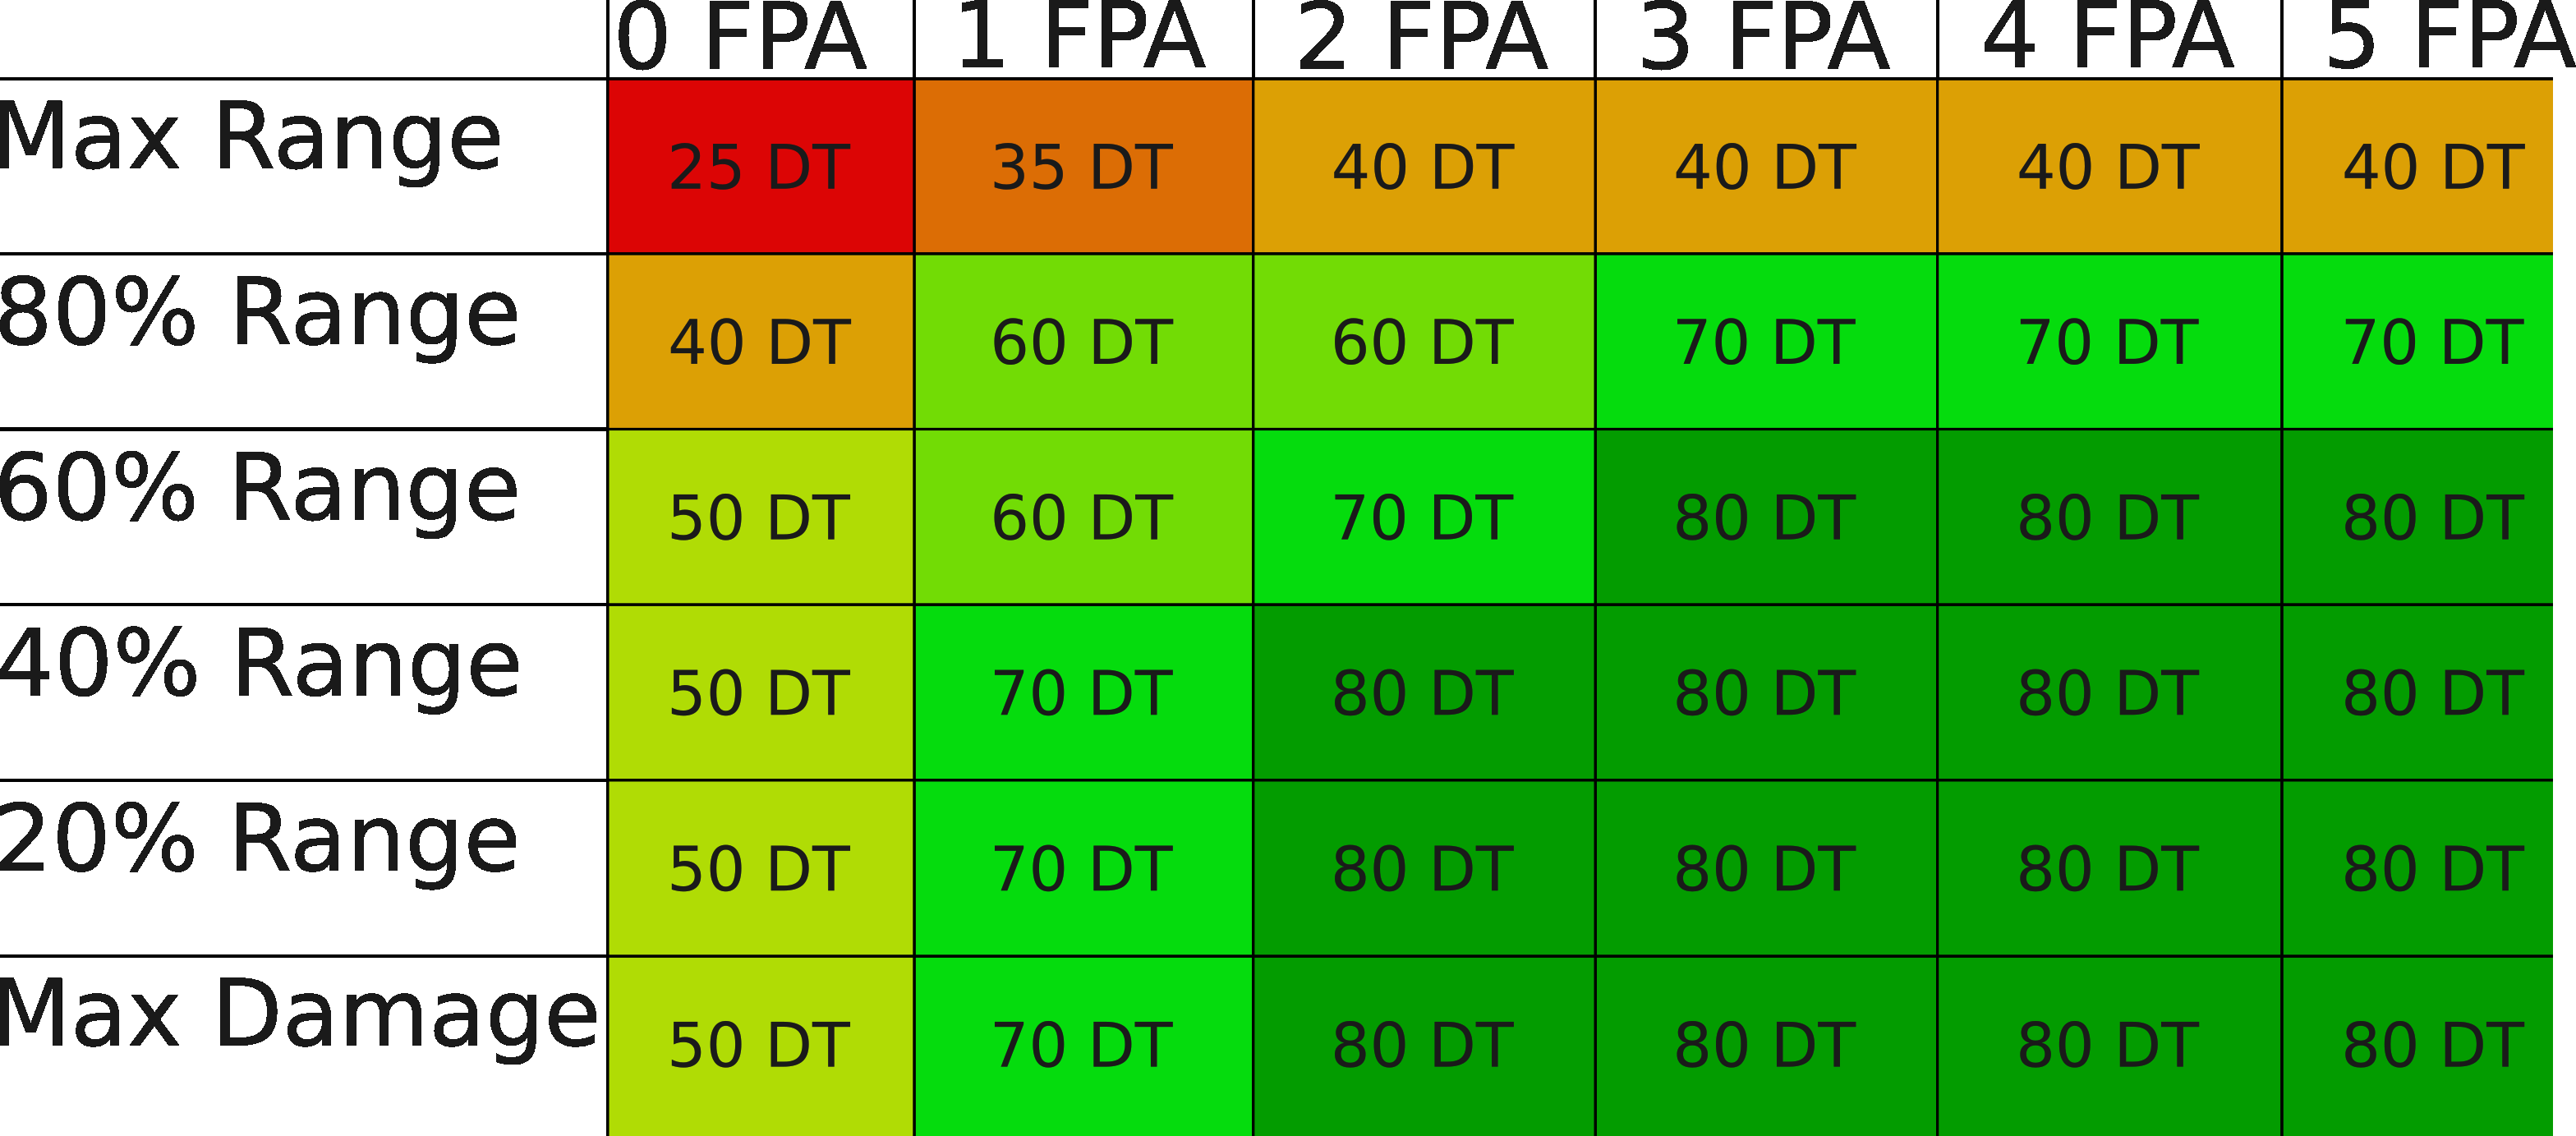
Damage FalloffThe final mechanic that lowers the power of the beam weapons is their damage falloff. A beam has reduced damage and armor penetration ability the further away it hits a target. At its maximum range a beam does exactly 50% of the listed damage and armor penetration. So a base beam would do 30 damage per hit instead of the listed 60 damage. At 80% of the range the damage is roughly 83% of the base damage, roughly 50 instead of 60. At 60%, 40%, and 20% the damage is roughly 91%, 96%, and 99% of the base damage, 55, 58, and 59 damage respectively. There is a tool available here [rocketpuppy.github.io] that I have made to help visualize this effect.
Using the Solomon as an example and combining the three effects, the damage against it from a base beam weapon would total only 18 damage per hit at the maximum range. And at 80% of the max range the damage would only be 29.4 damage per hit. This is a far cry from the listed damage per second, only 90 instead of 300. It should be obvious now how important it is to get close to a target before firing, lest the first burst be wasted and the ship be forced to wait helplessly while the beams cool down.
Buffing ModulesThe three mechanics described above limit the damage that a beam can do, but there are two modules available that help with the situation:
The Focused Particle Accelerator module, which increases the damage and armor penetration of the weapon by 25% but lowers its burst duration by 5%.
The Energy Regulator module, which reduces the reload time of the beam by 20%.
Both of these modules can stack with diminishing returns. If all seven available 3x3x3 slots on a Solomon were filled with FPA modules they would have a combined boost of 89.41% to the damage and penetration of the beam, taking it to approximately 568 damage per second and 340 centimeters of armor penetration per second. If all slots were filled with Ereg modules they would reduce the cooldown period by 71.53%, taking it to 12.81 seconds. A basic approximation of damage per minute would put the Ereg modules at approximately 900 damage per minute (three full bursts), and FPA modules at approximately 1000 damage per minute (two full bursts).
While this by itself is a reason to focus on FPA modules over Ereg modules it is not the most important reason. By increasing the base damage that a beam does the FPA modules also increase the damage done per hit at the edge of the beam range. Using the Solomon as an example again, the seven FPA modules would put the edge of range damage at 29.7 damage per hit. This still isn’t great, but at 80% of the range the damage is now 48.5 per hit as opposed to the previous damage of 29.4 per hit. This now is capable of destroying most of the components that might be mounted on that battleship. Notice that with these FPA modules the edge of range damage is almost exactly the same as the 80% damage with no FPA modules. The Focused Particle Accelerator pushes out the effective engagement range of the beam weapon.
The below chart shows the maximum damage threshold a beam can break at different ranges and with different amounts of FPA modules. This does not take into account any damage reduction on the target hull. The linked website above contains a similar chart that does take damage reduction into account.
Beam Mechanics, Continued
BattleshortBoth the Mk600 and the Mk610 can be battleshorted. Battleshorting is a simple but powerful ability that lets the beam keep firing for longer than its listed burst duration. However, once this mode is activated outside of the beam’s burst duration, there is a chance that the weapon will take damage. This damage increases the longer it fires in this mode, and it can quickly add up and render a beam inoperable. Battleshort damage is also capable of causing fires and other debuffs that hinder DC crews and weapon performance.
The battleshort ability has a secondary effect. It can allow a beam to fire without waiting for the full cooldown period. When the beam fires without battleshort, it must wait for the entire cooldown period before it can fire again. By toggling battleshort mode on and then off again, the beam can fire for however long it has been recharging without doing any damage to it. For example, if the beam has gotten halfway through its cooldown cycle it could fire half of a full burst without any damage to the weapon.
Spinal vs TurretThere are three primary differences between the Mk600 spinal beam and the Mk610 beam turret. The first is obvious. The Mk610 is on a turret, and as such has an easier time than the Mk600 at hitting small and maneuverable targets. This includes targets as small and as maneuverable as a missile. The second primary difference is that the Mk600 has a 6 kilometer maximum range, while the Mk610 only has a 5 kilometer maximum range. The final point of difference has more to do with the hulls than the weapons themselves. The Mk600 can only be mounted on the Keystone hull, and when done so it has a 75% reduction to the damage chance from being battleshorted. This makes it possible to battleshort a Mk600 for many tens of seconds at a time, something that the Mk610 is incapable of doing, making the Mk600 supremely dangerous to the targets it is trained on.
Beam Usage In Practice
Effective beam usage revolves mostly around two main principles, with several advanced techniques that are used when the situation requires it. The two main principles are range control and lethality. Advanced techniques that are also covered in this section include: influencing where the beam lands while track-firing; position firing for pinpoint damage application; and pre-aiming for lightning-fast ambushes. Shipbuilding tips and the high durability of the weapon platform are also covered.
Range ControlThe obvious range control implication when using beams is their short maximum range. Every other weapon system outranges them by a large margin. Moreover, beam ships are often the slowest ships in an engagement, so closing a gap to get into weapons range is generally not possible. This forces players using beam ships to rely heavily on ambush strategies.
It is also important to consider the implications of chasing a target. Many beam players have opened up on a target at the edge of their range that was just a little too fast for them to catch. This has led to those players chasing the target into a counter-ambush or crossfire, leaving them helpless as they are crippled or destroyed. It is best to wait until a target is at least 200 meters inside of the maximum range before firing.
Beam damage is reduced the further out the target is to a minimum of 50% of the maximum damage. In general, attacking when the target is within 80% of the weapon’s maximum range (4,000 meters for Mk610, 4,800 meters for Mk600) is the most efficient range bracket for practical damage. At that range the weapon will do 83% of its maximum damage. This range also has a high likelihood of preventing the target from escaping.
LethalityWhile beams are among the fastest killing weapons in the game, they are not guaranteed or instant killshots. A number of factors deep in the game mechanics can conspire to make a beam considerably less lethal. In short, the closer a target is to the weapon, the more lethal it gets. Most small targets, frigate or smaller, only require one burst from the beam to destroy. As targets move up in weight class they require considerably more effort to put down. Sometimes going for the kill is less important than simply crippling the ship, which leaves it unable to help its allies and helpless while the beam player closes in for the coup de grace. Against many small targets such as swarms of corvettes or clippers, disabling them before they can use their own weapons is more important than killing all of them. Liberal use of the battleshort capability is key to disabling a vessel quickly.
DurabilityBeams are not only among the most lethal weapon systems in the game but they are also among the most durable. The Mk610 beam turret is a capital class turret, with survivability comparable to a Damage Control Central compartment. The Mk600 beam cannon is comparable to a Reinforced Magazine in terms of survivability. This pattern doesn’t end at the weapons. The Focused Particle Accelerator has a damage threshold of 40, which also puts it at similar levels of survivability to a Reinforced Magazine. These components are so tough that on a ship such as an Axford or a Solomon they will even survive concentrated missile strikes.
Firing Techniques
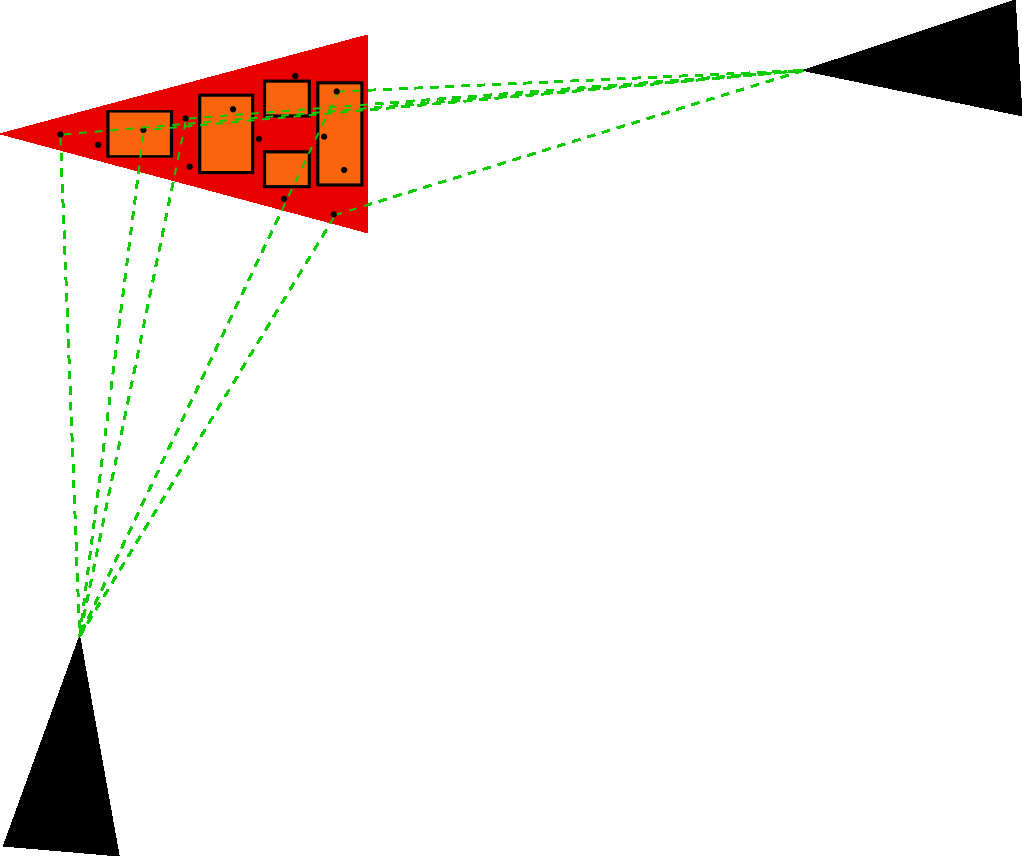
Track Firing TechniqueNormally when firing on a track there is little control the player has over where on the enemy hull the weapons are aiming. However clever players can use the geometry of the engagement to get more favorable targeting points. Consider a broadside target. The weapon has a large area of possible targeting points all along the broadside of the target’s hull. Some of those areas might contain critical equipment but most will not. It is better to try and approach a target from the longitudinal axis where the beam is able to burn through the length of the ship and “core out” all of the critical components. Especially nasty is the rear attack angle, which can swiftly disable a ship’s drive capability leaving it stranded and helpless while the beam player moves in for the killing blow.
The below image illustrates potential targeting points on a target with possible vital sections indicated by orange squares. A broadside and rear aspect attack angle are indicated, showing how favorable the rear aspect attack is to hitting a vital component when compared to the broadside attack.
Position FiringAn exceptionally effective technique to master when using beams is that of position firing. Position firing happens when, instead of firing on a designated track, the player fires on a designated position in space (this position being inside the hull of another ship). Ideally this is done within visual range or against a target made visible by missiles, but it is possible to do outside of visual range.
There are two major applications of this technique. The first is to snipe the weapons or other critical components off of a target ship. Consider an Ocello with Mk66 450mm cannons mounted on it. The Mk66 cannons only have 350 hit points. This only requires about two seconds of concentrated beam fire to destroy. With the use of the battleshort button and some practice it is possible to strip all three cannons from an Ocello in under ten seconds, leaving it helpless while an allied ship finishes it off with their own cannons. The other application of position firing is to position fire onto the broadside of a moving ship, letting its velocity carry it through the beam like a cheese wire. Appropriately timed and aimed this can lead to a beam raking the full length of the hull, destroying everything it touches.
The process of position firing can be a little tricky. This is the process I follow:
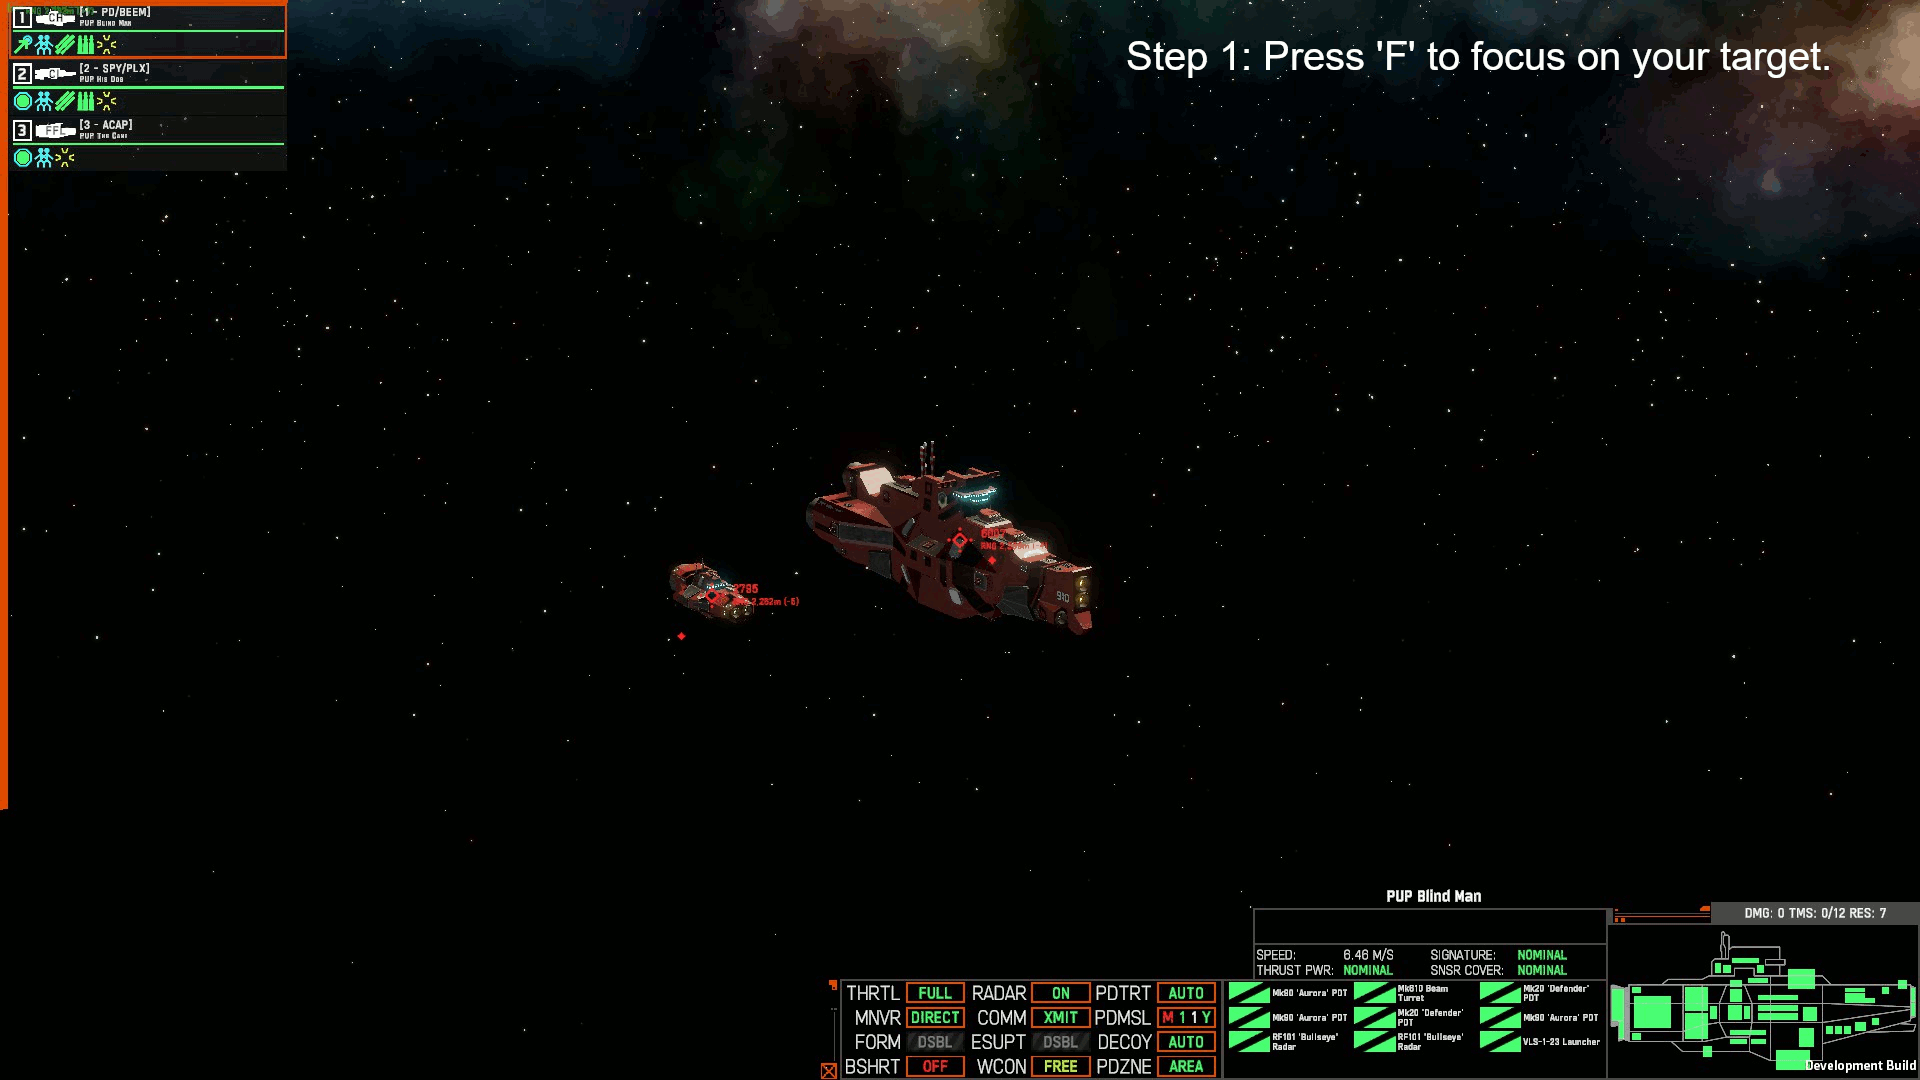
Focus on the targeted ship. You can focus on the ship by pressing the “F” key while hovering the cursor over the hull itself or the track that represents it.
Enter the tactical map.
Start a position fire order with the beams by right clicking in empty space and selecting the beam weapon.
The sphere widget will appear, line up the targeting pip with the projected pip of the ship in question and get the range roughly in line with the target’s range. There’s no need to be super-precise here and it’s better to be too far than too close.
Exit the tactical map.
Fine-tune the targeted position so the desired section of the hull is being targeted. If you lose track of the targeting pip go back to the tactical map and start from step 3 again.
It’s best if the beam starts firing immediately once you position fire. You can help aid this by switching weapons to hold fire and issuing a fire order on the track to be targeted. This will cause the weapon to aim at the target automatically, and once the position fire order is made you can take the weapons off of hold fire and they will start firing immediately.
Pre-aimingWhen executing an ambush it is important that the weapons fire immediately. If the target is afforded time to react then they could counter-strike before they are disabled. To this end, pre-aiming the beams is critical. The importance of an offset scout can’t be overstated here. Having a track to aim at before there is a clean shot makes every beam player’s life easier. Using hold fire until the shot is well clear of any rocks will prevent the beam from firing for half a second and then turning off because of an obstruction. A clean shot is indicated by the weapon indicator in the status bar flashing green.
If a track isn’t available, using position aiming, the heading hold command, or ideally both is the next best option. For spinal beams the hold heading command is a critical tool for any serious beam player. The ship’s heading should be pointing at the likely direction a target is going to approach from and then when they appear they can be targeted. The hold heading command is also useful for the beam turret as it has a limited amount of elevation, and rolling the ship to get the beam in line can be slow.
Builds
In general beam ships focus on damage over uptime. That is, most builds will prioritize Focused Particle Accelerators over Energy Regulators. This is the recommended path because it leads to more lethality and faster kills. Against most OSP targets two FPA’s is acceptable, but up to four is practical and has noticeable benefits. Beam ships want either speed or stealth to allow them to reposition without being noticed by the enemy team. Point defense is important to prioritize because even though the weapon system itself is durable against missiles it is still a significant setback to eat a missile salvo. It will render the ship inoperable and vulnerable to follow up strikes for quite a while.
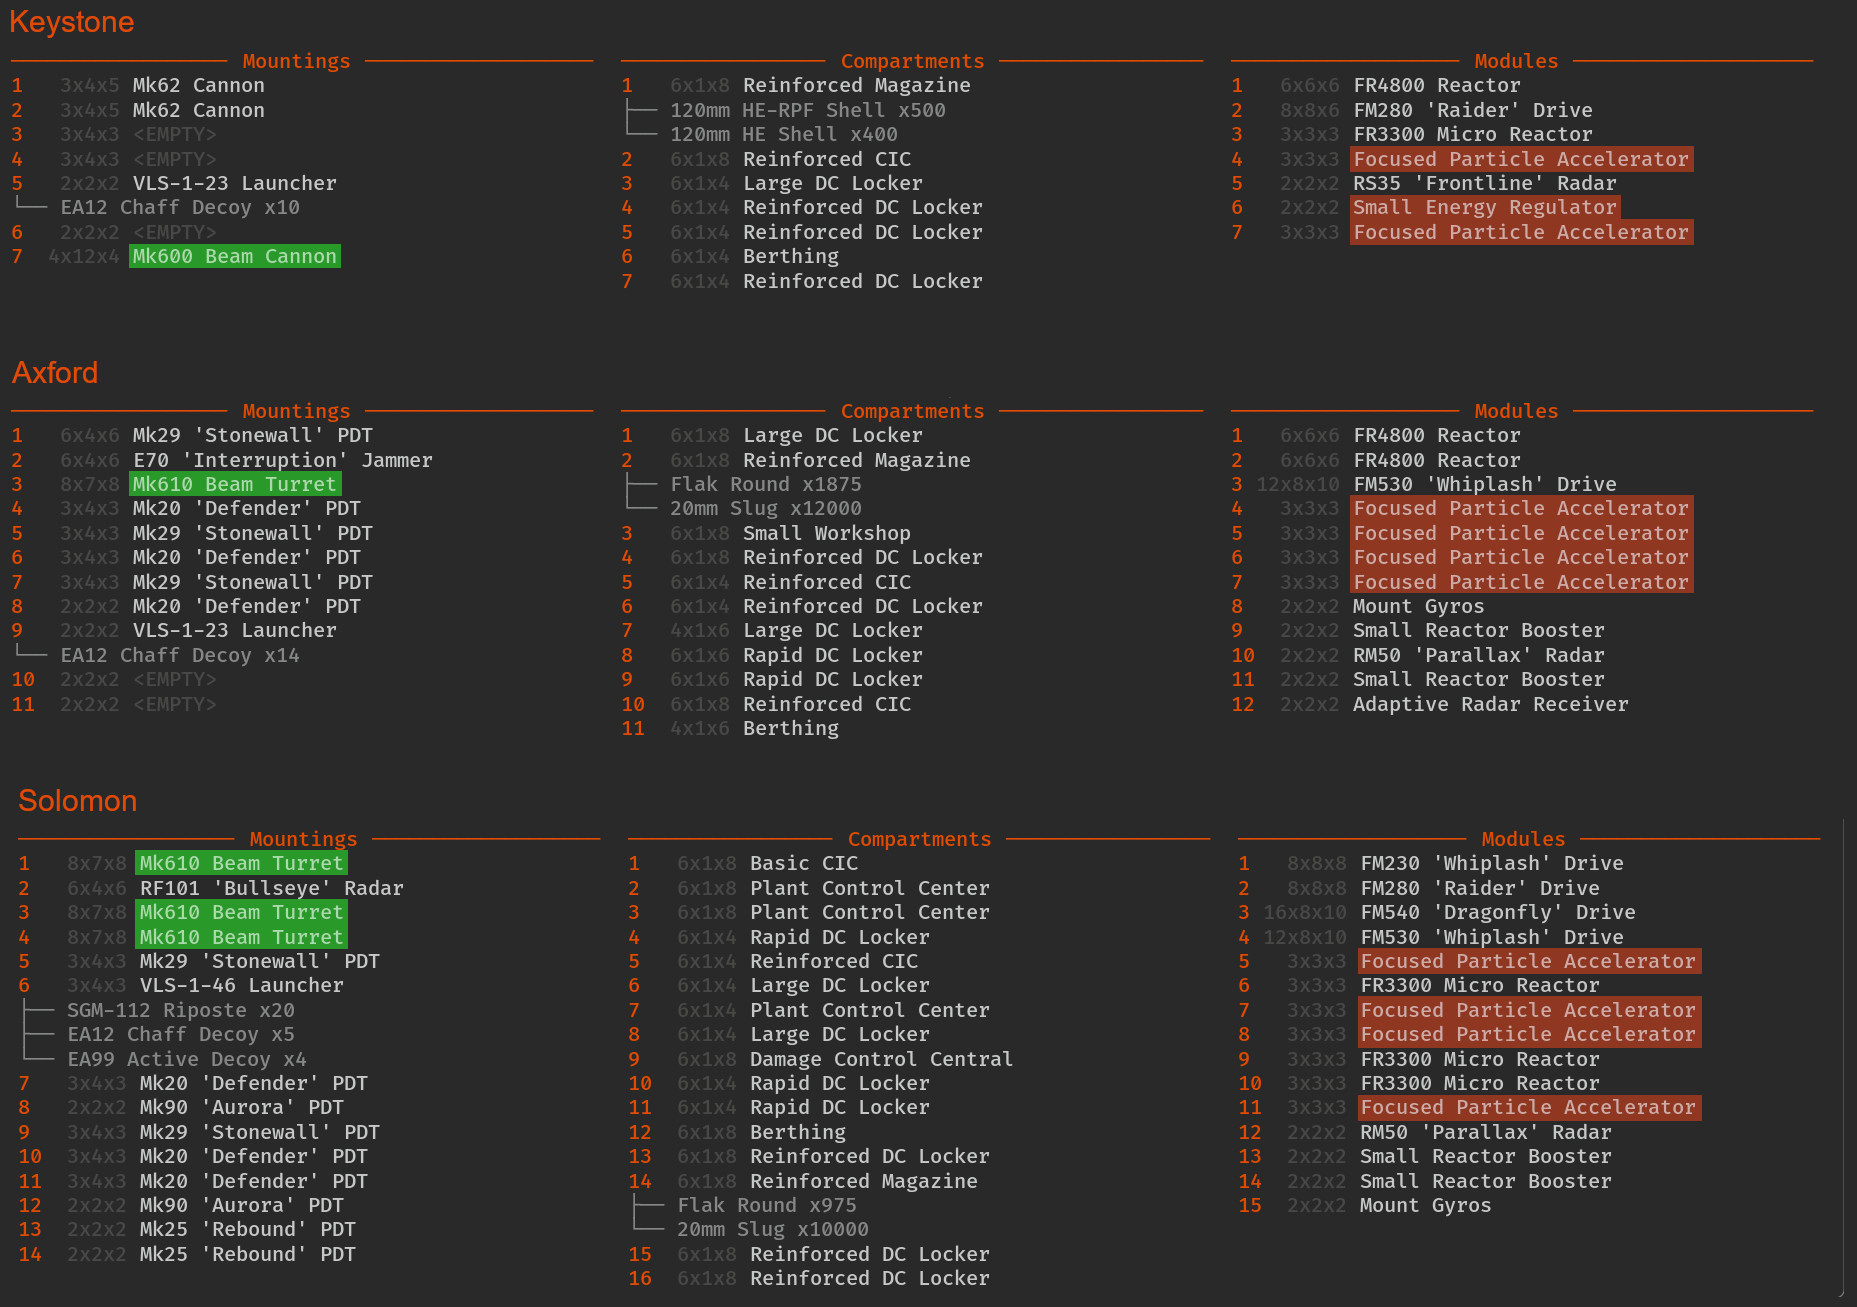
KeystonesThe keystone should run two but sometimes is built with three FPA modules to support the spinal beam. With the power generation bonus on the keystone hull this does not cause too many problems and sometimes a radar can even fit in. Oftentimes secondary weapons such as 120mm or 250mm cannons are mounted to give the keystone some defense against OSP shuttles and tugboats that it can have a hard time hitting with the beam. Keystone groups are usually run in packs of three, with some supporting vessels to provide target locks, jamming, or other utility ability. These can take the form of corvettes, frigates, or even a light cruiser.
Drive choice for the keystone is important. The FM240 Dragonfly Drive is a tempting choice because it allows the ship to orient the beam faster. However, empirical testing shows that this increased turn ability actually causes the weapon to miss more often on the first shot. The FM230 Whiplash Drive, with its reduction in turn speed, will allow the spinal beam cannon to hit on the first shot most frequently. It also provides a nice speed boost and with careful pre-aiming the downsides to turn speed can be largely eliminated.
I only run FM280 Raider Drives on my Keystones. The increase to linear thrust allows the vessel to more easily match velocity vectors with a target and reduce the required angle to turn. It also allows for more capable dodging against cannon rounds.
A more specialized beam Keystone build is found in the “goalie” archetype. This Keystone is built to supplement a scouting or capture point fleet by defending captured points from enemy incursion. These are built to be cheap, often forgoing even a Bullseye fire-control radar. They might even skip FPA modules because their intended prey is small ships such as shuttles and tugboats that might try to capture a point.
Beam Keystones usually run between 400 and 600 points.
AxfordsThe Axford is, in my opinion, the most efficient beam platform available in the game. It has room for up to four FPA modules and while it only has one beam turret it has an impressive hemisphere of coverage, making it easy to aim. When building a beam Axford it is best to focus on the beam as a primary weapon and dedicate the rest of the mounts to PD or other utility items. The beam turret itself is an ideal defense against small ships and the other weapons available to the Axford don’t mesh well with the beam playstyle. It is better to bring along a second ship such as a light cruiser to scout and provide fire support.
The beam also sees use on Axfords as a secondary weapon to provide a defense against small ships. This is common on 450mm cannon Axfords that otherwise are unable to easily defend themselves against these ship classes. While this is useful, the usage of the beam turret in this situation is not the subject of this guide.
Beam Axfords usually run between 1200 and 1600 points.
SolomonsThe Solomon is the unparalleled master of concentrated beam fire. With three beam turrets and plentiful sockets for Focused Particle Accelerators there is no other ship that can bring as much firepower to bear as quickly. There aren’t many wrong ways to build a beam Solomon. The primary things to remember are to bring at least three FPAs.
There is an important decision to be made as to how many and what kind of drives to bring. It is possible to build a beam Solomon with four FPA modules that still uses four drives, but it does have a significant trade-off in terms of power fragility.My beam BB does this, and the specific drive setup is this: FM540 Dragonfly, FM530 Whiplash, FM280 Raider, FM230 Whiplash. This provides enough power while still maxing out the speed at 31 m/s and providing good turn and dodge ability.
The beam Solomon by itself is the primary focus of a fleet, but there are usually points left for some escort ships. These can be varied but are usually frigate or corvette pairs. I run mine with a corvette pair so I can get three locks at once for three simultaneous beam targets. Doing this enables rapid destruction of swarms of light ships in seconds.
Beam Solomons usually run between 2000 and 2500 points.
General Strategy
Beams are weapons designed to intimidate and confuse the opposing forces. Their lethality while inside the weapon’s range means any opposing force must avoid getting within that range. This makes positioning and teamwork critical to effective beam play. Properly positioned on the map, and with appropriate teamwork, a beam ship can make victories look effortless. It is important to remember that low damage numbers do not mean that a beam ship was useless. Its effect on a match is more subtle than just providing rapid destruction. A beam ship that only kills one ship and in doing so forces the enemy to position so poorly that they cannot win the game is better than one that does lots of damage but loses because the enemy could move around it.
Beams are Terror WeaponsA beam ship is only useful as long as the enemy is afraid of it. They are weapons of terror and they should be played as such. Many players have treated beam ships as stealthy ambush ships, designed to lay in wait for most of the match until the juiciest target happens along. That is something that beams can do, but it leaves the rest of the team down a player until that ambush happens. Many games have been played where the beam player is effectively out of the game because they picked a bad ambush spot, leaving their team to fight the enemy while down a player and leading to a loss.
Be Known but UnseenTo be a terrifying presence on the battlefield the opposing forces must be aware of the beam ship’s existence. Commonly this is done in the first minutes of the game by using the beam to destroy an enemy ship attempting to capture a point. This informs the enemy that that area is off-limits. They can’t send anything to that area without risking its total annihilation. In order for this to be effective at controlling the enemy’s movements, a beam ship must position itself in a location central to the map and in quick reach of map objectives. The enemy must be aware of this location so they know to avoid it. But critically the beam ship should not be spotted, at least not continually. A spotted beam ship is a vulnerable one and is also much easier to avoid. Finally, the team must play around the beam ship to take advantage of the conditions it creates. The enemy will be forced to take poor paths to maneuver around it making them easier to attack. The team can also corral the enemy into the beam ship for swift destruction.
A Beam’s Sphere of Influence is Larger than it SeemsA beam’s nominal range is either 5 or 6 kilometers depending on the specific weapon. However this is not the extent of its sphere of influence. While enemy ships should know the rough area where a beam ship is located they should not know its exact position. This uncertainty means a competent enemy will stay much further away from the area of the beam ship than the nominal weapon range. An incompetent enemy will simply stray into range and be destroyed. Combined with this uncertainty is the ability for a beam ship to close a gap before an enemy ship can turn around. This gives an extra few hundred meters of additional dangerous space that the beam ship forces enemy ships to be wary of. All told, this can extend the sphere of influence from just 5 km to 7 km, or from 6 km to 8 km. With sneaky repositioning this can become even larger.
PositioningPositioning is critical to effective beam play. A poorly positioned beam ship becomes a liability to its teammates. It is unable to contribute damage to the fight and is easily destroyed from range by the enemy team. There are three general phases to beam ship positioning: the opening, mid-game, and end-game.
Opening OccupationIn the opening stage of the game, before anyone has captured any points, the beam ship needs to move as quickly as possible to a central map location that lets it overwatch multiple objective points. It is ideal if you are not seen during this positioning phase but it is more important to take the position before any points have been captured. Ideally the beam is used to deny the enemy an early capture point lead so the enemy will know roughly where you are regardless. This opening position, in addition to being centrally located, should also provide a large amount of cover that allows you to reposition without being seen. On Pillars, the large rock above the A point is an ideal location. On Tumbleweed, the central fissure in the map is generally where a beam ship wants to be. Both of these locations are difficult to assail by the enemy and provide relatively quick access to three different objectives.
Mid-game ManeuveringOnce the opening objective points have been captured and general fleet positions have been established it is time to start flexing your position. Reposition around your piece of cover while trying to get into combat range with the beam. It is important to remain unspotted during this phase, as all of the power a beam ship has on a match comes from its exact position being undetermined. If the enemy doesn’t know your exact position, then they can’t know when they are in killing range and will give a wide berth. Pay attention to and coordinate your movements with the rest of the team. They will act as a hammer while you act as an anvil, pushing pieces of the enemy into your range to be swiftly smashed. It is extremely important not to overcommit in this phase. Chasing enemies away from your cover rock is a fast way to an early death. Patience is the name of the game. Act as an anchor that your team moves around.
End-game ExecutionOnce enough of the enemy forces have been whittled away and both teams are close to a victory point win you will have entered the end-game of beam play. During this phase you are either committing to a single decisive engagement with your team or acting to mop up dispersed enemy forces. Either way, the cover of the mid-game needs to be left behind and the beam ship should go hunting. In general this will determine who wins or loses the match, and it is important to ensure objective points are covered to prevent enemy ships from capturing them. Teamwork is even more essential here to secure the win.
Team CompositionWith team coordination being so important, your overall team composition is important to ensure victory. With the beam ship acting as an anchor the rest of your team needs to be able to move around it and apply pressure to different flanks. Vauxhall class light cruisers are ideal for this job, especially when backed up by a large-caliber gun fleet or long-range cruise missiles. This will probably cover three of the four team slots including yourself. The last slot should be filled by a fleet capable of scouting and capturing objectives.
Playing Against Beams
This guide has established the principles and mechanics of collaborative and effective beam play. Once these have been understood it becomes easier to play against players using beams, both skilled and unskilled. Because effective beam play is so reliant on mind games the first rule of fighting against them is to stay calm and don’t panic. Then follow the three principles of range control, isolation, and focused fire.
Range ControlThe beam player wants to be within range to use their beams effectively. When playing against them it is important to deny them this range. They will be trying to mask their movements, making it difficult to determine their real position and thus the real danger zone. Ensure there is a scout capable of revealing its position before straying into its sphere of influence.
IsolationWhile the beam player’s team is trying to force your team into disadvantaged positions you should be trying to isolate the beam player from the rest of their team. This will allow you to more effectively stay outside of their range and disable them without being attacked in turn. This is easier said than done, and they will be working against you at every turn. A minor success is to force the beam player to retreat, allowing the rest of your team to take an advantageous fight against the rest of the enemy team.
Focused FireIf the beam player is caught in the open and can’t find some measure of hard cover to protect themselves then all available and effective weapons should fire on it. Beam ships are inherently durable, so focused fire is often the only way to destroy them and prevent them from being a threat for the rest of the match. It is important to ensure the ship is fully destroyed before leaving it alone. A half-dead beam ship can easily restore its beam and wreak havoc from a new hidden position.
Conclusion
Beams are weapons of terror. They exist to induce fear and panic in the enemy team, forcing them into bad positions, and allowing your allies to grind them to pieces. As a beam player, the feeling of watching an entire team scatter before your unbridled fury is the best emotion this game can offer. But beams are far from simple and it requires practice and good team coordination to perform well. This guide provided the mechanical, tactical, and strategic fundamentals necessary for you to level up your play.
Special Thanks
DerangedOctopus for contributing the Notes for the Impatient section and reviewing the guide.
HopefulMonster for reviewing the guide.
Vren for reviewing the guide.
Source: https://steamcommunity.com/sharedfiles/filedetails/?id=3095508294
More NEBULOUS: Fleet Command guilds
- All Guilds
- MD/Rail
- Jakub's Guide to not Dying to Missile Spam
- NEBULOUS: Fleet Command Guide 427
- Jakub's Guide to Not Dying to ANS Jamming
- A Thorough Guide to OSPN
- Helpful Heuristics to halt Hodgepodges and Half-measures
- Guide to Missiles and Point Defense
- Hardly's Helpful Guide to: What The Heck To Do With Your Spaceships
- Nuclear or: How You Can Learn to Stop Worrying and Make the Bomb
- Better Battle Report (BBR) User Guide