
AMMs As A System
Starting out with the strengths of AMMs, the most important one to mention here is their ability to dynamically and almost infinitely scale to any given incoming threat. As opposed to PD turrets which can only put out so much damage into incoming missiles per second, AMMs are launched per incoming missile, at a high enough rate that you can get enough out of the tube in order to defeat more or less arbitrarily large salvos. This goes hand in hand with another advantage and that being mount density. Whereas PDT need numbers in order to scale up to shoot down more threatening salvos, AMMs are only constrained by mount count as to how many of them you can bring, with 1 or 2 per ship usually being more than adequate to bring as many AMMs as you’ll need. The final defining strength of AMMs is their ability to reliably damage basically any target. Unlike 20mm which is significantly less effective when terminals are in play or flak which just can’t put out enough DPS to effectively kill sprinting hybrids before they hit, AMMs are (as long as their seeker is not impeded) able to reliably hit any missile save for a handful of specific setups of hybrids in the terminal stage, the high launch rate and high damage per AMM also means you usually will be able to put enough damage into even the fastest targets before they hit.
AMMs, for all their strengths, do also have significant drawbacks. For one their numbers are generally pretty limited (mostly by cost) so it quickly becomes uneconomical to try and defeat cheap and numerous (e.g. S2 spam) targets or ones with very high HP, such as containers and torpedoes which need many AMMs to hit them in order to net a kill. So while AMMs are certainly able to defeat these threats, the amount you’d need to defend more than 1 or 2 volleys quickly becomes too expensive compared to softkill or using turret based pd which have ammo costs that are a couple magnitudes lower.
Considering these factors, AMMs are best suited for missiles that don’t have high HP, that are individually expensive and are more limited in number. The most obvious example here is of course hybrids which tick all 3 boxes and AMMs are a strong option to defend even against amounts coming from a dedicated missile fleet, but also for example to defend lone small ships (e.g. scouts or cappers) from lower volumes of S2s.
Seeker Selection
If You Are Using ACT Or SAH (also Applies To EO), You Will Need To Click On Your Seeker And Set It To DETECT Small Targets, Else Your AMMs Will Not Home In On MissilesFor AMMs there are 3 good seeker options, SAH (semi-active radar), ACT (active radar) and CMD (command guidance). ARAD and WAKE are not used due to their inability to see missiles and EO, while able to see missiles, is prohibitively expensive at 8pt for just the seeker (more than several entire AMMs for the most common designs).
SAH is the cheapest, being quite literally free, but it does require illuminators to be present, working and able to point at the incoming missiles, incurring extra point, mount and power costs. While the PD controller does auto-task illuminators at incoming missiles, narrow-cone ones may be unable to light up more spread-out volleys especially at close range. SAH can be rather resistant to shipboard radar jamming (especially at shorter intercept distances) and can avoid decoys with manual illuminator firing but is vulnerable to missile-board jamming.
ACT is still pretty cheap (upgrading from fixed to steerable is also often free) and doesn’t require any infrastructure outside the launcher itself, but it’s the most vulnerable to penaids, falling for decoys and being defeated by missile-borne jammers, though at short intercept ranges it’s still rather resistant to limited radar jamming coming from further away ships.
CMD is rather expensive at 3.5 points but it pays for this in its ability to be more or less fully immune to having the AMM’s seeking be disrupted. CMD does not go for decoys and is unaffected by missile- and shipborne radar jamming (as long as the launching ship has tracks on the incoming missiles) as well as being resistant to comms jamming if intercepting at short range. Do note that CMD AMMs cannot retarget if the missile they were fired at is destroyed and will instead carry on in a straight line.
Note: for missile-borne jamming the general baseline is BSSJ (boosted self-screening jammer), the base SSJ (self screening jammer) generally has rather lackluster performance.
Avionics
As the PD controller cannot make use of Cruise waypoints and shorter ranged AMMs are better for reliability either way, as well as 2pt per AMM being a very substantial cost, AMMs should use direct avionics.
Remember to set your AMMs to DEFENSIVE at the top of the settings when selecting your avionics, the Defensive Targeting Doctrine will be covered in a later section.
The choice of Cold vs Hot launch is mainly one of the ship you’ll mount these on and the placement of the VLS that will hold the AMMs, on larger ships or with VLS that will generally face away from where missiles will be approaching from, Hot launch is required for optimal results (COLD means AMMs may hang around your ship for too long), Cold launch works fine on smaller ships with VLS facing not generally away from incoming missiles.
Setting your missile to “Self destruct” will not trigger the warhead, so there’s no reason not to use “Resume Search”.
Terminal maneuvers will actively worsen your chance to hit at no benefit, as well as being expensive so leaving your AMMs without them is highly recommended.
As Head-on intercepts are more favorable for AMMs, Minimum Angle is preferred over Free Approach.
Warhead
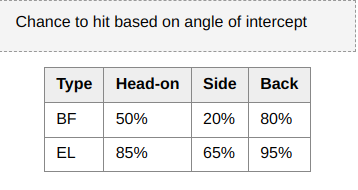
Only Blast Fragmentation (BF) and Blast Fragmentation EL (EL) are able to damage other missiles, and thus the only ones you will use on AMMs. Both BF and EL will do the same amount of damage given the same warhead size, but EL has a higher chance to hit across the board.
When an AMM comes within the blast radius or 50m (whichever is lower) of any enemy missile (the proximity fuse entirely independent of the seeker) it will detonate and roll a chance to hit against any missile (both enemy and ally), if the roll succeeds, the missile in question takes the full listed damage. Chance to hit is based off of the intercept angle between AMM and missile, rear on being the highest, front on the second highest and side on being the worst for both warhead types.
Table of chances to hit taken from
http://nebfltcom.wikidot.com/mechanics:component-damage#toc21
As for warhead size there are a handful important breakpoints to keep in mind (again assuming S1 body), “hardened” refers to the missile having the “hardened skin” support module equipped
1 tick warhead (minimum size):
Will 1-shot non-hardened S2
Will 1-shot non-hardened S2H
Will 2-shot non-hardened S3H
2 tick warhead:
Will 2-shot hardened S3H
4 Tick warhead (maximum size):
Will 1-shot non-hardened S3H
Minimum Warhead EL is generally good for all the listed targets (without hardened skin), though max warhead (BF for SAH and ACT, EL for CMD, the latter is very inefficient vs other targets however) is more efficient for non-hardened S3h specifically. For hardened S3h, 2-tick warheads generally are the way to go unless you have other PD to clean up the part of the salvo the AMMs don’t intercept.
Engine
Engine setup is perhaps one of the most complex things about AMM design and in doubt will need to be repeatedly tested in order for optimal results.
Range on AMMs is not very beneficial beyond reaching a minimum of around 2500-3000m to ensure your AMM will fly out to intercept an enemy missile in time. Beyond this more range has little benefit as hitting sprint stage hybrids is entirely possible using AMMs and more range also has its drawbacks, not only does it tax other engine characteristics, but it also makes your AMMs more susceptible to radar and comms jamming coming from the launching ship, as well as making it more likely that AMMs will be launched at missiles not coming for you and end up on bad intercepts.
Speed neither particularly strongly benefits nor hurts your AMM, though you may need more agility to hit when you increase the speed, more speed may be beneficial to get the AMM in position faster to intercept an incoming missile but is by no means something you should be maximizing for, your AMM doesn’t need to chase down the incoming missile after all, only put itself on its path.
Agility is very important for AMMs as it allows them to rapidly change course to intercept incoming missiles, especially hybrids with terminal maneuvers which can pretty rapidly and violently change direction, more maneuver also means the missile is able to more quickly “dip back down” to a head-on intercept when hot-launched, most successful AMM designs will put a lot of emphasis on maneuver, if not max it out entirely
For minimum or 2 tick warhead, max maneuver at 250m/s-280m/s is what I see most often used, for max warhead you’ll need to move the slider over towards range a bit but try to stay about 10g, increasing speed means you’ll want more maneuver as well to hit reliably which comes at high range cost with a small engine.
Doctrine Settings
Threat Size determines what sized missiles your AMM will be automatically tasked at by the PD controller, green number means they will, red means they won’t, click the number to toggle. Hybrids count as their listed size in both cruise and sprint, containers count as Size 3.
Note that AMMs will never be automatically tasked on missile launched decoys, but non-cmd seekers will still see and will likely direct the missile to go for them.
Next to the Size setting, you will be able to choose whether the missile will be launched at both hybrid and non-hybrid targets that match your size settings, or only one of the two.
Salvo Size determines how many missiles will be tasked per salvo per incoming missile that fits the criteria you set. The PD controller can be set to launch multiple salvos per incoming missile in the PDMSL posture setting (default also editable in the settings). Salvo size can also be manually overridden there.
Distance Priority sets whether AMMs will be fired at the further or closer targets first, generally you’ll want to use near-to-far here, especially with CMD AMMs, so the missiles launched at the back targets don't end up hitting further forwards targets first, thus causing other AMMs to go dumbfire.
The PDMSL doctrine (editable in the posture settings and in the game settings) determines how your PD controller uses your AMMs and can override many settings you determine in the editor if you choose to do so.
Fire Mode lets you set which targets your AMMs will be fired at, DCTRN means the settings you specified in editor will be used, ALL means they’ll fire at all targets and MAN means the PD controller won’t fire at anything not designated as PD priority.
Fire Policy lets you set the amount of Salvos to fire per incoming missile, 1 and 2 Salvo are self explanatory, MAX DOF will keep firing salvos until the missile dies. Successive Salvos are spaced out by the calculated intercept time in order to avoid overkill. Against particularly fast targets you may want to fire all the needed AMMs in one salvo though, as following salvos may not arrive in time.
Salvo Size lets you manually override the amount of missiles fired per salvo, if set to DCTRN it will use the settings set in the editor
Last Salvo will fire another salvo at the target so that the AMMs intercept in the last possible moment before the hit, this is always on top of the fire policy, though may not fire in time for very fast missiles.
Finally, PDZONE will affect what targets all PD (including PD turrets) will be tasked on, if you are using AMMs and find them often going for missiles not headed for you and thus missing, set your PDZONE to POINT, this means PD will only target missiles the PD controller thinks are coming for your ship, which more or less eliminates this issue.
AMMs will also deconflict across the entire team, so if one ship has already launched AMMs against a given threat, other ships will not also fire AMMs at it. Usually this is beneficial as it prevents wastage, sometimes however it stops your ships from launching the AMMs they need to defend against targets. You can opt out of deconflict entirely by setting COMMS to RECV (though this does make you vulnerable to friendly mines and disables CMD AMMs), otherwise you may need to manually prioritize incoming targets and/or increase salvo count.
Source: https://steamcommunity.com/sharedfiles/filedetails/?id=3152370347
More NEBULOUS: Fleet Command guilds
- All Guilds
- MD/Rail
- Jakub's Guide to not Dying to Missile Spam
- NEBULOUS: Fleet Command Guide 427
- Jakub's Guide to Not Dying to ANS Jamming
- A Thorough Guide to OSPN
- Helpful Heuristics to halt Hodgepodges and Half-measures
- Guide to Missiles and Point Defense
- Hardly's Helpful Guide to: What The Heck To Do With Your Spaceships
- Nuclear or: How You Can Learn to Stop Worrying and Make the Bomb
- Better Battle Report (BBR) User Guide