
Introduction
MSFSX is a great tool for learning the bascis of flying. The advanced simmers will often extensively mod their game to obtain even more fidelity to the game.
But if you came here, it means you probably are a newbie to this whole flight sim thing. so here i will try my best to explain the basics of flight so you can enjoy the game.
In this guide, i'll guide you through the different stages of a regular passenger flight from A to B.
I will not go into the details of procedures, approaches etc. We'll keep it simple and htis guide is aimed at newbies who play a vanilla FSX in standard planes like the stock Airbuses or Boeings.
Including how to use the different Autopilots. The GPS and the ATC window.
This guide will features screenshots and pictures that i haven't yet all collected and edited I will leave blank spaces for them. Also, my game is in French, there is no language option in the old DVD version of the game. So i'll edit the pictures or find a workaround later
Setting Up The Flight Plan


First things first. In order to fligh from A to B . You can either go VFR which is basically " free flight " or go with IFR which stands for Instruments flight. Basically, you need set up an IFR flight plan, in order to get guidance from the ATC. In VFR, the ATC will track your plane, but will not give you any guidance or instructions. Meaning you can wander around anywhere. In IFR, the ATC will tell you which direction to go, at which altitude you should be. Failing to do what the ATC says, won't reuslt in any failure. Failing to acknowledge his messages will though, result in the ATC closing your flight plan and leaving you on your own.
Suffice to say that in real life ATC ( Air Traffic Control(ler) ) is a very very serious thing. But don't worry. In FSX it is still very simple. And quite helpful.
In order to get guidance, you need to set up a flight plan. So in the free flight menu. Go the the flight plan tab to the right.
Inside the flight plan tab.
Choose your starting airport.
Make sure that you select your airport and also your starting point. Leaving it at default will make you spawn on the runway. You want to spawn at a gate or parking spot. Pick one of the gates or parkings in the dropdown menu. Make sure its large or medium size gate if you fly a big jet. Most medium twin engine jets like a 737 or A321 will fite in a medium parking. You want to have a large parking spot if you with a 747 or A340. Or any jumbo, quad engined plane. You get the idea.
Once you picked your starting airport, pick your destination. You do not pick the runway or parking spot in advance. Just pick the airport and click OK.
In the 3rd section of this window. You can choose between IFR and VFR. Pick IFR
In the 4th section, you can pick several route types. It's not really a big deal.
VOR to VOR is a route that goes from VOR to VOR... VOR is a beacon that you can see on a GPS, this option can be a good idea to pick. Though sometimes it will create a slightly strange route.
you can pick high altitude or low altitude route. As you please. Whatever you choose, you will still set the cruise altitude yourself.
Direct GPS. You can use that as well.
When you're done. Click on Find Route in the 5th section.
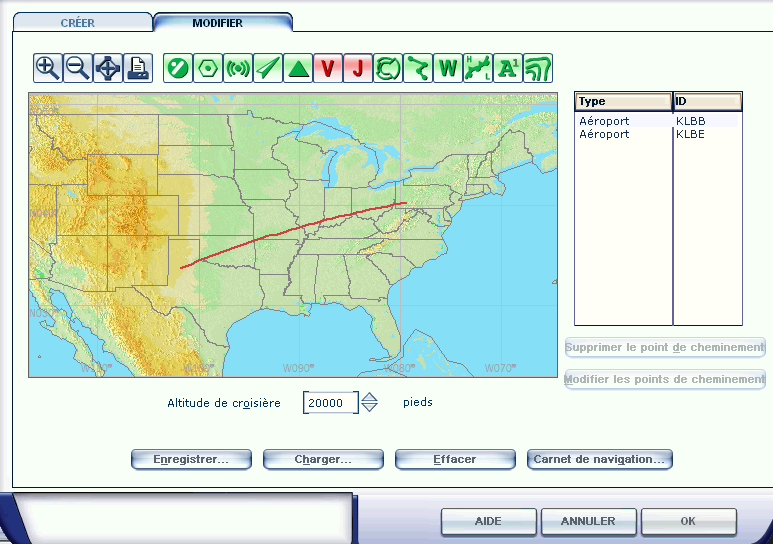
This will open up the map. ( in this case a random route )
It lists all waypoints, each waypoint can be deleted. you can add waypoints as well and design your route. If you're unsure about your ability to approach an airport, you can make it a little easier by designing a route that approaches the airport nicely aligned with the runway. It might not work in bigger airports snce sometimes the ATC will make you go around to another runway. Runways are generally used in one single direction. ( Planes do not face each other )
Under the map, you set the cruise altitude. This is the altitude that the ATC will make you ascend to. You can choose pretty much any. I'd suggest you do not go over 28k for a start. Higher altitudes can be harder to fly as the air pressure gets very low.
Try to cruise at least over 25k. Remember the higher you are, the faster is your ground speed ( i will explain speeds when we get to the cruise section )
You can ask the ATC in flight for an altitude change if you like. This choice isn't definitive, but i think you will have to climb up to that altitude at least once before being able to ask for a change.
Once it's done. Click Ok, save your route ( its a file in your documents, which is already named, so jsut press OK ) and you're set. Don't forget to pick you plane, the weather and time.
Setting Up The Fuel

Something that i forgot to add in this guide is fuel. Which is actually quite important.
You may have noticed in the option there's a "unlimited fuel" option. I would recommend not using that. Fuel has a mass, and greatly influences you plane's capability to fly, especially on large jets which hold massive amounts of fuel.
There is a very simple website you can use to help you with that.
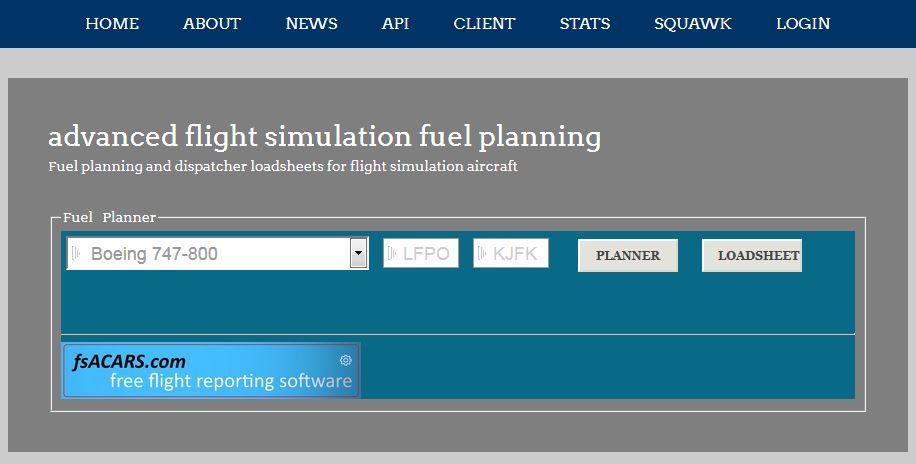
Once you have setup your flight plan, head over to http://fuelplanner.com/index.php
This is a very straight forward procedure.
Pick your plane in the drop down list, most should be in there.
And write down the ICAO code of the departure airport and destination in the two boxes. The ICAO codes are hte four character codes assigned to each airport, that you wil also find in th GPS.
In this example below, we will use a 747-800, from Paris Orly LFPO to Kennedy Airport KJFK.
Click Planner
On this page, you will see a bunch of numbers. Including the estimated time of flight.
The theoretical fuel needed for the trip, the reserve which is essentialy extra fuel to account for variations in your flight and consumption, and the last line is the total.
The number you are looking for is the Fuel on Board, which is the total.
All fuel quantities are listed in Pounds, make sure the fuel is listed in pounds in the game menu as well.
The Fuel managment window is on the main menu just next to the flight planner tab.
Click on it to show the plane's reserve tanks, whihc should all be full by default.
Each tank is listed with it's contents in pounds, and it's level in percentage.
Play with the different percentages until your total fuel is good in accordance to what Fuel Planner gives you. It doesn't have to be an exact match.
You can see the plane's center of mass shifting around on the diagram when you change percentages. It's essential you keep your center of mass aligned with the main frame, always keep the same amounts of fuel for each matching Left and Right tanks. Forward and backwards tanks don't need to be exact matches but it's better to keep the center of mass close to where it was in the first place. But having it a little bit forward or backward won't put you into trouble if you keep it reasonable.
Once it's good, confirm and you're good.
Unless you're going for a flight to Mars you will usually lose quite a lot of excess mass in this process, and this will make your plane more maneouvrable, and will allow you take off and land slower and easier. If you pick a runway that is a little too short, this would be the difference between taking off and driving into the grass.
Starting Off On The Ground.
When you spawn, if all was set up properly. You should face a hangar or a terminal. Whatever. Make sure you immidiatly set the parking brakes. on my keyboard it's RCTRL + ; or , .I have a azerty keyboard so it's ; . Sometimes planes will spawn with engines slightly spooled up giving you a small bump towards the wall. If you have crash activated you don't want that to happen obviously.
At this point, you want to start using the Radio. Good thing is, the radio is automated by the ATC windows which you can open using ù or ' .
With this window active, use the number keys ( not the numpad ! ) or your mouse to select the different options.
The first option you want to select is to set the radio to the airports traffic. the ATIS is a continuous broadcast of the local weather if you're interested.
Once it's done, contact the ATC to request permission to start your flight. The ATC will give you some information like which runway you will use, and which altitude to reach after takeoff. You can take these and set them on the autopilot in advance ( More on the autopilots later one )
If you take off on runway 36, set a heading of 360, if it's runway 14L, set the heading to be 140, etc.
This will allow you to keep your plane going straight during ascend. Before receiving more guidance.
Once he's done talking. Click the option to repeat and confirm.
Next up, contact ground, and ask for permission to start taxiing.
Ground will give you directions on the ground, once he's given you the taxi route to the runway, you can select an option to activate ground guidance. this will show some arrows on the ground to tell you where to go. As airports taxiways can be confusing and hard to identify i always use it.
In order to leave the hangar. Disable parking brakes, make sure your engines are killed by pressing F1, and then press SHIFT P to activate pushback. Your plane will slowly reverse. Press S to switch view types and A to switch cameras within each categories. Use the cameras to check there's no one in your rear, and where you should turn.
Onece you have enough clearance. Throttle up gently and turn using the rudder or the joystick towards the arrows and follow them.
A neat tip to make sharper turns, is to use the asymetrical throttle. To turn right, give power the the left side engine. To turn left, give power the the right. While using the rudder or joystick of course.
Stay connected to the ground radio until you reach the holding point of the runway. And beware of traffic, and also crossing runways.
Taking Off And The First Stage Of The Flight.
So now you should be holding at the runway entrance. Or behind other planes that are waiting as well. Contact the tower and ask permission for take off. He'll tell to either hold ( f there are planes queueing or landing ) or he'll tell you you're clear to take off. When it's clear, line up on the runway and prepare for take off.
If you followed the basic training lessons and missions. You shoud know that in order to take off you need to have flaps set. If you haven't already, lower your flaps. Depending on the plane and runway size, set them to about a third. Something like 10 or 15 max. Check that your aerobrakes are disingaged just in case. Throttle up, and SPEED.
All aircrafts have different minimal speeds at which they can sustain flight, and at different flap level. You should know these or have a small sheet handy. I don't. It generally is something like this for most airliners. You should start pulling on the stick at around 160 knots. Dont overdue it will scrape the tail. Maintain a reasonable pull until you see the plane lift up. Keep accelerating and climbing steadily. At around 1000ft, you should engage your autopilot. With a V/S set to about 1800 to 2200ft/m. If you set your starting altitude and heading right. Engage the respective autopilots and let go of the controls. Also you should engage your speed control on the Autopilot as well. Set it between 300 and 340knts depending on the plane. Each plane has a different max airspeed which in the case of airliners generally revolves around the 330knt mark. Though some older planes like the A300 had a max airspeed of 300. Propelled planes and helicopters rarely go this fast.
As you climb up, the ATC will first tell you you're leaving the airports control, and ask you to switch to another channel. Confirm and pick the next radio channel. Selecting options in the ATC window automatically sets the radio to the right channels. So don't worry about any knob.
When you switch to the right channel. The ATC will start guiding you, by giving you a new heading, and when your altitude is reached, he will make you climb in stages all the way to your cruise atltitude.
Cruising. Following Your Course. A Thing About Speed...
After takeoff, climbing and probably some radio switching and talking, you will finally reach your cruise altitude. When you do so, you can ask for a change of altitude if you fancy. But other than that there's not much to do. Just worry about following the course by changing heading in the autopilot when required.
Use the GPS or the PFD and try to follow the purple line. To open the GPS, open the toolbar by pressing alt. Then on top the screen, go to views, and look for the GPS which i think is in the dashboard tab or something like that.
More on the GPS later.
I wanted to talk about something newbies tend to be confused with.
It's speed. You will quickly see that if you open up the GPS. As you may notice, the speed indicated by the GPS, and the speed on your instruments and autopilot, aren't the same.
And when you look for the max speed of a plane on google. you'll often find something totally different than the 340kts limit i gave you earlier.
This is a simple problem. There are two types of speed involved here. Airspeed, and Groundspeed.
Airspeed is the speed of the air flowing around your plane. Ultimatly, the speed of the plane relative to the air around it. And groundspeed, the actual speed of the plane relative to the ground. Because air pressure is low in altitude. The higher you are, the less air there is to slow down your plane ( and optionally tearing it apart ) . This is why, the higher you go, the thinner the air, the higher your groundspeed will be for a fixed airspeed.
At 30k ft, in order to have maintain a airspeed of 340knts, you need to go a lot faster than what you were doing on the ground. This is why the speed of the GPS and instruments are different.
But keep in mind. Airspeed is always the speed you need to keep an eye on. If you are high in the sky with a high groundspeed but a low airpseed. Your plane could stall. Airspeed is essential and groundspeed data is pretty much irrelevant. Don't pay too much attention to it.
This is also the reason why you should never exceed max airspeed. Because it is the speed of the air around you, this means that exceeding it will put stress on your hull and wings. Which in real life results in bits of your plane being torn apart. So don't be surprised if you reach max airspeed quickly with little engine power required. You need the extra power to maintain this airspeed at high altitude, where the atmosphere is thin.
Approaching And Descending. And Runway Numbers
At some point during cruise, you will eventually be contacted by your current ATC whol will give you your distance to destination, and also give you a heading and altitude to follow. Then, you will switch to the approach tower who will give further directions until the last stage of landing. Depending on your altitude, the first message will come up more or less early. Theoretically, if you follow his direction as soon as you get the message, you will find yourself in the correct descent path. Being too slow will probably result in you arriving too high above ground.
During descend, i would advise a Vertical Speed setting of around 1800 to 2000ft/m on your autopilot, and also, you should reduce the speed setting to around 250 knts. This to make sure you have enough room to maneuvre and approach nicely. Also, when descending you might go overspeed. Avoid that by reducing the speed of the autopilot, and also, carefully using the aerobrake if necessary. Aerobrakes are a good way to slow down mid air and quickly lose altitude. But is used only if you are really off target. Generally, if you go too off, you should probably declare a missed approach to the ATC. No harm done this happens a lot IRL. In that case, the ATC will most likely make you climb up again a little, and make you fly around and back to the starting point of the final approach. you have less room to here so it can be a little challenging to get it right. Besides the ATC is sometime overwhelmed and can on occasions give you instruction a bit too late. Always have your GPS handy cause it helps a lot getting around and knowing your surroundings. As the ATCs instruction can be a little inaccurate, having the GPs allows you to correct that. And you can usually "interpret" the ATC instructions and figure out a more efficient way to it. Not necesseraly cutting corners, but just making sure you end up well aligned with the runway.
The GPS normally display the ILS ( a green outline the shape of an arrow which the tip is the beggining of the runway. When in final approach check that you are heading the right runway ( big airports often have L and R runways which means left and right for the smae number. Check the ATC messages so you land in the correct one. Zooming in or clicking on the airport on the main map menu will show you which runway is which if you are unsure.
General rule here is actually simple.
The number of a runway is the heading of the runway. When landing or taking off at runway 25. You should be landing and taking off while facing the 250° heading. the runway ID is just its heading minus a zero. Meaning the runway can be off of up to 5° left or right. Runway 25L is the runway on the left hand side when facing the 250° heading.
Runway 25 on one end is Runway 07 on the other end. You can figure it out by substracting 180 ( and not 360 ) to the runway number to give you the opposite heading.
So runway 25 has a HDG of 250, the opposite end has a HDG of 250-180=70 = Runway 7
etc...
( Thx for correcting my mistake in the comments )
During the final stages of descend, give youself time to gradually reduce your speed. At the end of approach, you shouldn't be faster than 200knts. You'll have more trouble slowing down if you arrive too fast
As you reduce speed. Gradually deploy flaps. Some planes have a sheet somewhere o nthe dash that tells about how fast you should be and at which flap level. If you don't, you can look this for your current plane. If you don't, you should generally be no faster than 250kts at the first flap level.
around 200 for second level. then 180, 160, 140 is a good starting point. Just understand that need to have enough flaps to fly at low speeds without dropping to the ground.
Landing And Wrapping Up The Flight.
At the end of the approach, you should be facing the runway. And heading down the ILS on the GPS.
the Tower ATC must give you full clearance to land first. Which might happen quite late. But if there's no plane before you, and none waiting at the runway start. You should have the green light.
If no clearance is given, you must have gone too quick, and the plane landing before you is somewhere behind. In that case, declare a missed landing or "go around". And restart.
Planes headed for landing have priority over planes on the ground. If you arrive on time, the runway will be clear and planes holding at the entrance will be asked to wait and let you pass.
Yould be somwhere around 180 to 160kts here. With flaps fully lowered. Lower your landing gear. Check it's down by looking for the big lever. If its down the gear is down. there are also small indicators that speel DOWN and go green when the gear is deployed.
You should also have your nose somewhere around the horizon. At this speed your planes loses altitude steadily, and if done properly, touch ground on the runway. you should have the nose down.
But you can always make corrections. There's little tricks here. Getting it right and doing it smoothly like a pro, is about doing it a lot of times.
Sometimes we forget how high the cockpit can be above ground, so don't aim too short of the runway because you could hit the runway earlier than you thought. And don't aim too short. A long runway on any airport supporting big airliners, runways will have more than enough room to slow down. Don't hesitate to aim for the first 1/3 of the runway if you're unsure.
When getting close ot the ground, gently pull on the stick to make sure the back wheels touch firt. Then gently put the nose down before aplying any breaks. Otherwise, the break could make the nose hit the ground too hard and break the gear.
Once all wheels are down, press period or : for azerty to deploy the aerobrakes. Pull the throttle all the way back below idle to engage reverse thrust. Reverse thrust produces a distinctive louder noise. And apply wheel brakes accordingly. Once you've slown down to around 20kts, throttle back to idle and close the aerobrakes, pull up your flaps. And exit the next taxiway. After you've exited the runway, stop. Tower will switch to ground countrol. Ask ground for clearance to taxi to the gates, parking spot, or petrol station. Pick your choice, and he will give you directions to your parking. You can activate the assistant here as well. Taxi gently ( around 20kts ) towards your parking. When arrived, parking brake on. and you can press SHFT CTRL F1 to shut down the engines.
You can now cool down, grab a cup of coffee or any nice beverage and realize how awesome you are. Cause you practicaly acheived what an airline pilot does everyday !
The Autopilots.


Different planes mean different cockpits. Here i will try to show you how to use the differnet autopilots available for the jets. Most APs look the same and use the same codes but it's always good to see all the different designs.
The Airbus A321. Most Airbuses use the same design so i'll just give this one. It's also the same for the other A320, 19, 18, 40, 30. the A380 uses a new different design. ( they're all available through mods of course )
This is rather simple.
Set the airspeed in knts using the knob under SPD
Set the Heading from 0 to 360 using the knob under HDG
Set the Altitude using ALT and the vertical speed of climb or descend using V/S. It's usually automatic.
To activate each function, click on the middle of the knob which acts as a button.
In order to activate the speed control. You first need to click the ATHR button which stands for Automatic Throttle. On all Autopilots you need to have ATHR On to turn on speed control.
You can use direct GPS autopilot by pressing the NAV/GPS switch and put it into GPS, and then deactivating the HDG kob, and pressing the LOC button. Your plane will automatically follow the waypoints and lines on your GPS.
To Engage autopilot, click the AP button. As long as the AP button isn't on, none of the function will be active. You can activate functions and then click AP when you need the autopilot without having to press all the buttons in a hurry.
The Boeing 737
IAS/MACH : Set your speed using the knob, press the SPEED button to activate the function, you must have the A/T ARM switch on ( up ) to activate auto throttle.
F/D ON / OFF Switch.
This is to toggle the pink lines on the pfd that show your autopilots "objective" it's useful if you have the AP Off but you're unsure where to point your aircraft to maintain the APs set altitude and directions.
NAV / GPS : Edit ( I checked it and i thought right )
The NAV/GPS switch lets you toggle between the heading setting and the premade GPS route. By default it is set to NAV which means the autopilot directs the plane following a fixed heading. When switching to GPS, deactivate the HDG SEL button, and activate the VOR LOC button. The VOR LOC coupled with the GPS switch, will tell the autopilot to instead follow the GPS path directly, and therefore. your plane should align itself on it's own to the purple line, and follow it.
HEADING : Set the Heading with the knob, you can also change the max roll angle by turning the inside of the knob ( you need to aim for it it's quite hard ) .
Press HDG SEL to hold heading.
ALTITUDE : Set your Alt with the knob and press ALT HLD to turn it on. Set your vertical speed by using the wheel.
To Engage or disengage the autopilot, press the master button labeled CMD A next to the altitude button.
B747
This is fairly similar with a different layout.
SPD and AT/ARM fr the speed control.
Use MACH if you use the mach value instead of knts.
To hold heading use the HLD button under the heading dial.
You can use the GPS as well with the VOR LOC and GPS switches just like the Airbus and 737.
Press the HOLD button under the Altitude knob to hold Altitude, press V/S to use the vertical speed setting.
Press CMD on the far right to engage Autopilot.
Source: https://steamcommunity.com/sharedfiles/filedetails/?id=358042994
More Microsoft Flight Simulator X: Steam Edition guilds
- All Guilds
- How to move your camera
- How to get the Best Experience
- How to talk to ATC (for dummies)
- Microsoft Flight Simulator X
- How to Install Addons + Payware/Freeware Recommendations
- How to increase the field of view on FSX: Steam Edition
- FSX Best Freeware Sites
- 6 Quick And Easy Rewards Hidden In Flight Simulator X