
Intro And Achievement Explanation
With the new Mirror of the Dreaming achievements, my brain has been activated and if you're reading this, yours may have been activated too.
While none of these achievements are incredibly difficult (yet), they do require some amount of knowledge with how mirror dungeons work. There are several resources out there, but what I was really looking for was one concise place to plan out my build. This guide is not intending to be a replacement for other excellent detailed guides that go in depth in EGO gift mechanics or a guide to the Mirror Dungeon itself but rather specific tricks for the achievements and quick-reference images.
With that out of the way, let's get into the achievements. Most of the achievements can be completed on Normal Difficulty, which may be useful if you do not have a specific team built for certain status archetypes. The ONLY achievement that REQUIRES Hard difficulty (outside the ones that specifically mention Hard difficulty) is the Tier 5 EGO Gift achievement. Everything else, while less stressful in Hard mode, is doable in Normal mode - though some of them may require heavier luck than others.
We can group our week 1 achievements into roughly five categories. The first three I won't be covering:
- Complete the Mirror Dungeon X times. This is self explanatory.
- Complete up to Floor 10 of the Mirror Dungeon. While difficult, this is also self explanatory. As of now I will not be going over specific strategies for later floors in the Parallel Superposition mode in this guide.
- Filling out certain thresholds of EGO gifts and Theme Packs for your collection. To find new Theme Packs, make sure to select Graces at the start of the run that give you extra Theme Pack selections and extra rerolls. Since rerolls refresh every round, make good use of them to hunt for new packs.
That leaves us with the two main categories that may be slightly trickier to plan around:
- Complete Floor 5 or higher with some number of EGO gifts belonging to a certain status archetype. (There are also achievements for up to 30 EGO gifts of any kind, but this should be pretty self explanatory as well.)
- Complete Floor 5 or higher with X number of Tier 4+ EGO gifts. (Up to 10 normal, or 4 fusion-only)
The rest of the guide will be focused on these two categories.
15+ EGO Gift General Strategies
Before we get into details for individual statuses and damage types, there are a few things to be aware of.
- First off, and very importantly, if you fuse EGO gifts together, the product only counts as 1 EGO gift for the achievement. If you are going for these achievements, fusing EGO gifts for the target status will not only lower your total count, but may make it impossible to complete the achievement on a given run, since ingredients for status gifts will NOT reappear if you own a fusion that uses them.
My images here DO include fusions, since these are also meant to be able to be used for general reference - but if you are going for these achievements, fusing is a bad idea.
- If there are extra EGO gifts for a status type in a theme pack, you CAN obtain them by fusing non-useful EGO gifts. This may be a better option than rerolling at the shop, depending on how much Cost you have saved up and how many spare EGO gifts you have laying around.
GRACE SELECTION
Your Rest Bonus may vary, but here are my suggestions for Grace bonuses to focus on in rough order of importance. It's not super necessary to follow this to the letter.
Interstellar Travel - The ability to refresh Theme Packs is extremely powerful and allows you to more easily hunt down your missing EGO gifts - most packs have at least 1 option likely to match your starting archetype, so seeing as many packs as possible is essential. In Normal mode, it is impossible to obtain 15 EGO gifts for a given status without the help of unique EGO gifts from Theme Packs - so making sure to focus these is extremely important! Choosing this Grace is priority number 1, especially in Normal Mode.
Perfected Possibility - I'd only take this at full Rest Bonus. Getting two additional EGO gifts crossed off the list immediately, one of which being a Tier 3, is very valuable. However, if I am lacking Rest Bonus, I would say choosing the other 4 options combined gets you more value than choosing this bonus by itself.
Star of the Beginning - Getting a free refresh in the shop, as well as an additional buying option, is very good for cycling gifts. Side note - I would personally avoid Moon Star-shop. The keyword refresh sounds good, and IS good at the start, but as time progresses and you only have a few missing gifts, that refresh is less effective and you'll have better luck locating your missing gifts via fusion and pack rewards. If you really want to run Moon Star-shop you can skip the next two graces in order to afford it. Know that I have completed most of these runs while not taking Moon.
Star-shower - Starting with an additional EGO gift is nice, but starting with 400 cost ensures that you have the resources you need in case an early shop is particularly lucrative.
Cumulating Starcloud - Mostly here just to round out the Rest Bonus cost, this one is surprisingly useful. Building up Cost early lets you boost your income a lot, and extra Cost for selling useless EGO gifts that are too low to be fused into what you need is also a nice little bonus.
GENERAL STRATEGIES FOR ALL ARCHETYPES Take the difficult/abnormality encounters whenever you can. It may increase the length of the run, but getting Cost AND a free EGO gift is better than only getting one or the other.
If you do happen to find yourself in an event, prioritize options that get you EGO gift quantity. If you gotta fight an abnormality to get 2 gifts instead of 1, it's worth it.
EGO Gifts do not repeat. Use this to your advantage! If there are only four possible Tier 1 EGO gifts for your status, and you have 3 of them - you are better off trying to obtain that final gift by fusing instead of shop rerolling. Don't be afraid to buy trash EGO gifts in the shop for the sole purpose of fusion, especially when you are close to completing a certain tier of gift. If you select a keyword and the result of a fusion does not show your keyword, that means you have obtained all possible gifts of that Tier that can be currently fused.
A related point - the results of a fuse will behave as if you still own the ingredients to whatever fusion you made. (All this means is that the results of a fusion cannot be one of the ingredients to that fusion.) This can be useful to help force certain gifts.
Some EGO gifts can only be obtained in Hard Mode! The wiki is not super clear about this and is also not good about showing which gifts those actually are. This guide's images will always separate out Normal and Hard mode gifts and fusion options.
Don't spend Cost on rerolling too early. The deeper your run gets, the more trash EGO gifts you will have picked up, and the more likely it is you will be able to obtain what you need by either shop luck, pack rewards, or fusion. The Floor 3 shop is where I will really start to consider my options for rerolling.
If you are playing on Hard Mode, and you do not have enough EGO gifts on Floor 5, continue playing into Parallel Superposition. Floors 6 - 10 will pull from the same pool of packs as Floor 5, so if you missed an important Theme Pack you will have additional chances to pick it back up. Past Floor 5, you don't have to 'win' - you can forfeit and collect rewards and still complete 'Beat Floor 5+' achievement conditions.
Following this guide should make completing these achievements very consistent, even on Normal Mode. However, if you are struggling with getting enough gifts, consider switching to Hard Mode, even if your best leveled team doesn't match the archetype you are going for. Getting an additional EGO gift after every pack is extremely useful for fusion purposes even if you can't get two of your desired status. You will be a bit weaker as a result if your team doesn't synergize with your EGO gifts, but if you have a strong enough team to weather the storm, this will make all of these achievements much easier. Hard Mode also has additional Theme Packs that are better at limiting EGO gift rewards to the desired archetype.
With that being said, let's get into it. Each image will include several sections: EGO gifts obtainable in Normal Mode (white text), EGO gifts only obtainable in Hard Mode (red text), and EGO gifts that are only obtainable in certain theme packs. There are also fusion sections for each of these categories, while applicable. Theme packs are labeled with two numbers or sets of numbers. Numbers in white are the floors that the pack can appear on in Normal Mode, and red numbers are the floors the pack can appear on in Hard Mode. If a Theme Pack is Hard Mode only, it will appear in red.
15+ BURN

Burn is one of the hardest of these achievements to obtain due to its limited presence in Theme Packs.
If you are okay with resetting and losing your Rest Bonus, getting Hell's Chicken, especially with a guaranteed burn gift, is very useful on Floor 2. You can usually at least land the pack with enough rerolls, and this is one of the exceptions where I would prioritize Event spaces in order to get the chance to earn the Burn gift through one of them. (Assuming you weren't lucky enough to get it as a guaranteed pack reward.)
Similarly, reroll on Floor 5 for LCB Regular Checkup. The gifts here are not super common, especially since they are all Tier 3, so going into this with a decent amount of Cost for shop rerolling, or extra EGO gifts for fusion, will be extremely useful here. Events are once again useful here to potentially land a guaranteed Burn gift. If you've completed this achievement, congrats! It gets smoother from here.
15+ BLEED

From one of the hardest achievements of this type, to one of the easiest! There are so many Bleed EGO gifts that this one is hard to miss.
While focusing on standard EGO gifts is fine, also be aware that each Floor has the possibility for a Theme Pack that may contain a guaranteed Bleed gift as a reward, if you are lucky. If you have trouble with this one, be sure to focus of choosing these Theme Packs with unique EGO gift rewards - you can get the standard gifts anytime, so take full advantage of these limited packs!
15+ TREMOR

Tremor is interesting. Ideally you can pick up the S.E.A. pack on Floor 2, but even if you don't - Timekilling Time is a lategame secret weapon that is incredibly useful. Not only can it show up on two floors, making it very likely you will be able to find it with enough rerolls, the Theme Pack itself is often full of events that also grant Tremor gifts. This is a scenario where I would shift my priority on stage selection to focus on getting as many events as possible.
15+ RUPTURE

It's important to have a strong start with Rupture. The lategame option is LCB Regular Checkup, which as mentioned with Burn, isn't very consistent at getting you its rarer Tier 3 gift options. Rerolling early for Outcast is nice. I would also recommend Hell's Chicken over S.E.A. for the Floor 2 option when possible. Hell's Chicken is more consistent and often includes an event that will give you the Rupture gift for free.
15+ SINKING

Sinking is on the easier side of things. The Unloving is a great early option, with Noon of Violet coming late enough that you are fairly likely to be able to fuse into those gifts, as well as the potential pack reward. The layout of Noon is also beneficial with two forced events, which could lead to filling out those extra unique gifts for free.
15+ POISE
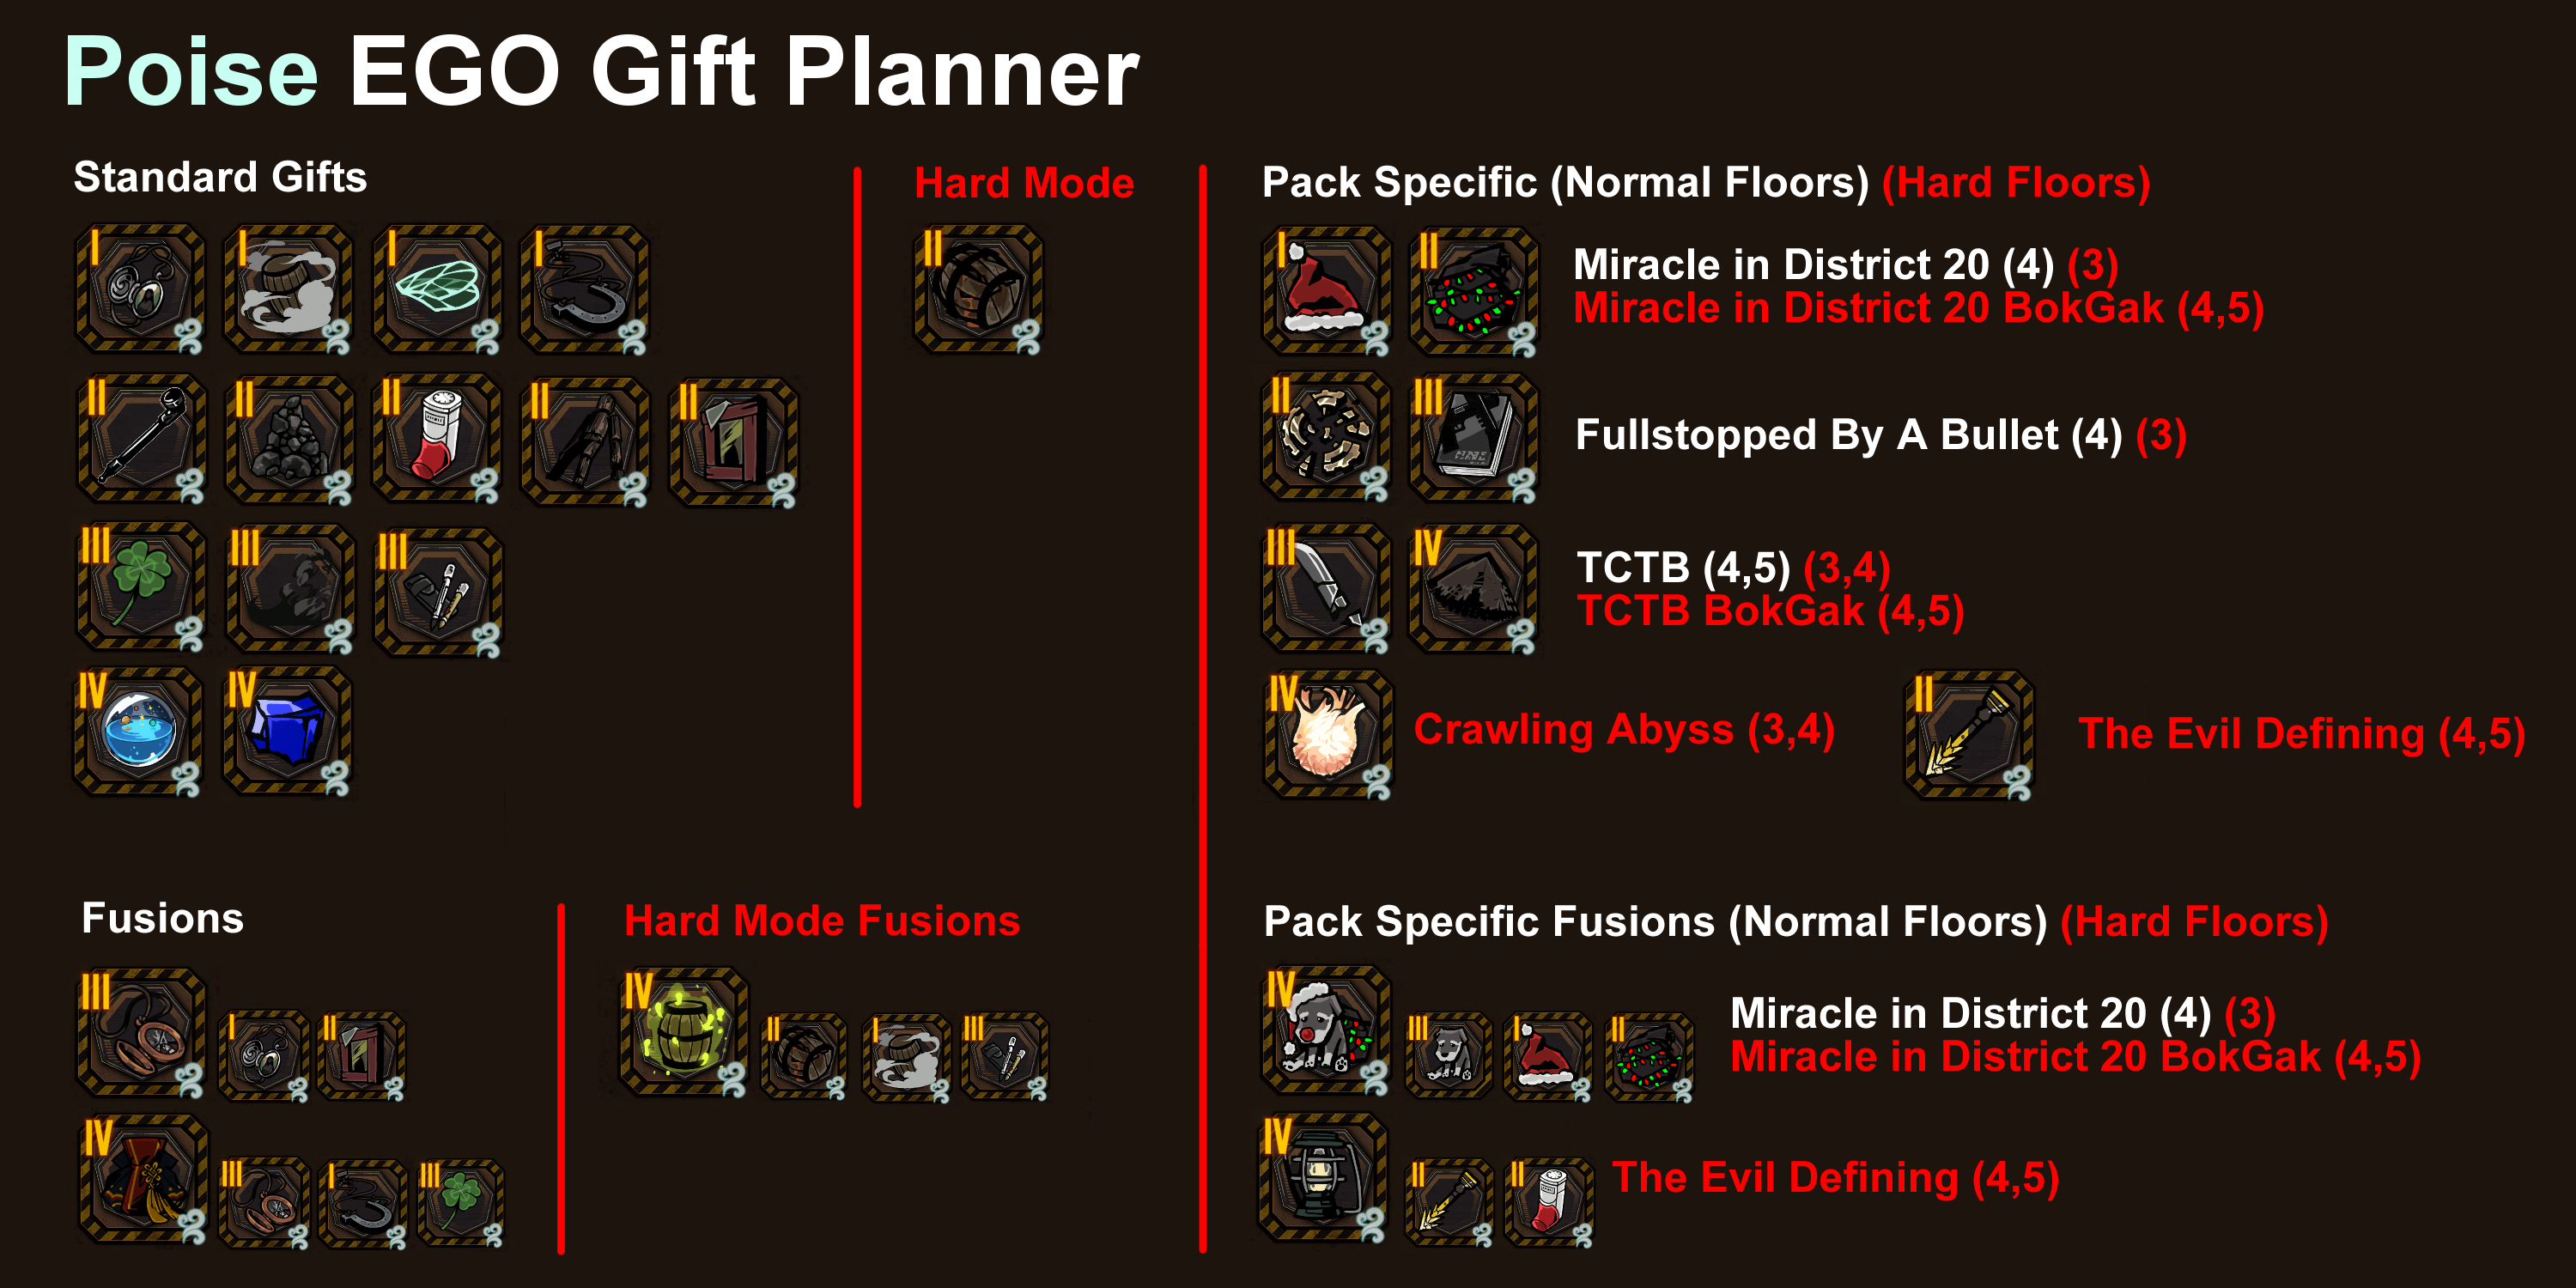
Poise has lots of options here as well, though a few are locked to Hard Mode. Miracle in District 20 is probably more efficient vs Full-stopped By a Bullet, because its Poise gifts are a lower Tier and will be more common to run across and easier to fuse. If neither option shows up, To Claim Their Bones is also available on Floor 4 and will very often include one or both of its Poise gifts as a guaranteed reward. However, prioritize Miracle or Full-stopped for Floor 4, because we can always pick up To Claim Their Bones on Floor 5 as a last resort.
15+ CHARGE
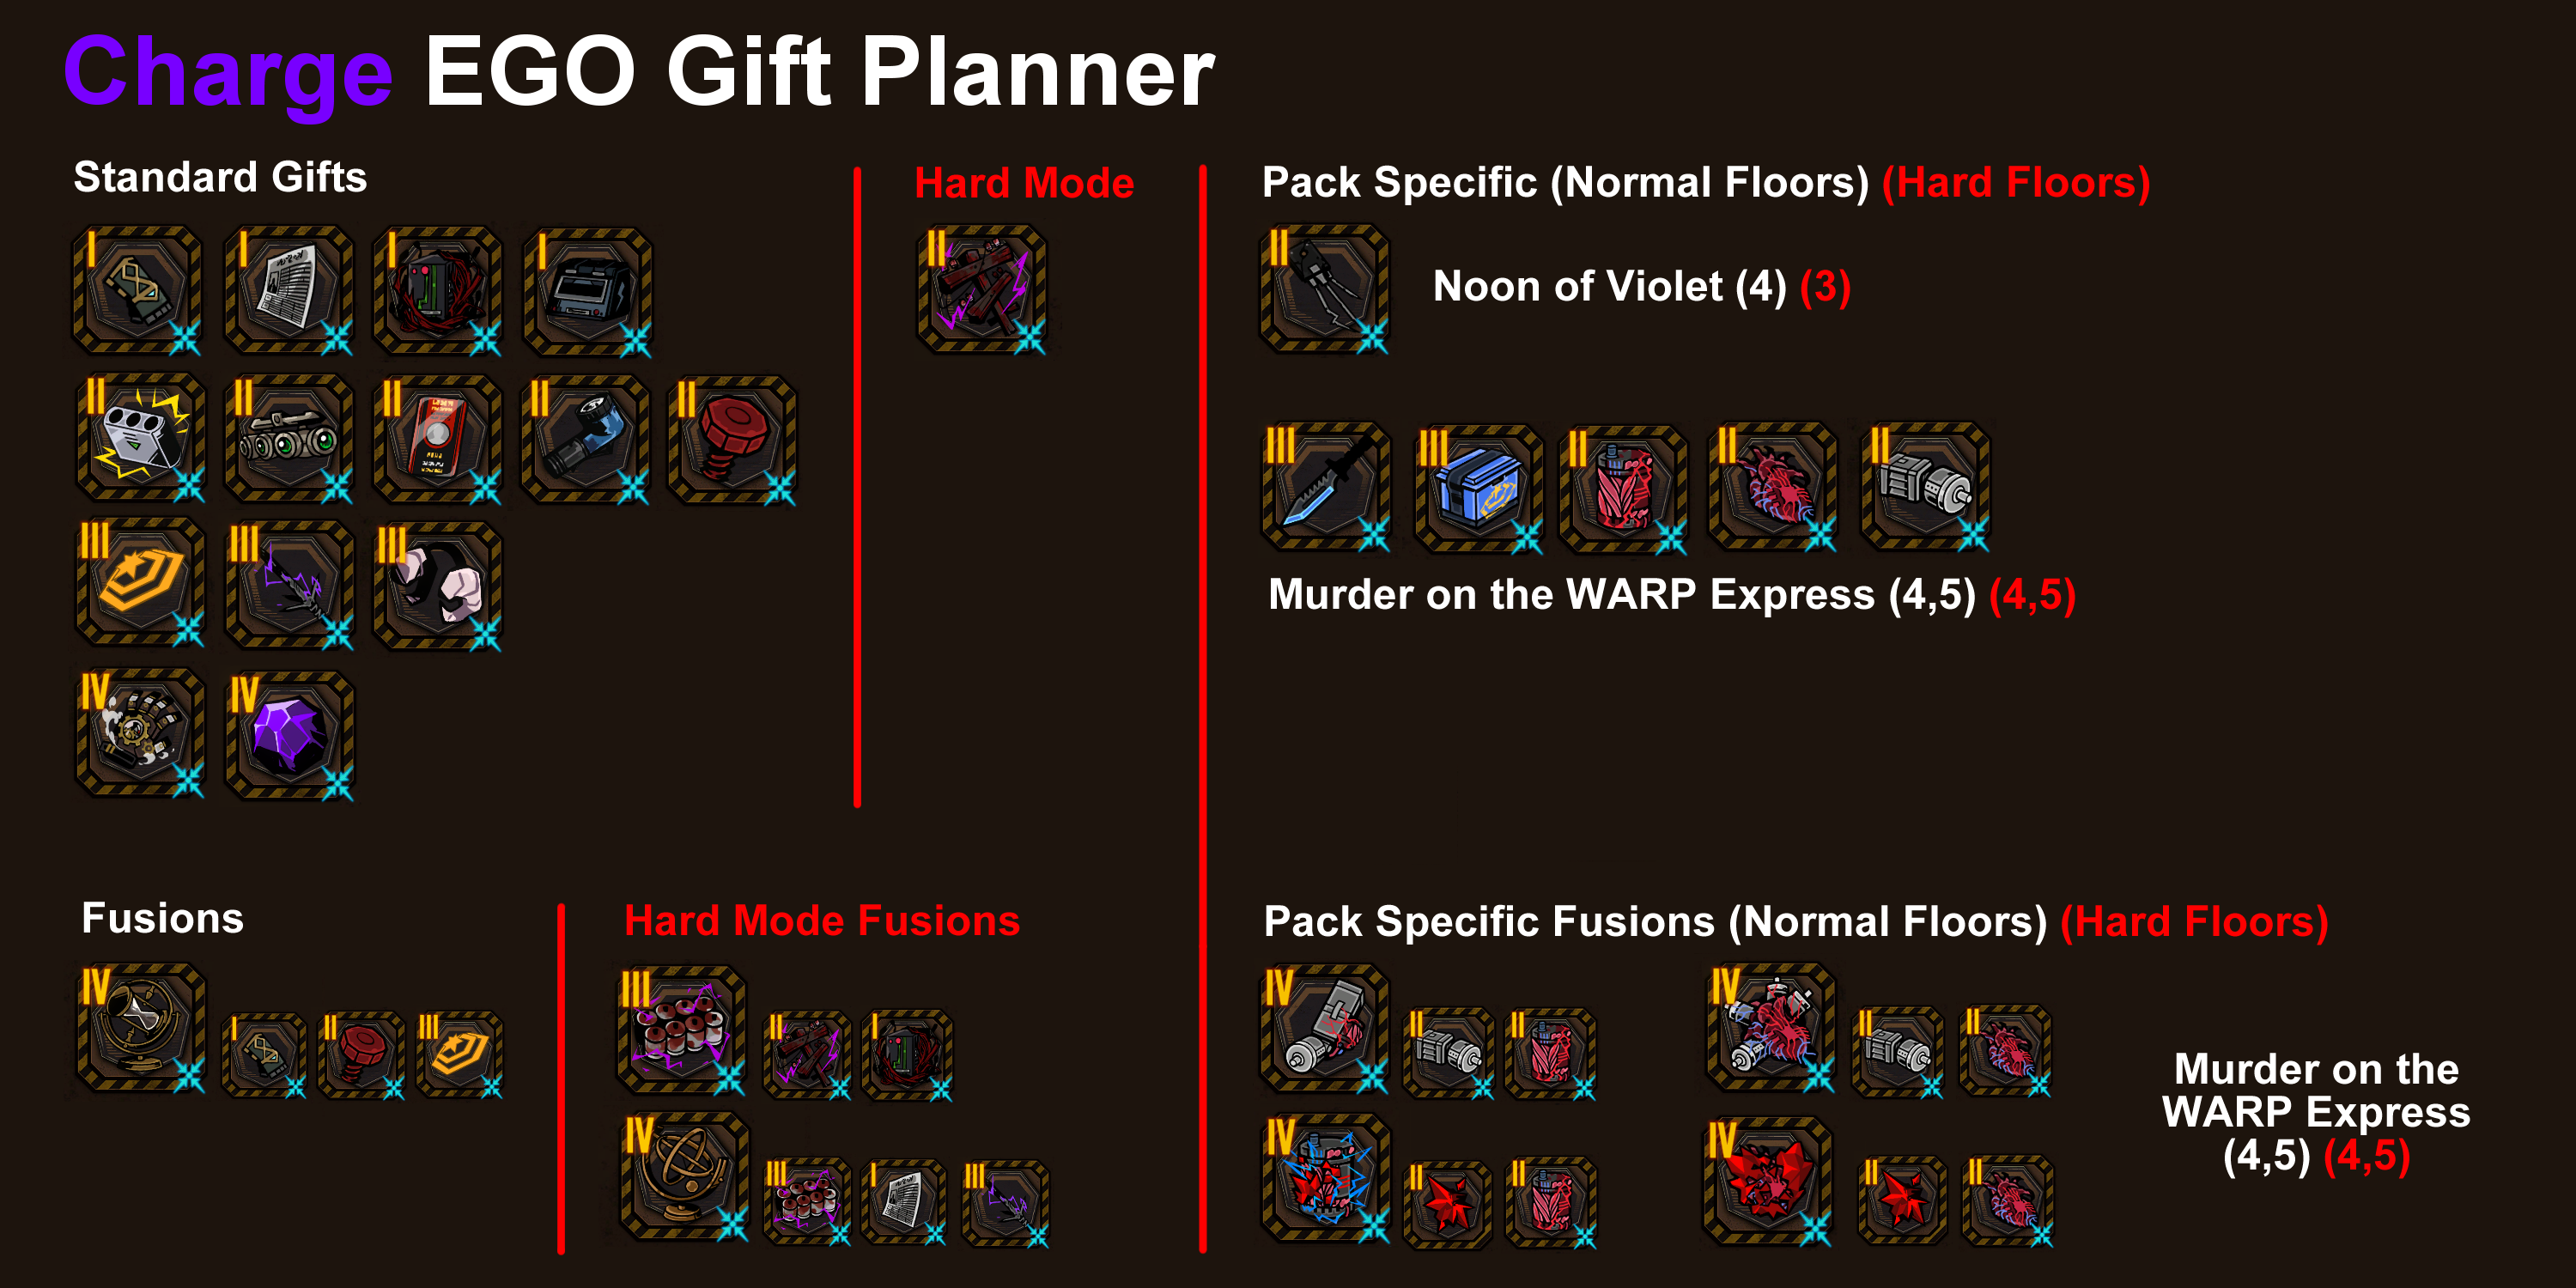
Charge shares a similarity with Tremor, in that Murder on the WARP express is a very consistent pack to find and provides a HUGE number of Charge gift options. Noon of Violet is basically a worst case scenario option if you happen to not find WARP on Floor 4, which you should be aiming for every time. (Though in Hard Mode these packs do not conflict.)
10+ BLUNT

The damage type achievements are much less intimidating. Blunt is the simplest of these. Even better, Normal Mode has access to the dedicated 'To Be Crushed' and 'Crushers and Breakers' Theme Packs, which are very likely to contain relevant EGO gifts. They are not included on the graphic, but on normal mode look for the first of these packs on Floors 2/3 and the second on Floor 5. On Hard mode, Floors 1/2 followed by Floor 4.
10+ PIERCE
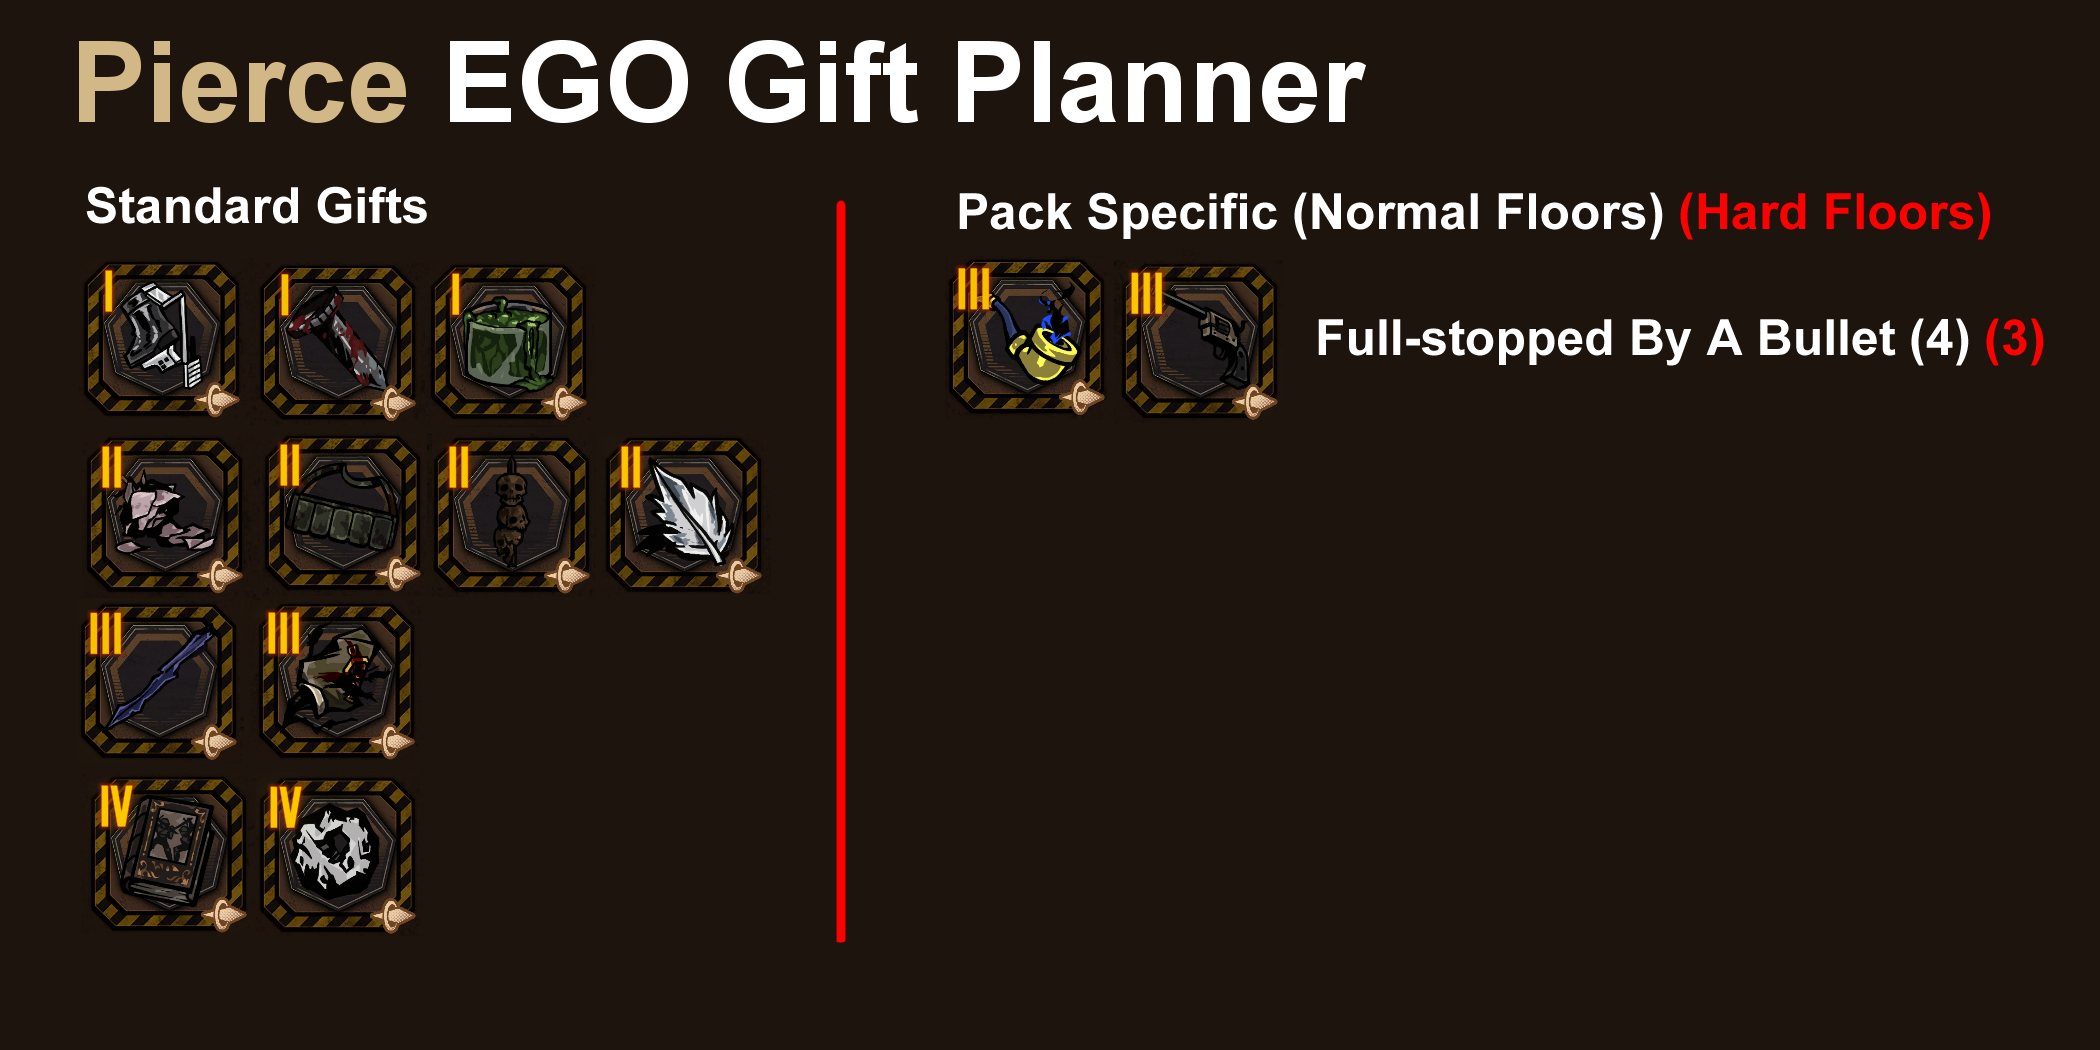
Piercing damage is similarly simple, with even more options. Follow the same Floor layout as mentioned in the previous section to find the 'To Be Pierced' and 'Piercers and Penetrators' Theme Packs. Additionally, Full-stopped by a Bullet can pick up the slack as a mid-run option.
10+ SLASH

Slashing is the funniest of all of these. It still asks for 10 gifts but has a huge array of additional options thanks to our friends at the Blade Lineage. You can follow the same Floor layout as mentioned in the Blunt section to find the 'To Be Cleaved' and 'Slicers and Dicers' Theme Packs. (You can aim to choose "To Claim Their Bones" on whichever Floor will not conflict with the Slicers and Dicers pack - Floor 4 for Normal, Floor 3 on Hard.)
Tier IV Gift Overview
This one can be tricky. Getting up to ten Tier 4 gifts is a lot, and the 'four fusion-only Tier 4+ gifts' achievement is also quite a challenge, especially in Normal Mode. Because we have twice as many floors in Hard Mode (and you collect twice as many gifts as floor clear rewards), these achievements are not nearly as large of a challenge in that Mode.
The remainder of this section and the following section will be written as a guide for Normal Mode. You can follow the same principles if playing in Hard Mode (especially if not progressing into Floors 6 and above), but there is much less urgency because of the aforementioned perks of playing on Hard.
The basic idea for this is to focus on selecting packs that have high-tier rewards, while also buying any Tier 4 gifts we happen to see at the shop.
I highly recommend going in with at least 110 Rest Bonus for the following Grace selections. The Binary Star-shop Grace option will be useful as it will help you roll into more Tier 3s and 4s at the shop. As before, Interstellar Travel is essential, letting you reroll into seeing more reward options for packs, as is Star of the Beginning letting you likewise reroll shops. This time, I also recommend Moon Star-shop for the additional free refresh in the shop alone. Lastly, Star-shower will kick us off with 400 cost to help us avoid missing out on anything good right off the bat.
The priorities while trying for ten Tier 4+ achievement is much different than if you are trying for the four fusable Tier 4s achievement. I will quickly talk about the goal of ten Tier 4s here, as it is more straightforward.
Getting as Many Tier 4s As PossibleYou can follow some of the suggestions in the below section for fusables, but really, since we don't care about what type of Tier 4 gift we obtain, a lot of this achievement boils down to just "collecting two Tier 3s and a Tier 2, fusing them, and being happy with whatever happens." The fusion only gifts are a nice bonus but not the priority. Remember that it is not essential to fuse into a Tier 4 as soon as you get the ingredients for it - waiting until later floors will allow the ingredients to sit in your inventory and block those gifts from appearing in shops or other fusions. Holding onto a large number of gifts is a good way to make your rerolls even more effective in the shop.
Outside of the fusion-specific gift ingredients, you should only buy Tier 3s or Tier 4s from the Shop. You will get enough of the lower tier gifts by random event fights and rewards to help fuel your fusions. Tier 1 gifts can mostly just be sold for extra Cost income since they will not contribute to fusing a Tier 4 directly. A reminder from earlier - take the difficult/abnormality encounters whenever you can. It may increase the length of the run, but getting Cost AND a free EGO gift is better than only getting one or the other.
I do recommend starting out with The Unloving and Automated Factory packs, because that is a nice easy Tier 4 fusion to obtain and is early enough where you likely won't have many other good options as pack rewards. From Floor 3 onwards, any pack that offers a Tier 4 gift as a reward should be taken no questions asked. If none of them do, which will usually be the case, there are couple good ideas of packs to focus on. Taking a guaranteed Tier 4 is better than heading into these packs without a guarantee.
To Claim Their Bones - Two available tier 4 fusions in Normal Mode, and an additional two that may randomly appear as rewards or in the shop. Very good pack. (Even better in Hard mode.)
Timekilling Time / WARP Express - Both offer flexible options for obtaining Tier 4 gifts from fusions, and fusion ingredients are often pack rewards. If you have no other options, head into one of these and keep an eye out for ingredients. (A full ingredient list is in the following section.)
You can also check which EGO gifts have increased odds of appearing for each of the final packs you landed on by clicking the magnifying glass on pack selection. Every little bit helps!
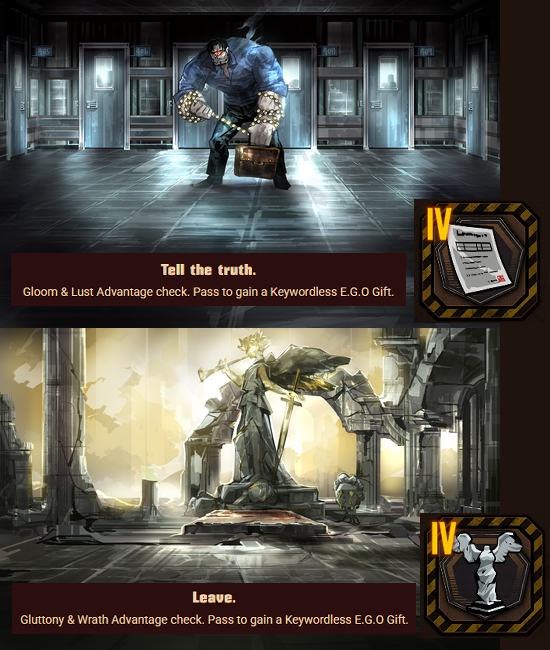
There are also two events that give Tier 4 gifts as rewards. Keep an eye out for these and be sure to select the correct option if you happen to run into them.
Best of luck as you go for this achievement - this is probably the hardest Normal Mode achievement right now. For the rest of this guide we'll focus on collecting four fusable Tier 4+ EGO gifts in one run. It's a scary prospect, but you can make this fairly consistent with a solid gameplan. Let's take a look.
4+ Fusion-Only Tier IV Gifts


For some players this reference image may be enough for you to wing it and get the clear, but I will also provide a very detailed walkthrough of my strategy to optimize your chances at getting this achievement - even in Normal Mode.
With a limited selection of status Tier 4 gifts, we want to choose the easiest ones to make. The Burn, Bleed, and Poise gifts all take 4 ingredients, while Tremor, Rupture, Sinking, and Charge only take 3. The best case scenario here is taking either Charge or Tremor; as we will use these statuses to interact with Theme Packs later on.
None of the starting EGO gift options are used in any fusion recipes. Tremor or Charge are good options here - Floor 3 is the only floor that we can choose whatever we want, so making a Tremor or Charge reward more likely is nice. Otherwise, it doesn't matter too much.
First off, with enough rerolls, we can pair up "The Unloving" with the "Automated Factory" Packs on Floors 1 and 2 to get a guaranteed Tier 4 for no extra work, assuming the packs have their ingredients as a reward, which they always(?) or nearly always seem to. You can do something similar with "Faith and Erosion" and "The Unconfronting" instead, but since doing both routes is impossible, we want to go for the Unloving/Factory route because they are completed on earlier floors.
As you progress through Floors 1-2, hold on to your gifts to block duplicates and help you hunt for your Tier 4 gift archetype. Again, take every Difficult Encounter and Abnormality Fight you can. If you find yourself in an event, prioritize getting as many gifts as possible. When clearing the Floor, Cost is the highest priority, followed by guaranteed gifts.
In early shops, only use your free rerolls and keep an eye out for ingredients. Tremor and Charge ingredients are MOST important to find, but Rupture and Sinking are good too. I wouldn't go for the others unless you happen to get a shop with like, 3 of the ingredients available. Do not fuse or sell any of the status EGO gifts yet.
When you get to Floor 3, you have ideally made some progress towards a few of the status Tier 4 gifts. For now, focus on finding a Theme Pack that rewards you with a useful gift - whether it be an ingredient you need or simply a high-tier gift. You can reroll once or twice in the shop, but prioritize saving Cost.
We've now reached Floor 4, which is where the core of this strategy comes into play. Use your rerolls to hunt for Timekilling Time (TKT) and WARP Express Packs. You may see both of these pop up at once. Prioritize packs that include unique ingredients as rewards. TKT is slightly more optimal to do first, because all four of its ingredients are Tremor-based, while one of the WARP ingredients has no keyword. If multiple packs have ingredient rewards, choose whichever has the higher number of them, to increase the odds we'll be able to collect another part of that fusion.
Whichever you select, the priority should now be on hitting as many events as we can. There is a decent chance in these packs that events will reward you with one of our desired ingredients. Be extra careful to not choose an option in an event that will give you any of the EGO gifts that are guaranteed as a reward! Here are the relevant events for both TKT and WARP, as well as their options.
At the shop, it's time to use up a majority of the Cost that we have saved up. We need to hunt down a complementary ingredient to the one we know is waiting for us as a reward. For example, if you know you have a watch case reward after a TKT pack, it is more important to buy one of the watch hands ingredients than another watch case!
Now's the time to start burning through our collection of trash that we've been building up all run. Attempt fusions before you use rerolls. Every failed fusion is just one more item that can block a duplicate from appearing in the shop, making ingredients more and more likely to appear. Because of this, DO NOT FUSE your spare Tremor or Charge Tier 2 gifts!!!! Holding onto these makes you more likely to fuse a vital ingredient! These are doing double duty for both the Theme Pack fusion gift AND your base Charge/Tremor gifts.
We also need to examine which of the status Tier 4 gifts we are going to commit to. We have one guaranteed Tier 4 from the Unloving combo, and are about to collect our second after this pack, so we only need two of these status gifts to reach our target of 4. Check which of the status gifts you are closest to completing, if you have not yet managed to complete anything yet. Use the other spare ingredients as fusion fuel to attempt to fuse into either a unique charge ingredient for WARP packs or a unique tremor ingredient for TKT.
Now that we've committed to our final options, be sure to keep an eye out for any missing ingredients as we now use our Cost to reroll for our missing TKT or WARP ingredient. Once you are low on Cost, you can finally use the rest of whichever trash Tier 2 gifts you haven't used yet for the current pack. (IE, Tremor for TKT and Charge for WARP.)
Following this process, it is VERY likely that you will be able to pick up at least 1 of the unique ingredients to match with our guaranteed reward. If you play extra well and get a bit lucky, it is entirely possible that you managed to collect all four ingredients. The hard part is done!
Floor 5 is a bit of a wind-down. If you are not done yet, reroll the Theme Packs until you get whichever of TKT or WARP that you did not take the previous floor. Because there is no reward in normal mode, we are basically in cleanup mode hunting for any missing ingredients for our status fusions. Events are still a priority in Floor 5, in case you get lucky with an event ingredient.
The Floor 5 shop depends on how the floor went. If we got one of the ingredients from an event and already have three Tier 4 fusions, we may want to fuse any extra gifts and reroll for a second half to that ingredient. If we did not get lucky with an event or are still only at two Tier 4 fusions, instead return your focus to fusing or buying the last gifts needed to finalize those fusions.
Don't forget to finally actually assemble your Tier 4 gifts at the Floor 5 shop!
With a bit of luck, you've done it! Congrats!
If you fall short, don't get discouraged. I think anyone can do this within 2 or 3 attempts using this guide. Here's my Normal Mode clear using the above strategy (and not even a particularly good team.)
As you can see, I ended with five fusion-only Tier 4 gifts, with a sixth nearly finished as well! I still ended up having enough resources at the end of the run to get Thrill going. Hopefully this serves as encouragement that you CAN get this done even as a Normal Mode player!
Outro
Any feedback or notes (or if there are any mistakes in my documents), definitely let me know and I will reexamine those. Otherwise, thanks for reading and good luck achievement hunting!
I plan to keep this guide updated with future achievements as they are released.
Source: https://steamcommunity.com/sharedfiles/filedetails/?id=3435555535
More Limbus Company guilds
- All Guilds
- Limbus Company Guide 904
- Limbus Company Guide 897
- Limbus Company Guide 878
- Event Farming Guide
- Limbus Company Guide 864
- How to Paint the Town Red: Lust Guide
- Mastering Gacha & Lunacy Resource
- TRADUCCIN al ESPAOL de Limbus Company
- Limbus Company Guide 831