Introduction / Einleitung
Welcome to my guide of Legend of Grimrock 2
First: Thanks to Kabraxis for helping with the english translation!
With this guide you will see almost everything Grimrock 2 has to offer. Besides you can unlock the following achievements:
Island Master, Seeker of Secrets, Treasure Hunter, Skull snatcher, Master of the Elements,
Chop Chop, Piece of the Pie, Watcher of the Skies, Golden Boy, Cartographer, I Have the Power!, Like a shadow, Hard as a rock, Having a Gneiss Time, Pest Control, Fumigation, Rest in Peace, Dragon Slayer, Enlightenment, Code Cracker, Snake Charmer, Hallowed Ground, Castle Crasher, Mine Sweeper, Turn off the Heat.
Every map has the same legend but there are symbols which are not represented on it. I`ve tried to keep it simple, so you can easily understand what`s the meaning of it.
Additionally on the quick(over)view you can see all important things that can be found in a level.
Statistics: 77 secrets, 20 powergems, 26 chests,11 buried chests, 9 skulls
Update section added
______________________________________________________________________________
Willkommen zu meinem guide zu Legend of Grimrock 2
Als erstes danke ich Kabraxis für seine Hilfe bei der englischen Übersetzung!
Mit diesem guide werdet ihr fast alles sehen was Grimrock 2 zu bieten hat. Nebenbei könnt ihr die Achievements freischalten die oben erwähnt werden.
Jede Karte hat ihre eigene Legende aber es gibt Symbole die dort nicht aufgeführt sind. Ich habe versucht diese so einfach wie möglich zu halten, so dass ihr deren Bedeutung leicht verstehen könnt.
Zusätzlich könnt ihr auf der Schnellübersicht alle wichtigen Dinge sehen die ihr in einem Level finden könnt.
Update Sektion hinzugefügt
Updates
31.10.2014:
-Some optical improvements (like capitalization)
-Pyramid of Umas: Serpent Staff isn`t necessary to open the door - C1 deleted from text and map.
1.11.2014
-Hamlet of Stormbreach: added nr. 1 to the map, added picture to nr.4.
-Hamlet of Stormbreach - Sewers: added letter B and explanation / increased and moved nr. 1 because it was to small.
-Ruins of Desarune - Archives: added the word "strafe" to the archive door directions and the storage room secret directions for better understanding.
3.11.2014
-replaced all mimic-treasures by normal treasures because the mimics are RANDOM.
9.11.2014
-Cemetery: added explanation for northern puzzle marked with C
-Ruins of Desarune: "rest" replaced by "wait" at C
15.11.2014
Sleet Island: added nr. 5 - Embalmer`s Pants
Sleet Island - Flooded Dungeon: added picture of Shield of the Elements
20.11.2014
Barren Desert: normal chest marked as buried chest.
12.01.2015
Cemetery - Wormbound Catacombs: solution for the five plates in the north west corner is now correct, wrong red cross fixed.
Pyramid of Umas: at B "close" renamed to "open"
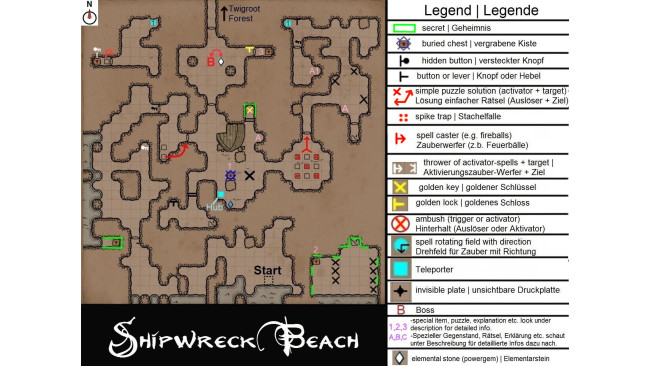
Shipwreck Beach


Quickview / Schnellübersicht:
3 secrets, 1 powergem, 1 buried chest, 4 chests, 1 golden key, 1 golden lock, Boss: Viper Roots
A:
Put the Rapier from A1 on the statues - one in the centre of the map, one in the east - to open the secret and the door.
Platziert den Rapier von A1 auf die beiden Statuen - eine steht im Zentrum der Karte, die andere im Osten - damit sich die Tür als auch das Secret öffnen.
1:
2:
3:
Shipwreck Beach - Dead Sailor`s Cave

A:
Horn of summoning
Twigroot Forest


Quickview / Schnellübersicht:
2 secrets, 2 chests, 2 buried chest, 1 golden key, 1 powergem, Tome of Leadership, Tome of Knowledge, Boss: Summon Stones.
1:
2:
Twigroot Forest - Twigroot Tunnels


Quickview / Schnellübersicht:
8 secrets, 2 powergems, 1 chest, Rogue Vest
A:
Battle = Weapon (Any)
Cold = Clothes (any)
Disease = Health Potion
Famine = Food (any)
Battle = Waffe (egal welche)
Cold = Kleidung (egal welche)
Disease = Heiltrank
Famine = Essen (egal welches)
B:
After pushing the button, quickly step to the right (without turning), the pit under you will be opened faster than the door. A poison bolt will be shot at you. If you are fast enough you can dodge this and run into the room before the door will be closed. If you are pushing the button inside the room, the same will happen again!
Nachdem ihr den Knopf gedrückt habt weicht sofort nach rechts aus, denn die Grube unter euch wird sich schneller öffnen als die Tür. Außerdem wird ein Giftbolzen auf euch abgefeuert. Wenn ihr schnell genug seid könnt ihr diesem ausweichen und schafft es noch durch die Tür zu kommen bevor sie wieder zu geht. Sobald ihr den Knopf von der innenseite des Raumes drückt passiert das gleiche nochmal!
1:
2:
3:
Twigroot Forest - Basement

Quickview / Schnellübersicht:
2 secrets, Tome of Health
Forgotten River


Quickview / Schnellübersicht:
4 secrets, 1 powergem, 1 skull, 4 chests, 1 buried chest, Rogue Gloves, Rogue Hood, 1 golden key, 1 golden lock
A:
Both activator-spells must hit their targets at the same time to disable the teleporters for a few seconds. The plates control all of the adjacent grids.
Beide Aktivierungszauber müssen gleichzeitig ins Ziel damit die Teleporter für einige Sekunden ausgeschaltet werden. Die Druckplatten steuern alle angrenzenden Gitter.
B:
If all four elements are at their particular places, the castle door will open if you are in front of it. After defeating the final boss you have to stand in the middle of the four elements and cast the central rune of your runeboard to get to the fifth shrine (River Tunnels B1)
Wenn ihr alle vier Elemente richtig platziert habt, wird sich das Tor öffnen, sobald ihr davor steht. Habt ihr den Endgegner besiegt, müsst ihr euch in die Mitte der vier Elemente stellen und die mittlere Rune auf eurem Zauberfeld zaubern, um zum fünften Schrein zu kommen (River Tunnels B1)
1:
2:
3:
4:
5:
6:
7:
Forgotten River - River Tunnels
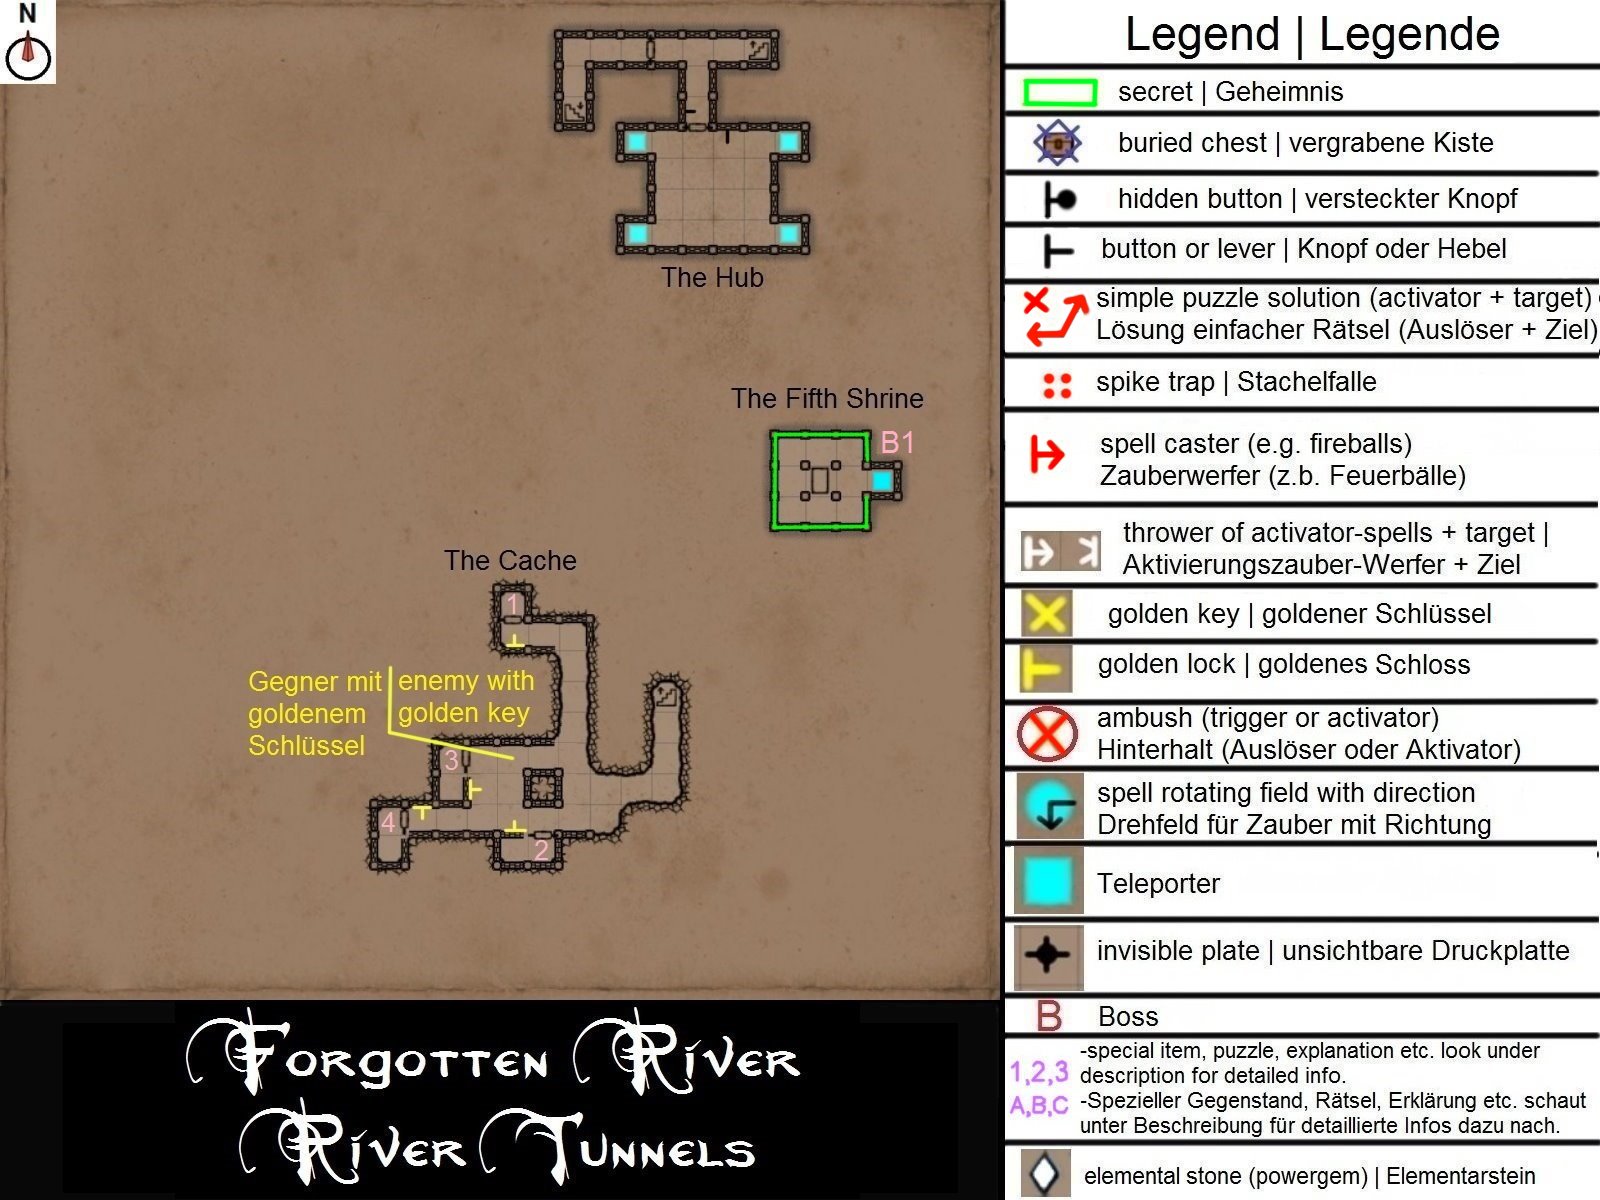


Quickview / Schnellübersicht:
1 secret, 1 golden key, 4 golden locks, Archmage`s Mantle
B1:
see Forgotten River B
Siehe Forgotten River B
1:
Snake Charmer`s Catch: Antivenom, Rope, Serpent Bracer, Scroll of Poison Shield
2:
Thief`s Catch: Crookhorn Longbow, Arrows, Lockpick, Speed Potion
3:
Paladin`s Catch: Heavy Shield, Fireblade, Small Healing Potion
4:
Conjurer`s Catch: Archmage`s Mantle, Small Energy Potion, Orb of Radiance
Keelbreach Bog


Quickview / Schnellübersicht:
2 secrets, 2 powergems, 2 buried chests, 1 chest
A:
All levers have to face down. One lever pulls two others at the same time. Looks harder than it is.
Alle Hebel müssen nach unten zeigen. Ein Hebel bewegt gleichzeitig zwei andere. Sieht schwerer aus als es ist.
1:
2:
Keelbreach Bog - Herder`s Den


Quickview / Schnellübersicht:
1 secret, 1 skull, 1 powergem, 1 chest, Serpent Staff, Boss: Herder`s Den
A:
The nine plates represent your runeboard. You have to reproduce every spell on these plates the spell-caster is casting. But here you have to place items upon them respectively to the runeboard. The nine plates, respectively the runeboard, are turned 90° to the right in this case (based on the direction of the map) You have to cast: Fireball, Iceshard, Lightningbolt. Now you got the serpent staff, you can open the door to the pyramid of umas if you stand in front of the entrance door and using its special attack.
Die neun Druckplatten stellen eure neun Zauberrunen dar. Ihr müsst jeden Zauber den der Zauberwerfer vor euch wirft, auf den Druckplatten nach machen, so als würdet ihr diesen Zauber selber zaubern wollen. Nur in diesem Falle legt ihr Gegenstände auf die Platten. Die 9 Druckplatten, also das Zauberfeld, sind in diesem Fall jedoch um 90° nach rechts gedreht (aus der Sicht der Karte). Ihr müsst Zaubern: Feuerball, Eisstachel, Blitzkugel. Anschließend habt ihr Zugang zum Serpent Staff, der auch als Schlüssel für das Eingangstor zur Pyramid of Umas darstellt. Stellt euch dort vor das Tor und benutzt den alternativen Angriff.
1:
2:
Sleet Island
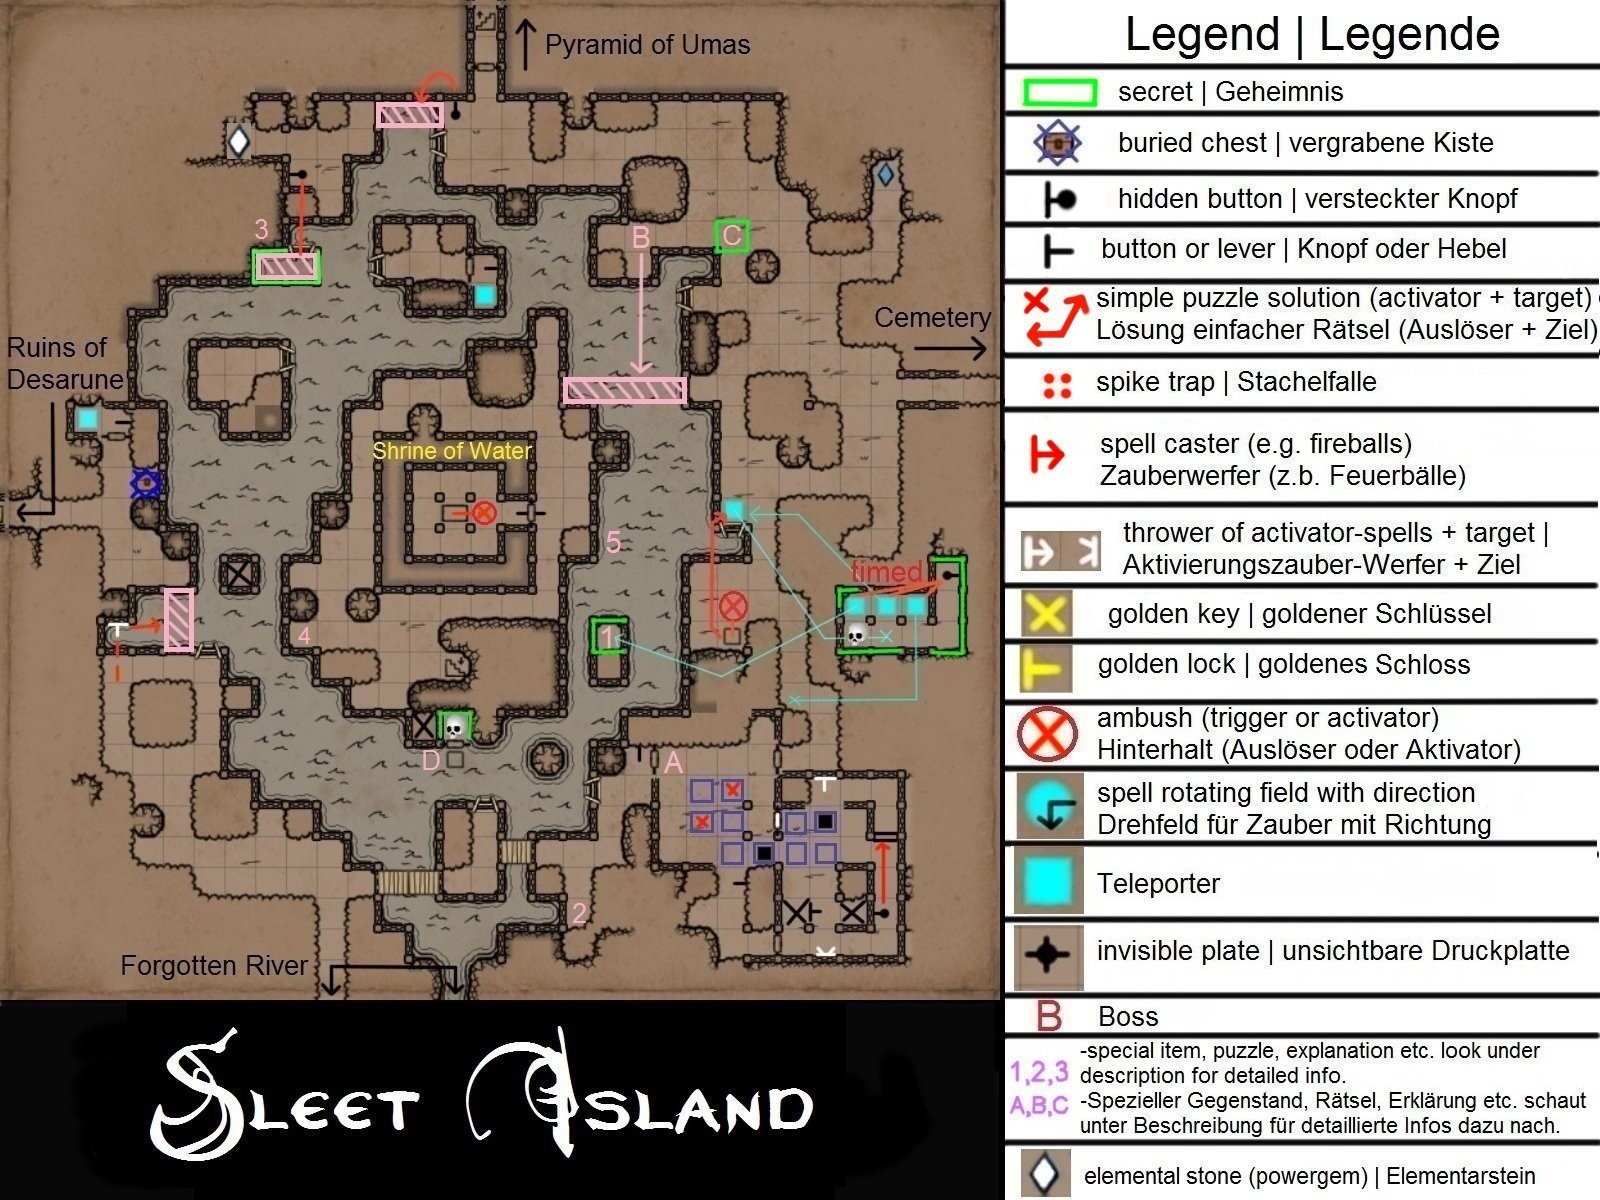


Quickview / Schnellübersicht:
5 secrets, 1 powergem, 2 skulls, 1 buried chest, Embalmer`s Pants, Mirror Cuisse, the meteor
A:
Pull the lever south on this side of the area, it activates the obelisks. Push the first Obelisk two squares east. Press the secret button in the south east corner, it opens the secret wall to the north. Now push the first Obelisk back three squares. Push the second obelisk from north one square down and two squares west afterwards. Press the button in the east area and go out of the way from the activator-spell. This will open the last gate and you can push the obelisks to its final place.
Zieht den Hebel im Süden auf dieser Seite des Gebietes, er wird die Obelisken aktivieren. Bewegt nun den ersten Obelisken zwei Felder nach Osten. Anschließend drückt ihr den geheimen Knopf in der süd östlichen Ecke, er wird die geheime Wand im Norden öffnen. Nun bewegt den ersten Obelisken drei Felder zurück Richtung Westen. Bewegt den zweiten Obelisken ein Feld nach Süden und zwei Felder nach Westen. Drückt den Knopf im östlichen Bereich und geht aus dem Weg, damit der Aktivierungszauber die Tür öffnen kann und ihr die Obelisken in ihre Endposition schieben könnt.
B: "every night the silent one sees something. Look where he looks and be patient"
Standing on this field at night while looking south will show the trickster create a bridge to the central island. Quickly run to the other side, the bridge disappears after a short while.
Wenn ihr Nachts hier steht und nach süden schaut, werdet ihr den Trickster beobachten wie er eine magische Brücke zur Zentralen Insel erschafft. Ihr müsst schnell hinüber rennen denn die Brücke verschwindet nach kurzer Zeit.
C: "I saw where the meteor fell"
Dig here to find the meteor, put it on the star forge in Crystal Mine - Abyss at B to obtain the Meteor Hammer.
Grabt hier um den Meteor zu finden. Legt in auf den Sockel der Star Forge in Crystal Mine - Abyss Position B um den Meteor Hammer herzustellen.
D:
You must standing on this plate for about ~30 seconds without a break to open the gate.
Ihr müsst für ungefähr ~30 Sekunden ohne Pause auf dieser Platte stehenbleiben damit sich das Tor öffnet.
1:
To obtain the orb you have to stand in front of the ladder and throw an item south onto the ambush plate. You will be teleported into the secret room in the east, quickly one step left and one step forward.
Um zum Stormseed Orb zu gelangen müsst ihr vor der Leiter stehen und einen Gegenstand auf die Platte werfen. Ihr werdet in den geheimen Raum teleportiert und müsst schnell einen Schritt nach links und einen Schritt vorwärs machen.
2: Arquebus
Warning: If you take this weapon you will be teleported to the flooded dungeon and cornered instantly by mummies!
Warnung: wenn ihr diese Waffe nehmt werdet ihr in den Flooded Dungeon teleportiert und sofort von Mumien umstellt sein!
3:
4:
5:
Sleet Island - Flooded Dungeon


Quickview / Schnellübersicht:
2 secrets, 1 golden key, 4 golden locks, Crystal Cuirass
1: "The Glass Vault"
Spirit Mirror Pendant, Great Energy Potion, Potion of Dexterity
2: "The Steel Vault"
Cutlass, Frostbomb x3, Shield of the Elements
3: "The golden Vault"
Acolyte Staff
4: "The Floral Vault"
1x Crystal Flower, 2x Mudwort, 3x Falconskyre, Leafbond Bracelet, Shamans Cloak
5:
Ruins Of Desarune


Quickview / Schnellübersicht:
5 secrets, 1 chest
A:
The door in the south of this room will open if all magic bridges above are off (remove any item from the plates). From the upper floor let items fall down to activate the magic bridge again.
Damit sich die Tür im Süden öffnet müssen alle magischen Brücken deaktiviert sein (entfernt alle Gegenstände von den Druckplatten). Aktiviert die magischen Brücken von oben wieder indem ihr Gegenstände herunter fallen lasst.
B:
The puzzle in this room involve the floor below. If the spider falls down through the pit in the middle upon plate B1. The plate here open the pits. The plate below teleports the spider back up. If the spider falls upon B1 lights behind the portcullis will show you on which plates items have to fall to open the door here. The solution is marked on the map. If the door up here opens, a secret wall below which leads behind the portcullis will open too.
Dieses Rätsel bezieht den Raum eine Etage tiefer mit ein. Eure Aufgabe ist es, die Spinne eine Etage tiefer auf die Plattform B1 fallen zu lassen. Die Druckplatte hier öffnet die Fallgruben. Die Druckplatte eine Etage tiefer teleportiert die Spinne wieder hier hinauf. Landet die Spinne auf B1 wird euch durch Lichter eine Etage tiefer hinter den Gittern angezeigt auf welchen Druckplatten ihr Gegenstände fallen lassen müsst damit sich die Tür hier oben öffnet. Die Lösung ist eingezeichnet. Öffnet sich die Tür hier oben, öffnet sich auch gleichzeitig unten eine Geheimwand die in den Raum hinter den Gittern führt.
C:
If you wait here for a specific time you will be teleported one level down (Archives C1) and attacked by ice elementals. To go back, wait there again.
Wenn ihr hier eine gewisse Zeit wartet, werdet ihr eine Ebene tiefer (Archives C1) teleportiert und von Eiselementaren angegriffen. Um wieder zurück zu kommen, wartet dort erneut.
1:
2:
Ruins Of Desarune - Archives


Quickview / Schnellübersicht:
4 secrets, 1 skull, Rogue Pants
A:
You need the code to solve this puzzle. It`s one floor below on map Lexiconary at nr. 5
Ihr braucht den Code um dieses Rätsel lösen zu können. Er befindet sich eine Etage tiefer in Lexiconary bei Nr. 5
Code for the archive door:
UHU NA, AR E, TE NA, LAM E, AR NA
forwards 2x, strafe left 1x, strafe right 2x, backwards 1x, strafe left 2x.
Storage Room (Secret)
TE, UHU NA, PALA, UHU NA, PALA NA, AR E, FAAM, KO, LAM KO
strafe right 1x, forwards 2x, turn left 1x, forwards 2x, turn left 2x, strafe left 1x, turn right 3x, backwards 3x
Code für die Archivtür:
UHU NA, AR E, TE NA, LAM E, AR NA
Vorwärts 2x, Seitwärts Links 1x, Seitwärts Rechts 2x, Rückwärts 1x, Seitwärts Links 2x.
Lagerraum (secret)
TE, UHU NA, PALA, UHU NA, PALA NA, AR E, FAAM, KO, LAM KO
Seitwärts Rechts 1x, Vorwärts 2x, Drehung links 1x, Vorwärts 2x, Drehung links 2x, Seitwärts Links 1x, Drehung rechts 3x, Rückwärts 3x
B1:
see map: Ruins of Desarune B
siehe Karte: Ruins of Desarune B
1:
Skeleton archer drops rogue pants
2:
3:
Puzzle for the Cemetery Gate.See map Cemetery letter A
Rätsel für das Cemetery Gate. Siehe Karte Cemetery unter A
Ruins Of Desarune - Lexiconary


Quickview / Schnellübersicht:
6 secrets, 1 powergem, 1 chest, code for the cemetery gate
A:
Giant Crab carries key
Eine Riesenkrabbe trägt einen Schlüssel bei sich
B:
To open this door you have to play the game "rock - paper - scissors". scissors beat paper, paper beats rock and rock beats scissors.
Um diese Tür zu öffnen müsst ihr Stein,Schere(Schwert),Papier spielen. Schere schlägt Papier, Papier schlägt Stein und Stein schlägt Schwert.
C:
You have to drop items on the three plates in the neighboring room. The teleporter on your side sends every item to the teleporter in the neighboring room without stopping it. The button here moves the teleporter on the other side to the east. Push the button and drop any item into the teleporter. Throw any item from the south into the teleporter afterwards. Once again hit the button and throw any item from the north into the teleporter.
Hier müsst ihr auf jede der drei Druckplatten im Nachbarraum einen Gegenstand bekommen. Der Teleporter auf eurer Seite wird jeden Gegenstand zum Teleporter im Nachbarraum schicken ohne den Gegenstand aufzuhalten. Mit dem Knopf an der Wand könnt ihr den Teleporter drüben nach Osten bewegen. Drückt einmal auf den Knopf und legt etwas in den Teleporter, anschließend werft ihr von Süden etwas hinein. Noch einmal den Knopf drücken und von Norden etwas hineinwerfen.
D: "I am the strongest" "I can`t fly" "I am alive" "i can walk"
D1: Crowern Figurine "i am alive"
D2: Snail Figurine "I can`t fly"
D3: Skeleton Figurine "i can walk"
D4: Ogre Figurine "I am the strongest"
E:
If you push this hidden button you will be teleported to position E1 instantly and attacked by three mimics!
Wenn ihr diesen Geheimknopf drückt,werdet ihr sofort nach E1 teleportiert wo euch 3 Mimics angreifen!
F: "The Crossing"
Both of the plates to the side will highlighting another plate at the end of this room. Move the obelisks to the right side of the bridge, so you can throw an item on this plate. It will activate the obelisk in the middle, so you can build a bridge to the other side. Warning: if you take the figurine, you fall into an ambush.
Die beiden Platten außen beleuchten die Platte hinten am Ende des Raumes. Schiebt die Obelisken an die rechte Seite der Brücke, damit ihr einen Gegenstand von hier hinüber werfen könnt. Die Druckplatte schaltet den mittleren Stein frei, nun könnt ihr eine Brücke auf die andere Seite bauen. Vorsicht: nehmt ihr die Figur geratet ihr in einen Hinterhalt.
G:
The path of the eagle
The disguised path
1:
2:
3:
4:
5:
Hamlet Of Stormbreach


Quickview / Schnellübersicht:
2 secrets, 1 powergem, 2 chests, 1 buried chest, Rogue Boots
A: "If you wish to enter Crystal Mines, you must take the way of the snail"
This message refers to the four plates in front of crystal mine entrance. Move from plate to plate with two-three seconds delay (slow like a snail) the last plate will open the gate.
Diese Nachricht bezieht sich auf die 4 Platten vor dem Eingang zur Crystal Mine. Betretet die 4 Platten nacheinander im Abstand von 2-3 Sekunden, also im "Schneckentempo", die letzte Platte öffnet dann das Gitter.
B:
Combination: S N O O S N N
C: "House of Braids"
(English)
S S S S (key) E N (lever 1) W N E (lever 2) S W N W S W W (lever 3) N (lever 4) E S E S W
(Deutsch)
S S S S (Schlüssel) O N (Hebel 1) W N O (Hebel 2) S W N W S W W (Hebel 3) N (Hebel 4) O S O S W
1:
2:
3:
Spirit Mirror Pendant
4:
Hamlet Of Stormbreach - Sewers


Quickview / Schnellübersicht:
4 secrets, 1 powergem, 2 chests, 1 golden lock, 1 skull, Crystal Gauntlets, Crystal Shield, Meteor Shield, Archmage`s Cap, Boss: Ratling
A: "Follow the Leader"
You must follow the spikes and also push the five buttons in this order. Position yourself on the bridge (letter A) facing east at button nr. 1. Keep in mind that the spikes move like the number 8 in this pit. The buttons are always in front of you while you are running, so hold your mouse cursor in the correct position to click at every button easily. If you are fast enough the spikes won`t lap and hit you before reaching the ladder.
ihr müsste den Stacheln folgen und auch in dieser Reihenfolge die 5 Knöpfe aktivieren. Stellt euch auf die Brücke (Buchstabe A) mit Blick nach Osten auf Knopf Nr. 1. Ihr könnt euch im Gedächtnis halten, das die Stacheln sich wie eine 8 durch diesen Graben bewegen. Da ihr beim Rennen die Knöpfe immer direkt vor euch habt, haltet den Mauszeiger am besten direkt auf die richtige Position, dann braucht ihr nur noch zu klicken. Wenn ihr euch beeilt, sollten die Stacheln euch nicht überrunden bis ihr die Leiter erreicht habt.
B:
You have to move from island to island in an specific order which is marked on the map. (standing on the ladder doesn`t count, you have to stand at least one grid on the island). Have you done everything right, the teleporter will appear if you step on island 5.
Ihr müsst euch von Insel zu Insel in einer bestimmten Reihenfolge bewegen, diese ist auf der Karte markiert (nur die Leiter hoch zu steigen reicht nicht, ihr müsst mindestens ein Feld auf der Insel stehen). Wenn ihr alles richtig gemacht habt, wird beim betreten von Insel 5 ein Teleporter erscheinen.
1:
2:
3:
4:
5:
6:
Cemetery


Quickview / Schnellübersicht:
1 powergem, 2 buried chests, 1 chest, 2 skulls, Ethereal Blade
One of the skulls is buried at one of the gravestones. The content of these graves is random so you have to dig every grave.
Einer der Totenschädel liegt in einem der Gräber, markiert durch die Grabsteine. Da der Inhalt zufällig ist werdet ihr jedes Grab ausheben müssen.
A:
Move the Obelisk to the direction and back to the middle, then to the next direction:
Bewegt den Obelisken in die entsprechende Richtung, anschließend zurück in die Mitte und dann in die nächste Richtung:
N W S N N
B:
The goal here is to throw/shoot something in the three teleporters, the items will fall upon the three plates in the south and open the gate. However this has to be done in a sequence, this means: Every time you step on the plate all of the three teleporters will only be activated once and randomly. It`s impossible to throw something in one teleporter, resetting the sequence by plate and throw another item in the next teleporter and so on. I would suggest to leave an inventory screen open, so you already have items ready to throw. Because the portcullis open first, you will easily hear which teleporter will be next.
Ziel ist es, in jeden der drei Teleporter etwas zu werfen/schießen, damit die Gegenstände auf die 3 Platten im Süden fallen und das Tor öffnen. Jedoch muss dies innerhalb einer Sequenz geschehen, d.h.jedesmal wenn ihr auf die Druckplatte tretet erscheint jeder der drei Teleporter nur einmal und dass in zufälliger Reihenfolge. Es ist nicht möglich erst einen Gegenstand zu werfen, die Sequenz per Druckplatte neu zu starten und dann in den nächsten Teleporter zu werfen usw. Am besten lasst ihr ein Inventar offen, wo ihr sofort 3 Gegenstände zum werfen griffbereit habt. Da sich zuerst die Gitter öffnen, ist es relativ leicht auszumachen, welcher Teleporter als nächstes dran ist.
C:
The three X-marked buttons open the current pit and close the next one clockwise. Same for the Z-marked buttons. You have to move the closed pits in a way so you can safely press the buttons that are above the pits. Don`t stand on the closed X-pit if you push the X-button next. Same for the Z-button and Z-pit.
Again: Don`t stand on the pit you want to move next, move the other one there instead.
If you stand on the southside of the pits: move the Z-pit under the middle x-button and the X-pit in front of it, so you have a small bridge. Push the middle X-button twice afterwards and you have a bridge to the other side.
Die drei mit X markierten Schalter öffnen die aktuell geschlossene Fallgrube und schließen die nächst angrenzende im Uhrzeigersinn. Die anderen beiden mit Z markierten Schalter steuern eine zweite Fallgrube auf die selbe Art und Weise.
Ihr müsst die geschlossenen Fallgruben so bewegen, das ihr die Hebel über einer Fallgrube sicher betätigen könnt. Steht also nicht auf der geschlossenen X-Grube, wenn ihr als nächstes den X-Knopf drücken wollt. Das selbe gilt für den Z-Knopf und die Z-Fallgrube.
Nochmal: Stellt euch nicht auf die Fallgrube, die ihr bewegen wollt. Bewegt stattdessen die andere Fallgrube dorthin.
Steht ihr auf der Südseite der Fallgruben bedeutet das: bewegt die Z-Grube unter den mittleren X-Knopf und die X-Grube davor, so das ihr eine kleine Brücke habt. Anschließend drückt ihr den mittleren X-Knopf 2x und ihr habt eine Brücke auf die andere Seite.
1:
2:
3: Damage elementals only! - Kann nur Elementare verletzen!
Cemetery - Wormbound Catacombs


Quickview / Schnellübersicht:
3 secrets, 1 powergem, 1 chest, Bane, Meteor Helmet, Crystal Helmet, Boss: Xarant Wormbound
A: "Under, and under, and over, and all over again, and over"
Jump into the pit, walk under the bridge to the other wall. Turn around and walk back (under the bridge). Climb up the ladder and walk over the bridge. (Now all over again) Jump into the pit, walk under the bridge to the other wall. Turn around and walk back (under the bridge). Climb up the ladder and walk over the bridge. Finally turn around and walk back over the bridge.
Springt auf einer seite in den Graben, geht unter der Brücke her bis zur anderen Wand, lauft die beiden Felder (unter der Brücke) nun zurück und klettert die Leiter hinauf. Lauft über die Brücke und (Wiederholung) springt wieder in den Graben, geht unter der Brücke her bis zur anderen Wand, lauft beide Felder (unter der Brücke) nun zurück und klettert die Leiter erneut hinauf. Lauft über die Brücke und sofort wieder zurück über die Brücke.
B:
The 12 plates open and close depending on the ingame time of day.
Die 12 Platten öffnen und schließen sich je nachdem welche Uhrzeit bei euch gerade im Spiel ist.
C:
If you walk into the big room, a ghoul horde will spawn immediately in the lower section. As long as you don`t fall or voluntarily jump into the lower section you will be safe here, because enemys don`t get up here. But don`t believe you can go in there and kill them all with ease! Instead we will kill one after another. Jump down from above to stand directly in front of the lever. The lever will open the gate to the teleporter. Then you have to fight your way over there and step into the teleporter. On the map it`s only two steps but you will be cornered very easily. Sure you can wait for a chance getting through this without a fight but don`t wait for it.
A shield (magic or potion) is very helpful here, or the spell iceshards because it will damage all enemys standing in a row. Don`t hesitate to use bombs here too, the ghouls are very tough. Ignore all enemys which are not standing between you and the teleporter! But think about this: if you are killing an enemy, the next enemy will take his place if he has the space! With the right timing you can fight your way from grid to grid by moving against an almost dead enemy. If you have finally made it through the teleporter it will be much easier now. One ghoul after another will walk into the teleporter and so they will become easy targets for range attacks and spells.
Wenn ihr den großen Raum betretet, wird sofort eine Horde Ghule in der Grube auferstehen. Solange ihr nicht freiwillig in die Grube springt oder fallt, seid ihr auf dem Rundgang sicher, die Gegner können nicht zu euch hoch. Wenn ihr allerdings glaubt ihr könntet einfach runter gehen und alle töten irrt ihr euch gewaltig! Stattdessen werden wir uns einen nach dem anderen vornehmen. Lasst euch von oberhalb des Hebels herunter fallen, damit steht ihr direkt vor ihm. Der Hebel wird das Gitter vor dem Teleporter senken, ihr müsst euch zu ihm durchkämpfen und anschließend betreten. Auf der Karte sind es zwar nur 2 Schritte aber hier unten seid ihr schneller umzingelt als ihr "Ghul" sagen könnt. Ihr könnt natürlich auf eine Gelegenheit warten kampflos durch zu kommen, aber rechnet nicht damit.
Hier zahlt sich der Schild aus (Zauber oder Tränke) oder der Eiszauber "Iceshards" da er alle Gegner in einer Reihe trifft. Scheut euch auch nicht Bomben einzusetzen, die Ghule sind sehr zäh. Ignoriert alle Gegner die nicht zwischen euch und dem Teleporter stehen! Denkt jedoch daran: Vernichtet ihr den Ghul vor euch wird sofort der Nächste seinen Platz einnehmen wenn er Platz hat! Mit dem richtigen Timing könnt ihr euch aber von Feld zu Feld kämpfen indem ihr gegen den Gegner lauft kurz bevor er vernichtet wird. Habt ihr es einmal in den Teleporter geschafft, wird es sehr leicht. Die Ghule werden jetzt einer nach dem anderen durch den Teleporter treten, leichte Beute für Fernkampf und Zauber.
D:
The button on the bridge activates the activator-spell and the lever under the bridge controls both doors asynchronously. Push the button and quickly step backwards and fowards again immediately. Once the spell passes you over the bridge (you can see it due to the white glow) pull the lever. The spell will be rotated in the dead end. Pull the lever again when the spell passes above you again.
Der Knopf auf der Brücke feuert einen Aktivierungszauber ab, der Hebel unter der Brücke steuert asynchron die beiden Fallgatter. Sobald ihr den Knopf drückt müsst ihr ein Feld rückwärts und sofort ein Feld vorwärts laufen. Sobald der Zauber über euch hinwegfliegt (ihr könnt es an dem Lichtschein vor euch sehen), betätigt ihr den Hebel. Sobald der Zauber in der Sackgasse gedreht wird und erneut über euch hinweg fliegt, betätigt ihr den Hebel erneut.
E: "With icicless from beneath, i strike thee"
To make the barrier disappear you need the "ice guardian figurine" at position E1
Damit die Barriere verschwindet braucht ihr die "Ice Guardian Figurine" von Position E1.
1:
2:
3:
4:
Cemetery - Orul`s Crypt


Quickview / Schnellübersicht:
2 secrets, 1 powergem, 2 chests, Boss: Orul Wormbound
A: "What can never be observed, but its presence prevents everything from being seen? Answer me this and you shall be guided to the other side"
The answer is darkness. You have to remove the two torches from their holding. Only then you can see the lights in the long hall, showing you which grid will be safe during the next spike sequence.
Hier ist die Antwort Dunkelheit. Ihr müsst die beiden Fackeln auf dieser Seite des Raumes aus der Haltung nehmen, dann werden in der langen Halle alle Felder beleuchtet, die bei der nächsten Sequenz begehbar sind.
B: "I differ, who am i?"
Multiple times you have to choose the one (out of four) which is not identical with the others. A mistake will free one or more imprisoned monsters in this room.
Hier müsst ihr mehrmals aus den 4 Möglichkeiten diejenige wählen, die nicht zu den anderen passt. Macht ihr einen Fehler, wird ein oder mehrere eingesperrte Monster in diesem Raum freigelassen.
C:
To open the door to the next room drop an item through the portcullis, so it can fall down on the plate. If you now step on the plate in this room, the magical barrier on the other side which is blocking another plate will be deactivated for 2 seconds. In this time you have to put an item on that plate (the best way is shooting) and avoid the moving barrier.
Um das Tor zum Nebenraum zu öffnen, müsst ihr einen Gegenstand durch das Gitter auf die Platte unten fallen lassen. Wenn ihr jetzt auf die Druckplatte in diesem Raum tretet wird das Kraftfeld, welches auf der anderen Seite eine weitere Druckplatte blockiert, für exakt 2 Sekunden verschwinden. In dieser Zeit müsst ihr einen Gegenstand (am besten schießen) auf die gegenüberliegende Druckplatte befördern und das sich bewegende Kraftfeld meiden.
D: "When the room is void of light, the door will open"
All of the magical bridges have to disappear and with your last move you have to get in front of the door on the other side. If you step on one of the magical bridges the previous one will disappear. If you step on one of the plates all magical bridges will appear again. The solution is marked on the minimap below.
Ihr müsste alle magischen Brücken im Raum verschwinden lassen und mit der letzten Bewegung vor die Tür auf die andere Seite gelangen. Sobald ihr eine der magischen Brücken betretet wird das vorherige verschwinden. Betretet ihr eine der drei Druckplatten tauchen alle magischen Brücken wieder auf. Ihr könnt die Lösung auf der seperaten Karte unten sehen.
E:
Cross the room without getting hit by the activator spells. The button will start all activator spells again.
Ihr müsst durch den Raum kommen ohne das euch ein Aktivierungszauber trifft. Der Knopf startet alle Aktivierungszauber neu.
1:
Fireblade, Fire Torc
2: Scythe
3: Great Axe
4:
5:
Pyramid Of Umas


Quickview / Schnellübersicht:
5 secrets, Mirror Gauntlets, Mirror Tagelmust, Mirror Greaves
A:
The eight plates in the other two rooms are influencing this hall directly as they close the pits both here and there. The plates which must hold an item are marked with a red x on the map. Once you push the first button (out of four) you have to hurry because the gates will close after a specific time. Under this hall is a note with a hint to another secret. The three pits at the very end of the hall with the four portcullis will lead you down to it.
Die jeweils acht Druckplatten in den anderen beiden Räumen beeinflussen diese Halle direkt, indem sie die Gruben sowohl hier als auch dort schließen. Die Platten, auf denen ein Gegenstand liegen muss, sind mit einem roten X markiert. Sobald ihr den ersten der insgesamt vier Knöpfe drückt, müsst ihr euch beeilen, da die Gitter sich nach einer bestimmten Zeit wieder schließen. Unter dieser Halle liegt eine Notiz mit einem Hinweis auf ein weiteres Geheimnis. Die drei Gruben am Ende der Halle, vor den 4 Fallgattern, führen euch dort hinunter.
B:
You can ignore the first plate for the moment. Drop down an item on the second plate, but you need to be able to reach it from the other side. The pit behind the portcullis will open and activates a teleporter in front of the first plate. Step into the teleporter, take the item from the plate, walk in front of the door, throw an item on the first plate and the door will open.
To reach the secret under this room you must drop an item on the first closed pit (where the teleporter appears) before you drop an item on the second plate. The item will fall into the room on another plate and open the door there.
Die erste Druckplatte könnt ihr erstmal ignorieren. Legt auf der zweiten Platte (beim Gitter) einen Gegenstand ab, aber so dass ihr ihn von der anderen Seite erreichen könnt. Die Grube hinter dem Gitter wird sich öffnen und vor der ersten Druckplatte einen Teleporter aktivieren. Tretet in den Teleporter, nehmt den Gegenstand wieder von der Druckplatte, stellt euch vor die Tür und werft einen Gegenstand auf die erste Druckplatte, damit sich die Tür öffnet und ein weiterer Teleporter aktiviert wird, der euch zurück auf die andere Seite bringt.
Um an das Secret eine Ebene tiefer zu gelangen, müsst ihr einen Gegenstand auf die erste Fallgrube legen (wo auch der Teleporter erscheint) bevor ihr etwas auf die zweite Druckplatte legt. Dadurch fällt dieser Gegenstand eine Etage tiefer auf eine Druckplatte und öffnet die Tür dort. Der Raum unten ist nur über die 2 Gruben hier zu erreichen.
C:
To open this door you have to place the following items on the sarcophagi:
C1: Wand of Fear
C2: Moonblade
Um diese Tür zu öffnen müsst ihr obere Gegenstände auf die Sarkophage legen.
D:
To get this weapon use the teleporter to the south east. Caution: you will instantly be surrounded by two giant snakes and two medusae! Concentrate your power to the weaker giant snakes and kill them as fast as possible. Poison shield and shield are very useful here, just like frostbolt and frostbombs because they can take one or more enemies out of the fight for a limited time. If you have freed yourself, keep moving and stay out of the line of sight from the medusae, their bows are very effective. Don`t get surrounded in the corners, the spikes will be activated by standing on them.
Um an die Waffe zu gelangen müsst ihr in den Teleporter rechts unten treten. Warnung: ihr werdet augenblicklich von 2 Riesenschlangen und 2 Medusen umzingelt sein! Konzentriert euch sofort auf eine der Riesenschlangen und tötet sie so schnell wie möglich. Giftschild und Schild sind hier hilfreich. Ebenso der Frostbolt und die Frostbombe um einen oder mehrere Gegner kurzzeitig aus dem Kampf zu nehmen. Habt ihr euch befreit, bleibt in Bewegung und versucht aus der direkten Sichtlinie der Medusen herauszubleiben, ihre Bögen sind sehr effektiv. Lasst euch nicht in eine der Ecken drängen, die Stacheln werden ausgelöst sobald ihr darauf stehen bleibt.
E:
To open the room with the sarcophagus inside, drop an item from the north through the portcullis on the plate. The door to the sarcophagus will close and the portcullis to the next room will open. Go into the next room and drop down another item trough the portcullis on the plate. Now go back and remove the first item you dropped down on the plate. Back into the room, remove the second item and the door opens.
Um die Tür zum Raum mit dem Sarkophag zu öffnen, müsst ihr erst von Norden einen Gegenstand durch das Gitter auf die Druckplatte legen. Darauf schließt sich die Sarkophag-Tür, während sich das Gitter zum nächsten Raum öffnet. Anschließend geht ihr in den nächsten Raum und legt von Süden einen zweiten Gegenstand durch das Gitter auf die Platte. Jetzt geht ihr wieder raus und entfernt den ersten Gegenstand wieder von der Platte. Zurück in den Raum, den zweiten Gegenstand entfernen und die Tür öffnet sich.
1:
2:
3:
4:
5:
6:
7:
8:
Pyramid Of Umas - Tomb Underground


Quickview / Schnellübersicht:
4 secrets, 1 chest
1:
Pyramid Of Umas - Tomb Of Rites


Quickview / Schnellübersicht:
2 secrets, 1 powergem,1 chest, Archemage`s Scapular, Blueberry Pie
A:
Put the Mirror Gauntlets (map: Pyramid of Umas nr. 5) on the sarcophagus to open a secret door.
Legt die Mirror Gauntlets (Karte: Pyramid of Umas nr. 5) auf den Sarkophag um die geheime Tür zu öffnen.
B:
Blueberry Pie
C:
You have to place objects on the sarcophagi (order doesn`t matter). The mentioned sarcophagi are marked on the map. Afterwards you take the item of the sarcophagus in the north from position C1. Attention: this will close the pit under the lever but will open the pit behind you! If you want to go back put this item back.
Ihr müsst auf die markierten Sarkophage Gegenstände legen (Reihenfolge ist egal), die betreffenden Sarkophage sind auf der Karte markiert. Anschließend nehmt ihr von Position C1 aus den Gegenstand vom Sarkophag im Norden. Passt auf, dieses schließt zwar die Grube unter dem Hebel, öffnet aber gleichzeitig die Platte hinter euch! Wenn ihr wieder zurück wollt, legt einfach den Gegenstand wieder dorthin zurück.
D:
You need the serpent staff here to open the door in the north. Now push the secret button which will activate a spell rotating field which will reroute the fireballs and open the portcullis. But it will open a secret door too. Behind it two medusae await you!
Ihr braucht hier den Serpent Staff, um die Tür im Norden auf zu schießen. Anschließend betätigt ihr den versteckten Hebel. Dies wird erstens ein Drehfeld aktivieren welche die Zauberbälle auf den Zauberauslöser lenken und damit das Gitter öffnen, aber auch gleichzeitig eine Geheimtür mit zwei Medusen, seid gewarnt.
E:
Again you need the serpent staff. Wait till the teleporter reaches E1 and enter the teleporter on your side. Quickly use the serpent staff on the door before the moving teleporter reaches you. Now do this again but this time throw an item through the open door on the plate behind it.
Hier benötigt ihr erneut den Serpent Staff. Wartet bis der Teleporter zu E1 wandert und geht in den Teleporter in der Sackgasse. Benutzt schnell den Serpent Staff auf die Tür im Osten bevor euch der Teleporter zurück teleportiert. Anschließend wiederholt ihr das Ganze, nur diesmal werft ihr einen Gegenstand durch die nun offene Tür auf die Druckplatte dahinter.
1:
2:
Pyramid Of Umas - Ceremonial Chamber


Quickview / Schnellübersicht:
Meteor Leg Plate
1:
2:
Barren Desert


Quickview / Schnellübersicht:
1 powergem, 1 buried chest, golden key, Meteor Plate
1:
Crystal Mine Entrance


Quickview / Schnellübersicht:
2 secrets, 1 powergem, 1 chest, Crystal Boots, Meteor Gauntlets
A:
If you step on this plate, all pits around you and the door in front of you will open. Also a fireball is coming your way. But the message tells us to wait and do nothing. The fireball won`t harm you and teleport you to the other side.
Betretet ihr dieses Feld öffnen sich die Fallgruben, die Tür vor euch und ein Feuerball kommt euch entgegen geflogen. Wie wir jedoch aus der Notiz entnehmen können, müssen wir einfach nur stehen bleiben, der Feuerball verursacht keinen Schaden und ihr werdet auf die andere Seite teleportiert.
B:
To grab this key, we must take a closer look at the two bordering rooms. To the left there are moveable obelisks, to the right magical barriers. Each obelisk is linked to a magical barrier. If you move a obelisk, you will move the linked barrier, too. The barriers do NOT have to comply with the architecture of the room, they can go through walls.
Um an diesen Schlüssel zu kommen, müssen wir uns die beiden Räume rechts und Links ansehen. Im linken Raum stehen verschiebbare Obelisken, im rechten stehen Barrieren. Jeder Obelisk ist mit einer Barriere verlinkt, wenn ihr einen Obelisken verschiebt bewegt ihr damit auch die entpsrechende Barriere. Die Barrieren im rechten Raum müssen sich NICHT an den Aufbau des Raumes halten. Das heißt ihr könnt Barrieren durch Wände verschieben.
1:
2:
3:
4:
50 Pellets, 10 Cannonballs
Crystal Mine - Core


Quickview / Schnellübersicht:
3 secrets, Crystal Amulet, Meteor Helmet, Crystal Greaves, Tome of Health
A:
Here you have to block or to avoid the activator-spell so you can walk through this. In the next room there are five pits, if you go into one of these pits you will find a secret. The spikes there will only be activated if you step on them, so you have enough time to dodge.
Hier müsste ihr den Aktivierungszauber blockieren oder vorbei lassen, damit ihr voran kommt. Durch die 5 Gruben im nächsten Raum gelangt ihr zu einem Secret. Die Stacheln eine Etage tiefer werden durch Betreten aktiviert, ihr habt also genug Zeit zum Ausweichen.
1:
2:
Rope
3:
4:
5:
(only accessible from above / nur von oben zu erreichen)
Crystal Mine - Abyss

Quickview / Schnellübersicht:
2 secrets, 1 powergem, Meteor Hammer, Archmage`s Loafers
A:
Electricify the activator-spell target (bomb or spell) and go out of the way to open the door.
Ihr müsst das Aktivierungszauber-Ziel mit einem Blitz beschießen (Bombe oder Zauber) und anschließend aus dem Weg gehen damit sich die Tür öffnet.
B: "Forge of the Fallen Stars"
Put the meteor on the altar to create the meteor hammer.
Legt hier den Meteor auf den Sockel um den meteor hammer zu bekommen.
Castle Nex - Ground Floor

Quickview / Schnellübersicht:
2 secrets, 1 chest, 1 skull
A:
You have NO time for turning around. You have NO time for waiting until the move animation is over (this will probably cost you 1 second at the end and that is too much). If the first move animation is nearly over you must hit the next move button! Hit the Button and walk as fast as you can (from your perspective): backward, 5x left, 3x forward (ladder), left, 6x backward, right, backward.
Ihr habt KEINE Zeit, um euch zu drehen und KEINE Zeit auf das Ende der Bewegungsanimation zu warten (am Ende wird euch das eine Sekunde kosten und das ist zu viel). Wenn die Bewegungsanimation fast zu Ende ist, müsst ihr schon die nächste Bewegungstaste drücken! Drückt den Knopf und bewegt euch so schnell ihr könnt (aus eurer Sicht): rückwärts, 5x links, 3x vorwärts (Leiter), links, 6x zurück, rechts, rückwärts.
B:
Ending 2, look on map Forgotten River - Tricksters Lair for description.
Endsequenz 2, schaut auf der Karte Forgotten River - Tricksters Lair für die Beschreibung.
1:
The Cursed Compass, you will need it on Twisted Passage.
Den Cursed Compass benötigt ihr in Twisted Passage
Castle Nex - Library

The three free standing pillars on this level reveal a part of this puzzle. After a full cycle (clockwise) around a pillar, you will hear a clicking sound. After the second cycle around this pillar, a message appears on it. Warning: strong enemies are spawning then, too! All of this applies for every of the three pillars.
Pillar A: "Two V"
Pillar B: "One II"
Pillar C: "Three III"
The following messages refer to the three levers and the closed door near the centre of the level. Every of these levers stands for a certain number:
Lever 1: 4
Lever 2: 2
Lever 3: 1
Important: After pulling one or more levers and pressing the door button these levers have to be back in the up position. The respective numerical value of every lever which is pointing down will be added to the other ones of levers that point down. After pushing the door button you will hear a specific number of clicking sounds, which indicates if you've done everything correctly.
"One II" = "First: number 2" push lever 2 ( = 2), afterwards push the door button. You hear two clicks.
"Two V" = "Second: number 5" push lever 1 + 3 ( 4 + 1 = 5), afterwards push the door button again. You hear five clicks.
"Three III" = "Third: number 3" push lever 2 + 3 (2 + 1 = 3), afterwards push the door button, you hear three clicks and the door will open.
Die drei freistehenden Säulen auf dieser Etage enthüllen euch einen Teil des Rätsels. Nach der Umrundung einer Säule im Uhrzeigersinn hört man ein Klicken. Nach der zweiten Umrundung dieser Säule erscheint an ihr eine Nachricht. Achtung: es erscheinen dann auch starke Gegner! Das alles gilt für jede der drei Säulen.
Säule A: "Two V"
Säule B: "One II"
Säule C: "Three III"
Diese Nachrichten beziehen sich auf die 3 Hebel und die verschlossene Tür nahe des Zentrums der Karte. Jeder der drei Hebel steht für eine bestimmte Zahl:
Hebel 1: 4
Hebel 2: 2
Hebel 3: 1
Wichtig: Nachdem ihr einen Hebel und den Knopf bei der Tür gedrückt habt, muss der Hebel anschließend wieder nach oben zeigen, jeder Hebel der unten ist, addiert seinen entsprechenden Zahlenwert zu den anderen Hebeln, die ebenfalls unten sind, hinzu. Nachdem ihr den Knopf bei der Tür gedrückt habt, hört ihr eine bestimmte Anzahl an Klicks, die Menge an Klicks verrät euch, ob ihr alles richtig gemacht habt:
"One II" = "Als erstes Zahl 2" drückt also Hebel 2 ( = 2) und anschließend den Knopf bei der Tür. Ihr müsst jetzt 2 Klicks hören.
"Two V" = "Als zweites Zahl 5" drückt Hebel 1 + 3 ( 4 + 1 = 5) , anschließend wieder den Knopf bei der Tür. Ihr müsst jetzt 5 Klicks hören.
"Three III" = "Als drittes Zahl 3" drückt Hebel 2 + 3 (2 + 1 = 3), nochmal den Türknopf, ihr müsst jetzt 3 Klicks hören, dann ist die Tür offen.
Castle Nex - Twisted Passage

A:
Now you will need the Cursed Compass from the entrance hall. The only goal here is reaching the door at the other end of the hall. Important: Don`t go north! If you are going one step, the compass will adjust itself, it can take a few seconds to be done. Sometimes the compass needle is switching between two directions. Don`t run through the hall, you will fail. Everywhere the compass needle is pointing north are invisible teleporters, they are all leading back to the stairs.
Jetzt braucht ihr den Cursed Compass aus der Eingangshalle. Euer Ziel ist es, nur bis zur Tür auf der anderen Seite des Raumes zu kommen. Wichtig ist nur: Ihr dürft nicht nach Norden gehen! Wenn ihr einen Schritt macht, richtet sich die Nadel neu aus, es kann einen Moment dauern bis sie sich gefangen hat. Manchmal zeigt sie abwechselnd in zwei Richtungen. Rennt nicht durch den Raum, das schafft ihr nicht. Überall wo die Nadel nach Norden zeigt, sind unsichtbare Teleporter die euch zurück zur Treppe teleportieren.
Castle Nex - Test Chamber

Quickview / Schnellübersicht:
1 secret
A:
To make progress here, let an item fall through the portcullis on the plate.
Um hier weiter zu kommen, müsst ihr erstmal einen Gegenstand durch das Gitter nach unten auf die Druckplatte fallen lassen.
B:
The goal here is to delay the activator spell, so you can cross the magic bridge. But the activator spell has to hit its target afterwards to open the portcullis. Lay down items on plates to activate specific spell rotating fields. The solution is marked on the map but you must hurry to cross the magic bridge because time is short.
Euer Ziel ist es, den Aktivierungszauber so lange zu verzögern bis ihr über die magische Brücke seid. Jedoch muss der Zauber anschließend auch im Ziel landen sonst öffnet sich das Gitter nicht. Dazu müsst ihr Gegenstände auf Platten legen damit diese ganz bestimmte Drehfelder aktivieren. Die Lösung ist auf der Karte angezeigt, ihr müsst euch jedoch beeilen, um über die magische Brücke zu kommen, da die Zeit knapp bemessen ist.
1:
Venomfang Pick
Castle Nex - Void

The map is confusing, i will descripe the walk through this shortly. There are two buttons in this hall, they will activate magic bridges. The first one is on level 1 and easily accessible. The second one is right above you if you are in front of button one. You can only reach it if you jump down from level 4. Attention: exploding fire elements are attacking you here! The chest is only accessible from level four too.
Die Karte ist unübersichtlich, daher beschreibe ich kurz wie ihr hier durchkommt. Es gibt 2 Knöpfe in dieser Halle, die magische Brücken aktivieren. Der erste ist auf Ebene 1 und leicht zu erreichen. Der zweite Knopf ist direkt über euch, wenn ihr beim ersten Knopf steht, eine Ebene höher. Ihr gelangt nur über die vierte Ebene dorthin, indem ihr euch herunter fallen lasst. Achtung: explodierende Feuerelemente greifen euch hier an! Zur Kiste gelangt ihr, indem ihr euch ebenfalls von Ebene 4 herunter fallen lasst.
1:
Sickle Sword
Castle Nex - Roof

Quickview / Schnellübersicht:
1 powergem, Boss: Lindworm
A:
Final Boss Lindworm. After defeating the boss you can choose between ending cutscene 1 at position B, or defeating the secret boss in the trickster's lair. You can enter the trickster's lair through the hub on the map Forgotten River - River Tunnels. The closed door is open now. If the secret boss is your choice, ending cutscene A is no more available!
Endgegner: Lindwurm. Nachdem ihr ihn besiegt habt, könnt ihr zwischen zwei Möglichkeiten wählen: Endsequenz 1 bei Position B, oder den geheimen Boss in Tricksters Lair besiegen. Ihr könnt Trickster's Lair durch das Hub auf der Karte Forgotten River - River Tunnels betreten. Die geschlossene Tür ist jetzt geöffnet. Fällt eure Wahl auf den geheimen Boss wird Endsequenz 1 gesperrt!
B:
Ending 1
Forgotten River - Trickster`s Lair

A:
If you place the fifth element on the pedestal, you will fight against the Trickster. On the map you can see what is happening if the trickster activates a lock. First he will try running out of the room and activating the fireball spellcaster + spell rotating fields. You can easily dodge the fireballs but a fireshield or a high fire resistance will protect you greatly here, because there will be three fireballs at once. After a short time, the spell caster + spell rotating fields will be disabled. Now don`t make the mistake and run after him! He will only lure you into more traps! Don`t move far away from this room, it is possible to stay and fight here. Running around is suicide!
After defeating him, you will fight the Island Master himself. He is moving so fast, it nearly looks like teleporting, so watch out! Later he will cast clones and is protecting himself with a shield. Besides he attacks with all offensive spells and can push you back! Avoid standing near a pit for a longer period of time! Destroying the clones is easy but it will not harm the Island Master himself. To defeat him you must destroy his shield, only then he is vulnerable. He drops the master key, it unlocks the exitdoor and the portal to the second ending cutscene in castle nex ground floor - position B
Wenn ihr das fünfte Element auf dem Sockel platziert, werdet ihr gegen den Trickster kämpfen. Auf der Karte könnt ihr sehen was passiert wenn er eines der Schlösser aktiviert. Als erstes wird er versuchen aus dem Raum zu rennen und die Zauberwerfer + Zauberdrehfelder zu aktivieren. Ihr könnt den Feuerbällen leicht ausweichen, aber ein Feuerschild oder hohe Feuerresistenz werden euch hier gute Dienste leisten, weil gleich drei Feuerbälle auf einmal abgeschossen werden. Nach einer kurzen Weile werden die Zauberwerfer + Zauberdrehfelder wieder deaktiviert. Begeht jetzt nicht den Fehler und rennt dem Trickster hinterher! Er wird euch nur in noch mehr Fallen locken. Begebt euch nicht zu weit aus diesem Raum hinaus, es ist möglich den Kampf nur in diesem einem Raum auszutragen. Durch die Gegend zu rennen ist Selbstmord!
Nachdem ihr ihn besiegt habt kämpft ihr gegen den Island Master persönlich. Er bewegt sich so schnell, das es fast wie teleportieren aussieht, also haltet die Augen offen! Später wird er Klone von sich herbeizaubern und sich mit einem Schild schützen. Außerdem beherrscht er alle Offensivzauber und kann euch zurückstoßen! Vermeidet es also für längere Zeit neben einer der Gruben zu stehen! Um ihn zu besiegen müsst ihr seinen Schild zerstören, nur dann ist er verwundbar. Er lässt den Meisterschlüssel fallen, welcher die Ausgangstür sowie das Portal zur Endsequenz 2 in Castle Nex Ground Floor bei Position B öffnet.
Source: https://steamcommunity.com/sharedfiles/filedetails/?id=333699548
More Legend of Grimrock 2 guilds
- All Guilds
- Party Creation Tutorial
- Completed Maps (All Secrets and Treasures)
- Legend Of Grimrock 2 Guide 7
- Complete Spell List & Runeboard Guide
- Legend of Grimrock 2 : Alchemy
- Legend of Grimrock 2 - Full Text-based Guide
- Legend of Grimrock 2
- All Secrets And Treasure Chests (77/77, 11/11)
- Buried Treasure Hints and Locations, plus The Meteor and The Relic