
ㅤ

Entities


Entity ## – the bacteria / cable monsterThis entity wanders around the first level, the backrooms. It is believed to control that area. It will wait in silence, until you walk or run past, at which point it will chase after you, giving off a loud screech. This entity hits you until you run out of health points, but can be outrun as long as you are printing. The best way to deal with this entity is through avoiding areas where the fluorescent lights have turned a dark orange. If it is chasing you, escape immediately to a locker.If you must travel through an area with dark orange lighting, peak slowly around corners, you may see it waiting in the distance for you.
ㅤ
ㅤ
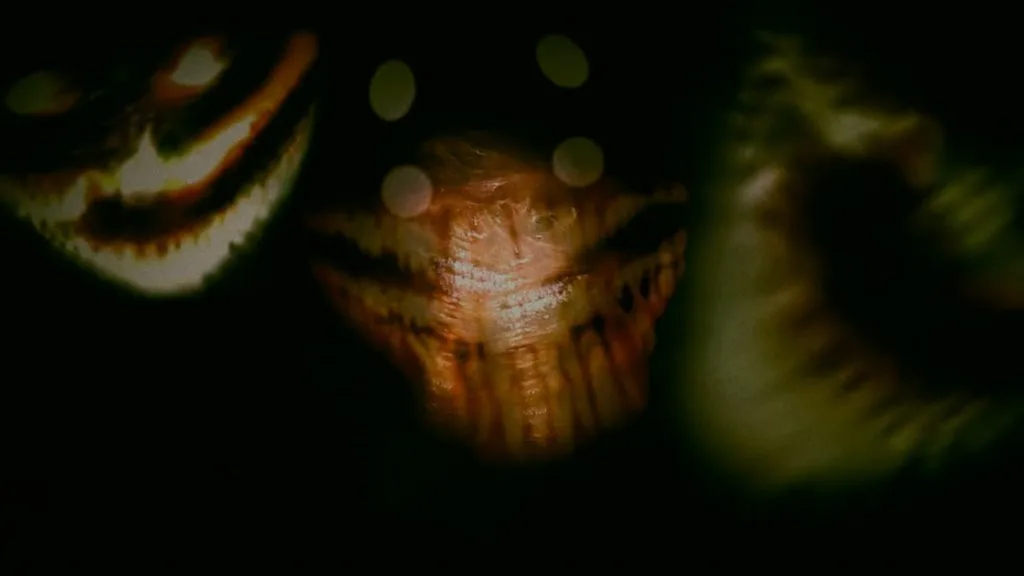
Entity #3 – the smilerThis entity will manifest in areas of darkness in the backrooms. Its wide grin and white eyes materialize out of the shadows, waiting for you to look at it. It will slowly turn you insane, so make sure to have anti-anxiety pills on hand. If you look at the smiler, just simply turn around and walk behind a wall or a door. You can simply wait for the smiler to dematerialize. If you look at them or are too close to them, they will instantly consume you, killing you no matter your health. As long as you avoid eye contact and walk past them, they cannot possibly pose a threat. Your flashlight will flicker when one is near. When it flickers, turn it off.
ㅤ
ㅤ
Entity #8 – the houndThis entity trawls along the vents in the backrooms, and pounces down to hunt. You will hear it clamber out of the vents, at which point you should stay well away. It is fast and will chase you down. The hound, once it has found you, will quickly chase you and hit you until your health runs out. The game says it can be intimidated with eye-contact, however you are better off running to a locker to escape it. If you hear it clamber out of a vent, be very wary of that area. There will be no lighting cues for it. You can wait out for the creature to leap back into the vents. You can then use the screwdriver to close the vents, thwarting the creature, making it less likely to hop out of that vent again. There are some vents, however, that are broken and cannot be closed.
ㅤ
ㅤ
Entity #10 – the skin-stealerThis entity is attracted to blood and gore, so you’d better patch yourself up if you are hurt. Its feet smack the ground with a moist slap; the skin the entity wears doesn’t belong to it. It lurks in the parking level and in the Office rooms, waiting for its next skin suit. This entity will charge at you upon sight and will hit you until you die. It does not make a sound when charging, however its distinctive footsteps can be heard. You can escape this creature using lockers. The skin-stealer can be parallelled to the cable creature, however there are no lighting cues and this creature is always walking around.
ㅤ
ㅤ
Entity #67 – the partygoerThis entity only comes out to play when you fail its game in the Office rooms. You’d better play to its rules and do as it says, or it will take great pleasure in removing your insides. This entity can be avoided entirely if you manage to beat the ‘fun games’ that the partygoer makes you take part in. If you fail at any point during the gift-finding or candle-blowing stage, however, then it will enter the maze to punish you. There is nothing you can do to stop this entity. It will frolic around, its footsteps heavy. When it sees you, it will run towards you You can try to run away, and you might lose its trail. If it catches you, however, you will be slaughtered. Make sure you win, next time.
ㅤ
ㅤ
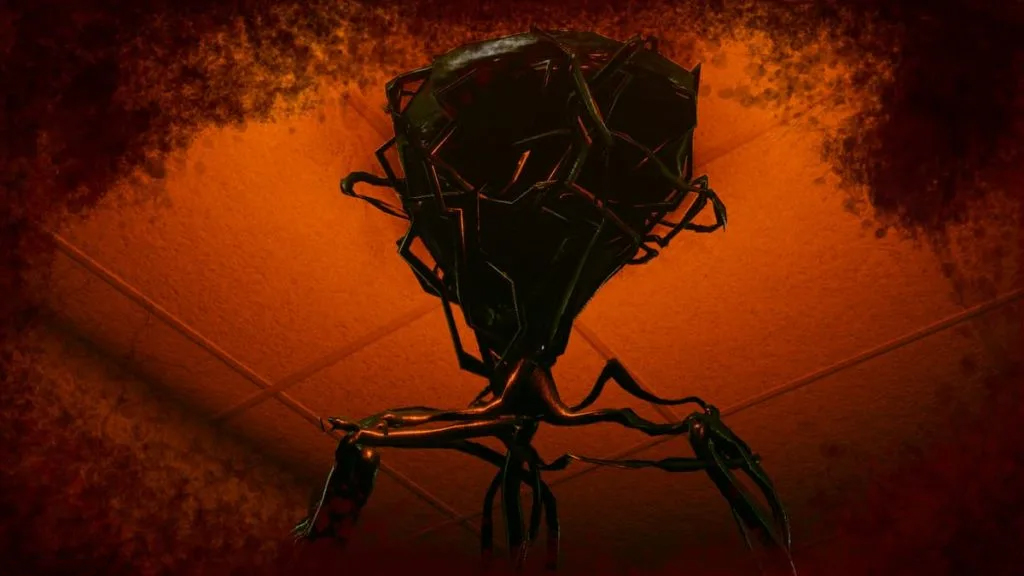
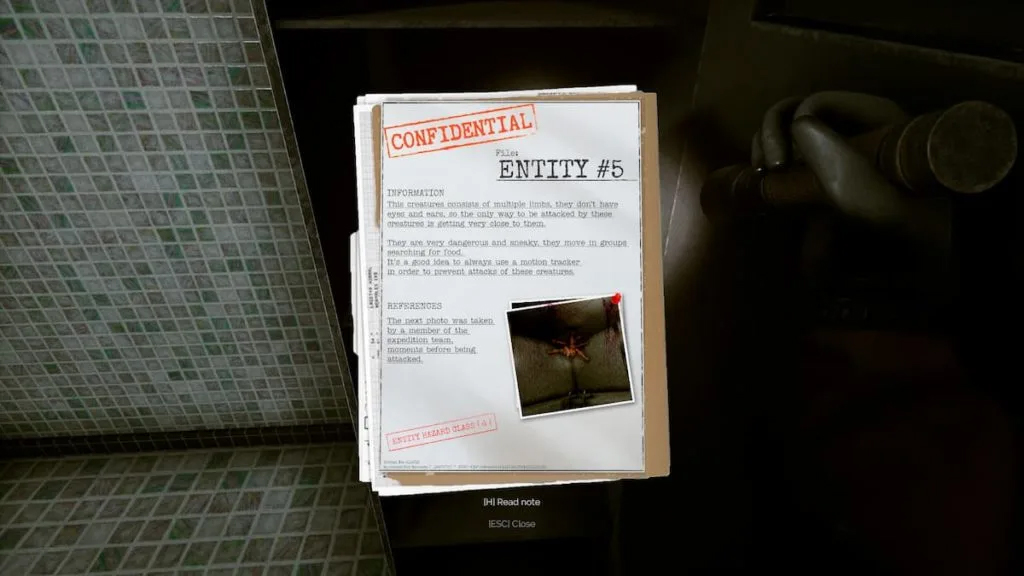
Entity #5 – the clumpThis entity is without eyes nor a nose. It is a bundle of appendages that is somehow adept as swimming, which you find as you enter the pool zone or the Sewer Rooms. If you get too close, it will leap onto you, devouring you with its large mouth. In the pool zone, you must use the motion tracker to detect where they are to avoid them. One effective strategy is to keep on moving and snaking past where they appear to be. If you bump into one, no matter how much health you have, it will kill you. They cannot leave the water, so once you’re out, you’re safe. In the Sewer Rooms, however, they are on display for all to see, roaming the sewage as if a highway and roaming some of the rooms. Same rules apply, get too close and they will instantly kill you. They do not have any senses so rely on your touching them.
ㅤ
ㅤ
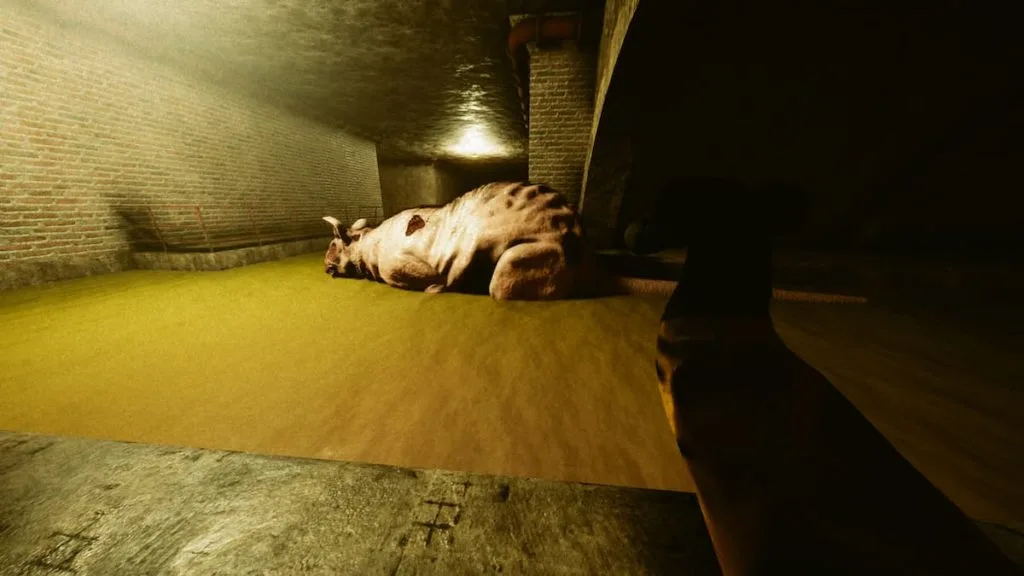
Entity #25 – The death ratGinormous and riddled with bacteria and plague, Entity #25 roams the sewage channels of the Sewer Rooms. Despite having no vision, the hearing on the behemoths are uncanny, and they will dash towards any noise they hear. If you see one approaching, freeze before it gets too close. Without eyes, it can walk right by you. But move a muscle, and it will come down on you instantly, killing you in one hit. Your only bet is to stay still and wait for it to shuffle by. Even if you are on the side-lines, the rats will run up to sniff out any noise. The only safe places are the rooms, so if you can, ditch into a room if one is running towards you.
Items
Booster/assisting items Almond water – Heals one hit of health. Found all over the place.
Anxiety pills – Reduces stress (reduces any screen blur / fuzz). Found all over the place.
Moth Jelly – Gives unlimited stamina for a while. A rare treat, spawns where it may be needed.
Flashlight – Lights up the way ahead (‘F’ to activate). In the first drawer you bump into in the actual backrooms.
Radio – Used to communicate between players not in external communication. Found in the room before the elevator puzzle on top of the left drawer.
Backrooms items Clock hands – Needed for the clock puzzle. Randomized spawn.
VHS tape – Needed for the VHS player atop the TV. Randomized spawn.
Screwdriver – Needed to close vents to hinder Entity #8. Found in the second drawer under the clock.
Hammer – Needed to break the vases. In the locker in the room with the 9 dead bodies.
Red key – Needed to unlock the Red Door. In a vase.
Fuses – Needed to restore power in the Office rooms. In the letter-lock safe behind the Red Door.
Body Parts – Needed for the 9 dead bodies puzzle. Only three are needed, see the VHS tape. Randomized spawn.
Bolt cutters – Needed to break the lock of the final door in the backrooms beyond the radioactive room. Found in the number-lock safe.
Geiger counter – Needed for the radioactive room puzzle. Detects radioactive level of objects. In the hazmat room beyond the switches puzzle.
Extinguisher – Needed for the radioactive room puzzle. Reduces the radioactive level of objects. In the hazmat room beyond the switches puzzle.
Hazmat suit – Protects the wearer from radioactive hazards. In the hazmat room beyond the switches puzzle.
Valve handle – Needed to stop the leaking pipes in the Parking level. Scattered throughout the room.
Office Rooms items Motion tracker – Needed to detect Entity #5 in the pool section. Found in the rotary lock safe in the flipped room.
Abecedery Codex – Translates the symbols on the monitors to input the code into the terminal. Found in the rotary lock safe in the flipped room.
Garage access card – Lets you unlock the door in the Parking level. Found next to the dead body near to where you spawn in.
Party Hat – On the table of the ‘fun’ hazmat party guests. Lightens the mood…
Red access card – Lets you unlock the final red door of the game. Found after completing the Fun Level…
Sewer Rooms items Water Treatment Key – Used to open the door to the Waste Treatment room. Found on the floor in the sewers next to a dead body. Will not always be in the same place.
Sewer Storage Room Key – Used to open the door to the Storage Area. Found on the floor in the sewers next to a dead body. Will not always be in the same place.
Metal Detector – Used to identify the locations of the medallions. Found in the waste room in a locked locker.
Rat Medallion – Used to insert into the Medallion puzzle in the Waste Treatment room. Found in the blocked-off section being held by a dead hazmat.
Fish Medallion – Used to insert into the Medallion puzzle in the Waste Treatment room. Found in the sewage water in the blocked-off section. Requires the metal detector to pinpoint its location.
Parrot Medallion – Used to insert into the Medallion puzzle in the Waste Treatment room. Found in the sewage water in the blocked-off section. Requires the metal detector to pinpoint its location.
Oil Drum – Fill it with oil to pour into the pipes of the dark, unlabelled room to stun the arm creatures. Found in the Storage Room.
Bucket – Can fill it with human meat to distract the miniature renditions of Entity #25 in the Exit Room. Found in the Storage Room.
Gear Cog – Used for the gear puzzle. Found where the statue used to be in the Grinder Room after completing the medallion puzzle.
Gear Handle Lever – Used for the gear puzzle. Found in the waste room.
Sewer Exit Key – Used to unlock the Sewer Exit. Found in a cell in the dark, unlabelled room after the gear puzzle has been completed.
Sources I Used
https://gamerjournalist.com/all-entities-and-how-to-survive-them-in-inside-the-backrooms
https://gamerjournalist.com/all-items-and-how-to-use-them-in-inside-the-backrooms
End Of The Guide

Thank you very much for your attention. I hope you learned a lot and your game will look much better. I will be grateful if you give me a prize and like this guide.
Source: https://steamcommunity.com/sharedfiles/filedetails/?id=2917815716
More Inside the Backrooms guilds
- All Guilds
- RE-play OLD events guide
- Inside the Backrooms Guide 474
- Inside the Backrooms Guide 469
- Inside the Backrooms Guide 459
- Inside the Backrooms Guide 449
- Grassrooms - Progression guide + Map
- GRASS ROOMS - , ( )
- Grass corridors
- Inside the backrooms -
- Safe Code Route