
Getting Started
Two helpful guides:
1. Going Medieval Guide For Beginners:
https://techraptor.net/gaming/guides/going-medieval-guide-for-beginners
2. How To Start a New Colony:
https://steamcommunity.com/sharedfiles/filedetails/?id=2504460761
Research And The Library
Research is how your settlement acquires the knowledge of how to build things. The idea is straightforward, but as a newbie I found the concept of storing knowledge in books a little confusing.
Initially your Production Facilities (F2) will allow you to build a Basic Research Table and have a settler start researching - by writing Chronicles. When you have 10 of these you can unlock Agriculture, which allows you to create Crop Fields (F7) and start planting.
The thing is, those 10 books are no longer available. They store that particular knowledge, and can't be used for new research. You now need another 15 Chronicles to unlock the ability to build basic furniture (including bookshelves to store your Chronicles in your Library).
If your Chronicles were to be destroyed in an attack then you would lose all the knowledge gained so far, which is why they are best kept underground (more on that later).
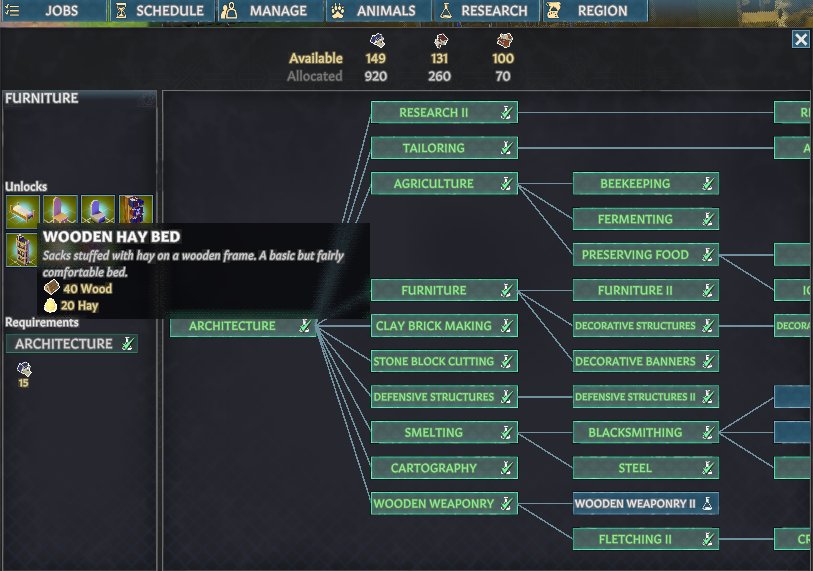
The following screenshot is taken from late in my learning game, when I have researched all that I need to. I have unlocked further levels of research and so I now have a surplus of 149 Chronicles, 131 Textbooks and 100 Theses, which I don't need but are mega-useful for trading (more on that later).
Recognised Types Of Room
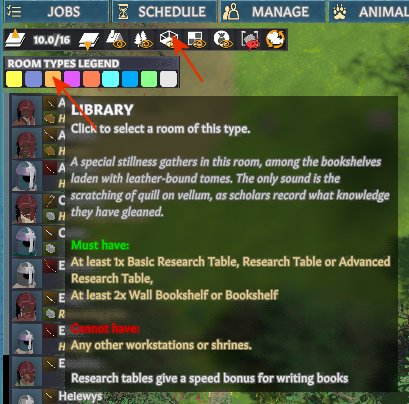
The game recognises a number of room types: currently Kitchen, Workshop, Library, each type of Chapel, Bedroom, Shared Bedroom, Great Hall and Spare (a room with no recognized purpose yet).
Each type (apart from Spare) has specific requirements about what must and must not be in it.
The reason for building recognised types of room is that what goes on in them becomes more productive, and/or gives settlers in them a happiness boost (see later).
In the case of a recognised Library, for instance, there is currently a recognised-room speed bonus of +20% for writing books.
Building Tips And Stability
The most important thing to learn, whether it's adding floor tiles across the top of a room or building underground, is the idea of Stability.
This was the essential guide for me:
https://www.youtube.com/watch?v=XTfHj4hONmc
What you learn here will be used in (among other places) Cold Cellars for Storage of Perishables (section below).
Cold Cellars For Storage Of Perishables
Building underground has several advantages, among them safety from trebuchet (treb) attacks (which can destroy precious contents such as books created during research) and a more stable and controllable temperature (particularly important when storing perishable items like food and achieving the right conditions for creating alcoholic drinks).
By far the most useful introduction to the whole business of underground building w.r.t. temperature control (for me) was this one (click to open link):
The Fundamental to Cold Room Temperature[playgame.tips]
If, for example, you want to know how the temperature in an underground kitchen will affect the cold storage area that it connects to, or how temperatures depend on depth below ground, the above guide makes that clear.
The following video guide covers a number of important topics, including how to dig a compact vertical staircase to reach levels where the temperature is low enough.
https://youtu.be/YRKE5jazE7A?t=315
Suggestion: the video recommends a 2*3 tile opening for the staircase, but I found a 2*4 opening much easier to construct, with a 1-tile "landing" at each level.
My difficulties in constructing the compact staircase (and help received) were described in this discussion thread:
"Simple" descending staircase in a 2x3 hole...
Making Booze In Temperature-Controlled Cellars
You will know by now that medieval settlers need their booze (even if they can't handle it!) to be happy (more on settler happiness in a later section).
Unfortunately, fermentation processes are particularly finicky about exact temperatures.
I found everything I needed to know in this excellent guide (click to follow link):
Edymnion's Guide to Making Alcohol
That's it!
Stockpiles And Other Storage
Stockpiles and other storage units (such as shelves) have two important attributes:
What is allowed to be stored in them, including any limits on quality and hitpoints.
Their priority, used to control movement between storage areas.Also, where the game tells you how much of something (e.g. iron nuggets) the settlement has, it only takes notice of what is in stockpiles and the other storage units.
Facts in the current game:
* When not in storage areas, resources may sit in piles on the ground or floor. Unless such piles are "Forbidden" then settlers (or hauling animals) will move them to the highest priority storage area that has room.
* Likewise, settlers (or hauling animals) will move resources from a lower priority storage area to a higher priority storage area (the highest priority area that has room).
Suggestions:
* Suppose you are building something large that needs wood and hay. Somewhere there may be stockpiles for both wood and hay, and settlers will run to and fro between these stockpiles and what you are building.
It may be better to create small high-priority temporary stockpiles of wood and hay near your construction area, which lower-skilled hauling settlers (or animals) will keep filled up while the constructing settlers do the actual work.
* A similar strategy for using temporary seed stockpiles is shown in the Crops and Crop Fields section below.
Keeping Settlers Happy

I'll come clean here. I am a long way from understanding all the ins and outs of settler happiness, although I think I know in general what's good and what isn't.
In the current game, my impression is that the only benefit of having very happy settlers is the glow of satisfaction you get from seeing them. The really important thing is to stop them feeling very unhappy, which is a different matter.
It's also important to take note of each settler's perks, and notice when they get another one. These will often affect how you schedule their work: a simple example being that a Night Owl perk means they work better in the hours of darkness. Some perks you can't do much with, e.g. the Churl perk just means the settler is going to be harder to keep happy.
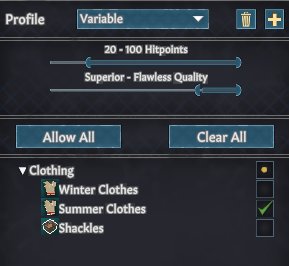
Part of keeping settlers happy is having good quality winter and summer clothing for them to wear - for creating these and improving their quality, see the section on Production and Dismantling Queues.
* I received a great tip on changing the settlers' clothes from summer to winter or vice versa, which is particularly valuable wihen you have many settlers: in the MANAGE tab, give them all the same edited Apparel profile (which I call Variable). My current profile is shown here.
Then, all you need to do for the changeover is to edit this profile, preferably when the settlers are asleep so that you know where they are. They will drop their clothes immediately (!) into the usual Forbidden piles, and when they wake up they should auto-equip their new clothes if they are in recognized storage areas.
Settler happiness is one of the most complex areas of the game, and I suspect the most likely to change.
See for example, this discussion thread:
Eating and drinking peculiarities
Mining For Resources

Mining is a mechanic that is used for several important things. We have already met it in digging underground storage areas and staircases, where in my valley game the settlers are just digging out dirt (which kind of evaporates) containing two clay resources in each column.
Two important things in doing that were:
1. The issue of stability, avoiding collapses.
2. The issue of a settler not trapping themselves by digging a hole that they can't jump back over.
What's new in Mining for Resources is the issue of actually finding where the resources (e.g. iron) are.
One of many useful guides is this one (click to open):
How to Get Iron in Going Medieval[www.setreadygame.com]
Another tip I found useful was to zoom out the view, select the mining tool, use Control+Mouse Wheel to examine a lower layer, and run the cursor around in that layer to see what the mining tool shows as being located in each location. Basically this is rapid prospecting, and it's quite easy to see when the normal "Dirt" changes to something else.
Production And Dismantling Queues
My own guide (from things learnt on discussion group):
https://steamcommunity.com/sharedfiles/filedetails/?id=2837873452
Speedy Walkways
I was introduced to the idea of Speedy Walkways (as I call them) in the guide shown in the Cellars and Perishables Storage section above.
And later I found this excellent video which explains the whole thing:
https://youtu.be/4CO4atDdKZk
Facts in current game:
* How fast a settler moves on a surface depends on that surface's Traversal Speed, one of the things shown at the bottom left of your screen as you run the cursor around.
* 100% Traversal Speed is how fast a settler (or e.g. a hauling animal) walks on wooden floor tiles..
* On grass (or anywhere that hasn't been built on) you have 85% Traversal Speed.
* On clay brick and limestone brick floor tiles you have 110% Traversal Speed.
* Stairs have the same Traversal Speed as on grass, regardless of what they are made of.
* Wooden floors (or paths/walkways build using wooden floor tiles) are therefore actually 17.6% faster than grass to walk on (=100/85).
Suggestions:
* Use clay or limestone brick floors for speedy walkways where extra speed really matters, e.g. moving around between or behind battlements or for frequently travelled areas.
* Instead of using (say) wicker fences to separate and surround crop field areas, consider using speedy walkways instead.
Examples of both of the above suggestions are shown in the Crops and Crop Fields section below.
* You can also use Speedy Walkways outside your settlement to provide faster access to areas some distance away that the settlers visit, e.g. an area where a wild crop grows or a tree plantation that you have created. For these I use wooden pathways which for me are quite fast enough.
Since settlers can move diagonally, a diagonal section of walkway needs to be laid with a staggered pattern of two floor tiles.
An example of the start of a long Speedy Walkway outside my settlement is shown below.
(The battlements here have clay brick flooring for robustness and speed of movement.)
Food And Nutrition
What keeps settlers alive is basically Nutrition, which can be supplied by:
* Raw food
* Meals cooked or otherwise produced from a variety of ingredients, including crops and raw meat.
What the following excellent guide works out for you is that each settler requires an average Nutrition of 114 per day:
Jeff's Food and Nutrition Guide in Going Medieval[www.setreadygame.com]
The guide takes into account the fact that the appetites of settlers are not all the same, and that they don't all eat at the same interval.
The guide also gives you an indication of how many crops to plant for each settler. Taking cabbages as an example, and allowing for no growth over winter, the answer is about 8 crops per settler.
This calculation doesn't take into account nutrition from meat obtained from hunting or slaughtering.
Raw Ingredients have various Nutrition values: Crops (beet, cabbage etc.), mushrooms and raw meat currently have a value of 30, Milk, eggs and honey currently have a value of 25. Cheese and smoked meat (which are produced, not strictly raw) currently have a value of 33 and 35 respectively. Pickled vegetables currently have a value of 33.
You can see from the Almanac (button top right of screen) that most Meals currently have a Nutrition value of 95, except Lavish Meal (a herb added) which currently have a Nutrition value of of 100.
What isn't clear from the guide, and from other information currently provided by the game, is that although 1 meal appears to require 12 cooking ingredients, what actually happens is that the cook prepares 3(*) meals at a time with those ingredients, meaning 4 cooking ingredients per meal.
So,it seems that a settler gets more Nutrition from eating 4 raw ingredients (4x30=120, say) than from the meal that is produced from them (95, say)! But then there is the settler's happiness to consider - not surprisingly, perhaps, they are not too happy eating raw ingredients.
(*) It turns out that a particularly skilled cook will prepare 4 meals at a time from 12 cooking ingredients. I have confirmed this happening with a cook of skill level 27, but don't know the exact skill level at which the change occurs.
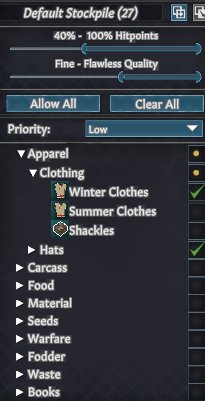
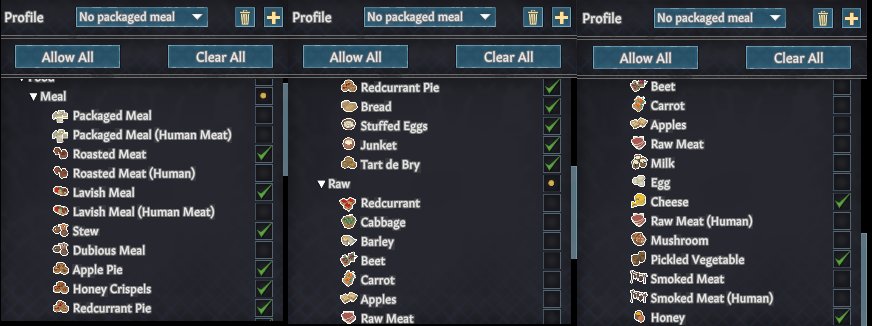
You can control what settlers eat from the MANAGE tab. These are my current settings for their edited profile, which stops them eating Packaged Meals (most useful for caravan journeys), since those meals require textiles to produce,
The settings also stops them eating most raw ingredients. Cheese and pickled vegetables are not strictly raw - they are the result of a production process, and the same is probably true for honey (bees production). I didn't use to allow settlers to eat honey because of its use in producing mead, but I have way too much booze at present!
The management profile above shows what I will allow settlers to eat. But when cooking, you can also control what cooking materials go into a meal. There are many "gotchas" here: for example, if you a producing cheese from fermented milk, you don't want curdling milk to be used as a meal ingredient! Likewise you don't want to allow barley to go into a meal if you are using it to produce ale or beer.
You get the idea...
Crops And Crop Fields (and Crop Blight)
* Looking for good crop information to go here *
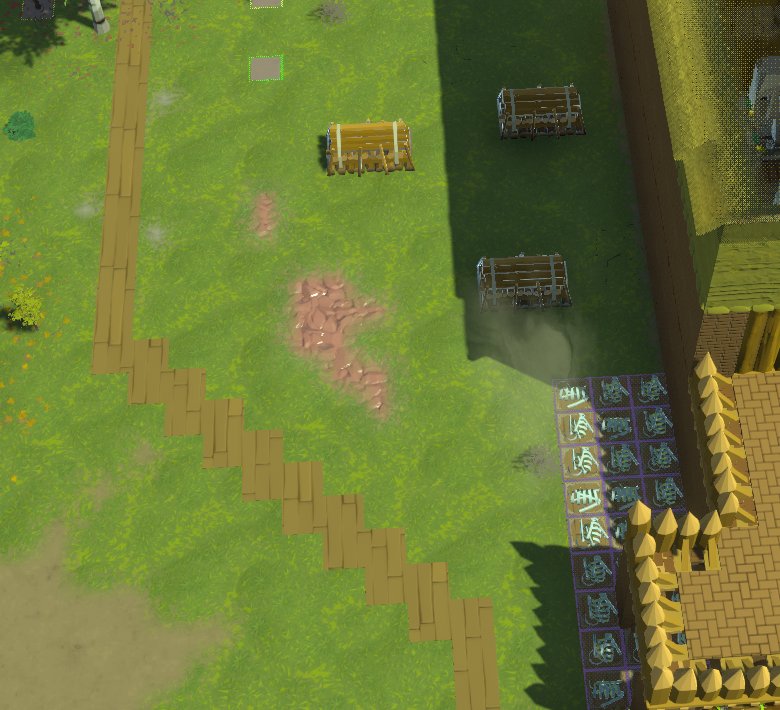
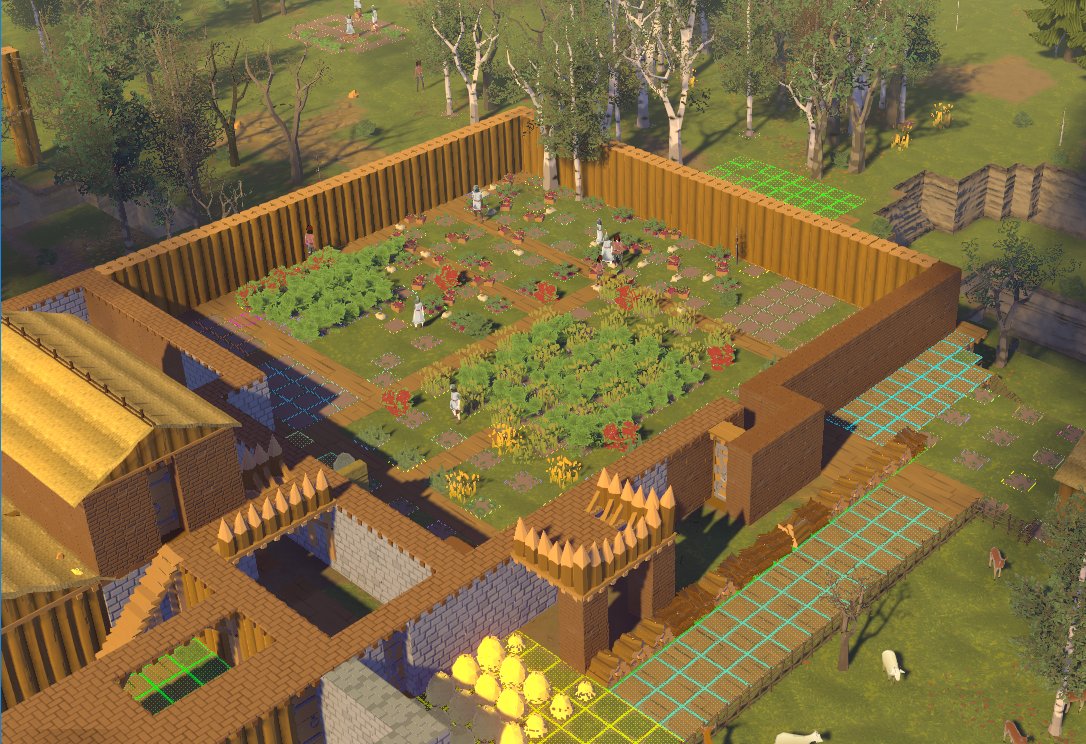
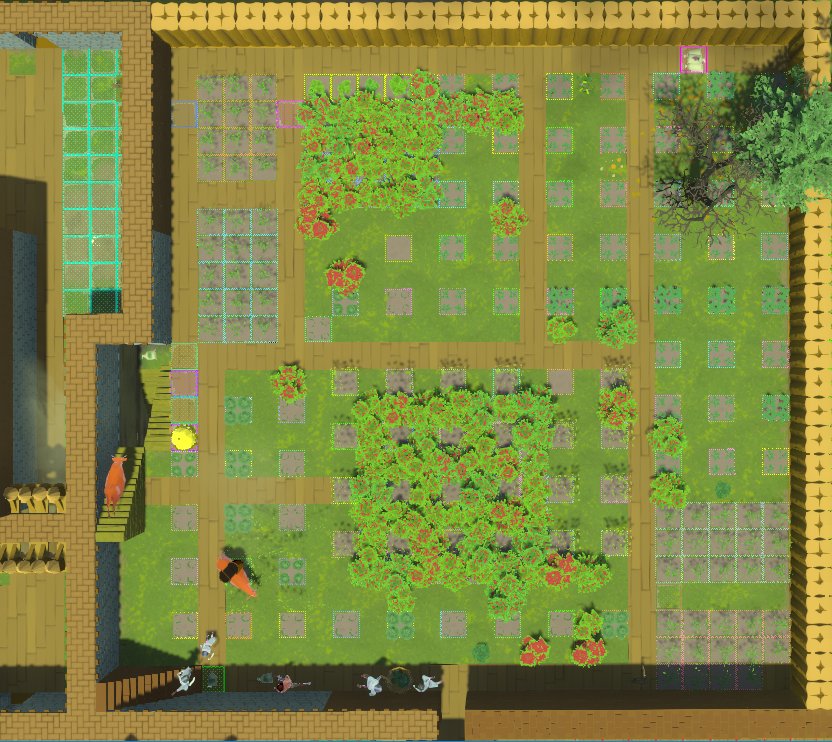
The following screenshots are two views of my crop fields area, as it evolved during my learning game. It has produced way too much food and flax for my 20 settlers!
It is a defended area because of being connected underground to the main settlement, and is now also connected one level up by clay brick floors and battlements (more about those in section Defending Your Settlement below).
The layout was developed to minimize the effects of crop blight.
For those interested, these are two related discussion threads:
Dealing with blighted crops - what worked for me
Minimising damage from crop blight - result of a small experiment
The second thread also contains some good advice I received about when to stop and start sowing.
Cellar storage areas, kitchens and other related production facilities are located underground below this area (where seeds and food are stored in cold rooms).
The crop fields are divided and surrounded by wooden walkways, rather than by wicker fences, which helps settlers move around more quickly.
On the wooden walkways there are also some one-tile temporary high-priority stockpiles for various seeds, which are used before and during planting times, kept filled by hauling animals, These stockpiles have all their contents disallowed at other times, so the hauling animals return unused seeds to storage.
At this stage in the game, BTW, settlers have NO priority for Haul jobs, since my 9 cows do all the hauling very well!
You may notice a 1-tile hay pile as well, one of several in the cows' travel paths to avoid them eating many of the other crops!
Some of the stockpile areas outside the crop field walls permanently don't allow anything to be stored in them. This was a good tip I received to avoid piles of things (e.g. linen) to be dumped there for long periods of time, long enough that decomposition was setting in (and they weren't available for e.g. clothes production). Whether this was due to a game glitch I don't know, but it's a useful tip to get piles of stuff moved into proper storage quickly.
Animals - Domesticating, Training And Feeding
These are the guides that I found most helpful:
https://www.youtube.com/watch?v=sZ3GS6zlBpU
https://www.youtube.com/watch?v=S6gMwbFV9M0
Just my own experiences and preferences:
* Animal husbandry is the skill needed here. An excellent tip I found is to develop beehives (skeps) early as they train this skill, as well as being useful in their own right.
* I don't keep dogs, because they don't seem to contribute anything to the settlement. I harden my heart and have them slaughtered.
* I have so far had my settlers successfully domesticate cows (relatively easy) and deer (not so easy). I will keep sheep if they ever turn up again in my area. Never seen chickens in my game.
* Domesticated cows are then trained for hauling (takes a while), where they are really useful.
* Domesticated deer are bred in captivity as a food and leather resource (by the time I finally achieved this, I didn't really need the resource). Some problems in breeding them were discussed in this thread, which threw up some useful information about animal caps.
* I don't have pets that follow a settler around. Can't see the point (yet).
* Hauling cows will naturally eat what they find (and like settlers, they have to be fed anyway). I put hay piles at strategic points in their walkways and they mostly eat those. Hay is readily available by harvesting ripe long grass that grows wild outside the settlement, and by harvesting barley.
* I have seen no reason to believe that training animals for combat is worth the time and effort to domesticate and then train (say) a wolf. It appears that enemies will quickly kill an attacking animal anyway.
Relationships Between Your Settlement And Surrounding Factions
Your settlement is surrounded by others in your region. In order to see what those settlements are, the factions that they belong to, and to trade with them using caravans (see next section), you need to build a Cartography Table.
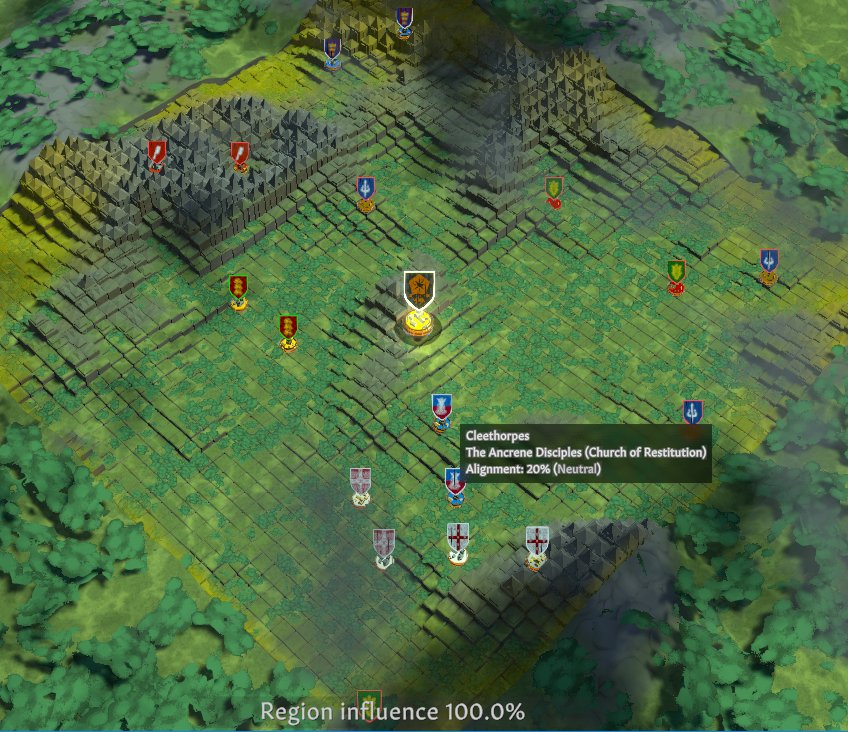
For that, you need to use 30 Chronicles to unlock Cartography in your Research. You can then place the table anywhere (mine is now in my Great Hall) and you can now use the Region tab next to your Research tab.. You will see something like this:
The above screenshot was taken late in my learning game. Your Region Influence (here 100%) basically shows how much notice other factions are taking of you. This will grow as you develop your settlement and as you interact with other factions.
Some factions are Permanently Hostile, in my case various Bandit factions. They will attack your settlement periodically, although in my game without using trebuchets (trebs).
Other factions have various alignments towards your settlement, ranging from hostile (below -75%) to Neutral (-75% to +75%) to Friendly (above +75%).
Hostile factions will attack your settlement periodically, in my game at least sometimes using trebs.
You can change the alignment of the factions to your settlement (other than those permanently hostile) In these ways:
1. You can accept an escaping settler from one of their settlements. This will seriously annoy that faction and their settlements will go hostile to yours, if they weren't already (and a retaliatory raid will soon be on its way).
2. You can trade with a settlement of a non-hostile faction, and give them more value than you receive. This will increase their alignment towards you.
3. You can send a caravan to a hostile faction, and offer them goods without receiving anything in return. Depending on the value of what you give them, their alignment towards you will improve, eventually enough to stop them being hostile.
When a faction finally becomes friendly towards your settlement, they will now include weapons and armour in what they offer you for trade.
Trading And Caravans
Before you are able to send caravans to trade (see previous section), merchants from other settlements will occasionally arrive to trade with you.
You will need to select a settler with a Speechcraft skill (the higher the better) and then right-click the merchant to initiate a barter.
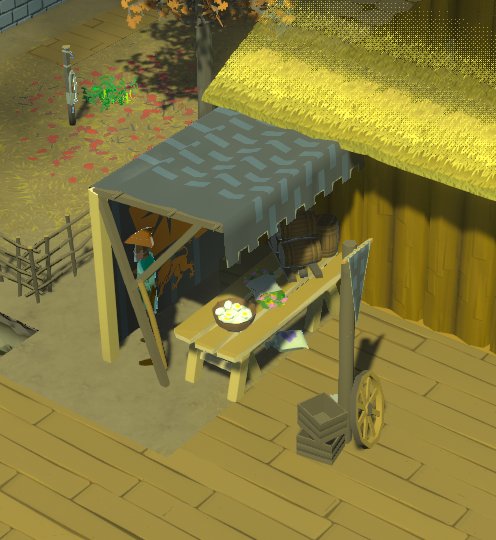
You don't actually need a Merchant Stall (obtained from the MISC menu, F5) to do this, but if you have one the merchant will come and stand in it rather than wandering around the settlement, so they are a little easier to locate.
The pole-like object next to the Merchant Stall is the Caravan Halt (unlocked with Cartography). More on that below.
Forming a caravan is not difficult. You click a settlement on the Region map, select the settler(s) with Speechcraft skill whom you wish to travel (which gives you a combined weight allowance for goods carried) and then the items that you wish to carry. You will need to include sufficient food for the journey, which is where Package Meals are useful (but not necessary) since they are high nutrition for their weight.
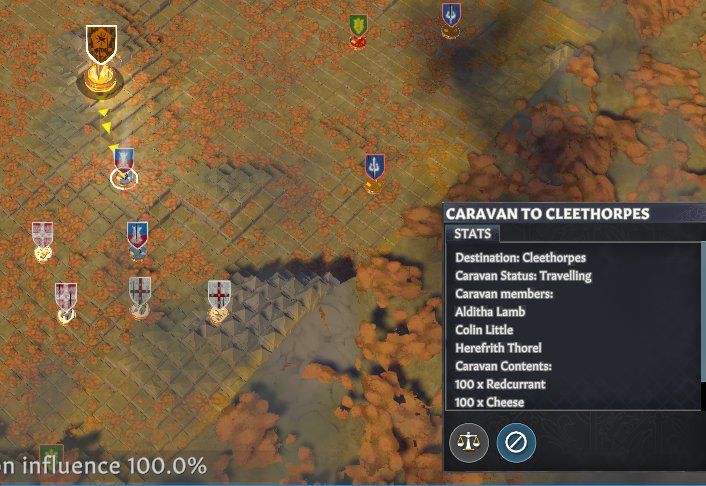
Once you launch the caravan your settler(s) will round up the supplies and then start. Your Region map will then show something like this (I am offloading a whole lot of surplus produce here!):
When the caravan arrives you will be notified. You click the scales symbol (bottom left of the popup) to initiate the barter, limited by your weight allowance on the return trip. Then to speed things up you will normally click the "cancel" icon at the bottom right of the popup to initiate the return journey.
You will be notified when the caravan returns home, and this is where things are a little curious in the current game. If you don't have the Caravan Halt then the returning settlers will drop all their supplies at the edge of your settlement's area map and then carry on walking home! If you do have the Caravan Halt then (in the current game) the supplies will be magically dropped in piles at the Caravan Halt at the same time as the settlers enter your map. This is strange, but useful. Settlers or hauling animals will then move the piles of returning supplies to stockpiles and storage in the usual way.
The following link will tell you more about the bartering process (and much more about trading generally):
Going Medieval - Trade (Wiki)[goingmedieval.fandom.com]
Note that with the game in Early Access, information in this Wiki is quite detailed but may be out of date.
Defending Your Settlement...
An important disclaimer up front: I am writing this as a newbie in the late stages of his first easy learning mode game. My settlement has had plenty of increasingly-severe attacks, but I expect things to get more difficult (and more interesting) in harder-mode games.
So, two main things I have learnt:
1. Apart from very early and mild attacks before defences are built, melee weapons are all but useless. Defending (and hunting) is all about ranged weapons.
This might also be true in harder games, see this discussion thread:
Newbie question: When do melee weapons become useful?
It's my archers that do the fighting and hunting, and so it's those settlers that also get the good armour (mail was fine in this game). I also concentrated on getting them good longbows and crossbows as early as possible (see the section on Production and Dismantling Queues).
2. Traps of any kind seem not only unnecessary, but dangerous to your own settlers.
All that is really needed - at my level, anyway - is to have strong walls (mainly against treb attacks, see next section), entrance(s) through at least one reinforced door (or several wooden doors behind each other) that attackers take a long time to get through, and raised areas surrounded by merlons from which archers can shoot down at the attackers - their higher elevation giving them an advantage.
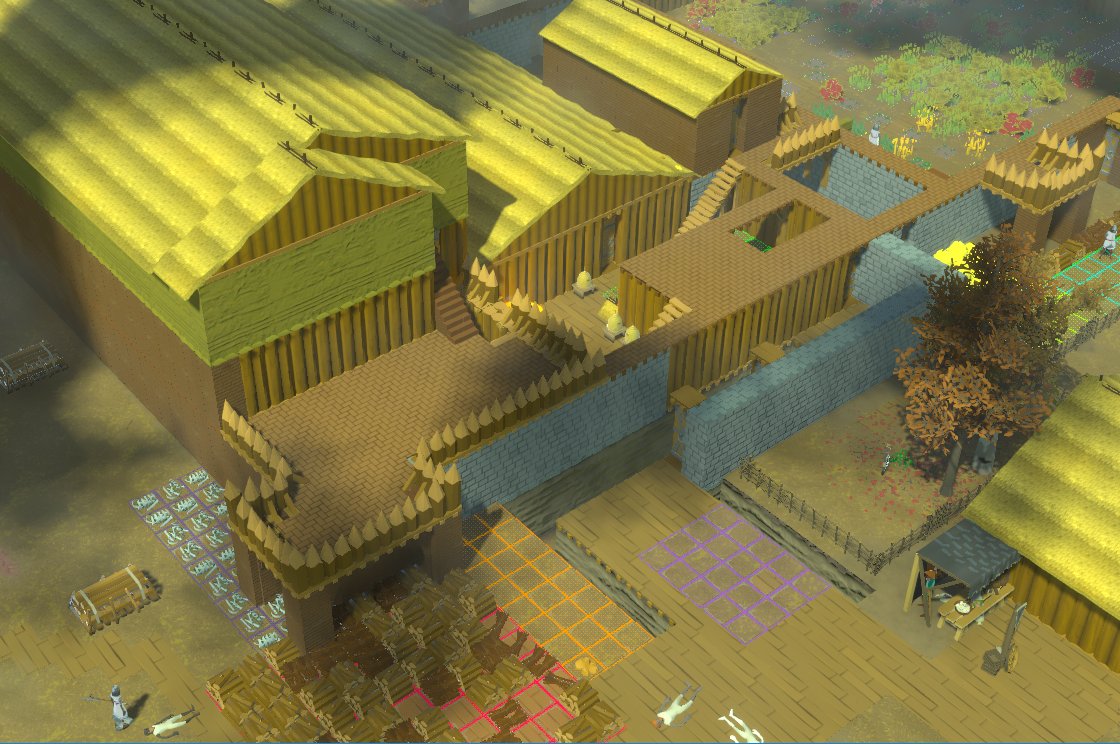
By late game my settlement's defences looked like this:
The screenshot above shows the main entrance, which in fact is where all attacks now occur. Attackers invariably come down the left hand side, being distracted by destroying pyres built since last time and getting shot at while doing it. The front entrance has a ditch in front of the wall, and two reinforced doors to get through, again while being shot at.
In my game the first reinforced door has only occasionally been slightly damaged before the attackers are all killed or fleeing. The second door has never been reached.
The defences on the right hand side of the settlement are no longer needed, although they were at one time. Various changes I made caused the path marauders would take down that side to be much longer (slower to traverse) than the paths down the other side, and so they never come this way any more.
My response to an attack (FWIW) is generally as follows:
* When notified of the incursion, save the game!
* Draft all the settlers (easier I find from the MANAGE screen), unless most of them are sleeping, in which case I draft only the archers and anyone who is awake.
* Select each drafted settler in turn and right-click where I want them to be - archers on the battlements, naturally, most of the rest safely inside somewhere. (In the early game I had my strongest melee fighters standing inside the final entrance door.)
* When it's all over, remember to undraft the settlers and rebuild the destroyed pyres.
* Activate the pyres (there's a permanent one inside the settlement walls) so that settlers won't be made unhappy for too long by seeing corpses.
...Against Trebuchets (Trebs)
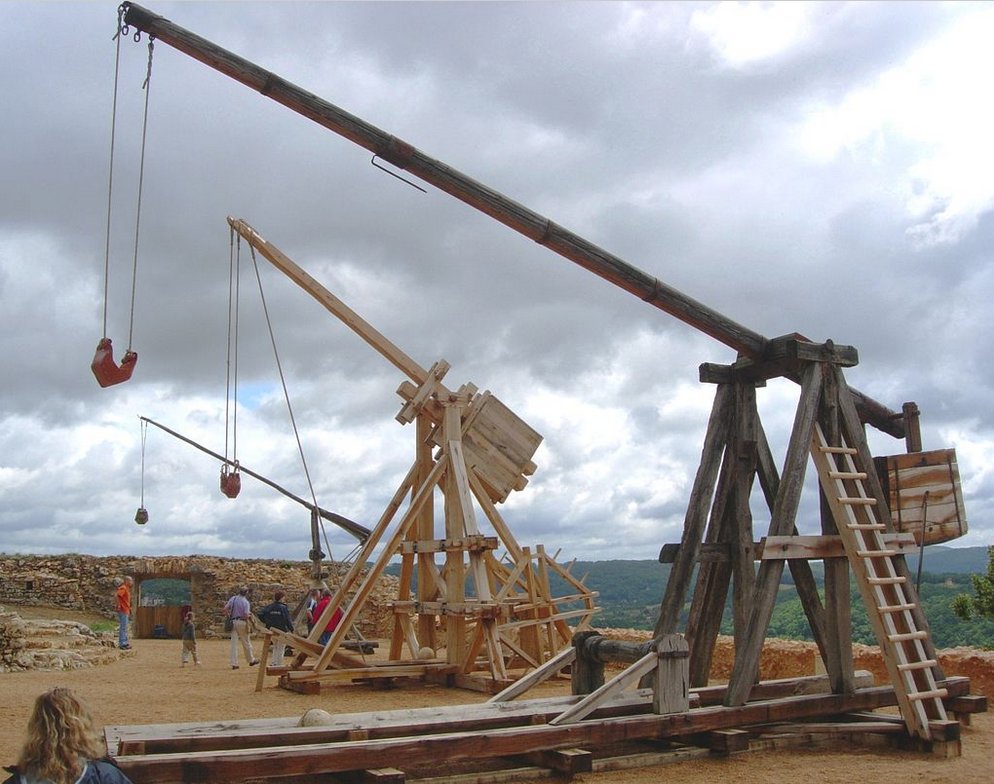
No, these are actually replicas of the real thing (Wikipedia[en.wikipedia.org] !)
IMPORTANT GAME EVENT:
Since the patch on 11 July 2022, settlers will now properly repair damaged construction - but naturally will not replace anything that was completely destroyed.
This changed the game signficantly.
When a treb shot hits the outer wall or roof, it may or may not destroy a section completely. If it does, settlers will have to be instructed to replace it. If it doesn't, then settlers (who can reach it) WILL automatically repair the damaged section.
However a treb shot also seems to create "splash damage" which may be some distance from the point of impact. Again, something like a cracked floor tile WILL be repaired automatically by your settlers, Anything completely destroyed will have to be replaced.
Experts seem to agree that the extent of splash damage does NOT currently depend on the strength of the walls that were hit.
Just from my experiences so far in easy learning mode:
* Limestone block walls and clay brick walls (not limestone walls and clay walls) have 8 times the durability (hitpoints) of wooden walls, so in a valley where clay is abundant starting clay brick production early seems a good idea.
* I added a second clay brick wall next to the existing wooden walls, producing a double-thickness wall, and the walls have never had sections completely destroyed.
* Because trebs seem to have a preference for certain areas of my settlement, I used clay brick tiles instead of wooden floor tiles there. I haven't had one of those completely destroyed, and those that aren't completely destroyed will now be automatically repaired.
* It seems like a good idea, following a treb attack, to systematically check that all of the room types previously recognized are still recognized. Doing this has helped me to identify where splash damage has occurred.
Source: https://steamcommunity.com/sharedfiles/filedetails/?id=2842276701
More Going Medieval guilds
- All Guilds
- Remove Death by Old Age
- Jobs & Priorities
- Going Medieval - Guide to Modding and Supported files
- Changing Voxel Values (Mining)
- Going Medieval Guide 345
- What changes do you want to see in the game? \ ?
- Going Medieval Guide 325
- Going Medieval Trke Rehber.
- How to Dismantle Items Effectively
- Character creation guide [BR/EN]