
[Type A] The Nesasio
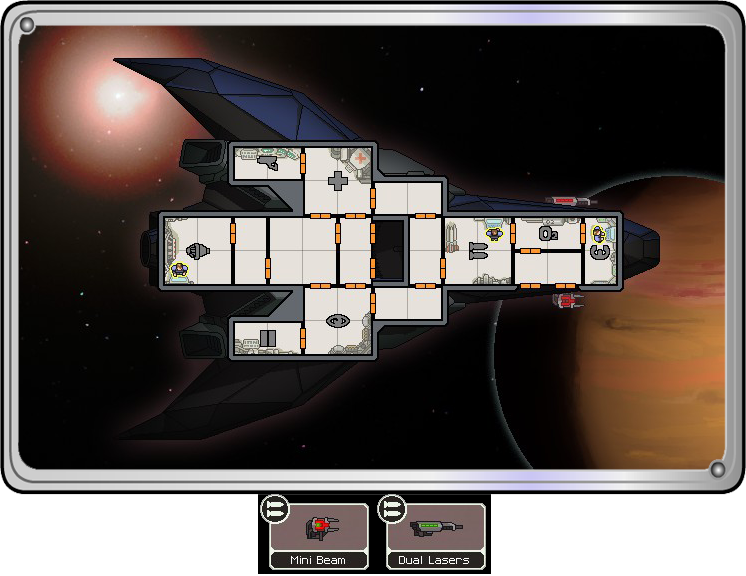


A tricky ship to use, which requires a certain degree of finesse. The distinct lack of shields means that you need to rely on evasion, cloaking and finishing fights quickly to make it through the first sectors
What, no shields?
The Nesasio is a very cool-looking ship, and you also might notice the awesome Cloaking System that came with it. Of course, you also have hopefully noticed the distinct lack of shields. If not, the shots pounding into your ship certainly will. As you can probably guess then, survival is all about your ability to evade shots. Needless to say, you’ll want your engines always running at maximum power, and you must have crew manning them and the pilot’s seat at all times
Engineer… Engi… geddit?
Speaking of crew – Some Engi are a very important investment here. With 2 crew pretty much locked to their rooms, you’ll need some crewmembers capable of running around the ship to deal with repairs mid-battle. Fire is also a big problem for this ship, as the only airlock is right at the front… and unless you’re happy venting both your oxygen and weapons room, whilst cutting off the pilot from the rest of the ship, you’re venting nothing baby
Edit: After a very good spot from Big Boss - The Nesasio actually has more airlocks (centre-left of the ship) which makes fires and boarders slightly less fatal
Fighting… it ain’t so bad
To be honest, the lack of shields isn’t actually a huge setback. The trick is in ending fights quickly before they really take off. The 5 second cloak buys you the initiative. The trick is to use it as the deadliest shot is en route (like a missile) – Even starting out, this bumps your evasion to 90% - Largely cancelling their first volley. If they have drones, then you’re up against it: Hit cloak as soon as the drone is about to launch its first shot (you can tell as it stops moving) – You really must squeeze every second you can. Your weapons take around 10 seconds and you only get 5 cover
The synergy of the dual laser and mini beam are obvious. The trick is ultimately to punch the shields down for the mini beam to hit the weapons/drones (whatever is the biggest threat) – Whilst shields are an obvious target, the cloaking cool down means you’re considerably more vulnerable to the 2nd volley, so the attacking systems are bumped up in priority. Of course, if you can hit both, all the better. Note: The dual lasers charge up slightly faster, so can fall out of sync with the mini beam if you get carried away and ‘pre-aim’ them before both weapons are fully charged
What to avoid
The lack of shields / crummy layout means that any natural hazard is practically fatal for you. Luckily the scanners let you spot these in advance. It’s also a good idea to try and plot a route to the exit that allows for several paths, just in case 1 is a hazard. When it comes to jumping sectors, avoid Zoltan at all costs. Their shields waste your initiative and give them a few free volleys
Race to the Shields
As you can probably guess, the main aim of the first few sectors is to get those all-important shields. Unfortunately this is no easy feat, as it sets you back 125 scrap (not counting the 2 energy to start using them too) – You just have to bite the bullet and avoid all but the most vital purchases (that’s crew, teleporter or epic weapon like burst laser Mk II) – Though if a store isn’t around for a handful of jumps, feel free to bump up the engines/cloaking. Also, don’t be afraid to sell off the titanium coating to get shields – It’s cool, but 15% is unlikely to save your skin very often
Arm up!
With the shields in place, you’re probably in a position to take a slight breather. Defensively you should be doing well now, rocking shields, good engines and cloaking. So time to U-turn it and go all out on offence – that mini-beam combo won’t hold up for much longer. Honestly speaking, boarding crew is the best way to go as you’ll need the extra scrap
What to Aim For
The cloaking system means that you only have 2 extra systems to play with. You also only have 3 weapons slots (where most ships have 4) so you’ll want to be decked out with some hard-hitting stuff. Maximum shields are also a must – Don’t think you can hide behind the engines and cloaking for the final fight. As for extra systems, the standard set are your best bet:
- +3 Crew (x2 Boarders: Rock / Mantis – x1 Engi)
- A new set of weapons (x2 Decent Hull Damaging x1 Support/Bomb is a reliable build)
- Shields
- Crew Teleporter
- Hacking
[Type B] DA-SR 12
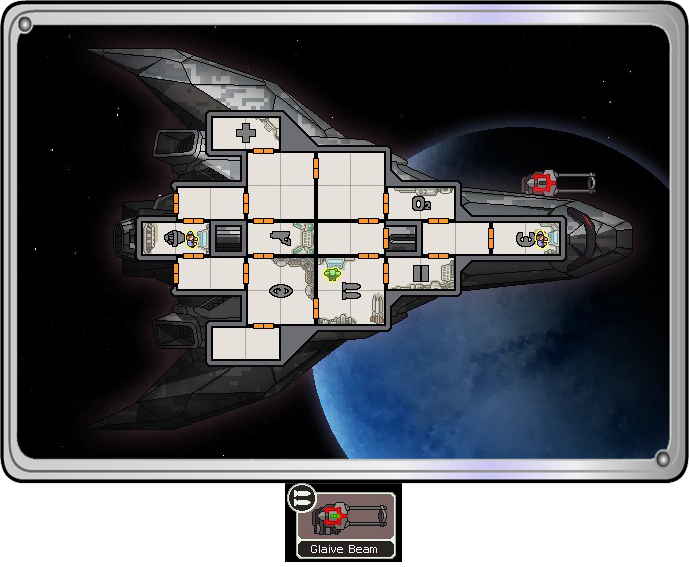


Aptly described as a glass cannon. If you can survive a fight long enough, you get to unleash the Glaive Beam upon your foes which, if you’ve never used it, is like one-shot death in a can
Before you go…
As soon as you can: Upgrade your reactor. If you want to stand a chance - You need to have your engines and cloaking at full blast, Glaive Beam active and obviously some oxygen. Keep the crew at their stations too – You want pilot and engines manned at all times, and weapons also manned to squeeze a second or 2 off the Glaive Beam
The Waiting Game
As you can probably tell – Fights are a simple case of surviving long enough to unleash the Glaive Beam at the enemy ship. At 25 seconds though, it’s a long wait. The good news is that you have upgraded cloaking, buying you 10 seconds off… but that’s still 15 to survive uncloaked for, and the engines aren’t that amazing
The best time to cloak is when the deadliest shot gets fired. If you time it right, you’ll miss the shot and be able to fire your Glaive Beam before the 2nd. If they have drones or a beam weapon though… grudgingly… sit and hope for the best. No, really… there’s no real way around it for now. All I will say is, don’t be afraid to flee with this ship. If something breaks – it will break horribly, so don’t stick around to watch
When you get the chance to fire the beam: Start at the shield room (or at least include it early on if you can hit more rooms starting from another – remember, damage is per room!) so you can knock it out and inflict maximum damage. For most ships in the early sectors, you will annihilate them in a very satisfying one-shot wonder
Weapon Insurance – 50 Scrap
I know you have a lot to buy here (shields, for starters) – But if you get 50 scrap spare early on, consider throwing it into your weapons room. It might seem a waste right now, but the last thing you want is that Glaive Beam going offline from a stray shot. An extra bar will give you a shot’s buffer, letting you repair without the Glaive losing power. If you get extra crew, keep them in the weapon’s room to aid repairs to begin with – That damn thing must stay online!
Same weaknesses
Much like the Nesasio – Avoid every natural hazard and Zoltan section if possible. Any of them will pretty much spell near-certain death for you
The Shield Game
As before – The big race early on is acquiring some shields. Grudgingly you have to cough up an unflattering 125 scrap for it (not counting 2 bars of energy too) so it’s back to saving up. Whilst you want to get it as early as possible… don’t bypass a really good weapon/crew if you see some, as shields are generally more common in stores. This early on in the game, it’s an ok gamble. But don’t put it off too long. You want shields by the end of sector 2 at the very most
Whilst boarding is normally cool – You’ll want shields first. The boarding process is too lengthy to be able to survive without them, and it’s not like you can just casually Glaive the enemy ship for support – You’ll wipe it out half the time!
Now about that beam…
Personally I’m not a big fan of the Glaive beam. Don’t get me wrong – It’s awesome, generally one-shots ships and can punch through 2 layers of shields (albeit at reduced damage)… but the problem is that it uses a whopping 4 power and takes ages to charge. Any other weapons will purely be support ones, and you’ll need to invest a lot in the weapons room to be able to field them alongside the beam – something you’re not in a great position to with this ship (considering the amount you need to buy)
Personally, once you get a handful of decent weapons: Sell off the Glaive. The 4 power (plus the 5th if you paid attention earlier) will largely let you field a few good weapons without any additional investment. It’s down to you, but with only 3 weapons allowed… you’ll certainly feel the pinch when you start facing stronger shields
As such, boarding is also a good call when you have the shields to last the fight. Just beware of the smaller Medbay, which makes healing a bit fiddly
And the exits are… where?
Of all the downsides to this ship, I have another to add to the pile… The only airlocks are tucked right at the back with a sneaky one in the middle (in fact, I missed them all completely when I played). They're awkwardly placed, so venting out fires or boarders will be messy. As such, you’ll need to get some boarding crew and Engi online – Otherwise both will quickly start to become a big problem
What to Aim for
- +3 Crew (x2 Boarders: Rock / Mantis – x1 Engi)
- A new set of weapons (x2 Decent Hull Damaging x1 Support/Bomb)
OR
- A good set of weapons to aid the Glaive Beam
- Shields
- Crew Teleporter
- Hacking
Full-level shields are obviously a must here. If you can upgrade your cloaking (only 50 scrap), why not – It’ll buy you breathing space when you need it, and also helps you get the drop on the flagship with enough time to knock out the rocket room with boarders before it even fires a volley (except phase 1, as they cloak too. In that instance: Cloak when the 3 rockets fire) – But upgrade the rest of your ship first, as that’ll pay off more
Crew teleporter and Hacking are the standard set. I think I’ve bored you with why they’re useful now
[Type C] Simo-H


It’s a Stealth Cruiser! Only it has a distinct lack of cloaking and a paint-job fit for desert warfare (after all, space is well known for its sand dunes)… yeah, I don’t get it either
It’s all about drones
When my good friend IfItMovesNukeIt quipped that the strategy for this was to “Cry. A lot” he wasn’t joking…
The Simo-H cruiser is tough. Even with 2 of its systems augmented to be more efficient (the Laser Charger and Overcharge+ Drone both use 1 less power), you’re still terribly ill-equipped as you leave the hangar. You have no shields or cloaking (and engines are decent but nothing special)
What you have to rely on are your drones… The Shield Overcharger+ is really cool and a definite keeper – It creates 1 bar of Zoltan shield every 10 seconds or so (stacking to a maximum of 5), guaranteeing a single shot to be blocked. You also get an Anti-Combat Drone, which stuns attacking drones (potentially blowing them up)
Built to Die
The problem, however, is straight maths. The Overcharger+ blocks 1 shot. Unfortunately… nearly every enemy ship will fire more than 1 shot. The Anti-Combat Drone can counter enemy drones nicely… but nearly every enemy ship with drones will have on-board weapons too
What you end up with then… Is the enemy pretty much being given a free punch at your ship. You might as well stick your chin out and point to it saying “C’mon tough guy. Right here”. So keep the crew where they are. You’ll want Pilot’s and Engines manned to squeeze every ounce of evasion you can get, and someone on weapons to let you strike sooner
Sit tight and hope for the best. The only reprieve is that missiles tend to fire faster (and ion slower), so the more dangerous shot tends to be the blocked first
The drone room tends to come under a lot of fire, so if your Overcharger+ goes offline… don’t panic (well, maybe a little). It’s generally better to just leave it and aim to win the fight quickly. Vent the room if needs be, but you’ll want to keep the other systems manned
Ending Fights Quickly
Without a doubt then, the trick to surviving the first set of sectors is to fight fast. You’re in no position to keep up a sustained attack – So it’s all about striking quick and getting the weapons offline
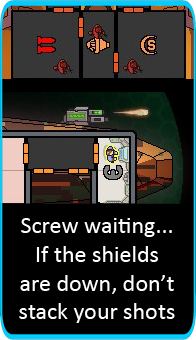
At the start of every fight: Pause and power up your drone of choice. The Overcharger+ in particular needs time to charge up that shield – And you want it by the first volley. The Anti-Combat drone can be quite pedantic: Only shooting drones that go near it (lazy sod) so you might have to put up with a few hits, annoyingly
You might notice a vague familiarity with your armaments. And you’re right – They are, by and large, the exact same set as the Nesasio – And the combat style is no different here. The only difference is that instead of spending 10 seconds charging up 2 shots, the Laser Charger charges 1 shot every 5.5 seconds, able to stack up 2 to fire as a single volley (or just the 1 if you shoot earlier). The aim is to use it to blast a hole in the enemy shields for the Mini Beam to take advantage of. Always wait for the Laser Charger to stack up both shots before firing – Unless it’s a shieldless drone, in which case don’t bother and just go nuts!
Now, I know shields are a very tempting target – But with this ship you really want to tear up the weapons/drones first. Aim the Laser Charger at them and make sure the Mini Beam’s catches them too. The advantage here is twofold: Firstly you silence the weapons so aren’t raking in hull damage… but better still: You’re giving your Overcharger+ a chance to stack up more Zoltan shields! With a few shields up, you’re suddenly in a good defensive position to negate the next few volleys – So even if the fight takes a bit longer and the weapons come back online, you’re in a better position than if you went for the shields straight away
Once you turn to the shields though and bring them down, now’s when you get to play with the Laser Charger’s alternative function: Screw stacking shots – Just keep it firing when it loads one (you can use autofire to do this). You simply want it targeting any system getting repaired (especially shields) – The aim being to keep everything down
Let your Mini Beam do the rest
Hubble Bubble, I’m in Trouble
It goes without saying that Shields are your absolute top priority here. The nasty facet is that the longer you leave it… the more expensive it gets overall in terms of repair costs. So much as you’ll want cool weapons, you must grab these early
The good news is that when you get shields… you’re finally able to take a breather. The Overcharger+ will continue to be a superb aid, so defensively you’ll be doing well. The problem is that you’ve now got what would resemble a passable starting ship… and you’re part way through the first sectors!
So much like the Nesasio, it’s time to go full reverse and go all out on offence. Your starting set will struggle against 2 shields – So don’t be picky: Make do with whatever you can get your hands on. Boarding is also an important investment at this point – As you’ll really need to start pulling in the scrap. Sadly it’s ultimately down to what you stumble upon. Remember that you have a Drone Controller (and can ditch the Anti-Combat Drone once you have shields) so feel free to pick up a Combat Drone if you’re really running out of options
Same ol’ same ol’
As with all Stealth Cruisers – Avoid every natural hazard and Zoltan section if possible. You have Long-Range Scanners, so make good use of them and plan routes with multiple options if possible
Additionally, make sure you’re using the Long-Range Scanners to pick as many fights as possible. You’ll want the scrap, so get stuck in!
What to Aim for
- +3 Crew (x1 Boarder: Rock / Mantis – x1 Engi)
- A new set of weapons (x2 Decent Hull Damaging x1 Support/Bomb is a reliable build)
- Shields
- Crew Teleporter
- Hacking
- [Optional] Defence Drone
- [Optional] Drone Recovery Arm
You only have 3 weapons slots to play with here… so you need to make sure you get hold of some top-notch kit down the line. Whilst they’re cheap and cheerful, you’ll need to ditch the Laser Charger and Mini Beam sooner or later – as it’s near impossible to get a good loadout with them taking up space
The Overcharger+ is definitely a keeper – Requiring less power than store-bought ones. You won’t really need the Anti-Combat Drone, so feel free to swap it out for a Defence Drone (a very good accompaniment) – You’re likely to use these a lot, so a Drone Recovery Arm is also a very good investment early on, to help make your stockpile go further
As always, boarding is also a very good call here – Particularly as you’ll be hard pressed to rely on 3 weapons alone. You’ll want to make sure your shields and engines are strong though, as boarding will likely slow down fights a bit (but for the scrap, it’s worth it)
Thoughts And Suggestions
Anything I've missed?
Anything you'd like more detail or explanations on?
Disagree with any of the above and want to challenge me to a Dance-Off in a Star Wars bar?
Give me a shout! There's plenty more to come, so any changes and suggestions are welcome. The awesome ones shall be implemented and full credit will be given to the delightful owner
Happy Gaming
Links To The Other Class Guides
Hungry for more? Fear not - The other ship classes are catered for! Just follow the links below:
- Kestrel Class
- Engi Class
- Federation Class
- Zoltan Class
- Mantis Class
- Slug Class
- Rock Class
- Lanius Class
- Crystal Class
Source: https://steamcommunity.com/sharedfiles/filedetails/?id=305512128
More FTL Faster Than Light guilds
- All Guilds
- Weapons tier list
- Installer le mod FTL : Multiverse
- Tier list FTL: Faster Than Light
- The Ten Commandments of Hard Advanced FTL
- 100% FTL: Faster Than Light
- Optimal Crystal Cruiser Unlock Strategy (SPOILERS)
- Practical FTL
- FTL: Faster Than Light - Sector Navigation Guide
- FTL: Faster Than Light - Hard Do's and Don'ts