Terminology Defined
To avoid any confusion, here are what some important terms mean and how they work. These are all different things, though most are closely related.
Work OrdersWork Orders are added using the Work Orders (u) screen, or by clicking a workshop and clicking the Work orders tab to create a workshop-specific work order.
Unless a work order is suspended by conditions, it will automatically create one or more Jobs at one or more workshops. But a work order is not the same as a job, it's something else that automates the creation of jobs.
JobsJobs refers to all work-related tasks. That is, they're a subset of tasks which doesn't include things like eat, drink, dance, or sleep. When people use the term "job", they're usually talking about tasks added to workshops, but technically they would also include mining and other designations.
Jobs can be created by work orders adding tasks to workshops, adding tasks manually to workshops, creating designations, or implied by configuration of stockpiles and such plus whatever conditions exist that put those things out of sync with their configured objectives. So planting seeds is a job queued up automatically for you based on how farm plots are configured even though you didn't have to add it to a workshop.
TasksTasks include both job tasks and absolutely everything a dwarf could do on their own including eating, sleeping, drinking, dancing, singing, socializing, praying, following military orders, and so on. Most of the personal need tasks can't be controlled directly, only limited to some extent by a lack of facilities for doing them.
LaborsLabors[dwarffortresswiki.org] are essentially job categories. For example, Mining is a labor that includes all mining/digging jobs. Furniture Hauling includes not only moving furniture from a workshop to a stockpile but also installing furniture in rooms. (Sometimes the types of jobs that fall under a labor are not entirely clear.)
There are also entire categories of labors that include multiple labors, such as Stoneworking which consists of Masonry, Stone Carving, Stonecutting, and Stone Engraving. Individual labors frequently also involve more than one sort of job task, like Stone Engraving includes both engraving walls and rock slabs at workshops.
Labors are used to control which dwarves are allowed to do what jobs. Internally, all dwarves have a flag for each labor that determines which jobs they are allowed to do, but the newer work detail and scheduling system aims to prevent you from having to micromanage these flags for each individual dwarf. Instead, you create Work Details and these individual labor enable/disable flags are automatically set for you on each dwarf based on the work detail configuration.
This is almost always much easier than having to manually do your own set arithmetic to figure out and click the labor flags manually on lots of dwarves.
OccupationAn Occupation[dwarffortresswiki.org] is a location-specific position like Tavern keeper or Doctor. These are similar to the positions in the Nobles/Administrators screen.
These can have their own effect on what labors are enabled for a dwarf. For example, even if a dwarf is not in any work details that specify medical labors, assigning them as a Doctor in a hospital will enable Diagnosis, surgery, and setting bones for them.
Icons for these positions show up under work details to remind you of what sort of other stuff they might be doing.
ProfessionsDwarf Professions[dwarffortresswiki.org] are only a quick-and-vague labeling system that provides a clue as to what skills a dwarf is best at, but don't have any effect on enabling or disabling labors. These labels can also be misleading since an Armorsmith might have a lower Armorsmithing skill than a Fish Dissector, and might only have the profession Armorsmith because he has no skill in anything else. The Fish Dissector might only have that as their profession because they have Legandary level fish dissector skill, but they might also have Master level skill in Armorsmithing.
The main points about profession are: they have almost no effect (except for some purposes like guild membership), they can be misleading, they don't directly affect task selection (only the actual skill does), and make sure not to confuse them with occupations or labors.
Work Detail Types
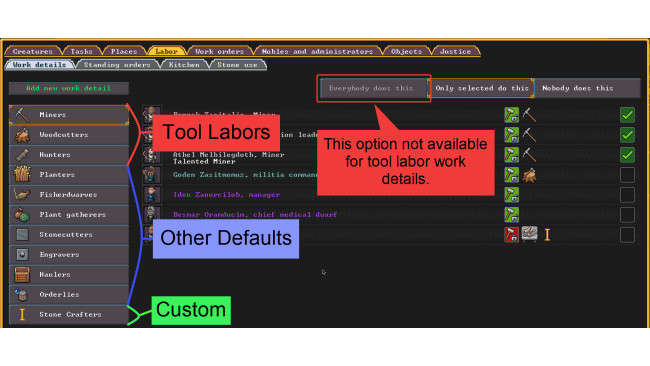
It isn't entirely obvious, but there are actually three types of work details: "Tool Labor" default work details, other default work details, and custom work details. Here are what they are and how to use them.
Work detail types.
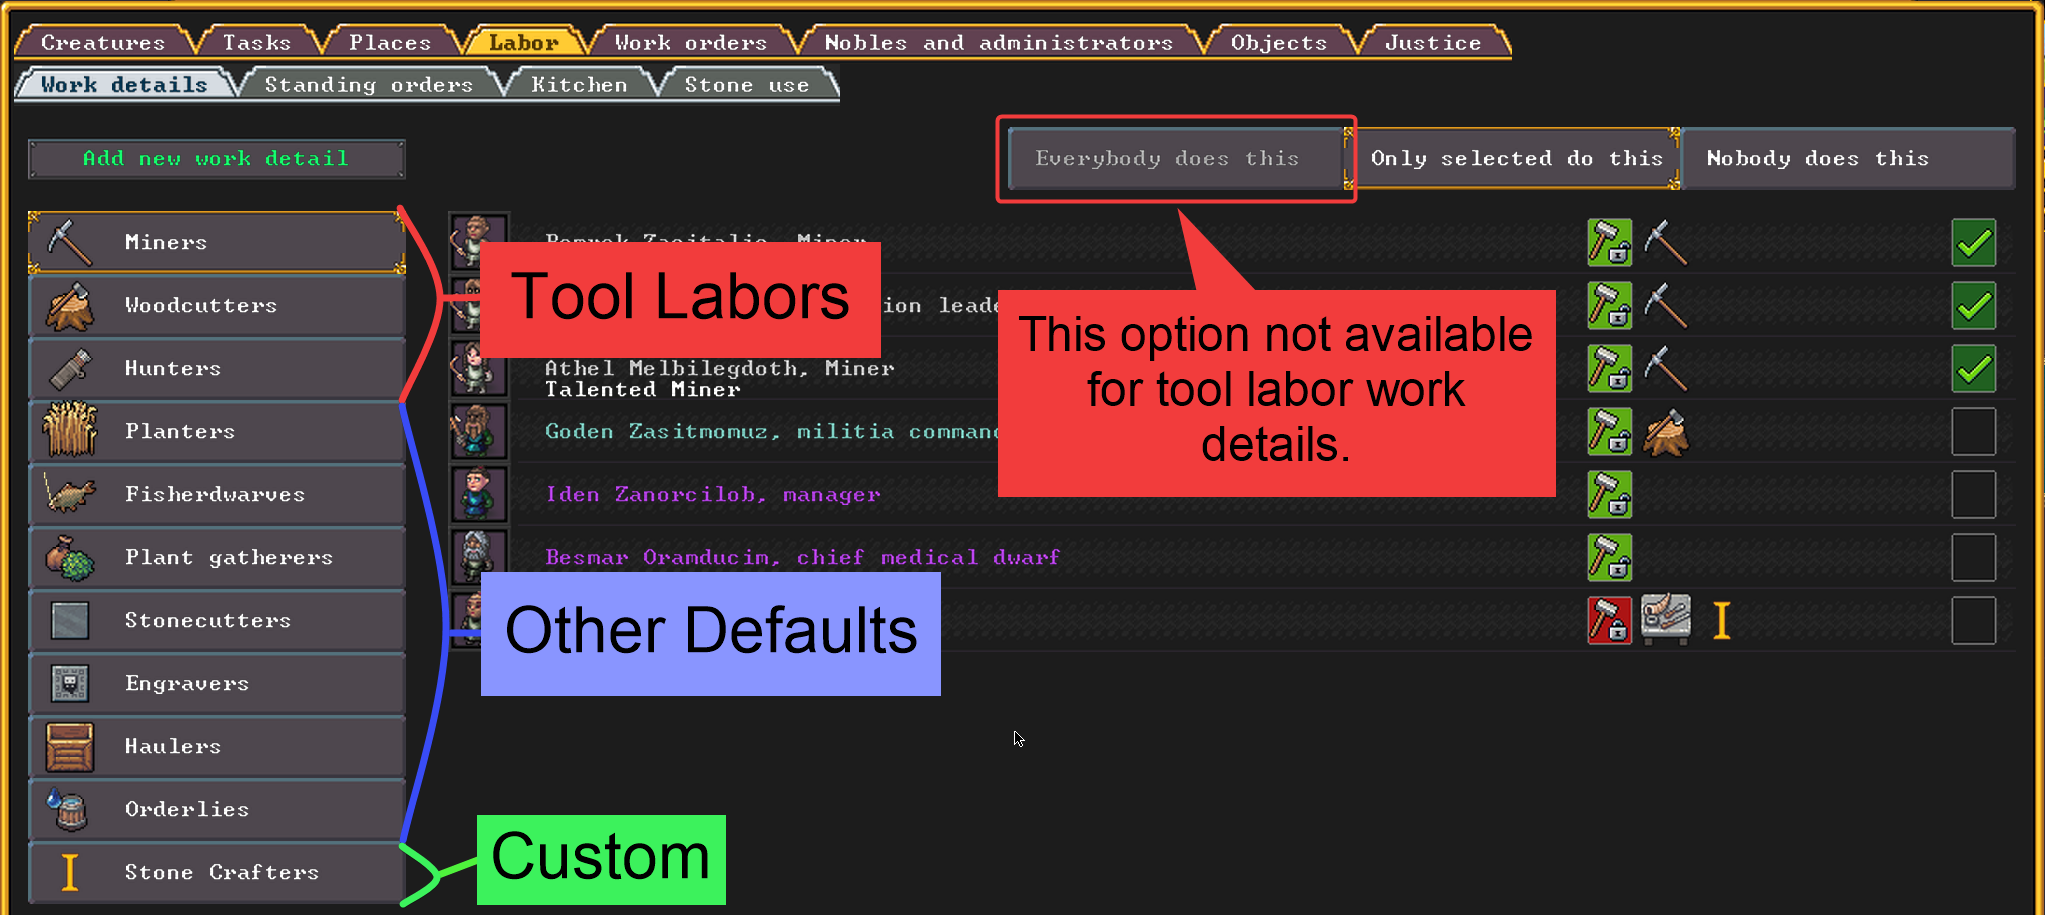
Tool Labor Work DetailsThe first three default work details (Miners, Woodcutters, and Hunters) are special because they all require carrying tools. This is why you can't set any of these three to "everybody does this". All three conflict with each other and with "Equip/always" squad uniforms.
Dwarves will only carry one tool at a time, and will not switch tools depending on task. Therefore you should not add the same dwarf to more than one of these three work details. They will only grab one tool, stick with that tool, and only do the tasks that require that tool.
Technically, each of these work details has a "civilian uniform" which consists of the tool or tool set needed for that labor. If a dwarf is in a squad, they should switch to their military uniform when they're given military orders, and switch back when they no longer have any military orders.
But, if their squad's schedule routine is set to "Ready" (or any routine set to "Equip/always") then they will always wear their military uniform which will prevent them from equipping their civilian tool labor uniform. Therefore they should either not be in a "Ready" (Equip/always) squad, or the squad uniform needs to be specialized to fore them to carry the same weapon as a solider that they use for the assigned civilian work detail.
Other Default Work DetailsThese don't require tools and are basically the same as pre-configured custom work details that exist by default. You can't delete or edit them though. Especially early on, you can just leave them set to "Everybody does this".
Custom Work DetailsAny labor category that is not covered by a default work detail will default to "everybody does this". For this reason, you don't need to create custom work details for everything. The only time you should need to do this is when you want to restrict a labor to only certain dwarves.
Work Detail Options


Work details have a few types of settings.
Generalization options:
"Everybody does this"
"Only selected do this"
"Nobody does this" Checkboxes to indicate which dwarves are selected for the particular work detail.
Add new (custom) work detail.
Custom work detail settings (which don't exist on default work details).Additionally there is a global-per-dwarf setting for unspecialized or specialized which is also available in every work detail view even though it's not specific to any work detail. The green color can be thought of as meaning "green light to do anything by default", and the red thought of as "restricted from doing anything by default".
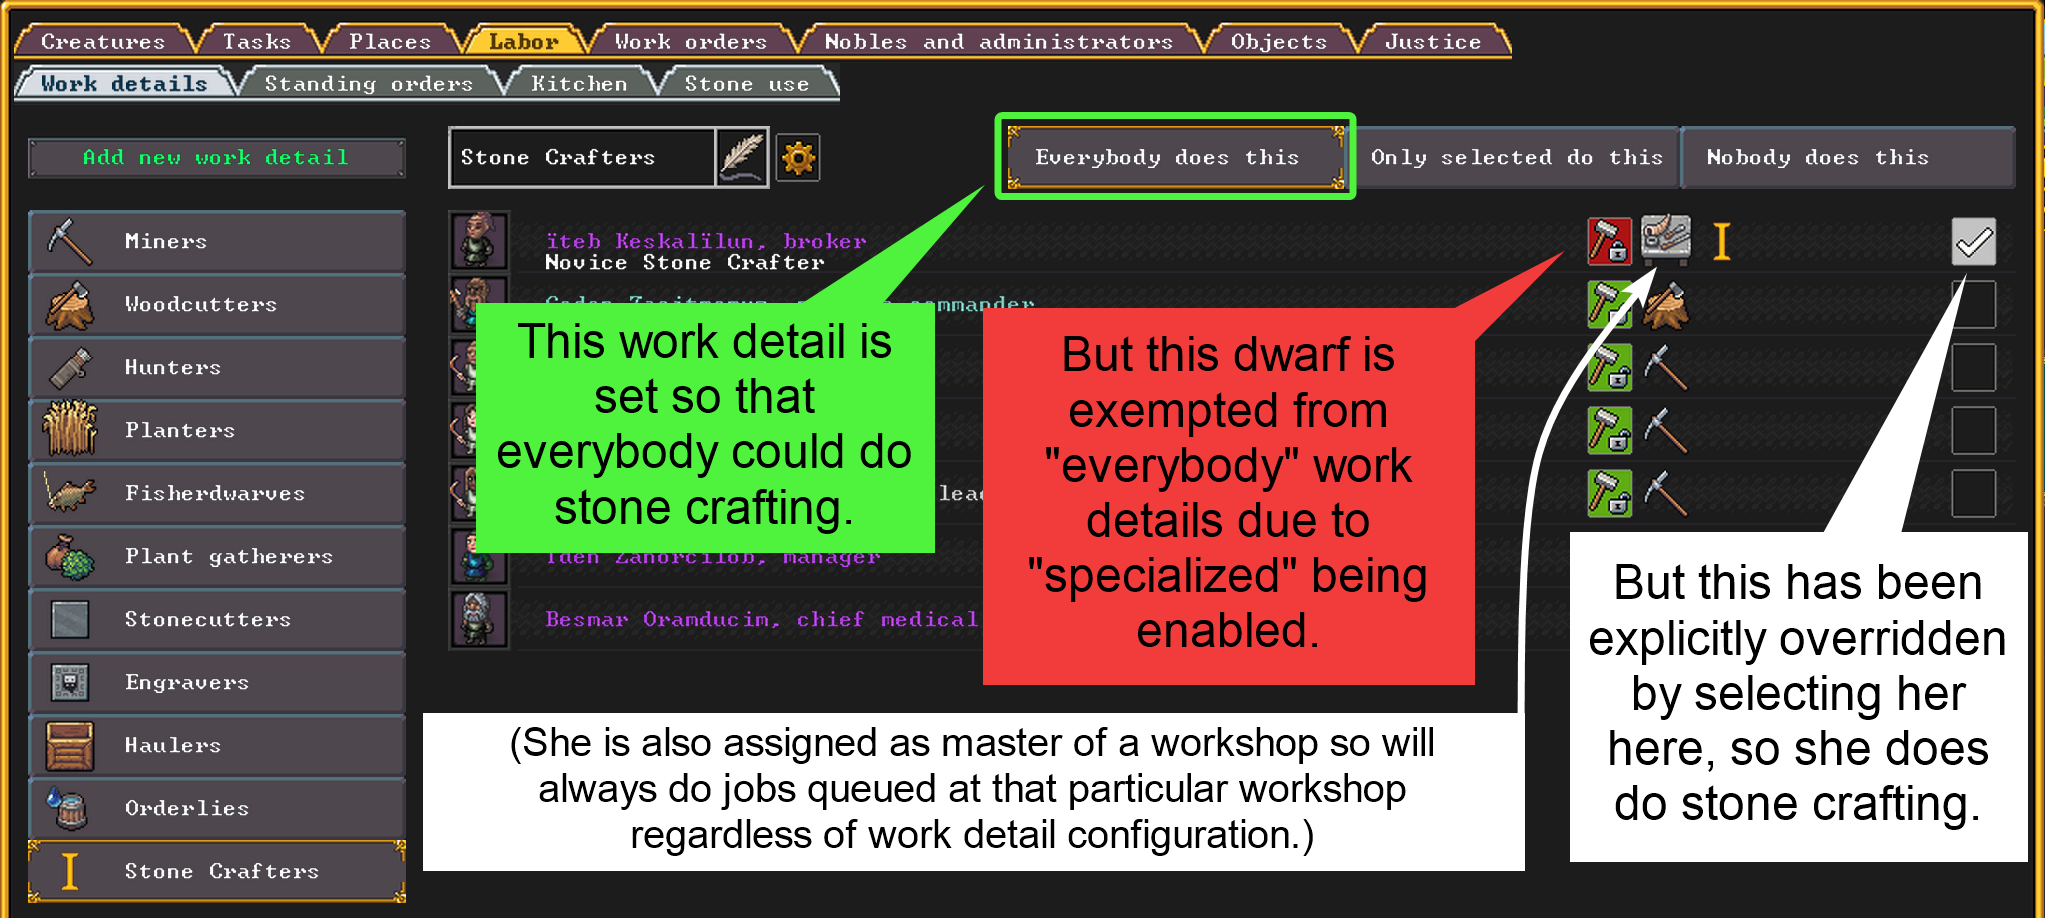
Generalization, Selection, and Specialization"Everybody does this"This will allow all unspecialized dwarves with the icon to do this particular type of labor. As previously mentioned, this option doesn't exist for the three tool labors since they conflict with each other.
Except for the tool labors, and any defaults that start out otherwise, every labor defaults to "Everybody does this". That includes labors for which there are no default or custom work details configured.
This means that if you want to start weaving or metal smithing you don't necessarily need to add a custom work detail for those. By default, any unspecialized dwarf might do the weaving or metal work but the ones with skill in an area will tend to prefer the corresponding job. The unskilled or less skilled dwarves will tend to avoid it in favor of something else that they have more skill in.
If a work detail is set to "everybody does this" then dwarf selection doesn't matter for unspecialized dwarves, except as remembered configuration for who to use if changed to "only selected" later, but if a dwarf is specialized then they're exempted from the work detail. So if you want a specialized dwarf to not be exempted from an "everybody does this" work detail after all then you need to select them in that work detail. The checkbox will turn white to indicate they will still be allowed that labor even when specialized.
An example of why you might still select a dwarf in a work detail that is set to "everybody does this". Assigning a dwarf to a workshop will allow them to still do jobs at that workshop even if specialized and not in any work details.
"Only selected do this"This means that the labor will be restricted to only those dwarves with the checkbox selected. Others won't do the labor unless another work detail enables it for them.
If two work details overlap, then deslecting a dwarf in one will not override the selection of one in the other. For example, lets say we have work detail III which has Weaponsmithing and Blacksmithing selected, and another work detail IV that has Armorsmithing and Blacksmithing selected. If Urtist McWeaponsmith is selected in III but deselected in IV, he will still be able to do Blacksmithing jobs.
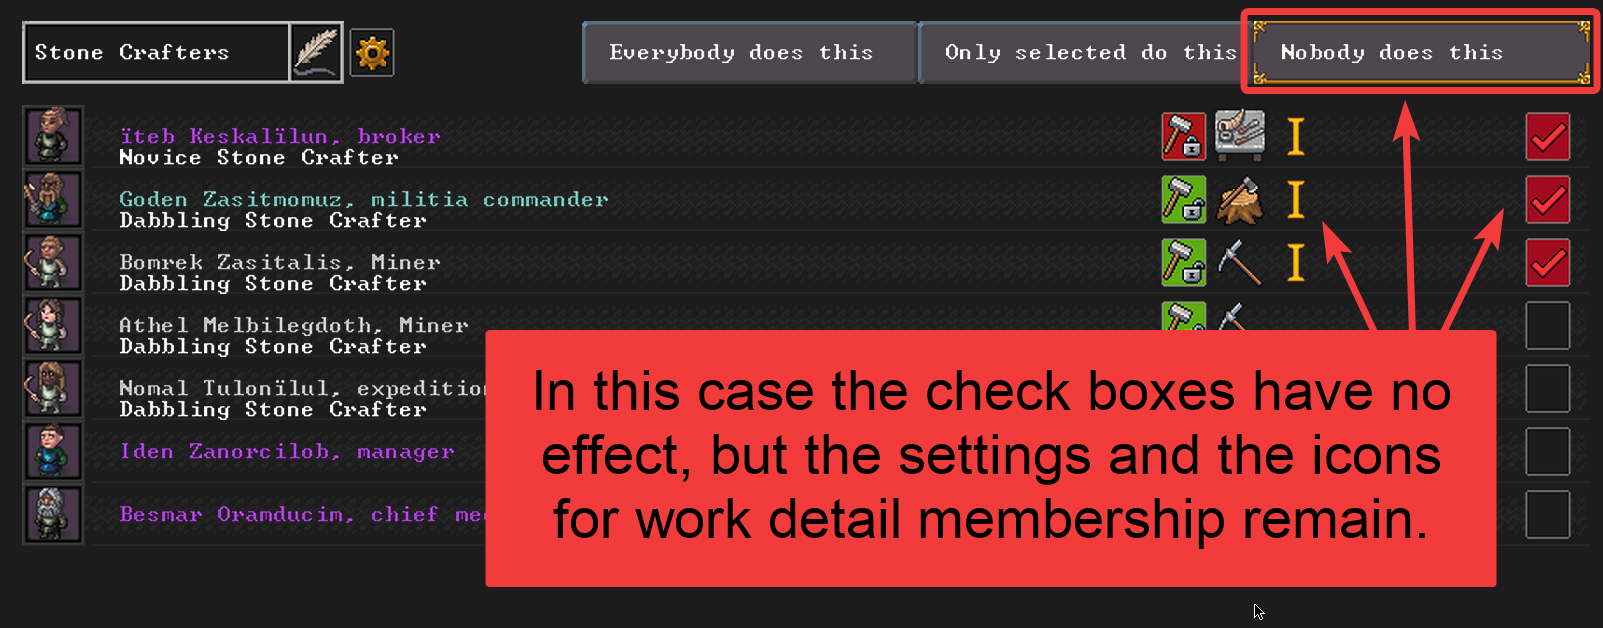
"Nobody does this"This will disable the associated labor(s) for all dwarves even if they're selected, no matter if they're specialized or not. The selection checkbox for any selected dwarf will turn red to indicate that the selection is being ignored, but the check will remain so that the selections will be remembered in case the detail is changed back to "only selected".
If there is overlap with another work detail this will not prevent another work detail from enabling a labor. So using the example custom work details III and IV from above, if III was set to "nobody does this" it wouldn't prevent any dwarves in work detail IV from doing Blacksmithing.
This makes it easy to temporarily shut down a work detail, then resume it later with the same dwarves selected.
Custom Work Detail SettingsCustom work details can be added with the Add new work detail button. Notice that these settings don't exist for the default work details. The default details can't be edited or deleted.
To delete a custom work detail, click the gear icon and click the Delete button in the upper right. And to change the name, it's the same as every other name field.
Note that the tool labors of Mining, Woodcutting, and Hunting are not available for custom work details. But everything else is, even when it overlaps with a default work detail.
Here are what labors are enabled for some of the less obvious default work details:
Planters: Farming (fields)
Haulers: all types of Hauling labors
Orderlies: Suturing, Dressing Wounds, Feed patients/prisoners, Recovering woundedThe rest enable a single labor with the same name as the work detail.
Even though the defaults can't be deleted or edited, you could (for example) set one like Haulers to "nobody does this" in order to render it moot and ignore it, then create custom work details with more specific hauling labors for finer grained control of hauling work.
Dwarf Skill Convergence
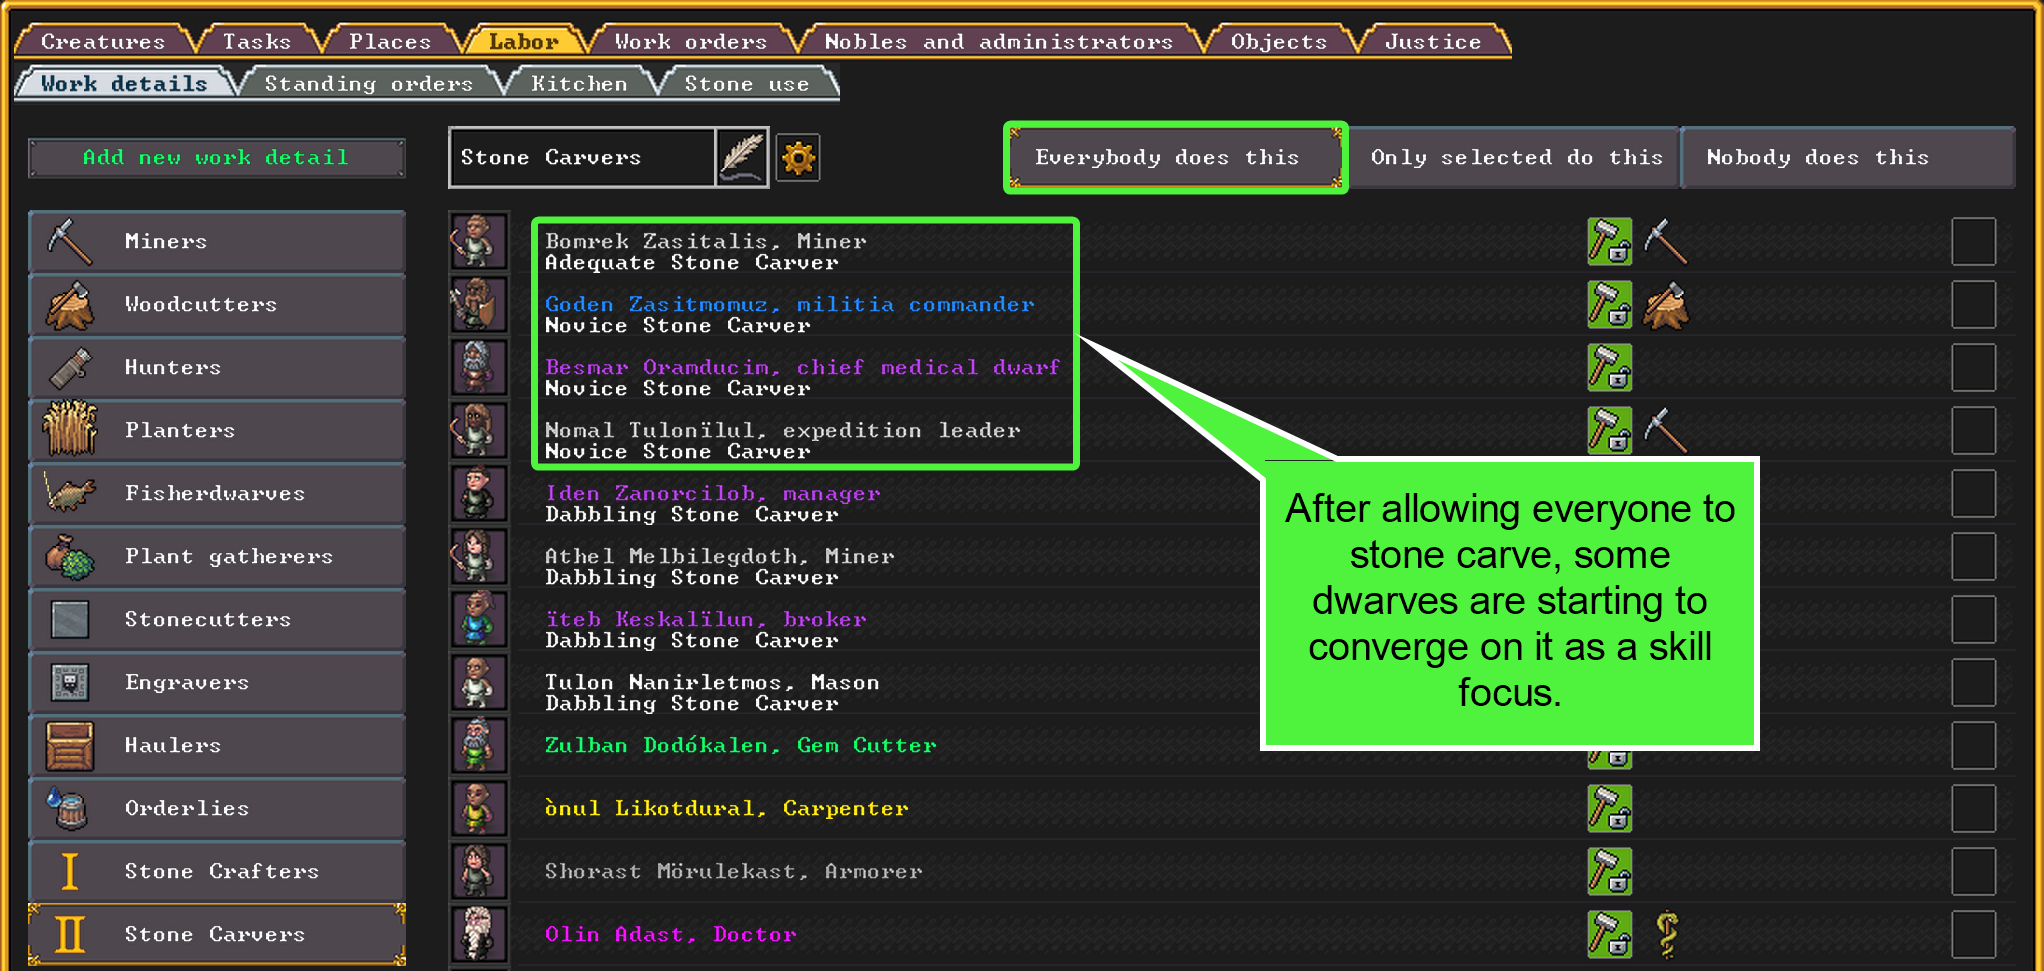
If we just let everybody do something, after a while some will start to develop more skill than others.
Some dwarves are starting to "get gud" at this.
At this point we might want to just limit the work to the ones with the apparent preference and aptitude, or we could leave it open to everyone and see if anything changes. After all, the miner might end up with enough mining work that they don't do much more stone carving and might start falling behind skill-wise.
Workshop Masters
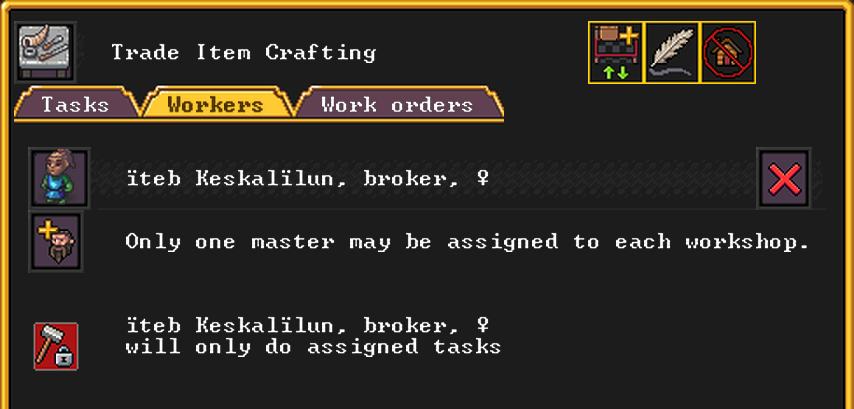
Which jobs a dwarf does is normally controlled by work details, and any dwarf allowed the corresponding labor can use any workshop needed, but it's also possible to manage dwarf work in another manner: on a per-workshop basis using workshop masters.
This is done by using the Workers tab in a workshop window. Click the workshop, click the Workers tab, then assign a dwarf as "master" of the workshop.
(Note that while this normally excludes other dwarves from using the workshop, dwarves in strange moods could still steal a master's dedicated workshop. So be on the lookout for that happening.)
A Craftsdwarf's workshop has been named "Trade Item Crafting" and a dwarf (who also happens to be the broker) has been assigned as master. Since the master is specialized, she will also only do jobs at this workshop and will always do any jobs queued here even if not in a work detail that would normally allow it. (Workshop masters should usually be specialized.)
Specialized MastersA workshop master, if specialized, will always do jobs queued at their workshop even if they aren't assigned the required labor in a work detail. So in the example above, the workshop master could be in no work details at all and would still do any stonecrafting, woodcrafting, etc jobs queued at this workshop. But the same jobs queued at other workshops would be ignored by this dwarf unless she were in the necessary work detail.
Therefore if you want to keep a workshop master working at only their workshop, it makes sense to make sure they are specialized and not in any work details. You then control what they do based on what you have queued at their workshop.
Unspecialized MastersIf the workshop master is not specialized then which jobs they do will be determined by work detail configuration; the jobs will have to either have their labors covered under an "everybody does this" work detail or the master will need to be assigned to a work detail that enables the corresponding labor. This means they could end up with jobs at their workshop that they aren't allowed to do.
Advanced Work Orders
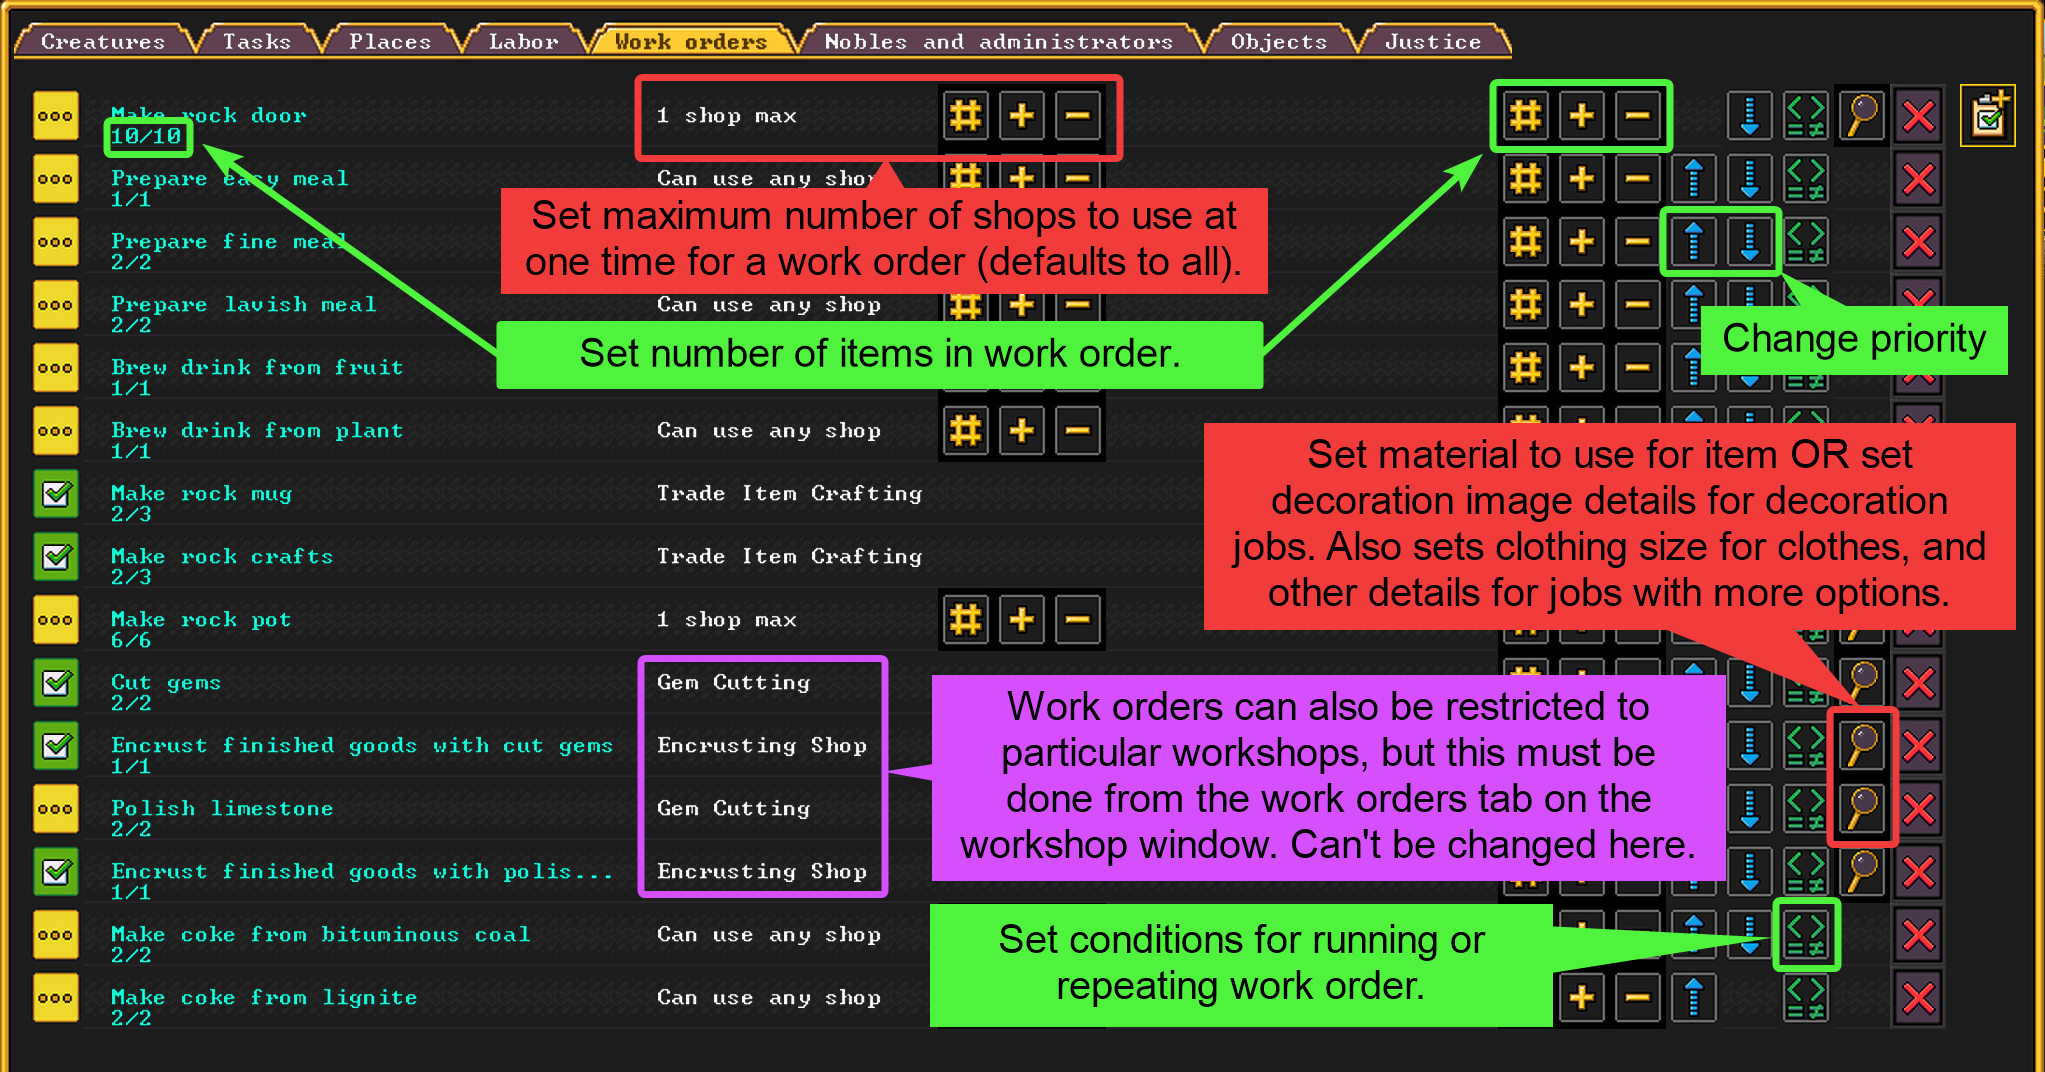

Just adding a work order and doing nothing else will add a one-time work order that will just disappear when the order is finished, but there are a bunch of options here that can be very useful.
Options in the Work Orders (o) window.
Maximum Number of ShopsLets say we have four craftsdwarf's workshops. Maybe we don't care which one cranks out the rock mugs, but we don't want more than one of them cranking out rock mugs at any one time. We can use this to limit the number of shops that the work order will queue up the jobs at.
Note that if we did want all four workshops cranking out rock mugs on conditional repeat then we'd also need to make sure the work order was for at least 4/4 rock mugs. If we put 1/1 on repeat then another job won't be queued until 1/1 is complete.
Workshop-Specific OrdersSometimes we might want everything done at a specific shop, either because of it's location or because we want a specific workshop master to do all the work.
We can't set this from the work orders screen, but we can set it from the specific workshop's work orders tab.
How to create workshop-specific work orders and prevent a shop from doing any others. All of the work orders for a shop won't necessarily show up in this window, but they will show up in the Work Orders (o) window.
The assigned workshop can't be changed after the work order is created. If you want to use a different specific shop, or no specific shop, you have to create a new work order and delete the old one.
Setting Job Item DetailsThe little magnifying glass icon allows you to set various details for a work order. Often the only option, if one exists, will be what sort of more specific material to use such as exact type of rock rather than "just any rock", but other types of jobs such as decoration jobs have more options.
If you want your rock mugs decorated with bone images of an aardvark under a tree admiring a sun then this how you would specify that.
If making clothing then this is where you would specify anything other than the default such as clothing size if you need to make large clothes for human citizens.
Other options for other jobs exist, so generally speaking just try out this button on any job to see what detailed options are available.
Conditional Work Orders
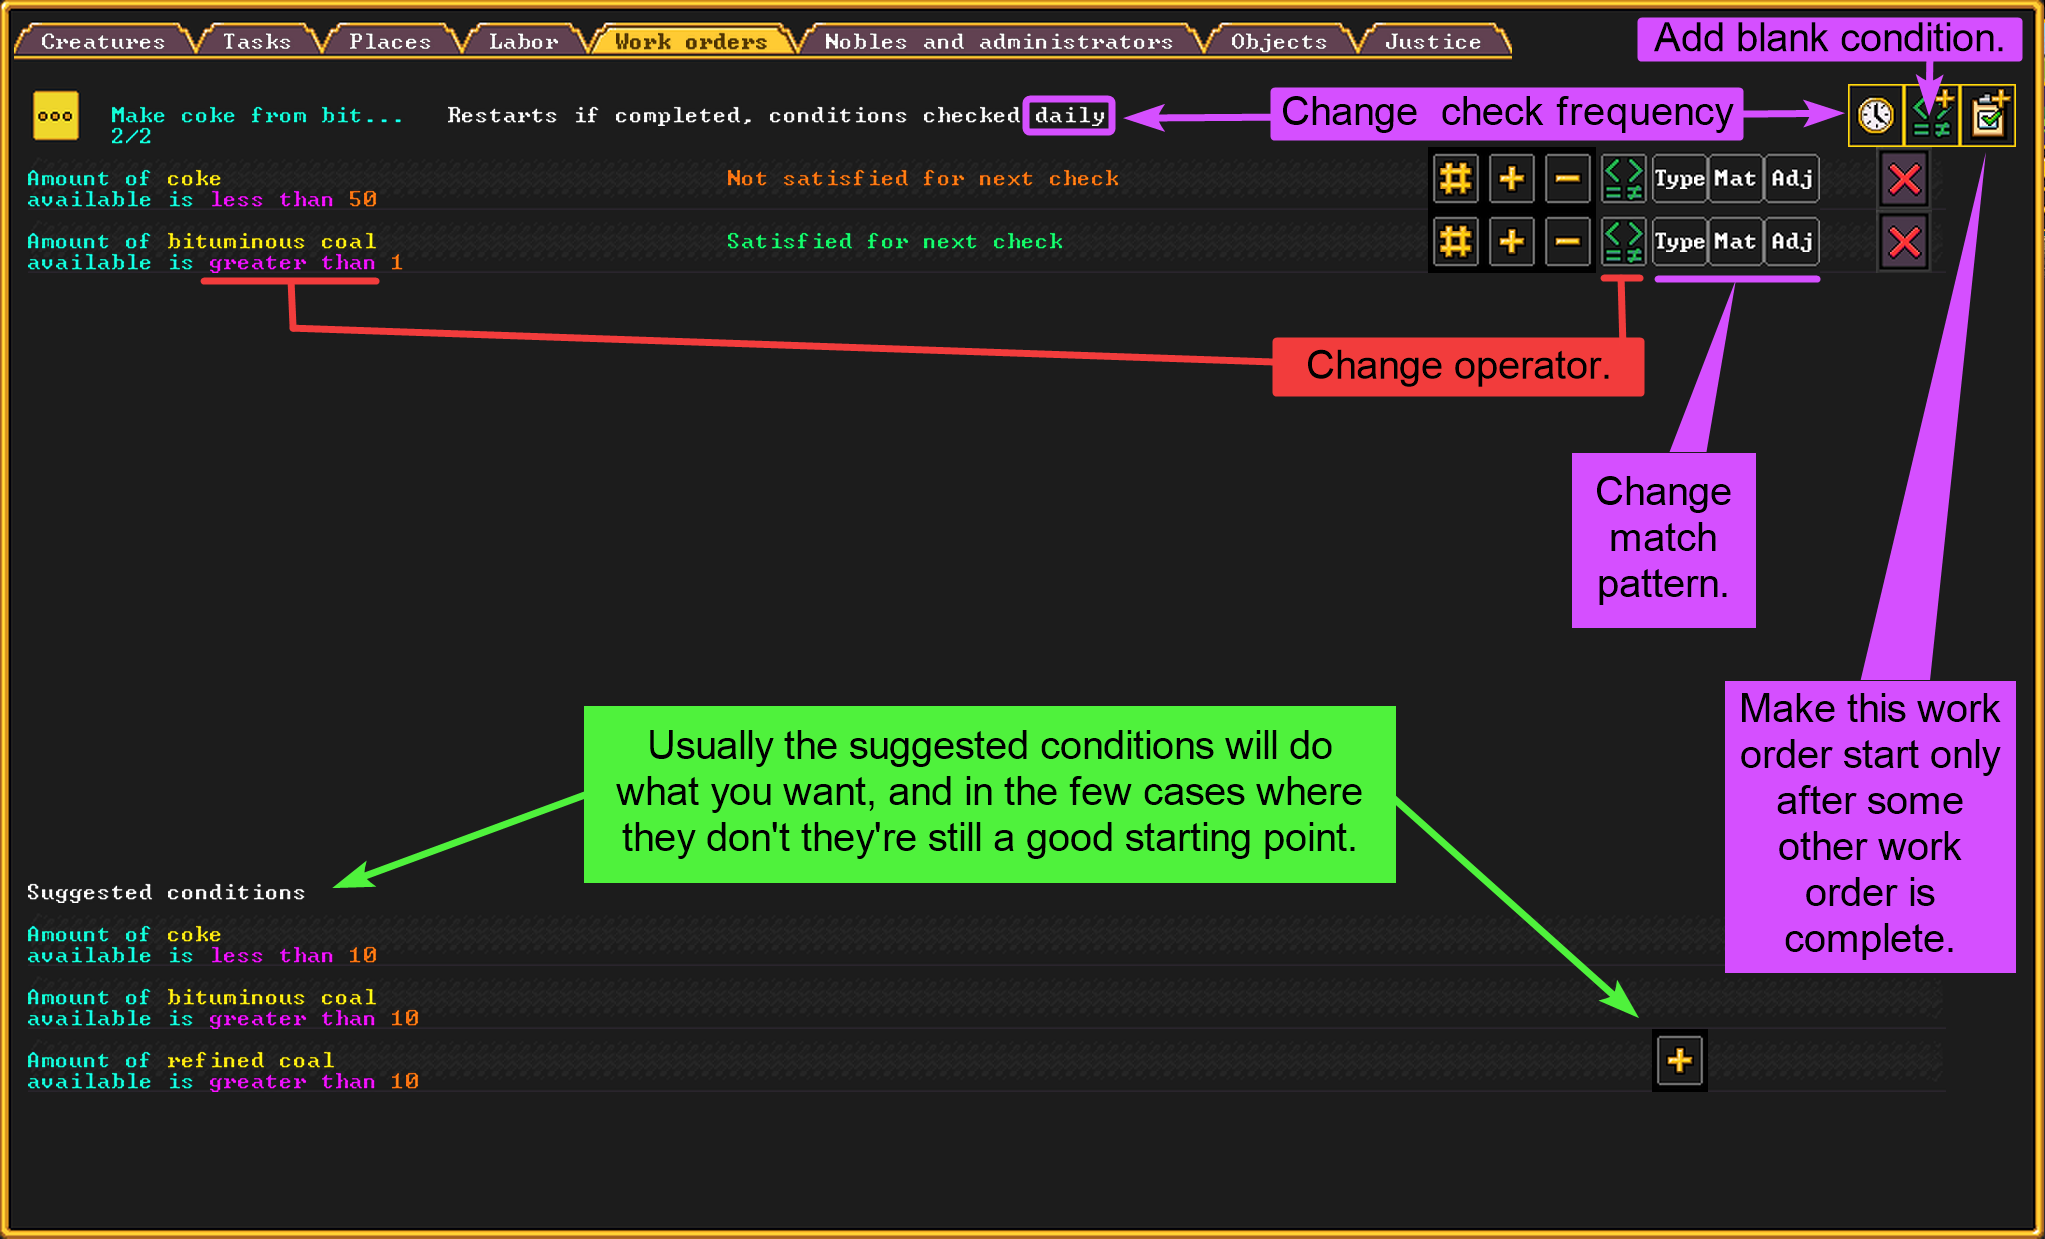

Sometimes it's good enough to just add a one-time work order that disappears on completion, but doing this all the time gets to be a pain. Wouldn't it be nice if we could just set up work orders to always keep some amount of fuel, for example, on hand?
Well fortunately we can do that with conditional work orders. It's also possible to prevent a work order from starting until one or more other work orders have either completed or started.
Conditional work order options. At the top is the list of conditions that ALL must be met for the work order to start, continue, or restart.
Conditional work orders keep repeating as long as their conditions are met. For this reason you could often specify the amount as 1/1, but if you want multiple workshops and dwarves to work on them at once then you'll need a larger number for the batch. Also, if a single job takes less than a day to complete, and the check interval is set to one day, then you'll get a maximum of one item per day when it might be possible to get more in that time. Same goes for longer time intervals.
Specifying 1/1 is usually good enough for things that don't need to be cranked out at maximum speed.
Suggested and Custom ConditionsUsually the suggested conditions work out well enough, and even when they don't they serve as a half-configured starting point. But sometimes you need something different.
If you use the button to add a new condition, the pattern will default to "items" which isn't very useful. So to set the pattern details to something useful you need to use the Type, Mat, and Adj buttons.
Type (select one)This is the general item type which can be as vague as "item" (any item type), somewhat vague like "plants", or a little more specific like "bags".
In some cases this can just be left set to "item" because either the material or the adjective settings will sufficiently narrow down the condition. For example "sand-bearing item" is just as good as "sand-bearing bags".
Mat(erial) (select one)This option contains every material in the game, and not all of the options are even possible. For example, I doubt that it's possible to have "frozen giant raven pus bags" (and it would be rather disgusting if you could have those) but the UI will let you specify nonsensical stuff like that.
Keep in mind that this is the material that the item is made out of and not the sort of material that it contains. So "sand bags" would mean "bags made of sand" not "bags that contain sand".
Adj(ective) (select zero or more)A full list of these is available on the wiki here[dwarffortresswiki.org] . These are additional modifiers and are most often what you want instead of item, material, or even both.
You can specify more than one but frequently you only need one.
An example of how these are used: if you want bags that contain sand then use "bags" as the type and "sand-bearing items" as the adjective. However, using "item" as the type and the same adjective to get "sand-bearing items" will work just as well.
You might notice that a number of adjectives are redundant with the same option under material, but adjective may have a more general specification like "bone" (any type of bone) whereas material may only have specific types of animal bones.
Examples


Keep Microcline Doors In StockLets say that we want to keep approximately 10 microcline doors in stock at all times, because we like microcline for it's blue color and we're doing a lot of renovation or something.
Keeping microcline doors in stock.
To create this work order we use the following steps:
Create a "make rock door" work order.
Set the number to 5/5.
Click the magnifying glass icon to specify microcline as the specific rock type.
Click the conditionals icon to set the conditions.
The suggested conditions just happen to be exactly what we want, so we hit the + buttons on those to add them.We could also set the amount of microcline required to 5, raise the number of microcline doors needed to suspend the work order to 20, or use 1/1 batches if we don't care about speed too much, don't need multiple workshops used, and don't want any "overshoot" on our target stock amount.
Make Lavish Meals When We Have Lots of Food SurplusLets say we want to make lavish meals but only when we have a large amount of food on hand. Otherwise we will let other work orders for easy or fine meals take care of the food prep.
Make lavish meals when we have lots of extra food ingredients, but don't have too much food already prepared.
To create this we:
Add a "Prepare lavish meal" work order.
Change the batch size to 2/2.
Click the conditions button on the work order.
Add the suggested condition for "unrotten prepared meals" and set it to "less than 50".
Add the suggested condition for "unrotten cookable solid items" and set it to "greater than 50"/
The cooks will now keep a bunch of lavish meals on hand under food surplus conditions when enough leftovers have been eaten.
Automatically Assemble Musical Instrument When Parts ExistIf making musical instruments then it's useful to have work orders to automatically assemble them when all the parts exist. Here's an example.
Automatically assemble a three part musical instrument any time there's at least 1 of each part.
To get this we do this:
Add a work order and type "assemble".
Pick a musical instrument assembly job.
Change batch size to 1/1.
Click the conditions button.
Add the suggested conditions for each part.
Change the quantity on each one to "greater than 0".Now every time we end up with one of each part somehow the instrument will get assembled.
Since these instruments are procedurally generated and you don't necessarily know which ones exist or what the parts are, creating these work orders for each instrument also tells you what parts need to be made to make each instrument.
Source: https://steamcommunity.com/sharedfiles/filedetails/?id=2920669655
More Dwarf Fortress guilds
- All Guilds
- Danger rooms still work........(Kinda)
- Dwarf Fortress, Linux ()
- Armok is real
- I HATE CUTEBOLDS, I WANT THEM TO DIE
- Efficent Modding Guide (Compressed Tweaks)
- Finding Lairs [Adventure mode]
- Kosten effizienter Start [v0.1]
- Default Oldschool World Options
- World Map Key/Legend
- A humble guide - how to bury your dwarves.