
Introduction - Disclaimer

Greetings fellow rallyist! This guide is the best way to start your carreer as a proffesional car tuner...! Or not really, because all it will do is assist you with the in-game setups to get the most out of your car, whether that is a FWD machine, or an all out 4WD beauty.
This guide is complementary to the in-game descriptions on what each car part does when altered, although I am sure you'll be fine even if you stick to this guide only.
Also keep in mind that Dirt 4's tuning is unique in a way that the extent to which you can adjust your car's setup solely depends on your chief engineer's tuning skill. At first it can be frustrating since you won't be able to go into detail when changing certain things so hiring a better Chief Engineer is always adviseable (Main Menu>My Team > Staff >Chief Engineer)
Lastly, a necessary part of tuning is testing. Don't make massive changes before testing so that you can easily spot a flaw in a setup! And remember to also test in actual counties, not just the DirtFish rally school which happens to have very different grip levels.
I hope you find my guide useful as I spent a considerate amount of time and effort making it and remember, practice makes perfect so don't stick to just theoretical knowledge! Go out there and mess around with the settings yourself!
DISCLAIMER
This is not a guide on how to get oversteer and reduce throttle understeer to a bare minimum, a topic heavily discussed these days with the supposedly "flawed" Dirt 4 physics. If you're here just for this, I suggest you take a look at the "Differentials" section, particularly the Central Diff.
Grip Levels
An important thing to understand before reading the rest of this guide is the grip of each wheel. Due to forces like friction, each car wheel has a specific amount of grip. This is not measureable in any metric way.
Grip is affected by many various factors like the surface (ice has less grip while tarmac more), the tyre (tarmac tyres on gravel have less grip than gravel tyres on gravel, the weight they support and many more. There are two main types of grip you will need for this guide; Straight line grip, which is the grip of your car while moving in a straight line and cornering grip, which is the grip of your car during a corner or while the front wheels are turned.
Speaking in lamest, least scientific terms, the grip of each wheel is allocated to different functions in order for the car to obey the driver's instructions. The rear wheels of a Rear Wheel Drive (RWD) car for example, must usually do two things: Get the car to move (when on throttle) and also prevent the car from sliding. The grip in this case would be allocated between pushing the car forward and preventing it from sliding. If the grip were to "run out", the car would slide (which is also the reason RWD cars oversteer when you step on the throttle, at least in other games. This is currently broken in Dirt 4)
An important thing to remember is that, when front wheels lose grip, the car understeers because it doesn't have "enough" grip to turn. When the rear wheels lose grip, the car oversteers because there is nothing to keep the rear-end of the car from sliding.
Again this was in the least scientific terms possible.
Brake Bias And Strength
In-game UseTL;DRMost cars if not all cars, both in Dirt 4 and real life, come with four brakes, one on each wheel. When tuning, the brakes are usually categorized in Front Brakes and Rear Brakes.
The brake bias determines how the brake power is split between the Front and Rear brakes. Front biased brakes result in the front brakes having more power than the rear. To measure brake bias, Dirt 4 uses a percentage. 100% corresponds to front biased brakes while 0% to rear biased brakes.
Front biased brakes typically result in understeer when turning simply because the front wheels have to work harder since they now have to both turn and slow the car down.
When the bias is towards the rear, it gets a bit more complicated. Obviously the rear wheels, just like their front counterparts, struggle more when braking since they must prevent the rear from sliding and also slow the car down. As a result this often leads to oversteer since the rear wheels will lose grip. But the intensity of this is much larger compared to the understeer in the front, simply because the front wheels get some bonus grip when braking due to the car weight moving forward (think inertia forces) whereas the rear wheels lose grip when braking since most of the weight is now towards the front. This also means front biased brakes are often more effective.
The strength of the brake input depends on how much you depress the brake pedal (if playing on a wheel) and also the Brake Strength setting of your car. This is pretty straight forward even from the in-game description. The more brake power there is, the quicker your car will slow down, however if a wheel locks up (usually the result of too little tyre grip compared to the strength of your brake), you will not slow down as fast. The brake strength can also intensify the effects of Rear and Front biased brakes respectively (Understeer/Oversteer)
Like mentioned above, Dirt 4 uses a percentage where 100% = front biased and 0% = rear biased. You can tweak that via a slider and the available range is usually between 50% and 90% (some cars have 52 - 90 etc.) As far as I'm concerned, this means you can't get rear biased brakes, the best you can get is a perfect balance between the two (50%). So just because the slider is perfectly centered in-game, it doesn't mean your brake bias is split perfectly between the two wheels. That is why, compared to previous games like Dirt Rally, it's better not to use the slider as a visual indication of the setup but instead use the values next to it.
Generally speaking, people who like to use their brakes in order to induce oversteer during a corner should move the bias to the back, while users who like powersliding should probably keep it towards the front so that they can brake faster before a corner. [size=2]
Extreme amounts should not be applied as this results in poor braking and wheel lock up. Even if you are an oversteer freak, moving the bias fully to the rear guarantees nothing but trouble.
Front brake bias = Understeer when braking
Rear brake bias = Oversteer when braking
Gear Ratios
In-game Use: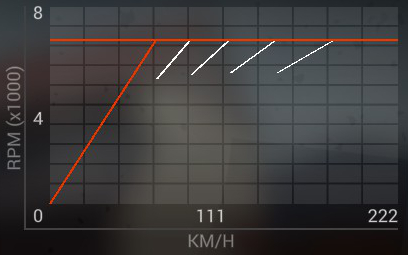
 TL;DR
TL;DRGear ratios and the gearbox function in general is something quite complicated for the average person. Simply put, gears exist because your average engine can run up to 8 or even 9000RPM, so connecting the engine directly with the wheels would be a wheelspin mess, not to mention you'd stall the engine every time the car stopped. So gears reduce the RPM of the engine to an RPM the wheels can actually effectively use. The amount at which they reduce it is the ratio. (Not exactly sure on this, anyone feel free to correct me)
Long gear ratios improve top speed but worsen acceleration.
Short gear rations improve acceleration but reduce top speed.
The easiest thing to do if you want your car to either be faster at top speed, or accelerate quicker, is change the Final Drive ratio. But that is not particularly efficient, especially when you're only having trouble on straights or on corners but not both.
Remember, changing 1 gear means you'll most likely need to make adjustments to the lower and higher gears. If you don't follow this rule, your car will most likely end up being unpredictable (see below).
In-game we are provided with a visual depiction of the gear ratios that can help you with balancing all the gears. You have probably seen this before since it is a very popular way of visually inspecting the gear ratios of a vehicle and it is used in many games.
Here is a screenshot of the in-game graph:
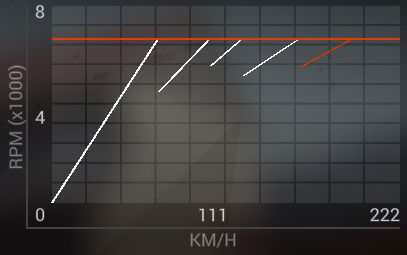
This is a depiction of the default ratios for the Hyundai R5. The diagonal lines represent the gears, with the first diagonal line from left to right being 1st gear (which is orange because I had it sleected), the second one 2nd gear etc. The goal when adjusting a gear is to maintain this smooth transition between all the gears. It is recommended that the following gear's bottom tip is above the tip of the previous gear or on the same level. Else your gears might be unpredictable in a sense that a gear lasts much longer or shorter on full throttle than the rest etc. Below is an example of a somewhat flawed setup.
Here the transition is not smooth and while I am sure whoever created it (totally not me) had a goal in their mind, they'll probably regret it as soon as they hit a stage.
A good driver who wants to get the most out of their car will adjust gear ratios from event to event and even from stage to stage. Since some stages have more straights or corners than others, changing your ratio accordingly is a great way to earn those few tenths over your opponents. Planning ahead is the way to go!
Use final drive setting for big scale adjustments
Edit individual ratios for more precise results
Lengthen your ratios for top speed
Shorten your ratios for acceleration
Differentials
In-game Use:Central Differential:Here it starts getting interesting!
The two wheels of the front and rear axles don't turn at the same speed during a corner. This is because the outer parts of a spinning circle move faster than the innner ones. As a result, assuming a bend/corner is part of a circle, the outside wheels of a car must turn at a different speed than the inside wheels, else the car will lose grip and "slide off". This is why the 2 front and rear wheels turn independently.
However, this "independence" also brings in side effects. If one driven wheel of a car, that is a wheel with power being given to it by the engine, is not touching the ground, there will be less resistance. In fact there will nearly be none, so the transmission will assign all the power to that hovering wheel. The result is loss of power. Another example is one wheel massively losing grip. Loss of grip means less resistance so it spins faster. This is why a differential exists. A differential allows the two wheels to turn independently as they should, but only up to certain extent thus leading to the elimination of cases when one wheel turns much faster than the other.
Depending on the wheels a differential controls, it's either called a front differential (controlling the 2 front wheels) or a rear differential (controlling the 2 right rears).
A locked differential allows small spinning differences between the 2 wheels it controls whereas an open or slip differential tolerates bigger differences.
A locked differiential (or diff for short), as mentioned previously, forces the wheels to turn at similar speeds. This provides better straight-line traction because engine power isn't wasted on a wheel with little grip but spread to both front or rears nearly equally. But since the wheels must turn at different speeds during a corner, a locked differential results in loss of grip when turning. That is why a locked diff on the rear wheels causes oversteer and on the front understeer.
There are also central differentials in 4WD cars which control the difference in speed between the front and rear wheels. This is particularly useful as this type of differential also allows you to configure the torque bias, that is whether you want your engine power to be given mostly to the front wheels, the rear wheels, or split equally. More on that below.
It's worth noting that a differential is only used on wheels that have power from the engine. So a Front Wheel Drive (FWD) car usually only has a front differential.
In Dirt 4, depending on the car, you can have a Front Differential, a Rear Differential, or both for 4 Wheel Drive cars which also happen to sometimes have a central differential.
Front and Rear Differentials have the ability to function differently when on throttle, braking and not applying any input (preload), so you can adjust how the differential reacts whenever those different inputs are sent through. For example, one may want their diff to be more open when braking compared to when on throttle, it's all up to you. The game has a concise description of what each setting causes if you forget, but honestly, if you trully understood the above introduction to differentials, you won't need it.
Being different than the other differentials, I felt this needed its own section.
Like mentioned previously, this 4WD-only central diff controls the difference between the speed of the two front wheels and the two rear wheels. This is crucial and can have a massive influence on the car, yet Codemasters have such a poor description in-game that lets users scratching their heads and possible ignoring this.
It comes with two options, the Central Diff itself and the torque bias. The torque bias is quite straightforward. They allow you to give more power to the front, or rear wheels. Giving more power to the front wheels causes understeer, similar to FWD cars, while power on the rear results in oversteer just like RWD cars.People who like to slide their cars around corners often set the bias towards the rear, which would be my advice as well. Always go for a balanced, 50-50 torque bias or even a rear one. Just don't overdo it.
Now moving on to the important part, the Central Diff setting. This can have a massive effect on whether your car slides through a corner using oversteer, or it grips to the apex of the turn and goes around more smoothly without sliding as much. Again, the main point of the normal differential (not central), as mentioned in the introduction, is effectively using power. By ensuring the two wheels spin identically speed-wise, the situation where a wheel without grip spins violently due to there being no resistance (thus wasting power) is eliminated. The central differential isn't much different, but instead of controling two wheels of the same axle, it controls the front and rear axle wheels. When you start sliding around a corner in a four wheel drive car, the rear wheels lose grip. Immediately, the central differential assigns less power to those wheels and as a result they find grip. This means your slide ends and you gain grip again, which is not what you want.
So if your driving style is sliding around corners, don't have the central differential locked. Instead, maintain a balanced setting or even allow it to be open. This is also why R5 cars are easier to slide than Group A cars. R5s don't have a central diff while Group As do.
*for a different opinion, check the comments posted on the 25th of November 2017*
Suspension
In-game Use:Spring Rate:Ride Height:Anti-Roll Bar:Tender Spring Rate:The suspension is a spring used to absorb bumbs. It also helps with the weight management of the car.
When idle, the weight of the car with neutrally set suspension is split across all 4 wheels. The more weight there is on the wheels, the more the grip those wheels provide. This is why under braking your front wheels get more grip, because the weight of the car moves towards the front thanks to inertia forces. Weight management in rally is done via various techniques, some of which (I think) are included in the DirtFish rally school in-game. The suspension however also players a major role.
The spring rate defines how stiff the spring of the suspension is. The softer the spring, the easier it is for the suspension to be compressed. Soft suspension can result into increased absorption of bumps. The weight of the car also moves more aggresively when you brake, accelerate and turn. So in some way, you can control how much grip you want the front and rear of the car to have. If you have soft front springs and stiff rear springs, there will be less weight on the rear wheels and as a result less grip, so oversteer is easier to achieve.
Again, to determine which suspension, front or rear, is stiffer, don't use the sliders. Use the value in N/mm next to each slider. Higher values mean a suspension is stiff while the opposite applies for low values.
The ride height of a vehicle is the clearance between the ground and the lowest point of its main chassis. It can be adjusted via the suspension. A high ride height (10-15mm) can help the car handling in rough terrain (gravel) as well as make braking more efficient. A lower ride height reduces the centre of mass thus the handling is more precise and the car reacts quicker to your turn inputs. Remember, lower ride heights means the suspension compresses less, so make sure to stiffen it a little as well as be more careful with your braking. There will be less weight on the front wheels when braking so even less traction which means the chances of locking up are higher.
When a vehicle turns left, due to inertia forces, the weight moves to the outside wheels, which in this case are the right wheels. This same thing applies to right turns as well. The movement of the weight towards the outside is called roll. When a vehicle turns, the outside wheels do most of the work compared to the inside wheels, so roll can positively affect your vehicle since it gives extra weight and thus grip to the outside wheels. However it makes the vehicle unstable and sluggish. Stiff anti roll bars prevent this while soft ones allow it and also prevent your car from launcing off the ground when only one wheel hits an object like a curb or a small rock. TIP: Stiff rear anti-roll bars and soft front anti-roll bars cause oversteer. The opposite setup causes understeer.
A stiff setting will extract the suspension quicker. This is particularly useful in stages with many bumps, crests and jumps where you want the car to be in contact with the ground as much as possible. However a stiff setting also reduces bump absorption by a lot.
Damping
In-game Use:Bump:Fast Bump:Fast Bump Threshold (Set In Metres Per Second):Rebound:Fast Rebound:Fast Rebound (Set In Metres Per Second):If a force makes a spring compress, it will extract and compress again until forces like friction turn all its energy into heat. The same applies to suspension springs. This is what the dampers do; stop the suspension from violently going up and down whenever you hit a bump. A stiff damper setting will prevent more suspension movement than a soft setting.
Less suspension movement means more stability, but also less bump absorption. This is why typically you want to set the dampers to stiff in a smooth tarmac enviornment (Spain) compared to a gravel rally with lots of bumps.
Depending on the car you have different adjustable settings. Here I have included all the settings in Dirt 4. There are dampers on all 4 wheels and you can adjust the front wheel dampers and rear wheel dampers seperately.
How stiff the damper becomes when the car hits a small bump on the road
Fast How stiff the damper becomes when the car hits a bigger bump on the road
Anything that makes the suspension compress faster than the set value in mps (metres per second) is considered a fast bump and the fast bump setting is applied by the damper. Anything lower than that value is a bump.
Clarification: When a spring compresses, it extends shortly after. In order for this extension not to be violent and destabilize the car, the damper controls it. This extension is called the rebound.
The rebound effect can momentarily pull weight away from the wheels, thus the wheels lose grip. The dampers can control this effect thanks to the Rebound Setting. So, stiffening the rebound setting especially on the front wheels can maintain the weight on them even if the spring wants to rebound. This way you reduce understeer after bumps/jumps.
How stiff the damper becomes when the spring extends after being compressed.
Fast How stiff the damper becomes when the spring extends quickly/violently after being compressed.
Anything that makes the spring decompress/extend faster than the set value in mps (metres per second) is considered a fast rebound and the fast rebound setting is applied by the damper.
Wheel Alignment
In-game Use:Camber Angle:Toe Angle:Another important aspect of car tuning albeit more simple.
There are two main types of wheel alignment, camber and toe angle.
The camber angle is the angle made by the wheels of a vehicle relative to the vertical angle of the vehicle when viewed from the front or the back. When the top of the wheel is further away from the vehicle than the bottom, it is called positive camber whereas when the top of the wheel is closer to the vehicle than the bottom it is called negative camber. In rallying, negative camber is nearly always used compared to positive camber. Due to the tyre's tendency to roll on itself when the vehicle is turning, the inside part of the tyre can often lift off thus reducing the contact area between the road and the tyre. Negative camber compensates for this thus cornering grip is improved at the cost of straight line traction. Note that negative camber only benefits the wheels on the outside of a corner, but it doesn't matter since the outside wheels are the ones that contribute the most to the turning of the vehicle.
Toe angle is the angle made by the wheels of a vehicle relative to its horizontal angle when viewed from above. When the wheel points towards the inside of the vehile it is called Toe in while the opposite Toe out.
The game allows the user to tweak the camber angle and the toe angle of both the front and the rear wheels.
Sufficient description provided both in-game and above as for its general effects. Can only be negative in-game. Negative Camber should usually be set to 0.5 - 3 degrees. Adjust it as you see fit. Extra Note: Excessive camber angle makes the wheels in real life to slightly bend due to the weight of the car. This is not visible with a naked eye. However this increases rolling resistance (It has nearly nothing to do with anti-roll bars) meaning you lose power during corners. To compensate for this, assuming Codemasters have simulated in Dirt 4, use some toe-out when applying lots of negative camber.
The game has gotten the effects of Toe in and Toe out wrong in the descriptions. Toe in does NOT improve responsiveness, it improves stability. Toe out improves responsiveness.
Thanks For Reading
This was my first guide related to racing. This was made using knowledge I have gathered both from personal experience and from trustworthy sources on the net. If you find any mistake of whatever significance, please feel free to let me know.
I also accept friend requests if anyone has questions regarding tuning, wants to compare times, or anything else.
And remember to rate this up if it helped in any way ;)
Source: https://steamcommunity.com/sharedfiles/filedetails/?id=946479197
More DiRT 4 guilds
- All Guilds
- Jak zosta Pro
- UPDATED: Hydro's Logitech G29 FFB Guide
- DIRT 4 100% Achievements guide
- Guide 6
- Pace notes: Understand your codriver
- Tune Vehicle Russian Translate //
- DiRT 4 - 100% Achievement/Trophy Guide
- DiRT 4 - How to Get All Gold Medals in Joyride