Introductions
I found this guide[www.xboxachievements.com] (credit to Metabolic XBA) seems to be the most popular guide for doing Worst Nightmare in a single playthrough, but Ive found it really lacks in specific information. Feels very much like a guide for a second play-through where you're already familiar with the game, so I’ll be elaborating on it with my own experiences and a few substantially easier locations for the challenges.
Make sure you read and prepare yourself for the subsequent challenge as some of them have extremely specific scenarios which will not re-appear. It may even be worth taking manual copies of your saved game so you can revert if needs be.
For save game backups, I wholeheartedly recommend Game Save Manager[www.gamesave-manager.com] to automate the process of saving your games to Dropbox/OneDrive/etc.
Save game location for Arkham Origins is:
--- Steam\userdata\<steam id>\209000\remote
If you disable Steam Cloud, the location should be:
--- %USERPROFILE%\Documents\WB Games\Batman Arkham Origins\SaveData
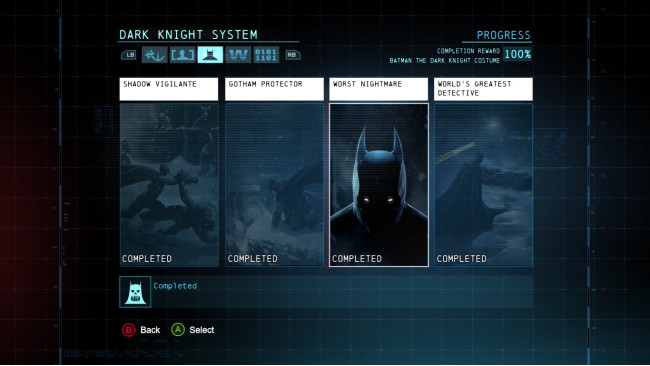
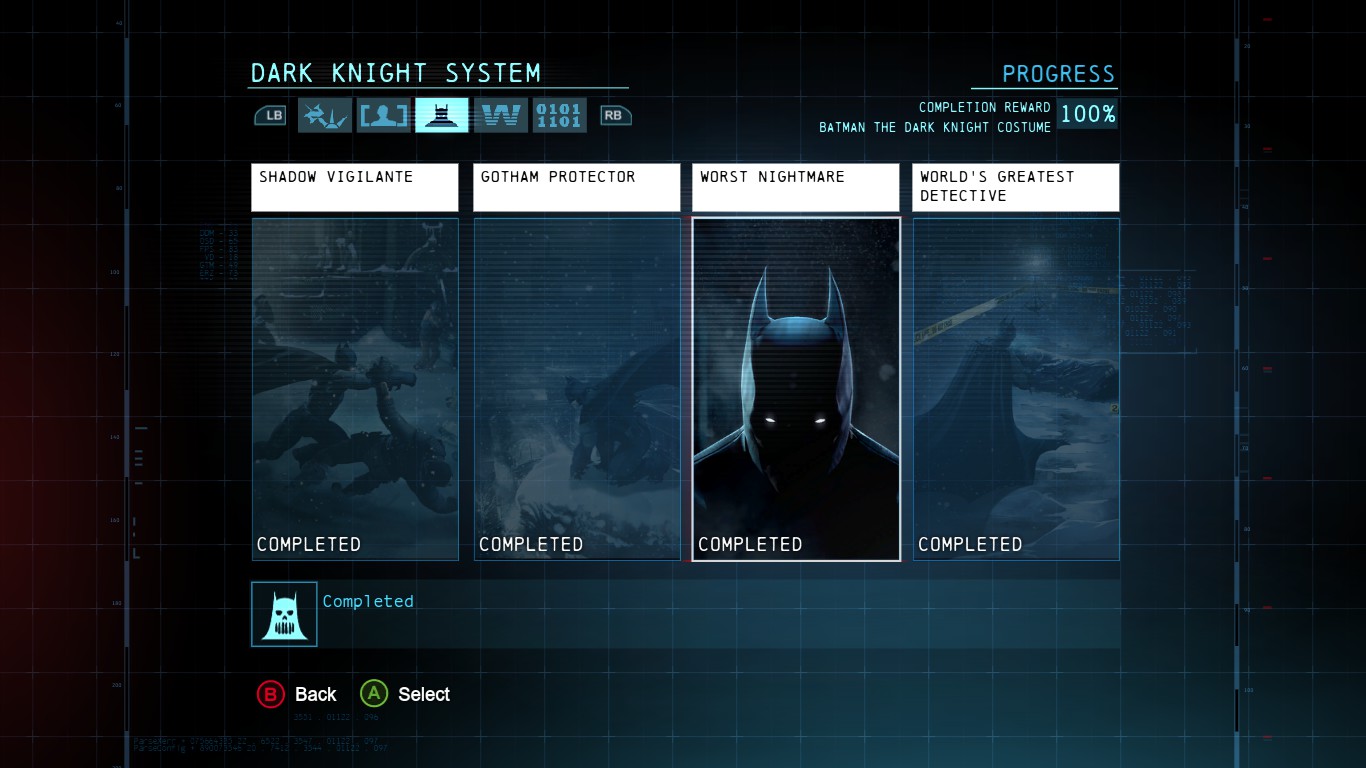
Rank #01

Challenge: 1) Perform an inverted takedown, a vent takedown and a wall takedown.
Frustration Factor: 1/5.
Description: Shortly after the prologue at Black Gate you will forced to investigate a GCR radio tower. This is basically your introduction to the Worst Nightmare challenges, Just follow the path set out for you to take down the three thugs using the required takedowns to net your first rank.
Extra Notes: There are 4 enemies to take out in the radio tower, the first 3 have your required takedowns, so if you mess up you can safely restart checkpoint.
Continue on with the story until you are required to collect the second sim to track down Penguin and head over to the marker. The objective marker will specifically state “second sim”, its actually the third card you pick up. Unlike the previous Predator Encounter, this one is in the open city, so don’t accidentally fly to the marker and alert the 3 enemies there.
Rank #02

Challenge: 2) Perform three silent takedowns in one predator encounter.
Frustration Factor: 1/5.
Description: Once near the objective, look above them for a suspended shipping container. From there, look down and you will see there are three armed guards patrolling the area. Get a feel for their routes then just drop down and take all three out with silent takedowns to complete Rank #2.
Extra Notes: The game will auto-save when you takedown the final guard, so if you get spotted you can reload your checkpoint. If you do get spotted and it auto-saves, its not the end of the world. Any open-world, respawning predator encounter can be used. See the Steel Mill below for an ideal spot.
Continue with the story. About half way through the Final Offer, after meeting your first enforcer enemy type (large enemy), you will come to a Predator Encounter in the Theater, this is where you will be getting Rank #3.
WARNING: The Theater is obvious, they mention it several times through the Final Offer and the door even mentions it above the archway. This challenge is limited in where it can be done, only two opportunities before Rank #6 and would ruin your play-through.
Rank #03
Challenge: 3) Finish a predator encounter without being seen.
Frustration Factor: 4/5.
Description: This one is pretty easy, there are 6 regular thugs and you can use your detective vision. I tended to just take them all out silently so you can avoid them grouping up and actively searching for you. Take them down one by one to bag Rank #3 and the Sonic Batarang.
Extra Notes: This one is easy when you’re prepared for it. For this challenge you CANNOT use any Predator Encounter thats in the outside world. The Steel Mill does not work, nor does another story-related 7-man encounter on a rooftop a little further on in the story, this also would explain why you do not get the “unseen” achievement at the previous challenge despite Batman's new fancy HUD giving you the “unseen” bonus when calculating your experience. The theater is the first opportunity you will have to get this challenge done, but there is one other chance if you mess up (I did).
Secondly, as this challenge will not complete until the last guard is taken down, you do not get any repeat attempts at this. The game will auto-save when the last guard is out. You can take a manual backup of your save if needs be.
Lastly, it appears that the inverted takedown counts as being seen as the guard looks at you during the animation. Play it safe and use silent takedowns from behind for all guards. Do not use inverted takedown, grate takedown or any other loud takedown including Knockout Smash.
If you do accidentally finish this, its not the end of the world. I did manage to find one other place a little further on that you can get this, but this one is substantially easier. The one further on is in the GCPD Bullpen, outlined in a later challenge.
Deathstroke

Missable Achievement: Not long after the Theater will be the Deathstroke boss fight. For this encounter, you need to make sure you Counter every one of his attacks, not just the ones with the button prompt. If he attacks through the course of the regular fight you need to either counter or dodge. So long as you’re not hit, its fine. As the fight progresses, Deathstroke will attack multiple times and you will need several counters to see it through.
After exiting the ship I suggest talking to the first Anarchy follower then quickly heading over to diffuse the first bomb. This is so you can open up the deck of the Final Offer as a predator area. It's a useful place to get a couple of other ranks later.
Once you are done with that we are going to head over to the Steel Mill for Rank #4. At this point we haven't been introduced to the Steel Mill yet so for anyone who doesn't know the location it's shown on the screen shot below:
What makes this encounter ideal, at this stage of the game there are only 3 patrolling enemies. Its a very easy, repeatable Predator Encounter to knock off the remaining ranks before the all-important Rank #6.
Rank #04
Challenge: 4) Use a Sonic Batarang to lure an enemy into a takedown (3 times).
Frustration Factor: 1/5.
Description: The reason I suggest coming to the Steel Mill now for Rank #4 is because right now there are only three guards and they are spread out and really easy to lure one by one. Just snap to a corner, throw the Sonic Batarang down, wait for them to head over to it and do a corner takedown. Head up to a vantage point to wait for the Sonic Batarang to recharge then rinse and repeat two more times to complete the challenge.
Extra Notes: This does not need to be done in a single predator encounter as described above. If you check your progress from the Dark Knight menu, you will see the number of times you’ve completed a Sonic takedown. This area is perfect for the challenge as its repeatable. I would suggest using this area to knock off the challenge before moving on, and if you’re clever, you can knock off this AND the next challenge together, you just need to have done at least one Sonic takedown elsewhere first so you’re not getting all 3 in the same instance at the Steel Mill. If you do, only the Sonic Batarang will complete and activate the next rank.
While the guide suggests you continue with the story until you are heading over to the GCPD, you can very easily nab the next challenge at the Steel Mill as well (if you didn’t do this at the same time already).
Rank #05
Challenge: 5) Complete a predator encounter without using detective vision.
Frustration Factor: 1/5.
Description: You are going to have two shots at this when you get to the GCPD, you can do it on the roof, just turn off your vision as you approach and grapnel up to one of the vantage points so you can check out the area, or you can do it inside in the Bullpen predator encounter. I found it easier to do on the roof. The bullpen is just a little trickier because there are more guards and it's more confined. The advantage is you have more takedown methods at your disposal. Don't forget that although you can just wade in and fight you CAN'T drop a Smoke Pellet if you get in trouble because it will automatically put in into Detective Vision.
Extra Notes: Ignore the guide above, nab this bad-boy outside the Steel Mill. Only 3 enemies there, very easy to do. I left it in as it describes the Bullpen area that you could use to get the “unseen” predator challenge if missed at the theater. Note about the smoke pellet is also good to keep in mind, but as the Steel Mill is easy to repeat, its not really an issue.
Continue with the story. After you are finished with the sewer your next objective will be the Gotham Merchants Bank. Head over there for Rank #6
WARNING: if you want to do this in one playthrough you have to make sure these first five are done before you continue with the story. The next rank involves doing an explosive gel takedown on a weak wall and this is the only place to do it until much later in the game.
Rank #06
Challenge: 6) Perform 4 exotic takedowns in one predator encounter. Vent takedown, explosive gel takedown, corner takedown and a hanging ledge takedown.
Frustration Factor: 3/5.
Description: Enter the bank. As soon as the cutscene ends (you can’t miss it) look down to see the two explodable walls. The hanging ledge takedowns can be done from the metal grate ledges above the tellers windows. The final two takedowns are pretty standard, there are vents in both upstairs offices, the entrances are half way up the staircases on either side of the room and there are two vents on the ground floor near the explodable walls. You should get the takedowns done as soon as you can, this challenge will unlock as soon as they are done. There is no need to wait for the encounter to be over. The last man standing will surrender for interrogation rendering him useless.
Extra Notes: Go for the explosive one last as its noisy, the other takedowns you can keep the enemies relatively calm. Use Sonic Batarang to lure someone infront of the wall to avoid knocking them out with the explosion instead. Also, for the Hanging Ledge Takedown, crouch on-top of the metal grate above the teller, when a guy below you walks under you’ll get the tip “silent takedown”. The animation for this is Bats choking the guy with his feet. The vent takedown; make sure you don’t do a floor grate. Easiest spot for the vent is in the upstairs offices (enter from the stairwell). Given this a 3/5 only if you’re following this guide. Its easy to restart your attempt (don’t interrogate the final guy), but if you miss this opportunity, your next one is in the final area of the whole game.
Head over to your next story objective at the Steel Mill, unlike the earlier ranks, the next one cannot be done outside.
Rank #07
Challenge: 7) Complete a predator encounter without doing any takedowns.
Frustration Factor: 3/5.
Description: I recommend using beatdowns exclusively for this, just because I know for sure they work and it isn't too hard to pull off using them. Just be patient and wait for the guards to separate before going for your next target. As soon as you initiate a beatdown all the guards will rush you so make sure you give yourself enough room and point your camera up to the nearest vantage point for a quick getaway.
Extra Notes: Ive only given this a 3/5 if you’re following this guide. This challenge might seem easy, however it needs to be done indoors. The area in particular where this challenge can be done is a few fights into the Steel Mill in an area called “Drug Lab”. There are about 8 enemies and one of them disrupts your vision. If you follow the tips above in this area you’ll be fine, beatdowns on these enemies only last around 5 hits so you have time to escape to the gargoyles above. Predator areas prior to the “Drug Lab” in the Steel Mill do not count. I was panicking that I’d miss out as the guide did not specify which area and with the requirement to beat all enemies comes that awful auto-save so no chance to repeat this. Play it safe, drop down behind and use beatdown, don’t risk accidental takedowns. You can be seen, you just don't want to as those shotguns can tear you apart pretty quickly.
After you exit the Steel Mill and continue with the story you will get a message from Alfred telling you about an SOS he has detected. Before heading to your next story objective go to the location he marks on your map. When you get there you will have to solve a simple crime scene and this will unlock Deadshot's predator room that we will be using soon.
For me, the call from Alfred never came, from what I can tell its because I used fast travel as soon as I left the Mill. I even went to the Point of Interest and found the flare but the cutscene did not trigger. To get it to work, I returned to the Mill and made my way from the entrance towards the Bridge. This triggered the SOS message from Alfred.
Shiva
Missable Achievement: Around about this time you will probably hear a baby crying. Investigate the pram and you’ll be attacked by Shiva. She has a “test” for you to complete which finishes at Sheldon Park. You need to beat the fight inside the building at Sheldon Park without taking any damage (the other “test” fights don’t matter). If you take damage at any time, you can restart checkpoint. Its not too bad, just plays out like your standard fight.
You need to complete this side mission in order to unlock Critical Hits on normal attacks, required for one of the later Shadow Vigilante ranks.
When you're through with that carry on with your story objective until you are inside the Gotham Royal Hotel, there are two predator rooms in here, the lobby and the swimming pool. Head to the lobby for Rank #8.
Rank #08
Challenge: 8) Complete a predator encounter without using detective vision and without being seen.
Frustration Factor: 4/5.
Description: This one sounds like it could be difficult but in this room it's a piece of cake if you know the guards movements. There are 8 in total, three on the balconies, three on the ground floor and 2 on the landing in front of the security room. The final two will remain stationary as long as they are not alerted, they just turn on the spot. I'll try to explain the easy way, as soon as you start immediately grapnel to the vantage point on your left. There will be a guard walking under you, don't wait for him to get completely under you just jump down behind him as soon as you think you will be safe to do so and take him out silently. Quickly turn around and head right onto the bridge to take the next guard out, then head forward and left to get the guard heading down the stairs. Try to get him BEFORE he starts heading down the second set or he will slide down and alert the two guards in front of the security office. Now turn around and head up the stairs and straight ahead past the bridge, look to your right and you will see a break in the banister. Go there and look down and there should be a (jammer) guard heading towards you but on the ground floor wait for him to get to you and make a right then jump down and immediately get in cover behind the Christmas Tree because there will be another guard heading towards the one you just jumped down behind. watch them until they have both veered left and right respectively then safely head out and take the guy on the right down first (he's a jammer). Turn around and head to the next guard then look right and the third guard will conveniently have his back to you ready to be taken out. Now you should only have the two stationary guards left, grapnel up to a vantage point closest to them and lay down a Sonic Batarang on the stairs opposite the one with the body (enemy #3) to take the first one out with an inverted takedown. Quickly grapnel away so the last guard won’t see you then as he is finding the unconscious bodies of his friends glide down behind him, take him out and you're done.
Extra Notes: Above is pretty comprehensive (I edited a few bits), just make absolutely sure you’re not seen before you hit the final guy because it’ll autosave. Would be a good idea to manually backup your save for this one as you’re running out of Predator opportunities.
Now instead of continuing on with the story, back-track and exit the hotel, we are going to head over to Gotham Merchants Bank for Deadshot's Predator Encounter (unlocked with the SOS side mission mentioned above) and Rank #9. The reason for this is because Rank #10 is substantially easier to do in the next Hotel room and it could throw off your whole play-through.
If you cannot get the SOS side mission to trigger, you can complete Rank 9 at the pool and save Rank #10 for the Firefly Predator Encounter later in the story.
Rank #09
Challenge: 9) Perform 4 loud takedowns in one predator encounter: grate takedown, inverted takedown, knock-out smash takedown and a ledge takedown.
Frustration Factor: 4/5.
Description: This one is easy enough, use Sonic Batarang if you have to for the Inverted and Ledge takedowns. Just be wary of Deadshot, he can pretty much shoot you from anywhere. This will unlock as soon as all four takedowns are done so wait until then to beat Deadshot.
Extra Notes: If Deadshot kills the hostage or you die and have to restart, you will need to earn the challenge all over again. Performing knock-out smash, ledge takedown and grate takedowns on Deadshot count towards this challenge, though you cannot perform inverted on him.
Tips for Deadshot: once you have your Worst Nightmare rank, clear out all other enemies. As his health drops, a set number of enemies will appear. The final one is a jammer. Take out all enemies before damaging Deadshot too much, you want it to be just you and him when he grabs the hostage. From there, use the vantage point at the entrance, glide to him when he’s facing away and Silent Takedown.
Now we can head back over to the hotel and continue on until we hit the swimming pool predator room. Its just after a helicopter ride with Vicky Vale.
Rank #10
Challenge: 10) Complete a predator encounter with a high threat level or higher without being seen.
Frustration Factor: 2/5.
Description: It shouldn't be too hard to get this done, just be patient, watch out for mines if you are trying to sneak up on someone and remember that after a couple of inverted takedowns they will arm mines on the vantage points. Don't forget you can use your detective vision for this one.
Extra Notes: While not too hard, its certainly a good candidate for taking a manual save prior to doing this one as the rank will pop with the auto-save at the end. Avoid loud takedowns and do silent as often as you can.
Carry on with the story until you are back out in Gotham, then head over to either the GCPD Roof, the Steel Mill or the Final Offer to get Rank #11... or alternatively make your way around destroying the poison for Black Mask’s side mission and pick up the next two challenges at the Church at the end. You'll want to do Black Mask's side mission anyway to get the upgraded Smoke for later.
Rank #11
Challenge: 11) Take out an enemy with a Sonic Shock Batarang.
Frustration Factor: 1/5.
Description: Really easy, when you get to whichever area you chose, lay down a Sonic Shock Batarang and wait for someone to come over and check it out. Now detonate it in their face to complete rank 11.
Extra Notes: Not really anything to add. I picked up this as one of my takedowns towards Rank #12 in the Church for the final area to Black Mask’s side mission. Just make sure its your first takedown in order to unlock Rank #12 then get 4 other different ones after that.
If you’re not still in the Black Mask Church, then you can continue on with the story until you reach the first bomb room in Pioneer's Bridge. This room is suitable for Rank #12.
Rank #12
Challenge: 12) Complete a predator encounter with a high threat level or above by performing at least 5 different takedowns.
Frustration Factor: 1/5.
Description: Just vary your takedowns, in this room you can do inverted, ledge, knockout smash, wooden wall, grate, silent, hanging ledge and sonic shock batarang. Hanging ledge is a pain to maneuver into so I would only try that if you're desperate. Make sure you get these done before you get down to the last guard (Bridge room), he will surrender to be interrogated.
Extra Notes: Fairly straight forward, I picked up this one in the Church for Black Mask’s final area. You really want to do Black Mask’s side mission for the next challenge anyway, and the Church has plenty of grates, walls, vents and you can even use the Sonic Shock Batarang in the same spot - just make sure you do the Sonic Shock Batarang first as if done last you won’t open this challenge.
If you’re in the Pioneer Bridge, I recommend back-tracking out as this next one is easy. Any of the respawning predators in the city will do, I did the Final Offer.
Rank #13
Challenge: 13) Eliminate 3 enemies within the duration of one smoke pellet.
Frustration Factor: 1/5.
Description: Exactly what it sounds like but you have to be quick and on point in this room because there are only four guards total. Take one of the out loudly (grate takedown, sonic shock or knock-out smash) then wait for the other three to come over. Drop a smoke in the middle of them then head in there and silent/knockout smash all 3 before the smoke dissipates. Upgrading your smoke bombs, through the Black Mask side mission will make this much easier to pull off.
Extra Notes: I did this one at the Final Offer. Silent Takedown on the sniper then use your perch to throw out a Sonic Shock Batarang. Make sure you do the Knockout Smash with your Silent Takedown, they won’t hear a thing. Unlike the guide suggests, there's not stress here. If you mess up you can easily restart checkpoint where the rooms on the Bridge only have 4 enemies and will auto-save on the last one.
Continue on with the story until you reach the very start of Black Gate Prison (main entrance). Forget the rest of Pioneer’s Bridge. Trust me. You should certainly have it by now, but just incase, make sure you have Double or Multi Batarang. If you don’t nows your chance to grab a little more experience before you finish the bridge.
Rank #14
Challenge: 14) Eliminate 3 enemies using a propane tank.
Frustration Factor: 2/5.
Description: Completely ignore the other guide, attempting this on Pioneer’s Bridge is asking for a fist through your screen.
Extra Notes: At the main entrance to Black Gate Prison, sit ontop of the main gate, equip your Double or Multi Batarang and target the 2 or 3 right-most prisoners to knock them unconscious. Quickly equip your Remote Batclaw and attach the nearby propane tank to one of the other enemies. No need to try and setup enemies together, they’re all ready for you. The problem will be the propane tank is extremely unreliable at takedowns. The one you hit will be out, you just need to get lucky with 2 of the others. If they remain dizzy, restart. If they’re out and you see the swirling bats, you’re all good. You can check to make sure you’ve reached Rank 14 by checking the menu before you get the popup to say its complete. Very easy at this spot, may take a few restarts due to the reliability of the propane tank, but with no setup needed its a stress-free piece of cake.
Continue on with the story until you get to the final predator room of the game, in Black Gate Prison, “Nexus”.
Rank #15
Challenge: 15) Pull 2 enemies over a railing at the same time using advanced gadget techniques.
Frustration Factor: 2/5.
Description: This needs to be done with the Remote Batclaw, the hardest part of this rank is the setup. In this final room grapnel up and look down you will see there are barriers overlooking the bottom level. You need to get two guards close to those barriers, across from each other, tag one with RB then shoot the other and it should pull them both over. It's a bit luck based too, as I found on two occasions I set it up pulled them both over and only one of them was knocked out. If you absolutely can't get it in this room, you can also do it post game on the deck of the final offer, I actually found it easier to lure them there although 4/5 out of the five times I tried it only one guard was knocked out.
Extra Notes: The other guide is partially correct though it was all about placement and not setup. You want to move as fast as you can, the quicker you get into place the quicker you’ll see the enemies you need to tag. Starting from the entrance to Nexus (where your restart point is), look up to the open grate. Go up there and open the grate on the other side. As soon as its open, leave and follow the wall to your left. You’ll soon be directly underneath a gargoyle, zip up there. As you look directly down you’ll be above a pit and you’ll see a guy walking towards you on the left. Tag this guy. Directly below you will be a second guy in the pit climbing up the ladder. As soon as he is up the ladder, hit him with the Remote Batclaw to join the two in holy matrimony, ‘til death do they part. The trick is to try and have the distance from the railing roughly the same otherwise only one of them will fall into the pit. As with the previous rank, this is in a very easy spot to repeat if you miss.
Shadow Vigilante #15
Shadow Vigilante Rank 15 - Untouched, 50x Combo with 15 Variations
The final rank of Shadow Vigilante requires you to a 50x combo, 15 combat variations without getting hit on a group of enemies of Medium threat level or higher. While this seems like a massive undertaking, whether by design or through a glitch, these goals can be achieved across multiple fights. I don’t think you can quit the game in between reaching these goals, so play it safe and work on all 3 in the same game. Beat one group without getting hit (there is a group central to the Diamond District that contains one heavy and multiple unarmed), then utilise your Shock Gauntlets to boost your combo easily in another fight, then mix up your gadgets and combos for your variation bonus in another fight.
Variations include normal attacks and counters, all of your quick-gadgets, all of your two-button special moves and the three-button combos like Aerial Assault and Ultra Stun. There are around 20 total, you only need 15, so skip any you have trouble with. One of each move is all that counts.
Gotham Protector #15

Gotham Protector Rank 15 - Crime In Progress (Bridge)
The final rank of Gotham Protector requires you to beat a Crime In Progress in each of the games 9 locations. For some reason, the Crime In Progress on the bridge does not want to respawn (its the first ever one you do). In order to get this final one you can either restart in NG+ or Night mode and pick it up at the beginning or you can trick the game. Get a Crime In Progress at Sheldon Park, lure the last enemy to the South-East corner near a couple of pipes and you’ll see the game pop-up in the center of the screen to say you’ve changed to the Pioneer Bridge district. Make your final KO here and it will count for the final area. The exact location is seen here:
Unmarked Collectibles
Neither Anarky Tags or Cyrus Pinkney’s Plaques are displayed on the map and they can only be seen ingame with your detective vision. There is an achievement for 20 Tags, but getting all of them counts towards the 100% achievement.
Maps of their locations can be found here:
Anarky Tags[guides.gamepressure.com]
Pinkney Plaques[guides.gamepressure.com]
Alfred
The only tip I can offer for hearing everything Alfred has to say is to make sure you've completed all of the Most Wanted side missions, talk to him, then either leave the Bat Cave and return or use the Training simulator. Quitting the game and reloading should work fine too.
Just keep going until he repeats himself, then leave and come back.
Source: https://steamcommunity.com/sharedfiles/filedetails/?id=417966331
More Batman: Arkham Origins guilds
- All Guilds
- Batman: Arkham Origins: Gua completa de logros 100% (ESP)
- Fatal Error Fix
- Batman: Arkham Origins Guide 515
- Batman: Arkham Origins Guide 505
- Some Multiplayer Achievements with ARSH
- " "
- How to stop playing Batman: Arkham Origins [lite version]
- || Batman: Arkham Origins
- "One Million"
- Batman: Arkham Origins. Cold, Cold Heart.