
Introduction & Differences

This is a guide to the Pixel Remaster version of Final Fantasy. This guide will cover everything mentioned in the description and aim to get you to 100% completion.
Please make sure to review the table of contents before beginning in case there is something you want in particular.
! Please note this version of the game does not include Origins, Dawn of Souls or 20th Anniversary content !
This means that the following are absent:
FMVs
Difficulty selection
Soul of Chaos
Labyrinth of Time & Chronodia
MP System
PS, GBA, Anniversary style sprites
This version of the game does include:
Level 99 level cap
Recoloured and refined NES sprites
Original NES/D&D style spell system
GBA (Dawn of Souls) enemy values
GBA dialogue
Intelligence based magic damage
Origins (PS1) Easy Mode shop pricing
3D FFIV and Steam/iOS FFV sound effects
Remastered spell effects
Peninsula of Power patched out
Fixed encounters changed to Monster-in-a-box encounters
Remastered OST
How do I access the 15 Puzzle?
As this is a common question, I will cover this here. The 15 puzzle or sliding puzzle is accessible by boarding the ship then holding confirm and tapping cancel repeatedly until the puzzle appears. The goal of the puzzle is to arrange the numbers 1 - 15, left to right, top to bottom for rewards. Please see the secrets section or my achievement guide for strategies to solve the 15 puzzle.
Please note that despite rumours spreading, the 15 puzzle can be accessed with any controller or keyboard and mouse.
This guide is partnered with the guide below which has a Ctrl+F friendly bestiary.
https://steamcommunity.com/sharedfiles/filedetails/?id=2560789101
Map Key


This is you!
Enter/exit area
Go up a floor
Go down a floor
Weapon shop
Armour shop
Inn (restore HP/MP)
Black Magic shop
White Magic Shop
Item shop
Church (revive fallen party members)
Unlocks with Mystic Key
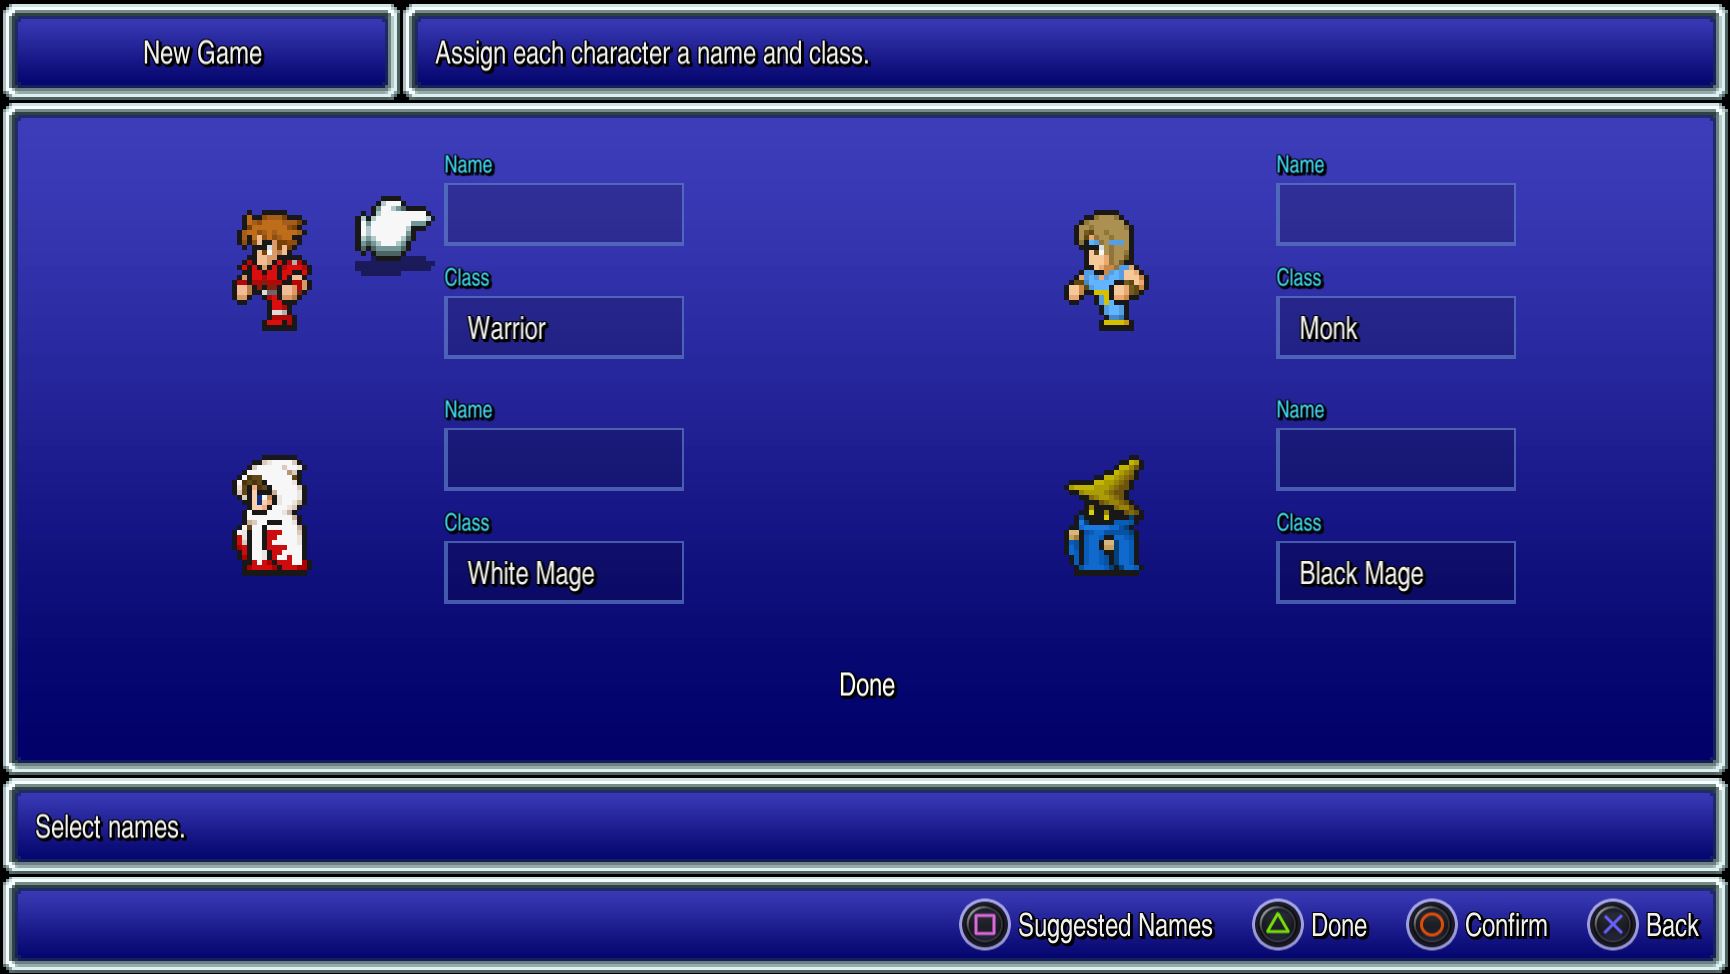
Four Warriors Of Light (Corneria, Chaos Shrine, Matoya's Cave, Pravoka)


The world lies shrouded in darkness.
The winds die...
The seas rage...
The earth decays...
But the people believe in a prophecy, patiently awaiting it's fulfilment.
"When darkness veils the world, four Warriors of Light shall come."
After a long journey, four young travellers did at last appear...
...and in the hands of each, was clutched a crystal.
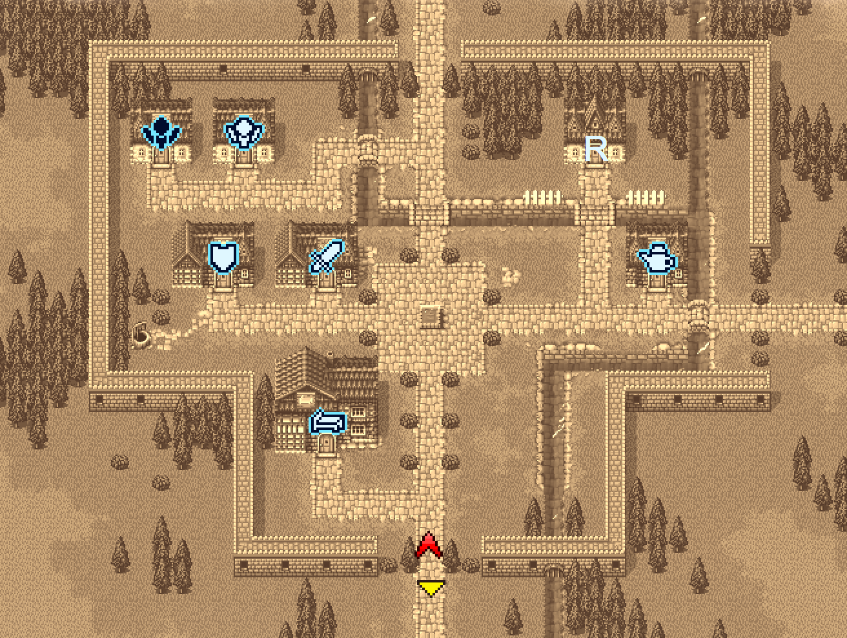
After the scene is set, you will be left standing outside of a town overlooked by a castle in the approximate centre of the world map. This town is Corneria and the castle, unsurprisingly, is Castle Corneria. Go ahead and enter the town.
Corneria Recommended Level: 1
Explore the town at your leisure and talk to the townspeople to learn about things, the dancer here will always give you a tip to the next direction of the game's main story quest. Once that is done, it's time to outfit your classes as best you can. This will mean rapiers for warriors, thieves and red mages, a hammer for white mage, no upgrade for black mages and ensuring your monk for this portion of the game remains unarmed. Warriors will also need chain mail.
Cure, Dia and Protect are good white magic to have.
Fire and Thunder are essential with Sleep taking priority over Focus.
If you carry all three types of Mages, the Red Mage should take Sleep, Fire and Dia.
It is always a good idea to carry 10 or more potions where possible along with at least 1 Tent. By this point you will be running short on money, calling for you to get out there and earn some gil.
Trying to leave the town you will find your way blocked by the town guard seeking the crystal carrying kids of prophecy. Seeing the crystals in hand, you will be immediately spirited away to...
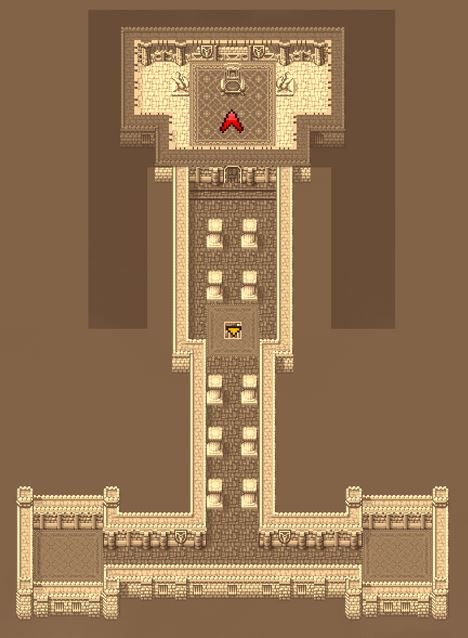
Castle Corneria
Arriving on the upper floor of the castle in the throne room the king will set out a quest for you to rescue his daughter, Sarah, from the once-loyal knight of Corneria, Garland. The King tells you they have fled to the Chaos Shrine in the northwest. He promises that once she is rescued he will have his workmen restore the broken bridge to the north.
Feel free to talk to the residents of the castle, including the queen and remaining princess who will all beg you to help in various ways and hint to a magical key to unlock the treasury we will encounter later.
Exit the castle.
Corneria Grind/Bestiary
You will need to grind to level 5 to take on Garland in the Chaos Shrine. You will earn enough gil to round out your supplies which should consist of potions and a tent.
For those chasing the Bestiary achievements, the local monsters between here and the Chaos Shrine are as follows:
Goblin
Goblin Guard
Wolf
Crazy Horse
Once you have done this, don't forget to revive any fallen party members and rest at the inn. Fallen party members are not revived by resting at the inn and instead must be resurrected at the church.
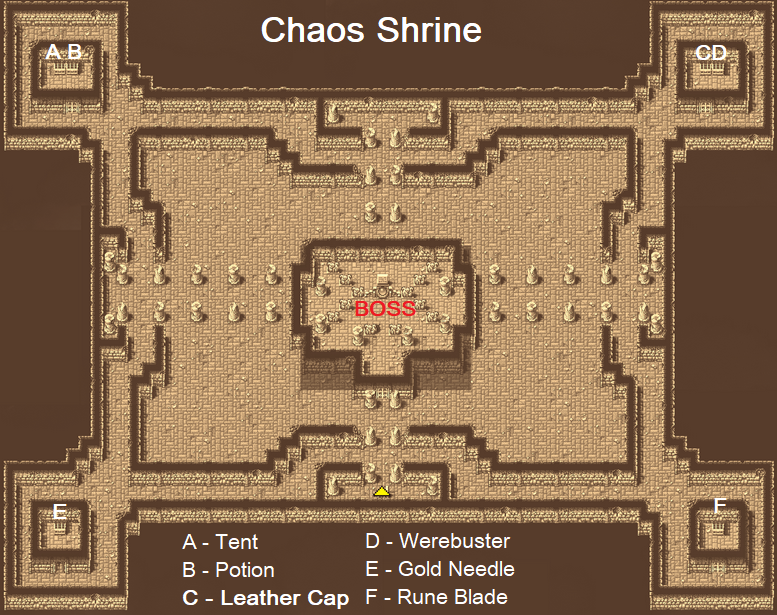
Chaos Shrine Recommended Level: 4/5
A relatively straightforward place, we want to grab the treasures on the north-west and south-west of the room and add the following entries to our bestiary:
Skeleton
Black Widow
Gigas Worm
Warg Wolf
Werewolf
Zombie
Ghoul
After you've gotten what you want out of this place, either exit to sleep in a tent first if your HP is below half or enter the central room and engage bestiary entry #12 himself.
"I, Garland, will knock you all down!"
Fire, Thunder and Physical attacks will work well against this rogue knight with one party member (probably a white mage) dedicated to tossing potions and cure spells out to heal what hits he does get out. Garland's only offence will be moderately strong physical attacks that hit one person at a time and thus is easily healed over.
After defeating #12 you will be taken back to Castle Corneria for a short speech from the King and Sarah as well as a cutscene showing the restoration of the bridge to the immediate north of Corneria. Make sure to speak to Sarah again before leaving to receive the Lute key item and a shy offer to stay at Corneria with her.
Alas, adventure calls. Head north of Corneria across the bridge and keep on charging north until you reach a cave on a peninsula.
Matoya's Cave
Entering the sole room in the cave you will discover a witch stumbling around and protesting about a missing crystal eye. Make sure to loot her chests for some curatives before heading back south to the mainland and East towards our next location.
Matoya's and Provoka Bestiary/Grind
In effort to reach level 7 by Pravoka, filling out this chunk of the bestiary achievement might be best.
Cobra
Ogre
Ogre Chief
Lizard
Pravoka Recommended Level: 7
Speaking to the townsfolk here you'll soon discover they're currently being terrorised by a band of pirates! Pirates that happen to be dwelling in the north-west of the town at present. Once rested and healthy, charge Bikke's Bikkeneers for a skirmish with bestiary #17.
"Cannonballs of steel..."
Casting sleep will leave you free to dispose of them how you wish. Without a sleep spell, Attacking your way through them as usual should work just fine.
Once defeated, Bikke swears blind of a change of heart that definitely has nothing to do with the risk of being stabbed, slashed, thumped and burned alive. He even offers up his Ship. Congratulations, you can now sail! Some townspeople will tell you about elves across the ocean, meanwhile we have our sights set on gearing up.
Warriors will work well with a Battle Axe and set of Iron Armour, any Red Mages or Thieves should be given new swords and Leather Armour. Even though the game has an accuracy stat, don't worry about it too much. Don't forget to keep monks unarmed! They will do less damage per hit but will do more hits per Attack, resulting in more overall damage. Upgraded armour ( for everyone also never hurts.
Blizzard, Temper and Invis are the must have spells here, especially as the damage buff Temper stacks with each cast! Slow and Dark can be ignored. In terms of White Magic, NulShock and Silence are spells that are my preference if you have gil to spare.
When on the ship, hold your confirm button and mash the cancel button until a prompt for something called 15 puzzle appears. Accept and play around of the game. (More info in secrets).
Now that Corneria and the surrounding area are mostly at peace, it's time to set sail southwest to Corneria then down south across the ocean. Once you've found a port, head south through the forest and discover the next place in need of aid.
Sea Bestiary
Sahagin
Sahagin Chief
Buccaneer
Shark
Bigeyes
Mystic Key (Elfheim, Western Keep, Marsh Cave, Backtrack)

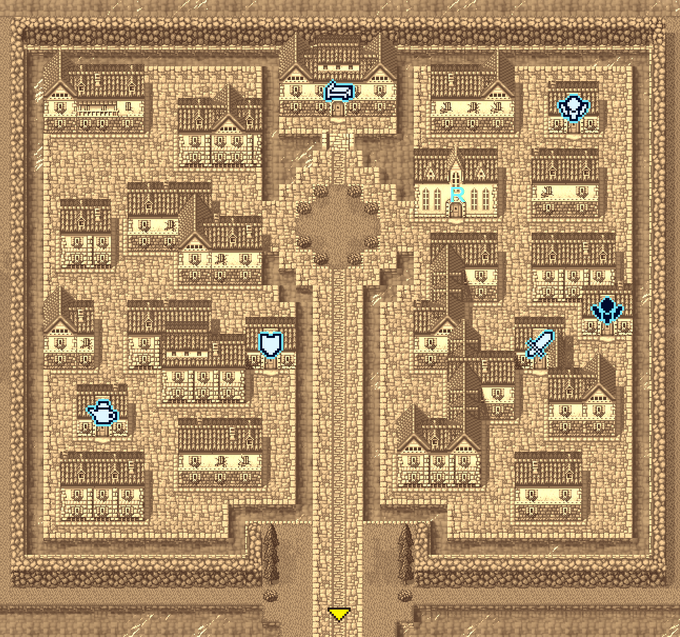
Elfheim Recommended Level: 8
Similar to Corneria, Elfheim is a town nestled amidst the roots of a castle. The people in town will talk of a cursed prince, the issue to take our attention and just as importantly, sports two sets of spellcasting shops. The level 3 and 4 spells here are very enticing but your priorities here are Thundara, Heal, Fira, Diara and Poisona. It will also be worth purchasing a shield and helm for any Warriors you have and steering clear of the other pieces of equipment for now.
Your main goal here now should be grinding level 10 or if you can stomach it, 11 before setting out West to the aptly named Western Keep.
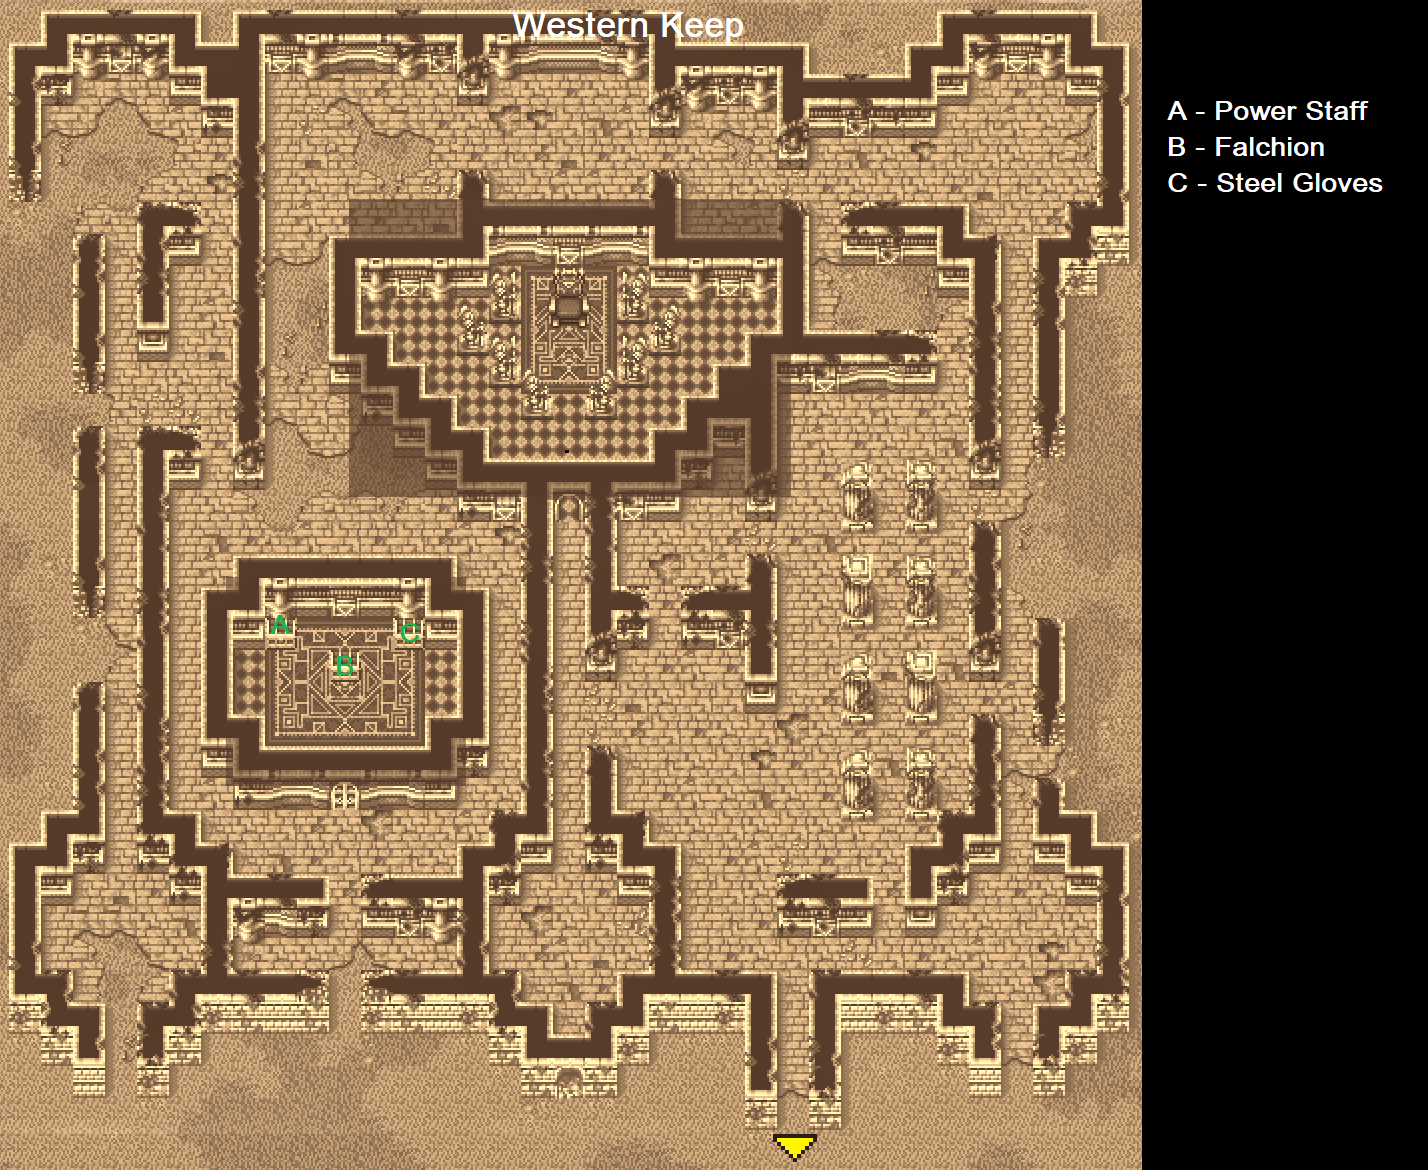
Western Keep Recommended Level: 10/11
Arriving in this abandoned, ruined keep our brief visit leads us to a king sat in a throne amidst these bat-laden hallways. He tells us of his stolen crown absconded in the southern Marsh Cave and asks of us to retrieve it for him. That quest in hand, return to Elfheim and get ready for the trip to the Marsh Cave. At this point you may at last be able to afford Poisona but failing that, make sure to bring a fair batch (~10) antidotes for what awaits. Bringing two tents is also advisable, one to use before entering the Marsh Cave and one to use on the way out.
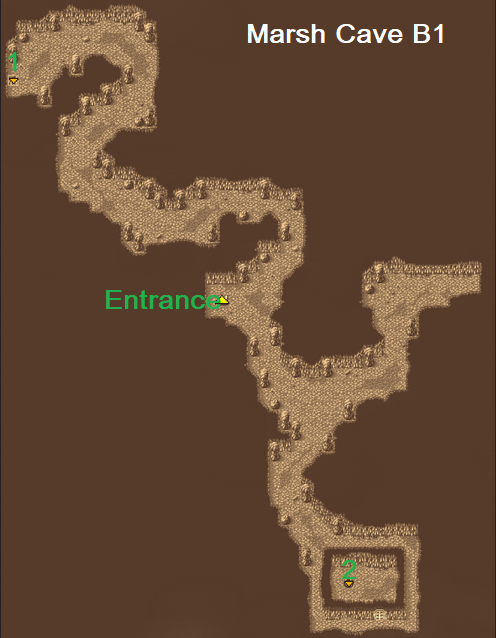
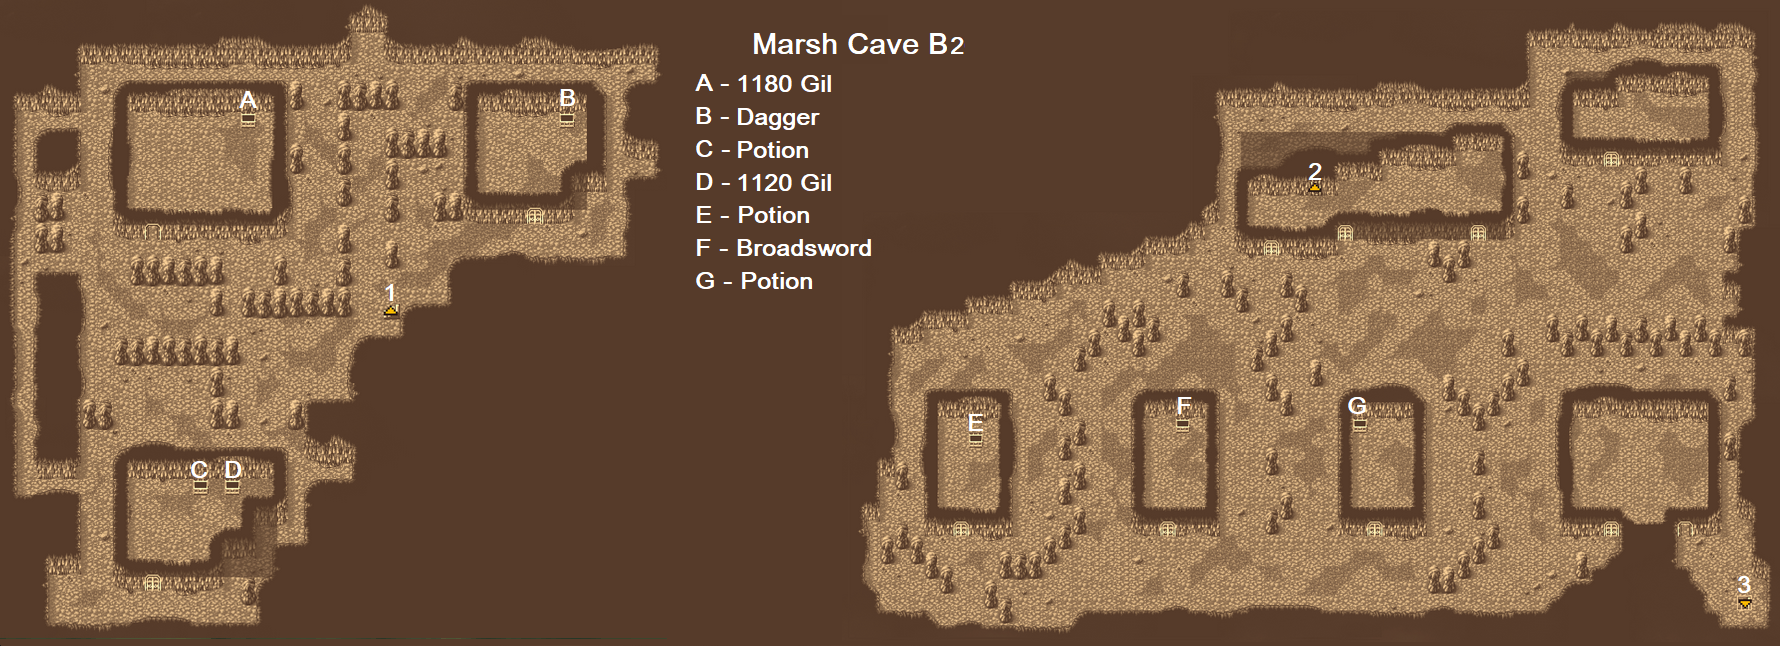
Marsh Cave 11/12
Welcome to your first large dungeon. Beware just about everything poisoning you. The southern path is the correct path so to get that treasure achievement, let's go north. If you're feeling short on supplies, don't worry about heading north now, we will be coming back later so you can skip to the next paragraph. Assuming you do head north you will end up in the left half of B2. Following the images provided, navigate your way between the three rooms in here and soak up all the treasure before heading back to follow the southern path.
Descending to the right half of B2, there are four rooms to the south. The Easternmost leads you to B3, the final floor while the Western and central rooms contains a single treasure chest each as depicted. Once looted and equipped, head on through the southeastern room and descend one last time.
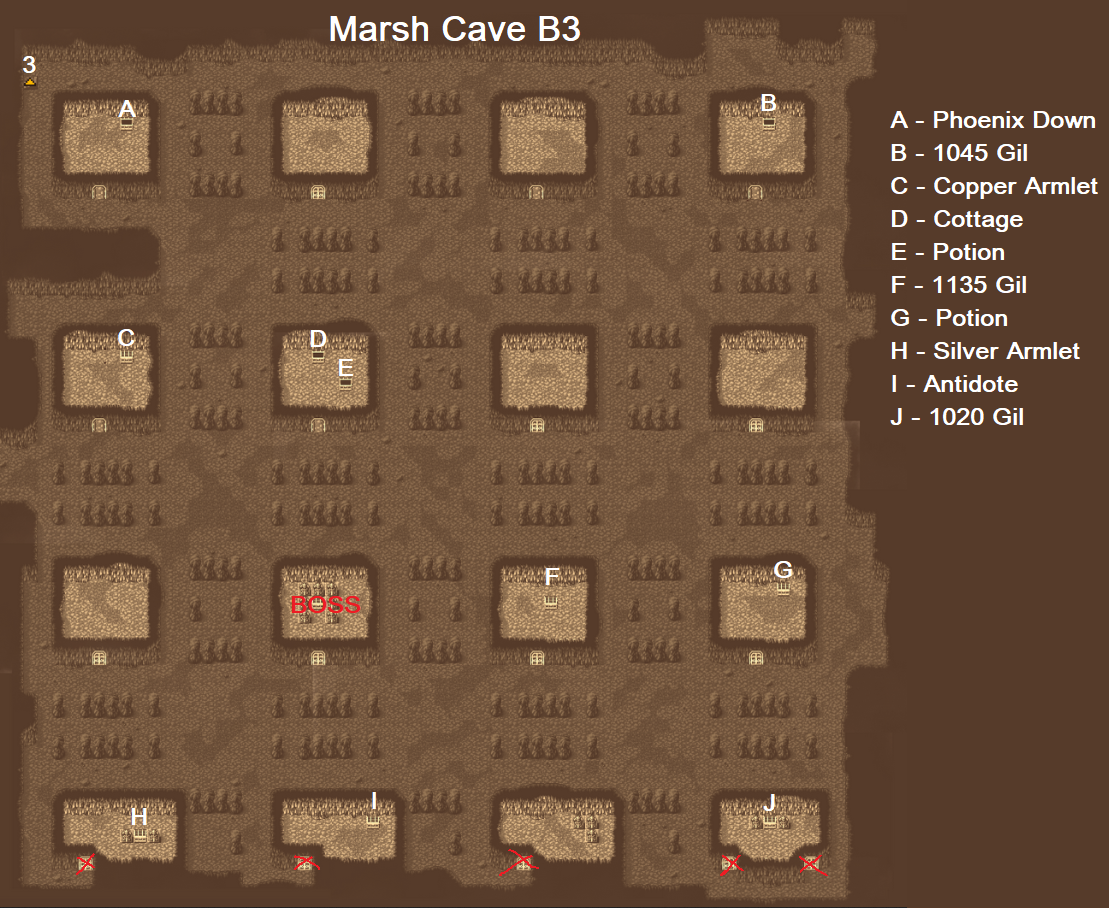
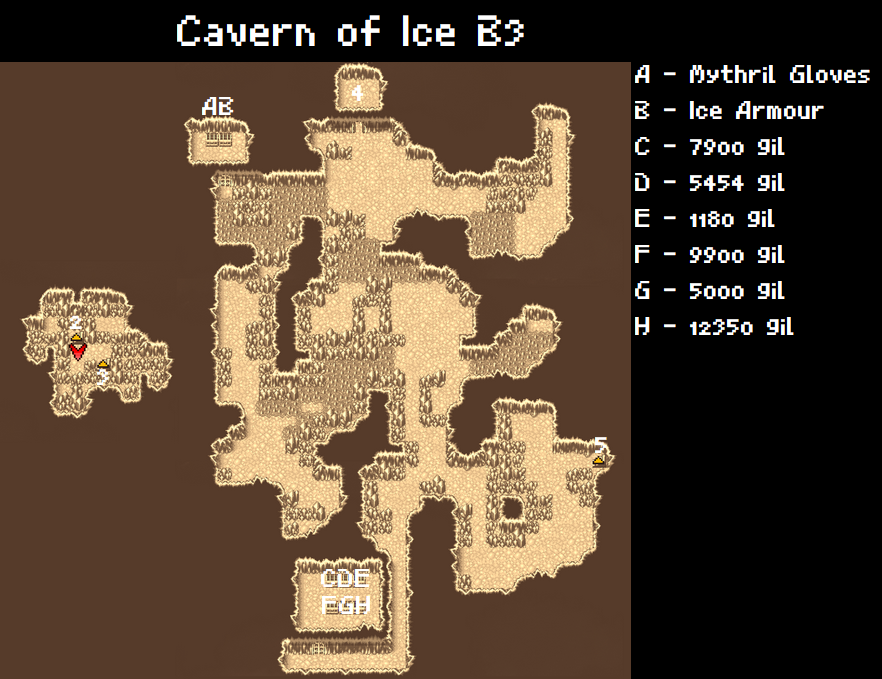
This last room is something of a mess. The boss can be found three rooms down and one to the right, though if you seek the treasure achievement you will be here for a slightly longer time. Thankfully, the image provided will help you avoid rooms shy of treasure. Be sure to take note that the rooms against the southern wall require the key to open.
Once your plundering or speedrunning dash is concluded, prepare to meet bestiary #32.
Supposedly, the piscodemons are set to spawn in a random amount. It may be 2, it may be 8. Typically, people encounter 4. These creatures have high attack and unimpressive defence. Your best bet is casting Protect on whoever is blessed with the lowest HP and if you have a Red or Black Mage, cast Thundara. Physical attackers are best simply attacking. Well done on surviving to the bottom floor and retrieving the crown! Regrettably, you must now climb back out.
Bestiary Checklist:
Black Widow
Warg Wolf
Werewolf
Zombie
Ghoul
Tarantula
Scorpion
Shadow
Green Slime
Crawler
Gray Ooze
Gargoyle
Bloodbones
Boss
Don't forget to use your Tent on the way out and if necessary, the Phoenix Down you found in there before doing so. Head back to Elfheim to sleep, restock and most likely purchase some more of those spells mentioned earlier. It is now worth also stocking up on Copper Armlets for any party members who can equip them and do not have better gear.
Return to Western Keep Recommended Level: 16
Having rested up, be sure to purchase some Phoenix Downs for the future before moving on and head on back to the Western Keep to present the crown you rescued from the Cave. Upon handing over the crown you will be greeted by bestiary #33.
"I AM Astos, king of the dark elves!"
A reasonably tanky boss, this dark elf sports high magic defence and unfortunately for us, the Death spell. This will instantly kill a party member, hence the urge to stock up on Phoenix Downs. He will also cast Fira and Sleep on your party as he deems fit. The strategy here is to cast Temper on your preferred physical attacker (don't forget that it stacks!) while your designated healer keeps everyone topped up. For defeating this creature, you will have earned yourself the crystal eye key item.
The Great Backtrack
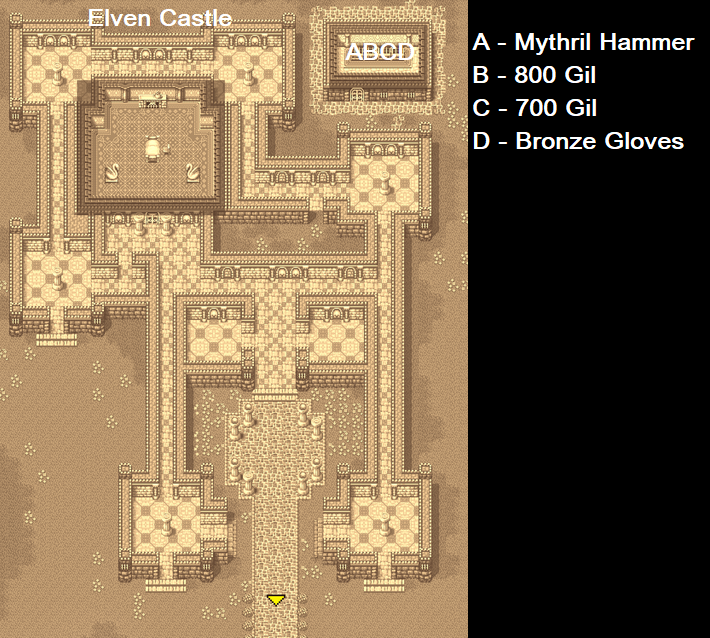
Now that we have the crystal eye in our possession it's time to go back whence we came. If you remember the witch, Matoya, from earlier, she just so happened to be shy of one precious crystal eye. Sail back north to Corneria from Elfheim and journey north to reach her cave. You will be rewarded with a Jolt Tonic, a fantasy-brand energy drink which will wake even the most ardent sleeper. Jolt Tonic in hand, head for the Elven Castle and help the prince take a sip to rouse him from a cursed five-year slumber. In return, you will at last be furnished with the Mystic Key. You must now go forth and plunder.
In the interest of saving time, I will be listing all Mystic Key locations in a list here for your convenience. Please refer to relevant maps to help you navigate. As it is the first time properly visiting the Elven Castle, the map will be included below. Though I don't usually include what is in the chests in text, I will here for the sake of ease due to backtracking.
Western KeepLeftmost treasure room chest (guarded) Power Staff
Middle treasure room chest (guarded) Falchion
Rightmost treasure room chest (guarded) Steel Gloves
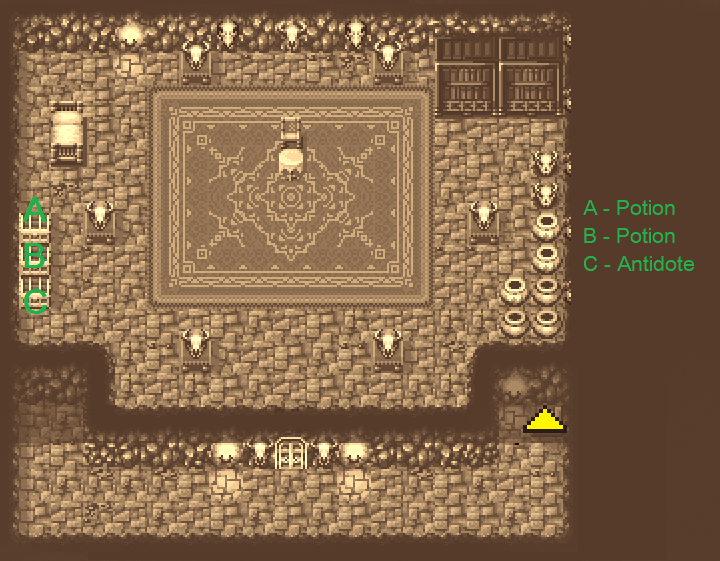
Marsh Cave B3
Southeastern treasure room (guarded) Silver Armlet
Lower Middle treasure room (guarded) Antidote
Southwestern treasure room (guarded) 1020 Gil
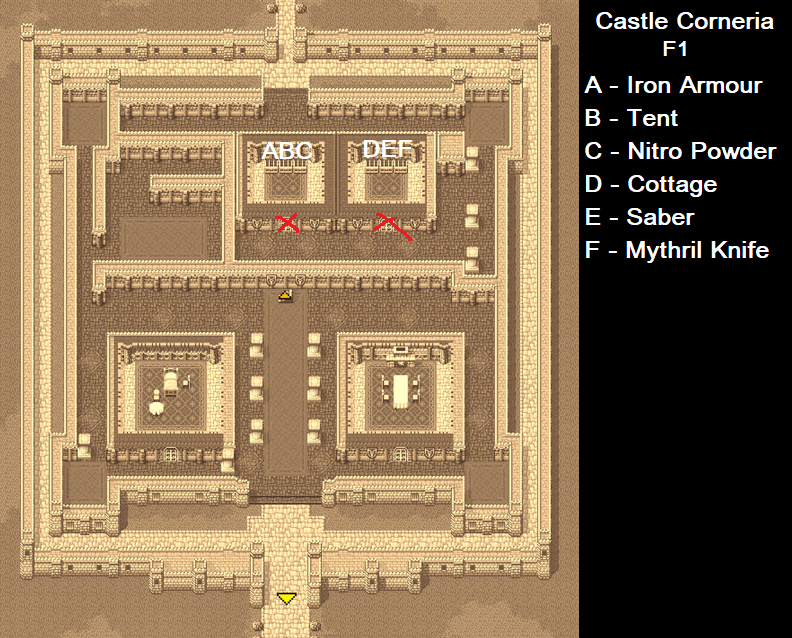
Castle Corneria Left chest of the locked eastern treasure room - Iron Armor
Middle chest of the locked eastern treasure room - Tent
Right chest of the locked eastern treasure room - Nitro Powder (main quest item)
Left chest of the locked western treasure room - Cottage
Middle chest of the locked western treasure room - Saber
Right chest of the locked western treasure room - Mythril Knife
Chaos Shrine Locked southeastern room - Rune Blade
Left chest in the locked northeastern room - Werebuster
Right chest in the locked northeastern room - Gold Needle
Earth Crystal (Mt. Duergar, Melmond, Cavern Of Earth Pt.1, Giant's Cave, Cavern Of Earth Pt.2)

"The earth decays..."
Your backtracking completed, it is now time to progress again. Get on board your ship and sail West of Corneria until you reach a northern dock. Southwest of here you should find yourself at the entrance into our next location in a mountainside.
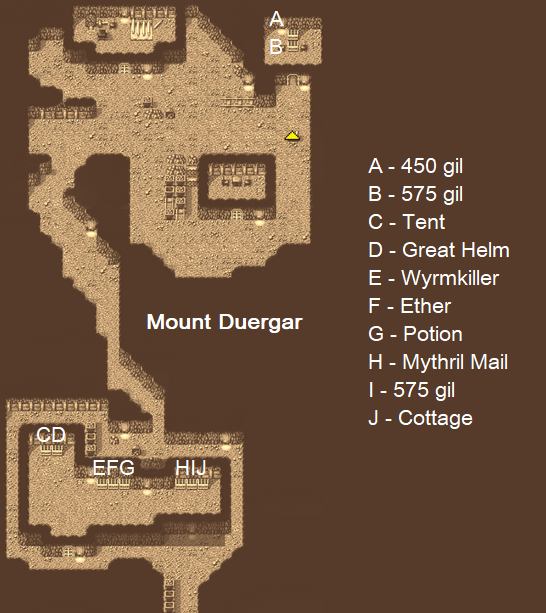
Mount Duergar Recommended Level: 17/18
Welcome to the home of Dwarves with Scottish accents. You'll find an assortment of treasure here and a Dwarven smith saying if he only had some Adamantite he could make a new weapon. We'll have to remember that as it results in the best weapon in the game.
Once you have taken all of the loot, a dwarf named Nerrick is below the southern treasure room. Hand over the nitro powder key item to him and he will blast away a land bridge, giving you the access to sail across the wider world.
Make sure to equip any of the compatible treasure here and still keep your monks without weapons. Be sure to also purchase a stock of Gold Needles (~10) before moving forward. Once this has been done, it's time to sail west through the newly made canal and pass by an island to reach reach a port. Disembark and enter the town.
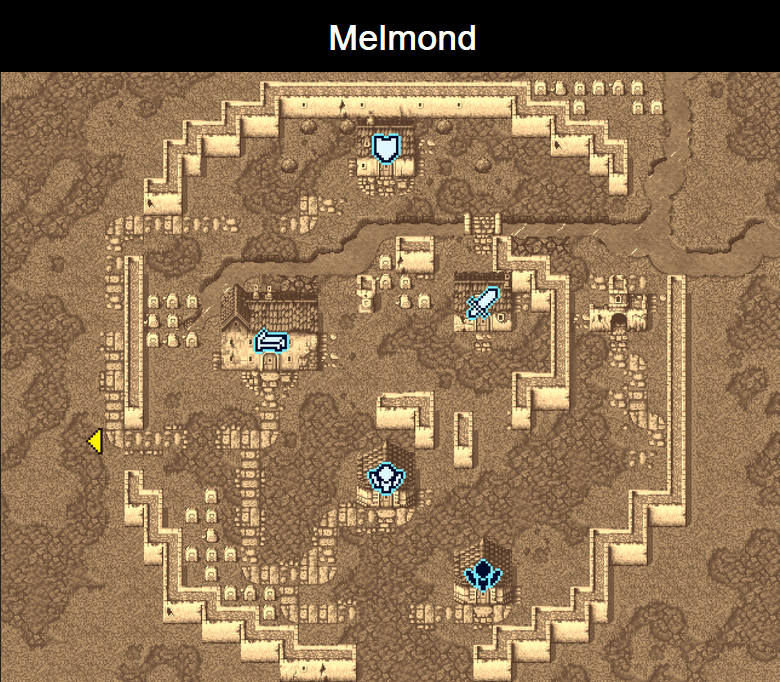
Melmond Recommended Level: 18
Welcome to Melmond, a ruined town on a patch of corrupted earth. The townspeople here will tell you about nightly attacks by a vampire dwelling in a place called the Cavern of Earth and how fertile the land used to be. Some people will mention coming here to investigate why the earth is rotting and some others will mention an ancient civilisation to the north that faded.
Unlike the other towns we've visited, this one lacks a church or item store. I hope you came well prepared. Fortunately it instead stocks the spell Life, your new revive spell provided you have someone who has access to . You should also purchase Curaga or Healara for your white mage as Diaga will be useful throughout the game for dealing with the many undead FF1 has. Firaga is the only priority black magic in this town and the Longsword is recommended for anyone who can wield a sword but does not have Wyrmkiller equipped. The armour here is not good enough to buy. If you need to go back to stock up on items, now is the time to do so. It is recommended you switch to purchasing Hi-Potions(10+) and Ethers (10+) as part of regular supplies from this point onwards.
Once you're prepared, head west from Melmond and head south as soon as possible. This will take you across thin piece of land to a triangular shaped peninsula, similar to a devil's tail. Pass between the two mountain ranges, spend a tent to heal up and save before entering our first crystal dungeon.
Ghoul
Ghast
Lesser Tiger
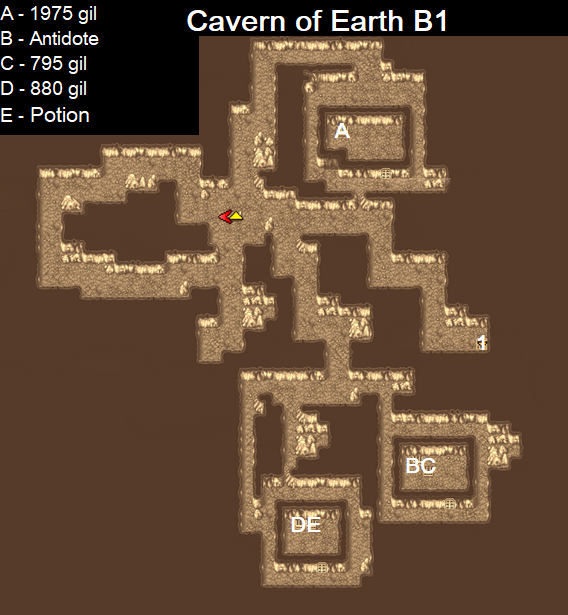
Cavern of Earth Pt.1 Recommended Level: 19/20
Bestiary:
Wraith
Hyenadon
Minotaur
Hill Gigas - Strong enemy.
Earth Elemental - Strong enemy, weak to fire.
Troll
Wight
Cockatrice - Beware petrification. Use a Gold Needle to cure this.
Boss
Ogre Mage
Sphinx
Beware that most treasure on this floor is guarded by monsters. On the first floor, go north and then take a right to reach the first treasure room. Go back to the entrance and go east, taking the first south that you can. Of the 3 paths only the eastern and western paths lead to treasure, the central path is a dead end. Move back to the entrance stairs and go east again, this time following the path to it's end where a staircase deeper into the cavern awaits.
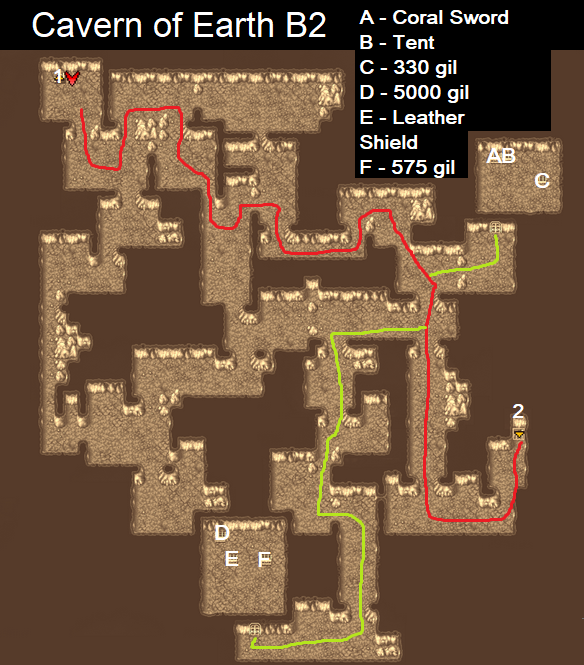
Progressing through this floor is slightly more complicated. I have included an edited path onto the map to avoid a confusing amount of text based directions. The green paths will lead you to each treasure room while the red path leads from one floor to another.
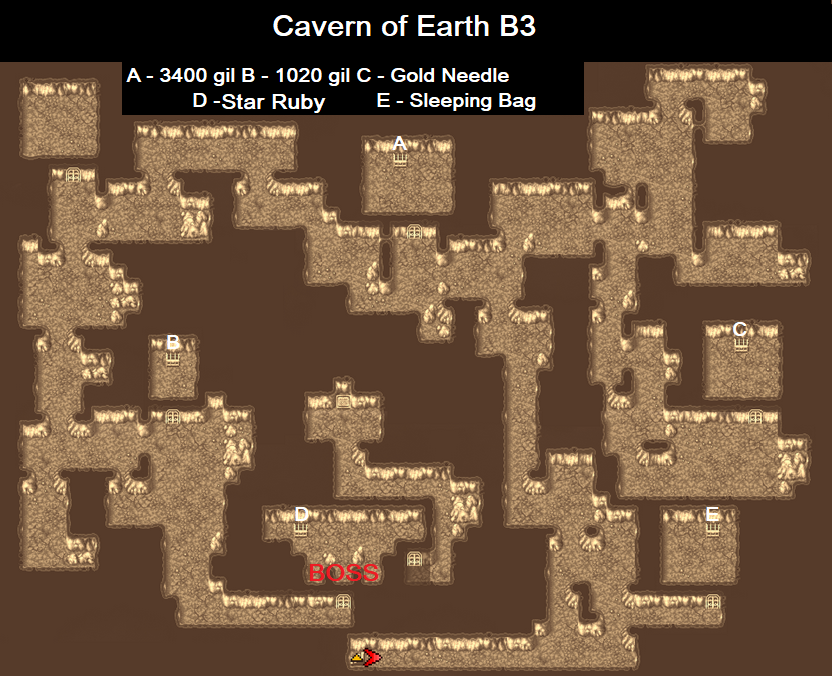
The same process has been repeated here, though the room is easier to get around this time. For part 1 of this dungeon we only need to defeat the boss and retrieve the key item he has stored in a chest in the room with him. Once you speak to the bat, it's time to battle bestiary #46.
"Mere mortals cannot kill the undying!" bossinfo
This boss deals heavy single target hits and regenerated HP at the end of every turn. Luckily, all undead in this game are extremely weak to Fire and Dia. Skip using Temper on a physical class this time and go straight to your highest level Dia and Fire spells which should be Diaga and Firaga respectively. This will likely be enough to kill him but failing that, your physical attackers should finish him off easily.
After defeating the vampire, open the chest behind him. Now we have the Star Ruby we can take steps to undo the seal on the cave and access the Earth Crystal. We will leave this place for now and rest in a Tent once out of the cavern. Head back up the "tail" onto the mainland and head West. Here you will find another cave.
Giant's Cave
Give the Star Ruby to Titan in the middle of the cave. Titan will eat the Star Ruby and move for you to pass through. Go south and clean out the treasure room, making good use of the Optimise button in the Equip screen to keep your characters up to date with your treasure. After this, take the exit Titan was blocking and follow the overworld path to reach a Sage mentioned earlier in Melmond.
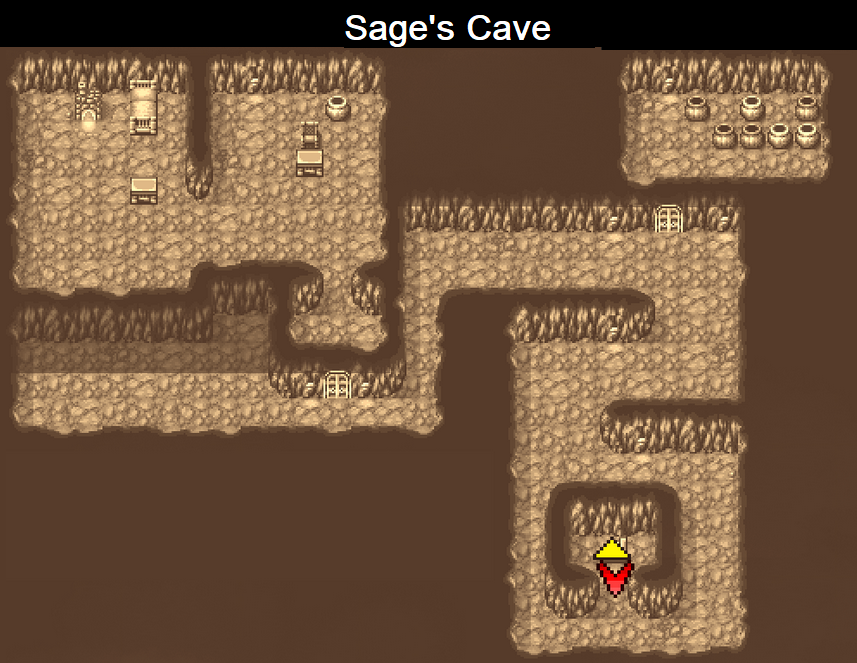
Sage's Cave
As there is no treasure here go and speak directly to the sage to receive the earth rod. This will be used in B3 of the Cavern of Earth to unseal the way to the Earth Crystal. Exit and head back through Giant's Cave back to the Cavern of Earth.
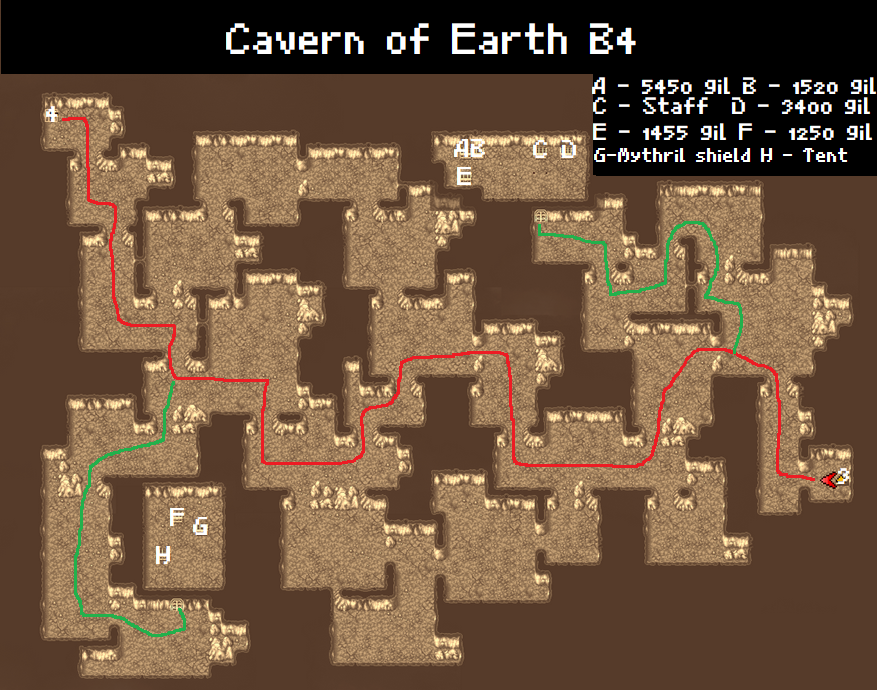
Cavern of Earth Pt.2 Recommended Level: 22+
Retracing your steps to B3 where you defeated the vampire, take the door on the right. Behind the room you will find a stone platform which will be removed using the earth rod. Descend to B4.
This floor contains two treasure rooms. One to the north which will require backtracking to the main path and one to the southwest, south of the exit. Once again these chests are most guarded by monsters. Take the stairs down to the final floor, B5 in the northwest of the map when ready.
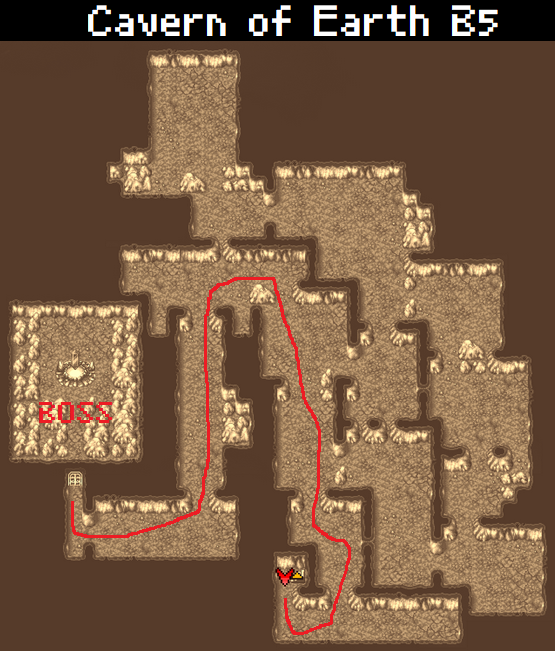
B5 is a simple floor. Head as far north as you can without taking a right until you can turn west and then south. Following this path will take you to the Earth Crystal's chamber at last. A yellow orb blocks our path and soaks up the magic of earth crystal, causing this corruption of the land. Use up your white magic to restore party health before confronting the boss and top them up with the Ethers purchased earlier. Interact with the orb to confront bestiary #49.
"I will not be disturbed by mortal men. I am the Lich... Fiend of Earth!"
Lich's high defence stat makes him resistant to physical attacks, he will also cast Haste to compensate for his poor Speed stat. He will also use spells to deal 100+ damage to your entire parts and strong single target attacks. The first of the elemental fiends is yet another undead enemy so Diaga and Firaga are your best choices when not casting Healara or Curaga. Your strongest physical attacker shoud continue attacking as usual while your remaining party member/s gives out Hi-Potions as required.
Our task here is complete, interact with the yellow teleportation circle behind the altar of earth. Save your game and rest in a tent before heading back to Melmond.
Fire Crystal (Crescent Lake, Mt Gulg)

"Where the Fiend of Fire passes, all is engulfed in flame..."
By now you should have the achievements for several story events, 100k gil and slaying 500 monsters. Now is also a good time to take on the 15 puzzle if you haven't already. This is described in the Secrets section.
Once rested, open up your world map and look for a section in the southeast of the world that resembles a crescent moon. This is our next destination. We will get here by sailing south from Melmond around the outside of the southern continent. You will know you are headed the correct way if you sail by Marsh Cave with it to the north of you as you continue heading east.
On your way you will pass by the southern port to Elfheim, this is a good place to stop off to stock up on supplies. With your comfortable cushion of gil you could now easily buy 99 potions (~4k gil) and 20+ Hi-Potions and Ethers. Having 10 of each status curing item is also a good idea with 5 cottages in reserve.
Keep sailing east and you will know you are close when you see desert to the north of you. Keep following the coast north until you see a port. Dock and disembark here. Head southeast, passing through the forest while following the south edge of the lake. You will find a way into the centre of the crescent on the west side of lake and within it, a walled town.
Crescent Lake Recommended Level: 24
Welcome to Crescent Lake. This is where Red Mages will start to have issues buying magic as they cannot use Level 6 spells. Thundaga, Quake, Protera and Exit are your priority spells. You may not be able to learn Exit untilyou upgrade into a White Wizard later in the game. There will be no need to purchase any mythril gear unless you are running a multi-warrior party as the upcoming dungeon has enough to gear one warrior.
Head through the gap in the northeast part of town and follow the path east into the forest attached to the town. Here you will find a group of sages who will tell you about the crystals, including Lukahn who wrote the prophecy of the Warriors of Light. They will tell you to return here when you have restored all of the crystals and the one in the southeast will give you a Canoe. Using this you can now traverse the dark watered rivers throughout the world. Exit the town.
Local Bestiary:
Ankheg
Pirahna
Crocodile
White Croc
Ochu
Hydra
Go west on the river until a northern path opens up. Go north and then east, then north and then east again. At the next fork in the river take the west path until you can follow the river south onto an island with the volcano Mt. Gulg surrounded by a moat. Cross the moat, rest using any spare tents or a cottage, save your game and head inside.
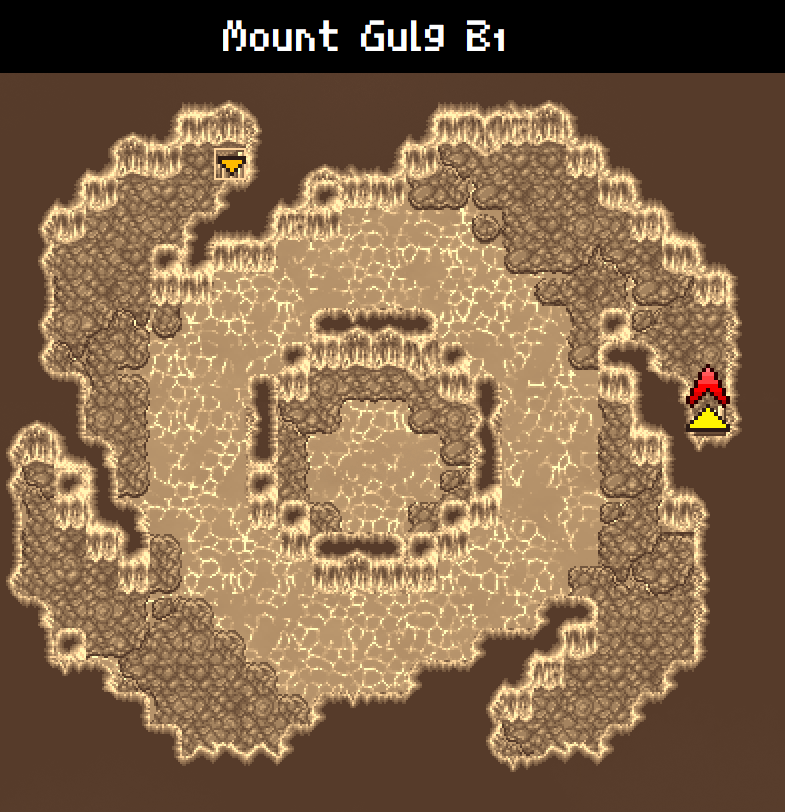
Mount Gulg Recommended Level: 25/26
Bestiary:
Ankheg
Horned Devil
Pyrolisk
Fire Elemental
Fire Hydra
Lava Worm
Hellhound
Fire Lizard
Fire Gigas
Red Dragon
Lava tiles will damage you every time you step on them but you cannot encounter enemies on them. Avoid them so we can fill up our bestiary, gil and exp. This floor is pretty simple so head to the northern point of the room, follow the northern wall west and head north to the stairwell as soon as you can. Don't forget to use your leftover regular potions to top yourself back up.
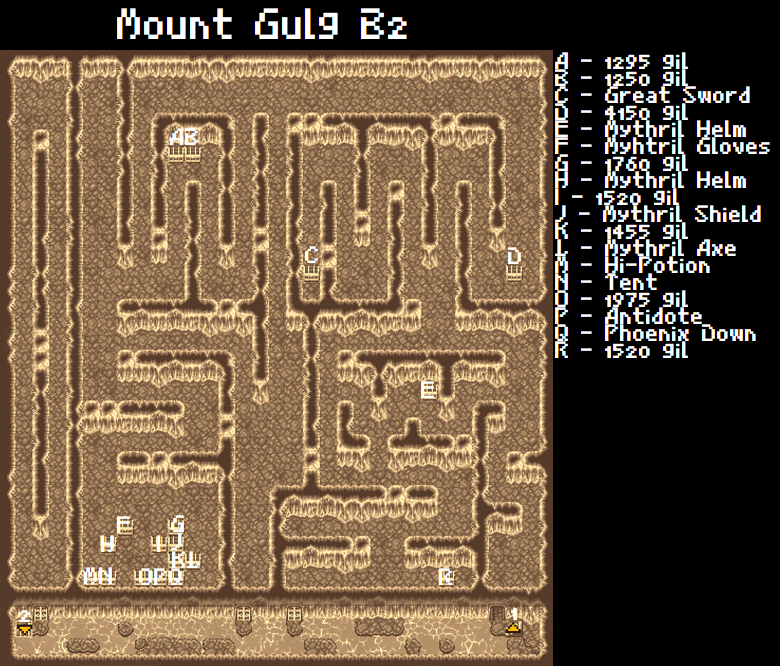
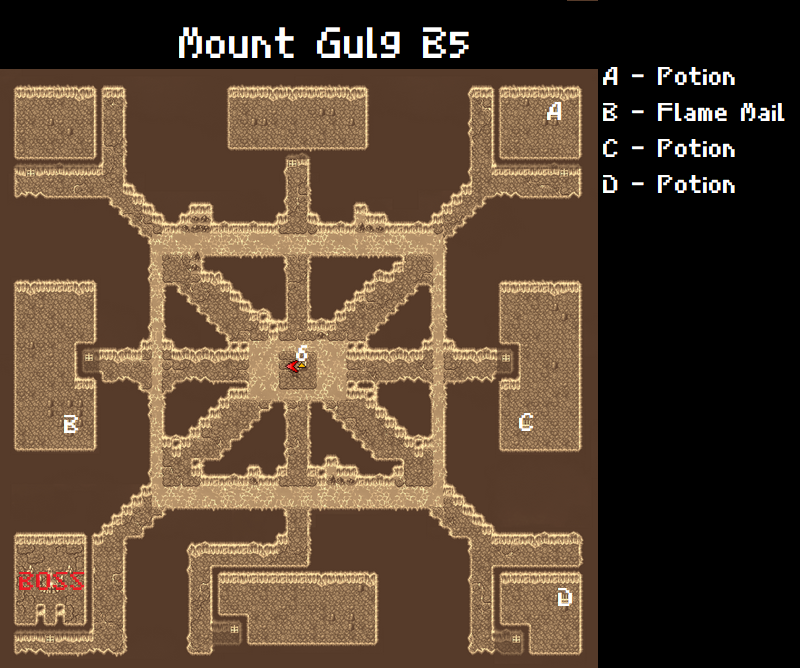
The best way to collect all of the treasure in this room is to enter the nearest door and sweep anti-clockwise, beginning at chest E, heading north to C then East to D before following the northern corridoor , taking the second south to reach A and B before continuing south to the main treasure room. There is an enemy NPC here that will fight you when interacted with, we will be doing this for bestiary, exp and gil. Clean out the treasure room them exit via the door to the immediately Southeast, entering the door to the East and heading further east to take the final chest. Exit the door and head east to the stairwell down to the upper portion of B3.
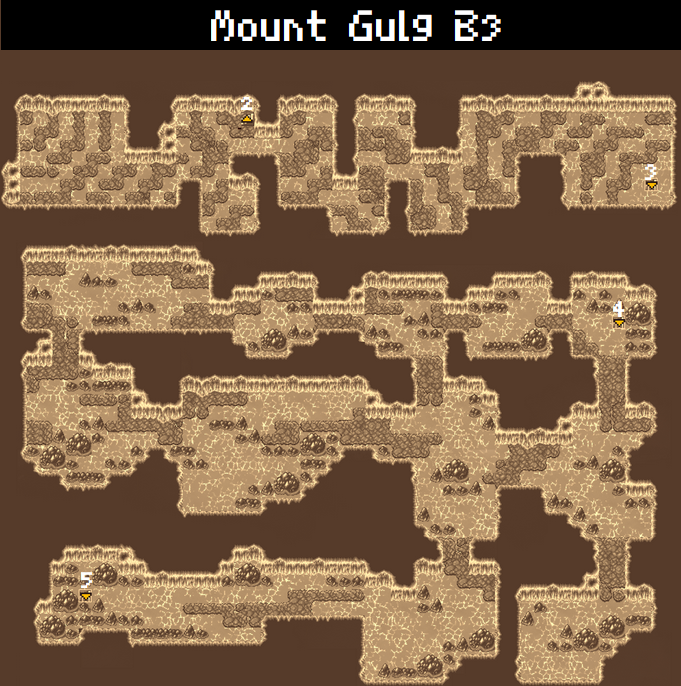
There is no treasure on this floor. This is a straightforward part of the floor designed to make you accustomed to the idea of jumping between panels constantly. Head East to find the staircase to descend to B4.
As seen on the image below there will be a short section of B4 which you should head southeast through to come back up to B3's lower section. From the stairs head south, west, then south again before following the west path to the end.
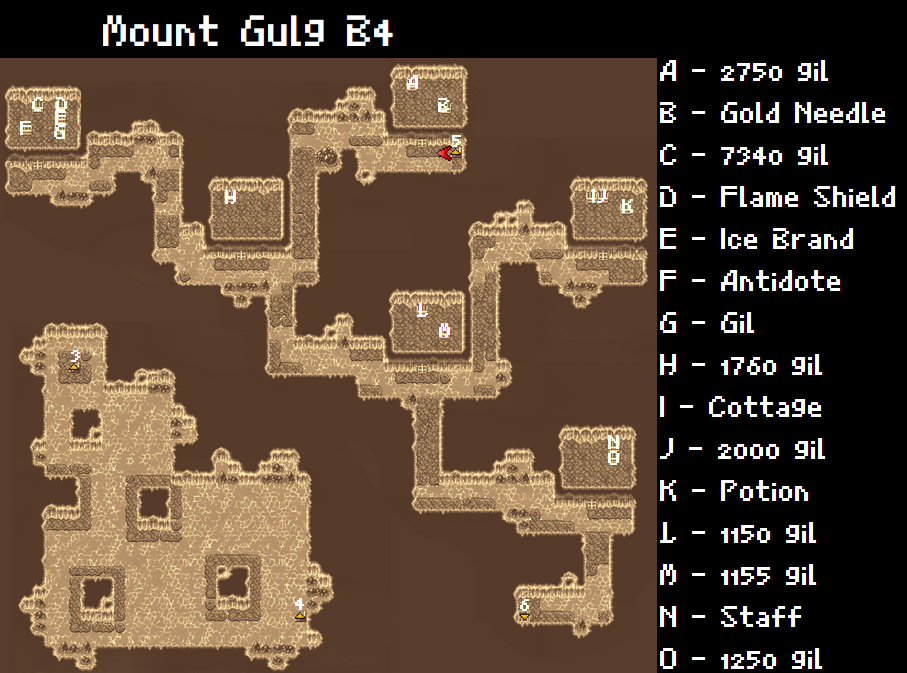
This is one of few areas in the game where the end of every path results in a reward. Clear out all of the treasure rooms in descending order and by the time you reach the stairs you should have everything. Make sure to give the flame shield to your warrior and the ice brand to your red mage. If you do not have one, also give it to your warrior.
We're back to being baited with dead end and fruitless corridors. Visit the Northeast, west, east and southeast rooms to scoop up the treasure on this floor. Equip your warrior with Flame Mail and head for the southwest room.
Another crystal awaits with another orb. Use your phoenix downs, hi-potions and ethers to get your party back to full fighting strength. Quick Save from the menu and get ready to take on bestiary #67 when you interact with the orb.
"Those who oppose me shall burn in hellfire!"
Marilith has high HP and will cast the highly damaging fire spell Firaga, couple with hard hitting single target attacks and is also not weak to ice. A fun skip around is this is her weakness to sleep, silence and confusion spells, meaning she will be functionally incapable of damaging you effectively. Failing access to those spells, cast NulBlaze as soon as possible to halve the damage from her magic. Casting Temper on your highest damage attacker is also a good idea. Keep your white mage spamming healing spells.
Once #67 is defeated the fire crystal will be revitalised. Interact with the red teleportation circle to exit. Once outside, revive any incapacitated party members and use a Cottage to fully heal before saving the game and preparing to return to Crescent Lake to restock again.
Upgrades (Cavern Of Ice, Ryukahn Desert, Citadel Of Trials, Dragon Caves, Gaia)
"After a long journey, four young travellers did at last appear..."
Having restocked at Crescent Lake, sail your Ship further north to the next dock. Canoe along the river and go northwest to reach a cave. It's time to upgrades so we can progress.
Cavern of Ice Recommended Level: 30
Bestiary:
White Dragon
Winter Wolf
Mindflayer
Ice Gigas
Specter
Remorazz
Dark Wizard
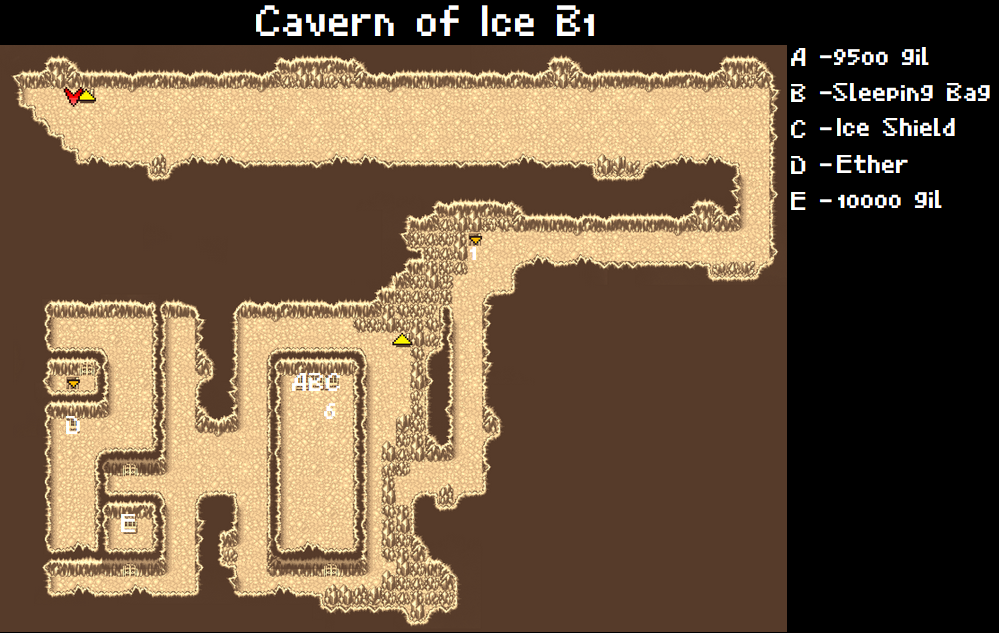
This dungeon is short and simple, based mostly around falling through cracks in the ground. Fire magic will serve you well here. Follow the corridor and take the stairs down to B2. You will be able to retrieve the treasure later in the dungeon.
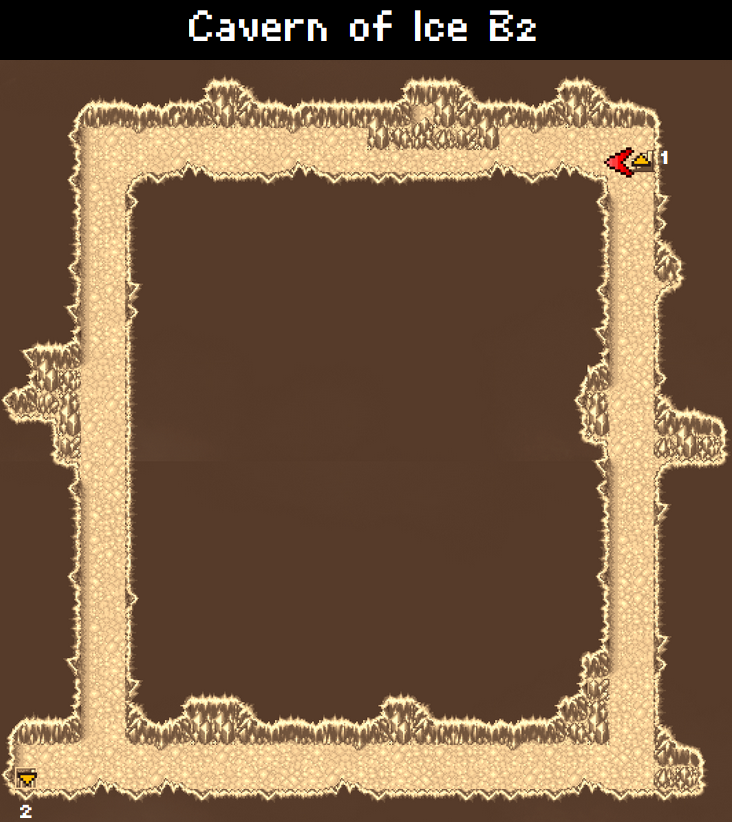
An extremely simple, square shaped room. Take either path and when arriving at the southwest corner, go down the staircase to the west half of B3.
The west portion is maybe the simplest room in the game. You walk those 4 steps like you mean it to access southern B2.
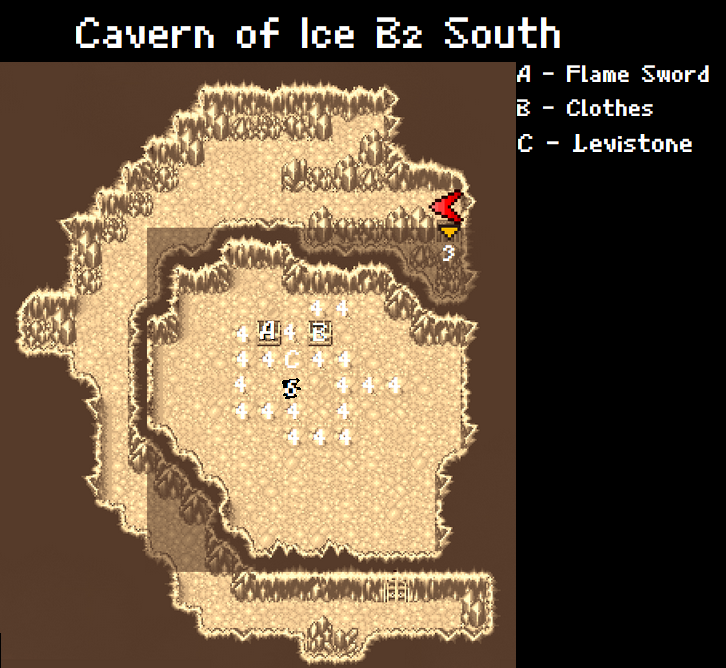
Follow the path down to a doorway at the south of the floor and walk through it. In front of you will be the goal of this dungeon, the Levistone key item. Carefully walk around the cracks in the floor to loot the chests and equip the flame sword immediately, it will give you a heavy advantage in this dungeon. Stepping on any of the cracks (marked 4) will send us down to the eastern portion of B3.
When you arrive in the eastern portion of B3 an NPC will block your exit. Talking to them will cause a random encounter. After winning you will be able to move into the rest of the floor. Walking across the dark ice spikes will cause damage just like lava so use regular potions to top off. Make sure to loot the northwest and far south treasure rooms before taking the exit to the southeast.
The exit will leave you up on B1 with a treasure chest nearby, another treasure room to the south and a second treasure room to the east with a crack in it. Once you're finished looting, stand on the crack to be dropped down in front of the Levistone. Do not move! Open your menu and use up those potions and ethers, quick save and then step forward to engage bestiary #75.
Evil Eye is a trivial boss. It possesses a lot of lethal spells such as Kill and Death, though it will cast Thundara and then Hold before attempting those. It may alternatively use the skill Gaze to cause damage, stun, stone or death. Thanks to its poor defences, low HP and lack of specific weaknesses or defences it will go down within a couple of hits and spell casts at worst.
#75 defeated, take the Levistone and work your way out of the Cavern of Ice. Use a Cottage and save your game before heading south of Crescent Lake, around the mountain range and into the desert to the west.
Ryukahn Desert
Upon entering the desert a small cutscene will play. The party will bring out the levistone and make use of it to part the sands and pull up a most valuable craft from beneath it. Congratulations, you now possess the Airship! This allows you to travel over mountains and land in any large enough green grassy area on the overworld.
Stock up again, this time with your assumed excess of gil increasing the stock of ethers and hi-potions to 20-30. Don't forget to refill your stock of cottages. A main benefit of the airship is now being able to use the cheap Corneria inn and resurrection service at your discretion.
This is your final reminder to engage the 15 Puzzle minigame on the regular Ship, listed in the secrets section.
Restocked and resupplied, fly to the northwestern continent shaped like a bird. Fly west of the desert, following the land to find two peninsula, one with a castle on it and another with a small patch of land where you can land your airship. Land it there and walk up along the wing of the bird continent and back down to the next location, making sure to cross the river north of the mountains and not enter the desert of try to pass by the forest to the south.
Use a cottage, save, and enter the citadel.
Local Bestiary:
Sabertooth
Basilisk
Weretiger
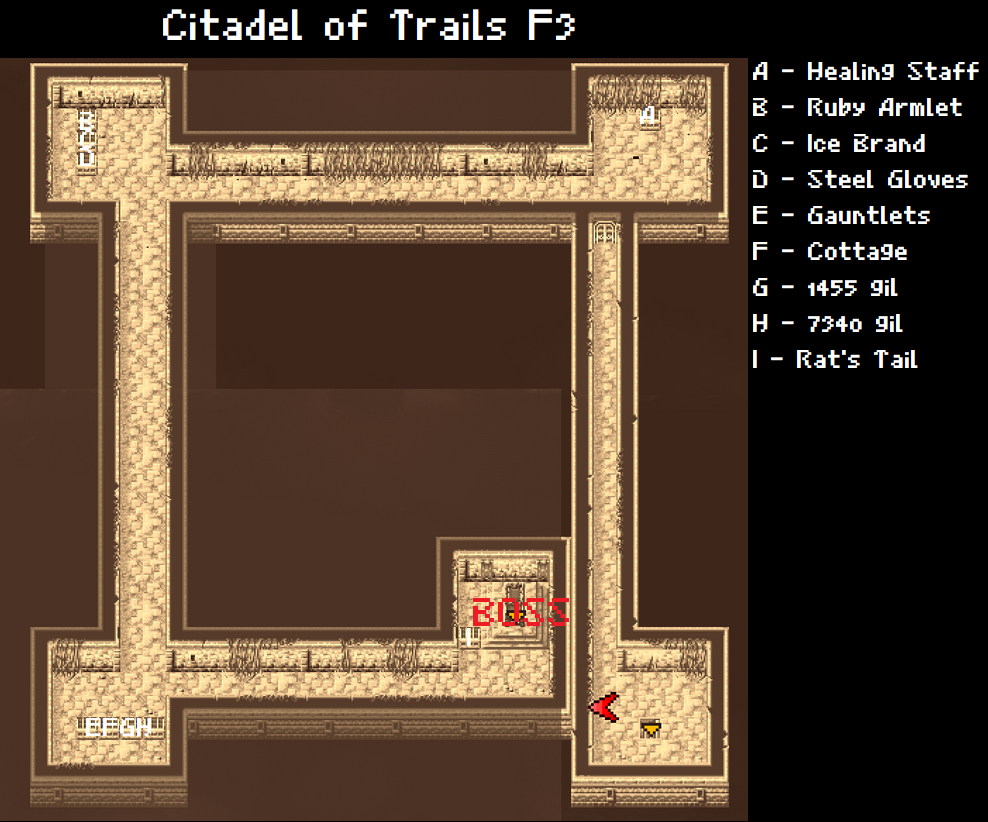
Citadel of Trials Recommended Level: 32/33
This is a teleport puzzle dungeon. Heavy guide map usage is advised.
Bestiary:
Mindflayer
King Mummy
Medusa
Rakshasa
Clay Golem
Nightmare
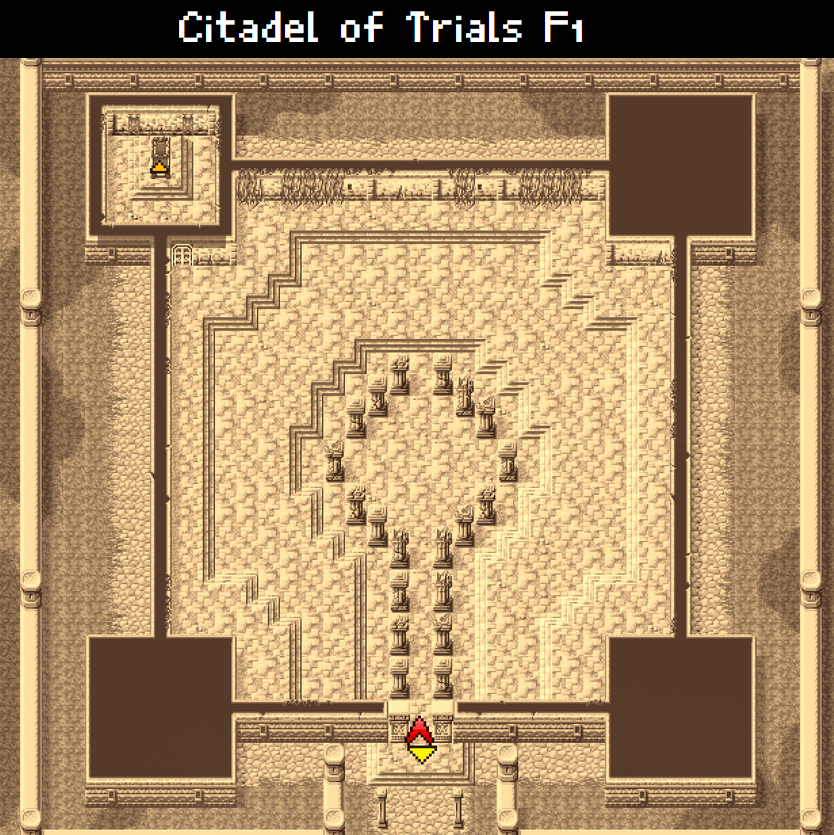
For this first floor, walk forward into the centre of the room to speak to the sage. He will approve of you for carrying the crown and encourage you to attempt the trials. Move on to the northwest room and sit on the throne.
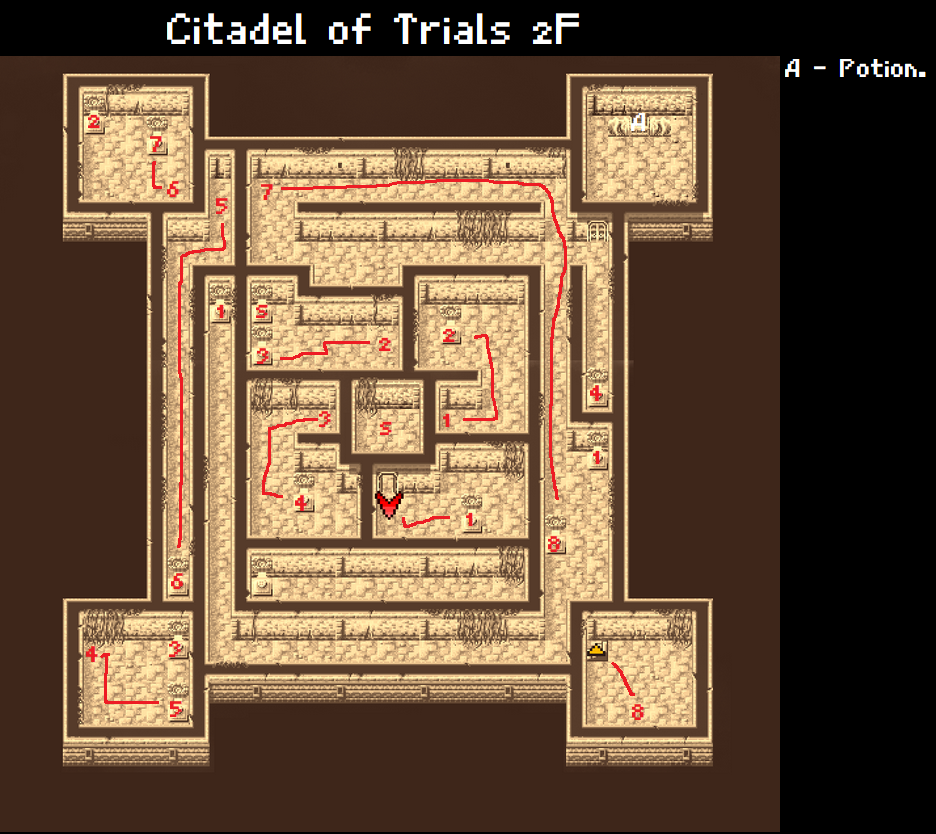
This floor of the dungeon is the teleporter heavy puzzle. Please follow the image and make sure to loot the chest in the northeast of the room as you pass it. Take the stairs up at the end to floor 3.
THis final floor is straightforward. Most chests are guarded by monsters and an NPC enemy blocks the doorway and the throne. After you have looted the citadel of the last of it's treasures, use your potions, ether and quick save. Prepare to face bestiary #92.
Another easy boss. They have no particular attacks of note and being undead are highly vulnerable to fire and dia spells.
Once you have defeated them, climb onto the throne and exit. Use a cottage and save as usual. After this, return to the airship, using a tent or cottage as required and take off. Fly west to the archipelago with holes in them and disembark.
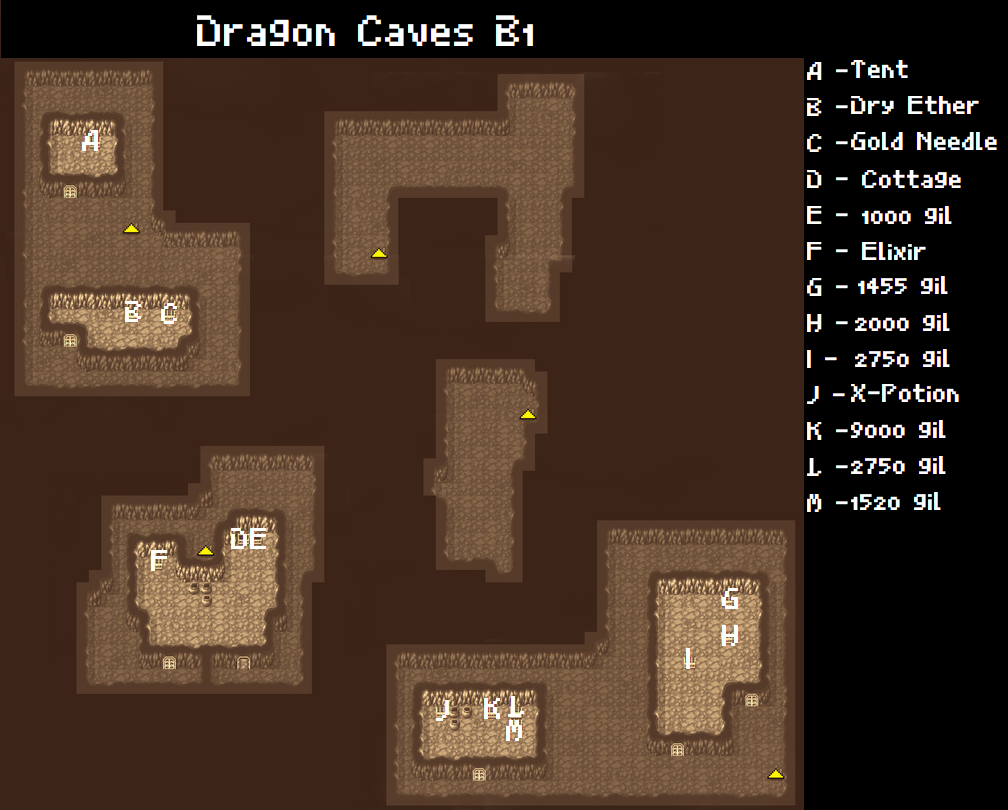
Dragon Caves
Most of these caves are simple loot rooms so don't hesitate to clear them all out. The one exception is a lengthy hallway leading to Bahamut, king of dragons. He is so impressed with your Rat's Tail, the evidence of conquest of the Citadel of Trials that he upgrades your party to their advanced jobs!
Be sure to equip the Gauntlets on your Knight if you have one. While you're at it, optimise everyone else's gear too and keep your Masters unarmed.
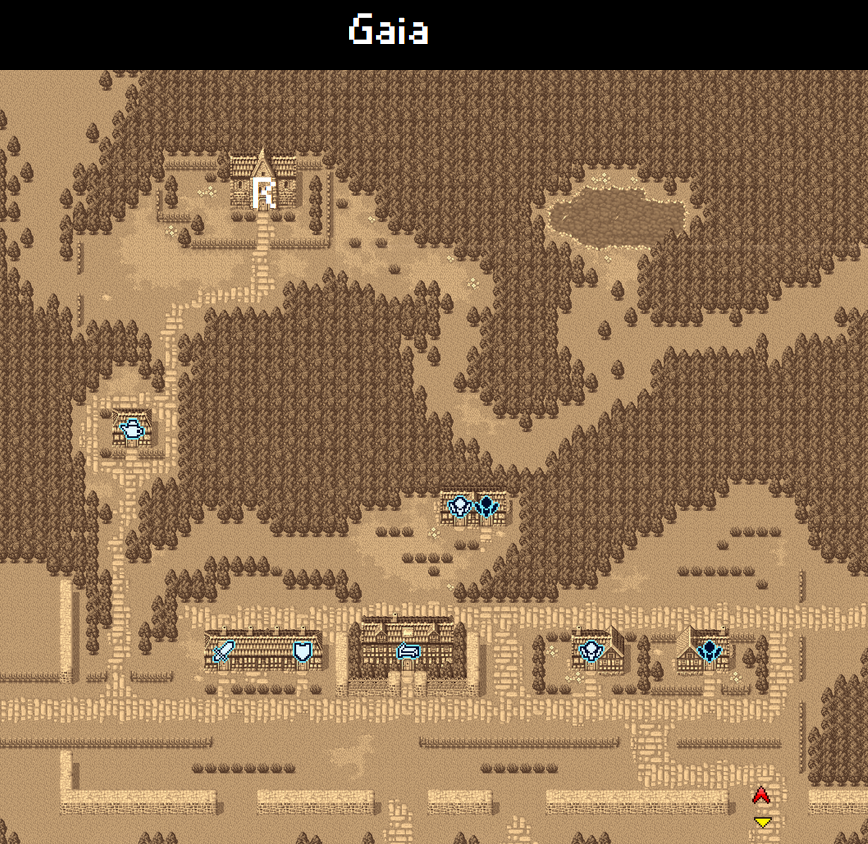
Exit and take to the air again to take a detour down to Crescent Lake to pick up the Exit spell and restock. Now is a good time to purchase magic for Knights (lvl 4 white), Ninjas (lvl 4 black) and Red Wizards (lvl 7 white/black). Fly to the northwestern continent and find a desert with a patch of forest and a mountain range to the north. Land below the forest and cross the desert, heading for the patch of desert next to the small patch of forest. You will enter the Caravan by walking around on it. Purchase the bottle faerie for 40k gil. Return to the airship and fly to the "head" of the bird continent and land in the mountain range next to the town. Save your game so as not to lose your progress and enter it.
Gaia
Entering the town the bottled faerie will escape. She will be to the north, following the forest path to the spring.
This town will at long last offer light armour upgrade options in the form of Ruby Armlets. Purchase these for each member of the party that can equip them, though you should already have 1 from the prior dungeon. Purchase and equip protect rings also. Cat Claws also make for an excellent Black Wizard weapon. Curaja, Holy, NulAll, Dispel and Blizzaga are your priority spells. If you can't afford Holy, Diaja will do for now though you should return when you have the funds. Speak to the faerie to receive oxyale, a key item that will allow you to breathe underwater.
Leave Gaia and return to the desert on the western continent.
Water Crystal (Waterfall Cavern, Onrac, Sunken Shrine)

"The seas rage..."
Instead of entering the desert, canoe your way up the river to the east of it until you can enter a waterfall. Save your game outside of it.
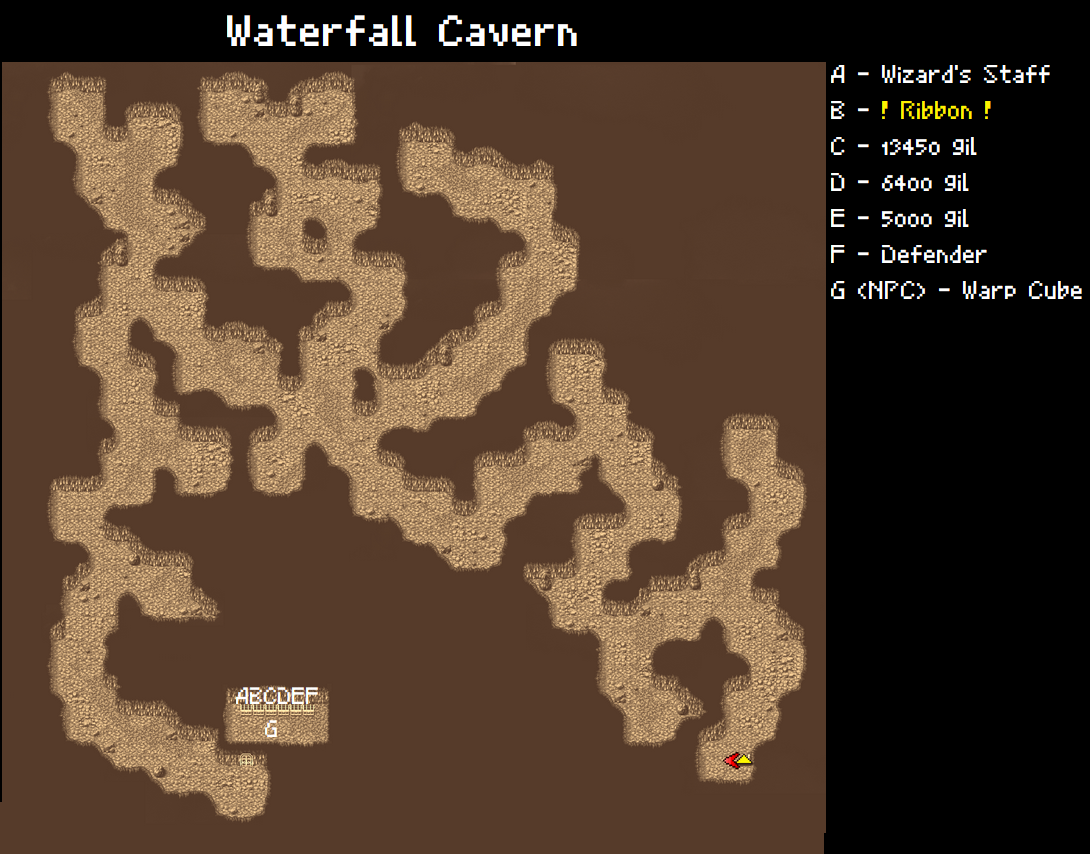
Waterfall Cavern
This ia short and sweet location that is technically part of the Air Crystal quest line but we'll be headed here early for an important piece of armour. Head north from the entrance then take every western path that you can until you hit the far western wall where you can only go north or south. Head south and enter the door to find a robot and six chests. Talking to the robot will yield the Warp Cube and an ominous warning about Tiamat. The Ribbon is the best piece of head gear in the game, halving all elemental damage from spells and skills. As this is your first ribbon, it is best equipped on your designated healer so that they can keep the rest of the party alive or pick them back up after heavy attacks. The Defender is also excellent for your Knight.
Exit the cave and row your way back down the river, heading east into the forest and north to our next town.
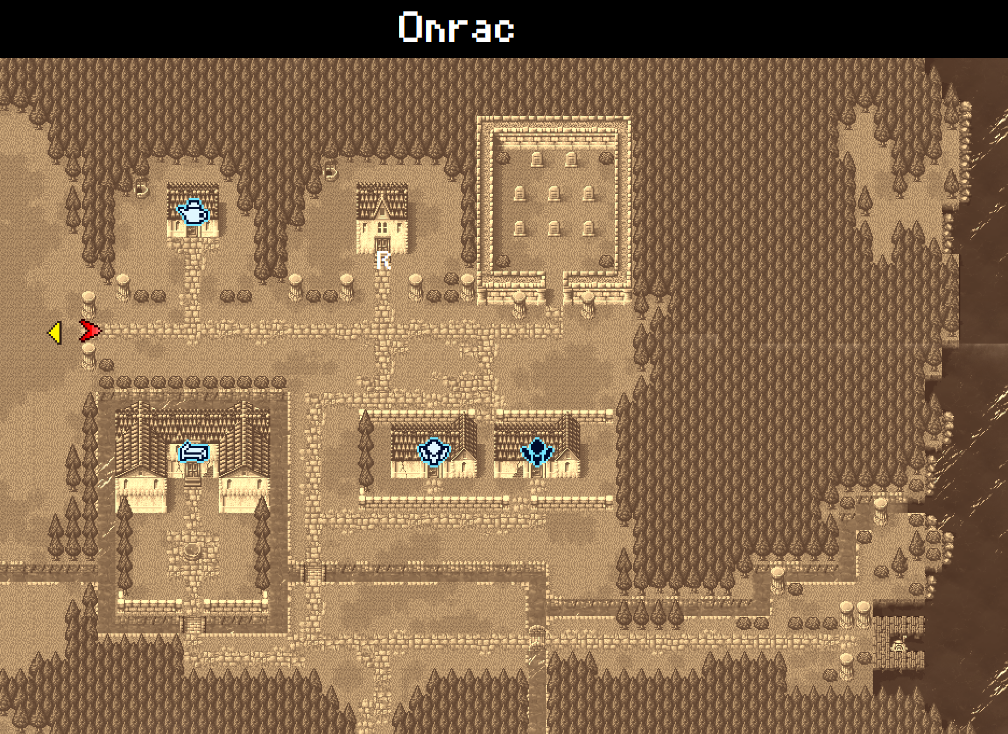
Onrac
Here in Onrac you can pick up the fancy spells Healaga and Saber. Saber is an improvement over Temper and Healaga is the next up from Healara in terms of HP restored. Sleep at the inn then go back outside and save before re-entering. The townspeople will speak of the robot we just met falling from the sky (Laputa, anyone?) and talk about oxyale. One dancer in town even seems to be amazed by having legs and another mentions a researcher named Unne seeking out the Rosetta Stone.
When you're prepared to move on head for the southeast of the town. A woman will identify you as the chosen ones that carry oxyale to save the mermaids and move away. Enter the barrel and you will sink beneath the surface of the ocean.
Sunken Shrine
Being on the sea floor, thunder spells work well on everything here. Remember the Gauntlets from earlier? If you use the Item command and use them, they will cast Thundara on the enemies here. This will be an effective way to exploit a weakness and save MP.
Bestiary:
Sahagin Chief
Sahagin Prince
White Shark
Deepeyes
Ghost
Sea Snake
Sea Scorpion
Sea Troll
Water Elemental
Water Naga
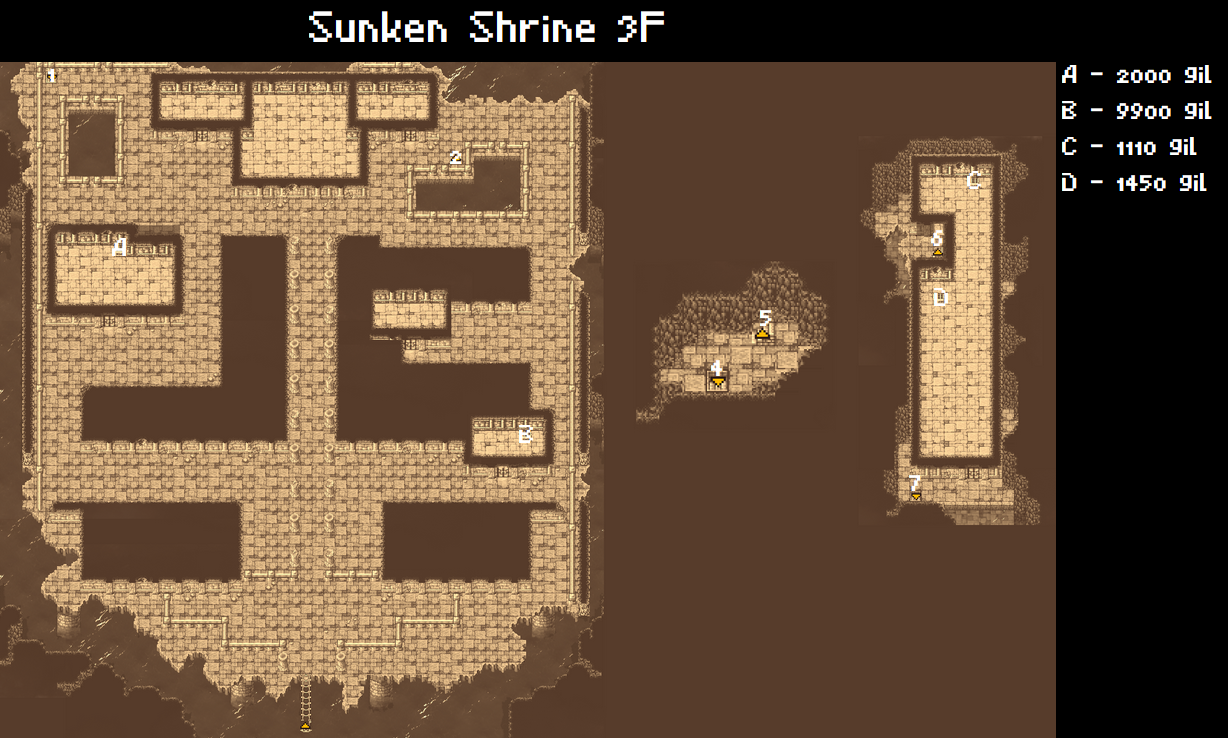
With this dungeon we enter at the western section of 3F instead of B1 or F1. Climb the rope ladder from the barrel and move past the marble railing, heading east of the pillars to a door. Take the treasure here before heading west of the pillars and then north to the next treasure room. We have two options, to go up or down. Heading down will lead us towards the Water Crystal and the end of the dungeon so to fill out our bestiary and treasure achievements we will head up. Take the staircase in the northeast of the room to 4F.
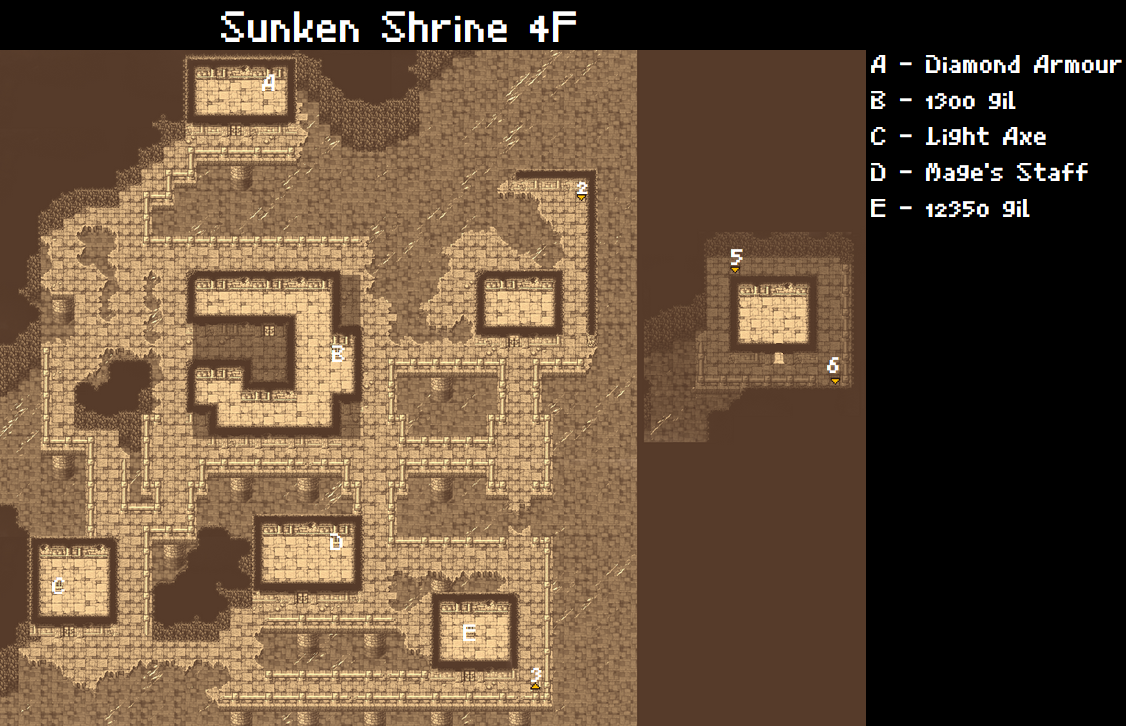
Each room of this section of the floor contains treasure except for the one immediately south of the stairs you just came down. Head west past it and north around the next room, continuing north to hit the topmost room of the floor and commence looting. There is the larger room to the south and three more southwest, south and then southeast of the larger room. Make sure to equip your warrior with the Diamond Armour. Once you have done this, take the staircase in the southeast corner up to 5F.
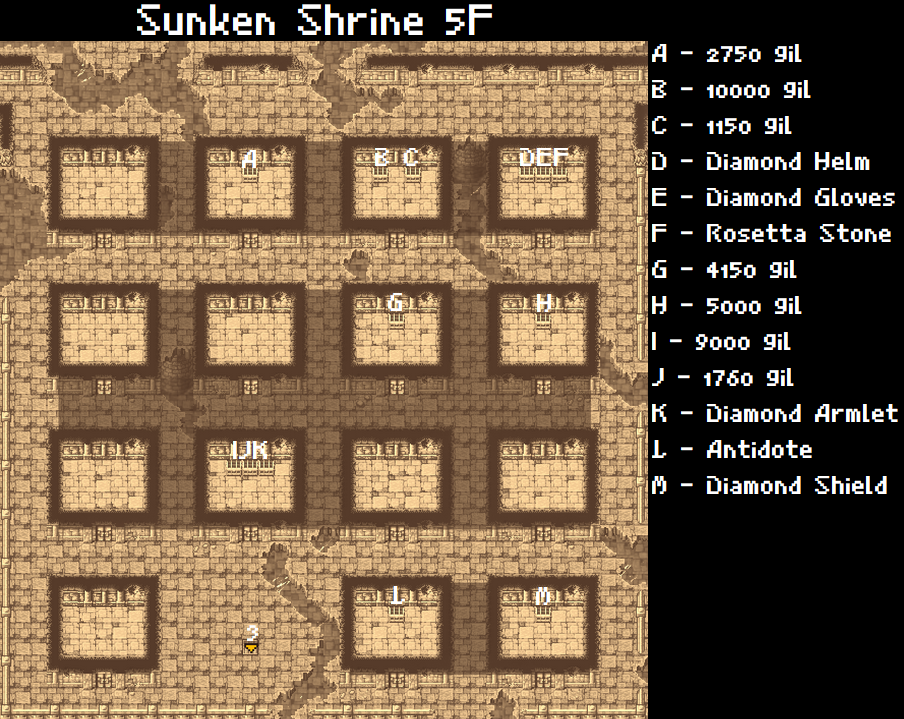
5F is treasure and lore rich. This is the floor the friendly NPC mermaids inhabit. This room is made up of a 4x4 grid of rooms with various breaks in the floor barring your way. Treasure can only be found in certain rooms as shown in the map image. To access the Northeastern room you will need to take the path off to the side at the northwestern most point of the room as it loops back around, providing access. Give your warrior the rest of the diamond equipment and give the Diamond Armlet to your party member with the lowest HP total that does not have a Ribbon equipped. Head back down the F3 and take the staircase leading downwards.
You will come out on the eastern section of this room's map. Head north and take the lengthy route up the side rooms of the higher floors, making sure to loot along your way before eventually being brought back to 2F, staircase 7. There are 4 room on this floor to loot, one being directly to the south of you, another to the north and two more roughly lined up with those two rooms to your west. Head to the one north of you first to acquire another Ribbon and equip it onto your lowest HP party member excluding whoever already has a Ribbon. Once you have looted these rooms, take a look at the Giant's Gloves. They cast the spell Saber when used as an item, raising attack and accuracy. These will be important to use to buff your strongest physical attacker and should now be made part of your opening moves. Remember these whenever I call for you to cast Saber in a boss battle to conserve MP. Go to the northwest of the room and take staircase 8 down to F1.
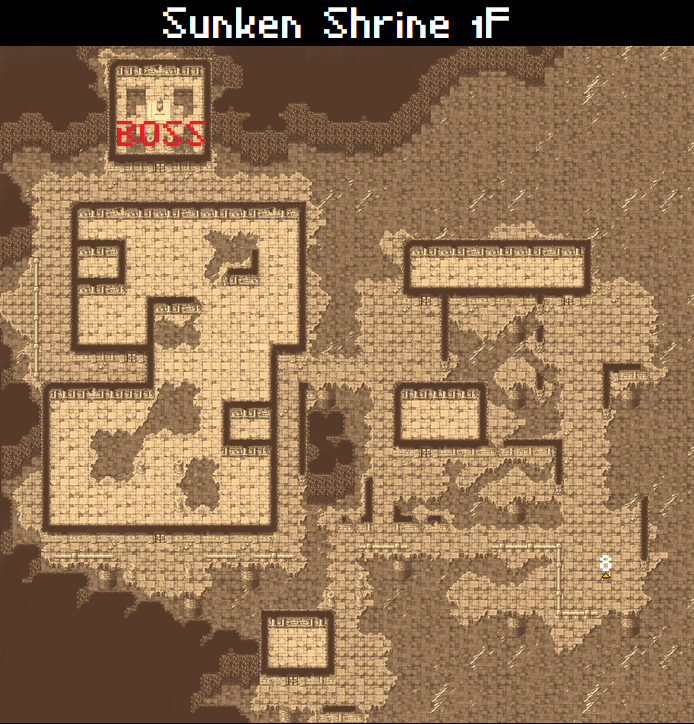
F1 is mostly a decoy. After so many rooms filled with treasure, this floor carries none. Head west past the railing and take the first north you can without entering a room. Take the next west and follow the path until you can enter the large room. Head north through it and exit the door around the corner to your west, following the path to the final room where bestiary #102 awaits. Heal up with potions and ethers, open the menu to quicksave and interact with the blue orb.
"Fools! These dark depths shall be your tomb!"
#102 relies on physical attacks, hitting up to 8 times. He has a 25% chance of using Ink which will attempt to Blind all party members. He also has high magical defence. Have your strongest physical attackers use the Giant's Gloves to cast Saber while your mage of choice casts Protera, followed by Invisira. If you have a Black Mage, spamming Thundaga is still a good idea to exploit his weakness though if you feel the damage is lacking, casting Haste and Temper on other party members is your best course of action. If you decide to go this way, have them Haste your healer of choice followed by your strongest physical attacker.
Now that the water crystal is restored, interact with the blue teleportation circle to exit. You will teleported outside of Onrac. Rest however you see fit, be it a cheap stay at Corneria, Onrac or a Cottage then save your game. Restock and prepare to head to the next location.
Wind Crystal (Melmond, Lufenia, Mirage Tower, Flying Fortress)

"The winds die..."
Fly south back to Melmond and stock up heavily on ethers (50+)
Melmond
In the graveyard to the northeast of town the researched Unne awaits. Speak to him and he will use the Rosetta Stone key item tot each you the language Lufenian. Fly up towards Gaia and south of it at the shoulder of the southern "wing" of the bird continent there is a small patch of land between mountains and a forest. Land here. and walk down along the wing until you reach a town.
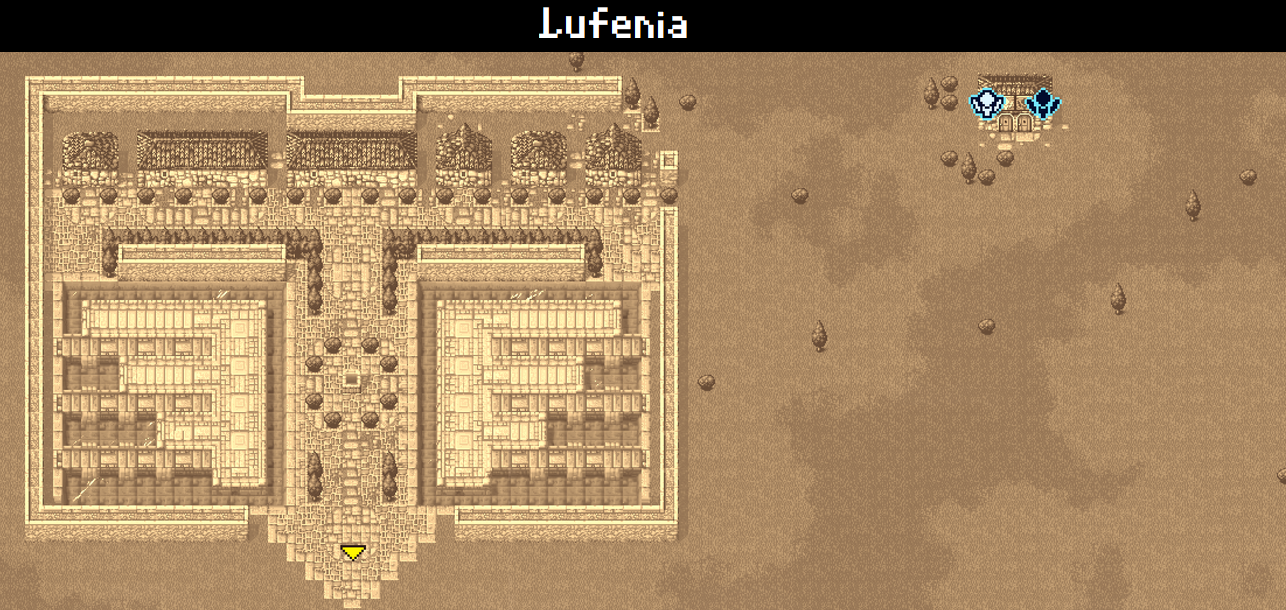
Lufenia
Lufenia is the final town in the game! We've nearly filled out our world map. On the eastern waterways of the town you will learn about five warriors that came before you and were turned into bats by the 4 Fiends and how the Fiends are controlled by another entity. You will also be given a Chime key item to access the flying building at the peak of Mirage Tower. Make sure to purchase Full-Life, a spell that revives party members with full HP and Flare, the strongest and most damaging black magic. White magic and ethers should be your main out of combat but still in dungeon healing method.
Fly to the south of the desert to your west and land on the grass. Make your way to the tower in the middle of the desert. This is an excellent spot for training if you have fallen behind. Rest up and save before heading in.
Local Bestiary:
Sand Worm
Tyrannosaur
Baretta
Allosaurus
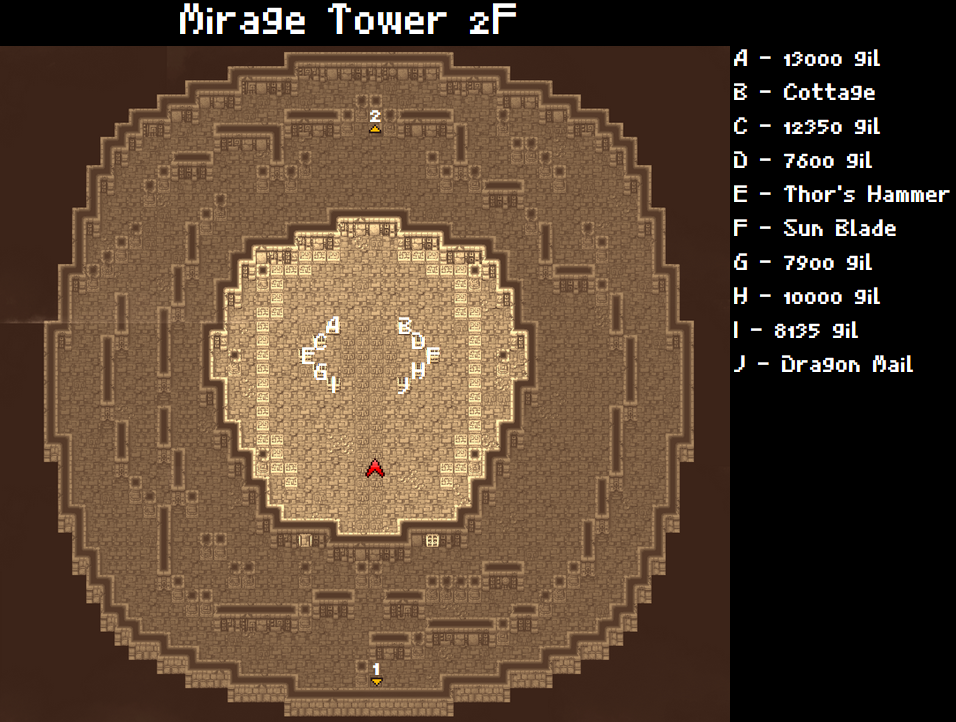
Mirage Tower Recommended Level: 41
Blizzara will help cut through the encounters. Physical attackers should attack normally with the healer using Thundara through the Gauntlets until healing is needed. Use Ethers are required to restore MP.
Bestiary:
Black Knight
Blue Dragon
Chimera
Guardian
Hellhound
King Mummy
Mummy Nightmare
Wyvern
Go straight through the door and enter the gap in the walls. Follow the west wall and head east as soon as possible, following the loop and snatching up the treasure. Equip the Aegis Shield to your Knight if you have one, it will nullify stone and poison. Exit via the western of the southern doors and go up to 2F.
Follow the spiral heading east and enter the gap norhteast, then the northwest gap. Head east from that gap to enter the next, following the wall south to enter the main treasure room of the tower. Give Thor's Hammer to a White Wizard and the Sun Blade and Dragon Mail to your Knight. The Dragon Mail will reduce elemental damage from fire and ice by half.
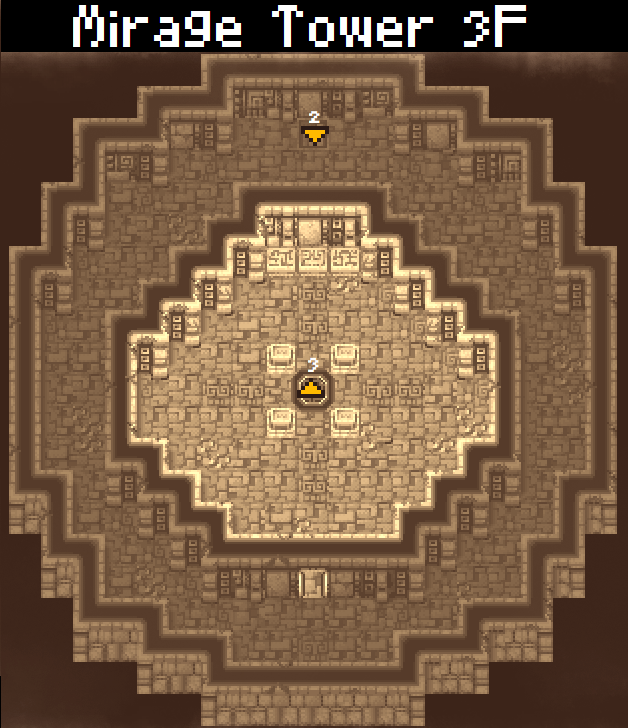
This floor is short and to the point. Enter the room from the south and defeat the Blue Dragon NPC. Use the warp cube on the central panel to ascend to the Flying Fortress.
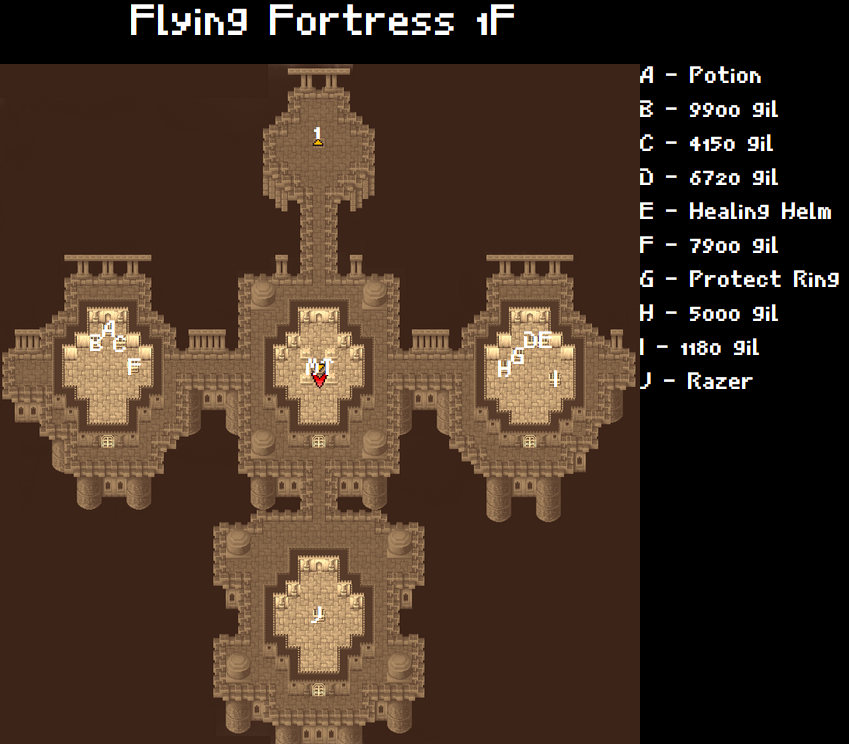
Flying Fortress
Bestiary:
Air Elemental
Black Flan
Chimera
Dark Fighter
Death Knight
Earth Medusa
Fire Hydra
Manticore
Neochu
Soldier
Spirit Naga
Stone Golem
Vampire Lord
Warmech
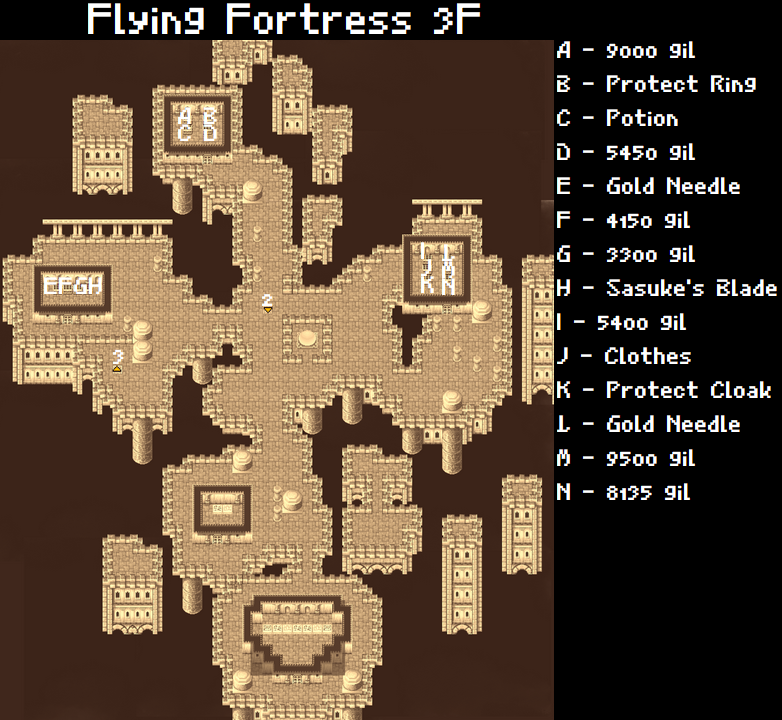
This dungeon is mostly arranged like a clock face.West, East and South there are treasure rooms. Plunder them and then go north to ascend to 2F.
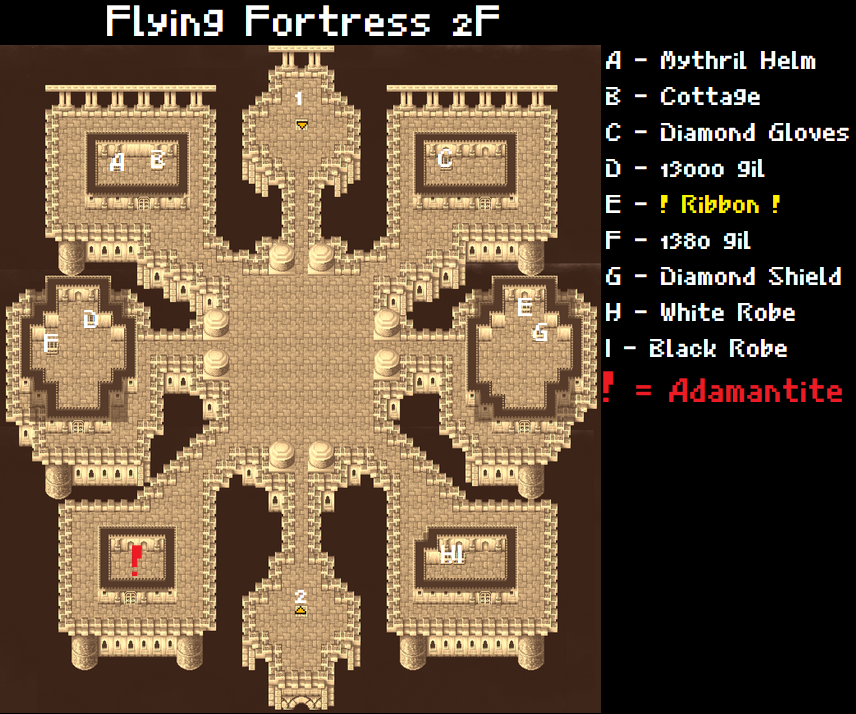
Another, slightly more complex clock face. The southwest holds the most important treasure, adamantite for forging excalibur. Head East next to seize the last ribbon of the game and put it on the next character. Do not put these on Knights if you can help it as they have other defensive options. Outfit your wizards with the correct robes for them, moving the diamond armlet if necessary to another character to even out defences. Progress to 3F by heading south into the light.
If you have a Ninja, this floor is perfect for you. North, East and West have treasure rooms with the south only containing a cluster of computers complaining about Tiamat having no weaknesses. Go west to get the Sasuke's Blade for Ninja and equip it immediately. If you don't have one, don't worry too much. Once you have collected all of the treasure, equip your healer with the protect cloak and go to the south half of the east platform to progress. I would recommend interacting with the orb in the centre of this floor for a neat mini cutscene.
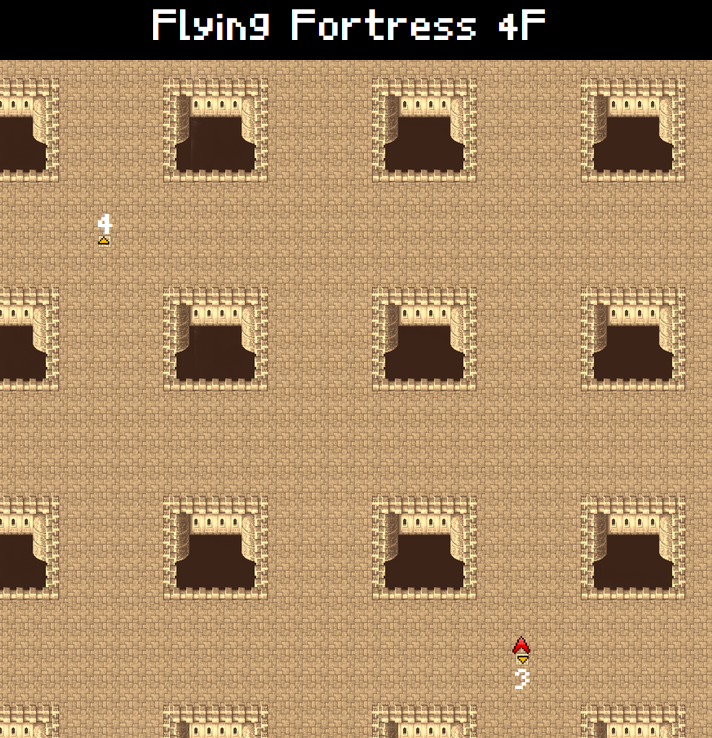
This floor is an endless loop of identical scenery. Luckily, we know the way. HEad north two holes then keep heading east until you see the teleporter. Step into it.
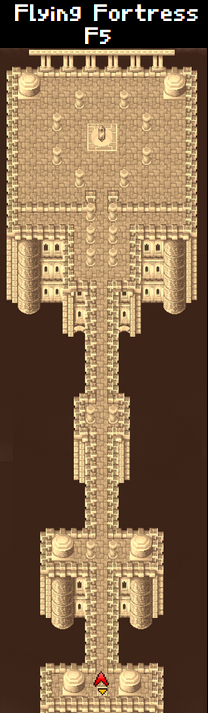
Immediately recover all HP, MP and quick save. #119 is not the threat here. A 3/64 chance exists on the bridge ahead of you that the superboss Warmachine/Death Machine may spawn. While killing it is necessary to fill the bestiary, be warned it will not be an easy fight. Details on fighting it can be found in the Secrets section.
Progress north along the only path and prepare to fight bestiary #119.
"May the image of Tiamat, the Fiend of Wind, be the last to burn in your eyes!"
She resists fire, thunder, lightning and quake. She will also cast Thunderbolt, Poison Gas, Icestorm and Blaze. Healara upwards are the best counters to her spells. However, she is weak to poison and petrification. If you use the Razer acquired earlier from the Item menu it has a chance to instantly kill her. Failing that, Holy and Flare are good options, as is the usual Saber buff for your physical attacker.
Congratulations on restoring the final crystal! However as we saw from the viewscreen, not all is well...
Rest up and save your game.
2,000 Years Of Chaos (Past Chaos Shrine)


"The world lies shrouded in darkness."
We seem to have revitalised the 4 crystals and yet, the game still continues.
It is time to prepare for the final confrontation.
Head to Mount Duergar and speak to the smith, surrendering the adamantite in exchange for Excalibur, the strongest weapon in the game. Equip it to your Knight if you have one and enjoy your achievement! You may need to fight a battle for the game to trigger the achievement afterwards.
Here is your shopping list:
99 Ethers
99 Hi-Potions
99 Phoenix Downs
1 Cottage
Cat Claws (If you didn't already purchase them for Black Wizard)
Holy
Flare
Full-Life
Curaja
Healaga
Diaja
Exit
I am aware some of this was advised earlier but now is the time to get it if you have not already.
For anyone hunting Warmachine, be prepared to spend a long time on that bridge and try to hit level 50 first. By now you should have all but three or four achievements in the game, that of level 50 characters, 100% bestiary, the final story achievement and the mastery achievement for earning all others. If you have not finished your bestiary up to the final dungeon (the last entry before this is 119), please save your game and visit Extras in the menu to find the gaps in it and visit my achievement guide linked below to find your missing monsters instead of backtracking through this guide. The guide below has Ctrl+F friendly bestiary.
https://steamcommunity.com/sharedfiles/filedetails/?id=2560789101
Hard grinding exp in the final dungeon or Flying Fortress is the easiest way to hit 50 at the moment as fixed/guaranteed tile encounters are now patched out or turned into NPC/monster-in-a-box encounters. Warmech gives the most exp per fight but is rare and a superboss. Outside of the final dungeon, Tiamat's bridge is the recommended grind location until the community finds another.
When you're ready or want some better equipment before taking on warmech, head to the Chaos Shrine and touch the dark crystal. You can speak to the bats here before touching the crystal if you wish to learn more about what is happening before stepping onto the altar.
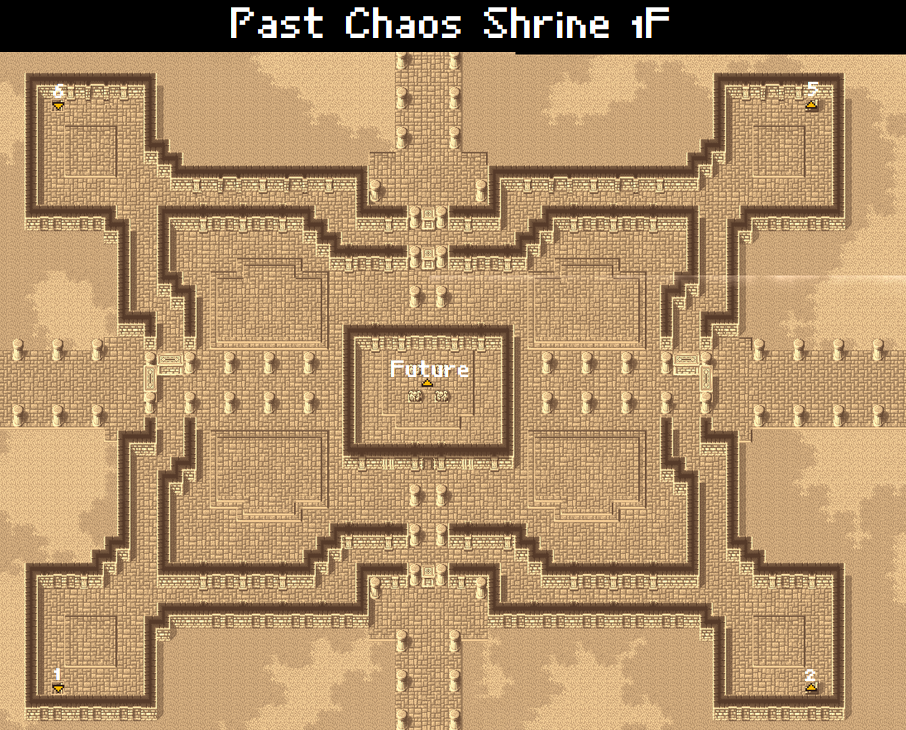
Past Chaos Shrine Recommended Level: 45-50
Bestiary:
Rhyos
Death Eye
Purple Worm
Iron Golem
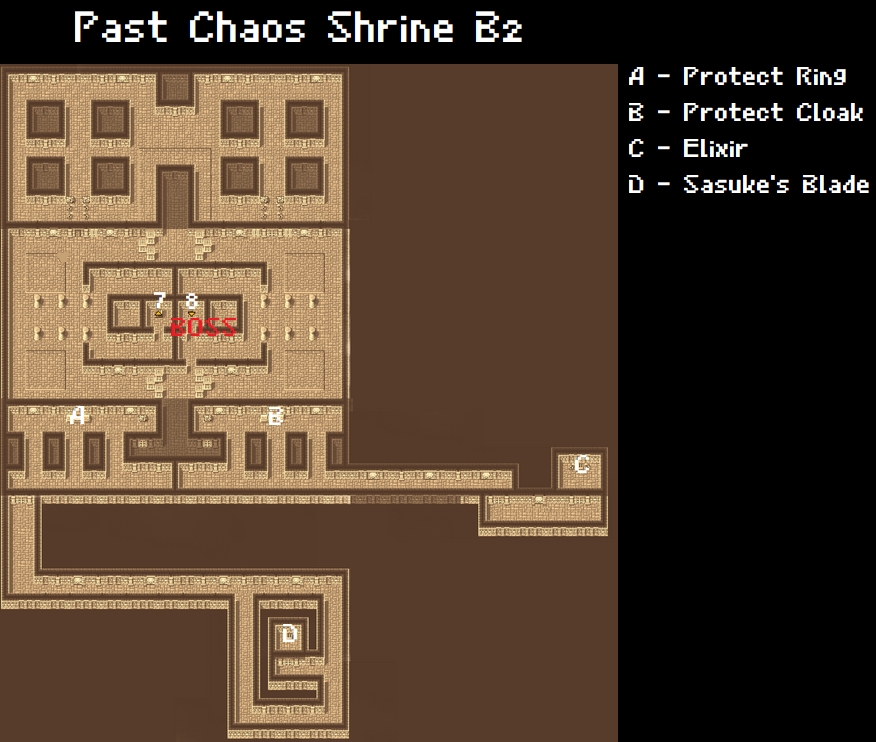
Welcome to 2000 years ago, when the four fiends still lived in the Chaos shrine. This place is filled with the strongest enemies in the game and is the longest dungeon in the game. However, we are prepared. The EXP earned in here should be enough to push you to level 50 across the party and you should also easily cap your gil in here. You may leave at any time via use of the black teleportation circle or the Exit spell.
Go to the southeast of the room take the staircase upward. The southwest staircase leads to a dead end and should be ignored.
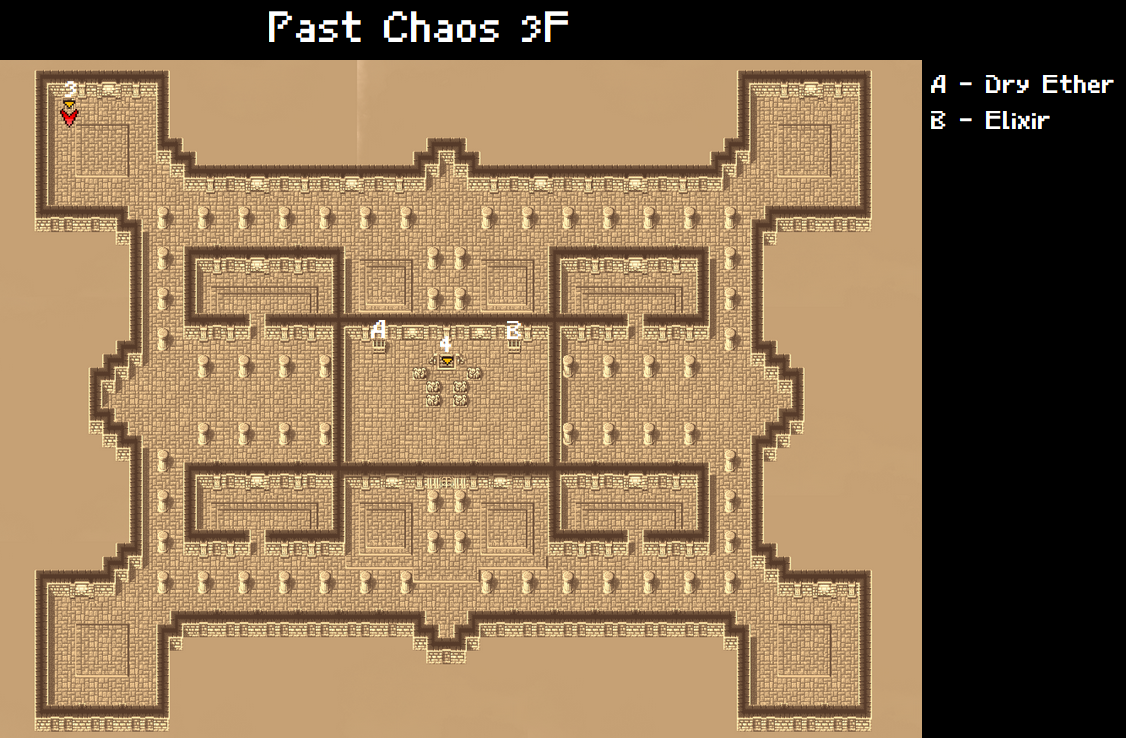
Head straight west across the room and take the next staircase up.
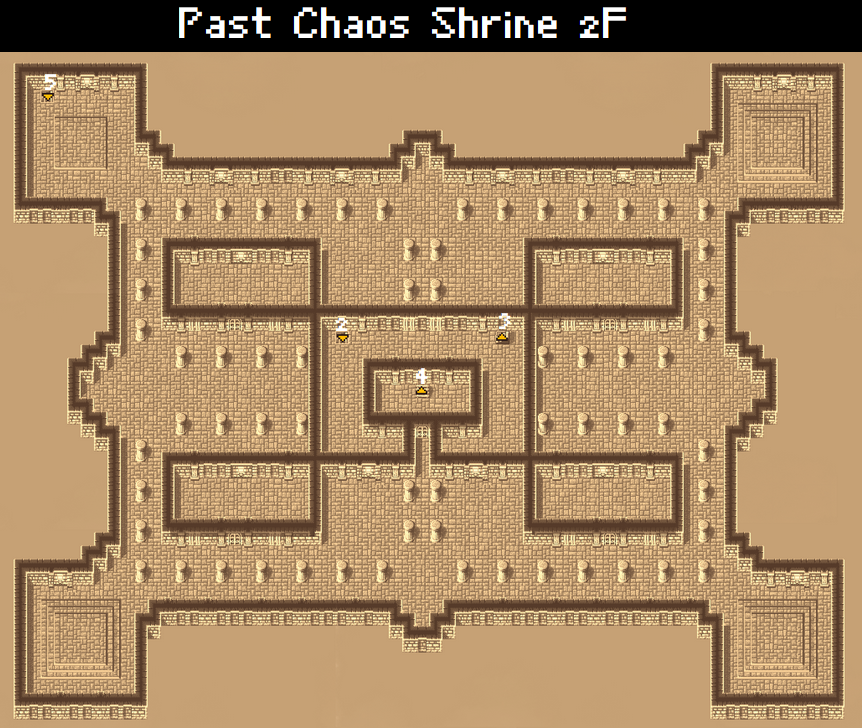
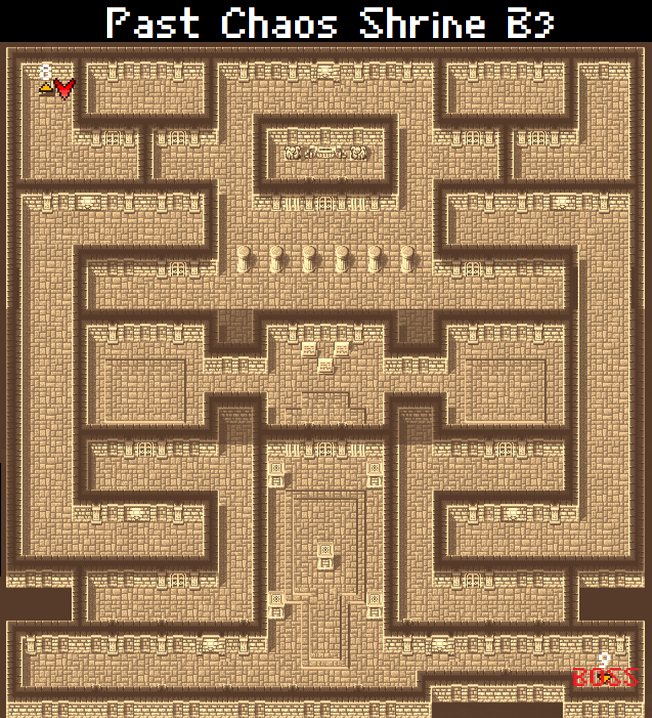
Go to the south wall of the room and then follow the pillars east, turning north as they do. Loot the two chests either side of the central room and then descend using the stairs here. Back on 2F, exit the room and go to the staircase on the Northwest of the room and continue to descend. Head all the way west and descend again to B1.
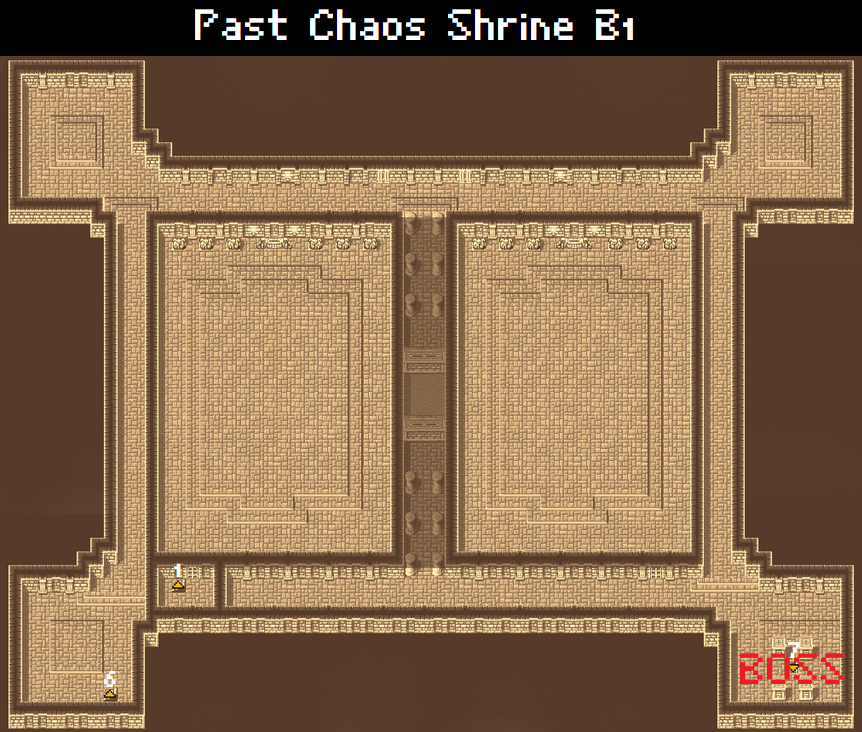
Welcome to the first elemental floor of the dungeon. This floor is a buffed repeat of the earth shrine in terms of enemies. Given resistances to status ailments and no weaknesses, bombard the enemies on this floor with any -aga level spells you like and beat them into the ground. Head for the northern wall, follow it all the way east and then head all the way south. There is no treasure here so you can ignore the rooms to your west. Engage the familiar orb for bestiary #124.
This rerun of Lich will use Flare, Stop, Warp and Kill. The ribbons and protect rings we collected will guard us against this. He has no weakness to fire but maintains his dia weakness. Saber and haste openers are ideal, cast Diaja and Flare afterwards and healing as required. Recover as required and descend to the next floor.
This floor is the fire floor. Blizzard spells will help you out a lot here as expected. ead to the northwest of the room and pass through the northern room, taking the east exit before heading back into the mid ring. Instead of heading for the stairs, exit south. Each door contains a chest to the north of it and a longer pathway to the south. Clean these out and confront the next familiar orb.
Marilith's rerun is stronger and now resistant to ice. She will go through the rotation of Firaga, Blind, Firaga, Blind, Firaga, Stun, Firaga, Stun. Opening with Invisira, Protera and the usual Saber strategy is best. Folow this up with physical attacks plus Holy and Flare. Restore using your stock of items and go down to B3.
This water shrine reflection is best dealt with using lightning. Pass through the room to your immediate east then the long room to your immediate south. Head north from here into the room and east again, turning south at the gravestones then head east again. Engage the blue orb to progress.
Kraken's weakness to lightning is gone but he remains more or less the same. The same strategy as the other three fiends of Haste, Saber, Protera, Invisira and then Flare and Holy will work well here. Restore again and descend.
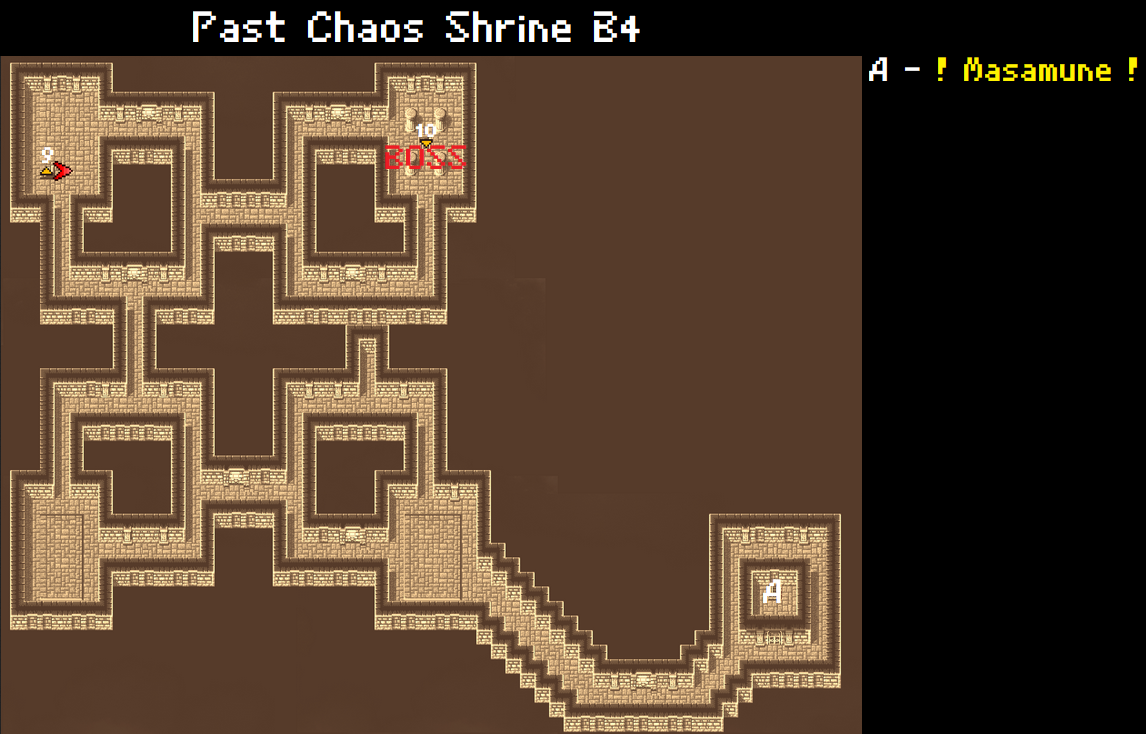
This is the final elemental floor and has much simpler pathing. Head to the southeast of the floor to acquire a Masamune, a powerful weapon that any class can equip. Congratulations on the final treasure chest!
Equip it to your healer of choice unless running Masters to make the auto-battle Attack option that much more lethal before heading back to the start of the floor. Head West, following the wall to the northwest corner to engage the final orb.
Tiamat has also lost her weaknesses and gained stats. She will use magic 50% of the time, rotating through Scourge, Blizzara, Thundara and Fira. Haste, Saber and Temper are your best buff choices, allowing your physical attackers to quickly chew through her HP bar. Recover and descend.
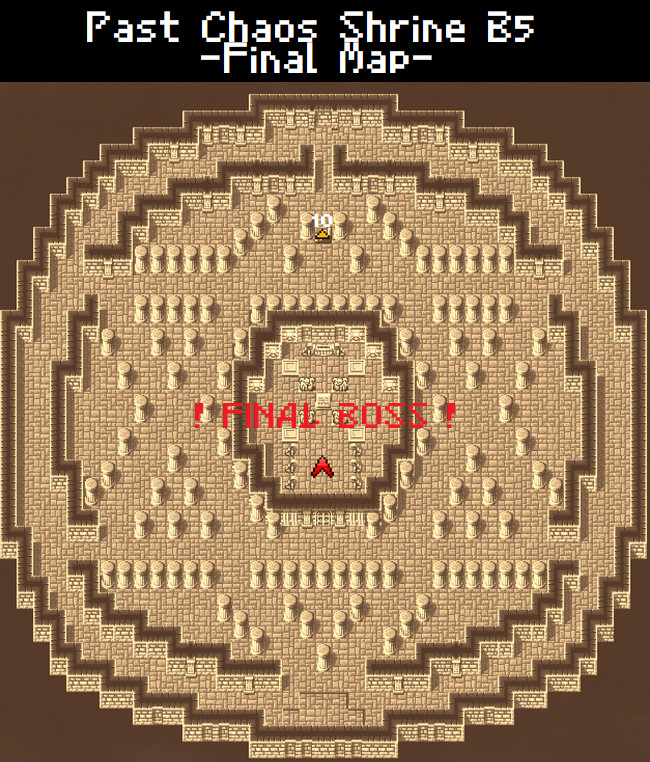
This final floor is a straightforward final confrontation. Move around to the south and enter to find Garland waiting for you. Interact with him to commence the final confrontation.
Chaos's physical attacks cause paralysis but thankfully ribbons take care of that. He will cast the abilities Blaze, Tsunami, Cyclone and Earthquake in a loop alongside the spells Blizzaga, Slowra, Thundaga, Curaja, Haste, Firaga, Blizzaga and Flare. Earthquake is an Earth elemented kil spell, not death-elemental so Protect Rings may not block it.
Cast NulAll on your member without a ribbon and cast Saber on everyone with the Giant's Gloves. Protera and Invisira are a must with Haste being needed for all party members. Chaos resists all elements and has high magic defence, physical hits are the way forward. Have your white wizard healaga as required and buff your strongest physical attacker with Temper.
Once Chaos casts Curaja, it is time to go all out. Don't hesitate to use Elixirs to fully restore your healer's MP given that this is the final battle.
Congratulations on beating Final Fantasy!
Classes & Composition

This is where I will discuss possible party compositions including the pros and cons of each class. It is also important to note that each class will at a certain point in the game, rank up and become an advanced class.
There are many challenges and possibilities arising from party composition in this game, from the 4 Black Belt or White Mage challenge to an All Warrior party. In other words, practically any composition is viable and provides it's own challenges and advantages. Please beware that some will be far more challenging than others.
Classes
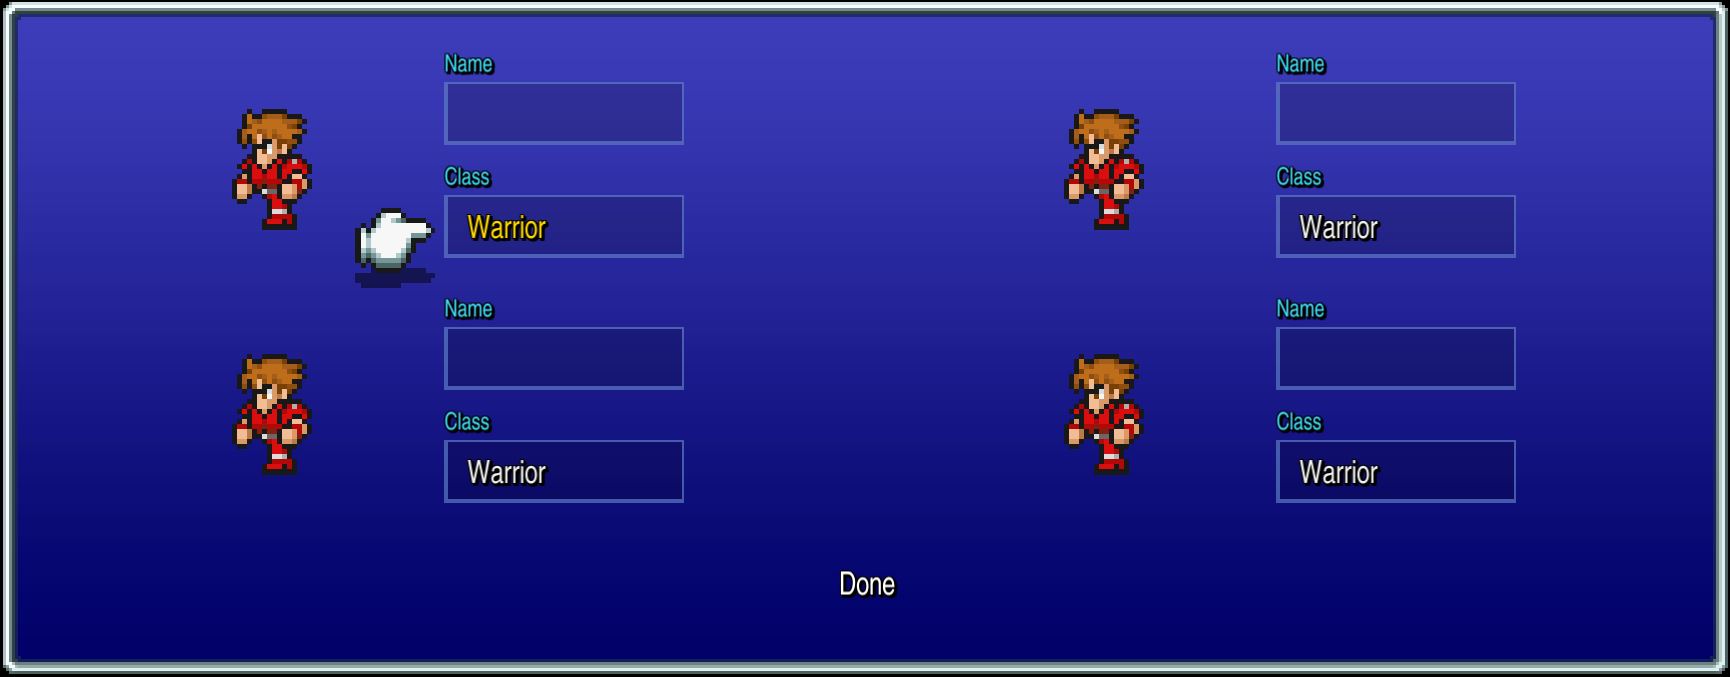
Warrior -> Knight (WAR)
Tank class. Highest HP pool, high defence, high magic defence, high agility (which is how characters block in this game) that only gets better when they upgrade to Knight. Due to often wearing heavy armour they are usually incredibly slow but their high HP means less healing needs to be done since they are unlikely to be killed in one, two or even three hits. Knight can use white magic after upgrading.
---
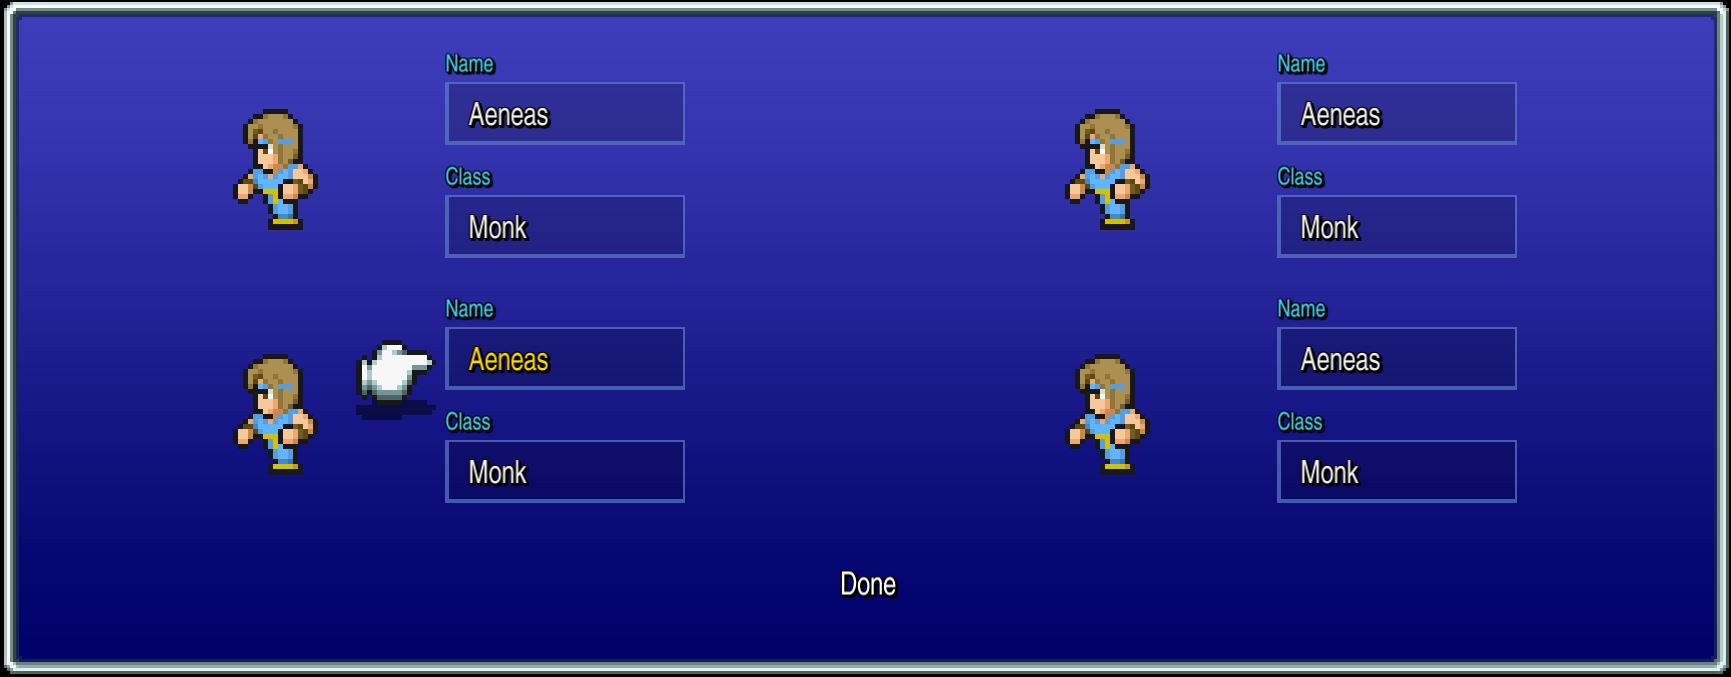
Monk -> Master (MNK)
Physical glass cannon. This class is at it's best when unarmed, doing more hits and dealing more damage than if given a weapon. This class also has a system for having higher defence when unequipped of armour but typically will suffer greatly from magic. I personally advise armouring them but not arming them. Due to the high number of hits they will perform on an enemy, their damage is usually very high. Their upgrade is unremarkable except for it's peculiar reduction of the monk's defence.
---
Thief -> Ninja (NIN)
Highest speed, highest luck, no ability to steal. Though the high luck stat does make items more likely to drop as an emulation of stealing, the thief and ninja suffer from poor defences, poor hp and poor armour choices. However, their high speed and ability to use Haste and Temper once upgraded makes them incredibly useful. They are also a high damage class, typically dealing more damage than a Knight.
---
Black Mage -> Black Wizard (BLM)
Highest magic damage class. Lowest HP and strength. They will die easily if ganged up on but they carry an excellent arsenal for deleting whole parties of enemies and when their MP runs out, daggers and cat claws mean they still have some fair offensive power even if they have lower strength than their neighbouring white mage. They typically carry a spell a boss will be weak to one way or another and have decent enough evasion to sometimes escape their brushes with death. Their usefulness is only somewhat diminished by late game items such as Gauntlets but using items will never compare with their damage on groups and bosses.
---
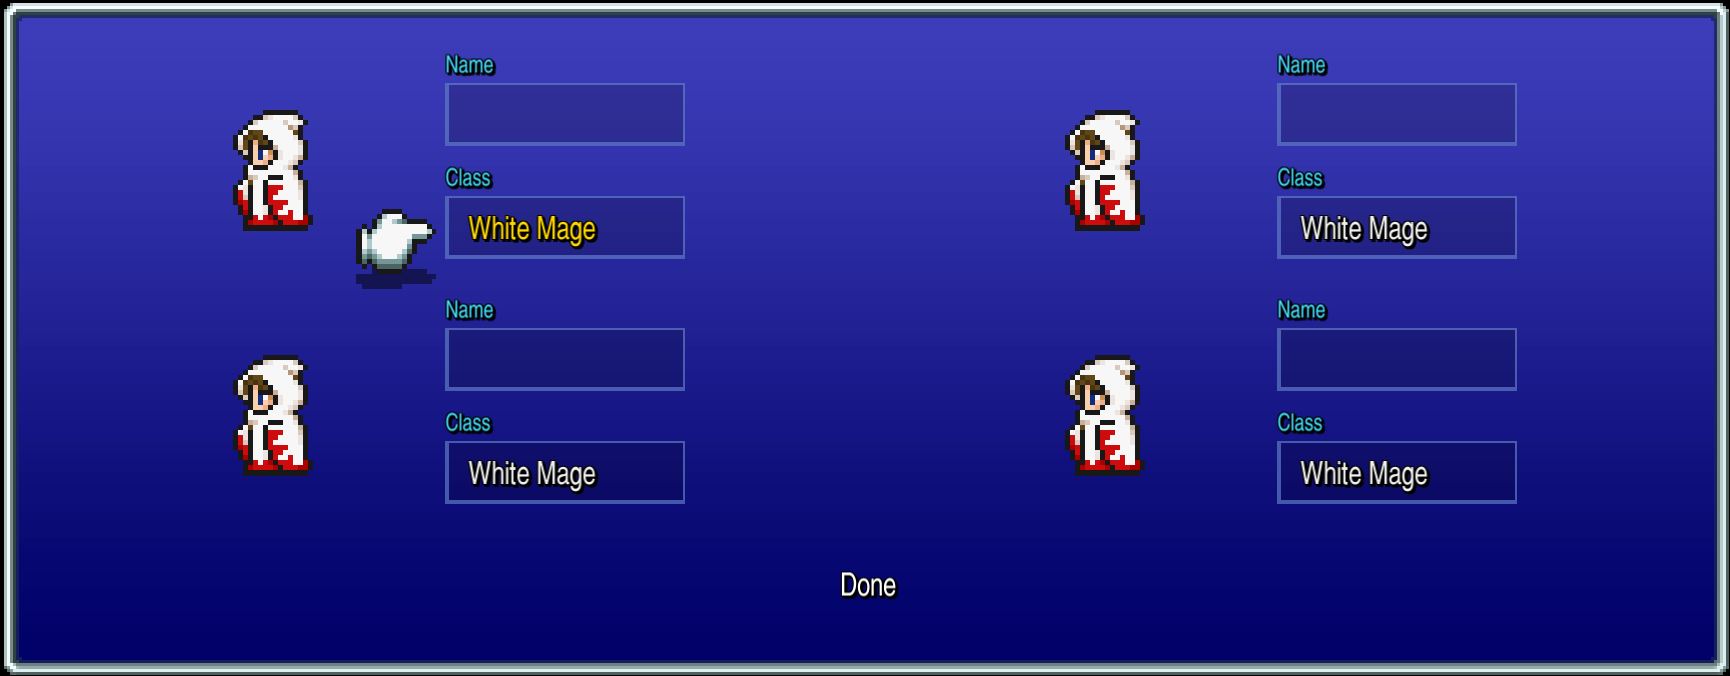
White Mage -> White Wizard (WHM)
Healer supreme. Able to bully undead enemies (which FF1 has a lot of) and perpetually spam healing and buffs while being cheap to maintain, the white mage is a solid choice to make life easier. They have the lowest speed and evasion, making them easy targets to hit but offensively are unable to deal damage effectively to the wider pool of enemies beyond undead until the late game.
---
Red Mage -> Red Wizard (RDM)
Jack of all trades. They have less HP than the average and less MP than the other mages. They will typically be on half the HP of a knight but have the benefit of being able to equip armour from the warrior/knight category. Their weapons also mean that when they run out of MP or MP for effective spells, they will not be left as a poor damage dealing option in the early and mid game. They are a fair substitution for a black belt or ninja but not another mage.
---
Compositions
This is the default, canon composition offered to you by the game. Based on the novelisations, manga etc the canon identities of the party are as follows:
Job JP Name EN Name Crystal Warrior Zest Setro Water Thief Sauber Zauver Air White Mage Floe Flora Fire Black Mage Daewoo Teol Earth
This party is a balanced jack of all trades. Everyone in the party will eventually be able to cast magic and thus you are never likely to run out of resources, you can put out good damage and thanks to the thief/ninja you will almost always move first in battle. Compared to other parties it can lack in damage and has three low defence characters meaning you will spend more time healing.
---
This is my personally recommended composition and the one the guide is written around. As opposed to the default party the choice of Monk over Thief means maintenance costs are lower as the Monk/Master benefits from a lack of equipment and typically puts out more damage than the Ninja will. The white mage will keep your party alive while the black mage deals damage and the knight serves as an anchor to deal moderate damage and survive big hits and revive others using items in a crisis scenario. This party does suffer if somebody dies as each party members fulfils a fairly specialised role but is worth the risk imo.
---
This party is expensive to gear and difficult to heal in the late game with your 4th Knight wanting for gear, although with your sheer amount of HP and physical damage you will be able to bludgeon most of the game to death with little to no trouble and still having all 4 party members standing,
---
The drink potions and do damage party. This is the one some drinking games have been based around. Miniscule defence means you take high damage all around but thanks to all the gil you're saving on equipment and making by selling your dungeon drops, you'll be able to afford the plethora of potions needed to survive. This is arguably the strongest level 50 party there can be in terms of raw damage per turn.
---
Fights are going to take you a very long time but with the amount of healing you're carrying, you will almost never die. Make sure you know the weaknesses of the bosses you're up against and exploit undead-heavy areas to level up. Be warned, some bosses will drag out for so long that you run out of MP/
---
Secrets

! THIS SECTION CONTAINS SPOILERS !
15 Puzzle
A sliding puzzle game in which 1 - 15 must be lined up in order and then a battle fought to cause the game to check the flag for the achievement.
This is done by acquiring the ship from the pirates in Pravoka and then riding it. While at sea, hold down your confirm button and spam the cancel button until the prompt for 15 Puzzle appears. This is confirmed to work on all configurations, controllers etc.
15 Puzzle Strategy
Move the 1 & 2 tiles into their final position.
Move 4 into 3's final position.
Move 3 directly under tile 4
Move the blank square to the top right corner
Move 4 into position and then 3
Move 5 & 6 into their final positions like 1 & 2
Move 8 into 7's final position.
Move 7 directly under tile 8
Move the blank square to the right of 8
Move them into position
Move 13 into 9's final position
Move 9 to be directly to the right of 13
Rotate the 5 tiles in the bottom left of the board counter clockwise until 9 and 13 are in their final positions
Move 14 to 10's final position.
Move 10 to be directly to the right of 14
Rotate the three tiles in the middle two columns on the bottom two rows counter clockwise until 14 and 10 are in their final positions
Rotate 11, 12, and 15 clockwise or counter clockwise until they are all in the correct positions
Tombstone in Elfheim
South of Corneria by ship is the town of Elfheim overlooked by a castle. In this town you can find three tombstones arranged which over time and iterations of Final Fantasy has been engraved with one of two epitaphs. In this Steam version of FF1 we get:
"Here lies Link." as opposed to, "Here lies Erdrick".
For anyone unfamiliar, Link is in reference to the protagonist of the Legend of Zelda franchise and Erdrick in reference to the great hero often referenced in the Dragon Quest franchise.
Excalibur, Masamune and Ribbon
These pieces of equipment are the most desirable in the game.
Ribbon: Halves all elemental damage and prevents most status ailments.
There are only 3 ribbons in this game. Sunken Shrine 2F, Waterfall Cavern, Flying Fortress 2F
Excalibur: The best sword in the game for a knight and an achievement. Take the adamantite from the flying fortress and then head to the blacksmith in Mount Duergar.
Masamune: High damage end game katana equippable by any class. Please note if you wish to use the Masamune outside of the final dungeon you must enter it with the Exit spell learned or be willing to backtrack a long way.
Warmachine/Death Machine
Open with Invisira and Protera, using Giant's Gloves to Saber your physical attackers. Your healer should exclusively heal through this fight and it will be difficult to keep black mages and ninja alive. At 2000 HP with regeneration this fight may take a while and the machine's attacks hit hard but the reward of a full bestiary and the truckload of gil/exp will be worth it. Warmech has lower defence than magic defence so don't be afraid to Temper your strongest attacker to speed things up.
Source: https://steamcommunity.com/sharedfiles/filedetails/?id=2560435354
More FINAL FANTASY guilds
- All Guilds
- FINAL FANTASY
- FINAL FANTASY | Guida al 100% del bestiario
- How to remove white screen flashing on critical hit in FF I PR
- Desequipar las armas del Monje mejora su ataque
- Character Tier List / Party Composition Guide
- FINAL FANTASY Guide 191
- FINAL FANTASY Guide 181
- FINAL FANTASY Guide 171
- FF1: Complete Modding Guide and Index
- Font Modding Guide and Index