Introduction
This guide assumes you are post-Wind Crystal and pre-final dungeon with access to the Airship and regular Ship. This guide will cover the bestiary, gil, 15 puzzle and excalibur achievements. The rest are from story progression or will be achieved in the process of getting the other achievements here or, failing that, fairly trivially.
Why so many sections?
Steam has a limit on how many characters you can use per sections and includes in that limit formatting text. This makes tables such as the bestiary extremely costly to setup character wise and for the purposes of you being able to search it quickly, it's available in text form as opposed to screenshots of a table made elsewhere.
We have made sure to avoid any numbers being included in the bestiary so you can simply search for your missing number, look for the location and it's weaknesses then be about your killing. The only clash with this may be the usages of numbers in the sliding puzzle and treasure sections so please be careful with your Ctrl+F.
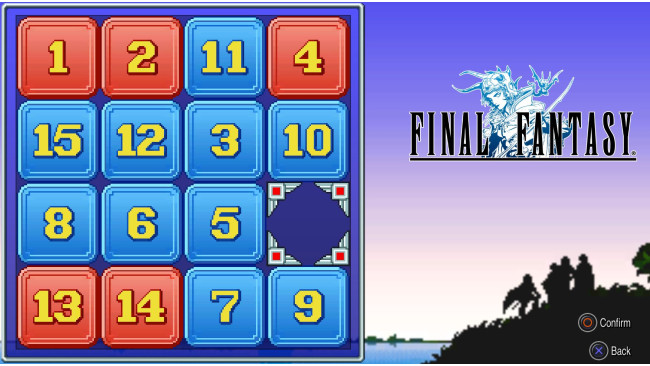
15 Puzzle
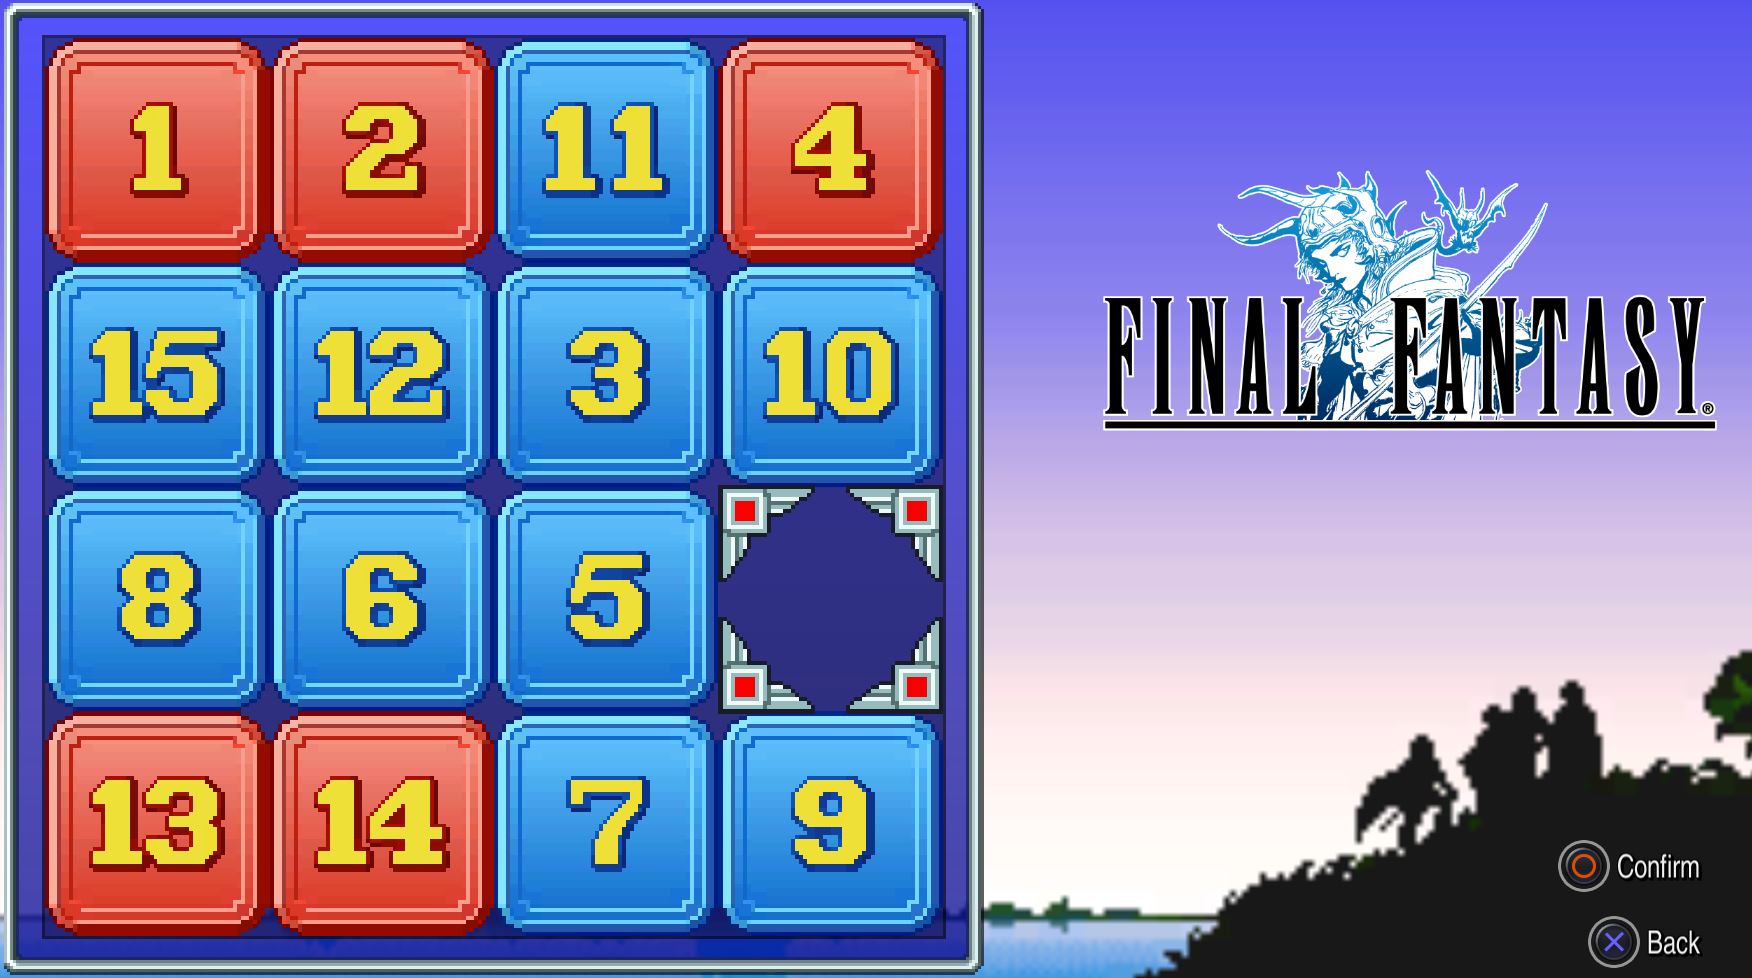
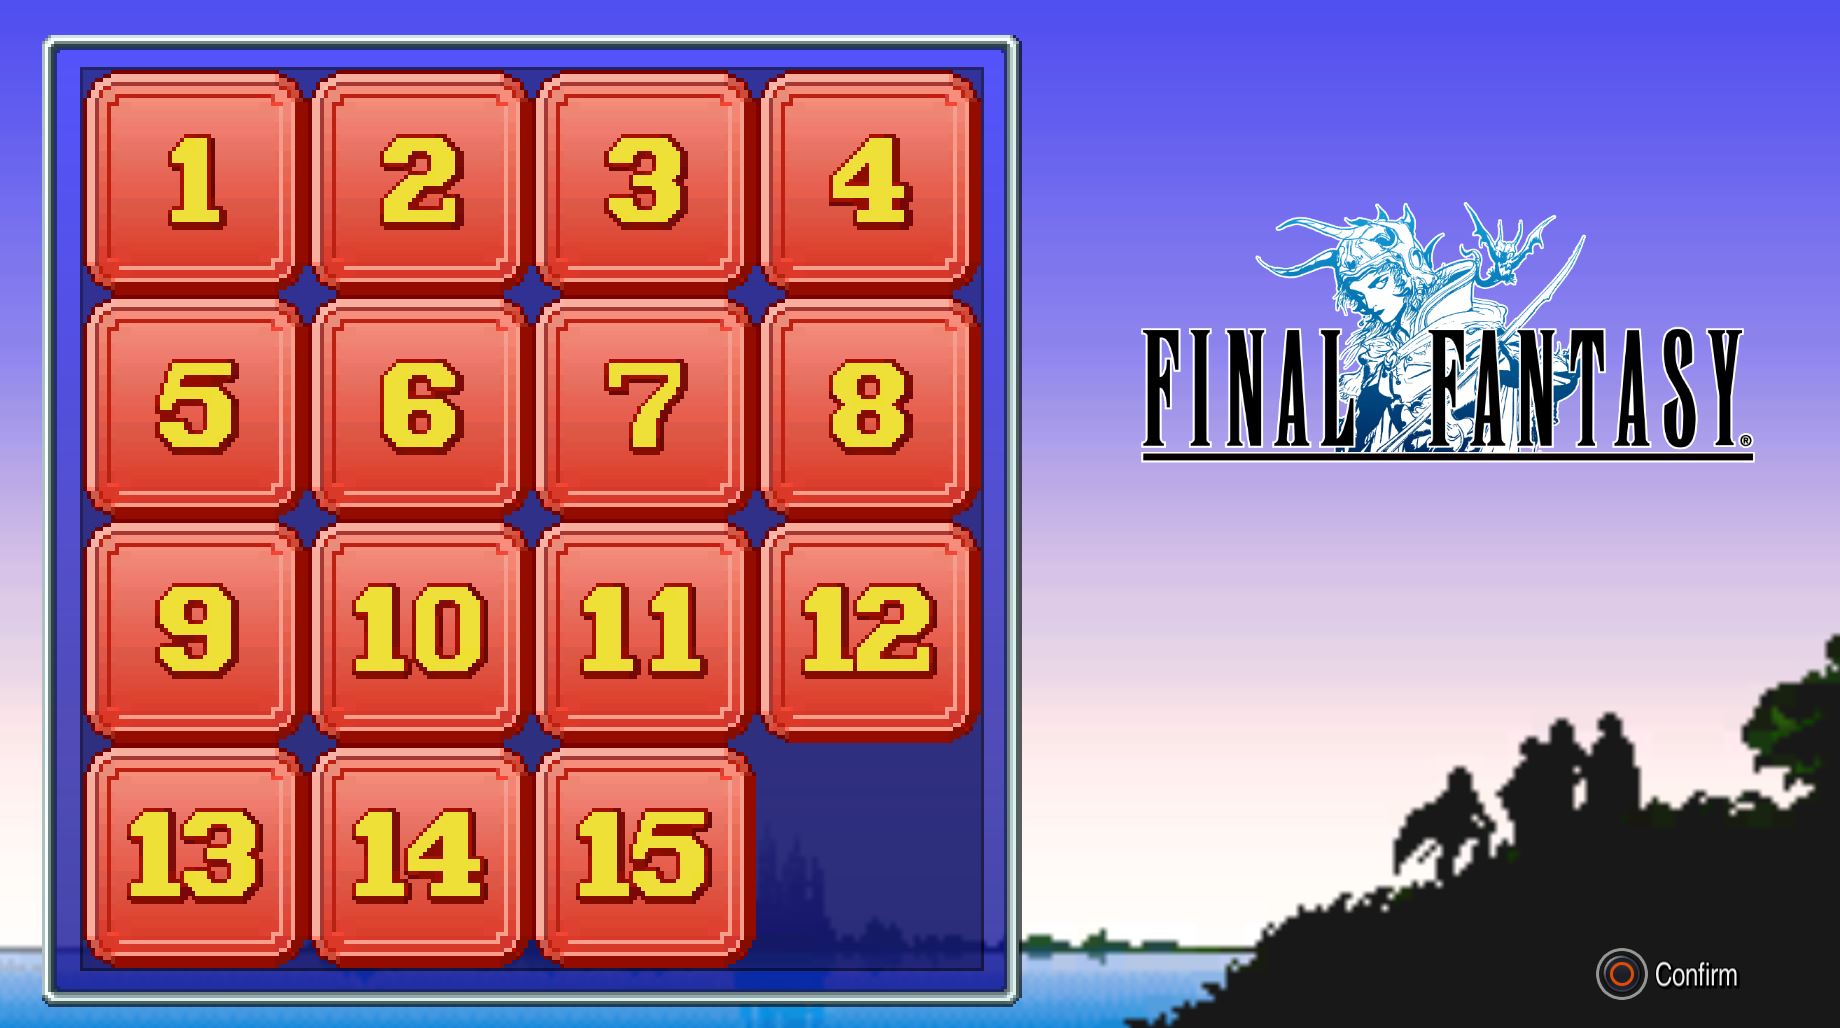

A sliding puzzle game in which 1 - 15 must be lined up in order. If you win or lose, a battle must be fought to cause the game to check the flag for the achievement.
This is done by acquiring the ship from the pirates in Pravoka and then riding it. While at sea, hold down your confirm button and spam the cancel button until the prompt for 15 Puzzle appears. This is confirmed to work on all configurations, controllers etc.
Strategy
Move the 1 & 2 tiles into their final position.
Move 4 into 3's final position.
Move 3 directly under tile 4
Move the blank square to the top right corner
Move 4 into position and then 3
Move 5 & 6 into their final positions like 1 & 2
Move 8 into 7's final position.
Move 7 directly under tile 8
Move the blank square to the right of 8
Move them into position
Move 13 into 9's final position
Move 9 to be directly to the right of 13
Rotate the 5 tiles in the bottom left of the board counter clockwise until 9 and 13 are in their final positions
Move 14 to 10's final position.
Move 10 to be directly to the right of 14
Rotate the three tiles in the middle two columns on the bottom two rows counter clockwise until 14 and 10 are in their final positions
Rotate 11, 12, and 15 clockwise or counter clockwise until they are all in the correct positions
Excalibur
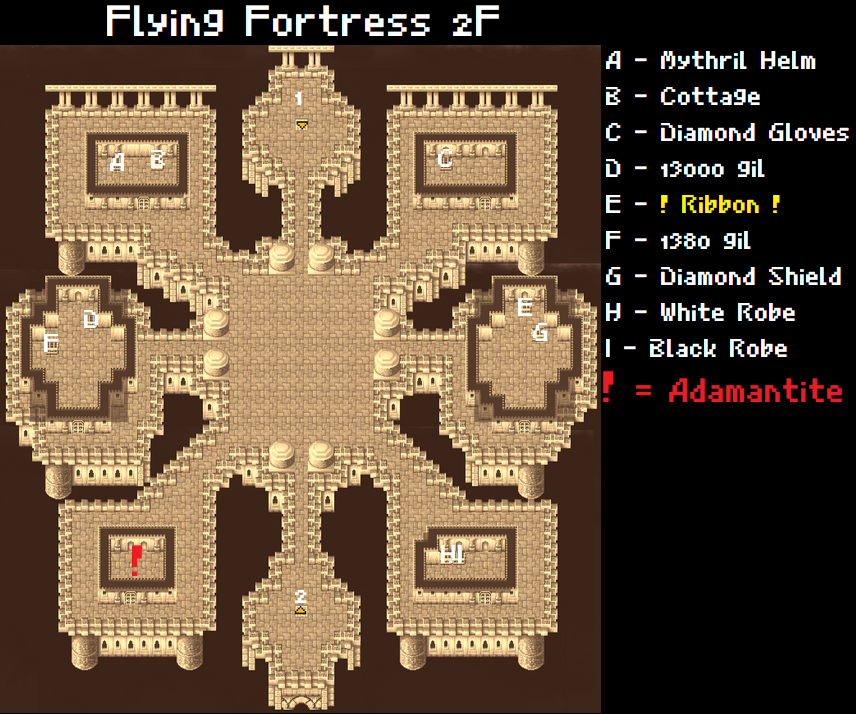
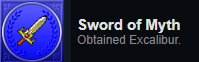
The excalibur is the best weapon for a Knight in Final Fantasy. Required for an achievement, it is acquired from the Dwarven Smith. To craft it, he requires Adamantite which can only be found on the second floor of the Flying Fortress.
Adamantite Location:
This is then taken to the Dwarven Smith in Mount Duergar.
Congratulations! You now have the Excalibur.
Exp Grind

Guaranteed encounter tiles have been patched out of this game. This means that the Peninsula of Power, Hall of Giants and repeatable boss encounter tiles are gone.
The final dungeon and Tiamat's bridge are now the best place to grind for EXP. By grinding on TIamat's bridge in Flying Fortress 5F you can encounter Warmachine with a 3/64 chance, the superboss that gives the most exp and gil in the game. The regular monsters are also similar to the final dungeon.
Bestiary 1 - 28
Search by number. Your bestiary can be found under Extras on the main menu and will show which numbers you are missing.
Any monster marked with a ★ is a boss.
Credit to Rinoa for doing data entry on this while I was working on the rest of this guide and the walkthrough guide.
No. Name Location(s) Weakness #001 Goblin Near Cornelia, near Chaos Shrine, near Pravoka, near Cavern of Earth. None
No. Name Location(s) Weakness #002 Goblin Guard All grassy areas, Cavern of Earth. None
No. Name Location(s) Weakness #003 Wolf All grassy areas, woods, and caves. None
No. Name Location(s) Weakness #004 Crazy Horse Cornelia, Pravoka. None
No. Name Location(s) Weakness #005 Skeleton Marsh Cave and Chaos Shrine/Temple of Fiends. Fire, Dia
No. Name Location(s) Weakness #006 Black Widow Cavern of Earth, Marsh Cave, Chaos Shrine. None
No. Name Location(s) Weakness #007 Gigas Worm World Map near Pravoka. Fire
No. Name Location(s) Weakness #008 Warg Wolf Grassy areas, Cavern of Earth, Chaos Shrine. None
No. Name Location(s) Weakness #009 Werewolf Grassy areas, Cavern of Earth, Chaos Shrine. None
No. Name Location(s) Weakness #010 Zombie Marsh Cave, Chaos Shrine/Temple of Fiends. Fire, Dia
No. Name Location(s) Weakness #011 Ghoul Marsh Cave, around Melmond. Fire, Dia
No. Name Location(s) Weakness #012 Garland ★ Temple of Chaos. None
No. Name Location(s) Weakness #013 Cobra Cavern of Earth, around Melmond and Elfheim. None
No. Name Location(s) Weakness #014 Ogre Cavern of Earth, Giant's Cave, around Melmond and Elfheim. None
No. Name Location(s) Weakness #015 Ogre Chief Giant's Cave, Cavern of Earth, Mount Gulug, around Elfheim. None
No. Name Location(s) Weakness #016 Lizard Cavern of Earth. None
No. Name Location(s) Weakness #017 Pirate Pravoka. None
No. Name Location(s) Weakness #018 Sahagin In the ship. None
No. Name Location(s) Weakness #019 Sahagin Chief In the ship, Sunken Shrine. None
No. Name Location(s) Weakness #020 Buccaneer In the ship. None
No. Name Location(s) Weakness #021 Shark In the ship, Sunken Shrine. Lightning
No. Name Location(s) Weakness #022 Bigeyes In the sea. None
No. Name Location(s) Weakness #023 Tarantula Marsh Cave, Cavern of Earth. None]
No. Name Location(s) Weakness #024 Ghast Around Elfheim, Around Melmond, Earth Cave, Cavern of Ice. Fire, Dia
No. Name Location(s) Weakness #025 Scorpion Marsh Cave, Mount Gulug. None
No. Name Location(s) Weakness #026 Shadow Marsh Cave, around Melmond. Fire, Dia
No. Name Location(s) Weakness #027 Green Slime Marsh Cave. Fire, Ice
No. Name Location(s) Weakness #028 Crawler Marsh Cave. None
Bestiary 29 - 56
No. Name Location(s) Weakness #029 Gray Ooze Marsh Cave. None
No. Name Location(s) Weakness #030 Gargoyle Marsh Cave, Cavern of Earth, Chaos Shrine. None
No. Name Location(s) Weakness #031 Bloodbones Marsh Cave, Cavern of Ice. Fire, Dia
No. Name Location(s) Weakness #032 Piscodemon Marsh Cave, Cavern of Earth, Cavern of Ice. None
No. Name Location(s) Weakness #033 Astos ★ Western Keep. None
No. Name Location(s) Weakness #034 Mummy Western Keep, Cavern of Earth, Cavern of Ice, Mirage Tower. Dia
No. Name Location(s) Weakness #035 Wraith Western Keep, Cavern of Earth. Dia
No. Name Location(s) Weakness #036 Anaconda Marsh Cave, Cavern of Earth. None
No. Name Location(s) Weakness #037 Hyenadon Cavern of Earth, near Melmond, Mount Gulug. None
No. Name Location(s) Weakness #038 Lesser Tiger Giant's Cave, around Melmond, around Onrac. None
No. Name Location(s) Weakness #039 Minotaur Cavern of Earth, Mount Gulug. None
No. Name Location(s) Weakness #040 Hill Gigas Cavern of Earth, Mount Gulg. None
No. Name Location(s) Weakness #041 Earth Elemental Cavern of Earth, Chaos Shrine. Fire
No. Name Location(s) Weakness #042 Troll Cavern of Earth, grasslands around some towns. Fire
No. Name Location(s) Weakness #043 Wight Cavern of Earth. Fire, Dia
No. Name Location(s) Weakness #044 Ochre Jelly Cavern of Earth B4 - B5. Fire, Ice
No. Name Location(s) Weakness #045 Cockatrice Cavern of Earth, Cavern of Ice, Mirage Tower. None
No. Name Location(s) Weakness #046 Vampire Cavern of Earth, Mirage Tower, Chaos Shrine, Whisperwind Cove. Fire, Dia
No. Name Location(s) Weakness #047 Ogre Mage Cavern of Earth. None
No. Name Location(s) Weakness #048 Sphinx Terra Cavern, Mount Gurgu. None
No. Name Location(s) Weakness #049 Lich ★ Cavern of Earth. Fire, Dia
No. Name Location(s) Weakness #050 Ankheg Near Crescent Lake, Gulug Volcano. None
No. Name Location(s) Weakness #051 Piranha Rivers, fought in the canoe. None
No. Name Location(s) Weakness #052 Red Piranha Rivers in all the world, with the canoe. None
No. Name Location(s) Weakness #053 Crocodile Rivers in the World Map. None
No. Name Location(s) Weakness #054 White Croc Rivers on the World Map. Lightning
No. Name Location(s) Weakness #055 Ochu Rivers around the world. None
No. Name Location(s) Weakness #056 Neochu Rivers around the world. None
Bestiary 57 - 84
No. Name Location(s) Weakness #057 Hydra Rivers around the world. None
No. Name Location(s) Weakness #058 Horned Devil Mount Gulug, Citadel of Trials. None
No. Name Location(s) Weakness #059 Pyrolisk Mount Gulug, Mirage Tower. Ice
No. Name Location(s) Weakness #060 Fire Elemental Mount Gulug, Chaos Shrine. Ice
No. Name Location(s) Weakness #061 Fire Hydra Mount Gulug, Flying Fortress. Ice
No. Name Location(s) Weakness #062 Lava Worm Mount Gulug, Chaos Shrine. Ice
No. Name Location(s) Weakness #063 Hellhound Mount Gulug, near Onrac, Mirage Tower. Ice
No. Name Location(s) Weakness #064 Fire Lizard Mount Gulug, Chaos Shrine. Ice
No. Name Location(s) Weakness #065 Fire Gigas Mount Gulug, Chaos Shrine. Ice
No. Name Location(s) Weakness #066 Red Dragon Mount Gulug, Lifespring Grotto. Ice
No. Name Location(s) Weakness #067 Marilith ★ Mount Gulug. None
No. Name Location(s) Weakness #068 White Dragon Cavern of Ice, Chaos Shrine, Lifespring Grotto. Fire, Lightning
No. Name Location(s) Weakness #069 Winter Wolf Cavern of Ice, Chaos Shrine, around Onrac and Lufenia. Fire
No. Name Location(s) Weakness #070 Mindflayer Cavern of Ice, Flying Fortress, Chaos Shrine. None
No. Name Location(s) Weakness #071 Ice Gigas Cavern of Ice, around Onrac, Chaos Shrine. Fire
No. Name Location(s) Weakness #072 Specter Cavern of Ice. Fire, Dia
No. Name Location(s) Weakness #073 Remorazz Cavern of Ice, around Onrace. None
No. Name Location(s) Weakness #074 Dark Wizard Cavern of Ice, Chaos Shrine. None
No. Name Location(s) Weakness #075 Evil Eye Cavern of Ice, Flying Fortress. None
No. Name Location(s) Weakness #076 Desert Baretta Great desert, around Onrac, Cardia Islands. None
No. Name Location(s) Weakness #077 Sabertooth World Map, Plains area on the Onrac continent, Mirage Tower. None
No. Name Location(s) Weakness #078 Wyvem World Map, near Onrac, Great Desert, Mirage Tower. None
No. Name Location(s) Weakness #079 Wyrm World Map, near Onrac, Mirage Tower. None
No. Name Location(s) Weakness #080 Manticore Flying Fortress. None
No. Name Location(s) Weakness #081 Baretta Great Desert. None
No. Name Location(s) Weakness #082 Basilisk Bahamut Islands, Chaos Shrine. None
No. Name Location(s) Weakness #083 Allosaurus Great Desert, around Lufenia. None
No. Name Location(s) Weakness #084 Weretiger Bahamut Islands, Mirage Tower. None
Bestiary 85 - 133
No. Name Location(s) Weakness #085 Sand Worm Desert near Onrac, Ryukahn Desert, Great Desert, Cardia Islands. None
No. Name Location(s) Weakness #086 Minotaur Zombie Citadel of Trials, around Lufenia. Fire, Dia
No. Name Location(s) Weakness #087 King Mummy Citadel of Trials, Mirage Tower, Waterfall. Fire, Dia
No. Name Location(s) Weakness #088 Medusa Citadel of Trials B2, Mirage Tower 1F/3F. None
No. Name Location(s) Weakness #089 Rakshasa Citadel of Trials B2, Flying Fortress 3F. None
No. Name Location(s) Weakness #090 Clay Golem Citadel of Trials, Flying Fortress, Chaos Shrine. None
No. Name Location(s) Weakness #091 Nightmare Citadel of Trials B3 (Guardian), Waterfall, Mirage Tower 1F, Flying Fortress 1F, Chaos Shrine B4. Ice
No. Name Location(s) Weakness #092 Dragon Zombie Citadel of Trials. Fire, Dia
No. Name Location(s) Weakness #093 Sahagin Prince Sunken Shrine, Lifespring Grotto. None
No. Name Location(s) Weakness #094 White Shark Sunken Shrine. Lightning
No. Name Location(s) Weakness #095 Deepeyes Sunken Shrine. Lightning
No. Name Location(s) Weakness #096 Sea Snake Sunken Shrine. None
No. Name Location(s) Weakness #097 Sea Scorpion Sunken Shrine. None
No. Name Location(s) Weakness #098 Sea Troll Sunken Shrine, Chaos Shrine. Lightning
No. Name Location(s) Weakness #099 Ghost Sunken Shrine. Fire, Dia
No. Name Location(s) Weakness #100 Water Elemental Sunken Shrine. Ice
No. Name Location(s) Weakness #101 Water Naga Sunken Shrine. Lightning
No. Name Location(s) Weakness #102 Kraken ★ Sunken Shrine. Lightning
No. Name Location(s) Weakness #103 Tyrannosaur World Map, Great Desert. None
No. Name Location(s) Weakness #104 Black Knight Flying Fortress. None
No. Name Location(s) Weakness #105 Chimera Mirage Tower. Ice
No. Name Location(s) Weakness #106 Guardian Mirage Tower, Flying Fortress 3F/4F. None
No. Name Location(s) Weakness #107 Blue Dragon Mirage Tower, Chaos Shrine. None
No. Name Location(s) Weakness #108 Green Dragon Waterfall Cavern, Chaos Shrine, Lifespring Grotto. Ice
No. Name Location(s) Weakness #109 Stone Golem Flying Fortress. None
No. Name Location(s) Weakness #110 Air Elemental Flying Fortress. None
No. Name Location(s) Weakness #111 Spirit Naga Flying Fortress. None
No. Name Location(s) Weakness #112 Death Knight Flying Fortress 1F, Chaos Shrine B4. None
No. Name Location(s) Weakness #113 Earth Medusa Flying Fortress 1F, Chaos Shrine B1. Fire
Bestiary 114 - 128
No. Name Location(s) Weakness #114 Black Flan Flying Fortress. Fire
No. Name Location(s) Weakness #115 Soldier Flying Fortress 3F. Lightning
No. Name Location(s) Weakness #116 Vampire Lord Flying Fortress 3F, Chaos Shrine 3F/B4. Fire, Dia
No. Name Location(s) Weakness #117 Dark Fighter Flying Fortress. None
No. Name Location(s) Weakness #118 Warmech Flying Fortress on the bridge leading to Tiamat. None
No. Name Location(s) Weakness #119 Tiamat ★ Flying Fortress. None
No. Name Location(s) Weakness #120 Rhyos Chaos Shrine 2F. Ice
No. Name Location(s) Weakness #121 Death Eye Chaos Temple 3F. Fire, Dia
No. Name Location(s) Weakness #122 Purple Worm Chaos Shrine 1-3F B4F. None
No. Name Location(s) Weakness #123 Iron Golem Chaos Shrine B4. None
No. Name Location(s) Weakness #124 Lich ★ Cavern of Earth. Fire, Dia
No. Name Location(s) Weakness #125 Marilith ★ Mount Gulug. None
No. Name Location(s) Weakness #126 Kraken ★ Sunken Shrine. Lightning
No. Name Location(s) Weakness #127 Tiamat ★ Flying Fortress. None
No. Name Location(s) Weakness #128 Chaos ★ Chaos Shrine. None
Treasure 1 - 113
Chests 1 - 113
Castle Corneria F2 Locked eastern treasure room
Locked eastern treasure room
Locked eastern treasure room
Locked western treasure room
Locked western treasure room
Locked western treasure room
Chaos Shrine
Northwestern Room
Northwestern Room
Southeastern Room
Locked southeastern room (guarded)
Locked northeastern room (guarded)
Locked northeastern room (guarded)
Matoya's Cave
West wall, Matoya's Room
West wall, Matoya's Room
West wall, Matoya's Room
Elven Castle
Locked Treasure Room
Locked Treasure Room
Locked Treasure Room
Locked Treasure Room
Marsh Cave B2
Northeastern room, northern path
Northwestern room, northern path
Eastern room, southern path
Southwestern room, northern path
Western room, southern path
Western room, southern path
Southwestern room, northern path
Marsh Cave B3
First room of the first row, the right chest in the second room in the second row
Fourth room of the first row
First room of the second row
Top chest in the second room in the second row
Fourth room of the third row
Second room of the third row (guarded)
Third room of the third row
Locked first room of the fourth row (guarded)
Locked second room of the fourth row (guarded)
Locked fourth room of the fourth row
Western Keep
Middle chest in the locked treasure room (guarded)
Left chest in the locked treasure room (guarded)
Right chest in the locked treasure room (guarded)
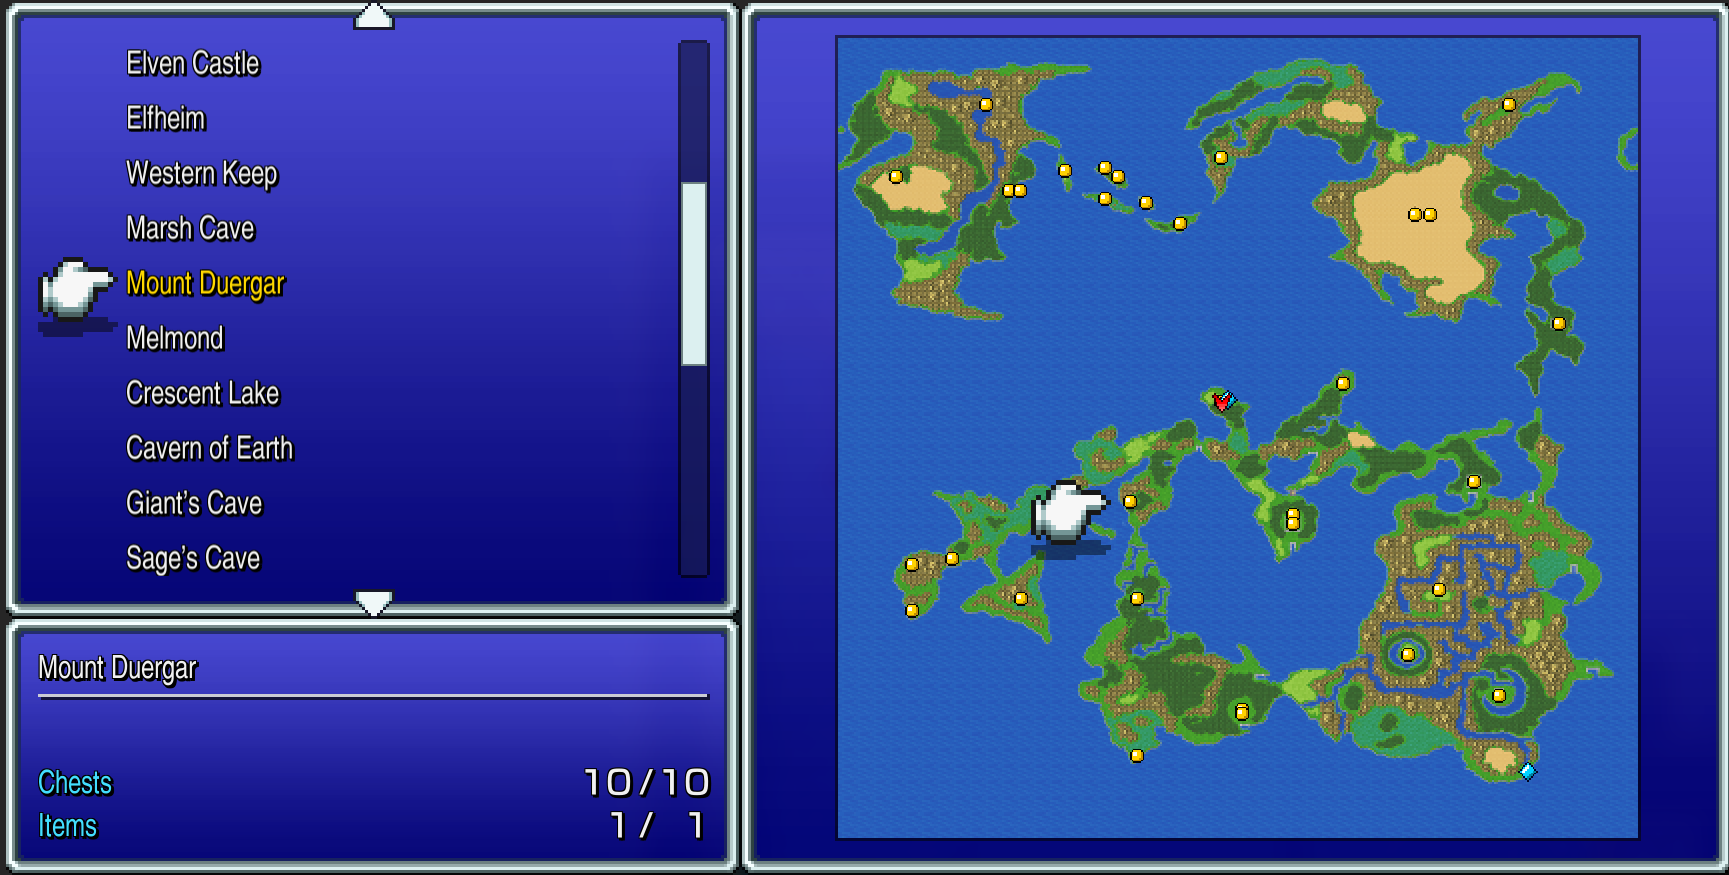
Mount Duergar
Top chest in the northeastern room
Bottom chest in the northeastern room
The left of the left chests in the locked room
Right of the left chests in the locked room
Left of the middle chests in the locked room
Middle of the middle chests in the locked room
Right of the middle chests in the locked room
Left of the right chests in the locked room
Middle of the right chests in the locked room
Right of the right chests in the locked room
Cavern of Earth B1
Northern room (guarded)
Right chest in the southwestern room (guarded)
Left chest in the southwestern room
Right chest in the southeastern room
Left chest in the southeastern room (guarded)
Cavern of Earth B2
Bottom left chest in the southwestern room (guarded)
Bottom right chest in the southwestern room (guarded)
Top chest in the southwestern room (guarded)
Top left chest in the northeastern room
Top right chest in the northeastern room
Solitary right chest in the northeastern room
Cavern of Earth B3
Southeastern room
Eastern room (guarded)
Northern room (guarded)
Small western room (guarded)
Southern room
Cavern of Earth B4
Right of the right-side chests in the northern room (guarded)
Left of the right-side chests in the northern room (guarded)
Top right of the left-side chests in the northern room
Top left of the left-side chests in the northern room (guarded)
Bottom of the left-side chests in the northern room (guarded)
Bottom left chest in the southern room (guarded)
Right chest in the southern room (guarded)
Top chest in the southern room (guarded)
Giant's Cave
Fourth chest in the treasure room
Third chest in the treasure room
Second chest in the treasure room
First chest in the treasure room
Mt. Gulg B2
Southeastern halls (guarded)
Eastern winding halls (guarded)
West end of the northeastern halls (guarded)
East end of the northeastern halls
Right chest in the northwestern halls (guarded)
Left chest in the northwestern halls
Right of the top left chests in the southwest treasure area
Left of the top left chests in the southwest treasure area
Left of the bottom left chests in the southwest treasure area
Right of the bottom left chests in the southwest treasure area
First chest of the bottom row of the right-side chests in the southwest treasure area
Left chest of the second row of the right-side chests in the southwest treasure area (guarded)
Left chest of the third row of the right-side chests in the southwest treasure area (guarded)
Middle chest of the bottom row of the right-side chests in the southwest treasure area (guarded)
Top of the right-side chests in the southwest treasure area
Right chest of the second row of the right-side chests in the southwest treasure area
Right chest of the third row of the right-side chests in the southwest treasure area
Right chest of the bottom row of the right-side chests in the southwest treasure area
Mt Gulg B4
Left chest in the northeast room (guarded)
B4/B5 Right chest in the northeast room on B4 (guarded)
Central room of the northern area
Bottom left chest in the northwestern room
Bottom of the right-side chests in the northwestern room
Middle of the right-side chests in the northwestern room or in the right chest in the eastern room
Top of the right-side chests in the northwestern room
Top left chest in the northwestern room
Right chest in the central room (guarded)
Top chest in the central room (guarded)
Left of the left-side chests in the eastern room
Bottom chest in the southeastern room (guarded)
Bottom chest in the southeastern room (guarded)
Top chest in the southeastern room (guarded)
Mt Gulg B5
B5 In the chest in the western room (guarded)
eastern room on B5
eastern room on B5
eastern room on B5
Treasure 114 - 208
Chests 114 - 208
Cavern of Ice B1
Large western room near the stairs leading from B3
Small western room
Left chest in the eastern room with the hole
Middle chest in the eastern room with the hole
Right chest in the eastern room with the hole
Cavern of Ice B2
Middle chest in the treasure room (reached by entering a hole on B1)
Left chest in the treasure room
Right chest in the treasure room (guarded)
Cavern of Ice B3
Right chest in the northwestern room (guarded)
Left chest in the northwestern room (guarded)
Left chest of the top row in the southern room
Left chest of the bottom row in the southern room
Middle chest of the top row in the southern room
Middle chest of the bottom row in the southern room
Right chest of the top row in the southern room (guarded)
Right chest of the bottom row in the southern room (guarded)
Dragon Caves
Southern room of the western island
Southern room of the western island
Southwest island
Southwest island
Southwest island
Eastern room of the southeast island
Eastern room of the southeast island
Eastern room of the southeast island
Western room of the southeast island
Western room of the southeast island
Western room of the southeast island
Western room of the southeast island
Castle of Ordeals 2F
In the chest in the northeastern room on 2F (guarded)
Castle of Ordeals 3F
Northeastern room
Northwestern room
Northwestern room
Northwestern room
Southwestern room
Southwestern room
Southwestern room
Southwestern room
Next to the throne
Sunken Shrine 2F
Southeastern room
Southeastern room
Southwestern room
Southwestern room
Southwestern room
Northwestern room
Northeastern room (guarded)
Northeastern room (guarded)
Northeastern room (guarded)
Northeastern room (guarded)
Sunken Shrine 3F
Western room
Small southeastern room
Sunken Shrine 4F
Central crescent-shaped room
Northern room
Southwestern room
Central room in the southern area
Southeastern room
Sunken Shrine 5F
Second room of the third row
Second room of the third row
Second room of the third row
Second room of the first row
Third room of the second row
Third room of the first row
Third room of the first row
Fourth room of the second row
Third room of the fourth row
Fourth room of the fourth row
Fourth room of the first row (reached by walking west from the first room)
Fourth room of the first row (reached by walking west from the first room)
Fourth room of the first row (reached by walking west from the first room)
Tall room (on the third level B3)
Tall room (on the third level B3)
Mirage Tower 1F
Outer western path in the main room
Centre of the main room
Centre of the main room
Centre of the main room
Centre of the main room
Centre of the main room
Inner eastern path of the main room
Inner eastern path of the main room
Mirage Tower 2F
Left side of the main room
Left side of the main room
Left side of the main room
Left side of the main room
Left side of the main room
Right side of the main room
Right side of the main room
Right side of the main room
Right side of the main room
Right side of the main room
Waterfall Cavern
Treasure room
Treasure room
Treasure room
Treasure room
Treasure room
Treasure room
Treasure 208 - 249

Flying Fortress 1F
Southern room
Western room
Western room
Western room
Western room
Eastern room
Eastern room
Eastern room
Eastern room
Eastern room
Flying Fortress 2F
Northwestern room
Northwestern room
Western room
Western room
Southwestern room
Southeastern room
Southeastern room
Eastern room
Eastern room
Northeastern room
Flying Fortress 3F
Eastern room
Eastern room
Eastern room
Eastern room
Eastern room
Eastern room
Northern room
Northern room
Northern room
Northern room
Western room
Western room
Western room
Western room
Past Chaos Shrine 3F
Central room
Central room
Past Chaos Shrine B2
Southwest room
Southwest room
Southeast room
End of the path past the southeast room
Past Chaos Shrine B4
End of the path leading from the southeast quadrant
Source: https://steamcommunity.com/sharedfiles/filedetails/?id=2560789101
More FINAL FANTASY guilds
- All Guilds
- FINAL FANTASY
- FINAL FANTASY | Guida al 100% del bestiario
- How to remove white screen flashing on critical hit in FF I PR
- Desequipar las armas del Monje mejora su ataque
- Character Tier List / Party Composition Guide
- FINAL FANTASY Guide 191
- FINAL FANTASY Guide 181
- FINAL FANTASY Guide 171
- FF1: Complete Modding Guide and Index
- Font Modding Guide and Index