
Diagnosis : Chronic Lack Of Funds
1) Completing Public Targets 2) Handling Emergencies3) Handling Epidemics4) End Of Year Awards5) VIP Bonuses6) Research MoneyWhat is with this level!?
Don't worry, you'll learn to appreciate the change in pace and challenge. Eventually. Maybe.
Well, I did.
So, Duckworth Upon Bilge is an especially unique level because it is a public hospital. This means patients will not pay you for their diagnosis and treatment.
Your means of getting some cash are extremely limited. I've listed them in full here. Sit down, you at the back, and etch these directly into your skin. This is for your benefit!
For those of you confused by number six, yes, you can flat out order your Researchers to research you some dosh. And I recommend that you do. Any cash flow at all can be vital on this map.
Figuring out how to get income is critical in this level. If it is not going to get you income, don't build it, don't hire it, kick it out the door. Tarquin's objectives are by far your most important focus. You can cancel an objective in favour of another by pressing the X, if it is really going to cost you too much time to complete. (The first two Objectives can't be cancelled, but from then on, you get some control.)
This level also introduces Epidemics. Which is good news for you, because you can get cash reward by dealing with them. So view an Epidemic as a nice occasional windfall!
For an easy step-by-step guide to get past one star, just watch my video:
Treatment Plan
Getting Started
Hello, I am Dr Majora. But that sounds a bit threatening so call me Madge. Madge is the least threatening name of all time, right? Someone called Madge wouldn't rule an empire of hospitals while slowly injecting demonic DNA into the populace.
So, you've probably developed some good habits from your previous, private hospitals. You like to bling up your rooms. Promote your staff. Expand nice and rapidly on a schedule that suits you...
Well that's all WRONG and you're going to have to abandon some habits.
Don't upgrade your machines unless you're asked to.
Don't train staff unless you're asked to.
Don't promote your staff unless you have to.
Don't build anything unless you're asked to.
Why? You won't be seeing any profit off these investments, because you aren't being paid to cure people. You're being paid to satisfy Tarquin. If you upgrade a machine for no reason, you're taking food out of your own mouth later. Save your machine upgrades for when you'll actually get some reward money for doing so.
Wait. Be patient. Be stingy. Don't feel pressured to build a treatment room because patients are demanding one. They won't actually pay you back in cure money. Send 'em home. Hold back on treatment rooms until there's an emergency or objective for them.
But first, some setup.
First Fifteen Minutes
Buy a plot of land while you can. Money management woes can really slow your expansion when you need it most, so just purchase somewhere to expand now. This is good advice for all hospitals - always have somewhere ready to expand into.
Shuffle the rooms. The hospital rooms don't have an especially good layout. In particular, the loos should really be next to where your GPs are. I usually prefer to delete everything and start from scratch.
Also as a heads-up: There are not enough fire extinguishers when you start this hospital. Your Cardio and General Diag are at risk of fire. You may not have had a fire yet in any of your hospitals, because you are a sensible person who hires a lot of janitors. Unfortunately, you don't have that luxury here. Expect a few fires now and then.
Build a Training Room. Your first Objective is Train a Staff Member. Anatomy Posters are dirt cheap and be lined around the walls. Several small Training Rooms are more economical than one big room.
Review your staff. Your staff really need to work to justify their salary in this hospital. Plan ahead and identify skill gaps. You already know you will be needing a Researcher and a Mechanic. Fire the overqualified in favour of interns you can train to your own standards. Home-grown staff are always cheaper. Also do not hire any Grumpy staff on this level, or any other level where Staff Happiness is going to be an objective.
Make sure you hire a Janitor. Your first set of objectives are "train a staff member" followed by "upgrade a machine." So get a janitor. If you can't get one who knows Mechanics, then you'll be training them in Mechanics shortly.
Build a research lab. This is going to be an extremely important room. Add any and all items that will speed research. The research Monitors seem to offer the best value for money. Obviously, you'll also need a qualified research Doctor to work in your room.
Consider building a Marketing Room. Marketing is actually useful on this level. For one thing, it will happily generate its own Objectives. It can also boost your Reputation and aid you with various other Objectives.
Resolution Lab
You need to cure 5 8-bitten Patients, for which you're going to need the Resolution Lab. This room will now be in your research list. However, instead of researching it here in Duckworth, I recommend your first step is to go back to your previous hospitals. Research the Resolution Lab over there instead. Then come back to Duckworth and build the room.
Moving on
You're now ready to go! Open the floodgates.
Your second Public Target will be Upgrade a Machine. The Pharmacy or the De-Lux Clinic are good picks here. If you haven't got any upgrades, you need to research them.
Your next room will probably be Psychiatry, as soon as you can get a doctor to staff it. Wards and Psychiatry do double duty, diagnosing patients as well as curing a variety of ailments. They will be serving as your hospital's early backbone.
Stay resolutely focused on your money making objectives.
The Pharmacy cures several different kinds of diseases, which will prevent your hospital from becoming too much of a graveyard. In the same vein, your next treatment room will likely be the all-purpose Injection Room, or Fracture Ward. Individual clinics however should be shunned. Curing three Jest Infection patients, while good for your reputation, will net you precisely no other benefits. Send them home and keep your cash.
Staff
Your staff's wages are a big problem. A very big problem, because you don't have a monthly income. Just monthly outgoings. In many ways, Duckworth is a simple battle between you and your wages bill.
I already told you, don't promote or train staff. Don't hire overqualified people. Fire anyone who expects more money. Favour people who are Cheap and Positive where possible.
That said, you still need to tailor your staff's skills, so some training is necessary. However, I recommend holding off until you get an actual objective for it. Tarquin has an adorable habit of asking me to train a nurse, directly after I've just finished giving a lecture to a class of nurses.
At this point in the game, you probably already have a good idea of what qualifications you like in your staff. So I'll just briefly go over my own preferences:
Janitors: I like every one to be qualified in Maintenance. About a third of those also need Ghost Capture. At least one janitor among the staff needs to be a Mechanics specialist - preferably two, so they can tag-team. Fire your Janitors when they get too experienced and pricey. They only need to be level three, tops.
Assistants: Don't need to be qualified, unless you want to make use of Marketing, which I definitely recommend you consider.
You will not get revenue from Cafes or Gift Shops in this level, so neither is recommended. Marketing however deserves a second look. You will get objectives to "cure so many patients with X" and Marketing can aid with this, by skewing your patients to actually have X.
Along with your Janitors, you're likely to have a high turnover of Assistants. There's no point fulfilling their pay demands when you can just hire someone else who's cheaper.
Doctors: General Practice is the eternal bottleneck of every hospital. When your hospital is at full capacity, you're going to need about 8 GPs. So it's a bad idea to fall behind on your GP training, as it can stifle your growth dramatically. You're also going to need at least two psychiatrists in this level, and your trusty research team.
How about surgeons? Tarquin is really keen on me building a Surgery for some reason. So I indulge him. I have a very nice and sparkly surgery suite, sitting closed. Oh, you do know you can close rooms, right? Click on the door and there's a close room button.
Anyhow, the operating theatre and the DNA clinic require specific qualifications. Read: expensive staff. The operating theatre also steals one of your precious nurses. These rooms are simply not worth it. Build one to satisfy the objective, but don't actually use them. Also, feel free to sell them later.
On that note, if you have X-Ray or Mega Scan, don't bring them anywhere near this map. Just no. Nurses do diagnosis better and they do it for less money. Which brings us to:
Nurses: Dontcha love them. The worker bees of a good hospital. Anyhow, you won't be needing qualified nurses. Nah. Instead you should focus on having sufficient nurses at all times. Nurse vacancies do tend to grind the hospital to a halt, so make sure the machine keeps moving. I recommend having at least one nurse who is Treatment focused. Use this nurse to handle your emergency patients and boost your cure rate.
Getting the most from your Staff
Keep your staff happy by ensuring they have food, drink and toilets nearby. Doesn't matter about the patients, they aren't paying us or anything. Your expensive staff however will be more productive if they don't have to cross the hospital grounds to go to the loo.
Level 4 or 5 rooms will make your staff very happy and boost their productivity. Boost a room's prestige by using the Gold Star Award. Rooms like GP, Ward and Psychiatry, where your staff spend a lot of time, should be high level. The staff room should also be level 5.
Emotional Intelligence and Stamina are particularly valuable on this map. They will help squeeze a little extra productivity out of your skeleton crew. Even better though, are staff with the free trait versions: Tireless and Positive. Good traits are a godsend. Grumpy staff however should be instantly fired.
Being able to use your own trainers, instead of relying on outside tutors, will make a significant difference to your budget. Watch out for staff with the Teacher or Natural Mentor traits. Grab them and aim to make them your in-house gurus.
Making Money Off Research

Or at least, trying to
A completed research project at just the right time will be a boon to you in Duckworth, often dragging you back out of the red. Break out the calculators however, as there's no such thing as a free lunch. It's important to maximise Research profit, otherwise you are paying expensive staff wages to no effect.
This is how the repeatable research projects actually break down in terms of profit.
The second column is profit, i.e. the reward money minus the greenlight fee. The third column is profit per research point required to actually complete.
General Research: $19000; $19
Roderick's Plot Hole: $33000; $22
Project Windsock: $99000; $9.9
Cheesier Gubbins: $42000; $21
In other words: ($Reward - $Greenlight) / ResPoints = Profit per research point.
Please note: you need the Bigfoot DLC to be able to access most of these. They are unlocked by playing the Pointy Mountain maps.
Roderick's Plot Hole comes out as the clear winner, with $22 per research point. This should be your choice of research project, if you have the option.
Oh no, wages...
Of course, things are not quite so simple. You also have to factor in the wages of your research staff.
Get this part wrong, and you'll wipe out any profit you just made on your staff bill.
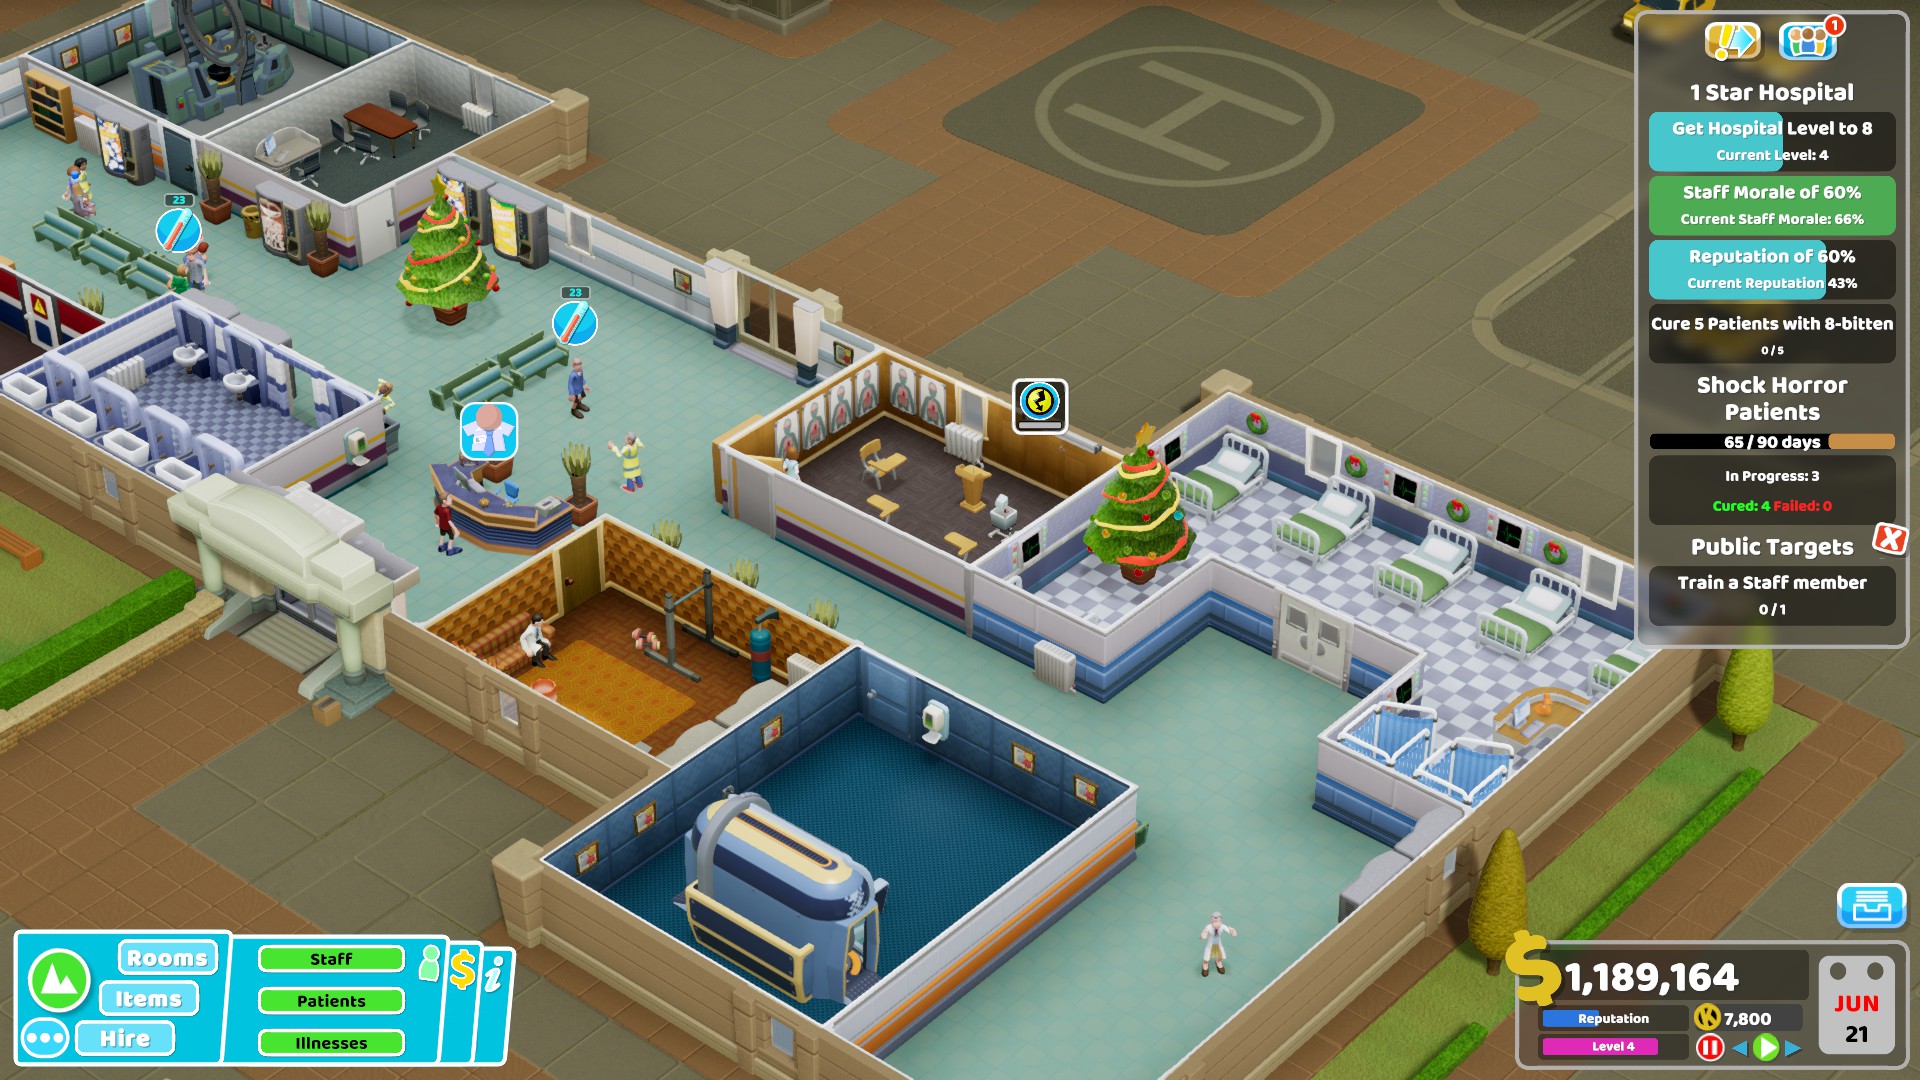
In my research lab you can see above, a pair of Level 2 researchers working together nonstop from the start of October finished Roderick's Plot Hole (1500 points) at the end of December.
I recommend keeping your Researchers at level 3 or below, as they tend to get pricey at level 4. Also as an important note: your home-grown trained Researchers will be significantly cheaper than a doctor you purchase off the streets. Developing your own staff is definitely the way to go. If you can get one that is Cheap, huzzah.
Should you ever have the luxury of having some money to burn, then maximise research speed by filling your research lab with goodies. Research Monitors are the best choice. This will reduce the wages hit in Research by a small amount, by speeding up how fast your staff work. You should also have toilets, food and drink very close by, so your staff waste no time.
Outright Cheating
Start "Project Windsock" in Duckworth. Switch over to any other map with a research department and play there instead. When the project is about to be completed, jump back over to Duckworth. Profit. If anyone asks, I did not tell you this.
Known Objective Types
This is a list of the Public Targets you will be seeing while working towards one star. There may be others I that haven't encountered through pure chance.
Maintenance
Water 10 plants
Restock 8 vending machines
Unclog 8 toilets
Upgrade a machine
Don't just sit on your hands waiting on your Janitors. Click on the plant / vending machine / toilet and as long as the item isn't at 100%, you can direct your Janitors to "fix" it.
Staff
Promote a staff member
Train a staff member [any]
Train a [specific type] of staff member
Save up your staff promotions for when you need them!
General
Thermal Comfort of 80%
Turns up if your hospital has less than this. Can be farmed by removing radiators afterwards, resetting to below 80%
Research 200 research points
Make [Room] level four
Does not matter if you have room already built or not; will still request it. Won't request if a room of that type exists at level 4 or higher.
Build a [Room]
Will not ask for a type of room you've already built.
Other Tips


Emergencies
Hooray! Someone else's misfortune is your cash windfall.
I will often hold off on building treatment rooms until I have emergency patients show up for that room.
Why? Am I being paid to cure those other people? Heck no.
I get paid for emergency cases. Get a treatment room built and reap the windfall. Emergency rewards are stingy, but they generally at least let you break even.
Remember to assign a staff member, too. Make the room high priority and, in rooms like Wards, assign an additional nurse to share the load.
It's often a good idea to place some toilets next door as well. Emergency patients take positive pride in tottering all the way across the map to the most distant loos possible. It's also a plus if you think ahead and cluster your treatment rooms around the helipad. That way your patients waste no time getting to where they need to be.
My personal favourite rooms for emergencies are the Ward and the Fracture Ward.
Why? Because if seven people turn up to Chromotherapy, there's not much I can do to speed them along. Short of building another actual Chromotherapy suite.
Wards however can be fitted precisely to your needs. Got seven Fractured patients? Build five beds and you'll shuffle them through quickly. You can also assign multiple staff to the task. If you have a really low cure rate, take a second look at your staff. I have one doctor and one nurse with focused Treatment qualifications, who I use as my Head of Not Messing Up Emergencies. After all, you don't actually get any reward money unless you cure them.
Of course, you can keep any treatment rooms you built for emergencies for the use of other patients. I suppose.
End of Year Awards
The actual presentation unhelpfully forgets to mention any of this, but you actually get a small cash prize for each award won. It's only $5,000 alas. Still, you'll be glad of it.
VIP Visits
Unfortunately, most of the VIPs offer rewards only in terms of reputation and Kudosh. Tarquin himself being a prime example of these stingy sightseers.
Anyhow, some VIPs do give you financial recompense. They will judge your hospital on the quality of your rooms. If that rich darling Jasmine is headed to your toilets, this is a good moment to hurry up and spam the place with Gold Star Awards.
Level Four Rooms
So Tarquin keeps asking me to make a level four room. Fine.
Make one level four room. Then pillage its contents the next time Tarquin wants a high level room.
Just move the furniture around, yo. Also the starting staff room has some nice furnishings to steal.
If you're having trouble breaking into level four despite ludicrous bling, try making the room a bit bigger. (They don't have to be square.)
The best item for increasing room prestige is the Gold Star Award. It's unlocked with Kudosh - go get it. Otherwise, try the Dog painting and the Jasmine Odyssey photo.
Farm Objectives
Build a level four room. Pillage it. Get asked to make it level four again. Repeat. Dosh.
Tarquin is a bit of an idiot. In particular, I keep building him that damn Surgery, deleting it, and then being asked to build it again. He's really stubborn about the Surgery. Not happening, Tarquin. Not happening.
The Research Lab and Marketing are also great for farming objectives. Tarquin will often ask you just to start a marketing campaign, or research 200 points. Researchers don't actually need a directed project to generate research points. Even better, marketers don't even need to bother being in the room... Just launch the campaign. I would recommend however trying to launch a campaign that suits your needs. If you have to cure some Fractured patients, then put out a campaign for the Fracture Ward. You can also launch a marketing campaign for a disease you can actually cure, rather than all these surgery patients who you will merely be sending home.
Actually Winning The Game
Oh right, that's what we're actually here for. Moving on...
A common mistake is to push for Star objectives too early. In Duckworth, you need to be sitting on a big pile of cash before you can switch focus to anything other than making money. Once you do have plenty of cash though, things are quite straightforward.
Cure 5 Patients with 8-Bitten
You need to research a Resolution treatment room. Any hospital map can research the Resolution lab, so off to Mitton you go.
There is an Emergency where 7 Patients with 8-Bitten will turn up. Cure 5 of them and you're done!
Otherwise, you might want to use Marketing. Put out a marketing campaign for this disease and you'll get more Patients turning up with it.
Staff Morale
As aforementioned, a high level, attractive room is the easiest way to please your staff. The Gold Star Award is highly recommended.
I've been telling you not to promote your staff. That's excellent advice for not being seventy feet in debt. However, to complete the level, you are going to have to make up for it. Once you feel you have a handle on the cash situation, start promoting your sulking staff. Use the staff info screen to "satisfy all pay requests."
If a nice room and a pay rise still doesn't cut it, have you considered Emotional Intelligence? Training improves morale by itself. However, in my hospital I happened to have a lot of staff who were inherently Grumpy, thus dragging my morale down. Some Emotional Intelligence training solved that.
Or, y'know.... You can also just fire them.
Make a level 5 staff room and send everyone on break. This should do the trick. But if it doesn't, then it is finally time give out pay rises. Or fire them.
Reputation
You'll also need to get your hospital's reputation up. I told you in the beginning, don't be shy about sending patients home. You can't afford to build every treatment room. However, at the end of the level, you do need to make sure you're curing a fair proportion of people. Hopefully by then you will have a collection of treatment rooms, which will boost your cure rate, hospital value and reputation.
Otherwise, it's Marketing to the rescue! Launch a big general Marketing campaign to get your Reputation back up to where you want it. Problem solved.
Level 8 Hospital
Build more rooms. The fastest way to improve your hospital level is simply this; build. Hiring a few more staff members where you have need of them will help as well. A hospital with a full collection of the necessary treatment rooms should be level 8, easily.
Epidemics


Oh you weren't having enough fun? That's alright, one of my demon DNA viral strains needs in the wild testing.
To handle an epidemic, you need to vaccinate all infected persons. This can mean both staff and patients.
Infected persons give themselves away through their behaviour. Abominable Curse patients act like mummies, with their arms stiffly outstretched (see screenshot above). I recommend abusing the pause button while you scan your hospital. Pause, scan, vaccinate, unpause, repeat.
What do you mean, "Dr Madge, I can't manipulate time and space?"
Just use the cosmic spacebar like a normal demigod would.
If a patient leaves your hospital while infected, you lose the challenge. For this reason, I recommend frequently lurking around the exits. Like a hawk waiting to swoop. Infected patients are easier to spot when they are out in the open.
Chances are, you'll end up wondering who the last infected person could possibly be. You're certain all the patients are clean....
It's the receptionist. Staff and patients who spend very long periods sitting down do not give their infected status away. Pinch their bench, or pick them up and drop them. Just make them walk and watch thier behaviour.
The other epidemic is Jogger's Ripple. This one is identified by people power-walking everywhere (see screenshot above). They move pretty darn fast.
Jogger's Ripple is easily confused for several things, chiefly the happy walk of cured patients. The speed of Jogger's Ripple is often the best way to spot them. Anyone high on caffeine will act the same though, so avoid placing coffee machines on these levels, at least until you have your eye in.
If you send a bunch of patients home, the Jogger's Ripple ones will storm ahead like marathon runners, with a big sign over their heads that's easy to track. Shoot 'em. I mean, uh, vaccinate them.
You get a nice cash reward for successfully handling an Epidemic, so consider it a good thing!
It's not common, but it's possible to fail an epidemic if the disease spreads out of control. Patients in congested areas can spread their germs, and it's game over if you end up with more infected people than you have vaccines to treat them. In the screenshot above, 6 infected patients very rapidly became 21, with little time to intervene. To prevent this, reduce corridor congestion.
Easily overlooked, there are in fact two ways to vaccinate folk. The first is in their patient / staff tab. The second is to select the button on your Objectives sidebar, where it tell you how many infected remain. You then enter vaccination mode.
Should you get certain glitches - notably, when external lecturers get infected - going into the cursor vaccination mode is the only way to proceed. Cursor vaccination mode should still work on people who can't otherwise be selected.
Dr Cox, I am not teaching you how to use the cosmic spacebar. Sit down.
Extreme Measures

You might be thinking after all this, "Hang on, Dr Madge... If I get no rewards for diagnosis, only objectives... Does that mean I can just dispose of GPs and stuff altogether?"
And the answer is - yes!
Certainly while working towards one star, this is a viable strategy. Turn the game on its head by having no diagnosis whatsoever. Just build clinics to treat emergency patients, then relentlessly chase Tarquin's objectives. Hah! Who needs GPs? Not us!
There is no penalty in the early game for having all your visitors ragequit. The Reputation requirement is very generous, easily met by some successful emergencies and VIP visits. Just keep following Tarquin's orders. This is certainly a financially viable way to keep your head above the water. You will however find that reaching the one star objectives is slow going. You still have to cure 5 Resolution patients, and waiting for the right emergency is painful. This is definitely not the fast way to win, but it's a fun alternative if you're just fed up with doing Duckworth the 'normal' way.
Jeez, finally...
You can watch a "minimalist" run of Duckworth-Upon-Bilge here:
Conclusion

I hope you found my lecture on "Public Hospitals and the Pillaged Wastegrounds" useful. Or at the very least, reassuring.
I honestly found Duckworth to be the most interesting level because it forced me to rethink my strategies. I wish you good luck with the challenge!
My last tip is to retreat gracefully. Duckworth is hard. If you are in any way uncertain about things like staff training and research, this is not the level to be learning on. You should probably have at least one three star hospital under your belt before attempting Duckworth. Not least because the Kudosh you've accumulated will have unlocked useful items. Things like Medicine Cabinets and the Gold Star Award should already be in your inventory. You can also choose to do your research projects on a friendly map, in whatever lab you've already set up. So go back to your favourite hospital and build it up a little more!
Learning never stops! You may have your own tricks and suggestions. Please share them in the comments box below!
If you want to see more of Dr Madge, you can browse my YouTube channel!
https://www.youtube.com/channel/UCUr9gc74US9wReyTqR5-LQQ
Source: https://steamcommunity.com/sharedfiles/filedetails/?id=1516835400
More Two Point Hospital guilds
- All Guilds
- Two Point Hospital Guide 10
- [FR] Astuces et conseils pour Two Point Hospital
- Illnesses, diagnosis, traits, tips and more...
- Two Point Hospital - Staff Management Guide
- Two Point Hospital - School of the Gifted Employees Guide
- Two Point Hospital - Level Layouts
- Two Point Hospital - Missing Your Golden Toilet?
- Two Point Hospital - Duckworth-upon-Bilge (3 Top Tips)
- Two Point Hospital - Epidemics