Introduction
Treasure of Nadia is the sequel to Lust Epidemic. While it is not necessary to play Lust Epidemic first there are characters and parts of the story that you will understand better if you have.
This guide will not be as detailed as my guide for Lust Epidemic, due to the fact this game has more outdoor environments. So, I will tell you that you need to go to a place, rather than tell you step by step on how to get there.
This guide is currently in progress. Right now it goes through the end of the story, but skips most of the side content such as Ancient Temple Puzzles, Booty Calls, Fishing, and so on.
The Characters
The Ladies
NameHeadshotIn GameAlia
(Sheltered adopted daughter of Naomi and Sam)Clare
(A rival treasure hunter working for Sofia)Diana
(Ex-treasure hunter now the town librarian)Emily Garner
(Runs the local Squallmart)Janet Davis
(Mother of your childhood best friend)Jessica Amor
(Town Doctor)Kaley Davis
(You childhood best friend)Madalyn Rose
(Mother Superior of the local church)Naomi Gala
(Free spirited mother of Alia)Pricia
(Runs the local massage palor)Sofia Vesper
(Famous treasure hunter)Tasha
(Bar maid at the local watering hole)
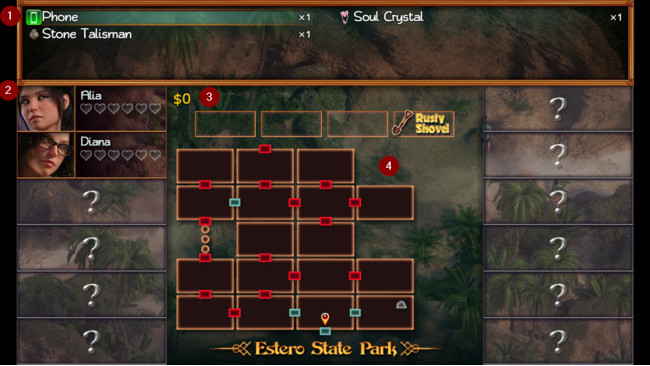
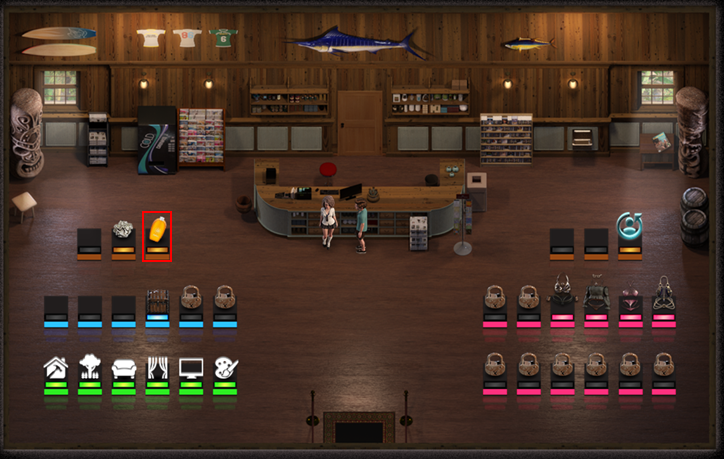
The Inventory Screen

You can access the inventory screen by pressing the ESC button or right mouse clicking.
1. Your inventory
These are the items that you have collected. You can click on them to find out more information about them, or use them. As you gain more items you will need to scroll down to see them.
2. Status with the ladies
The number of hearts you have affects the different acts they will be comfortable doing with you.
3. Your tools
You have four tools: Boots, Metal Detector, Guide, and Shovel. You will be able to upgrade the boots, guide, and shovel during the course of your adventure. The boot upgrades will give you immunity to different aspects of the environment. The guide upgrades will improve the talismans you find. The shovel upgrades will speed up the time required to collect lower level talismans.
4. Local Map
The map will show you the areas available to you. The green boxes indicate that you can travel between the two "rooms". Red "doors" mean that you are unable to currently access the area.
Maps


This story takes place in Cape Vedra.
Estero State Park
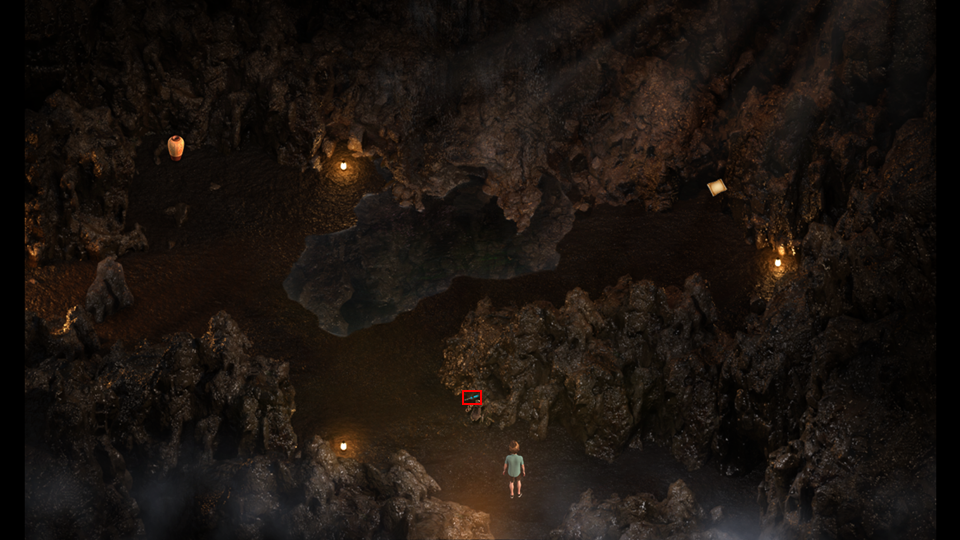
Caverns (Cave)
The Walkthrough - Part 1 - 0% To 3% - Scenes 1 - 7


This guide starts after the initial game tutorial stops, when you pick up the Soul Crystal. I highly advise you to set your Move Speed to Fast as Evie suggests. The "Save Often" motto is also highly recommended. If you leave the default options Evie will remind you to save.
This guide is divided into parts, mainly due to Steam limitations on how much text can be in a guide section. There is no "logical" reason for a new part, just that I ran out of room in the previous part.
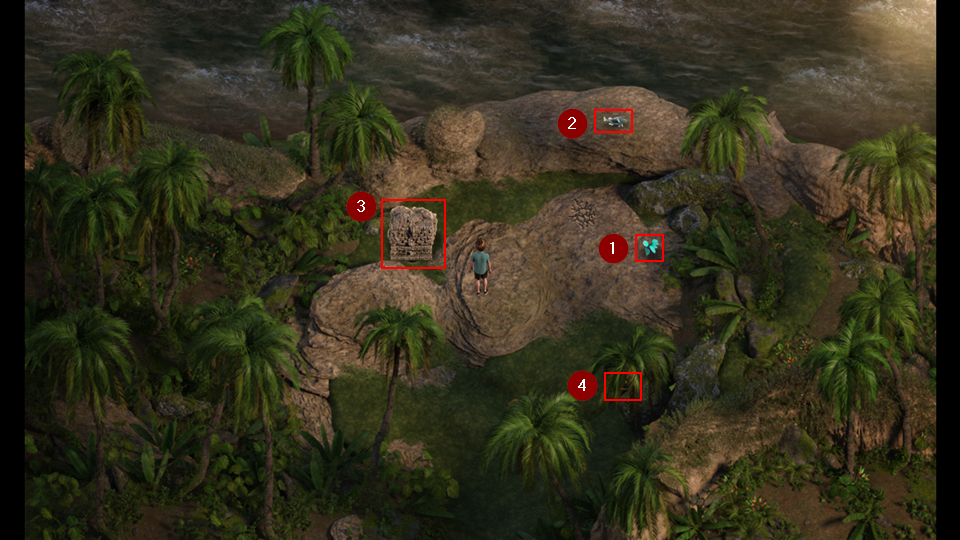
Go to Estero Park and meet Michael, the park ranger.
Click on the sparkle to find your first "treasure". Any time you see a sparkle you'll want to collect it. Don't worry, if you don't it doesn't disappear. However, it can't reappear in that spot until you collect it.
Go to the Library and sell the Stone Talisman to Diane.
Looks like it is going to take a lot of work to become a successful treasure hunter.
Go to the Lighthouse to visit Albert.
Notice the number 6 on the floor. You will need to light six torches to unlock what is there.
Go to Full Mast Bar.
Pick up the Room Key from the spark in the corner.
Go to Janet's Home.
Go upstairs and unlock the door on the right with the Room Key.
Pick up your Photo ID and note the number on the Chalkboard.
Go back to the bar.
Pay attention to Naomi's order, Sex on the Beach.
Bring the Dark Rum to Albert in the Lighthouse.
Receive a pair of Binoculars.
Let's go to Estero Key and do some bird watching.
Use the Binoculars to get a better look.
Naomi solo scene and earn Naomi's first heart.
Go to the Doctor's Office.
Talk to the Receptionist. I've found that clicking around their knees is the best spot.
Need to get an Insurance Card.
Go to the Church.
Notice the 5 on the upper level to the right of the entrance.
Go to Squallmart.
There isn't anything you can purchase with your $10.
Time to go to the park and hunt for treasure.
Go to the left and pick up the Chest Key.
Go to the Library and sell your Talismans to Diane.
Go to the Massage Parlor.
Take the path on the right and go to the back.
Pick up the Shovel Handle and read the crafting recipe (Silver Talisman Crafting).
Enter the Massage Parlor.
Select Yes. I'll take a massage for $30.Scene with Pricia.
Go back to the Park.
Pick up any talismans.
Go to the Beach.
Use your Binoculars to get a better view.
Brad and Valerie scene.
Go to the Mansion and talk to Sofia.
Go to Janet's Home and talk to Janet.
Go upstairs and in the left door and search Kaley's room.
Click on the sparkle by the window and use your Binoculars.
Click on the sparkle on the bedside table.
Go to Estero Key.
Follow Alia.
Talk to Alia.
Receive an Unknown Treasure.
Open the chest with your Chest Key.
Receive Kama Sutra - Alia - Foolin' Around.
If you invite a girl over you need to have Kama Sutra pages for her to do anything with her.
Go to the Library and show Diana the Unknown Treasure.
Sell any Talismans you have to Diana.
Go to Estero Key.
Receive Alia's phone number and first heart.
Go to Squallmart.
Talk to Ash.
Trade your Binoculars for the Photo Album and Photo: Dr. Jessica Amor.
You can access the photos in the Extras Album in your inventory.
Go inside of Squallmart and get something for your house, we don't need much. You should have enough money for Basic Walkway ($10), Basic Fence ($30), and Garden Flowers ($20). It doesn't take much to impress Alia. Don't worry about the prices for other things. As you progress you will find better Talismans that will sell for more money.
Go Home. Looking better already.
Use your phone to call Alia for a Booty Call.
Scene with Alia.
Go to Estero Park, we need to find some Talismans to earn some cash. We need $60 to purchase the Field Guide.
Click on any sparkles you find.
Follow the "Goons" west.
While the park ranger is distracted pick up the sparkle and Shovel Shaft.
You will now be able to access this area and not be turned back by the park ranger.
Head north (Up).
We have to wait until we get some gear to deal with the scorpions, otherwise we'll get stung and have to visit the doctor, and we don't have insurance yet.
Go back to the Park entrance and then east (Right).
Go into the Cave.
Scene with Clare
Pick up the Small Screwdriver.
Continue entering the areas you have access to in the park until you have enough Stone Talismans to get you a total of $60.
Go to the Library and sell the talismans to Diana.
Go to Squallmart.
Purchase the Field Guide for $60.
Go to Estero Park.
Continue entering the areas you have access to, until you find a Jade Talisman.
Go to the Parlor.
Give the Jade Talisman to Pricia.
Scene with Pricia and earn first heart.
Gain a 60 second Awareness bonus. This is shown by the countdown timer in the upper right corner of the screen. You will want to give Pricia one of each level talisman that you find as the bonus increases with each talisman level.
Go to Estero Park and look for talismans until the timer runs out.
Go to the Library.
Sell your talismans to Diana.
Go to Estero Park.
Go West (Left).
Go North (Up).
Grab the Chest Key, you will get stung by a scorpion.
Go to Squallmart.
Depending on your cash purchase the following, in this order, if you run out of cash you'll have to search for more talismans to afford the rest.
Insurance ($60)
Metal Detector ($70)
Lighter ($40)
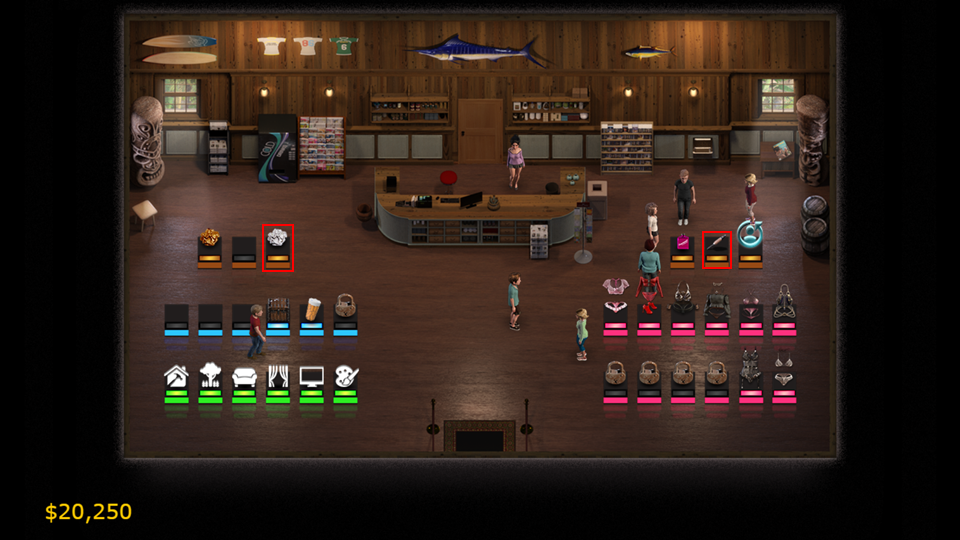
Shovel Head ($80)Once you purchase the Metal Detector you will start finding coins.
The small piles are only worth $5, the larger piles are worth $100, and there are even larger piles that you will find. Like the sparkles pick up any money you see laying around and they don't disappear if you don't collect them, they just can't respawn.
Now that we have insurance, lets go see the Doctor about the scorpion sting.
Go to the Doctor's Office.
Talk to the Receptionist.
You will now receive an Intelligence boost. Similar to Pricia the Intelligence boost will increase with subsequent visits. You will notice that this one is based on items and not time.
Go to Janet's Home.
Go upstairs.
Check on Kaley in the bathroom.
Kaley solo scene and earn Kaley's first heart.
Go to Janet's room.
Use the Small Screwdriver.
Click on the sparkle.
Click on the note by the wall.
Where have you seen a note on a chalkboard?
Click on the Shoe Laces in the bathroom.
The Walkthrough - Part 2 - 3% - 10% - Scenes 8 - 14


Go to the Library.
Talk to Naomi.
Naomi wants you to get her a drink and a good book.
Go into the library.
Click on the sparkle.
Receive a Boring book about paint probably isn't the reading material Naomi is looking for.
Talk to Diana.
Click on the sparkle.
Receive A Sinful Affair, this sounds more like what Naomi wants.
Now lets get her that drink.
Go to the Full Mast Bar.
Talk to Tasha.
Now what was Naomi's usual drink?
Purchase Sex on the Beach for $50.
There is a guy next to the dumpster that will trade you a treasure for a drink. Don't do it, it is a Stone Talisman and the cheapest drink is $10.
Go to the Library.
Talk to Naomi.
Give Naomi A Sinful Affair and the Sex on the Beach.
Scene with Naomi, her phone number, and second heart.
Grab your pants.
Go to the Doctor's Office.
Talk to Ash.
Go to the Church
Go into the Church while Ash keeps Madalyn busy.
Click on the sparkle to get the Church Key.
Open the chest with the Chest Key.
Receive Kama Sutra - Naomi - Blowjob.
Exit the Church.
Receive the picture of Mother Superior.
Go to Estero Park.
Take Alia into the cave.
Read the crafting recipe (Jade Shovel Crafting).
Go West (Left)
Scene with Alia.
Click on the Sparkle.
Receive Silver Talisman.
Light the torch with the Lighter, if you purchased it, if not you'll have to come back.
Go to the Park entrance.
Go to Squallmart.
Emily wants you to catch the robber.
Buy the Pipe Wrench ($40) since you're already here.
Go to the Parlor.
Follow the robber into the backyard.
Talk to the robber.
Give the Silver Talisman to Pricia.
Scene with Pricia and a three minute Awareness bonus.
Go to Estero Park and look for talismans in the outside areas you have access to.
You should have found at least one Jade Talisman. Let's craft the Jade Shovel.
Go to the Shrine in the cave.
Click on the Shrine and add the Shovel Head, Shovel Shaft, Shovel Handle, and Jade Talisman.
Receive the Jade Shovel.
Evie tells you that the new shovel will make digging faster. What it does is Stone Talismans will now instantly pop up and Jade and higher talismans will do the spin thing. You'll know that you've found one of the better talismans when your character says something.
Since we're in the park already, let's light the second torch. Go to the area West (Left) of the entrance and light the torch with the Lighter.
Go to Squallmart.
Talk to Emily.
Give Emily the $350Scene with Emily, Emily's phone number and first heart.
Go to the Library.
Talk to Diana.
Diana needs an MRI magnet to fix her scanner.
Go to the Doctor's Office.
Go to the bird in the parking lot.
Click on the sparkle.
Receive MRI Room Key.
Go into the West (Left) door.
Use the MRI Room Key.
Click on the sparkle.
Receive High Powered Magnet.
Click on Chest Key.
Go to the Library.
Show Diana something.Give Diana the High Powered Magnet.
Earn Diana's first heart.
Talk to Diana.
Sell all Talismans.
Go back outside.
Talk to Ash.
Offer Ash $250 for Diana's picture.Go to Estero Key.
It doesn't matter which one you pick to do first, the other will be available after you're done.
Go East (Right).
Talk to Alia.
Light the torch with the Lighter. This one doesn't count for your torch count.
Scene with Alia.
Earn Alia's second heart.
Go to the Full Mast Bar.
Go upstairs.
Click on the leaking pipe, towards the bottom, and use your pipe wrench.
Let's leave the chest alone for right now as there is a chest key that we will be able to pick up later.
Read the book in the corner.
Go downstairs.
Scene with Naomi and Tasha. Earn Tasha's first heart.
Go to the Men's room in the bar.
Read the crafting recipe (Stompin' Boots).
Go to the Library.
Talk to the guy blocking the door.
Go to Squallmart.
Talk to Ash.
Go back to the Library.
Go back to Squallmart.
Talk to Ash.
Buy photo from Ash for $100Go to Janet's Home.
Go upstairs.
Janet Solo Scene.
Go to the Library.
Pick up the stuff Ash dropped.
Receive Church Key, Silver Talisman, and Broken Camera.
Go inside and sell your talismans to Diana so you'll have some walking around money.
Go to the Church.
Click on the bottom left door and open with the Church Key.
Click on the sparkle.
Receive Cave of Jaega map and Chamber Key.
Light the two torches on the sides of the door.
Notice that if you step on the round pressure pad a Chest Key appears in Madalyn's Room, and it disappears when you step off.
Click on the door between the torches and open with the Chamber Key.
Go to Estero Park.
Earn Madalyn's first heart.
Go back outside.
Now that the Michael is busy at the Library we can go a little farther West (Left)
Click on the sparkle (may not be here as talismans are random)
Click on the Kama Sutra page, receive Kama Sutra - Tasha Strip Tease
Click on the green plant, receive Ginseng Plant
Click on the gold pile (nay not be here as gold is random) this is an image of a $100 pile.
Click on the crafting recipe, receive Camera Repair
This plant is too high to reach right nowYou will want to start collecting plants as you discover them. As far as I know you can only have one of each plant. If you have one in inventory you won't find another, so use them or sell them as soon as you are able.
We can't go north (Up) as there are scorpions blocking the path.
Eat the Ginseng PlantGo to the Doctor's Office.
Talk to the Receptionist.
See Doctor Jessica for $140Scene with Jessica
Receive an Intelligence Boost.
Click on the x-ray machine.
Go to the west (Left) door.
Click on the sparkle, receive Loose Screws.
Click on the Camera, receive Camera Base.
Go with Jessica to the bar.
Receive Jessica's first heart.
Drinking game with TashaYou take turns drinking and the first one to get drunk loses.
You have to wait until Tasha turns her head and then Pretend to take a drink.If you fail you restart the game.
Scene Tasha dancing topless.
Receive Tasha phone number.
The Walkthrough - Part 3 - 10% - 14% - Scenes 15 - 20


Looks like we have everything to fix the camera, let's go to the shrine and put it back together.
Use the shrine with the Broken Camera, Camera Base, Small Screwdriver, and Loose Screws.
Receive A Working Camera and a picture of Clare.
Go to Squallmart.
Talk to Ash.
Go to the Church.
Talk to Ash.
Go to Squallmart.
Go inside Squallmart.
Emily wants some Ginseng and Philweed.
Purchase the Sunscreen ($30)
Go to Estero Park.
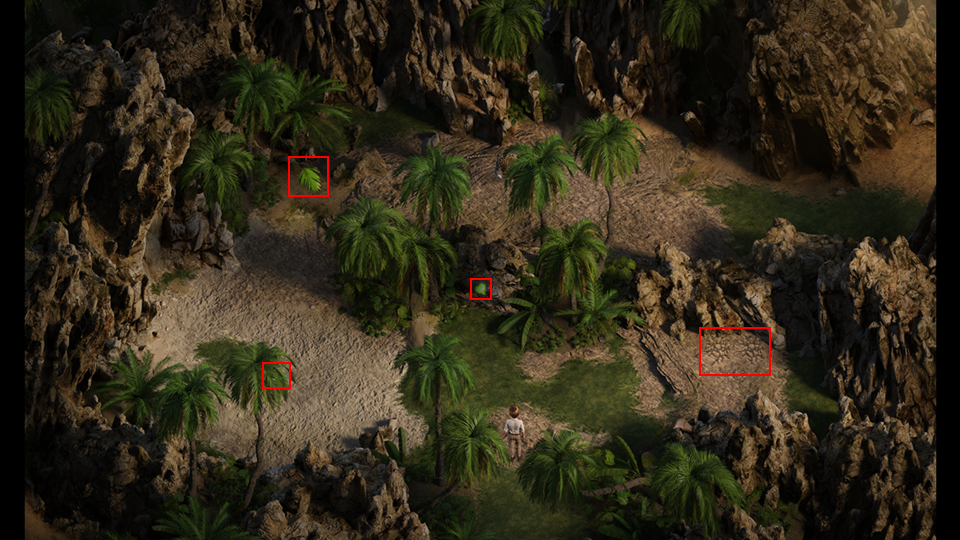
You're going to walk around to pick the plants that Emily needs. Due to the random nature and fact that they won't spawn if you have them in inventory they may not be in the places I find them.
To make it easier I will reference the locations in a row and column format, where the first number is the row of the "room" and the second number is the column of the room. Please see the Maps section for a visual of this.
Go to 5 - 1, the lower left grid on the map.
Watch Clare's group stomp the scorpions to open the next area.
Pick the Ginseng Plant. (May not be at this location due to the random nature of the plants)
Go to the new area (4 - 1) that Clare's group opened for you.
Pick up the Philweed Plant.
Pick up the Floppin' Fish. This will allow to purchase more lures from the Bait Shop.
Move the Loose Rune.
Collect all of the cockroaches.
Click on the Orange Spark by the tree.
Receive Naomi's Profile.After you have collected both the Philweed Plant and the Ginseng return to Squallmart.
Talk to Emily.
Give the Philweed Plant and Ginseng to Emily. From now on you will want to pick any plants when you see them.
Scene with Emily.
Earn Emily's second heart.
Purchase the Alloy Shovel Head ($200).
Purchase the Metal Hook ($90).
Go to the Library.
If you're running low on money you can sell your talismans to Diana.
Go to the Lighthouse.
You should already have the five roaches necessary.
Go to the Library.
Go to the Beach.
Talk to Diana.
Scene with Diana.
Go to the Library.
Receive Diana's second heart.
Go to Squallmart.
Talk to Ash.
Go to the Lighthouse.
Go inside the Lighthouse.
Go upstairs.
Talk to Ash.
Pay Ash something for the photo.Receive pictures of Naomi.
Go to Estero Key.
Go to Squallmart.
Purchase the Antacid Tablet ($30).
If you don't havea Ginseng plant look for one in Estero Park.
Once you have a Ginseng plant go to the backyard of the Parlor.
Talk to Pricia.
Receive $250.
Receive Leather Gloves.
Click on the garden and Plant the Ginseng in the garden.Go into the Massage Parlor.
Talk to Pricia to receive your reward.
Scene with Pricia.
Receive Awareness Boost, Pricia's phone number, and Pricia's second heart.
Go to the Library.
Go to Janet's Home.
Go to the backyard.
Go back into the house.
Talk to Janet.
Janet and Naomi want something to drink.
Go inside.
Click on the sparkle on the refrigerator.
Receive Iced Tea.
Go upstairs.
Go into Janet's room.
Click on the sparkle on the dresser.
Receive Iced Tea with Alcohol.
Go back to the backyard and deliver the drinks.
Give them the Iced Tea with Alcohol.
Scene with Naomi.
Go back to the backyard.
Go to Kaley's room.
Earn Kaley's second heart.
Go to the Lighthouse.
Go downstairs.
Talk to Albert.
Read the note on the bed.
Read the crafting recipe (Swift Shovel).
Pick up the Damaged Boots.
Talk to Albert
Receive the Idaho's Cryptic Note.
I'll save you the walking around and counting. The code is: 6846 Candles at the Church
8 Pillars at the Library
4 Crosses in the Graveyard
Open the chest and receive Rare Guide Book.
Go to Squallmart.
Receive photo of Emily.
Buy the Shoe Glue ($40).
Let's go to the Shrine and craft some Stompin' Boots.
At the Shrine use Shoe Glue, Damaged Boots, Shoelaces, and Leather Gloves.
Receive Stompin' Boots.
Time to take care of those scorpions.
Go to 4 - 2 and stomp all of the scorpions.
Go north (Up).
Scene of Clare
Read Clare's book.
Pick up Ultra Shovel Handle.
Pick up Floppin' Fish.
Pick up crafting recipe (Pickaxe)
Go to 4 - 3.
Give the Antacid Table to the bird.
Pick up the crafting recipe (Gold Talisman Crafting)
If you found a Gold Talisman go to the Parlor to give it to Pricia.
Optional scene with Pricia and an awareness boost that will last until you find another Gold talisman.
Go to the Library.
Talk to Diana.
Sell your talismans to Diana.
Go to Squallmart.
Go back to the Library.
Talk to Emily.
Click on the third sparkle from the top.
Receive Perennial's of Cape Vedra.
Talk to Emily.
Give Emily the Perennial's of Cape Vedra.
Go to Estero Park.
Pick up the Heavy Cord.
Pick up the Basic Container.
Open your inventory and select the Metal Hook.
Attach the Heavy Cord to it to create a Grappling Hook.
Time to go get that Red Ginseng.
Go to Estero Park.
Go west (Left) to 5 - 2.
Use the Grappling Hook to get the Gaffer Tape.
Go west (Left) to 5 - 1.
Use the Grappling Hook to get the Red Ginseng.
Go to Squallmart.
Talk to Emily.
Give Emily the Red Ginseng.
Scene with Emily.
Go to Estero Park.
Go to the Shrine.
Use the Grappling Hook to get the Wrench Grip.
Use the Shrine to craft the Pickaxe: Wrench Grip, Gaffer Tape, Grappling Hook, Pipe Wrench.
Receive Pickaxe.
With the Pickaxe we can break all of those jars we've seen and break open some areas.
Go to Estero Key.
Scene with Alia and Kaley.
Receive Alia's third heart.
Go to Alia's secret place.
Use your Pickaxe on the loose stones
Go down into the cave.
The cave is dark.
Go to the far Left.
Go to the top.
Click on the torch, your avatar will find the correct path.
Light the torch.
Pick up the Shaman Staff.
Reject OfferReceive $10,000.
Earn Clare's first heart.
The Walkthrough - Part 4 - 14% - 18% - Scenes 21 - 26


Go to the Church.
Since you've lit five torches a Chest Key will appear on the upper level.
Pick up the Chest Key.
Go to see Madalyn.
Use the Pickaxe to destroy the three pillars.
Push the rock onto the pressure plate.
If you screw up on the push puzzles just exit the room and re-enter and the puzzle will be reset.
Pick up the key in Madalyn's room.
Go East (Right) to the room opened by destroying the bottom pillar.
Pick up the Gold on the plate.
Read the book.
Break the Jar in the corner with the Pickaxe.
Receive a Silver Talisman.
Pick up the Broken Key.
Read the crafting recipe (Chest Key)
Go to the Parlor.
Go to Estero Park.
Look for some more Red Ginseng.
Go to 1 - 4
Use the Pickaxe on the weak spot.
Receive Quartz.
After you have found some Red Ginseng eat it. Oh no, we have to go see the Doctor again.
Go to the Doctor's Office.
Talk to the Receptionist.
See Doctor Jessica for $140Scene with Jessica.
Receive an Intelligence Boost.
You can see your Intelligence and Awareness boosts on your inventory page, along with your boots, metal detector, guide, and shovel.
Go to Estero Park.
Go to the Cave.
Go to the shrine.
Scene with Clare.
Receive Encyclopedia 1999.
Read the crafting recipe (Pirate Shovel)
Push the rock down 1.
Push the rock right 2.
Push the rock down 2.
Push the rock left 5.
Push the rock up 4.
Push the rock right 1.
Open the chest in the middle of the room with a Chest Key.
Receive Unknown Treasure.
Go to the Park Entrance.
Go to the Library.
Open the jar to the right of the door with the Pickaxe.
Pick up the Chest Key.
Show Diana something.Give Diana the Unknown Treasure.
Go to Estero Park.
Receive Silver Talisman.
Scene with Tasha and Naomi.
Receive Tasha's second heart.
Break the Jar with the Pickaxe.
Pick up Basic Container.
Go to Janet's Home.
Break the Jar in the front yard with the Pickaxe.
Pick up Basic Container.
Go into Janet's room.
Receive Janet's first heart.
Go to the Full Mast Bar.
Break the Jar on the side with the Pickaxe.
Pick up Silver Ore.
Enter the bar.
Receive Citation.
Go to the Library.
Click on the sparkle on the desk.
Receive Diana's Note.
Receive Secret Key.
Turn on the east (Right) light.
It turn on the light over the item to the right of the window in the back.
Go outside the Library.
Open the chest with the Secret Key.
Go Home.
Go upstairs.
Scene of Diana.
Go to the Church.
Talk to Madalyn.
Go to the Doctor's Office.
Go to the Supply Room (Left door).
Click on the box.
Receive Nitroglycerin Bottles.
Go to Estero Park.
Go to 4 - 4.
Pick up the Broken Key.
Read the crafting recipe (Rock Bomb).
Open the chest with a Chest Key.
Pick up Kama Sutra - Tasha Mustacheless Ride.
Go to the cave (5-4).
Go to the shrine.
Craft as many Rock Bombs as you have materials for: (Nitroglycerin, Basic Container, Silver Talisman, Jade Talisman)
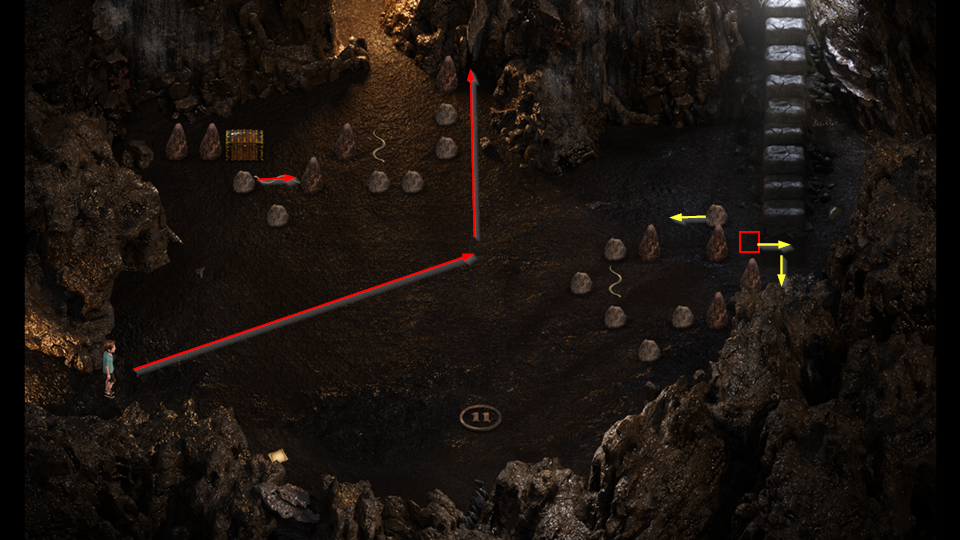
I will be using the same references for room in the cave as in the Jungle. The upper left room is 1 - 1 and the bottom right room is 5 - 4. See the Maps section for more information.
Go to 3 - 2.
Use a Rock Bomb on the bottom rocks.
Go down to 4 - 2.
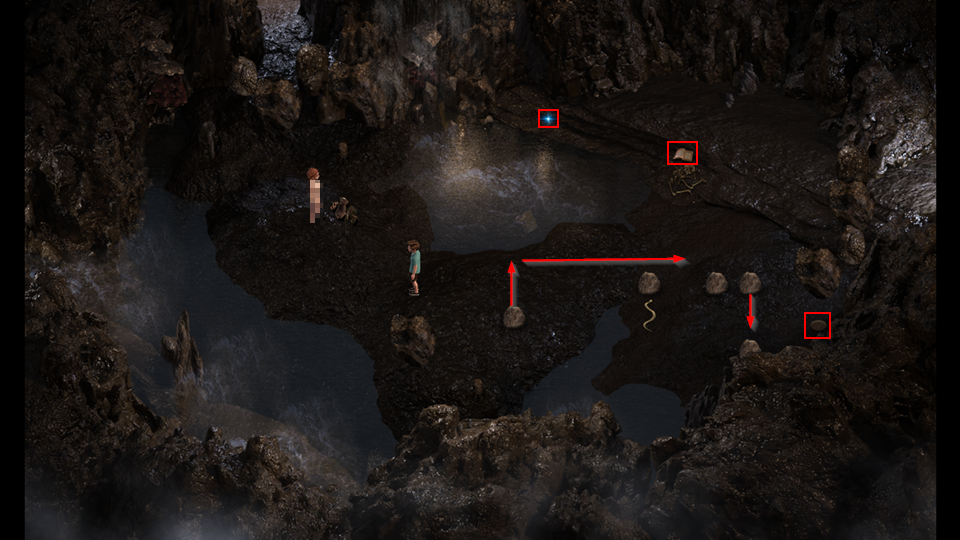
This is your first experience with a snake in the push puzzles. A snake will follow your movements and try to get to you. You need to make sure that snakes have no way to get through. If a snake touches you, you will have to start the puzzle over.
Push the center rock down 1.
Push the right rock left 1. Your screen should now look like the image below.
Start at the 1 to draw the snake up to the top level.
Go to the 2 to draw the snake to the level with the barrel.
Even though it looks like there is space for the snake to come through there isn't. Go to the 3 to trap the snake in the barrel.
Pick up the Snake in a Barrel.
Now lets use that pressure plate.
Move the right rock up 1.
Move the rock to the left 12.
Move the rock up 1 to activate the pressure plate.
Pick up the Chest Key that appears where the snake started.
Now that we have the snake return to the Doctor's Office.
Talk to Jessica in the examination room.
Go to Janet's Home and talk to Janet.
Receive Photo of Naomi and Alia.
Go to Estero Key.
Earn Naomi's third heart.
Go to Alia's secret spot.
Use a Rock Bomb on the rocks. If you didn't have the talismans necessary to create enough Rock Bombs you will need to go to the Estero Park and search for Jade and Silver Talismans until you do.
Go to the Doctor's Office.
Talk to Kaley.
Scene with Jessica and Kaley.
Earn Jessica's second heart.
Go to Estero Park.
Go to the cave.
Go to 3 - 2.
Use a Rock Bomb on the rocks to the north.
Another dark room. The spike traps trigger if you step on them, but you don't have a health meter, so it isn't that big of a deal. The auto pathing is terrible in this room. Walk to the back wall avoiding the spike traps. Walk behind the spike traps and then over to the torch and light it.
Pick up the gold laying on the floor.
Use your Pickaxe on the weak spot on the floor.
Receive Dolomite.
Go to the shrine.
Take Kaley back to 2 - 2.
Scene with Kaley.
Receive a Pirate Medallion.
Pick up the book.
Receive the Pirate Diary.
Return to the shrine.
Receive Kaley's phone number.
Go to the Library.
Show Diana something.Show Diana the Pirate Medallion.
Go to the Church.
Talk to Madalyn.
Give her the Pirate Diary.
Scene with Madalyn.
Go to the Library.
Talk to Pricia.
Diana will show you a book.
The Walkthrough - Part 5 - 18% - 23% - Scenes 27 - 36


Click on the sparkle to read and remember the Kayaking Tips, there will be a test later. Or you can just come back here.
Go to Estero Key.
Go to Squallmart.
Purchase the Kayak License Exam ($250)
Open your inventory and select the Incomplete License Exam.
Take Kayak License Exam
Receive Completed License Exam.
Go outside and talk to Michael.
Give Michael the Completed License Exam.
Go to Estero Park.
Go to 4 - 1.
Talk to Michael.
You basically have to avoid the rocks for 60 seconds. The money is only $5 per and you don't need it bad enough to hit a rock over it.
Go to 4 - 1.
Talk to Diana.
Stop all of the scorpions.
Pick up the Broken Key.
Break the Jar with your Pickaxe.
Pick up Gaffer Tape.
Move the rock right 3.
Walk around to the other side and move the rock left 1.
Move the rock up 2.
The path to the north (Up) will now be open.
Go north (Up).
Pick up the plant.
Receive Maca Plant.
Pick up the Old Map.
Play with the rock puzzle and keep resetting it until the one rock isn't there when you enter.
Push the top right rock up 1.
Push the rock rock that was to the left of it left 1.
Move into the top area.
Scene with Diana.
Pick up the Rusty Key.
Go to 2 - 2.
Read the crafting recipe (Ant Killer).
Open the chest with a Chest Key.
Pick up Kama Sutra - Naomi Doggy Style.
Go to 2 - 1.
Talk to Diana.
Receive Tikpak Artifact.
Go to 3 - 2.
Use your Pickaxe on the weak spot.
Receive Fossilized Algae.
Go to Squallmart.
Talk to Emily.
Receive Incomplete Serum Mixture.
Scene with Emily.
Receive Emily's third heart.
Purchase Alumina ($1000)
Purchase Plastic Wrap ($100)
Go outside.
Talk to Ash.
Go to the shrine.
Craft some Ant Killer: Fossilized Algae, Quartz, Alumina, Rusty Key.
Receive Ant Killer.
Go to 3 - 2.
Use the Kayak.
Click on the Ants.
Use the Ant Killer.
Pick the Maca Plant.
Go to the Parlor.
Follow Pricia to the backyard.
Talk to Pricia.
Give Pricia the Maca Plant.
Scene with Pricia.
Earn Pricia's third heart.
Since you're here you can sell any Ginseng plants you have to Pricia. You won't find more if you have one in inventory. Red Ginseng sells for $600 and Green Ginseng sells for $250.
Use your Pickaxe on the Jar to the left of the Parlor.
Go to the Mansion.
Go to the Library.
Talk to Diana.
Go to the Full Mast Bar.
Go out the back door of the bar.
Take the drink orders.
Go back into the bar.
I'm ready to grab the drinks.Go back into the main bar and click on the sparkle.
Go back out and serve the drinks.
Use your Pickaxe on the Jar by the grill.
Pick up the Basic Container.
Go back into the bar.
Go to the Men's Room.
Catch the Cockroach.
Go back into the main bar.
Go to Squallmart.
Buy Peanuts $50.
Go back to the Full Mast Bar.
Scene with Tasha.
Earn Tasha's third heart.
Leave the bar.
Talk to Albert.
Receive photo of Kaley.
Go to Estero Park.
Go to the Cave.
Go to the shrine.
Scene with Diana and Clare.
Go to Janet's Home.
Talk to Janet.
Go to Estero Park.
Go to the Cave.
Go to the Shrine.
Craft a Rat Trap: Plastic Wrap, Gaffer Tape, Roach, and Basic Container.
Receive a Rat Trap.
Go to Janet's House.
Talk to Janet.
Give Janet the Rat Trap.
Go inside the house.
Talk to Janet.
Go back outside and check the Rat Trap.
Scene with Janet and Jessica.
Receive Jessica's third heart and phone number.
Go to the Lighthouse.
Break the Jar on the outside with your Pickaxe.
Go inside the Lighthouse.
Pick up the Basic Container.
Break the Jar with your Pickaxe.
Go to the Estero Park.
Go to the Cave.
Go to the Shrine.
Craft a Rock Bomb: Nitroglycerin, Basic Container, Silver Talisman, and Jade Talisman.
Receive Rock Bomb.
Go to the Lighthouse.
Go inside the Lighthouse.
Go downstairs.
Use a Rock Bomb on the weak area of the wall.
Go into the new area.
Use your Pickaxe on the weak area of the floor.
Receive a Chest Key.
Read the book on the floor.
Go to Squallmart.
Go to the Library.
Talk to Diana.
Go to Estero Park.
Go to the Cave.
Follow Clare to 2 - 2 and watch her disable the trap to open up a new area.
Follow Clare to 2 - 3.
Go back to 2 - 2 and look at the cave art.
Go back to 2 - 3 and place the switches in the places indicated on the cave art.
Up, Up, Down, Up, Down, Up.
Click on the Gold Symbol.
Use the Tikpak Artifact.
Earn Clare's second heart.
Move left rock down 1.
Move rock that was next to it left 1.
Move side rocks up 1.
Move center rock to either side.
Pick up Pirate Diary.
Go upstairs.
Light Torch with Lighter
Use Pickaxe on weak ground
Receive White Sand
Pick up Floppin' Fish
Pick Philweed Plant
Pick Maca Plant
Pick Maca Plant
Read crafting recipe (Concrete)Go to the Full Mast bar.
Go to the overflow area in the back.
Click on the grill.
Use your Lighter.
Receive Fly Ash.
Go to Estero Park.
Go to the Cave.
Go to the Shrine.
Craft Concrete: Stone Talisman, Fly Ash, White Sand, and Dolomite.
Receive Concrete.
Go to Estero Key.
Follow Sam to Alia's secret spot.
Talk to Sam.
Give Sam the Concrete.
You should already have Philweed, Red Ginseng, and Maca Plant in your inventory if you've been picking them up while you've been walking around. If you do not, walk around in Estero Park until you find some.
Go Home.
Talk to Emily.
Scene with Alia and Emily.
Earn Alia's fourth heart.
The Walkthrough - Part 6 - 23% - 28% - Scenes 37 - 45


Eat a Maca Plant.
Go to the Doctor's Office.
Receive a text message (and picture) from Naomi.
Talk to the Receptionist.
See Doctor Jessica for $140Scene with Jessica.
Receive Intelligence Boost.
Go to the Church.
Talk to Madalyn.
Give Madalyn the Pirate Diary.
Scene with Madalyn.
Go to Janet's Home.
Go to Kaley's Room.
Look out the window.
Janet and Naomi scene.
Go to the Lighthouse.
Go to Squallmart.
Receive a text message (and picture) from Naomi.
Click on the sparkle.
Receive a Small Screwdriver.
Pick up the Broken Key.
If you have any of the plants put them in the grey bin.
The bars on the right will fill up as you add plants. The number of plants never goes down.
Go to Janet's Home.
Go to Kaley's Room.
Use the Small Screwdriver.
Scene with Kaley.
Earn Kaley's third heart.
Go to the Library.
Talk to Diana.
Go to Estero Park.
Go to the Cave.
Go to 2 - 3.
Go upstairs.
Scene with Diana.
Earn Diana's third heart.
Return to the Cave and use the stairs in 2 - 3 to return to the Estero State Park.
Go to 2 - 3 where the Jaguar is.
Go west (Left) to 2 - 2.
Read the book.
Pick up the Camera.
Pick up the Scorpion Venom.
Pick the Philweed Plant.
Pick up the Floppin' Fish.
Step on the Pressure Plate.
Light the Torch with your Lighter.Go to Estero State Park 2 - 1.
Click on the Bird.
Give the Bird Peanuts.
The bird will start to follow you. Take the bird to the Library.
Pick up the Chest Key.
Go behind the Library.
Scene with Diana.
Receive Diana's phone number.
Destroy the Pillar with your Pickaxe.
Move the rock down 1.
Move the rock across to the Pressure Plate.
Pick up the Gothic Key (Not the one by the bug) and Broken Key.
Go to Squallmart.
Deposit any plants you picked up in the grey container.
Talk to Emily.
Receive Love Potion.
Go to the Church.
Go to the room that is right of Madalyn's chambers.
Pick up the Cursed Shovel.
Open the door with the Gothic Key.
Go through the L shaped room to the next chamber.
Pick up the Broken Key.
Set the arrows as shown in the picture above.
This puzzle is part logic, part timing. The logic part is setting the arrows. When the mouse hits an arrow it moves in the direction of that arrow. The same applies for the snake. I found that clicking when the red arrow is pointing at the snake works most of the time. If you fail too many times the snake will be removed and you should be able to pass the puzzle easily.
Go to Janet's Home.
You can now go to the safe in the back room of Squallmart to pick up your cut of the Love Potion sales. The more plants you bring and the longer you wait the more money you will get.
Go to the Full Mast Bar.
Talk to Tasha.
Go to Janet's House.
Go to the backyard using the gate on the left side of the house.
Go in the backdoor.
Scene with Janet.
Receive Janet's fourth heart.
Janet's phone rings.
The passcode is the number from the chalkboard.
Go to the Parlor.
Scene with Pricia and Naomi.
Receive Naomi's fourth heart.
Go to Squallmart.
Go to the Mansion.
Click on the sparkle.
Jump when the guard is in the far position and set, and the camera is pointing the other direction. If you fail you just have to do it again.
Pick up the Feather.
When the guard is in the alcove go the to other side.
Smash the Jar with your Pickaxe.
Receive Fossilized Algae.
Move the container left 1.
Smash the Jar with your Pickaxe.
Receive Quartz.
Go up the stairs.
Click on the colored flowers.
Receive Hidden Key.
Note the House Number.
Smash the last Jar with your Pickaxe.
Receive Gold Talisman.
Push the container down 3.
Open the door with the Hidden Key.Scene with Tasha.
Earn Sofia's first heart.
Earn Tasha's fourth heart.
Go to Squallmart.
Receive Rusty Key.
Purchase Dart ($100).
Purchase Alumina ($1000).
Go to Estero Park.
Go to the Cave.
Go to the Shrine.
Craft Ant Killer: Fossilized Algae, Quartz, Alumina, Rusty Key.
Receive Ant Killer.
Go to Caverns 2 - 3.
Go upstairs.
Go to Estero State Park 2 - 2.
Click on the Ants.
Use Ant Killer.
Go north (Up) into new area.
Read crafting recipe (Blow Dart)
Squash scorpion to the right of rock.
Move rock left 1.
Move rock next to boxed in scorpion up 1.
Squash scorpion.
Move left bird left.
Pick up Bamboo.
Squash scorpion.
Move rock down 1.
Squash scorpion.
Move rock down 1.
Pick Philweed Plant.
Move rock right 1.
Squash scorpion.
Move rock left 1.
Move rock up 1.
Move right bird right.
Move rock right 1.
Move rock down 1.
Break Jar with Pickaxe.
Pick up Chest Key.
Light Torch with Lighter.
Teleporter activated.The Teleporter will take you to the park entrance. The Teleporter at the part entrance will bring you here.
Go to Squallmart.
Deposit your plants in the grey container.
Go to the Beach.
Talk to Emily.
Scene with Emily.
Go to Squallmart.
Purchase Love Potion ($2000).
Drink Love Potion.
Go to the Doctor's Office.
Talk to Receptionist.
See Doctor Jessica for $140Scene with Jessica.
Receive Intelligence Boost.
Go to Squallmart.
Go to the Parlor.
Go to the Full Mast Bar.
Go to the Doctor's Office.
Go to Estero Park.
Go to the Cave.
Go to the Shrine.
Craft a Blow Dart: Dart, Scorpion Venom Bamboo, and a Feather.
Receive Blow Dart.
Go to Squallmart.
Earn Emily's fourth heart.
Go to Squallmart.
Purchase Plastic Wrap ($100)
Go to Estero Park.
Go to the Cave.
Go to Caverns 4 - 2.
Go south (down) to Caverns 5 - 2.
Move the rock up 2.
Move the rock over 5.
Pick up the Pirate Diary.
Click on the sparkle.
Receive False Talisman.
Push end rock down 1.
Activate Pressure Plate.
Another Pressure Plate appears, active the new Pressure Plate.
Go into the new area to the east (Right).
Receive Grand Talisman.
Pick up Old Wood.
Go back to Clare.
Talk to Clare.
Give Clare the Old Wood.
Go east (Right) to Caverns 5 - 3.
Click on the near sparkle to traverse the water.
Talk to Clare.
Follow Clare to Caverns 5 - 4.
Talk to Clare.
Go to the Parlor.
Sell any Ginseng you want to Pricia.
Give the Grand Talisman to Pricia.
Scene with Pricia.
Awareness Boosted.
The Walkthrough - Part 7 - 28% - 33% - Scenes 46 - 56


Go to the Church.
Go to Madalyn's Chambers.
Click the sparkle.
Receive Chamber Key.
Open the right door with the Chamber Key.
Break the Jar with your Pickaxe.
Pick up the Basic Container.
Read the book.
Pick up the Bathroom Key.
Go back to Madalyn's room and open the left door with the Bathroom Key.
Scene with Madalyn.
Receive Madalyn's second heart.
Go back into the bathroom.
Read the note on the floor by the tub.
Go to the Cemetery.
Click on the ground under the palm tree.
When you find the piece that is weak break it with your Pickaxe.
Receive a Chest Key.
Go to the Ancient Temple.
I'll cover these puzzles in their own chapter. There are videos available online for all of the puzzles.
Go to Squallmart.
Receive a text (and picture) from Emily.
Purchase the Master Guide ($19,000).
Go to Estero Park.
Go to the Cave.
Scene with Alia and Kaley.
Recieve Kaley's fifth heart.
Go to Caverns 5 - 2.
Go to Janet's Home.
Go to Janet's Bedroom.
Janet Solo Scene.
Go to Estero Key.
Read the paper.
Pick up the Gaffer Tape.
Go downstairs.
Go to Janet's Home.
Go to Estero Park.
Go to the Cave.
Go to Caverns 5 - 2
Click on where the cockroach ran.
Go to the Shrine.
Craft a Rat Trap: Plastic Wrap, Gaffer Tape, Roach, and Basic Container.
Receive a Rat Trap.
Go to the Lighthouse.
Receive Rat in a Trap.
Go to Estero Park.
Use the Teleporter.
Go to Estero State Part 2 - 3.
Now that the Jaguar is busy break the Jar with your Pickaxe.
Pick up the Basic Container.
Go east (Right).
Pick up the Pirate Medallioin.
Two rocks will appear.
There are two Pressure Plates hidden by the palm trees.
Push the rocks to the Pressure Plates.
Light the Torch with your Lighter.
Pick up the Philweed Plant.
Pick up the Tikpak Treasure.
Go to the Library.
Talk to Diana.
Show Diana something.Show Diana the Tikpak Treasure.
Scene with Diana.
Earn Diana's fourth heart.
Go to Squallmart.
Receive text message (and photo) from Tasha.
Scene with Emily and Tasha.
Receive 2 Nitroglycerin Pills.
Go to Estero Park.
If you don't have the talismans required for the Rock Bomb, one Jade and one Silver, walk around the park until you do.
Go to the Cave.
Go to the Shrine.
Craft a Rock Bomb: Nitroglycerin, Basic Container, Silver Talisman, and Jade Talisman.
Receive a Rock Bomb.
Go to the Full Mast Bar.
Go to the Beach.
Talk to Jessica.
Go to the Bait Shop.
Purchase Finding Rare Fish ($1,000)
Purchase Heavy Natural Jig ($100)
Purchase Heavy Green Jig ($150)
Purchase Heavy Natural Plug ($200)
Purchase Heavy Green Plug ($250)
Purchase Heavy Natural Squid ($300)
Purchase Heavy Green Squid ($350)
I recommend only using Heavy lures as they will catch both smaller and larger fish. You will need to purchase all of the small lures to unlock a puzzle in the Ancient Temple.
Go Back to the Beach.
Catch a fish. See the Fishing section for information about fishing.
Scene with Jessica.
Earn Jessica's fourth heart.
Go to Estero Park.
Go to the Cave.
Go to Caverns 2 - 3.
Use a Rock Bomb on the rocks blocking your way east (Right).
Go east (Right).
Read the crafting recipe (Loaded Musket)
Break the Jar with your Pickaxe.
Pick up the Basic Container.
Go back to the Shrine.
Craft a Rock Bomb: Nitroglycerin, Basic Container, Silver Talisman, and Jade Talisman.
Receive a Rock Bomb.
Go to the Church.
Go to the L shaped room.
Use the Rock Bomb to open the weak wall.
Go into the new area.
Break the Jar with your Pickaxe.
Pick up the Basic Container.
Read the crafting recipe (Pirate Key)
Pick up the Gaffer Tape.
Read the book.
Pick up the Broken Key.
Pick up the Floppin' Fish.
Pick up the Spike Boots.
If you don't have a Grand Talisman go to Squallmart and purchase three Gold Ore ($4000).
If you don't have $12,000 you will need to collect your share of the Love Potion sales, sell any plants you can to Pricia, sell any talismans to Diana.
Go to Estero Park.
Go to the Cave.
Go to the Shrine.
Craft a Grand Talisman: Three Gold Ore and one False Talisman.
Craft a Pirate Key: Pirate Medallion, Grand Talisman, and two Broken Keys.
Go to Caverns 2 - 4.
Go to the right side of the middle snake to draw the left snake to the middle.
Push far left rock right 1.
Open the chest with the Pirate Key.
Receive a Tikpak Tablet.
Click on the spot behind the stalagmite by the stairs.
Go down by the next stalagmite to draw the snake into the alcove.
Push the rock against the opening.
Go up the stairs.
Open the chest with a Chest Key.
Pick up Kama Sutra - Diana Seat & Shift.
Pick the Philweed Plant.
Go to Caverns 3 - 2.
Now that we have the Spike Boots we can pick up the key in the corner.
Go to the Library.
Show Diana the Tikpak Tablet.
Go to the Mansion.
Scene with Sofia.
Receive Sofia's second heart.
Go to the Library.
Receive text message (and picture) from Alia
Receive Adventurer Outfit.
Time to test it out.
Go into the Library backyard.
Pick up the Chest Key by the flying insect.
Now you won't get stung, and lose the awareness buff from Pricia.
Go to Estero Park.
Take the Teleporter.
With our new gear we can do a couple of things here.
Break the Jar with your Pickaxe.
Receive a Grand Talisman.
We can also walk right past that bug that has been blocking our way.
Scene with Clare.
Receive Clare's third heart.
Go to Janet's Home.
Go to Janet's Bedroom.
Receive Janet's Dirty Panties.
Janet Solo Scene.
Receive Janet's third heart.
Go to Estero Key.
Scene with Alia as Naomi watches.
Receive Love Potion.
Go to Janet's Home
Go to Kaley's Room.
Go to Squallmart.
Purchase Soy Sauce ($20).
Go to Janet's Home.
Scene with Naomi.
Earn Naomi's fifth heart.
Go to the Library.
Receive Satellite Phone.
Go to Estero Key.
Go to Janet's Home.
Go around to the back door.
Scene with Kaley.
Go to the Cemetery.
Receive Whip.
Go to Estero Park.
Use the Teleporter.
Use the Whip to get the Old Musket.
Open your inventory.
Examine the Old Musket.
Pry it open with the Small Screwdriver.
Receive Gunpowder.
The Walkthrough - Part 8 - 33% - 39% - Scenes 57 - 62


Go to Deep Jungle 3 - 2.
Pick up the Tomb Key Segment.
Use the Whip to reach the orange spark.
Receive Diana's Profile.
Go to Deep Jungle 3 - 3.
Pick the Jasmine.
Pick the Philweed Plant.
Read the crafting recipe (Rope Ladder)
Click on the sparkle
Receive Old Bullet.
Open the chest with a Chest Key.
Pick up Kama Sutra - Pricia Deep Throat.
Go to Estero State Park 2 - 4
Pick up the Floppin' Fish.
Open the chest with a Chest Key.
Pick up Kama Sutra - Kaley Sixty Nine.
Go to Estero State Park 3 - 3
Use the Whip to get the Philweed.
Go to the Lighthouse.
Go downstairs to the old fort.
Use the Gunpowder with the cannon that is blocking your way.
So west (Left) into the new area.
Pick up the Crypt Key.
Pick up the Old Map.
Read the book.
Read the crafting recipe (Jasmine Massage Oil).
Go to the Cemetery.
Open the Crypt with the Crypt Key.
Pick up the Eye of Caulli.
Pick up the Broken Key.
Pick up the Rosa Moss.
Break the Jar with your Pickaxe.
Receive Gold Talisman.
Go to Estero Park.
Go to Cave.
Go to Shrine.
Craft Jasmine Massage Oil: Jasmine, Rosa Moss, Love Potion, and Basic Container.
Receive Jasmine Massage Oil.
Go to Parlor.
Give the Jasmine Massage Oil to Pricia.
Scene with Pricia.
Receive Pricia's fourth heart.
Go to Estero Park.
Pick up Machete.
Go to Estero State Park 2 - 1.
Use the Machete on the thorn bushes to get to the sparkle.
Click on the sparkle.
Receive Tikpak Artifact.
Go to Estero State Park 1 - 1.
Break the Jar with your Pickaxe.
Receive Grand Talisman.
Go to Deep Jungle 3 - 3.
Use your Pickaxe on the weak ground.
Receive White Sand.
Use the Machete on the thorn bush to the north.
Scene with Clare and Diana.
Use Teleporter.
Go to Deep Jungle 2 - 3.
Pick up the Ultra Shovel Handle.
Light the torch with your Lighter.
Read the book.
Open the chest with a Chest Key.
Pick up Kama Sutra - Clare Motorboat.
Take the Teleporter to the park entrance.
Go to the Cave.
Go to the Shrine.
Craft a Pirate Shovel: Cursed Shovel, Pirate Medallion, Jade Talisman, Gold Talisman.
Receive Pirate Shovel.
Now Stone, Jade, and Silver talismans will be instant pickups.
Go to Caverns 1 - 2.
Open your Inventory.
Use the Satellite Phone.
Use the Tikpak Artifact on the Tikpak puzzle.
Pick up the Tikpak Artifact.
Go to Estero State Park 2 - 3.
Use the Machete on the thorn bush to get the orange spark.
Receive Clare's Profile.
Go to Deep Jungle 3 - 3.
Go to Squallmart.
Emily needs a Lab Rat.
Purchase five (5) Basic Containers ($300x5). Now we can just buy them, instead of having to find them.
Purchase Plastic Wrap ($100)
Go Home.
Receive Clare's phone number and Clare's fourth heart.
Go to the Mansion.
Since the gate is closed click on the sparkle to get inside.
Talk to Sofia.
Give the Tikpak Artifact to Sofia.
Scene with Sofia.
Receive Sofia's third heart.
Go to Caverns 2 - 3.
Click where the thing disappeared into the wall.
Receive Chest Key.
Go to Caverns 1 - 3.
Pick up the Rosa Moss.
Click on where the Cockroach went.
Receive Cockroach.
Go to the Shrine.
Craft a Rat Trap: Plastic Wrap, Gaffer Tape, Roach, and a Basic Container.
Receive Rat Trap.
Go to Estero State Park 2 - 3.
Receive Rat in a Trap.
Go to Squallmart.
Talk to Emily.
Give Emily the Rat in a Trap.
Receive Bancrot's Serum.
Go to the Doctor's Office.
Scene with Jessica.
Receive Intelligence Boost.
Go to Squallmart.
Receive Satellite Phone call from Diana.
Purchase Multivitamins ($110)
Purchase Cleaning Oil ($3,000)
Purchase a Love Potion ($2,000) if you have Rosa Moss in your inventory.
Go outside and talk to Michael.
Go to the Library.
Go to the back of the Library.
Break the weak ground with your Pickaxe.
Receive Library Key.
Go around to the front of the LIbrary and use the Library Key on the door.
Go to Estero Park.
Go to the Cave.
Go to the Shrine.
Craft a Loaded Musket: Cleaning Oil, Old Bullet, Old Musket, and Silver Ore.
Receive a Loaded Musket.
Go to Caverns 2 - 4.
Pick up the Chest Key.
Go to Estero State Park 3 - 3.
Now that you've scared the Jaguar away you can go north (Up).
Receive picture of Diana.
Pick up Gunpowder.
Pick up Broken Key.
Jessica's Profile.
Pick up Pirate Medallion.
Pick up Motion Detection Camera.
Go to Squallmart.
Give Michael the Motion Detection Camera.
Go inside Squallmart.
Receive Alia's fifth heart.
Go to the Full Mast bar.
Scene with Alia, Naomi and Tasha.
Go to Janet's Home.
Go to Janet's Bedroom.
Scene with Janet.
Go to the Lighthouse.
Go to the second room in the Fort.
Use the Gunpowder in the middle cannon.
Go north (Up) into the new area.
Pick up the Broken Key.
Open the chest with a Chest Key.
Pick up Kama Sutra - Pricia On Top.
Read the book by the cross.
Pick up the Gothic Chest Key.
Read the book in the corner.
Go to the Church.
Go through the right door in Madalyn's chamber.
Open the Gothic Chest with the Gothic Chest Key.
Scene with Madalyn.
Earn Madalyn's third heart.
Go to the Library.
Receive a Satellite Phone call from Diana.
Go to Squallmart.
Emily needs a dehumidifier.
Purchase a Love Potion ($2,000) if you have used the one you had.
The Walkthrough - Part 9 - 39% - 46% - Scenes 63 - 73


Go to the Bait Shop.
Purchase the Broken Dehumidifier for $5,000.
Purchase Finding Bigger Fish ($3,000)
Purchase Heavy Pink Jig ($200)
Purchase Heavy Pink Plug ($300)
Purchase Heavy Pink Squid ($400)
Go to Estero Park.
Take the Teleporter.
Go to Deep Jungle 2 - 3.
Follow the Goons west (Left) into the newly opened area.
Pick up the Bamboo.
You have to wait until no one is looking at the cave to click on the bushes to cut through them. If you get caught you get tossed back to Deep Jungle 2 - 3 and can try again.
Read the crafting recipe (Dehumidifier).
Go into the cave.
Scene with Diana.
Earn Diana's fourth heart.
Go to Estero Park.
Go to Estero State Park 4 - 1.
Go to the Full Mast bar.
Scene with Clare and Tasha.
Earn Tasha's fifth heart.
Go to park entrance.
Take the Teleporter.
Go to Caverns 1 - 2.
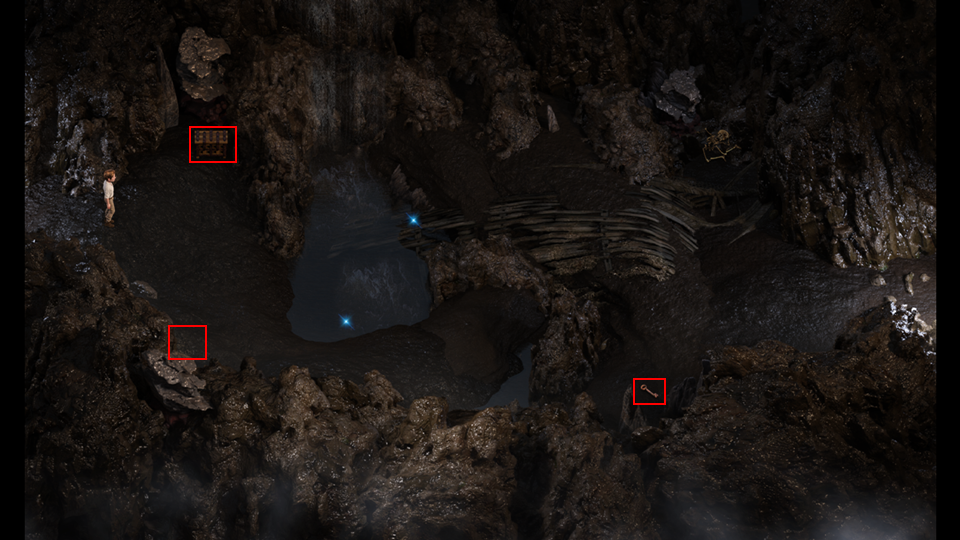
You have to get the women onto a pressure pad. When you talk to them the walk in the opposite direction about three squares. The instructions below are how many times you need to talk to them to get them to move onto a pressure pad. When they are both in place you stand on the third pad.
DianaDown 1
Right 2
Down 1
Left 1
Up 1
Left 2
Down 3
Left 1
You'll pick up the Broken Key when you move Diana into position.
Down 1
ClareUp 3
Left 1
Up 1
Left 2
Up 1
Left 1
Collect the Gold.
Step on the Pressure Pad.
A new Pressure Pad shows on the lower level.
Open the Chest with a Chest Key.
Pick up Kama Sutra - Kaley ♥♥♥♥♥ Sex.
Go to Deep Jungle 2 - 2.
Read book.
Pick up Broken Key.
Go to Squallmart.
Purchase Silver Ore ($1,000).
Go to Estero Park.
Go to the Cave.
Go to the Shrine.
Craft a Dehumidifier: Broken Dehumidifier, Small Screwdriver, Silver Ore, and a Gold Talisman.
Receive Dehumidifier.
Go to Squallmart.
Talk to Emily.
Give the Dehumidifier to Emily.
Emily needs some time.
Let's hunt down those profiles we've been seeing hints for.
Go the the Full Mast Bar.
Go to the overflow area in the back.
Open the chest with a Chest Key.
Pick up Kama Sutra - Jessica Heart Checkup.
Pick up Pricia's Profile from under the palm tree.
Go to Estero Park.
Go west (Left)
Go north (Up)
Pick up Alia's Profile.
Go to the Cave.
Go to Caverns 4 - 2.
Pick up Emily's Profile.
Go to Caverns 5 - 3.
Open the chest with a Chest Key.
Pick up Kama Sutra - Emly Let's Plow.
Use your Pickaxe on the weak ground.
Receive a Chest Key.
Pick up the Chest Key.
Go to Caverns 2 - 2.
Activate the pressure plate.
Pick up Janet's Profile.
Let's go see if Emily is done.
Go to Squallmart.
Scene with Emily.
Go to the Doctor's Office.
Receive Nitroglycerin x 3.
Jessica needs some Aloe.
Go to Estero Park.
Go to the Cave.
Go to the Shrine.
Craft as many Rock Bombs as you can: Basic Container, Jade Talisman, Silver Talisman, and Nitroglycerin.
Remember that you can now purchase Basic Containers as Squallmart.
Go to the park entrance.
Use the Teleporter.
Go to Caverns 1 - 2.
Read the crafting recipe (Tomb Key).
Go to the Parlor.
Receive Shea Butter.
Go the Estero Park.
Use the Teleporter.
Go to Deep Jungle 2 - 3.
Use a rock bomb on the rocks to the north.
Go North to the newly open area.
Pick up the Tomb Key Segment.
Read the crafting recipe (King's Shovel)
Pick up the Aloe Plant.
Pick up Clover Leaf.
Read book.
Go to the Shrine.
Craft Aloe Lotion: Aloe Plant, Shea Butter, Ginseng Plant, and a Basic Container.
Receive Aloe Lotion.
Go to the Doctor's Office.
Talk to Jessica.
Give Jessica the Aloe Lotion.
Go to Janet's Home.
Go upstairs.
Scene with Alia and Kaley.
Receive Kaley's fifth heart.
Go to the Mansion.
Scene with Sofia.
Go to the Library.
Go to the Parlor.
Scene with Jessica and Pricia.
Earn Jessica's fifth heart.
Go to Squallmart.
Go to Janet's Home.
Receive text message (and picture) from Janet.
Scene with Janet.
Earn Janet's fourth heart.
Go to the Full Mast Bar.
Receive Old Bullet.
Open Inventory.
Select the Old Musket.
Receive Loaded Musket.
Go to Deep Jungle 2 - 2.
Go west (Left).
Pick up the Aloe Plant.
Click on the sparkle.
Receive Grand Talisman.
Click on the Bird.
Pick up the Feather.
Pick up the Broken Key.
Pick up the Fan Palm Leaf.
Pick the Philweed Plant.
Pick up the Tomb Key Segment.
Go to the Teleporter.
Click on the orange sparkle.
Receive Kaley's Profile.
Go to the Shrine.
Craft a Pirate Key: Pirate Medallion, Grand Talisman, and two Broken Keys.
Go to the Pirate Ship, Caverns 2 - 1.
Open the Pirate Chest with the Pirate Key.
Receive Tikpak Artifact.
Go the the Shrine.
Craft a Tomb Key: Tomb Key Segment x 3 and a Tikpak Artifact.
Receive Tomb Key.
Go back to Tasha, Estero State Park 1 - 1.
Open the Tomb with the Tomb Key.
Receive Tikpak Tomb Photo.
Go back to the Tomb, Estero State Park 1 - 1.
Open the chest with a Chest Key.
Pick up Kama Sutra - Diana ♥♥♥♥♥ Sex.
Pick up Tiny Rope.
Pick up Broken Key.
Go to the Full Mast Bar.
Go to the Women's Room.
Receive a Cockroach.
Go to the Men's Room.
Talk to Richard.
Give Richard the Aloe Plant.
Receive 2 Broken Keys.
Go to the Doctor's Office
Go to the MRI room (left door).
Pick up the Gaffer Tape.
Pick up the Plastic Wrap.
Go to Estero Park.
Go to the Cave.
Go to the Shrine.
Craft a Rat Trap: Plastic Wrap, Gaffer Tape, Roach, and Basic Container.
Receive a Rat Trap.
Go to the Doctor's Office.
Talk to Jessica.
Give Jessica the Rat Trap.
Scene with Emily, Jessica, and Kaley.
Go to the Church.
Go to the Crypt through the church.
Scene with Madalyn.
Receive Madalyn's fourth heart.
Go to the Mansion.
When the guards aren't looking, destroy the four columns with your Pickaxe.
Then push the two green pots onto the pressure plates.
Pick up the Hidden Key.
Go out the door.
Open the chest with a Chest Key.
Pick up Kama Sutra - Jessica Drink It Up.
Open the door on the left with the Hidden Key.
Click on the Security.
Disarm it with the House Number, 980.
Go downstairs.
Scene with Clare.
Earn Clare's fifth heart.
Pick up Super Guide.
Pick up Tasha's Clothes.
Pick up Eye of Caulli.
Pick up Tiny Rope.
Exit Mansion.
Go to Doctor's Office.
Scene with Janet.
Receive Janet's phone number.
Go to the Full Mast Bar.
Talk to Tasha.
Give Tasha's Clothes to Tasha.
The Walkthrough - Part 10 - 46% - 57% - Scenes 74 - 79


Go to the Library.
Click on the face on the wall.
Use Eye of Caulli.
Click on the face on the wall again.
Use Eye of Caulli.
Go down into the new area.
Read book.
Pick up Caulli's Coin.
Pick up Old Map.
Pick up sparkle.
Receive False Talisman.
Read craft recipe (Royal Talisman)
Pick up sparkle.
Receive False Talisman.
Pick up Tiny Rope.
Pick up sparkle.
Receive False Talisman.
Pick up all of the Gold Ore piles.
Go to the Doctor's Office.
Talk to Pricia.
Go to the Parlor.
Talk to Pricia.
Go to Estero Park.
Go to the Cave.
Go to the Shrine.
Craft three (3) Grand Talismans: Gold Ore x 3 and a False Talisman.
Craft a Royal Talisman: Grand Talisman x 3 and Caulli's Coin.
Go to the Parlor.
Talk to Pricia.
Give Pricia the Royal Talisman.
Scene with Pricia.
Receive Awareness Boost and Pricia's fifth heart.
Go to Squallmart.
Purchase Knot Tying Guide ($5,000).
Exit Squallmart.
Go the the Lighthouse.
Go to Estero Park.
Go to the Cave.
Go to the Shrine.
Craft a Rope Ladder: Tiny Rope x 3 and the Knot Tying Guide.
Receive Rope Ladder.
Go to the park entrance.
Use the Teleporter.
Go to Deep Jungle 3 - 3.
Go to Deep Jungle 2 - 1.
Pick the Aloe Plant.
Try to go down the cliff.
Use the Rope Ladder.
Scene with Diana.
Receive Diana's sixth heart.
Pick up Broken Camera.
Squash the scorpion.
Receive Scorpion Venom.
Pick up the Broken Key.
Light the torch with your Lighter.
Pick the Poison Thorns.
Go east (Right).
Pick up the Broken Key.
Go into the Cave.
Open the chest with a Chest Key.
Pick up Kama Sutra - Clare Reverse on Top.
Read the crafting recipe (Deadly Whip).
Go to the Mansion.
Go to the Treasure Room in the basement.
Pick up the Dart.
Go back upstairs.
Scene with Clare and Sofia.
Go to Estero Park.
Go to the Cave.
Go to the Shrine.
Craft a Blow Dart: Dart, Scorpion Venom, Bamboo, and a Feather.
Receive Blow Dart.
Go to the park entrance.
Use the Teleporter.
Talk to Michael.
Give the Blow Dart to Michael.
Click on the sparkle.
Receive Memory Card.
Pick up the Deer Meat.
Go to Squallmart.
Purchase the Fashion Nerd For Emily ($400).
You can purchase the other available outfits now if you would like, and have the money.
Exotic Dancer for Alia ($400)
Angel Wrap for Naomi ($400)
Torn Up for Tasha ($400)
Red Dragon for Pricia ($400)
Pretty Pink for Kaley ($400)
Sexy Business for Jessica ($400)
Naughty Nighty for Diana ($400)
Green Fantasy for Clare ($400)
Angel in White for Janet ($400)
Sinful Desire for Madalyn ($400)
Michievous Mistress for Sofia ($400)
After a woman has six hearts, you have their profile, and have purchased their alternative outfit, you can upgrade the profile by purchasing their Bonus Profile for $1,000. This allows you to view them clothed, nude, or in the alternative outfit you bought when you bring up their profile on your phone.
Go to Estero Key.
Talk to Emily.
Give Emily the Broken Camera.
Give Emily the Memory Card.
Pick up Bumpy Candle.
Pick up Broken Key.
Go to Alia's Room.
Talk to Emily.
Scene with Emily.
Go to the Lighthouse.
Receive photo of Emily.
Go to Squallmart.
Receive Emily's fifth heart.
Go to the Church.
Talk to Madalyn.
Scene with Madalyn.
Go to the Full Mast Bar.
Go to Squallmart.
Purchase Shoe Glue ($40)
Go to Estero Park.
Search the park until you locate a Royal Talisman or three Grand Talismans. If you have three Grand Talismans you can pick up Caulli's Coin in the basement of the Library.
Go to the Shrine.
Craft a Deadly Whip: Whip, Royal Talisman, Poison Thorns, and Shoe Glue.
Receive Deadly Whip.
The Deadly Whip will allow you to kill some Cave Viper snakes.
Go to Caverns 2 - 4.
Whip the two snakes by the chest by clicking on either snake.
Move the rocks so you can get to the room to the north (Up).
Whip the snake.
Push the rock into the room so that you can enter.
Open the chest with a Chest Key.
Pick up Kama Sutra - Janet ♥♥♥♥♥ Play.
Read the book.
Pick up all of the coins.
Read the crafting recipe (Golden Teddy).
Go to Caverns 2 - 3.
Scene with Alia and Tasha.
Receive Alia's sixth heart.
Go to Janet's Home.
Go to Janet's Bedroom.
Scene with Kaley.
Earn Kaley's sixth heart.
Go to Estero Key.
Go into the House.
Go to the Doctor's Office.
Go to the Church.
Go to the sewers under the Church.
Kill the snake with your whip.
Move the rocks to you can get to the new area.
Pick up the Teddy Bear.
Go to Squallmart.
Purchase Gold Ore ($4,000).
Go to the Shrine.
Craft a Golden Teddy: Bumpy Candle, Teddy Bear, Gold Ore, and White Sand.
Receive a Golden Teddy.
Craft a couple of Chest Keys: Broken Key x 4
Receive Chest Key.
Go to the Doctor's Office.
Talk to Ash.
Give Ash the Golden Teddy.
Go to Estero Park.
Follow Michael to the west (Left).
Talk to Michael.
Receive Grappling Hook.
Go to the park entrance.
Use the Teleporter.
Go to Deep Jungle 2 - 3.
Use the Grappling Hook to reach the Fan Palm Leaf.
Go to Deep Jungle 2 - 2.
Use the Grappling Hook to reach the Fan Palm Leaf.
Go to Deep Jungle 2 - 1.
Pick up the Broken Key.
Click on the bird so that it will move out of the way.
Use the Grappling Hook to climb the north (Up) cliff.
Use your Pickaxe on the weak ground.
Receive Mysterious Key.
Pick up the Clover Leaf.
Pick up the Philweed.
This is another timing puzzle. You have to grab the Fan Palm Leaf when the Jaguar is facing the other way.
Go back to Michael and Ash.
Talk to Michael.
Give Michael the Fan Palm Leaves.
Go to the Mansion.
Go in the upstairs door.
Go to Squallmart.
Go to the Lighthouse.
Talk to Albert.
Have you shown Mr. Garner the interior?
Use the Grappling Hook to get the Cockroach.
Go inside the Lighthouse.
Mr. Garner should see the view from up top.
The Walkthrough - Part 11 - 57% - 63% - Scenes 80 - 91


Go to the Library.
Talk to Emily.
Scene with Madalyn.
It looks like Emily's equipment is leaking. Better go check it out.
Go to the Doctor's Office.
Talk to the Receptionist.
See Doctor Jessica for $140Scene with Jessica.
Receive Intelligence Boost!
Go to Estero Key.
Go in the House.
Scene with Janet and Naomi.
Receive Janet's fifth heart.
Go to Alia's secret spot.
Talk to Sam.
Leave Estero Key.
Go to the Mansion Basement.
Just walk and get caught by the camera, there isn't anything to get.
Exit the Mansion.
Scene with Sofia.
For this puzzle you use the arrows on the ground to control Clare. When you step on an arrow she will continue walking in that direction until she hits something or you use another arrow. You need to move her onto the pressure pad to the right of the door. Once she is on the pressure pad, walk through the tunnel to the other pressure pad by the water. You will pick up a cockroach as you walk through the tunnel.
Follow Clare.
Talk to Clare.
Scene with Clare, Diana, and Naomi.
Go to Caverns 2 - 4.
Receive Naomi's sixth heart.
Go to the Cemetery.
Enter Crypt.
Go to the Madalyn's chambers.
Use the right door.
Talk to Madalyn.
Scene with Madalyn.
Earn Madalyn's fifth heart.
Go to Estero Park.
Go west (Left)
Talk to Ash.
Go to Estero State Park 4 - 4.
Pick up the Boombox.
Take the Boombox to Ash, Estero State Park 5 - 2.
Talk to Ash.
Give the Boombox to Ash.
Receive a Chest Key.
Go to the Mansion.
Go in the upper door.
Go upstairs.
Read the crafting recipe (Metal Ladder)
Use your Pickaxe on the weak wall.
Go west (Left) into the new area.
Go downstairs.
Scene with Sofia.
Receive Sofia's fourth heart.
Read the crafting recipe (Hacking Tool)
Pick up the Ladder Segment.
Exit through the south (Down) door.
Go to the Lighthouse.
Go downstairs.
Go to Squallmart.
Go back into Squallmart.
Purchase the Goggles ($30,000).
Go to the Library.
Talk to Emily.
Go to the Parlor.
If you don't have them, gather the ingredients to craft Jasmine Massage Oil: Basic Container, Love Potion, Jasmine, and Rosa Moss. Once you have the ingredients go the the Shrine and craft the oil.
Go to the Parlor.
Talk to Emily.
Give Emily the Jasmine Massage Oil.
Scene with Emily and Pricia.
You can now sell all of your plants in bulk by using the grey container. Selling in bulk will also sell all of your Love Potions and Jasmine.
Go to the Library.
Talk to Emily.
Earn Emily's sixth heart.
You can now purchase Love Potions in bulk. The more you buy the cheaper they are. Click on the grey stand to the right of the desk to purchase potions.
Go to the Mansion.
Enter through the left door.
Go down into the Treasure Room.
Grab the Cockroach by the stairs down.
Go to Janet's Home.
Enter the house.
Use a Cockroach.
Go upstairs.
Use a Cockroach.
Go to Janet's Bedroom.
Use a Cockroach.
Go to the Lighthouse.
Talk to Albert.
Go to the Mansion.
Follow Sofia into the Mansion.
Keep using the Pickaxe on the weak wall until it and the Key disappear.
Go to the left door.
Scene with Janet and Kaley.
Go down either of the two longer stairs.
Use the Grappling Hook to reach the Chest Key.
Go to Janet's Home.
Receive a call from Diana.
Receive a call from Janet.
Janet wants a few things from her home.
Enter Janet's Home.
Go to the Bathroom.
Click on the sparkle.
Receive a Toothbrush.
Go to Janet's Bedroom.
Click on the sparkle on the dresser.
Receive Janet's Clothes.
Click on the sparkle in the Bathroom.
Receive a Toothbrush.
Go to the Mansion.
Go to the pool.
[/previewiconOpen the chest with a Chest Key.
Pick up Kama Sutra - Tasha Anal Sex.
Exit into the hall.
Go east (Right).
Open the door.
Pick up the Ladder Segment.
Go to the Storage Room on the first floor where you access the basement.
Scene with Kaley and Sofia.
Go to the Lighthouse.
Go to the second fort room.
Open the chest with a Chest Key.
Pick up Kama Sutra - Jessica ♥♥♥♥♥ Sex.
Use a Rock Bomb on the column blocking the path west (Left).
Go into the new area.
Open the chest with a Chest Key.
Pick up Kama Sutra - Clare Face ♥♥♥♥.
Read the book.
Go through the north (Up) door.
Use the Mysterious Key.
Pick up the Ladder Segment.
Read the crafting recipe (Penetrating Oil).
Open the chest with a Chest Key.
Pick up Kama Sutra - Madalyn Boobs & Butt.
Click on the orange sparkle by the barrel.
Receive Madalyn's Profile.
Go to Squallmart.
Purchase the Encryption Scanner ($43,000).
Purchase Silver Ore ($1,000).
Go to the Shrine.
Craft a Metal Ladder: Ladder Segment x 3 and Silver Ore.
Receive Metal Ladder.
Go to Deep Jungle 1 - 3.
Use the Metal Ladder to cross the gap.
You now have to make it back to town using the fewest steps possible. And, oh by the way, the fast travel teleporter isn't working.
East (Right)
South (Down)
South (Down)
West (Left)
South (Down)
South (Down)
East (Right)
South (Down)
Into the cave (East / Right)
West (Left)
South (Down)
East (Right)
East (Right)
South (Down)
Scene Clare, Diana, and Jessica.
Go to the Mansion.
Talk to Sofia
Receive Storage Key.
Receive Janet's sixth heart.
Scene with Janet.
Go to the Spa room where you picked up the Ladder Segment.
Open the storage chest with the Storage Key.
Receive Viper Antivenom x 3.
You cannot use your whip to kill these snakes. If you get bit by a snake and have Antivenom the snake will disappear. Once you run out of Antivenom you will have to retry what you were trying to do.
Go to Estero Park.
Go west (Left).
Talk to Pricia.
Scene with Janet and Pricia.
The Walkthrough - Part 12 - 63% - 68% - Scenes 92 - 101


Go to Estero State Park 4 - 2.
Click on the sparkles.
Receive Key Card and Old Bullet.
Open your inventory and select the Old Bullet.
Receive Loaded Musket.
Go to the park entrance.
Use the Teleporter.
A new Teleporter has appeared to the left of the original Teleporter. The new Teleporter will take you to the outside of the Casula Temple where you were bitten by the viper.
Use the new Teleporter.
Pick up the Philweed Plant.
Pick up the Sulphuric Acid.
Go to Deep Jungle 1 - 1.
Go east (Right).
Go back to the Casula Temple entrance.
Now you can't use your whip on these snakes you need to either outsmart them, or avoid them. While you have the antivenom you don't want to use it if you don't need it. Fortunately they aren't as fast as the other snakes. Saving the game will reset the snakes.
You need to lure the left snake down between the two stalagmites.
Pick up the King's Shovel Handle.
The second snake is on a path and you just have to move when the snake is out of the way. The snake will not vary from its path. Watch the path it takes and time your move accordingly.
Pick up the Crowbar.
Open the Temple door with the Crowbar.
Light the Dry Wood with your Lighter.
Receive Fly Ash.
Read the crafting recipe (Mystical Gas Mask)
Go to the Library.
Scene with Diana and Emily.
Go to the Full Mast Bar.
Go to the Cemetery.
Scene with Alia, Kaley, Madalyn, and Tasha.
Tasha's sixth heart.
Go to the Mansion.
Go inside the Mansion using the middle lower door.
Follow Sofia east (Right).
Use the Crowbar on the security card reader.
Receive System BIOS.
Go north (Up) through the door.
Receive Sofia's phone number.
Exit the Mansion to the street.
Re-enter the Mansion.
Enter the Mansion.
Follow Duncan east (Right).
Go to the Full Staff Bar.
Talk to Tasha.
Receive ID Card Writer.
Go to the Shrine.
Craft a Hacking Tool: Key Card, ID Card Writer, System BIOS, and Encryption Scanner.
Receive a Hacking Tool.
Go to where Ash is in the Park (Estero State Park 5 - 2).
Talk to Ash.
Go to Estero State Park 3 - 2.
Scene with Clare.
Receive Clare's sixth heart.
Go to Squallmart.
Go to the Mansion.
Go to the Pool.
Talk to Naomi.
Scene with Janet, Naomi, and Sofia.
Go out the south (Down) door.
Let's try out our Hacking Tool on the safe.
Receive Talisman of the Gods.
Go to the Parlor.
Talk to Pricia.
Give Pricia the Talisman of the Gods.
Earn Pricia's sixth heart.
Go to the Doctor's Office.
Go into the Examination room.
Talk to Emily.
Scene with Emily and Jessica.
Let's try our hacking tool on the locked door.
Go into the new area.
Click on the white sparkles.
Receive Nitroglycerin.
Receive Soap.
Click on the black area to the right by the lamp.
You'll get outside so that you can pick up the Chest Key.
Click on the roof to get back into the building.
You're going to have to wait until after you finish the story to get the keys for the lockers.
Go to the Shrine.
Craft a Rock Bomb: Nitroglycerin, Basic Container, Silver Talisman, and Jade Talisman
Receive a Rock Bomb.
Go to Squallmart.
Emily wants you to find Alia.
Go to Estero Key.
Go to the Church.
Go to the Sewers under the Church.
Go to Lost Underground 3 - 2.
Use the Metal Ladder to bypass the blockage by going to the side with the 13 on it and then coming back on the other side of the blockage.
Use the Rock Bomb on the rocks in the doorway.
Go into the new area.
Move the second rock up 1.
Walk to the empty space.
Walk left until you push a rock.
Push the rock where you are standing up 1.
Push the rock to your left, left 1.
Push the rock below it left 1.
Read the crafting recipe ???
When you read the crafting recipe some of the rocks will disappear.
Move the one rock to the right 1.
Click on the sparkle.
Use the Crowbar.
Go east (Right)
Pick up God's Shovel Handle.
Open chest with Chest Key.
Pick up - Kama Sutra - Sofia Snack Time.
Go back up to the Church.
Scene with Madalyn.
Earn Madalyn's sixth heart.
Exit the Church to the street.
Diana calls you on the Satellite Phone.
Go to the Full Mast Bar.
Go to Squallmart.
Go to Estero Park.
Scene with Clare, Diana, and Tasha.
Go to the west (Left) with Clare.
These snakes are on a path and won't chase you. You just need to time your moves so you don't cross their path.
Go up to the upper right corner.
Go left to line up with the open column.
Go down three pillars.
You next move will be to the pressure pad and it has to be timed for when the snake won't be there.
Back to where you were before the pressure pad.
Then to the end of the last column on the left. There is a brief crossing the first snakes path, but you should be able to easily miss it.
Next move up against the large column.
Move up the wall to break the Jar with your Pickaxe.
Receive a Talisman of the Gods.
Move back down to the base of the large pillar.
Then time your move to the far left wall.
Walk up and activate the pressure plate.
All of the snakes will disappear.
Return to the entrance and then go east (Right) to where Diana and Tasha went.
Same thing as the room with Clare. These snakes are on a path and won't chase you.
Walk up to the base of the large pillar.
Time your run to the wall.
Go along the wall until you are above the pressure plate.
Activate the pressure plate.
Return up to the wall.
Walk across to the large pillar to on the right side of the door.
You can walk down the center of the right hand path.
Line yourself up with the pressure pad.
When the coast is clear run down and activate the pressure pad.
All of the snakes will disappear.
Break the Jar.
Receive a Talisman of the Gods.
Go to the Mansion.
Receive Alia's Phone
Go to the Library.
Scene with Alia, Emily, Janet, and Kaley.
Go to the Parlor.
Go to Estero Park.
Scene with Jessica and Pricia.
Activate the pressure pads in this order.
Bottom Right
Top Left
Bottom Left
Top Right
The wall blocking the key will go away.
Pick up the Temple Key Segment.
The snakes in the center portion go away.
Receive Nitroglycerin.
Go to the Shrine.
Craft a Rock Bomb: Jade Talisman, Silver Talisman, Nitroglycerin, and a Basic Container.
Receive a Rock Bomb.
Go to Squallmart.
Go to the Church.
Talk to Janet.
Scene with Janet and Madalyn.
The Walkthrough - Part 13 - 68% - 70% - Scene 102 - 106


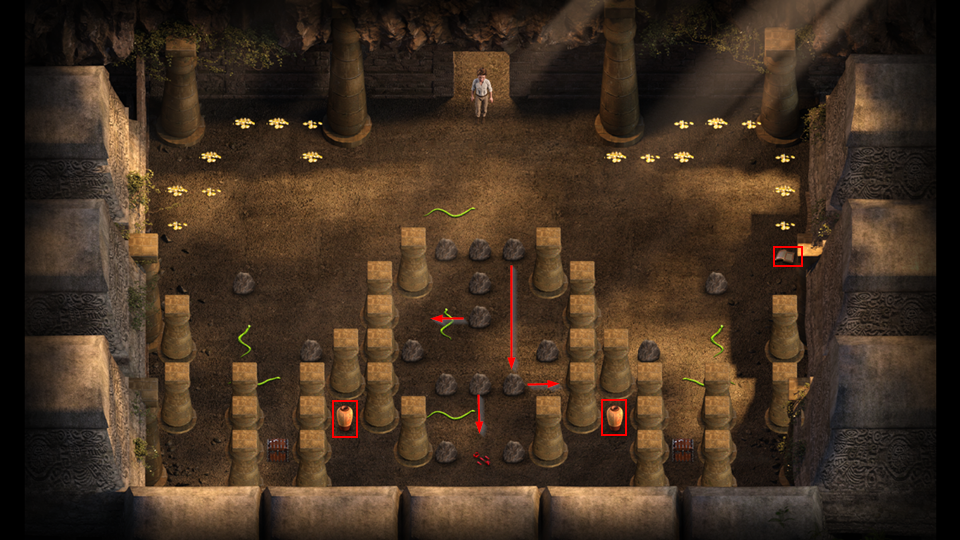


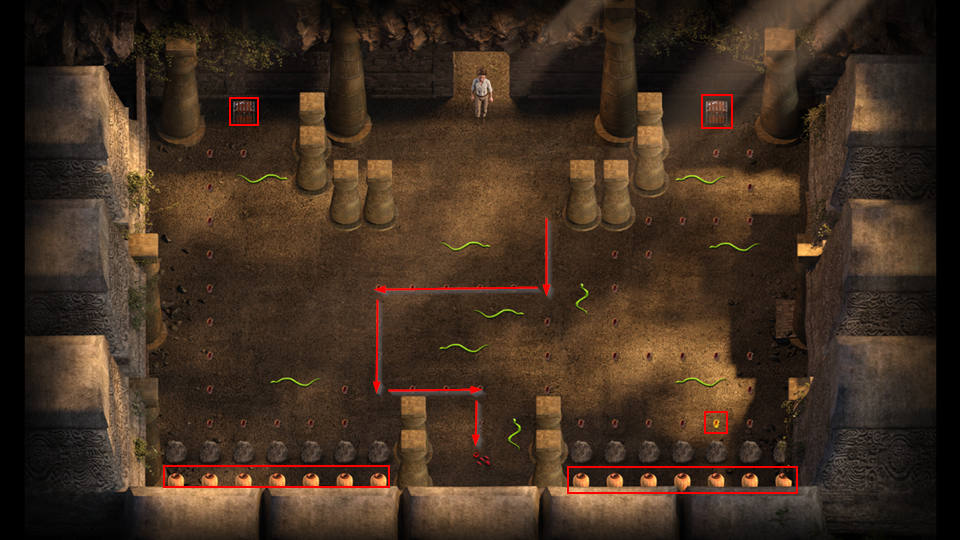


Go to the Mansion.
Go to Estero Key.
Go into the House.
Go into Sam and Naomi's Bedroom.
Pick up Painter's Mask.
Pick up Nail Polish Remover.
Read newspapers.
Pick up Pirate Medallion.
Pick up Old Map.
Go to the Shrine.
Craft a Mystical Gas Mask: Painter's Mask, Fly Ash, Super Goggles, and a Grand Talisman.
If you don't have a Grand Talisman you can either craft one, Gold Ore x 3 and a False Talisman, or hunt the Jungle for one.
Receive a Mystical Gas Mask.
Go to the Library.
Go into the Library Basement.
Enter the green gas.
Use your Mystical Gas Mask.
Open the chest with a Chest Key.
Pick up Kama Sutra - Madalyn Bite Job.
Use the Metal Ladder to cross to the other side.
Use the Metal Ladder again to cross to the other side.
Use your Pickaxe on the weak area of the floor.
Receive King's Shovel Head.
Cross back to the other side.
Go east (Right).
Cross to the other side.
Light the torch with your Lighter.
Cross back to the other side.
Go west (Left).
Go south (down), into the light.
Go upstairs.
Use the Crowbar on the crate.
Receive Grand Talisman.
Go upstairs.
Use the north (Up) door.
Use the north (Up) door.
Scene with Alia, Naomi, and Sofia.
Receive Sofia's fifth heart.
Exit the room.
Go west (Left).
Go east (Right).
Use the Hacking Tool on the security card reader.
Go upstairs.
Go in the hole in the wall.
Use your Pickaxe on the weak area of the wall.
Go downstairs.
Go downstairs.
Open the two supply chests.
Receive Viper Antivenom.
Go to Estero Key.
Go to Squallmart.
Go to Janet's Home.
Go to the Full Mast Bar.
Go to Estero Park.
Scene with Clare, Diana, and Kaley.
Push Kaley and Diana up to the pillars at the top.
Push Clare to the pillar on the left.
Push Clare to the pillars at the top.
Push Kaley left into Clare and then up onto the pressure plate.
Push Clare to the left then up onto the pressure plate.
Push Diana to the right then up onto the pressure plate.
Stand on the remaining pressure plate.
All of the rocks and the snakes on top will disappear.
Go to the Lighthouse.
Scene with Janet.
Go to Estero Park.
Use the Teleporter.
Use the other Teleporter to return to the Temple.
Go to Casula Temple 2 - 2.
Go to the green gas.
Use your Mystical Gas Mask.
Open the Supply Crate.
Receive Viper Antivenom.
Go to Casula Temple 1 - 3.
Use your Whip to get the Temple Key Segment.
Read the crafting recipe (Nitroglycerin).
Open the Supply Chests.
First chest costs $12,000 to open.
Receive Grand Talisman.
Second chest costs $36,000 to open.
Receive Royal Talisman.
Third chest costs $144,000 to open.
Receive Talisman of the Gods.
Fourth chest costs a Nitroglycerin to open.
Go to Casula Temple 2 - 3.
Use a Rock Bomb to destroy the rock wall to the south (Down)
Go into the new area.
These are all path snakes, so we just need to outsmart or avoid them.
While avoiding the snake patrolling the the top, move the far right rock down 3.
Trap the left snake by pushing the third rock in the middle to the left when the snake is up top.
Push the center rock down 1 when the bottom snake is on the left side.
Push the right rock right 1.
Go down and push the rock to the left when the snake is up.
Pick up the Temple Key Segment.
The center snakes will disappear with most of the rocks.
Break the Jars on the left and right with your Pickaxe.
Receive Talisman of the Gods.
Receive Stone Talisman.
Read the book.
Pick up the Gold Coins in the room.
Exit the Temple.
Click on the ground under the palm tree and break the weak ground with your Pickaxe.
Receive a Chest Key.
Go to the Full Mast Bar.
Talk to Albert.
Receive Nitric Acid.
Go to the Shrine.
Craft Nitroglycerin: Soap, Nitric Acid, Sulphuric Acid, and a Basic Container.
Receive Nitroglycerin x 2.
Go to the Doctor's Office.
Go to the Break Room (right door).
Talk to Jessica.
Give her the Nitroglycerin.
Talk to Jessica.
Scene with Jessica.
Receive Jessica's sixth heart.
Go to Estero Park.
Take the Teleporter.
Take the Temple Teleporter.
Go to Casula Temple 1 - 3.
Open the supply chest that requires Nitroglycerin to open.
Receive a Rock Bomb.
Go to Casula Temple 2 - 1.
Use a Rock Bomb to destroy the rock wall to the south (Down).
Go south (Down) to the new area.
This puzzle looks hard, but is very easy. Walk on the cockroaches to get to the key.
Once you get the key all of the rocks disappear and you can use your Pickaxe on the Jars.
If you pick up the Gold Cockroach the cockroaches will disappear if you stop on them. It doesn't change the path of the snakes, but it does remove your guide.
Use the cockroach path to get to the supply chests. Each chest contains a Viper Antivenom.
Now you have all four parts of the Temple key.
Go to the Shrine and craft the Temple Key: Temple Key Part x 4.
Receive Temple Key.
Return to the Temple.
Go to Casual Temple 1 - 3.
Open the door with the Temple Key.
Take the path to the new area.
You turn into three images. You control the center image. You will notice that your clones will face the same direction you face. When you stand on the control button they will move in that direction. They will stop moving when you step off the button. You have to guide them to the two pressure pads.You might want to change the move speed to normal for this.
Go to Janet's Home.
Talk to Janet.
Go to Estero Key.
Talk to Naomi.
Go to the Mansion.
Go in the top door.
Go to Estero Park.
Scene with Janet, Naomi, and Sofia.
Go to the Mansion.
Go to Estero Key.
Go into the house.
Go to Squallmart.
Talk to Alia
The Walkthrough - Part 14 - 70% - 70% - Scenes 107 - 113


Go to Estero Park.
Talk to Ash.
Go to Estero State Park 4 - 4.
Use your Grappling Hook to climb up.
Click on Kaley and use your Metal Ladder to walk across.
Go Home.
Pick up Tasha's Shorts.
Go inside.
Go to the Full Mast Bar.
Pick up Tasha's Top.
Go inside.
Go to the Women's Restroom.
Pick up Tasha's Boots.
Go Home.
Go inside and give Tasha her clothes.
Go to the Doctor's Office.
Scene with Alia, Emily, Jessica, Kaley, Pricia, and Tasha.
Go to the Mansion.
Go in the center door on the bottom.
Go to the third floor, last room on the floor.
Scene with Sofia.
Earn Sofia's sixth heart.
All hearts now collected.
Go to Janet's Home.
Go to Squallmart.
Talk to Alia.
Go to Squallmart.
Go inside.
Scene with Pricia and Jessica along with Valerie and Katherine.
Go outside.
Collect the Transmission Fluid.
Go to the Shrine.
Craft Penetrating Oil: Nail Polish Remover, Aloe Plant, Transmission Fluid, and a Basic Container.
Receive Penetrating Oil.
Go to the Cemetery.
Enter the Crypt.
Use your Crowbar on the crate.
Receive King's Shovel Shaft.
Open the door, use the Penetrating Oil.
Scene with Janet and Madalyn.
Read the book.
Open the casket.
Use the Crowbar.
Receive Priest's Compass.
If you have Caulli's Coin go to the Shrine and craft the King's Shovel: King's Shovel Head, King's Shovel Shaft, King's Shovel Handle, and Caulli's Coin.
Go to the Lighthouse.
Go into the Fort.
Go into the rooms and Click on the flashing blue dots.
The only one that is not obvious is in the room with the Cross and the cannon.
Return to the group.
The rock puzzle gets easier each time you leave the room. Push the rocks to try to get to the blue circle. If you fail leave the room and come back and there will be fewer rocks.
Open the door with the Priest's Compass.
Scene with Alia, Clare, Diana, Janice, and Kaley.
Pick up God's Shovel Shaft.
Go back and check on the girls.
Scene with Alia, Clare, Diana, Jessica, Kaley, Madalyn, and Sofia.
Go upstairs.
Search Joey's backpack.
Receive a Rock Bomb.
Go downstairs.
Scene with Evie.
The main story line is now complete.
Post Story - Part 1


Go to Janet's Home.
Go to the Doctor's Office.
Go to the Mansion.
Enter via the lower center door.
Go to the Beach.
Scene with Alia, Clare, Diana, Emily, Janet, Jessica, Kaley, Naomi, Pricia, Sofia, Tasha
Go to the Boat Dock.
Pick up the Floppin' Fish.
Are the fish getting bigger?
Read the note.
Fishing
Jim runs the Bait Shop. Jim will give you specifications for fish to catch and will pay you a bounty for catching the fish. If you have already caught a fish that meets the qualifications you will not need to find and catch a second one.
Fishing lures come in two levels, the base level and the heavy level. The heavy lures will give you a better chance of catching a larger fish.
If you cast directly on top of a fish it will swim away from the lure. you want to cast close to, but not on a fish.
#FishWeightReward1.SeaperchAny$302.RockfishAny$603.TunaAny$1004.Seaperch3lb$1205.Rockfish6lb$1506.Tuna40lb$3007.Hammerhead SharkAny$1,0008.Marlin50lb$1,4009.Seaperch5lb$1,70010.Rockfish28lb$2,50011.Tuna80lb$4,00012.Hammerhead Shark600lb$7,00013.Marlin300lb$7,000
Locker Keys


Locker Key 1 - Estero Park Entrance
Locker Key 2 - Cemetery
Locker Key 3 - Full Mast Bar
Locker Key 4 - Beach
The Lockers are in the Doctor's Office Break Room.
Locker 1: Photo: Pricia & Jessica
Locker 2: Chest Key
Locker 3: Photo: Jessica in College
Locker 4: King's Offering Chip
Credits
Screenshots taken and marked up with Greenshot[getgreenshot.org] , a powerful free screenshot tool
Source: https://steamcommunity.com/sharedfiles/filedetails/?id=2786189136
More Treasure of Nadia guilds
- All Guilds
- Treasure of Nadia Guide 182
- Treasure of Nadia
- Cheat Menu for Treasure of Nadia
- 100% Save all achievements within 15 minutes. (Windows)
- Treasure of Nadia Cheats (Mod)
- Broken Key Locations
- How to play "treasure of Nadia"
- Chest Key / Kamasutra Locations
- Treasure of Nadia Guide 114
- Treasure of Nadia Guide 104