Thanks to One-Tamriel you are able to make a difference in Cyrodiil from the moment you reach level 10. Without knowledge however, the world of PvP may seem unfair or overwhelming. Let this guide give you the basic information you need to start helping your alliance out. There won't be many advanced tactics here as this guide is simply here to help people get started. Focused heavily on no-CP campaigns.
Getting To The Alliance War Page

The default button to get the Alliance War page is L, if you changed it however it is this highlighted icon. You need to be level 10 to actually do anything here though.
UI - Campaigns
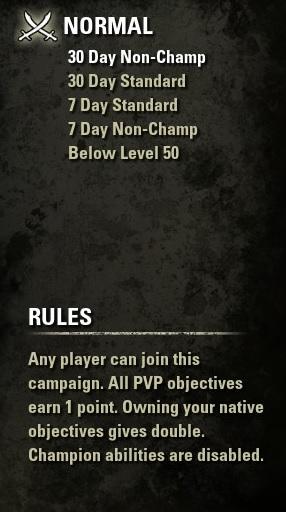
When opened the second tab of the Alliance War page. You get to choose between various campaigns. Non-Champ means that Champion Points are disabled in that campaign. Standard means that you are in Cyrodiil as you would be outside in PVE world; with all CPs active. Below level 50 means that you can't enter as soon as you hit level 50! Champion Points are also disabled in this campaign (obviously).
The names of the campaigns change regularly but these are the campaigns available. When you have decided which you want to join, you right click on the name and select either ''Home'' or ''Guest''.
If you are in your Home campaign, you enter leaderboards. And will actually be rewarded for the efforts you've made in that campaign. But your home campaign isn't easily changed.
Guest gives more freedom but doesn't give you any scoring / rewarding benefits. Why would you ever pick guest then? So you can play with a friend of yours! It's also way easier to change guest campaign.
UI - Scoring
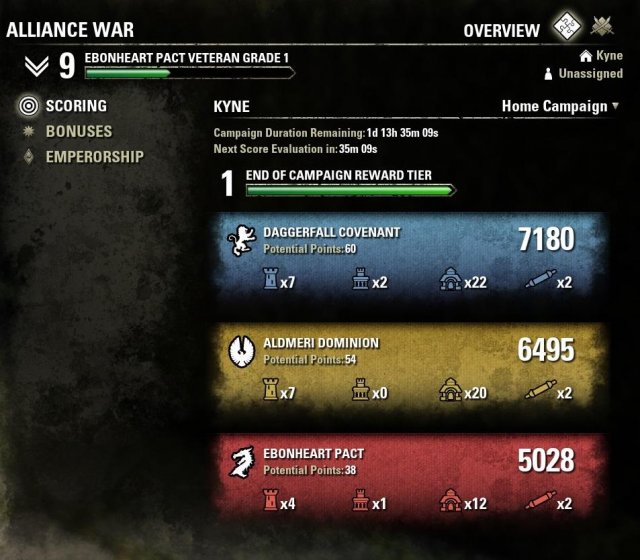
In the top left we see your personal alliance rank. This icon is also shown at your name next to your level when a player hovers their crosshair over you. These icons are for status, achievements and bragging rights.
Under that we see ''Scoring'' ''Bonuses'' and ''Emperorship'' which take you to different Alliance-War related pages.
In the top right we see in this example ''Kyne'' with a house in front of it. This is this particular character's home campaign. There isn't a guest campaign assigned to this character and thus behind the little stick figure guy it says ''unassigned''.
Under that we see how much time is remaining in the campaign. Once that time runs out the map will reset, the leaderboards will reset, and depending on your reward tier; your rewards! If it's 0 you don't get anything, if it's 3 you get a decent reward. If your alliance wins and you are high on the leaderboard (top 10) your reward might even be golden jewellery!
Then under there we see the 3 alliances. How many points they have and how many goodies they currently hold. Whoever is up at the top at the end of a campaign wins!
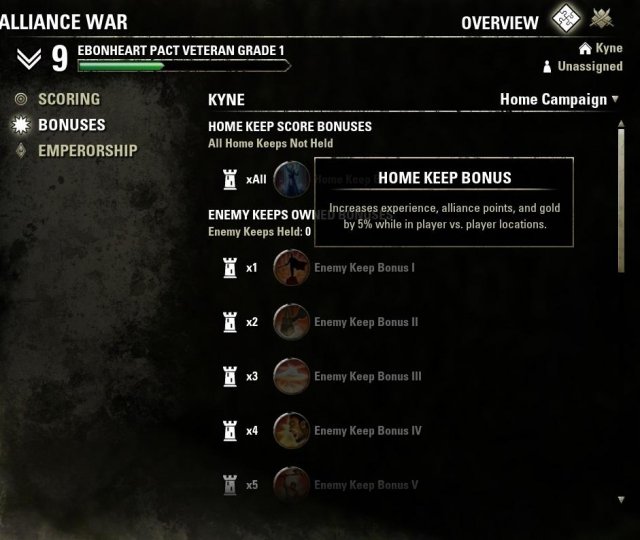
UI - Bonuses

The more your alliance holds, the mightier they will be. Capturing a lot will lead to various passive boosts for all members in the alliance. The best case scenarios are:
- 9 keeps gives 15% more experience, alliance points and gold. Weapon and spell critical chance increase by 8%.
- Owning 2 defensive Elder Scrolls gives 5% weapon and spell armour rating.
- Owning 2 offensive Elder Scrolls gives 5% weapon and spell power.
- Having an Emperor increases everyone's HP by 35 points per character level.
UI - Emperorship
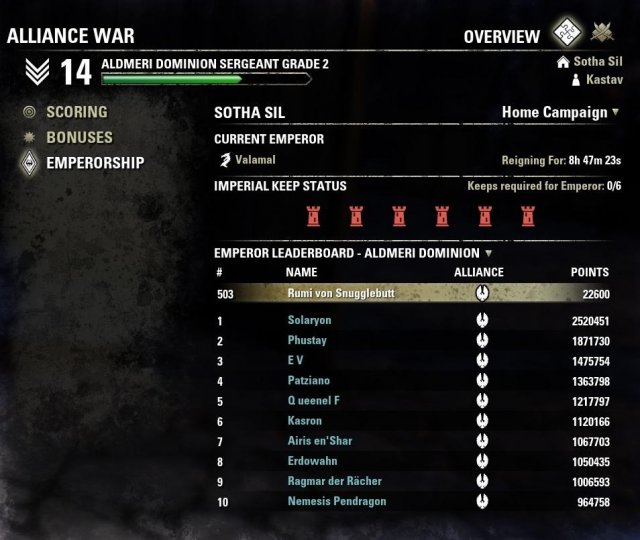
When your alliance captures the keeps surrounding the Imperial City, the #1 on the leaderboard for that alliance becomes the mighty emperor. The emperor has its own skill line which include 75% more resources, Ult generation, more siege damage and so on. If you fight an emperor and win you get fancy achievements at least.
This page also shows the top 10 on the leaderboards! Above that top 10 is your own rank. As you can see: My own just-some-information-for-the-guide-gathering-self isn't doing so well at rank 500+ this campaign. If you get Alliance Points (The green currency) you get points. Alliance points come from capturing, killing, repairing, resurrecting. Basically anything to help your own alliance will result in you crawling up the leaderboards.
Map - Home Base / Imperial City
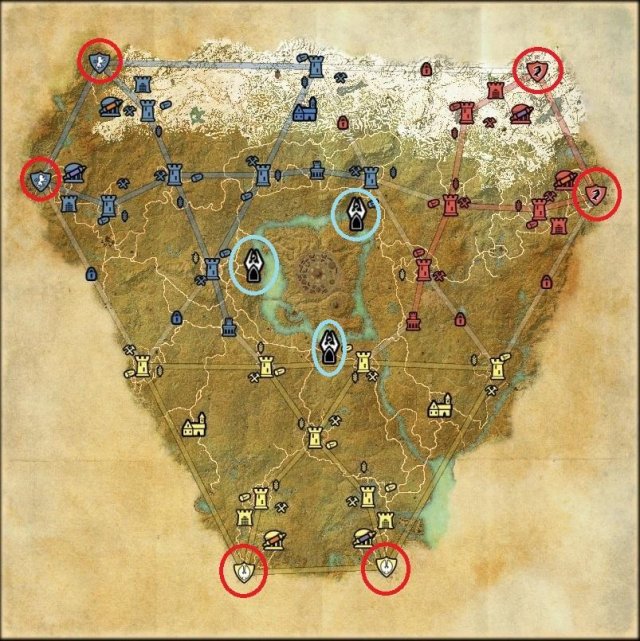
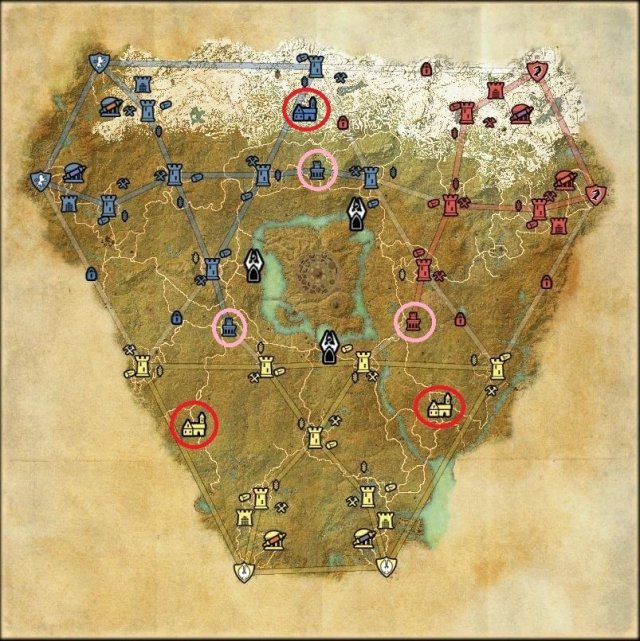
These red circled icons are home bases. The enemy can't reach these places ever. This is where you enter Cyrodiil after queuing. There's quests, crafting stations, stablemasters, the bank, Cyrodiil-Achievement furnisher, A siege merchant and some special traders selling Akaviri motifs, regional equipment boxes and special goodies.
Every weekend there's even a Golden Trader in the biggest of the two home bases. This Golden trader sells Golden jewellery and infused/impenetrable Monster helms/shoulders. Every weekend she has new jewellery and Monster set pieces to offer.
The icons with the pink circles are entrances to Imperial City Sewers. Another PVP area that works nothing like Cyrodiil, it's way more PVE focused too.
Map - Keep
Cyrodiil is a HUGE place. Thanks to keeps however, your alliance may easily teleport from one keep to another. The only requirement is for keeps to not be under attack and hold at least 1 Resource, while not being intersected by an enemy keep in the teleport links on the map. When a wall or gate reaches 50% hp when attacked, It gets the 'under attack' status. This breaks the teleport links until the keep is defended and repaired successfully.
Resources are the Mine (hammer and pickaxe icon) Lumbermill (log icon) and Farm (wheat icon) around keeps. The longer a keep you own holds a resource, the more it'll benefit your keep.
- Lumber gives your Door/Gate more hp, makes NPCs slightly stronger and makes Door/gate/Walls regenerate faster.
- Farms makes NPCs stronger offensive, defensive and are given a larger range.
- Mine gives NPCs better defense, walls more hp AND spawn protective locations and helps walls regenerate faster.
Map - Gates / Temples
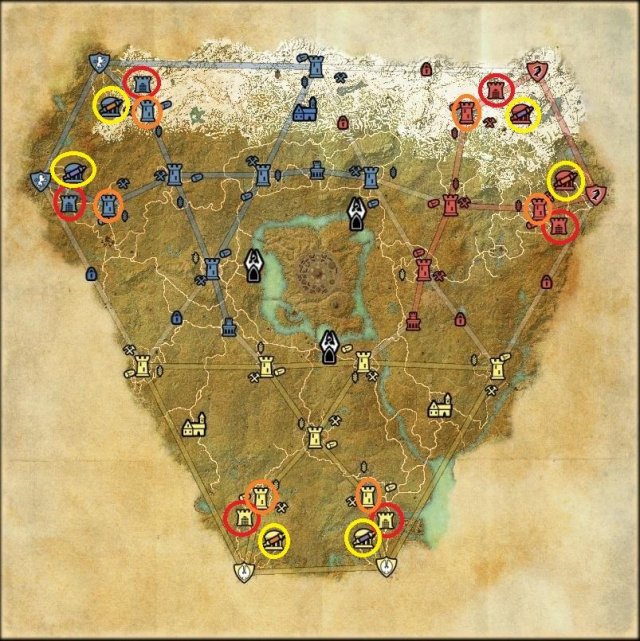
In the yellow circles we have Temples. At the start of the campaign every alliance has 2 elder scrolls. Elder scrolls give beneficial passives to your alliance members. Enemies cannot simply barge in and capture the Elder Scrolls however. This is because of gates.
Gates are the icons with the red circle. These gates can be gone through freely for alliance members of its colour. This is done with the ''interact with world'' button! A button that will not work for enemies. Enemies can only go through these gates of the gate is opened up.
The keeps with the orange circle are the keeps working the gates. Only after you've captured a keep like this, will the gate closest to it open. And that is the only way for enemy alliances to reach your Temple and capture the Elder Scroll.
Temples and Gates cannot be captured. NPC guards will guard non stop on them. Befitting the absolute final line of defense. There is no wall to siege either. It's all just loose soldiers.
Map - Town / Outpost
These three red-circled towns are not linked to the keep teleporting chain. These towns serve as a spawn point for whichever alliance owns it. When you die by an enemy player's hand, you can spawn here regardless of what keeps your alliance owns. This does NOT work if an NPC, monster, slaughterfish or fall damage kills you though. There's also vendors at the merchant flags selling pvp gear sets in light, medium and heavy at respective towns. For the true questers, there's some PVE questing to do here too.
In the pink circles we have Outposts. Outposts are a link to travel with just like keeps, they have however no resources and no outer wall. Making them fast to capture. The biggest use of outposts is using them to cut a keep from the teleporting lines.
The Game's Cyrodiil Tutorial
Upon entering Cyrodiil, there is a quest right outside the gate where you enter. This quest is this game's tutorial of Cyrodiil. It teaches you a little bit about cyrodiil and will give you give you information about siege weapons and teleporting. Just like this guide does! It's a good idea to do this to practice sieging and maybe learn a thing or two about what's to come. Completing this quest also gives 2 skillpoints and some Alliance Points to start you with.
Siege - Merchant
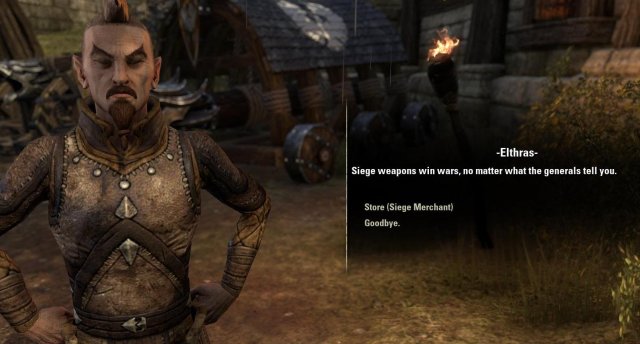
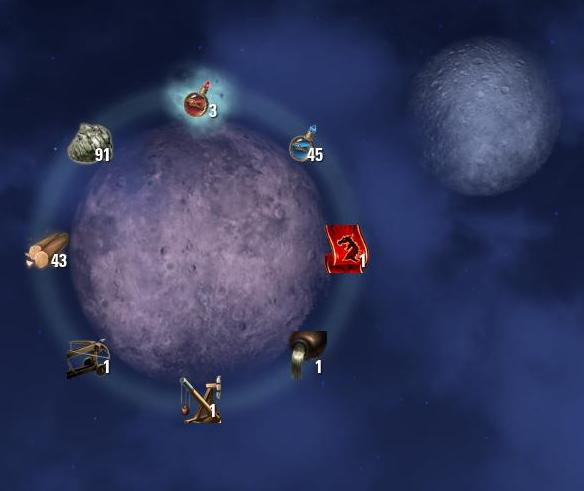
In every keep, outpost and even resource is a trader called Siege merchant. This NPC is what wins wars. But they serve as more than a merchant. Your options are:
- Store (Siege Merchant): Next topic!
- Inspect Keep: Here you can see how your keep's resources are affecting your keep.
- Claim ownership of keep: Be fast! Right after capturing a keep you can claim a keep, outpost or resource to represent your guild! This will make all guards and NPCs wear your guild's tabard! As soon as an enemy takes the keep, resource or outpost. The guild loses ownership over what was captured.
- Guild Store: When a guild has claimed the keep, resource or outpost. Its siege merchant will act as a guild trader for that guild too!
Siege - Weapons
Siege weapons wins wars! The more people siege, the faster something is captured. The more people siege, the better the defense.
- Trebuchet: These are the most powerful ranged siege. Their downside is that they are slow to reload and take in a huge amount of space.
- Ballista: Quick, small and effective. When space to siege is limited, these are good for both offense and defense. The projectile is fast and ballistas are effective against players too. 2 ballistas outperform a single trebuchet.
- Catapult: Not to be used against buildings. These siege weapons are effective against players. Especially the meatbag catapult goes hand-in-hand with ballistas. Ballista's weakness is the fact that players can heal. Meatbag catapults apply Major defile on enemies. In Cyrodiil healing is already half as effective. Add 30% less healing received to that and ballistas become a big danger indeed.
When bringing walls or doors down. It's good to use ''stone trebuchets'' and ''stone ballistas''. Fire only does half the damage of stone vs buildings. For raw damage numbers, fire siege is the best. Don't underestimate crowd control or debuffs though!
There's some more special siege too:
- Ram: These don't do anything against players, they don't do anything against walls, they're useless when you're defending. Rams only have one use. Bringing a keep's door/gate down. A minimum of 3 players is needed to operate the ram. This is done by simply standing inside the ram when it's deployed. It will operate faster the more people are inside the ram though. With the maximum operators being 6 people. With 6 people inside the ram, the gate is broken down in a flash. The ram will ride automatically to the next gate if you stay inside it. But most people pick it up and re-deploy it anyway.
- Flaming Oil: The bane of the cocky. These siege weapons made just for defending is to be placed above where enemies would walk. Above a gate, above a breach and a natural counter to the Ram. In half the campaigns (non-CP), two flaming oils hitting a player at the same time is almost certain death unless the status effect is removed or they are heavily healed.
- Cold-Fire Siege weapons: These drop from dolmen in Cyrodiil sometimes! They are stronger than other siege weapons. If you see an enemy shooting with blue fire, get something that cleanses status effects, or slot powerful healing. It's so very very VERY powerful. (In no-CP). They only come as ballistas or trebuchets. Cold-Fire Forward Camps don't exists yet.
Some bonus tips:
- One player focusing 100% on siege can operate 3 siege weapons at the same time. After shooting 1 siege, you move onto the next. After shooting again and 2 sieges reloading, you move onto the third. After shooting #3, you return to the first and it will JUST be done with reloading. When you operate 3 sieges, you are what allowed your alliance to win.
- Some Siege-etiquette! It's impolite to use a siege someone else placed. Simply activating it while no one is nearby is fantastic! Team effort! Great! But picking in a siege and not leaving it ever and actually waiting out the reload is frowned upon for good reason, you add nothing to the team as who placed that would've activated it anyway. Bring your own siege! Or actively move around! Or if you ran out of siege, see if you can put a siege shield(Alliance War skillline) up. Or heal! People usually die to defending ballistas, so you could resurrect those. Or if your build is 100% offensive, keep an eye out for sneaky enemies attempting to attack your assault group from the sides or behind.
- Siege weapons slowly lose hp. It's minor ticks at first but if your siege is deployed, it's slowly collapsing. If you make a siege weapon idle too long however. Ticks of 10% health drain your siege weapons in a flash! To avoid this happening, just activate it, shoot the ground, a wall or anything. Just avoid that super-idle health drain.
Siege - Support
As a wise man once said: ''A good defense is a good defense.'' Although costly, buy yourself some of these:
- Keep Door Woodwork Repair Kit: It repairs +/- 2% of a gate. you get some Alliance Points for every kit you use.
- Keep Wall Masonry Repair Kit: Same as wood kits, but for walls.
- Siege Repair Kit: These repair siege! Useful for Forward Camps, Cold-Fire siege and Rams. Anything really. Sometimes an assault takes so long, you actually have to repair or put down a new Flaming Oil(for example)
Forward Camp: Once your Alliance War Skillline reaches level 6. You are able to put down Forward Camps. These camps serve as spawn points with very limited range. Very helpful! Place them close to a keep you're attacking and people dying out-of-place away-from-the-crowd can respawn. Where otherwise they'd have to travel from another far-away keep again.
PvP - General
But you really are just cruisin' for a bruisin' right? Well, not so fast! If you come from PVE, you're probably equipped to take on enemies that stand still, don't block, are predictable and not sentient. You should first be aware of a buff/debuff applied to you in cyrodiil.
This permanent passive is called Battle Spirit.
- Gain 5000 more health
- Receive 50% less damage
- Healing 50% weaker
- Damage shields reduced by 50%
- Abilities with more than 15 meter range gain 8 meter more range
So fights aren't (usually) over in a single second thanks to this. It won't lasts much longer than that when you aren't in impenetrable armour armour though. The impenetrable trait causes critical damage to do less extra damage. It doesn't avoid crits! It reduces them.
Other actions helping with your survival are blocking, rolling and breaking free! Actions not used in PVE much. Blocking heavy attacks only because being knocked back is annoying. Breaking free because lack of patience. Rolling only outside of combat really. They don't get much use in 90% of PVE. In PVP however, they are so very important!
Blocking reduces incoming damage, that's helpful! Especially with half the attacks being some sort of Crowd Control. Or the most powerful attacks being telegraphed.
A good example is Mages Guild Meteor. It does like 13k damage + 12 seconds of 4k ground-damage in PVE. In PvP, thanks to battle spirit is does about 6k damage. Then blocking is 50% damage reduction. That's 3k damage! Then if you also throw in 1H+Shield, 70% damage reduction! Maybe you're a Dragon Knight. 80% damage reduction it is! Thanks to blocking. An ultimate that costs 200 ultimate-juice reduced to a petty attack of 1.2k damage. Then maybe a tick or two ground damage adds that up to 2.5k or so. Thanks blocking! It'll take some practice before you know when to block though.
Breaking free gives Crowd Control immunity. It's quite expensive but 4 seconds of total movement freedom is marvelous indeed.
Roll dodging is very strong. Completely avoiding most ranged attacks, and even a few close ranged ones. Even Nightblade's Death Stroke can be roll dodged! Meteor CAN'T be roll dodged. Don't get the full 6k - 9k damage on you now.
You probably already notice that all these options and actions are very defense focused. That's PVP! Very little bursting and a lot more surviving and out-lasting.
Sustain is so important. Unless your build is all around bursting, you probably won't have those weapon / spell damage glyphs on your jewellery. Instead recovery and cost reduction which seemed so overkill in the world of PVE.
Watch your resources, time your rolls and blocks, don't underestimate anything, don't overestimate yourself and wear impenetrable armour unless doing a PVP build for advanced people. (Like Sturdy, or maybe even Well-fitted)
Once experienced you can also focus more on bursting too, but for starters it's not recommended.
PvP - Executes
You have far less health than you might think. The majority of players in Cyrodiil have an execute. A skill that does a LOT of damage when your health is getting low. It's a good idea to be aware of these skills.
- Two handed - Reverse Slash: An instant-cast melee attack that does 300 - 350% more damage against targets with less than 50% health.
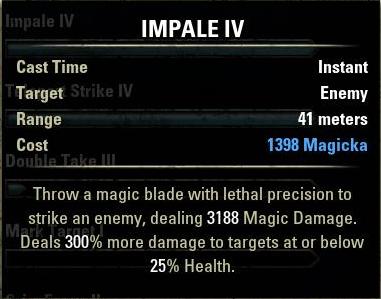
- Nightblade - Assassin's blade: An instant-cast melee attack similar to Reverse slash doing 300% damage against targets with less than 25% health. Magicka nightblades however have this skill available as ranged execute.
- Templar - Radiant Destruction: A ranged channeling beam that does 330% damage against targets under 50% health.
- Sorcerer - Mage's Fury: A ranged attack that deals mediocre damage but puts a status effect on you. If your health reaches 20% or lower while this is active, it activates and strikes you with a LOT of damage!
There is quite a few soft-executes in the game too. Dual wield abilities deal more damage to targets under 25% health. The Bow's poison arrow applies a Damage-Over-Time that deals up to 200% more damage to enemies under 50% health. But all these aren't as instant-dangerous-bursting as these executes.
Keep your health high!
PvP - Prioritizing Targets
When you have access to someone operating siege that's not in the middle of a big group, go get them! If you ever catch a healer being in a relatively vulnerable spot, go get them!
If you ever see a 30k hp + person blocking non-stopm or someone with 50k hp. Don't get them! Don't get taunted, don't be a PVE monster. Know what targets are valuable. An exposed Nightblade, a healer abandoned by those supposed to protect it, reachable siege operators, everyone that looks fragile. Make your attacks count!
PvP - Alliance War Skill Lines
When you receive your first Alliance Point, you unlock the two skill lines: Alliance War Assault and Alliance War Support. They have skills like 30% movement speed on horse. A stamina healing skill. Longer range on ranged skills. Resurrection time decreased, Healing boosted. It's great and all, but I'd like to point your attention to:
Purge! This removes siege Damage-Over-Times. Don't underestimate how useful it is to cleanse negative effects. DoTs from players can be removed too! It'll help others too. The only skill like this is Templar's Cleansing Ritual. Of course you can slot what you want. Just don't underestimate this!
Assault!
There are many ways to get a keep. Some ways work better than others depending on the situation. Whatever you do, don't siege doors ever! Shoot the wall next of doors. If you siege the tiny doors, you'll eventually only break off the door, but not the wall. If you siege the wall, the door will just crumble along with the rest.
Taking Resources?:It's a good idea to not touch the resources unless you are well aware the keep is full of enemies already. If you capture a resource, the keep is not under attack yet and enemies can teleport to the keep. The element of surprise is really important. Being 1/3rd through the assault before the enemy even knows is such a huge benefit. It often enough makes the difference between a successful assault and a failing one. Not capturing resources is better almost every time. If you do capture the 3 resources it'll cut the keep off to teleport to. And it makes the guards, walls and gates weaker.
Attacking Main Gate:+ Fastest way to get in.
+ A ram + plenty of trebuchets and ballistas can capture a keep before the enemy (unable to teleport as the keep is under attack) reaches the keep on mount.
- The most NPC guards are here.
- If there IS an enemy inside the keep already, flaming oil makes quick work of your lil Ram.
- Brute forcing it while there's plenty of enemies is a bad idea, as there is LOTS of room to put counter-siege for the enemy on their wall.
Attacking A Wall:+ The least amount of NPC guards.
+ Pretty often a height difference, making it much harder / impossible to counter-siege for the enemy.
+ Less room for enemies to put siege, and no/little room for oil.
- Can't use rams so breaching a wall will take longer.
Once The Outer Wall/main Gate Is Breached:- Done surprisingly little but very effective is Counter-sieging Counter-siege. Go to a corner of the wall, a spot where there's a single NPC guard. Pballista or trebuchet and siege the flaming oilers! Siege the ballistas!
- Don't leave the past in the past. Either through the gate or through the breach, your behind is the ideal spot for enemies to kill your group 1 member at a time.
- Remember siege etiquette. Don't steal and be aware that placing a trebuchet takes lots of space! They are better in some situations but not all.
Once Inner Wall/main Gate Is Breached:- Watch for flaming oil. Watch for ballistas facing the breach. Watch for siege! Do not get cocky! Purge, heal, push forward but DON'T get cocky! But don't forget your totally exposed back.
- Usually this is a tiny breach a whole team has to squeeze through. Watch for vicious death, nightblade bombs, group-skills and all that. Healing is SUCH an important role in cyrodiil, and here your healing prowess is put to the test.
- Run upstairs and kill if you're confident in your pvp abilities. If you're not in impenetrable, go for the flags. Capture the keep by standing next to a flag. There are two flags to capture in keeps.
Once The Keep Is Turned Into Your Alliance's Colour On The World Map:- Repair what you only just destroyed using the repair kits.
- Claim what you captured at the siege merchant so all the NPCs wear your tabard!
- Party but drink responsibly.
- Seriously though, repair.
- Capture resources! Remember that the keep can't be teleported to OR away from as long as it doesn't have at least 1 resource and is connected to another keep with at least 1 resource.
Defending
You're as far away from your homebase as you can. You spot one of the other colours running around and gathering at a certain side of the keep. The very first thing you should do is LOOK. Observe them, and communicate. Count the number of enemies, doesn't have to be precise and press that enter(chat) button. Slash Z Space. "15+ blues [keep name] lumberside." The keep won't be tagged as Under Attack until the wall or gate dropped to 50% health. Communicating wins wars as much as sieging does. So thanks to your crafty call, the numbers are evened when the keep gets the Under Attack status. But the fight didn't start yet.
Defending Outer Main Gate:Oil, Oil, Oil. Above Main Gate is a grate you can oil through. You'd almost hope they put up a ram just to see them underestimate oil and die. AP will come to you as one after the other drops. Hopefully you aren't alone however, as there is enemy ranged siege too. Ballista them! Remember you can operate 3 ballistas and not have any ready-to-fire time on any of the 3 being wasted. Now two things can happen: You can disrupt the attack long enough for enough reinforcements to arrive to push them back. In which case, you have successfully defended! Congratz!
Or they break through. You can usually anticipate this, by watching the gate's health drop down and you not having many players around you. IF this happens, back up in advance, get in the keep, climb on up to a place where you can put ballistas, and aim at the gate. MORE THAN 1 BALLISTA otherwise it'll be outhealed easily. A breach is a hole the enemy will come through, but this hole is rather small. Projectile travel time is a lot less complicated if you already can predict where an enemy is gonna go. Even if you are all alone as defender, this puts quite some pressure on the enemy team.
Defending Outer Wall:If they're attacking the wall, ballista them to heck. If their siege is slow, maybe put a Forward Camp inside the keep and go get them! (cuz PVP is generally more fun than sieging, even though sieging is more effective usually.) Not much you can do when their siege is overwhelming though. Just like main gate, make use of the breach. Ballista-ing the breach from inner keep.
Defending Inner Gate:Oil, Oil, Oil. But also ballista. Just like before, when the gate is about to broken down, aim 2 or 3 ballistas at the gate from the inside. This is so extremely effective. This gives oil-ers also more time to oil the area the enemy has to go through. Also useful is the meatbag catapult to have them unable to out-heal ballista and oil Damage-Over-Times. The combination of oil, ballista and meatbag obviously needs at least 3 defenders though. If you are with more than 3, maybe even more than 10. Make sure to do one of these things!
Defending Inner Wall:Really is the exact same as defending inner gate, but with less room to work with! Very limited room to oil and ballista. Still there IS room, maybe you'll be able to hold long enough for reinforcements to save you!
Communication
The chat is where you get information from and give information to. Make sure to have the Zone Chat activated. In this chat people will report what is under attack, where the next assault is gonna be and where victory is ensured. Without communication your alliance will crumble as everyone is too late for defending. Groups attack everywhere with no force rather than specific points with full force.
And YOU gotta help. Report what's happening. How much % is that gate it? When is the wall breached? Remind your team to put siege! Reminds them to repair! Remind them their shoelaces are undone! Anything to help your alliance move as one unstoppable force.
Acronyms used in Cyrodiil:
- lfg = Looking for Group : Use this to be invited into a group so you can see where other alliance members are going.
- lfm = Looking for Members : When it's early and all the soldiers are asleep. Some leaders might have some trouble getting together a decent amount of players. You can respond to this with 'lfg' to be invited into a usually small starting party. If you stay long enough, it'll grow up to be a full group of 24 members in just a few hours.
- ua = Under Attack! : If the keep that's 'ua' can still be teleported to, go teleport and help defend!
- inc = Incoming! : Basically like ua but the siege didn't start yet, the enemy is just on their way.
- emp = Emperor : The emperor and its own skillline is wreaking havoc somewhere no doubt. The emperor is always on an endless cruise for a bruise.
- BRK = Blue Road Keep : Just one of the keeps. Often enough just the first part of the keep name is said but this keep is called BRK.
- blk = Outpost Bleaker : Don't get it confused with BRK. This is the outpost in the north.
Source: https://gameplay.tips/guides/1215-the-elder-scrolls-online.html
More The Elder Scrolls Online guilds
- All Guilds
- The Elder Scrolls Online - Ancestral Tomb Guide
- The Elder Scrolls Online - How to Make Easy Money in Shornhelm (Thief's Guide)
- The Elder Scrolls Online - Achievement / Clockwork City
- The Elder Scrolls Online - Comprehensive Werewolf Guide
- The Elder Scrolls Online - Tips for New and Old Players
- The Elder Scrolls Online - Dwarven Theodolite Pet Guide for Morrowind
- The Elder Scrolls Online - All Houses Guide + Locations
- The Elder Scrolls Online - Saving Money on ESO
- The Elder Scrolls Online - How to Take Great Screenshots
