
Introduction
Welcome To The Banner Saga!
Having problems with the Dredge, or are you simply looking to win more fights with greater ease? Look no further, as this guide will help you to dominate and obliterate your foes.
For additional help, please visit the Official Game Wiki[bannersaga.gamepedia.com]
The Basics & Game Mechanics

Obviously you're most likely aware that The Banner Saga is a turn-based strategy game, which bears a lot of similarity to chess. If you've played Civilization, Disgaea 1 / 2, and or Final Fantasy Tactics, then you've got some background in turn-based strategy and a head start on your opponents.
A typical battle will involve 2 teams with your team being 6 units. The opposing team, typically the Dredge, though sometimes you'll fight the Varl or other Humans will more often have a few extra units. Each team will alternate turns as they take action: moving, attacking and or using their abilities, etc..
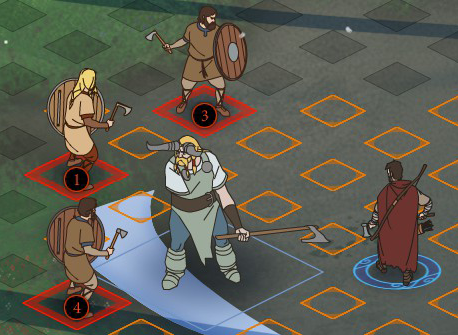
Combat takes place on a board, with square tiles, similar again to a chess board. Units have a specific number of tiles/squares they can move across each turn. Each unit is assigned a turn on the "initiative bar," in the bottom left of the screen. This will be the order in which units will take turns. Before you go to battle, you will have to set the order in which your units take action by entering the Heroes area and adjusting it as you wish. This turn order cannot be changed during battle.
Melee units such as the Warrior can only attack adjacent units. Ranged units have a number of squares they can attack from: Archers in this case, have a range of 5 squares, however they cannot attack units adjacent to them. Spearmen are the other exception in that they have an attack range of 2 squares.
Opponents will take turns when taking action with their units. Unlike in other turn based strategies, killing an enemy unit forfeits that side's turn, in The Banner Saga however, players continue to alternate turns even if one side has fewer units. Which means that remaining units get more turns as your or your enemy's team dwindles.
Strategic Tactics: Killing Or Maiming
By targeting your opponents larger and more powerful units and taking them out sooner, you put yourself in a tactical winning position, since their weaker units will continue to have to use their turns to attack you, which is most likely a waste for them. Better yet, targeting units like slingers which move when attacked with Impale causes great harm, and sometimes forces them to kill themselves before being able to move to attack back.
You are always able to chose to either KILL or MAIM the enemy units. Consider first if it is wise for you to kill an otherwise harmless unit, you will in turn "speed up" the remaining units of your opponent. You also might open yourself to being attacked, if the unit you killed was preventing something stronger from reaching you. Use careful judgement in deciding to finish off a Defender who takes up four spaces, potentially blocking additional units from reaching you.
If you outnumber your opponent, and he has 2 or 3 strong units left, there's a big probability that he’ll wreak havoc on your team, especially if you have more but weakened units.
Choosing Between Attacking Armor Or Strength


Units have two different statistics which serve as health. The first is strength, the other is armor; a shield which protects your strength. Strength is not only your unit's health, but also their attack power. As a unit takes more damage to their Strength, their attack also will decreases.
Typically you'll first want to reduce armor on an enemy unit before beginning to attack their Strength. There are exceptions, since when using units with a very high level strength, ( like Warhawk ), it's a good idea to attack an enemy directly, especially if you are able to reduce that enemy's Strength to half or less. However, if a unit's armor is quite high, it's probably a good idea to invest in making that enemy more vulnerable by breaking armor. After you'll broken it down a bit you'll be more effective, and can attack at Strength.
Ideally, being able to reduce the enemy to half life is a good rule of thumb, when trying to decide whether to attack Strength or Armor.
Information Collection And Movement Range
It's important to know that you can see how far your opponent can move when playing. Be sure to click on your enemy's units so you can see where he can reach and if he can reach you. This is very useful for knowing where to position your units while moving them. Yellow squares indicate move range extended by willpower.
Beyond knowing how your opponent can move and planning accordingly, you can also see which stats each opposing unit is strong in. This is very useful and can help you decide what unit you may need to kill or what you can leave alone for now.
Character Leveling
Status PointsWhat Role The Character Will PlayStrength serves as both your units health and attack power. As a unit is injured or gets closer to death, the potency of its attack also diminishes. The unit falls unconscious when this stat reaches 0. In a fight, try to keep this high as long as possible, or you won't be able to hurt your enemy.
Armor serves as a defense rating for the unit and also a secondary kind of health which protects the unit's Strength. When a unit is attacked by an enemy, the Strength damage to the receiving unit's is calculated as (Strength of attacker - targeted unit's Armor = damage to target unit's Strength). Armor can also be attacked directly and reduced, making a unit more vulnerable to Strength attacks. When armor is higher than the attacking unit's Strength, the attacking unit suffers a 10% miss chance for every point Armor is higher than Strength.
Break serves as the amount of damage a unit can do when attacking the armor of an enemy. It reduces the enemy's armor according to said amount. Unlike strength however, the potency of break remains constant all throughout a battle.
Willpower is an important resource during a fight because it allows your units to use skills, hit harder either to Armor / Strength or move your character farther. This obviously makes your units more flexible and able to cope with more situations. Willpower, though for the most part does not regenerate during battle unless a unit takes no action for a turn (rest). Because of this, how you spend willpower can be the decisive difference between victory and defeat.
Exertion dictates how much willpower a unit can use to boost its attack or move. With 2 exertion and 2 willpower a unit can move 2 extra tiles or do 2 more damage. Another option would be to move 1 extra tile and do 1 extra damage. You are not restricted to using willpower for only one action per turn, provided you have the available Exertion, since you can only boost each action for as much willpower you have left and what your exertion allows.
Ability is the unique power this class wields. See more information near the bottom of this guide.
You are currently able to customize your units up to Level 5, and based on the status descriptions above, here are a few useful tips:
When distributing points, try to figure out the unit's role on the battlefield.
If you want a high armor breaking unit, you'll put points into break.
If you want a finisher once the armor on an enemy is reduced, you'll put more points into strength.
If you want to be really mobile and use abilities, you'll want willpower and exertion.
Pre-Battle Unit Placement, Position And Order

Location, Location, Location! Positioning your units is an important consideration and there's a few things you want to avoid prior to the battle starting:
Avoid placing vulnerable units in the front row. Generally, towards the back is the safest location to position the unit, while sometimes placing towards the middle is neutral.
Remember about alternating turns. If you leave a unit at the end of the order queue in the front row of the deployment area, chances are that your enemy if positioned aggressively can hit that unit before you have the chance to move it.
Unit order plays a role in the opening of the match. On the first cycle the unit at the end of the queue can be the most vulnerable because it is last to act and can be quickly knocked out if positioned badly. On the flip side, make use of an opportunity to attack/take out a weakened unit, because it goes after the rest of your team.
When queuing your team, try to imagine each role and the sequence you intend. You may have a chance to set up a chain where the first unit will weaken, the next will support and block, and the third will finish. Try to locate these units closer to one another, and to sequence their turns in the order this plays out.
Special Thanks
Thanks to Raven2134[stoicstudio.com] with his invaluable experience and guide to help put these strategies together.
Thanks to Gamepedia[bannersaga.gamepedia.com] , to better experience the game together with the community of gamers.
Amazing thanks to Stoic: You three have made a fantastic game that I'm sure you're proud of and I'm quite thrilled to have a chance to enjoy! Please Please keep making games!
Source: https://steamcommunity.com/sharedfiles/filedetails/?id=216883318
More The Banner Saga guilds
- All Guilds
- Empanadas para tu caravana
- The Banner Saga
- Combat Strategy Primer
- Basic tips for Beginners.
- Every Decision and Consequence
- The Banner Saga Achievement Guide
- The Banner Saga Guide 3
- , .
- The Banner Saga