
Intro And Notes *WARNING THIS GUIDE IS OUTDATED*
Hey so I've been working on a portrait and found the documentation to be pretty lacking. Especially for Macs. I've decided to create a guide for how to make a mod that adds portraits. If you are on PC it should actually be easier since so many plugins and tools are readily available. Some of the tools and plugins should be helpful for any graphics mod.
This is my basic setup as of March 2018
Mac High Sierra 10.13.3
Stellaris version 2.0.1
photoshop cs5
brackets
maya 2018So at the moment there are about 3 levels to making portraits
Static Image
Animated portraits that use pre-existing meshes and animations.
Original Animated portraits with custom meshes and animations.I'm going to try and cover what I can and hopefully this guide can be updated as I learn how to do more.
Useful Web Resources: Here is a list of some websites and resources that are helpful of modding. I might have gotten some info here so you can cross reference some stuff.
https://stellaris.paradoxwikis.com/Modding
https://stellaris.paradoxwikis.com/Portrait_modding
https://forum.paradoxplaza.com/forum/index.php?forums/stellaris-user-mods.940/
https://forum.paradoxplaza.com/forum/index.php?threads/updated-guides-species.1073956/
I released a companion mod to help.
http://steamcommunity.com/sharedfiles/filedetails/?id=1323875845
Please feel free to download that and pick it apart. Unpacking the mod .zip is a bit weird since all the names are all numbers. Mine should be 1321800257.
Required Programs And Resources


So before you even start you need to have the ability to view modify and create certain files.
Photo editing tool: I'm using Photoshop cs5 but anything where you can create high quality images and then edit them should work.
People also seem to use gimp and the dds plugin for that. I do not have experience with that program so I will stick to cs5.
DDS file converter/viewer: Ok so this was a big headache to figure out and I had to search high and low for this to work on a Mac. Its still not perfect but I've been able to view and export them.
-MAC dds viewer: I'm using x-plane v1.31, super simple and shows a preview in the finder window. Can't "open" the file but its super useful when combing through the stellaris folders.
https://marginal.org.uk/x-planescenery/mactools.html
-MAC photoshop plugin: It works pretty well for cs5 even though it says cs6. Just plop it into your plugin location. The only weird thing is importing a dds files messes up the transparency.
http://fnordware.blogspot.com/2014/09/dds-plug-in-for-after-effects-and.html
-PC photoshop plugin: Easy I guess. I never used it but its endorsed by paradox.
https://developer.nvidia.com/nvidia-texture-tools-adobe-photoshop
-Web based converters: Useful for me since the mac plugin screws up transparency. These may have limits per day on how many you can do but they are still useful none the less.
dds to png:
https://convertio.co/image-converter/
png to dds
https://online-converting.com/image/convert2dds/
Text Editor: I use Brackets. Its free and pretty awesome. Made by the adobe people. I'm sure there are plenty of other ones. I think notepad++ is highly touted.
http://brackets.io/
https://notepad-plus-plus.org/download/v7.5.5.html
3D modeling/animation tools: (not important for static portraits) The game uses .mesh and .anim files which need special scripts/plugins to work. I guess maya and blender are the best 3D software for this process. I have maya 2018.
-MAC & PC ross-g Maya Fanmade importer/exporter scripts: Its way better then the paradox one.
https://forum.paradoxplaza.com/forum/index.php?threads/import-export-paradox-mesh-tool.1009625/
Follow their instructions but for Mac maya 2018 use this script loading code instead. Set to python.
import io_pdx_mesh import io_pdx_mesh.pdx_maya.maya_ui reload(io_pdx_mesh.pdx_maya.maya_ui) io_pdx_mesh.pdx_maya.maya_ui.main() You should get an import/export dialog box.
-PC Maya official Paradox scripts: This one doesn't work on Mac. Need paradox account to DL.
https://accounts.paradoxplaza.com/downloads
NOTE: The location for maya scripts for Mac is buried and tricky to find. For me it is /Users/YOURUSER/Library/Preferences/Autodesk/maya/2018/scripts/
Stellaris folders and reference files: You need to find your Mod folders and the main Stellaris folders DO NOT REPLACE ACTUAL STELLARIS STUFF. Just copy what you need into the mod you are making. I like to keep a folder full of aliases(shortcuts) on hand to quickly bounce back and forth and look at references.
-Mac Stellaris folder location:
/Users/YOURUSER/Library/Application Support/Steam/SteamApps/common/Stellaris/
-Mac mod location: This is where your mod is kept. The ".mod" files are not the real mods, this is just where you keep mods you made.
/Users/YOURUSER/Documents/Paradox Interactive/Stellaris/mod/
-Mac steam workshop mod location: Super useful for reverse engineering mods to see how they work. You just need an unzipper program. There are a bunch go look for one you like.
/Users/YOUR USER/Library/Application Support/Steam/SteamApps/workshop/content/281990
The code for the stellaris folder might be different for you but thats what mine is 281990.
1. Creating A Mod

First thing's first you need to create your mod. In the stellaris launcher where you select all the mods there is mod tools button. Open that up and create a mod.
Everything is pretty self explanatory. But heres a break down from the wiki.
The first blank is for the visible name of the mod.
The second blank is for the name of the actual mod file.
The third blank is the supported version. This should already be filled out and do not change it.
Below that is four available tags that that can be added. Use "Species".From this point on I'm going to refer to the mod as HAPPYguys. The race is called the Happy.
Creating the mod will put HAPPYguys items into your mods folder. This folder will have a HAPPYguys folder and a HAPPYguys.mod file in it. ".mod" files can be opened by your text program and updated later if you want to change any of this info. This can also be used to update the supported version of stellaris for your mod and add a thumbnail image for steam.
2. Setting Up Mod And Mod Folders


Stellaris uses a series of folders and they have to be set in the correct order. If you recall we had a shortcut to the main stellaris folder. What ever the mod is adding should mimic the structure that the stellaris folders use. In those folders there will be a whole bunch of .txt files, folders, and .dds files.
Start here/Users/YOURUSER/Documents/Paradox Interactive/Stellaris/mod/
Right away you should copy paste HAPPYguys.mod into your HAPPYguys folder. Rename it descriptor.mod
Create 2 folders and name it "common" and "gfx"
The HAPPYguys folder should look like this.
commonIn the "common" folder create 2 folders "graphical_culture" and "species_classes"
Keep the main stellaris folder open and locate the file inside "graphical_culture"
There should be something called "00_graphical_culture.txt" copy and paste that into your HAPPYguys "graphical_culture" folder. you should then rename it something more inline with your mod. In this case I named it "01_happy_culture"
That folder should look something like this.
now do the same for the species classes and find the file called '00_species_classes.txt" copy it and rename it.
That folder should look something like this.
I'll explain what all these txt docs do after we set up everything. And start modding the actual files.
gfxNow head to the "gfx" folder you made and create 2 folders "models" and "portraits"
In the "models" folder create another "portraits" folder
In this new "portraits" folder create your species folder. In this case I made the "happy" folder. This covers the whole group of portraits so if you are making a frog and a toad mod you might want to call the folder amphibians or something. Depending on if you want to create animated or a static portraits what you put in this folder depends. Lets leave it empty for now.
The folder tree should look like this.
OK don't get confused here but head to your original "portraits" folder create 2 folders "asset_selectors" and another "portraits" folder. Yeah theres a lot of portrait folders. Asset_selector is only useful for clothing choices I think. Leave these folders empty for now.
Go to the the main stellaris folder open and locate the gfx/portraits/portraits/ folder and copy paste which ever portrait you are most closely resembling. In my case I'm just going to copy the humanoid "09_portraits_humanoid.txt" file. Rename it like the rest.
Your mod should look something like this. I also have a "city_sets" folder here but I'm not going to cover that. Its pretty easy to figure out.
Did you get all of that? I hope so!
3. Static Art


If you want to make a modified animated some of this stuff might not apply. I'll repeat some stuff to cover it but the basics of creating an image will pretty much be the same.
ArtThis part is 100% on you to create some sweet art. You might want to open up some stellaris files if you want to mimic their style or just create your own. For this mod I'm going to go into their /Steam/SteamApps/common/Stellaris/gfx/models/portraits/ and find their humanoid 03 designs and make an image from that.
Their files are all in a ".dds" format so I'm going to use the online converter to create a png.
Now their art has some floating elements for the animations but we can modify all of it in photoshop.
First I'm going to blow these up to some large workable size and add some clothes. You should probably store these images in some art folder. Just not in the Mods folder since these will be super high quality working images. I'm going to do a male and female design with 2 colors each. So a total of 4 designs.
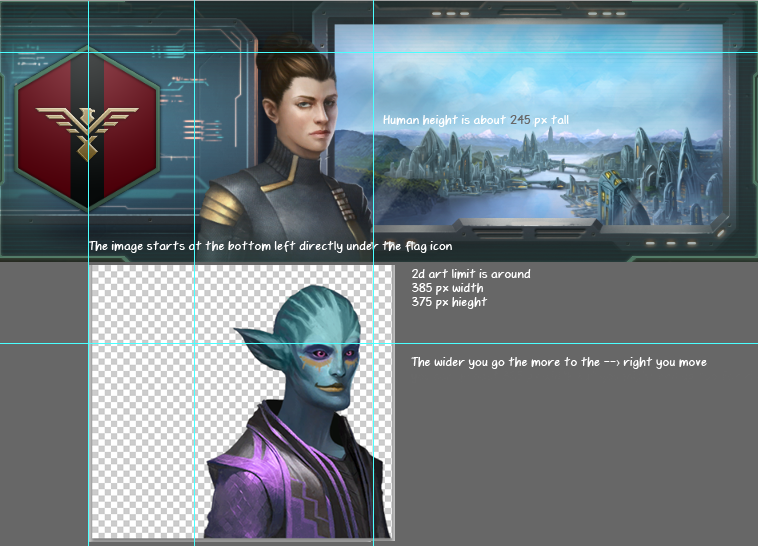
When you finish your main art you'll want to set them to game size. I'm going to save a copy of these design at a much smaller size. Try to make the image about 385 px wide x 375 px tall. Try to keep the character's head height at about 235-245 px tall if you want human like height.
When saving save as DDS use options DXT5 and Transparency.
The photoshop DDS save dialog looks like this.
Now to move the portrait left and right you can make the image wider and give more empty space to the left. It always starts at the lower bottom left.
Here is a quick diagram of what I mean. This is not exactly to scale but you get the idea.
Add all your new .dds art into the "Stellaris/mod/HAPPYguys/gfx/models/portraits/happy/" folder
the folder tree should look sorta like this.
A cool thing I found out is that you don't need to quit stellaris and reload the mod to see art changes. So if you want you can mess with color size and spacing while the game is open. you just have to click a different portrait and then back on yours.
3b. Static Code
The next step is changing the ".txt" files, its pretty much basic coding.
culture.txtFirst we need the culture species group.
find "Stellaris/mod/HAPPYguys/common/graphical_culture/01_happy_culture.txt" and open it in your text edit tool. Just replace everything with what I have below.
happy_01 = { ship_color = yes fallback = fungoid_01 ship_lighting = { cam_light_1_dir = { 0.6 -0.2 0.1 } cam_light_2_dir = { -0.4 0.0 0.0 } cam_light_3_dir = { 0.4 -1.0 -0.1 } intensity_near = 1.0 intensity_far = 5.0 near_value = 100 far_value = 4000 rim_start_near = 0.5 rim_stop_near = 0.99 rim_start_far = 0.3 rim_stop_far = 0.99 #rim_start_far = 1.5 #rim_stop_far = 2.0 ambient_near = 0.1 ambient_far = 0.0 }} You are filling in your culture group and what lighting they use. I have it as fungoid_01 as the fall back. That is when there are no ship or building art it will just use the generic fungoid stuff.
Quick tips. Don't misspell anything and don't add extra spaces when filling in "quotes" or "linked/file/paths/in.code" An extra space or spelling error can mess up everything. Use the FIND command to quickly replace a ton of scattered text.
classes.txtDelete everything and fill it with this code.
Happy = { archetype = BIOLOGICAL possible = { authority = { NOT = { value = auth_machine_intelligence text = SPECIES_CLASS_MUST_NOT_USE_MACHINE_INTELLIGENCE } } } portraits = { "2dhappy_01" #this is the static design I made } graphical_culture = happy_01 move_pop_sound_effect = "moving_pop_confirmation" } The species classification is now Happy, it would make more sense to call it Happiod but whatever. The portraits that it is using is "2dhappy_01" if you have multiple creatures like frogs, toads, newts you would put them underneath as "happy_01" "happy_02" "happy_03" ect ect.
"graphical_culture = happy_01" is just linking back to the last bit of code.
Ok so your common folders are all set. I still don't know how to add portraits to already made classes like adding a manbearpig to the humanoid set without replacing the entire thing.
portraits.txtLets head straight to portraits. probably the most important to code. Copy this stuff.
portraits = { 2dhappy_01 = {texturefile = "gfx/models/portraits/happy/2dhappy_male_01.dds"} 2dhappy_male_01 = {texturefile = "gfx/models/portraits/happy/2dhappy_male_01.dds"} 2dhappy_male_02 = {texturefile = "gfx/models/portraits/happy/2dhappy_male_02.dds"} 2dhappy_female_01 = {texturefile = "gfx/models/portraits/happy/2dhappy_female_01.dds"} 2dhappy_female_02 = {texturefile = "gfx/models/portraits/happy/2dhappy_female_02.dds"} } portrait_groups = { 2dhappy_01 = { default = 2dhappy_01 game_setup = { add = { trigger = {ruler = { gender = male }} portraits = { 2dhappy_male_01 2dhappy_male_02 }} add = { trigger = {ruler = { gender = female }} portraits = { 2dhappy_female_01 2dhappy_female_02 }}} species = { add = { portraits = { 2dhappy_male_01 2dhappy_male_02 2dhappy_female_01 2dhappy_female_02 }}} pop = { add = { portraits = { 2dhappy_male_01 2dhappy_male_02 2dhappy_female_01 2dhappy_female_02 }}} #leader scope leader = { add = {trigger = {gender = female} portraits = { 2dhappy_female_01 2dhappy_female_02 }} add = {trigger = {gender = male} portraits = { 2dhappy_male_01 2dhappy_male_02 }}} ruler = { add = {trigger = {gender = female} portraits = { 2dhappy_female_01 2dhappy_female_02 }} add = {trigger = {gender = male} portraits = { 2dhappy_male_01 2dhappy_male_02 }}}
Ok lets go over this stuff.
portraits = { 2dhappy_01 = {texturefile = "gfx/models/portraits/happy/2dhappy_male_01.dds"} 2dhappy_male_01 = {texturefile = "gfx/models/portraits/happy/2dhappy_male_01.dds"} 2dhappy_male_02 = {texturefile = "gfx/models/portraits/happy/2dhappy_male_02.dds"} 2dhappy_female_01 = {texturefile = "gfx/models/portraits/happy/2dhappy_female_01.dds"} 2dhappy_female_02 = {texturefile = "gfx/models/portraits/happy/2dhappy_female_02.dds"} }
2dhappy_01 is the main species we made back in the "classes.txt" the extra male female are just being given the textures for variations. If you don't want male or female you can shut that off in the "classes.txt" If you want each leader to have different outfits you might want to look into the real files for the triggers on that. it gets pretty complicated.
That about wraps up the static image portraits.
4. Animated Art
WIP
4b. Animated Code
WIP
5. Uploading Mod
Thumbnail
If you want a thumbnail picture on steam you need to add
picture="thumbnail.png" to your ".mod" code.
so for my file
"happyguysguidemod.mod"
name="HAPPYguysguidemod" path="mod/happyguysguidemod" tags={ "Species" } picture="happy.png" remote_file_id="1323875845" supported_version="2.0.1" You also need a under 1 mb image called "happy.png" inside you mod folder.
Uploading
Go to mod tools again and press upload mod. Track your mod down and upload that. Try not to upload multiple ones. I might get super confusing. Make sure your .mod files are all correct. If there is no error then you are successful.
Updating prexisting mod
Just hit fetch info after you've create a mod on steam. The ID number in .mod should match up with the web address. Then upload again and It should replace the old one on steam.
Have fun :)
Source: https://steamcommunity.com/sharedfiles/filedetails/?id=1321800257
More Stellaris guilds
- All Guilds
- Stellaris3.9.3
- Stellaris3.9.2
- Stellaris 3.7.2
- Stellaris 3.6.1
- How to fill in your empire's territory with any color
- 3.14 Guide to Traits, Ethics, Origins, Civics, Traditions and APs
- SteamP2P
- HOW TO OPEN GAME
- HOW TO CLOSE GAME
- Stellaris Guide 870