The Art Of Staying Hidden In Plain SIght
About EM

EM is created whenever your ship pulls energy out of the reactor. Heavy draw like charging a jump drive or running the engines at full throttle will throw out huge amounts of EM, increasing the range at which your ship will be detected. Thus staring out the golden rule for being a Gentleman is:
Having lower EM makes you harder to detect
Always have this at the front of your mind when looking at ship upgrades, balance the usefulness of any ship part with the EM it generates. Look to securing longer ranged sensors early on (have a look at the section for which ships might lend you better detection ability).
For upgrade paths, there are two choices
0 EM Cloaking
0 EM
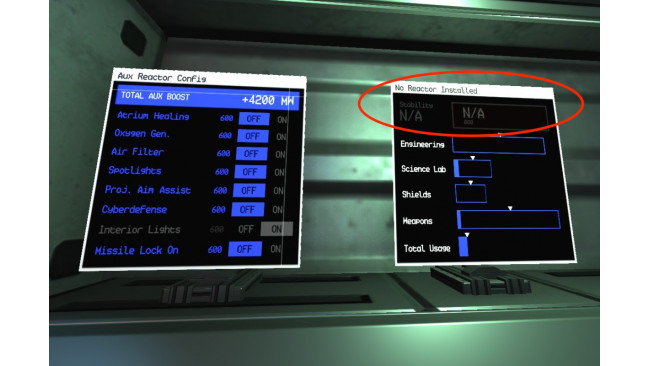
Old school Gentlemen will know that the Carrier, the Outrider and the Roland can be induced to produce 0 EM emissions by removing the core safety lock and forcing a core meltdown to initiate the core ejection procedure.
Once ejected the Engineer panel will require some rejigging (note the reactor temperature gauge registering the core has gone in the picture below)
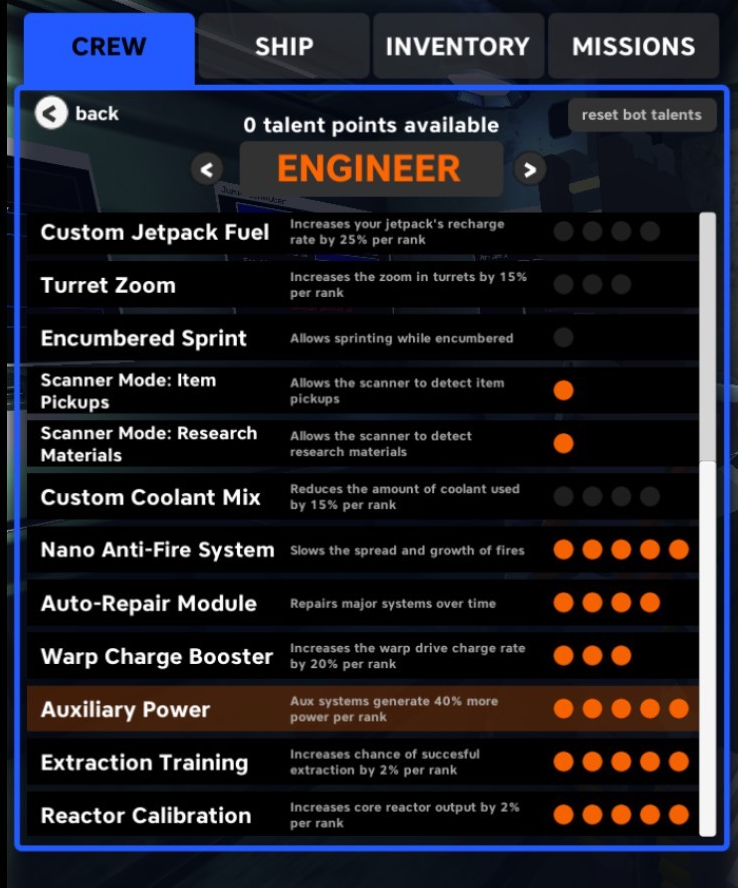
Now coreless, the ship will be solely powered by Auxilliary power which, while much lower than the reactor potential output, produces substantially less detectable energy traces. You can increase the amount of power available by researching Auxilliary Power talents for your engineer
You could call this hardcore mode.
You will no longer require reactor coolant or the associated engineer talents, the down side however is the engineer needs to be agile enough, physically and mentally, to balance the system requirements as they fluctuate while in use, which becomes a much less static and much more fluid process.
As Captain, you will need to plan your attacks to allow for the much lower available power and find the sweet spot where you can attack via science without being spotted by the target (see the section for the stock sensor ranges of ships ingame)
Cloaking
To get the benefits of cloaking you need to optimise the ship's power use to allow the cloak to be left running and while it is your EM emissions will be masked to 0. The golden rule here is
Any kind of weapon discharge (includes scanner pulses) or power disruption will force a decloak.
Have your Weapons Specialist power down everything on the weapons room console and the Engineer shut down power to weapons in the engineering power management panel. Make sure as Captain to turn off autotargeting in the TAB menu.
Cloaking receives its power through the science bay so boost science science to max. You should be able to run cloaking permanently on a stock install AoG reactor, just make sure the engineer knows to run coolant when necessary during warp preparations to avoid the core overheating and decloaking you at a time when you least want it.
Likewise make sure your pilot knows to avoid enemy probes.
Upgrade path:
You will rarely need ship weapons so instead invest in or " obtain":
armour and shield upgrades for when things go wrong to buy you time to jump
a higher output reactor so you can run cloak, engines and jump prep simultaneously (if taking the cloaking route)
Dark Drive to reduce your EM signature when cloaking (if taking the cloaking route)
better crew weapons for boarding, and urge your Weapons Specialist to max out health and pistoleer as main class skills.
Science programs become your main means of attack. In the auxilliary power panel turn off missile guidance and aim assistance, atrium healing, air filtering and O2 (have any breathers wear suits).
Going offensiveUse the captain targeting ability (tab) and you will be able to run programs without aggroing ships while cloaked. Look to use any in-system debris as cover against ships firing probes to force a decloak.
If you are decloaked for any reason (engines drawing power away from the cloak for example) until you recloak - enemies losing line-of-sight will become less aggressive and you can also be sneaky by going in random directions once re-cloaked.
Drones registered to a faction will usually have around 500 credits on them, use the targeting menu in TAB to switch between multiple targets while running one instance of Siphon - enough to keep you in fuel. Ships will have much more - so worth acquiring multiple instances of Siphon and running them during boarding operations - the extra outlay for fuel for program recharges will be more than covered.
Hack The Universe


The golden rule for effective hacking is:
Stay cloaked or otherwise undetected
For programs and viruses to work the captain will need to target the ship designated as target via the TAB menu. If you don't do this the various science displays will just be counting time and nothing else. Once you set a target your ship will automatically go into red alert and if you have fully powered weapons they will fire losing you reputation and decloaking or giving away your position. So be methodical and run the following prechecks until it becomes second nature to you:
Power down weapons in the Engineering console and in the Weapons area console
Discharge turrets safely- leaving them charged means they will have one shot, enought to -1 rep you
Block comms - check this has taken by opening the TAB menu
I will usually run cycling down weapon checks in the last port of call before setting off to go visiting.
Old school hackerdom
The keys to your hearts desires are electronic. Mastery of programs and viruses replaces the need for crass dsiplays of violence.
MaintenancePrograms will be given priority on energy coming from the jump drive or manual charges based on their positioning :
left to right then top to bottom.
Thus if you have 2 rows of programs the leftmost on the top row will be given highest priority, while the rightmost on the bottom row will have the lowest. You can reorder as you see fit by dragging and dropping on the computer monitor. The circles under each program indicate how many fuel charges will be needed to fully recharge it (note that different drives have different charge rates, you can check your ship's current charge rate by looking at the drive via the TAB -> Ship interface).
While you will come across other options, I'd like to focus on those that serve a Gentleman best:
Block Long Range Communications
Ever since the advent of the Alliance of Gentlemen, the other factions have been determined to put an end to our fun. Being recognised as a Genteman by the mundanes will see you hounded from all ports but the ones friendly to the Alliance, and so it was once that in those murky sectors of the nebulas where our kind plied their trade, counting on the heavy interference in those areas to stop calls for help from travelling far.
Whoever it was that managed to make this small collection of bits is truely the unsung hero for all us Gentlemen, for they gave us the ability to attack anywhere and without repercussion. Safeguarding the one thing that has no price - your reputation.
Siphon Credits
With the exception of the ancient weapon systems like Death seekers and Shock Drones, all encounters in space are potential earners with this program - lowly CU or WD drones will have around 500 credits each , and if you are nimble with your targeting you can infect multiple targets at the same time. Ships however will have much deeper pockets and you may get the chance to go for double profits by extorting them first then using Siphon, manually recharge and launch 2 -3 times or until the merry sound of free money pouring into the ship's coffer's stops. Though don't expect to remain on speaking terms with your mark. Can be used without intitating combat as long as the mark is visible to sensors and targeted.
Gentleman's Welcome
The lock pick for QT fields allowing Gentlemen to go a visting and pay their repects without having to use the battering ram of the main gun.
Back Door
you won't need this while the chaos level is low but if your virus attacks fail for no apparent reason the target may have upgraded hacking protections. Also see the following section on sensor exploits for alternatives.
Sensor Dish Mashups
You scan lock a ship buy pointing the sensor dish at them and holding down right mouse.
To be able to use programs on ships, they will need to be visible to sensors with Alliance ships the hardest to target due to their cloaking abilities.
If you can't get a sensor lock you can temporarily boost your range, and sensor performance for 10 seconds, by using Active Scan, this will also cause your EM signature to spike raising the chances of getting detected but won't break cloak. As a last alternative you can fire probes which will break cloak and if you are not far enough away (see the section About EM) you will be detected
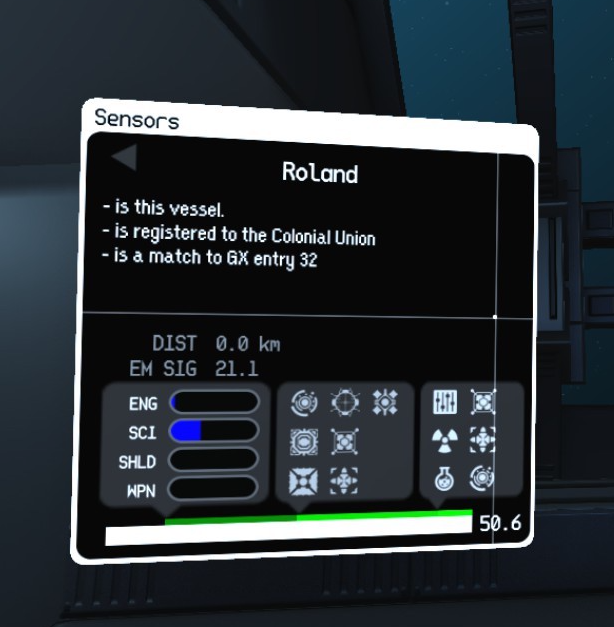
Based on the signal strength, which is shown bottom right in the sensor monitor, and outlined in red in the images below:
Weak signal (from 0.5 to 2.9)
ships aren't grayed out on the sensor display or top right in the GUI and will be targetable for viruses but no other information will be available
Low strength signal (3.0 to 9.9)
will show how the engineering is allocating reactor energy
Mid strength signal (10.0 to 17.9)
will allow the examination of ship components
Strong signal (18.0 +)
opens the sensor exploit interface allowing exploits to be launched affecting various ship components:
Engineering exploit
Based on weapon damage dealt - will direct damage to the engineering station, potentially killing the engineer if the target hasn't installed protection against screen explosions
Weapons exploit
Based on weapon damage dealt - will direct damage to the weapons station, potentially killing the weapons officer if the target hasn't installed protection against screen explosions
Science exploit
Based on weapon damage dealt - will direct damage to the science station, potentially killing the engineer if the target hasn't installed protection against screen explosions, will also affect cloaking and warp operation.
Cyber Defence exploit
will lower ECMs making it easier to use viruses and other offensive programs to attack the target
Shield exploit
will remove any boosts applied by shield modulation (14% against either beam or physical damage)
Reactor exploit
will force the target reactor to generate more heat potentially shutting down weapons and engines
Note: Ships can apply the same hacks to you
For sensor exploits you can check by scanning the ship, though there will be visual clues like flickering monitors or monitor borders changing colour.
For viruses you can remove them with antivirus programs or if the worst comes to the words by forcing a hard recet by powereing off the ship OS manually in engineering - though this will leave you without any power, engines or shields until the reboot process has finished.
Boarding
Note: both Siphon and Gentleman's Welcome will turn ships hostile as surely as if you'd fired a weapon - make sure you have a Plan B, such as a pre-charged warp with a planned escape route set on the map, just in case.
The golden rule for boarding is
Only Switch 3. Ever.
To get on board a ship you need to make sure the target has reduced or no shields - see the section About QT for a more detailed explanation on the in game concepts behind shields and teleportation.
AoG ships come with a virus called Gentleman's Welcome which is designed to circumvent shields, however it has a limited active life and once expired, your options are to stand impotently looking at the non functioning teleporter while your Science Officer fratically burns fuel cells to recharge programs. And all the while the enemy crew has been alerted to your less than honourable intentions and has nothing but time to dedicate to trying to thwart you.
In short you don't want things to drag out - have the first crew member across head to engineering and turn off the shields, thus allowing your entire crew to freely teleport across and tie up the enemy crew.
If you've already Siphoned, the target it will be already designated as such, if not double check the target has been slected via TAB. Also be aware turrets will atuo fire at this point unless you powered them down and ensured they aren't storing charges in their barrels beforehand.
The best plans go oft awry
If your viruses won't take check the target name isn't greyed out. If so have the Science Officer try angling the sensor dish so it's pointed at the target. If that fails have him run an active scan which will boost all the other ships sensors for up to 10 seconds after the active scan is over. If neither of those tricks work, you can either manually reload programs and try again after running Backdoor (this sometimes becomes necessary as the chaos level rises) or go old school and use the ships weapons to strip down the shields, though bear in mind this will decloak you. See the section About QT
However, and I can't stress this next point enough - make sure every single one of you crew know exactly which switch to throw in engineering to take down shields - there is nothing worse than someone walking into engineering and shutting off all power during a capture operation killling the capture screens and all capture progress. It can snatch defeat from the jaws of victory.
Make sure to upgrade small arms regularly. If you don't keep ahead of the tech curve you'll end up facing crews defending with better weaponry than you.
See the section on
Boarding equipment essentialsfor more info on the gear you want and what it does.
Get into the habit of reloading weapons that require it at the enemy ammo hopper once hostilities have ceased. Also make sure you crew are carrying mutiple pistols to minimise overheating issues. Scanners can be used to check how many crew are left alive after activating "Remove Claim"
On ships with bottlenecks ie a closed bridge with one entrance (Carrier, Fluffy One, Intrepid) have your crew rush and hold the bridge en masse. On more open plan ships have your crew (Sylvassi excell at this) attack systems to draw crew away from the bridge area with the exceptions of the Engineering systems as AI will also notice the shields are turned off, or the Life Support system on a Roland as it is directly infront of the teleport causing your crew to get bottlenecked on the teleporter.
Boarding Equipment Essentials

The pistols listed below are not the only ones in the game, they are the ones most commonly used on ships I run however either by personal choice or popular request.
If you're starting out know that weapon levels, like ship upgrades and enemy difficulty, are tied to Chaos level. So don't hold out for a +3 unles you enjoy dying more often than necessary - anything above +0 (the starter weapon level) will do enough damage early on. If you involve the crew in the search, they will busy themselves rooting out good deals while you mess with upgrades and sell off booty in the Automated Trader at hubs - zero the crew allowance limit (TAB - Captain) if you want to monitor what they're buying. Don't forget to do regular rounds of lockers to remove obsolete weaponry.
Tips- Weapons requiring reloads can be refilled at the ammo crate found in the appropriate stations on all ships.
The crate's ammo count bar will slowly deplete and once empty can only be refilled by jumping the ship. Get into the habit of filling up on ships you board to avoid being left without.
- Carrying multiple pistols will allow you to swap between overheated and/or empty ones.
Availability
Pistols and beam weapons have specialist dealers in most hubs - though don't expect to find more than 2 of the same kind and level of weapon. General stores will be a bit more of a mixed grab bag. Grenade launchers can only be purchased in the Burrow - if you're looking to outfit a crew the previously mentioned rule of two will apply so expect to make more than 1 visit.
Scanner
The Scientist starts with one, but well worth picking up extras from vendors around the galaxy - it only takes 1 survivor lurking on a ship you believe captured to start everything unravelling.
Repair tool
The lowly repair tool becomes almost weaponised if you have robotic crew - a robot firing whilst being healed by a repair +3 is a tank in all senses of the word.
Phase pistol
magazine capacity: infinite
Much cheaper than same level pistols and suprisingly useful in the +2 and +3 variants.
Doesn't require ammo refills but subject to overheating after 12 shots continuous fire.
Burst pistol
magazine capacity: infinite
The essential weapon for any Sylvassi allowing them to fire and stay cloaked. Is best suited for very close range.
Doesn't require ammo refills, but subject to overheating after 4 salvos continuous fire.
Heavy pistol
magazine capacity: 32
More generous magazine than the heavy beam variant, but not a gun for people who like to spray and pray. Best paired with a back up weapon due to ammo count limit.
Requires ammo refils, overheats after 4 shots continuous fire.
Heavy beam pistol
magazine capacity: 20
Beam pistols are the rifles of Pulsar. Essential for the kind of firefights that develop in the cavernous Roland. Deals heavy damage but has a small magazine, choose your shots carefully. Requires ammo refills, doesn't overheat due to slow fire rate.
Mini grenade launcher
magazine capacity: 18
This can fire up to 5 grenades at a time and make excellent room/atrium clearers
Requires ammo refills
Pulse grenade launcher
magazine capacity: 3
Each 'nade deals considerable damage, good for killing systems and crew.
Requires ammo refills
Health grenade launcher
magazine capacity: 3
The unit fires a grenade that is a portable high-powered atrium - exceptionally useful for holding open a beachhead or holding a closed bridge while capping
Requires ammo refills
So You've Just Got Boarded.
It's happened to the best of us. There you are sitting in the Atrium queue like a tortured soul in purgatory watching the ship you'd lovingly cared for and nurtured being befouled and sullied by the filthy Rozzers.
The golden rule here is:
Communication, Communication, Communication
Lack of decisive crew response is the number one cause of losing a game to boarding. If you haven't talked to the crew in earlier more peaceful times when they could give full attention, you'll end up in a lot of losing 3 or 4 vs 1 battles.
Most of the time slow reaction time is caused by people focusing on their stations during a battle, the first they know something is up is when they suddenly start taking damage from the Customs and Excise that just walked up behind them and started shooting them in the head. By the time they've popped back out of the atrium the intruders will be very close to *Removing Claim*.
Pressing Z and selecting the "Repel Invaders" status alert can help, but if you haven't carefully planned for the eventuality, you'll be premanently on the backfoot.
Starting out
To be boarded you need to be visible to sensors, something that won't happen if you are diligent with your cloaking - make sure the pilot knows to avoid probes as if they were infected spores. Also make sure your crew know to respond to boarders by coming off their stations at the first sign - the Pilot is the only crew who should try to stay on station to make evasive maneuvers to get distance betwen you and the attacker to restrict their ability to teleport by either getting out of sensor range or someone else getting the cloak back up. After which time any boarders left alive will be trapped and can be dispatched at leaisure.
Just having the spirit to fight back, while laudable, isn't enough however. Be sure you upgrade your armaments and repair tools regularly - each chaos level means your enemies will have better tech including personal weapons - stay ahead of them.
You should be preparing for the physicalities of boarding but in anycase it's perhaps worth mentioning with each successive level up make sure you and your crew are spending one of your two allocated talents on Health or Pistoleer, with the exception of Weapons and Scientist. Science should put points into Bridge Medic instead of health, he can make up for the missing health by autohealing, as well as benefitting anyone standing near. And Weapons should only be spending talents to max out Health and Pistoleer.
Armoured Skin Cells reserach can make your Weapons much more resistent to damage, however starting out you should hold off until you have researched the sensor upgrade for spotting science materials. It's expensive in terms of materials, but pays for itself after you unlock it, and regardless Weapons won't have enough spare talents for the first 4 lelvel ups.
Have your Weapons Specialist stand near the teleport primarily to raise the alarm and secondarily to gun down anyone coming across, he won't really have much else to do if you're following the Science based aproach to warfare outlined in this guide.
The boarders will be headed for the bridge due to the concentration of screens making for easy capping. The area is a natural bottleneck that you can use to your advantage - focusing fire through the doorways correctly means you'll be able to quickly kill intruders while using the walls for cover. Sylvassi equipped with burst pistols can use cloak to get into the bridge and stay cloaked while firing, and a robot being repaired with up to date tools makes a decent damage sponge.
Longterm
Reserach Armoured Skin Cells, and have any robot crew max their Health talents.
get health grenade launchers use them to make bulwarks - these are area of effect, portable atriums (less the sapwning), and using them in the bridge makes it nigh on impossible for intruders to hold or take back
get repair tool upgrades - a robot being repaired with a repair +3 gun a can absord a suprising amount of damage
actively stock up on food for Syvassi and humans, involve your crew in this at ports of call or when exploring a planet . "Collection of zesty jerky sticks" give the most insta health.
About EM


Electormagnetic radiation increases with the anount of power being pulled out of a ship's reactor, below are the EM readings for stock reactors on ships charging the stock jumpdrive, by faction :
WD
WD ships have the largest signatures of all the ships in game as they're intended for more direct approaches at diplomacy.
CU
AoG
At the diamentric opposite of WD strategy is the Alliance - ships are tweaked to be harder to detect
Fluffy
Detection
Your ability to detect or be detected depends on 2 factors:
EM signature
Sensor range
Ships grouped by stock sensor abilities
CU
WD Cruiser, AoG, FLuffy
WD Destroyer
About QT


Ship shields have 2 types of integrities. The primary type (circled in blue in the image below) refers to how much damage can be withstood before allowing beam weapons or physical weapons like scatterguns or missiles to pass through.
The secondary (circled in red in the image below) is QT (Quantum Field). This field is what stops you from teleporting onto a ship when the target has intact shields. Unlike primary integrity, the higher the minimum integrity for QT the less damage is needed to be able to allow teleportation to pass through.
Bear the above in mind when comparing shields for upgrades.
If following the cloaking route and using cloak to its fullest potential, then you should be taking next to nothing in damage during combat encounters. However if Gentelman's Welcome is proving problematic, and you are considering using weaponry to strip shields, knowing exactly how much is enough is very important as you will be forced to decloak by the first weapon discharge and will have to stay that way until you get a boarding party on the target for more direct access to shield controls.
Seeing exactly what a ship has installed requires your scientist to scanner lock (look through the scanner dish and hold down right mouse while pointing at the target) with a suitably strong signal will give you a mini version of the ship component menu,
clicking on the shields icon will open up a stats window for the component:
Remember the lower the number the more damage you will have to do - the ship scanned in the image above will not allow teleportation unless the shields are reduced to 30% strength or under.
If you took the 0 EM route you will run the risk of getting spotted more easily via probes at range and therefor more likely to take some sustained damage - you should be intimately acquainted with exactly how much damage will allow a raiding party onto your ship. Below are the stock shields on a freshly started Carrier game:
Source: https://steamcommunity.com/sharedfiles/filedetails/?id=1367944543
More Pulsar Lost Colony guilds
- All Guilds
- Tips and Tricks
- Obscure Game Mechanics (Outdated)
- Beta 20.3 Ship stats, bonuses and comment (OUTDATED, no time to play and update)
- How to beat PULSAR 1-2 players (or solo) + AI tips (Outdated)
- Pyro's megaguide to exploring the galaxy: Tips and tricks to make your journey easier.
- Playing Science in 30 Seconds
- Playing Pilot in 30 Seconds
- Pulsar: Lost Colony - Manual Virus Removal Guide
- Pulsar: Lost Colony - How to Find Artifact 3