Rods

Disclaimer: Information contained within this guide may be wrong; in fact some likely is. This info comes from my personal experience within the game.
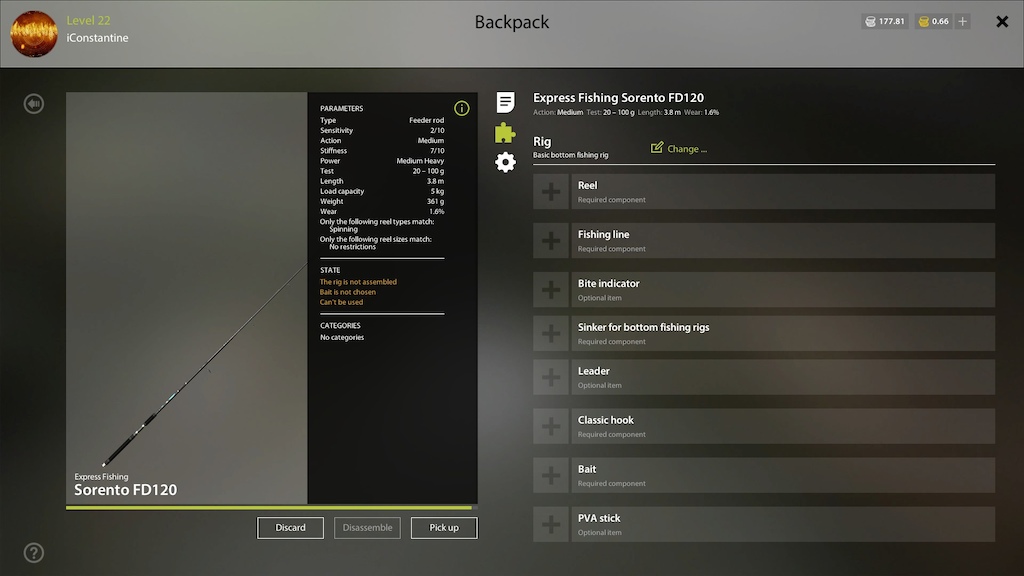
Above you see a standard lower Feeder Rod.
Sensitivity: Exactly how it sounds. How sensitive is your rod to showing bites? As a lower bottom rod, this one isn't too sensitive.
Action: This describes how much of the rod deflects (bends) when you put pressure on the tip. A fast action rod will bend in only the top third or less of the blank, a medium or moderate action will bend in the top half or so and a slow action will bend starting in the lower third of the rod.
Fast action rods are great for most applications where a short to long casting distance is involved and single hooks are the rule, such as worm and jig fishing.
Medium and medium-fast rods will usually provide a little more casting distance and still provide adequate hooksetting power.
Stiffness: Action, but the entire Rod? Not entirely sure of the applications in RF4.
Power: This is the Rod strength and lifting power. Heavy Rods work best with equal line. Obviously this means you do not want heavy line on Light Rods. A more powerful Rod is going to have a much easier time fighting and lifting a large fish into your net.
Test: Effectiveness with additions. Lures, weights, line, etc. Keep the weight in the right range.
Length: Pretty simple. How long is your Rod? No pics please. Longer Rods cast farther.
Load Capacity: If you look at lines, you will see that they have a correspodong load. You want your line load to be less than your Rod load. Why? Well, load is basically how much that item can handle before snapping. Would you rather have your line break or your Rod break first?
Weight: Not sure of the RF4 implications of this.
Wear: How much damage is your Rod taking? The more wear they have, the less effective they are, and more likely they are to snap. Pay attention to this if you are using line load equal to your Rod, but your Rod has more wear.
Rig: This shows what rig setup your Rod is currently set to. As you level up and use skill points, other rig types will become available. You can change rig by hitting the "change" button next to it.
Rod Types
To be done.
Reels

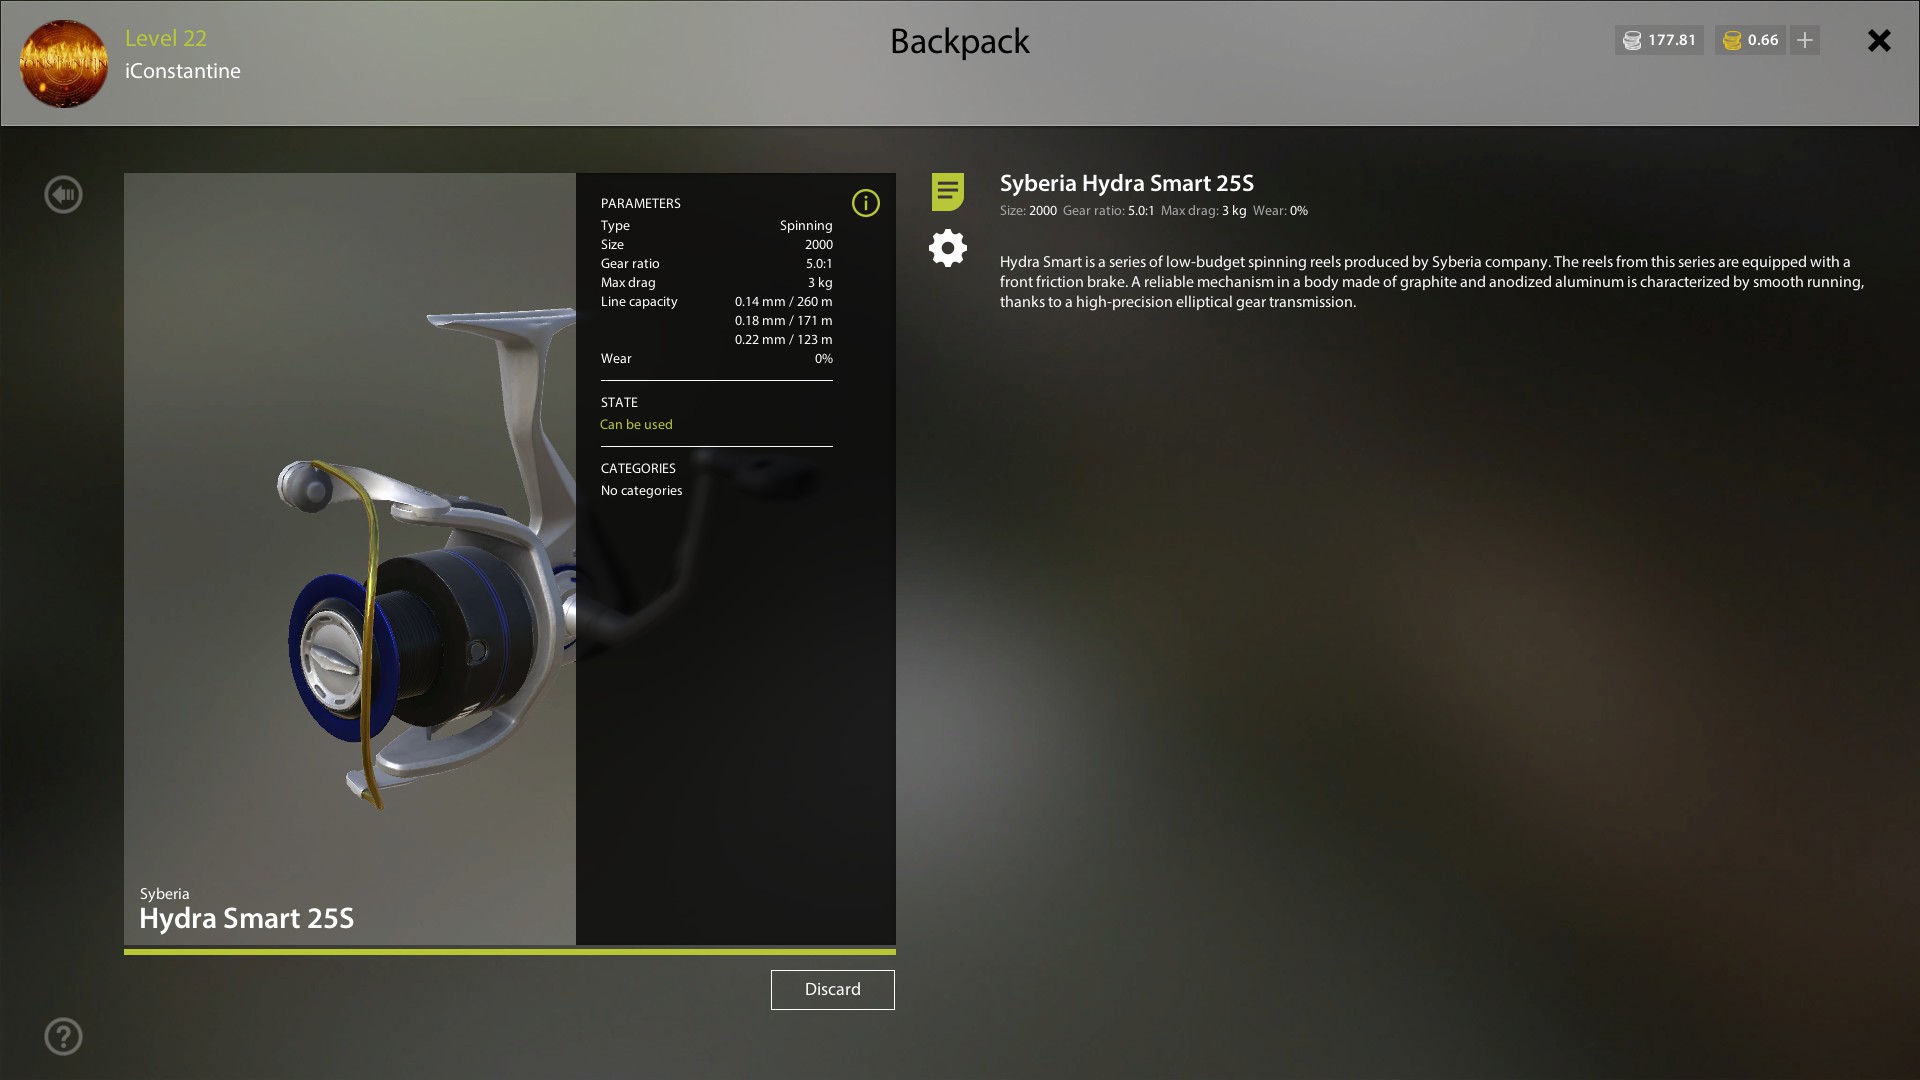
Above is a standard low cost reel.
Size: The number shown basically indicates the size of the reel. 2000 is pretty small, meaning it is a reel meant for small water bodies and fish. Smaller reels belong on smaller rods.
Gear Ratio: Gear ratios are easy to understand once you have a handle on what the numbers mean. 6.3:1? 5.2:1? 8:1? The number before the colon denotes the rotations the spool makes per one complete turn of the reel's handle. So a 6.3:1 ratio means the spool revolves 6.3 times with each handle turn. The larger the first number, the more line retrieved on each crank.
A slow reel is the ideal choice for most crankbaiting. A reel with about a 5:1 gear ratio is going to help you get your baits to their maximum depth and also give you superior feel, so you know exactly what's going on with your lure.
Reels with a gear ratio in the neighborhood of 6:1 are your workhorses.
Max Drag: Basically the horsepower of your reel. A fish close to this drag or over will provide you with an arm tiring fight.
Line Capacity: This shows how many meters of line you can fit onto your reel at the example thickness. The thicker the line, the less your reel can hold. Watch this carefully as you don't want to get caught with a low meter amount of line and get yourself spooled.
Wear: How much damage is your Reel taking? The more wear they have, the less effective they are, and more likely they are to break and more expensive to repair. Horsing fish in will increase the damage your reel takes, as well as a slight damage increase from braided line.
Line

Type: Fishing line comes in different types with different attributes.
Monofilament: It is generally soft and supple — knots draw tight and secure with very little slippage or burning. It provides good abrasion resistance and maintains sound breaking strength. Monofilament also stretches, an advantage in many fishing situations.
Fluorocarbon: Fluoro is less pliable, and it does not absorb water like mono. It also repels chemicals and ultraviolet light, and will not turn brittle in cold temperatures. Spill some sunscreen or gasoline on a spool of mono, and you’ve got a potential problem. But do the same on a spool of fluoro, and there’s nary a worry.
This basically means Flourocarbon line becomes invisible in the water and is far less likely to scare skittish fish.
Braided: Braided line is thin, but incredibly strong. Braided allows you to have both durablity, load strength and distance all in one line. Due to it's more intense creation process, it is a bit more expensive. Braided may also do slightly more damage to your reel, so you may want to be a little more careful when deciding to horse a fish in.
Length: I hope this is obvious. Choose your length according to the body of water you will be fishing at, and how confident you are at reeling in larger fish. You don't want to get spooled.
Load Capacity: How heavy your line is. Keep this below the load capacity of your Rod. If line capacity goes over rod capacity, your Rod is likely to break before your line.
Hooks
Hooks are pretty straight forward, but pretty important. The higher the stars on the hook, the better quality it is, the less likely a fish will spit the hook out. Read the descriptions for the little nuances of each.
Leaders

Leaders are a dual purpose item.
Bottom Feeding: While technically not required for standard bottom fishing, they do serve a purpose. Flourocarbon leaders "hide" your line, making your bait less scary for skittish fish. When choosing a leader size, get as close to your line load as possible without going over. This will make your leader the weak point and will break before your line does.
Later on when you are able to live bait fish with a bottom rod, you will need to grab Steel leaders. (read below)
Spin Fishing: When Spin Fishing, it is highly suggestable that that you use a large Steel leader. Steel leaders help protect your line from the highly aggressive and teethy Pike who will try their hardest to bite your line off. You can get away with a Flourocarbon leader in areas you think are low on larger Pike, but excerise caution.
Float Fishing: I imagine the same as Bottom Feeders, but have no experience with this.
Water Bodies
Will break down Lakes into their own detailed sections eventually. I'm still reasonably new and have not been to a couple of them yet. For now, this is the placeholder.
Cottage Pond: The Beginner pond. Good place for catching Frogs and learning the ropes. Visit the Lodge for free starter goodies once a day.
Mosquito Lake: Great for starting your Bream dream.
Winding Rivulet: Winding is your first real Spin Fishing destination. Try to find water obstacles that fish use for cover, like logs and branches. Water current changes in bends are good for predatory fish like Asp. Floats can also do well here once you get used to the moving current.
Old Burg Lake: This is where the fishing really begins. A little bit of everything scattered around. Be sure to check out the pond, but beware of monster Grass Carps.
Main Fish: Bream, Tench, Black Carp, Grass Carp.
Good Baits: Barley, Cheese, Doughs, Potatos.
Tip: Be careful with Potatos as monster Grass Carps can ruin your day.
Kuori Lake: Your next Spin Fishing destination, now with trolling. This is where you start using the Spoons and trying out Wobblers. This Lake has an extreme Silver turnover ratio once you get going.
Main Fish: Lake Trout, Sevan Trout, Burbot, Char, Kuori Char.
Good Spoons To Try: Hunter 002, Hunter 009, Soturi 003, Hypnotic 005.
Bear Lake: Welcome to Hell. This is the Pacific Rim of RF4 with monster Carps just waiting patiently to eat you alive.
Main Fish: Grass Carp, Mirror Carp, Leather Carp, Black Carp and the elusive Golden Tench.
Good Baits: Potatos, various Boilies.
Note: Carp are most active early morning and late evening. Mid day and Night time can be slow.
Tip: Bring fresh underwear and plenty of coffee.
Amber: Want Carp? This is your stop. Plenty of unique Carp to keep you busy.
Note: Bite rate will be much slower without PVA.
Volkhov River: Mostly a trolling water body, but don't underestimate the catfish and zander. Can also get hot on Bream.
Tip: Salmon love being between the Islands.
Sura River: Land of the Giants. Buckle up your undies, things are going to get wild. Eventually, when you find them. This River can be a bit slow.
Main Fish: Wild Carp, Sturgeon, houses disguised as Catfish.
Ladoga: Kuori 2.0 but a bit less trolling. Good place to try out jigging.
Tunguska: The Lake of everything. Trolling, spinning, drifting, floating, bottom fishing. You want it, its got it.
Bottom Fishers Tips & Tricks
Bottom Fishing is the bread&butter of fishing. You get to chill with your rods out, often watching a movie on another screen. Or if you want to maximize your profit, two bottom feeders and a spinner.
Low Level
Focusing Bream and Common Roaches can be a cheap and easy way to get Silver and experience. Try to get your hands on a bunch of Pearl Barley and finding some good spots with trial and error or asking around. Finding a good spot can get you more than 1 fish per minute. Bream and Roaches are also good for Cafe Orders. Old Burg is a fantastic Lake for this.
Most of the fish you are aiming for are a bit skittish. You can help this by buying Flourocarbon line, which is basically invisible underwater.
Never underestimate worms. You should be getting a shovel asap and be digging whenever you can. Some day, watch a movie and do nothing but dig til you are out of energy, and repeat until your movie is done. Those redworms you get are also useful, especially when you start entering comps and going to Volkhov.
You don't really need to go larger than size 6 hook at lower levels as it will just minimize your fish per hour.
Get to 3 feeder rods asap. (or 2 feeders and a spinner if you think you will get into spinning)
Put your rods on the ground in an order you can remember, and set at an angle to the water. Press U to drag and drop the Rods into the order you want. I put my weakest Rod first and my Srongest Rod Last.
Low-Medium Level
By now you may be getting sick of Bream, so your next move will probably be the hunt for Tench. Tench are fantastic Silver and exp. You will likely have to ask around to acquire some cheese, but the community will usually help here, especially if you ask nicely in Twitch streams. For locations, target lilly and algae areas in Burg.
Don't be afraid to alt+f4 if you are about to get spooled by one of those bully Grass Carps. Slap your ego. Your gear is more important.
Reels are more important than Rods when purchasing, but try to keep a good balance. Laverties, Sabres, Alfas are great to save for. Fortunas, Model Ones are great goals for Rods.
Come night time, you may want to start thinking about casting any Fish Pieces/Nightcrawlers that you get into deep holes. You will likely have to trade for these, but they are great for Burbot who come out at night. Just be careful for Catfish.
Burg Pond is a great but deadly place. Great for Tench and large Crucians, but also contains massive Carps. Whichever you hook, move your feet to keep that fish inside of the pond, or you risk being spooled. Standing on the bridge is a good lazy spot to fish.
The Water Bodies
dfsdfsdfs
Source: https://steamcommunity.com/sharedfiles/filedetails/?id=1436080479
More Russian Fishing 4 guilds
- All Guilds
- , , ?
- 4 RIPHOZ
- Zig-Rig Step by Step. [Eng]
- Zig-Rig .
- RF4 Equipment Repair and Maintenance
- Russian Fishing 4 Guide 585
- Russian Fishing 4 Guide 577
- RF4 Stores and Prices
- Russian Fishing 4 Guide 558
- Russian Fishing 4 Guide 548
